For years, the engine temperature in my Jeep CJ-5 had a pesky tendency to climb whenever I stopped for a few moments. Once we got moving again though, temps went right back down to normal and stayed there.
The problem was never that serious, but it did finally annoy me to the point that I decided to fix it.
So come along as we make some observations and do some basic troubleshooting. Hopefully if you’ve got a similar overheating issue, this article will come in handy and maybe even save you some bucks by avoiding an improper diagnosis.
Gauge Accuracy is Critical
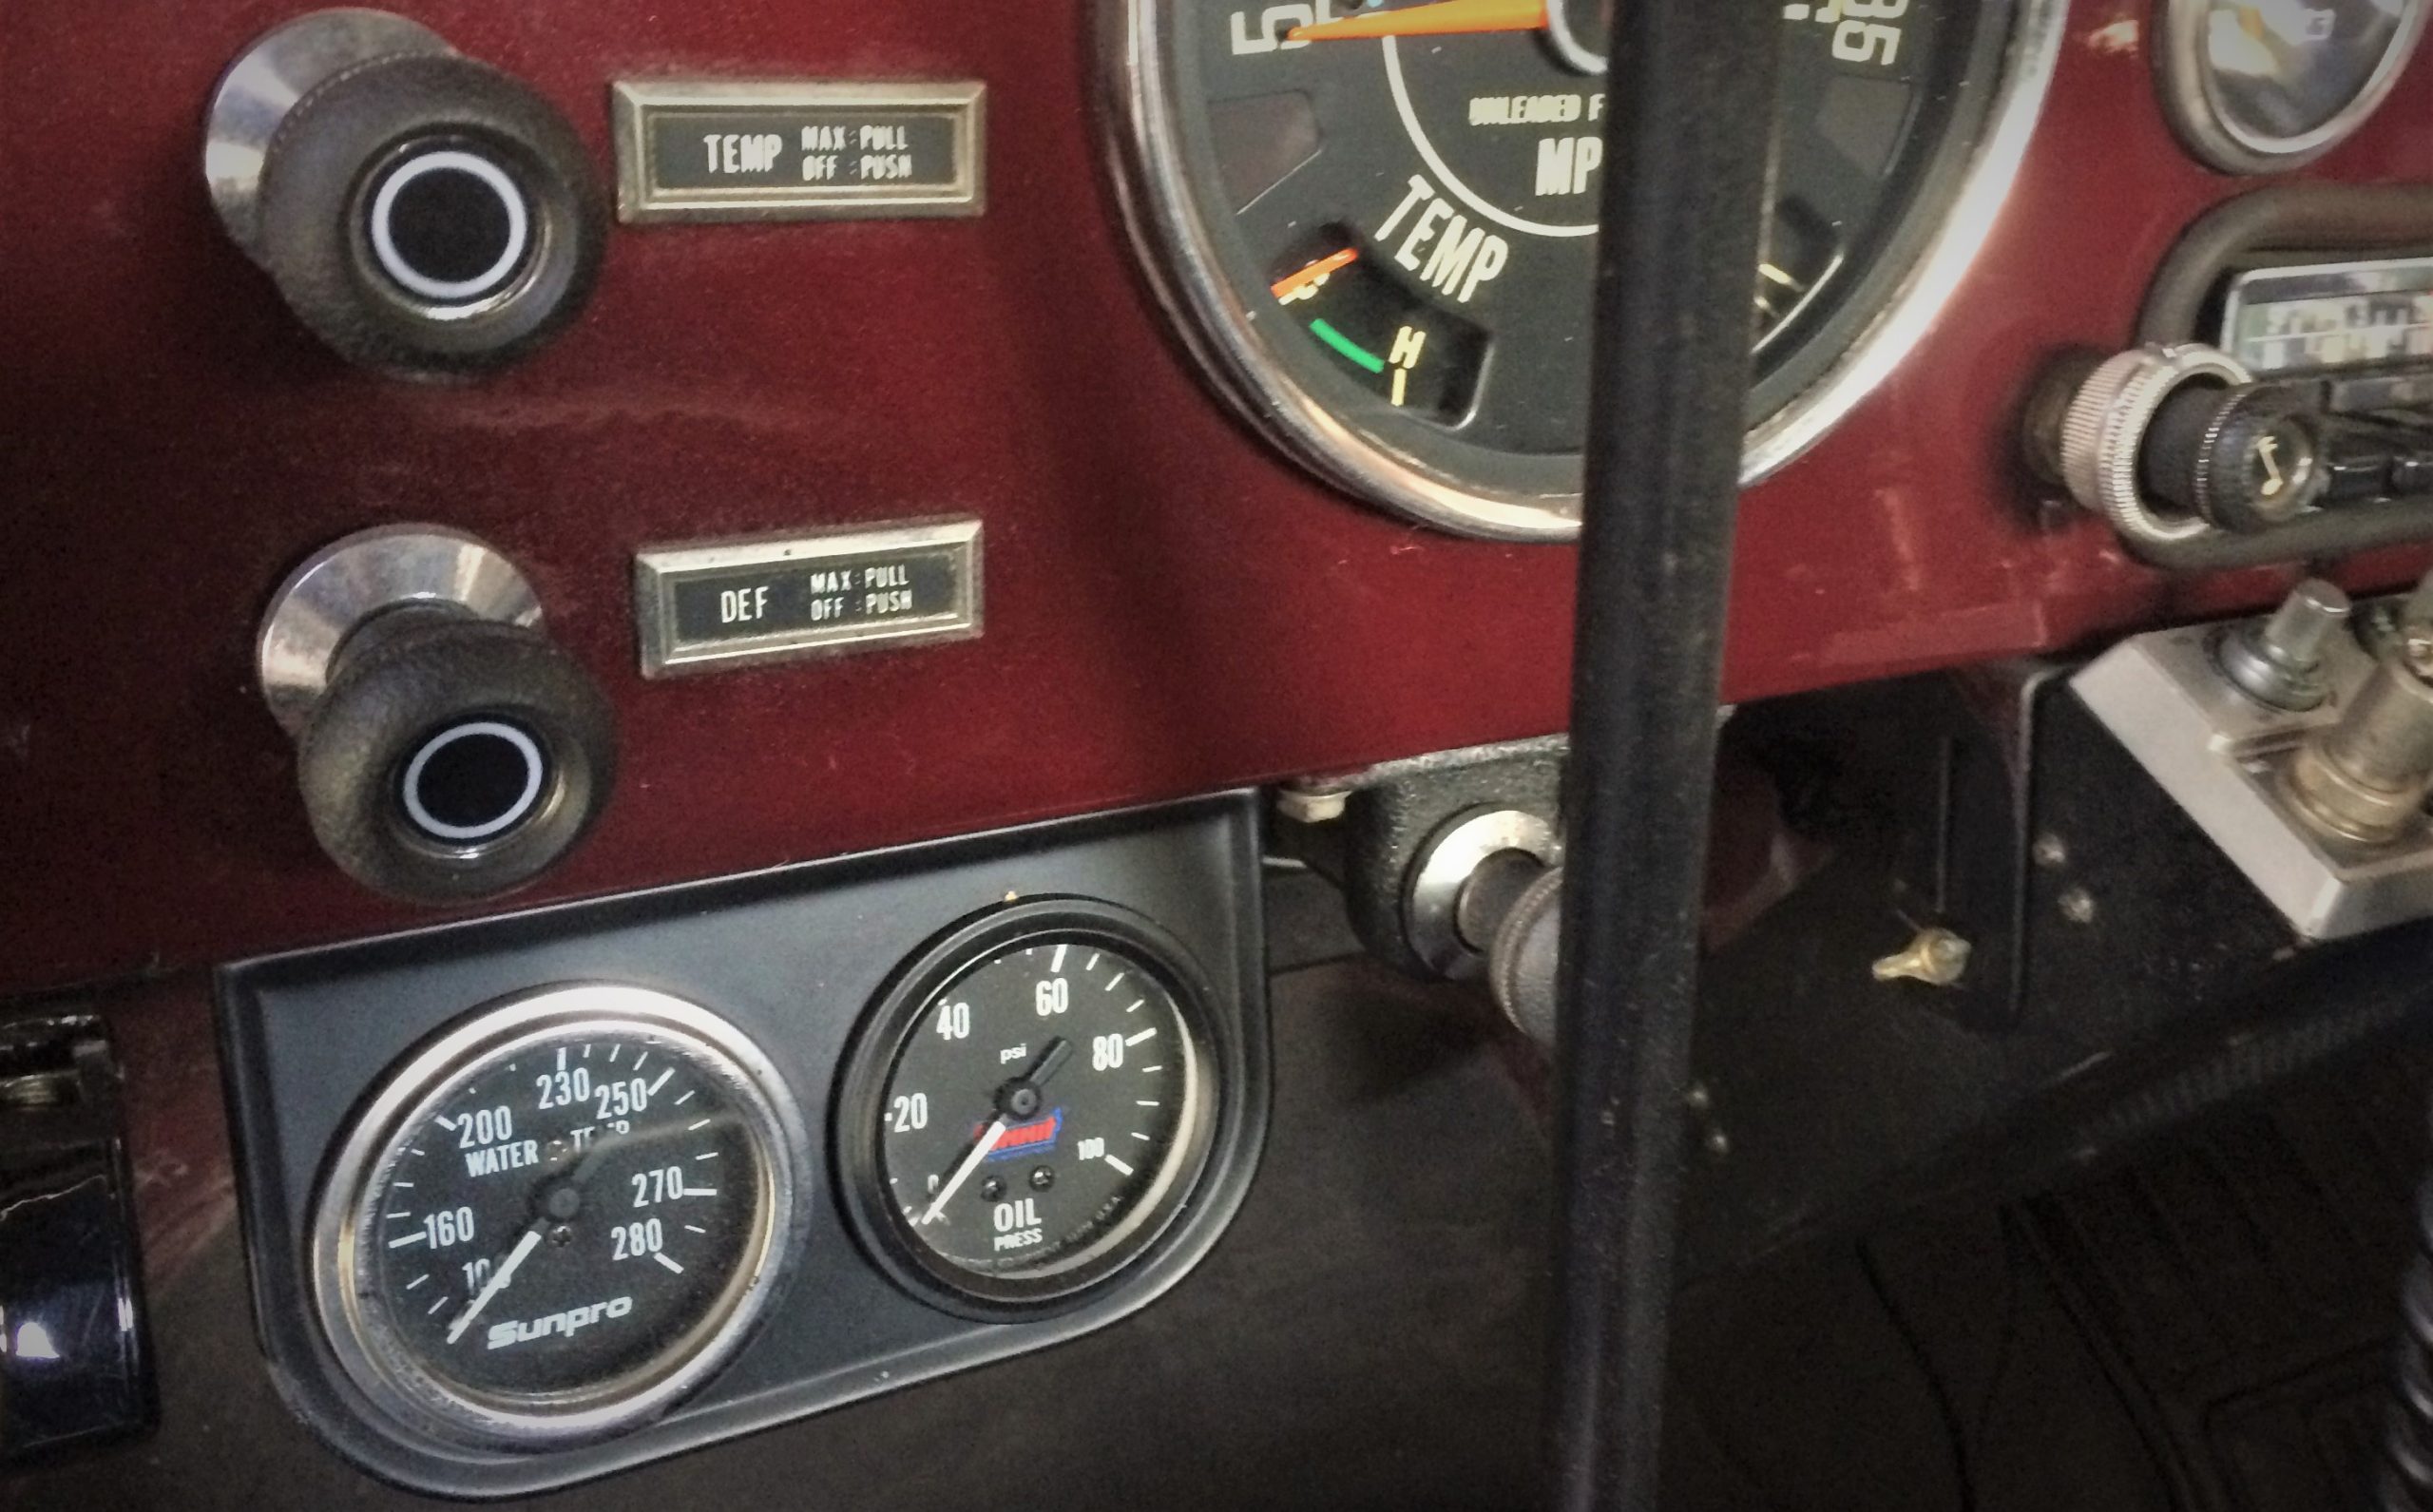
For starters, I didn’t rely on the stock Jeep’s temperature gauge to determine our operating temperatures. The OE gauge’s basic C-to-H display wasn’t exactly precise and, since it was electronic, it relies on a separate sending unit that could introduce another potential trouble spot.
In a nutshell, an electrical temperature gauge relies on an electric signal from a sending unit threaded into the engine, which itself is essentially a temperature sensitive electrical resistor. The gauge reacts to the changing resistance to deliver a temperature reading.
A mechanical temperature gauge uses a long, sealed tube/hose that’s permanently connected to the gauge, while the other end threads into the motor. The tube contains a fluid that expands and contracts as the temperature changes, which ultimately moves the needle in the mechanical gauge.
Get a much more thorough explanation here: What’s the Difference Between a Mechanical & Electrical Temperature Gauge? (& How To Test Them)
Years ago, I added an aftermarket mechanical water temperature gauge with a much more precise readout than the stock one. The gauge’s temperature probe was installed in the engine’s water neck, meaning it saw the coolant at its hottest point, right at the thermostat, before getting dumped back into the radiator.
I left both gauges hooked up too, and sure enough, when the temperature on the aftermarket gauge hits the factory-spec 195 degrees, the stock gauge’s needle is smack-dab in the middle between the C and H, which reassured me that they were both in pretty good working order.
I bring this up because, if you’re solving an overheating problem, you’ll probably want some specifics that only a precise gauge will give you.
A handheld temperature gun can be really handy too. Read more about them here.
Look for Obvious Obstructions
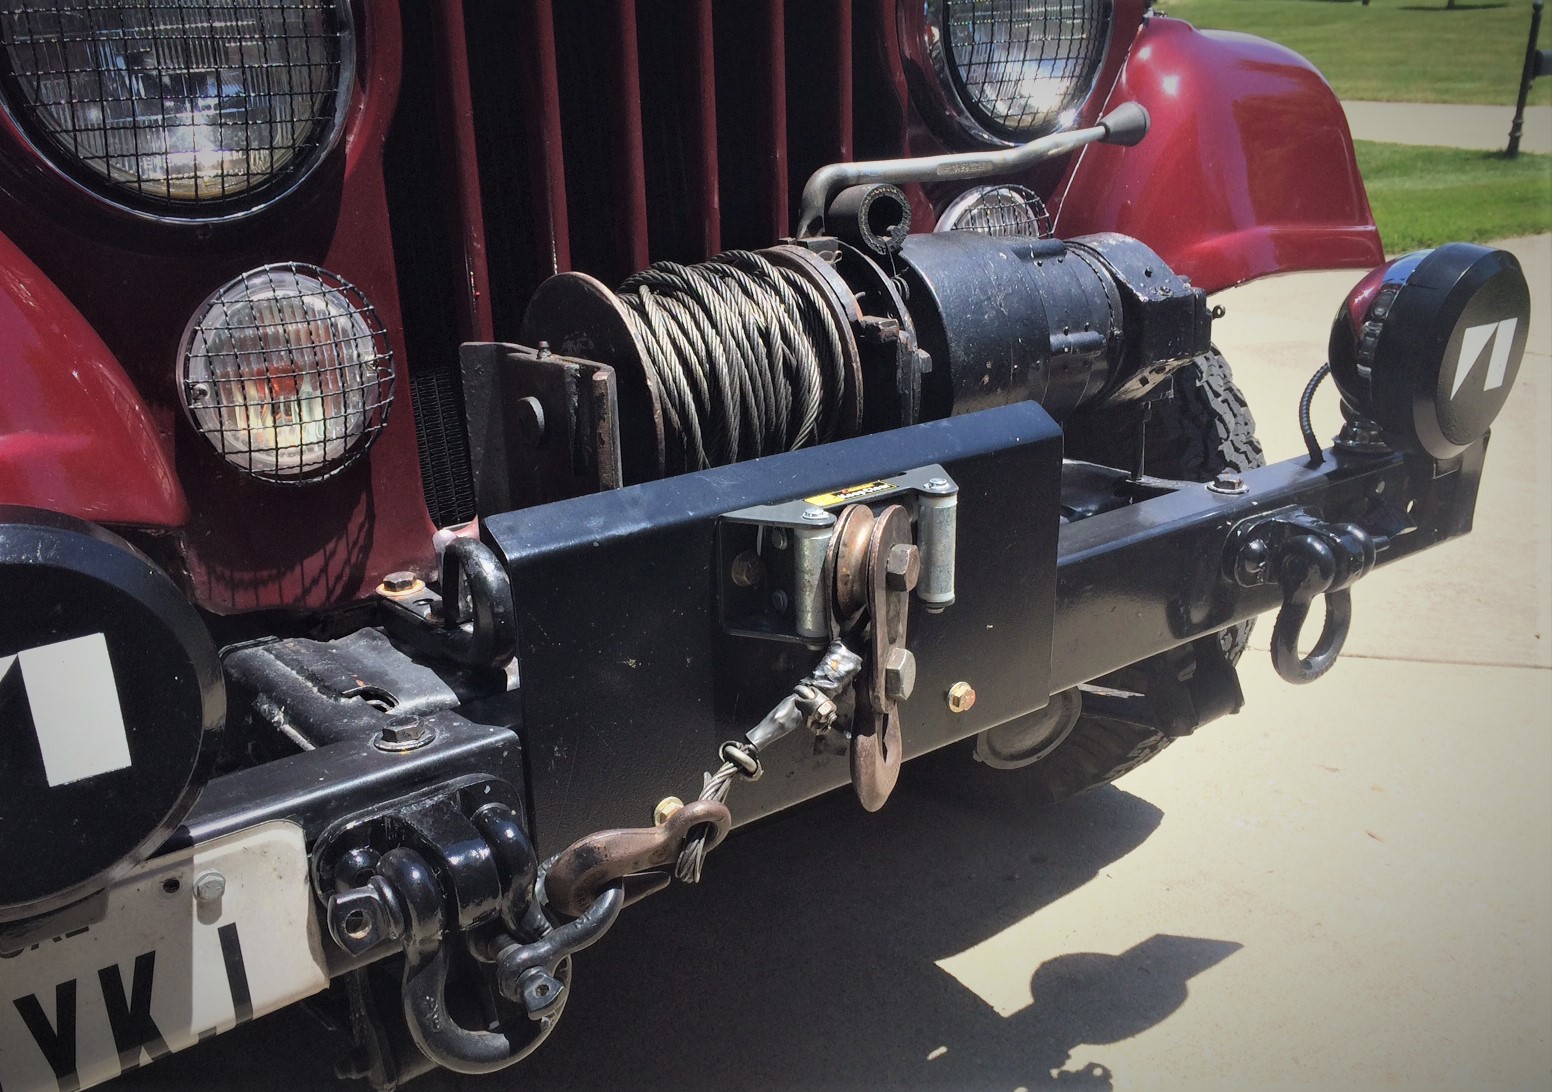
It’s also worth pointing out that our Jeep is equipped with a winch, placed directly ahead of the Jeep’s grille. This could block airflow into the radiator, which impacts the radiator’s ability to cool.
The good news is, the upper half is clear and there’s still a decent amount of space behind the winch for air to enter the bottom half of the grille too. And there are plenty of other vintage Jeep CJs running around with larger winches, so I was pretty sure that blockage wasn’t an issue.
But again, if you’re overheating, before you spend any money, check around the radiator for possible obstructions—anything from a set of aftermarket foglights to a clump of dead leaves can be a factor.
Determine if the Thermostat is Working
I quickly thought about swapping the 195° thermostat. But I figured it was working fine, because once the Jeep got rolling, the temperature held at a rock-steady 195 degrees. And it was regardless of vehicle speed too. From 5 mph to 75 mph, when the CJ was moving, it was perfectly happy. That also helped me begin to rule out things like clogged cooling passages, pinched hoses, or a bad water pump.
Nope, it was looking more and more like an airflow or radiator problem. So, on that note…
Inspect the Fan Shroud
While you may find differing opinions on internet forums, we’re big believers in fan shrouds around here—particularly in a stock setup like this. A proper shroud is important because it enhances your fan’s efficiency, allowing it to pull more air over critical areas of the radiator.
We can’t think of many (actually, any) stock radiator setups that don’t include some sort of fan shroud, so it’s pretty likely that your ride has one too. If it’s missing, that may be a big clue to why it’s overheating.
But that’s only part of the story, you’ll also want to seal your fan shroud up nicely against the face of the radiator (or supporting structure). That’ll help your fan pull the air more efficiently through the radiator’s cooling fins. To that end, I installed some weatherstripping in some of the small gaps between the radiator and shroud for a better seal.
Test Your Fan Clutch
My CJ carries Jeep’s “Heavy Duty Cooling” option, which includes a more efficient seven-blade fan. And AMC wasn’t kidding—it makes enough wind velocity to summon Ms. Gulch.
The Heavy Duty Cooling package also included a larger radiator, and with the 258 I6 engine, it deleted the fan clutch to ensure it all fit. That meant that the fan was constantly spinning, connected directly to the mechanical water pump. Though that setup saps some power from the motor, it does eliminate the possibility that a fan clutch wasn’t engaging.
If you’ve got a clutch on your fan, here’s an article that you may find useful: Mailbag: An Intro to Fan Clutches and How They Work
More importantly, this setup demonstrated how airflow was directly linked to cooling system performance: As water temperatures rose while the Jeep was stationary, I could rev the engine for a few seconds to speed up the fan and bring the temps quickly back down to normal. In other words, when more air moved through the radiator, the cooler engine temps got.
While this may seem like a no-brainer, it was further evidence that there was a problem with either A) not enough air getting into the radiator while stopped or B) the radiator wasn’t dissipating heat as well as it should. And since the fan and shroud checked out, I was getting closer and closer to the real issue.
But let’s eliminate one other cheap possibility first.
Check Coolant Quality & Levels
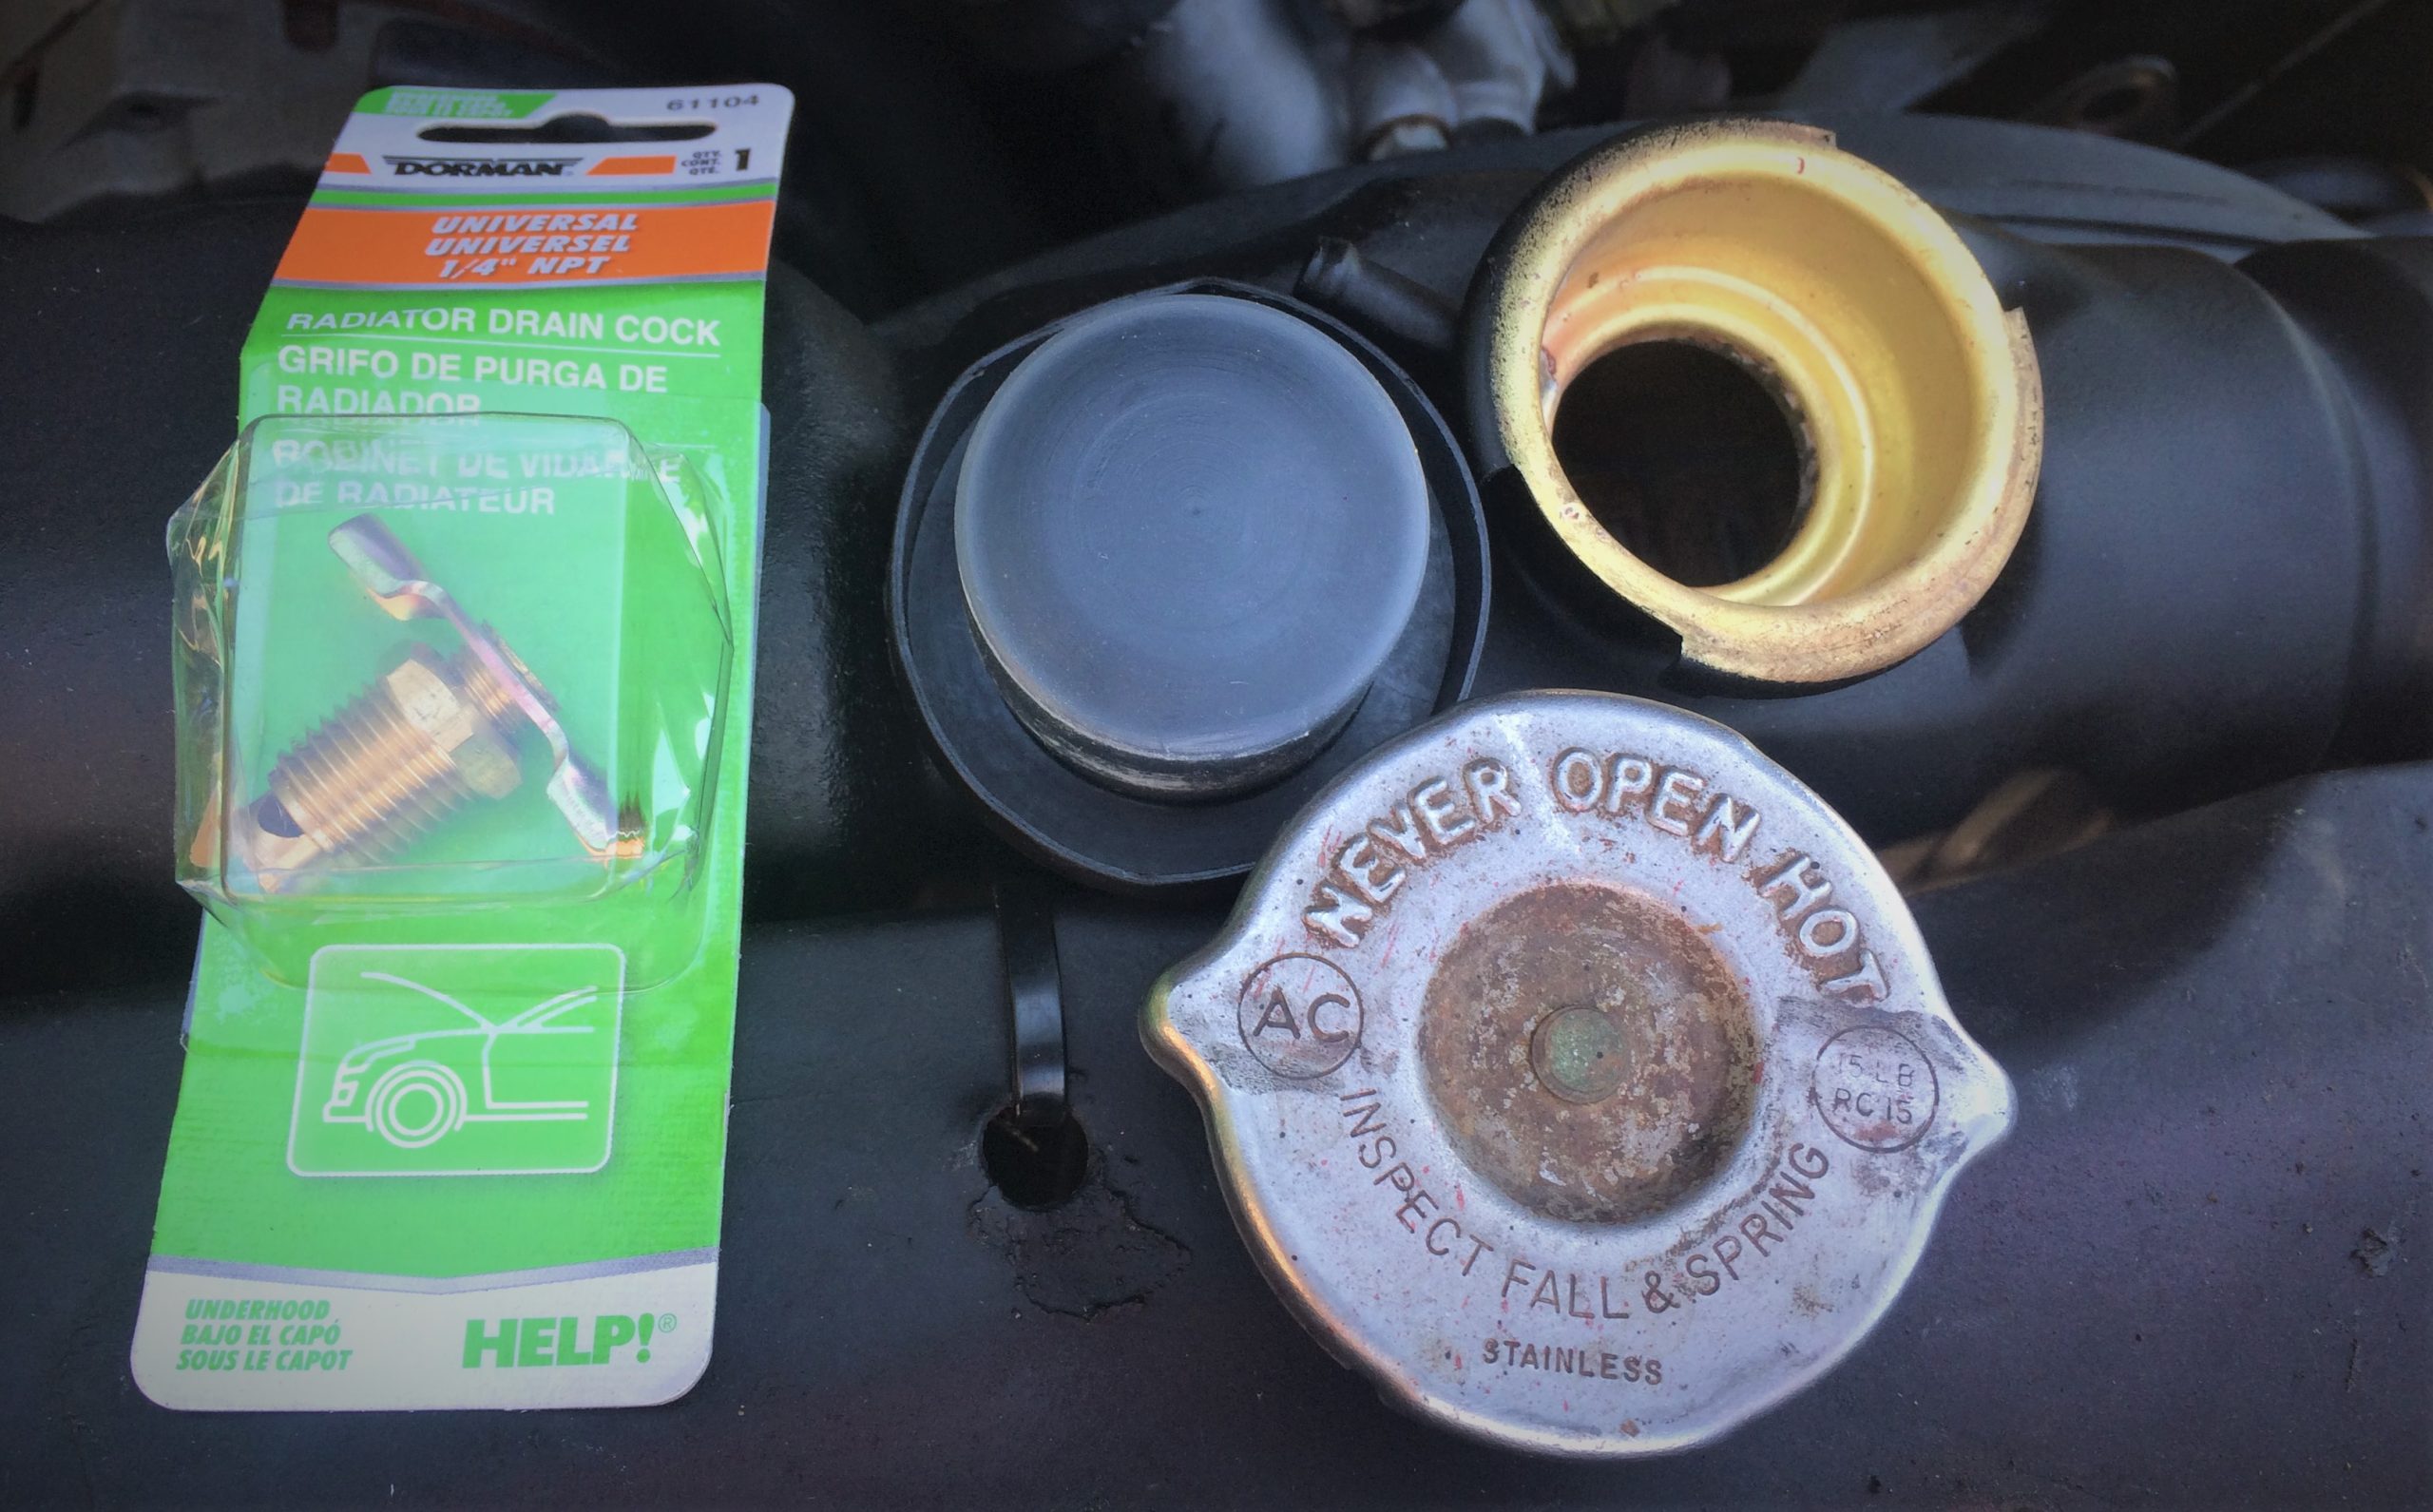
Though it was checked routinely, there was a small chance I could have been low on coolant. Taking off the radiator cap (when cold) told me that wasn’t the case though. I also grabbed a turkey baster, drew out some fluid, and drained it into a glass to look for any abnormalities. Odd discoloration or flakes floating around could indicate internal corrosion or some other contamination.
Nope, the coolant looked nice, clear, and green—which meant it was time to grab some tools.
And probably my checkbook.
Radiator Removal & Inspection
Admittedly, removing a radiator in a Jeep CJ is pretty easy. But it’s also messy and I didn’t want to change coolant if I didn’t need to.
Now though, with all the other easy culprits investigated, it was time to drain the system and yank the sucker.
First off, I knew the radiator wasn’t original to the Jeep. I also knew it had some bent fins.
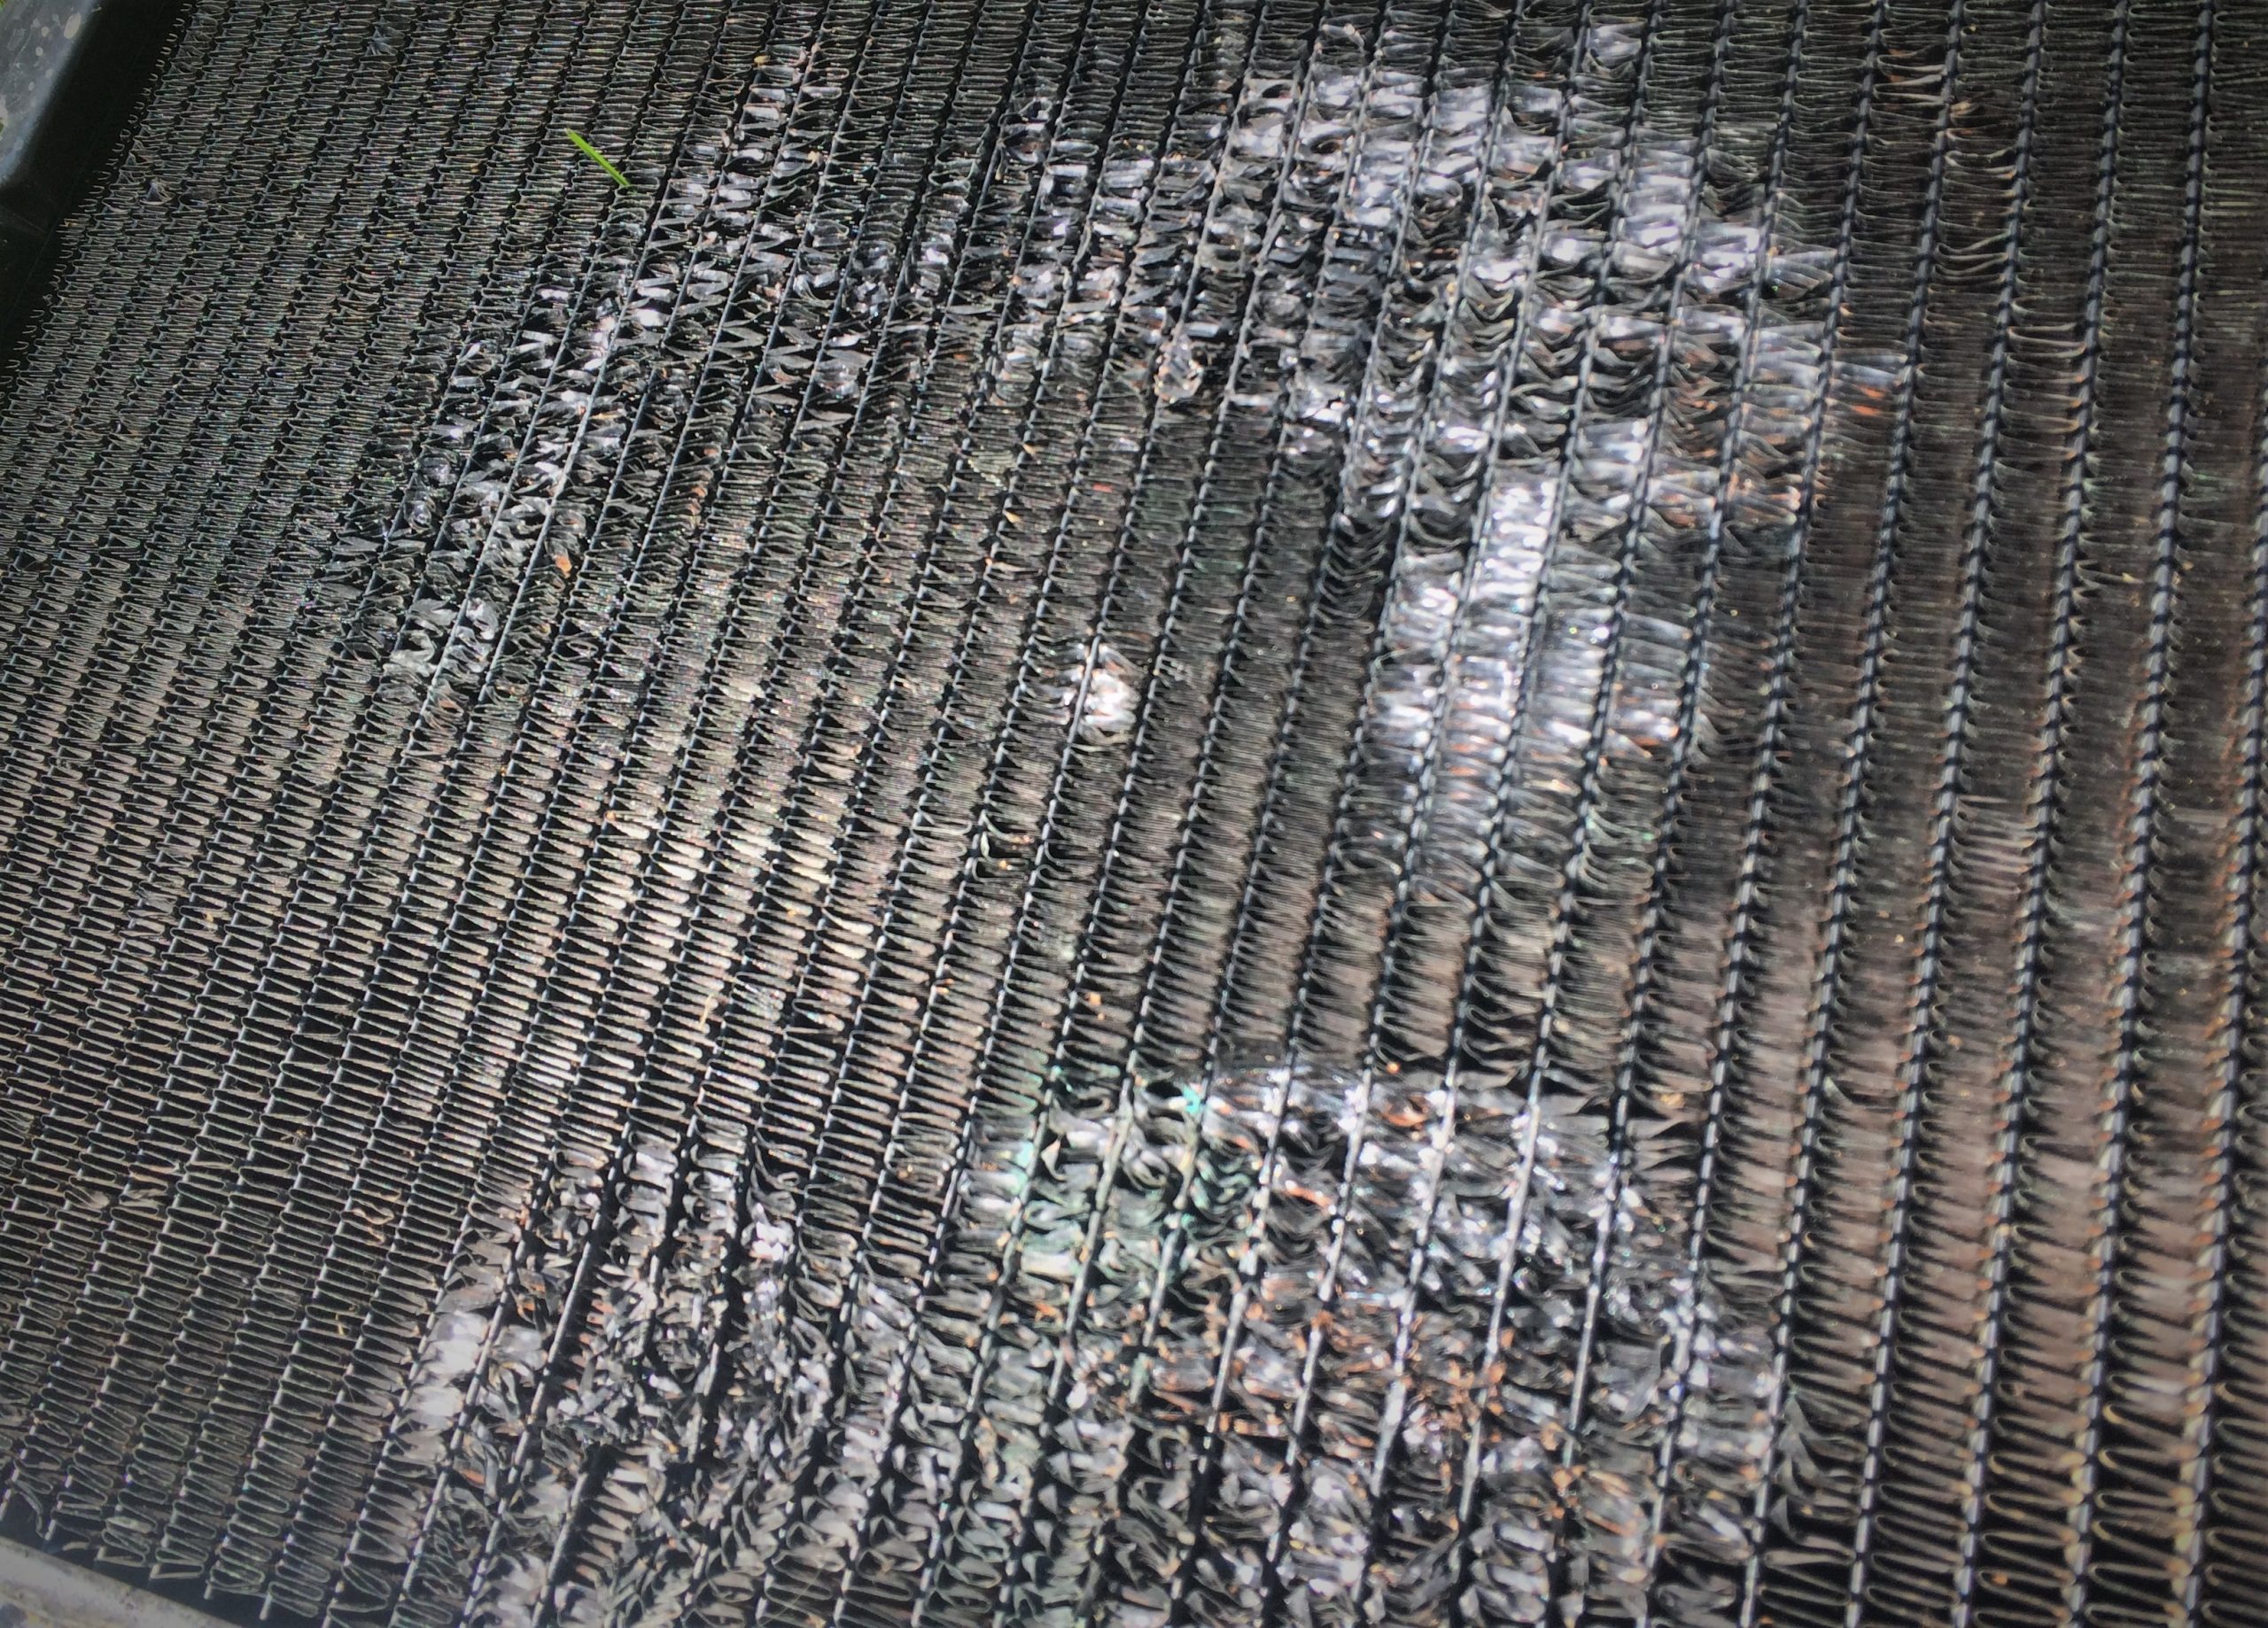
But once it was sitting on the lawn, I was surprised to see how thoroughly dinged up it was. As alluded to before, the Heavy Duty Cooling option meant space was tight between the front of the engine and radiator, which prohibited me from sticking a flashlight down there for any in-vehicle forensics. Now in full daylight, I got a good indication of where the overheating issue was coming from.
The radiator was littered with bent fins, far too many to fix effectively with a radiator fin straightener comb. And all those broken, bent fins really inhibited airflow through the radiator.
Parts of it were also caked in a layer of what appeared to be rattlecan spay paint or undercoating, which likely hindered the cooling fins’ ability to shed heat too.
Problem, Meet Solution
Instead of going through the tedious hassle of repairing the old aftermarket one, I went to our favorite Jeep parts source and picked up this Classic OEM-style radiator for a 1980 Jeep CJ.
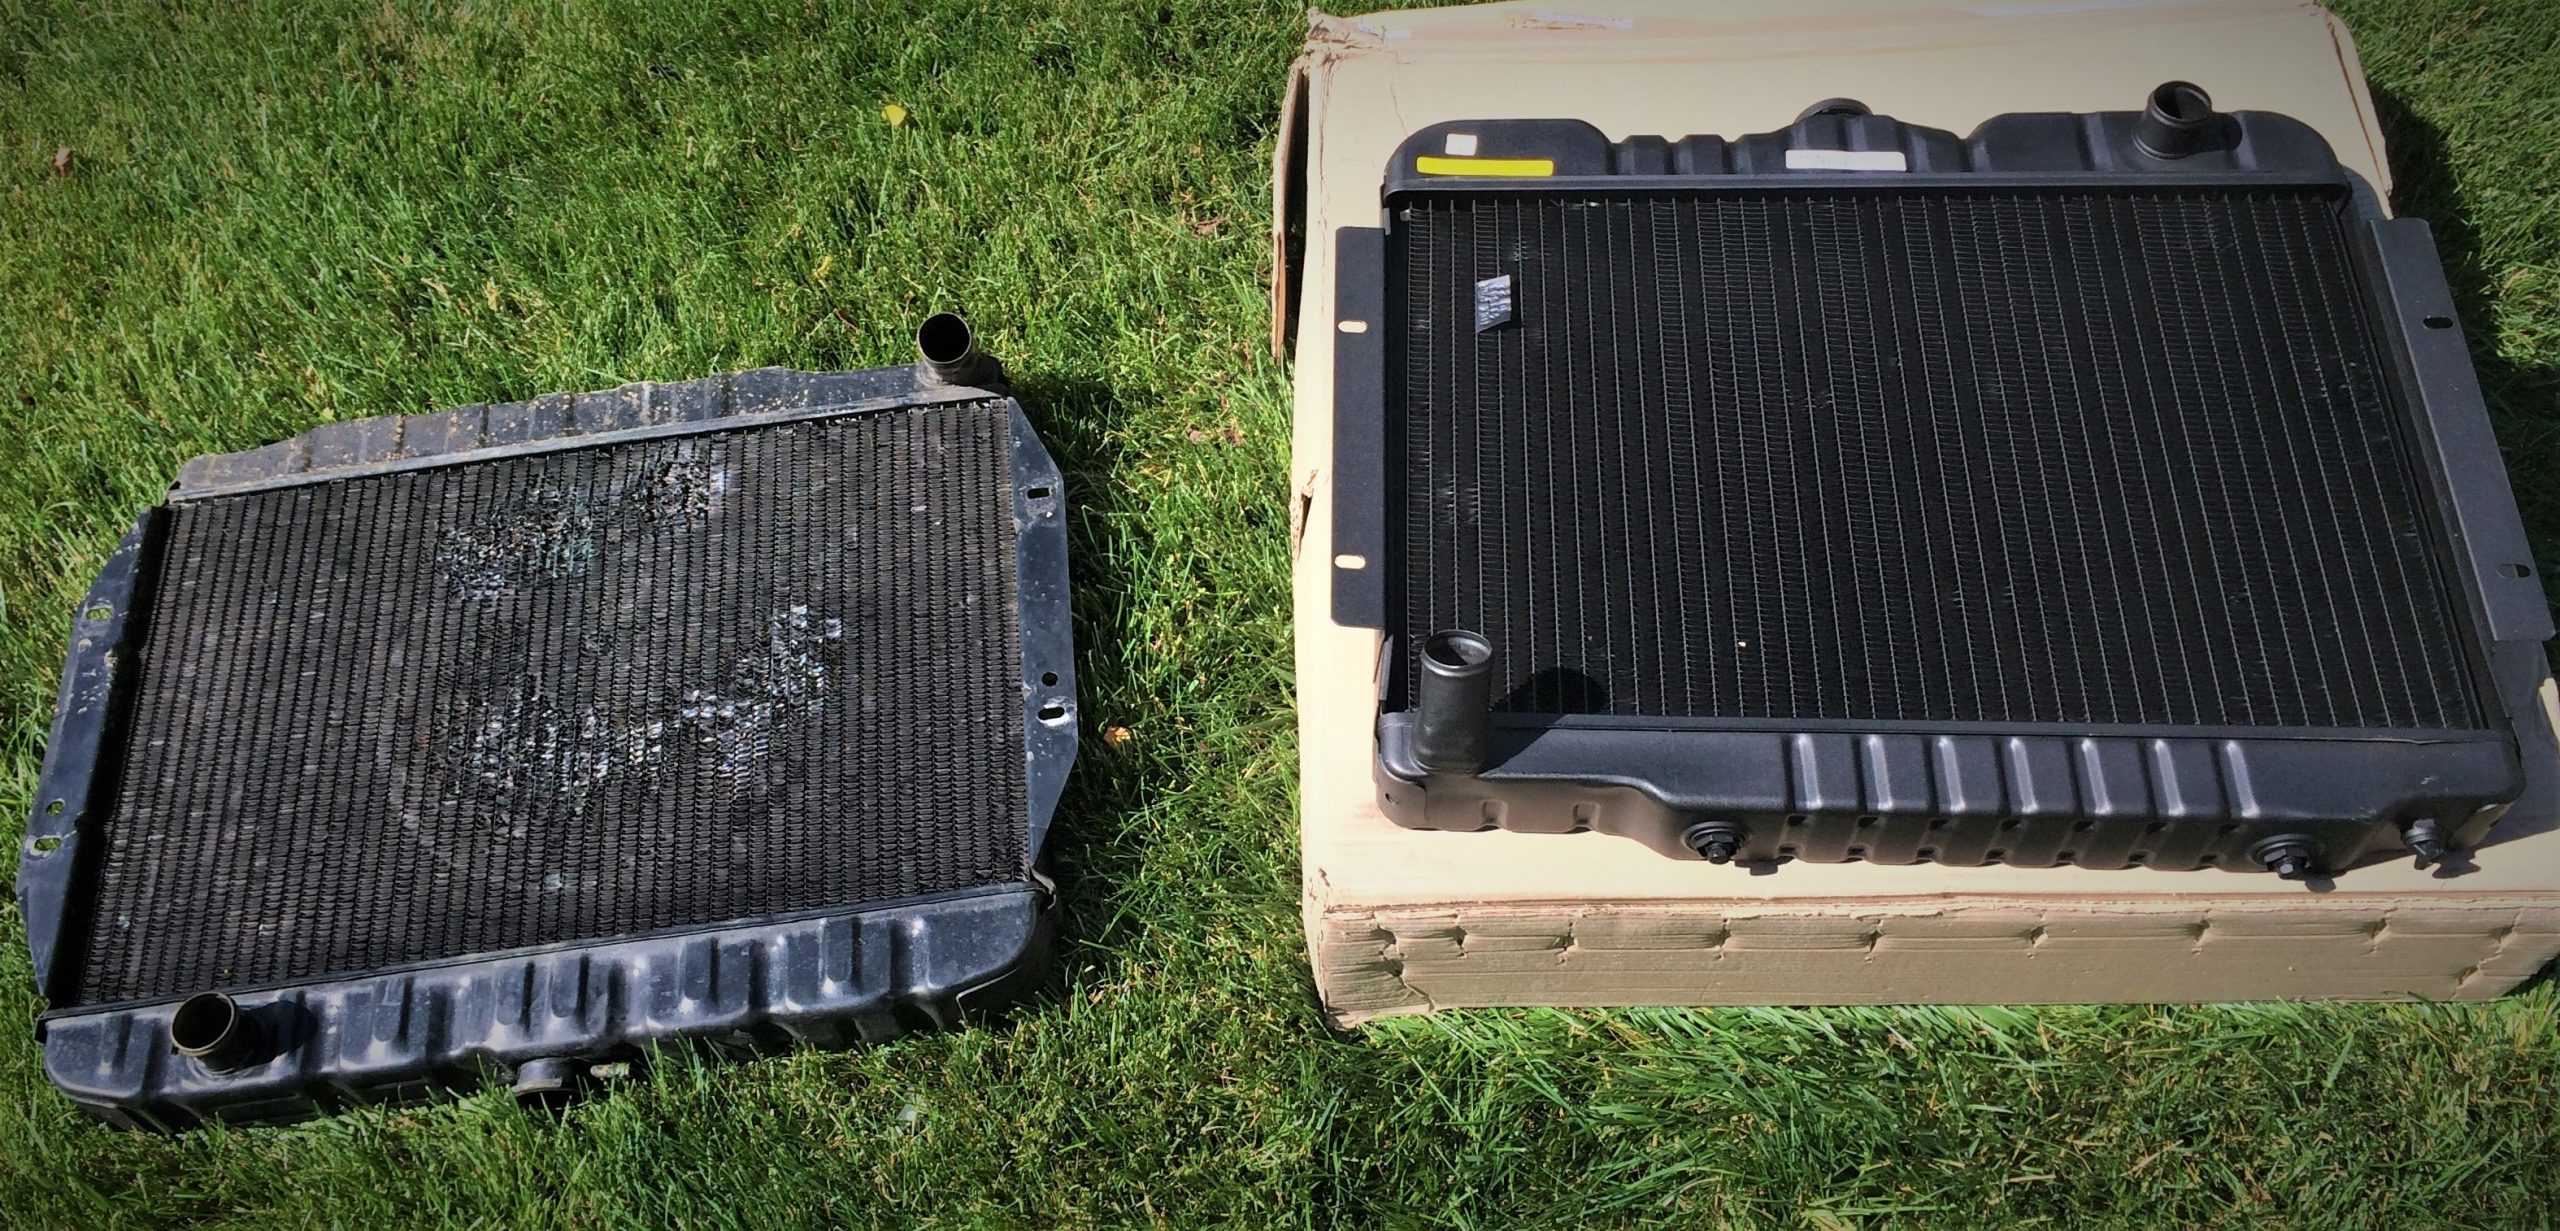
Though it looked slightly different than the one I yanked out, it didn’t bother me because the old radiator wasn’t the original one either. The important part though, was it fit—perfectly.
Everything was the right size. The inlet/outlet ports were in the correct location. The mounting holes lined up. And the whole thing plopped right down in the old one’s place.
I clamped the hoses, tightened the bolts, filled ‘er up, and hit the ignition.
The Jeep idled long enough to hit the 195 degree mark, and it stayed there. A quick jaunt around the neighborhood later, and our temps never crept above that number. A longer trip to the hardware store, with some serious idle time at stoplights confirmed it—the radiator was the culprit.
While I was a bit bummed it wasn’t a cheaper, easier fix, I’m really happy with the result. And if this story sounds familiar, hopefully you can follow a similar troubleshooting journey and get to the bottom of your overheating issues.
Great article. Although….. yep, some of us wont ever be happy I guess. I would have liked to see more diag with infrared temp guns. You know temps readings at certain spots. Whatever? I have seen guys do this and perhaps pretended to know what they were doing. Something I have tried and not really got the hang of.
Hey Stephen–glad you liked the article. Digital infrared thermometers can be really handy for things like pinpointing specific hot spots in the engine, checking temps on header/exhaust/turbo components, or confirming that your temperature gauge is accurate.
…
We didn’t really need one here for two reasons, 1) we were confident that our mechanical gauge was accurate because it matched the 195 degree thermostat AND the OE electrical gauge that was still functional.
2) Since we put the mechanical gauge’s sending unit right at the thermostat, after the coolant’s complete travel through the engine, we knew we were taking a reading at the coolant’s hottest point.
Hey back Paul,
Thanks for the quick reply. Yes, I dont think this vehicle warranted the temp gun either. I was just wondering if in the future you could pass on those diag skills.
Really great articles, please keep any and all coming.
Hey Stephen, I know it’s been a while, but we followed up on your suggestion to cover Infrared Temp Guns in more detail. You may enjoy this from Jeff Smith:
…
The Handheld Infrared Temp Gun: Dozens of Uses for the Gearhead In & Around the Garage
Good article Do they make a temp gauge with a wire so I do not have to drill such a big hole thank s Rick
Hey Rick, thanks for reading. I think I understand your question, but I can’t think offhand of a temp gauge sending unit that’s just a wire. I assume you’re talking about an electrical sending unit? While its true a mechanical gauge’s sensing probe is pretty big, you may get lucky running an electrical gauge, as it has a smaller sending unit. And you may even get luckier by swapping out a manifold or water neck with an extra hole already drilled and tapped. (You can see some typical electrical sending units here.)
…
What kind of engine you got? I can do some research and try to find a solution for you? Oh, and I wrote a follow up article a few weeks later that might be of further help:
…
What’s the Difference Between a Mechanical & Electrical Temperature Gauge?
i was wondering on this issue so long your article helps me alot to fix my problem thank you so much you guys doing great keep it up.