Chasing down electrical gremlins in a motor vehicle can be an exercise in frustration—the kind of frustration that makes young men old and old men talk to themselves.
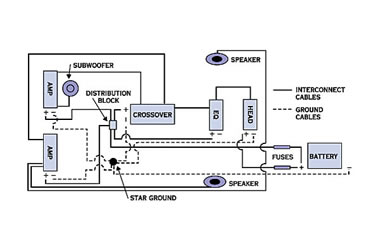
An electrical problem can often be traced to a single source: a bad ground connection. A bad ground can cause noise in an audio system, make electric fuel pumps run hot or produce low pressure, and make electronic engine controls do weird things.
Make Sure You Have a Quality Ground Point
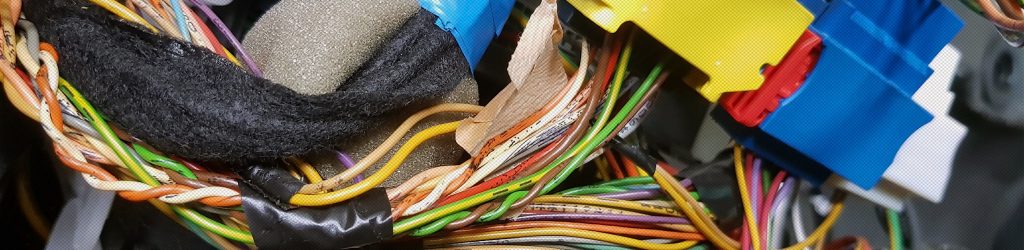
Many think that as long as the accessory’s ground wire is touching some part of the vehicle, it is grounded. That is not the case. You must make sure the ground wire is attached at a point that is free of paint, rust, or plating. Paint on body panels and the engine acts as an insulator, resulting in a bad ground connection.
Best Practice for Grounding Accessories to an Engine
If you are grounding an accessory to the engine, it’s good practice to run a ground wire directly to the alternator case and make sure there is no paint between the starter and the engine block mounting surface.
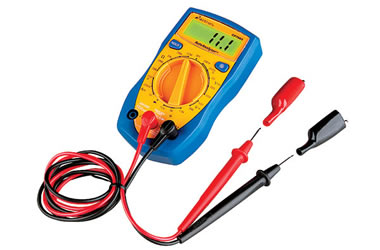
Using a Voltmeter/Multimeter to Test the Connection
If your accessory still doesn’t work properly after redoing the grounds, you will need a voltmeter or multimeter to trace the wiring. Set the voltmeter to read ohms (resistance) and probe the battery’s negative stud and ground connection on the accessory (the ground terminal on an amp, for example). If you have a reading less than five ohms, the ground is okay.
If the resistance is okay but the accessory still isn’t working right, set the voltmeter to DC current (voltage). Turn the accessory on and retrace the grounding path as you did before. The voltage should be no greater than .05 volts under load. If you find a point where voltage is present, then you need to add a bonding strap or find a new grounding point so no voltage is present at any of the grounding points.
If the reading is higher, you need to probe the grounding path between the accessory and the battery. Starting at the battery, run the voltmeter probe from the battery to the first grounding point, usually a fender on muscle cars and trucks. Continue to where the fender attaches to the main body, and from there to the accessory. If you find a point of high resistance (over five ohms), you will need to attach a bonding strap or wire between the panels or parts where resistance is highest.
Consider Engine-to-Chassis Ground Strap
One of the best things you can do to help ensure a properly grounded vehicle is to replace or add an engine-to-chassis ground strap; Taylor makes a nice four-gauge, braided stainless steel strap ideal for most vehicles.
Consider Larger Gauge Wire
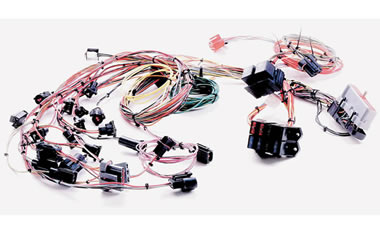
If you are adding a number of accessories or ones that draw a large amount of current, you should also replace the battery-to-chassis ground with a larger gauge wire. That’s because the factory ground wire is usually a less-than-adequate 10 or 12 gauge. A ground wire must be as large as the positive, or supply, wire to the battery.
Hopefully you will never have to experience the joy of tracing a bad ground. But if you find yourself in such a situation, these tips will help make the job go smoother—and get your ride back on ground level.
…
For more information on the basics of automotive electrical troubleshooting, check out our friend Eric the Car Guy’s two-part video series covering it:
Electrical Troubleshooting Basics, Part 1
Electrical Troubleshooting Basics, Part 2
…


A very good read Dave thanks
Appreciate that. Thanks for reading, Chuck.
How would you test a fuse box out of a car to see if it has the resistors inside working properly. For example a 2000 Silverado
What about 2015 Malibu trunk battery did not fix p305f. 16k odo. Ground appear taught.
Hey Dave, Got a question. I’m new to the electrical side of automotive. I just got a multimeter to troubleshoot and hopefully pinpoint my problem. As it’s hard to find a trustworthy mechanic who knows jeeps or a affordable diagnostics scanner (tried cheapys) That works with my 2005/06 Wh/Wk jeep grand Cherokee (I’m in Aus btw). I can’t afford to throw money at it without actually fixing the problem. I have driven 2years over 10000kms with abs,tcs lights on dash. Went in limp mode occasionally and park brake/e-brake light comes on dash. So done new battery, front hubs, all WSS sensors. But now it’s stuck in limp mode with e-brake light on dash (tried new switch). I’m waiting on brake shoes but old’s work fine. Also waiting for pads rear are 50% front 70%. I’m trying to find out if the hydraulic brake pressure switch is +or- I can’t get clear answer or diagram online to clarify circuit. There is no power to e-brake wire is this wrong? Should it have power til grounded? Is circuit broken by brake pressure switch? The fluid level wire has power which I thought was on same circuit. I can’t get brake booster switch off to test. Any info would be appreciated
Thanks
Ok i ran across this. I had a dead battery rwo days ago and so had a new one put in. Now when i turn my headlights on it dims the panel inside the car but when i turn the headlights on the panel goes bsck bright. Ive had the new battery checked and the slternstir and they both read good. Im a senior citizen livibg off social security. Can you make recommendations? The shop said my two connectors looked goid and were tight. I have a 2013 mazda 3.
Im not really a mechanic, but i am an electrical that has been working on cars for the past few years. Short Answer. Who knows. If you don’t want to do it yourself there are specialists (auto electrical tech). You want to do it? Go back to the battery, is it to strong or to weak. check specs to what you have, connections, battery wires. From there it’s all money spending time. I would replace the alternator then take it to the shop. then another shop for a second opinion
Clean all factory grounds or rewire with ofc cable
Dash light should be brighter with daylight. When the sun is setting, the dash backlighting is dimmed to a low(er) level. This can be coupled with the headlight switch if not automatic 🙂
Hi there
I have a 2018 Mercedes C Class and last weekend all of a sudden it just died whilst I was driving it. All the lights on the dash came up and all these warning signals. It would start up again but the techni guy that came to it said it was too dangerous to drive. It’s still at the garage now and they said their words to me were that it had had a catastrophic failure and it would take them some time to work out what had caused it to just stop running. Next day they call me back and said that that think it wasn’t earthed properly at manufacture. He also said that he is assuming it is that. They reckon it’s fixed up but they can’t guarantee it won’t happen again – so how does that leave me driving 110 down the highway and it happens again. Does this sound like a car that hasn’t been earthed properly – if it hadn’t been since manufacture why hasn’t it happened before now. Hope you have some idea
I am trying to troubleshoot a 2005 e320 that throws obd fault codes which can’t possibly be valid. I have replaced a few of the sensors but the same faults reappear shortly. The only thing in common with all the sensors is battery voltage and ground. I found a corroded ground strap from transmission to the body. I suspect that this is part of (if not all of) the problem. I have purchased a new ground strap from the dealer but before installing it, I need to know if the new strap and lug bolt should have any anti-seize or grease to retard future corrosion. Will this degrade the quality of the ground connection?
Use a dielectric grease to prevent corrosion. Remember, a electrical connection can be physically tight but may not be electrically tight!
I have a 97 ford f150 with a 4.6 in it. I have a grounding issue I think. When I open the door of it the dome light flashes on and off until I close the door. This happens with the truck on or off. Any ideas?
Jon vdw
I certainly would start with checking the body grounds. There should be a wire that comes off the negative cable that bolts to the fender. Remove the bolt from the fender and sand the area back to bare metal, then replace the wire with a dab of dielectric grease on the contact surface. Myself, i would get some 10awg wire, a couple ring terminals, and add it to that body ground. The truck is 23 yrs old, have the battery cables ever been replaced? They do go bad after a while. The wire and ring terminals will be less than 20usd, both cables for the battery will probably be around 70usd(im just guessing there). This has a good chance of clearing up alot of electrical issues you may have
You made a good point that something as simple as paint getting in the way can cause some electrical interruption in a car. I’ve only started driving my new car six months ago and it’s my first time driving an automatic transmission car so it’s kind of difficult for me to troubleshoot electrical problems. I hope I can find an automotive repair service near me this weekend so that I can figure out what’s the deal with my my car shifting gears a bit late.
I have a 2002 Saturn sl1 my transmission is shifting really hard I ran code test at auto zone only one code U1300 class 2 short to ground. How do I fix this? What do I do next?
[…] Download Image More @ http://www.onallcylinders.com […]
Hi I have a question, I have a 2007 malibu maxx that is blowing the power window 30 amp dedicated fuse, located in the cabin pass seat side fuse box. It only blows it when i start the car, and or if i place a fuse on the box while the car is running. If i just turn the key to the on position and acc the all windows and switches work and the fuse is not blown….only when the car is runninng or started…or in the starting process. All switches and motors are working ..this started a couple of days ago and i have been trying to examin cables, etc and nothing looks bad…the fusebox in the engine looks brand new…so the previous owner had that changed or the dealer did…any ideas from the masters?
Working on my old sentra eccs, engine not running issues. In the very short time the engine runs, battery terminal voltage at the posts fluctuates rapidly anywhere from zero to 14.7 volts and also at the sensors. This is the first time i have encountered such a problem. Removed all alternator connections, running on battery alone, same thing. Used two dvm’s, same results. Could this be a grounding issue? Cleaned and checked all ground points and no blown fuses or fusible links. Happens only when the engine is running but since the engine doesn’t run that long, difficult to trace.
1989 land rover defender blower motor not working, but when I put multimeter (reading CD volts) ground on ground and live wire at load side of fuse, a little spark on fuse and blower starts. Earth good continuity between earth terminal on connector to blower and chassis gnd.
** DC volts
Hi, this section is very informative and insightful from all I’ve read. I drive a BMW e90 325i, whenever I’m driving the car it just goes off and it refuses to start until after a while, the battery might be full but then I’ll have to wait for some while before it responds and starts again and by a while I mean an 1hr. Plz I dont know what the issue is and I’m confused about it. Its been embarrassing, it just stops on full traffic sometimes when I’m going 110mph
Hi i have an issue with my yamha quad i relaced starter and starter clutch. Now nothing works and i have power when key is on and test light connected to negative post and the frame. There is power to starter selanoid and the starter.
Hey Wayne, how’s the battery? It’s entirely possible that your battery has enough juice to power a tiny test light but not enough to turn an engine with compression. I’ve had that happen when working on old motorcycles with weak stock electrical systems. I’ll leave the power on (stupidly) while I make timing tweaks or a replace coil…go grab lunch, the battery drains, and yup, when I come back, there’s not enough current to turn over the engine–yet you’ll still see power on a test light or multimeter.
Have a 2003 Chevy Avalanche have a check engine light says evap vent Solenoid tested it it’s all good have power to it have no ground Traced it all the way up to the computer still no ground tried it with car running and not running. Sometimes it gets ground sometimes it loses it I can tell when the light goes off I’m pretty good at this stuff but I got like 2 weeks in it the only thing I can think is it the computer don’t like throwing parts in things I know it has positive ground system thanks for any help have a lot of time in this.
My 1979 Ford F150 has votage on the ground cable. I did the test light on the battery cable and pull fuses but no fuse made a difference. Does this mean I have a bad ground somewhere or a hot wire touching a body part somewhere? What do I check next?
I have a 65 Ford Mustang with a after Market turn Signal install with LED bulbs a 3 pin relay that came with the kit,at one point they work intermittently now not at all what should I be looking for in this install all new under dash wires and connectors.
I have equinox and I am checking electrical. I set my ohm meters to check ohms and I can hook one lead to postive side of battery and touch all over the motor and it ohms meter buzz like the hot wire is hooked straight to the motor. I also have like the wins shield pump motor coming on with out a key. Any ideas that would lead me in the right direction would be greatly appreciated. Thankd.
All of these suggestions regarding the application of dielectric to the contacting surfaces are just plain wrong. Dielectric grease should never be applied to the actual contact area of the components transferring the current. Dielectric grease is NOT conductive. The purpose of dielectric grease is to seal out moisture from a connection therefore keeping the resistance low by eliminating corrosion from the contact. Everybody tell a friend!
Sorry but the dipshitz at be talking about “voltage” slash “current” screams yall are effn dumb to the subject. Wtf?
‘Yall’ isn’t a word, dipshit. And you are talking about dumb people, Bonzo.
Again!!! I highly doubt the author of this has a legit understanding of ANY elec theory and or concepts. When the author states set your dmm to “voltage/ current” f’n whutever(sooooo no the same) I bowed out in regards to the ignorance!
Cheers!
Rian
I have an issue with my 2016 honda accord where my speakers will make this very loud static noise when I turn on the car mostly when it’s hot outside or its been sitting in the heat. The sound does not stop when the audio is off but eventually it will turn off after a while. In the morning since it is cool outside it does not make the same sound. I have been told this is a grounding issue but I have not changed anything in the stereo from the manufacture. How can I fix this issue? Honda said they have to diagnose it first and charge me a lot of money to fix. I believe that the car is fine because it works perfectly at times but in the heat it does not.
I have a 2001 grand am and I just put in a starter. There is a wire hanging and I don’t know what it is or where it goes…it says ped 1 12 m10 and I believe it’s a ground wire. What should I do?
2014 Kia Sorento. New Battery. New Alternator.
Charge light came on 1 week after they were replaced. Thought the new alternator may be defective. Noticed main ground strap (engine-to-chassis) was very corroded. Replaced ground strap, no charge light for a week. Then one day started the vehicle and the dreaded charge light back on. Made it home. checked voltages (10v) running, 11v engine at rest. Disconnected negative battery cable-engine cut off. Let it sit for an hour. Reconnected battery cable. No charge light, voltages looking good for about another week.
One week later, same issue, with charge light on. Disconnected neg. cable. running fine w/ no charge light, up to now.
Was told to check serpentine belt tension. OK.
Double-checked for a potential loose wire. Looks OK.
Now I don’t know any other areas to check as it is playing a funky game of “Hit-and-Miss.”
Any ideas?