Orange peel, wrinkling, paint curtains—these are all conditions that can ruin an automotive paint job. The good news is they’re all avoidable and fixable. In conjunction with the experts at Kirker Automotive Finishes, we’ve put together a list of some of the most common paint mishaps and how to avoid them. We’ve also included some basic information on how to fix these conditions.
Bad paint doesn’t have to be permanent. And neither does your fear of painting your own hot rod or truck. Find out how to avoid (and fix, if necessary) these seven common paint maladies and tackle your next paint job at home.
What Causes Paint Cracking?
Also known as wrinkling, splitting, or checking, cracking can include cracks of random size and often resembles the wrinkles on a reptile’s skin.
Common Causes of Automotive Paint Cracking
- Insufficient surface preparation: Step one in avoiding cracks or many other imperfections is properly preparing the substrate for paint. Cracking or other imperfections in the surface itself should be removed before the new material is applied.
- Lifting of substrate: When the wrong reducer is used in a top coat, or when certain materials are top coated before achieving full cure, the undercoat may lift in a way that appears like cracking.
- Improper choice in reducer or hardener: Be sure to follow the paint manufacturer’s suggestions on the type of reducers and hardeners to use with each paint. Improper or low quality materials may have an adverse effect on the finished dry paint film.
- Incorrect mixing ratio: If too much activator/hardener is used, or if the correct ratio is not properly mixed, defects may appear in the finished dried paint film.
- Environmental conditions: Excessive heat or humidity during application and curing can cause surface imperfections such as cracking.
- Too much, too quickly: Spraying too much material in full wet coats can lead to cracking.
HOW TO FIX IT
You’ll need to allow the paint film to cure completely. Once cured, you can sand out any imperfections and reapply the paint. Avoid the same mistakes by keeping the common causes above in mind.
What Causes Orange Peel in Car Paint?
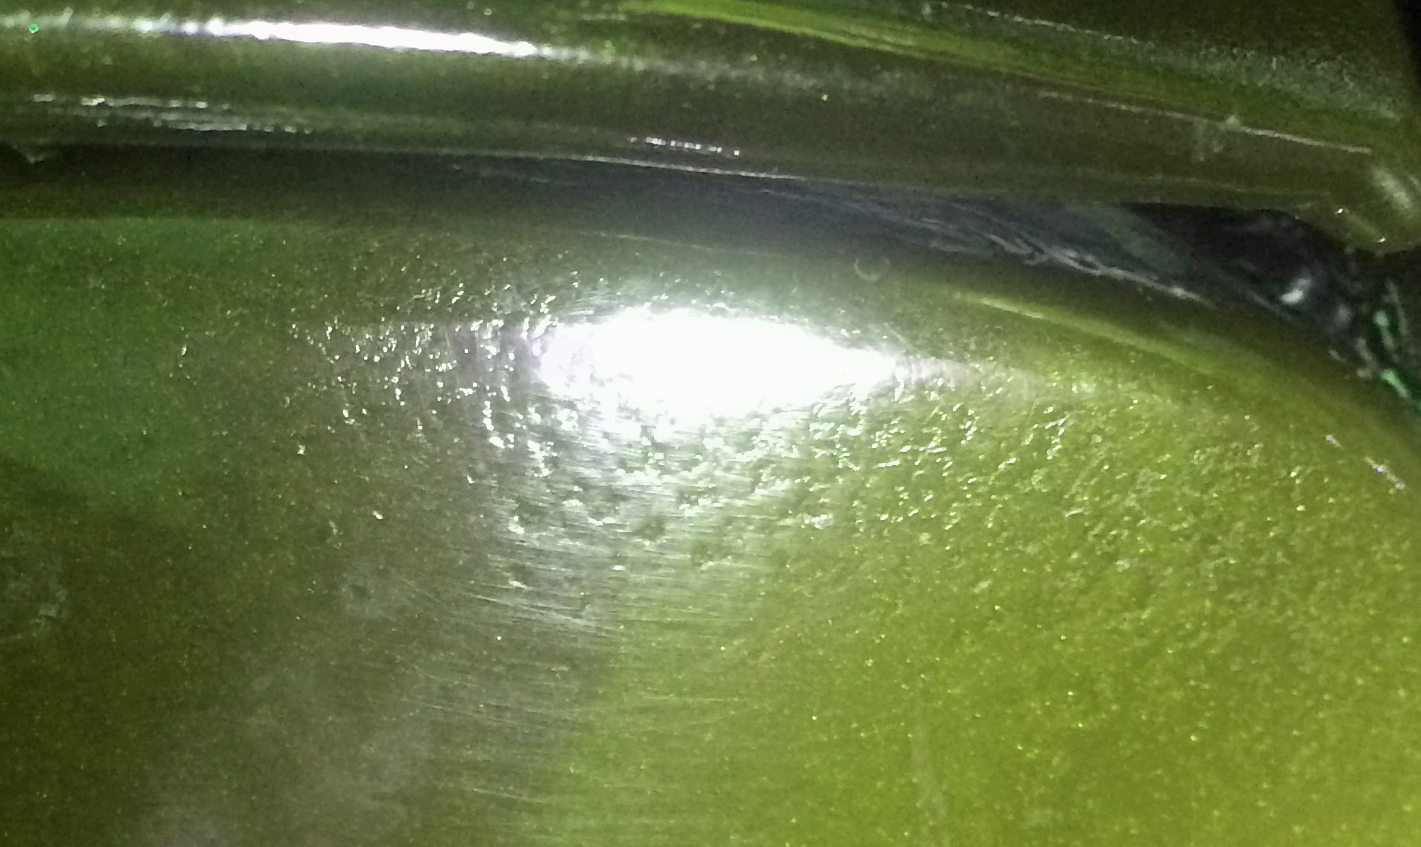
This is one of the most common conditions we hear mentioned when people talk about painting their own vehicle. As the name suggests, orange peel is a condition in which the dried paint has an appearance or finish similar to an orange peel.
Common Causes of Orange Peel
- Excessive film thickness: Again, applying too much material in full wet coats can cause issues. This includes preventing the paint from flowing to an even film before drying.
- Improper use of reducer: The wrong reducer for the conditions can cause solvents to evaporate too fast, allowing the paint film to dry before the material has properly flowed out to the desired appearance. Make sure to use the right reducer for the temperature and conditions in which you are working.
- Gun troubles: Make sure to use the correct spray gun, fluid tip, and air cap for your application. Also, insufficient air pressure at the tip of the gun can prevent paint material from properly atomizing, keeping it from flowing out to a desired appearance.
- Poor technique: Any number of factors, including the position of the gun tip, the speed of the pass, the degree of overlap between passes, and the distance of the gun from the panel, can lead to orange peel.
HOW TO FIX IT
If orange peel is minimal, sand out the texture in the dried paint film with a fine grit sandpaper, then compound and polish to restore gloss. If orange peel is significant, sand out imperfections and reapply paint using properly reduced material, air pressure, and technique. Making adjustments to the gun settings may also help.
Automotive Paint Runs and Sags & How to Fix Them
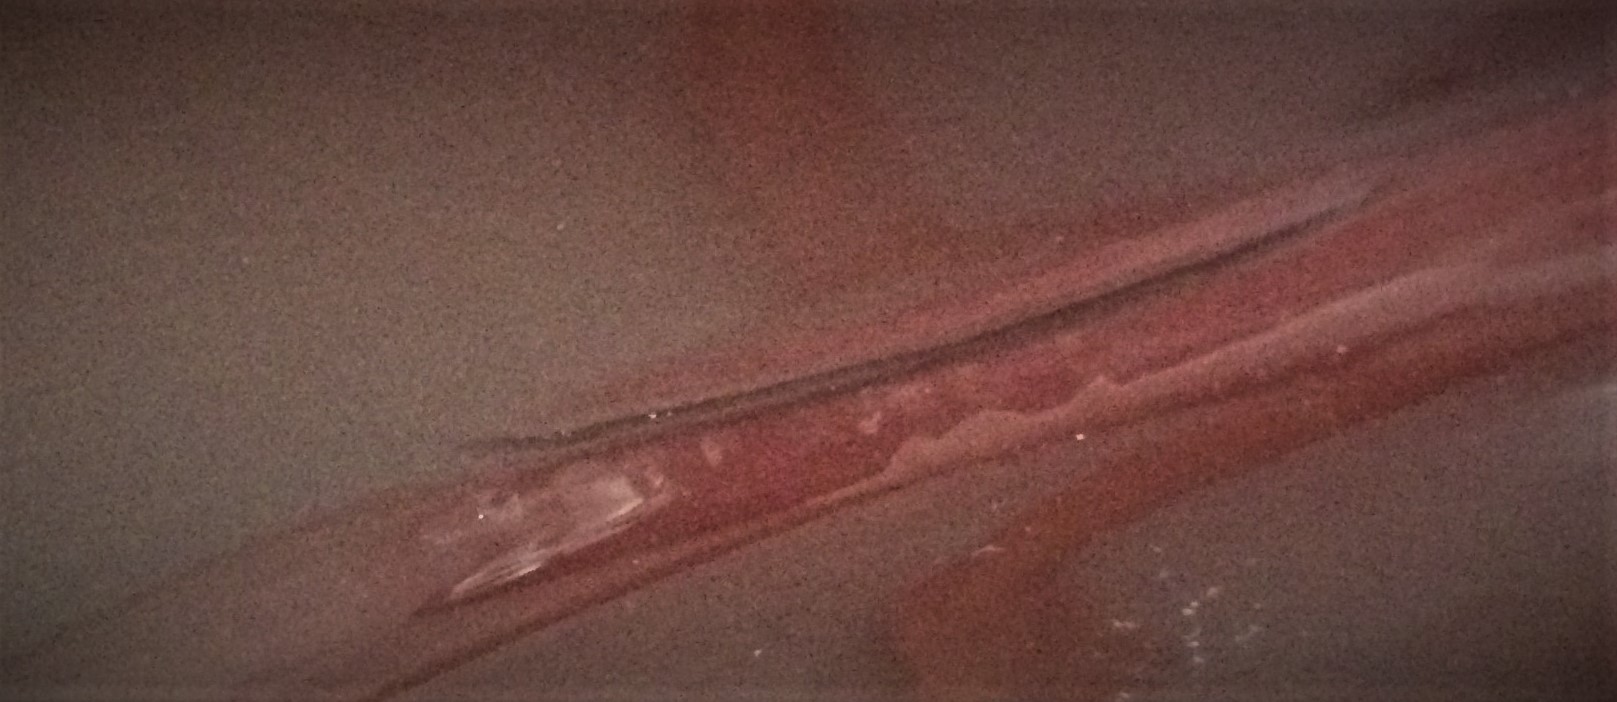
Whether on the side of a vehicle or while repainting a kitchen or bathroom, we’ve all probably dealt with paint sags or runs at some point. When struggling with runs, sags, or curtains on an automobile, there are some likely culprits.
What Causes Paint to Run or Sag?
- Improper reducer/too much reducer: Again, your choice in reducer and hardener plays a key role in your final finish. Be sure to choose the appropriate reducer for the type of material being sprayed, and the shop conditions in which they will be sprayed. Reducer that evaporates too slow and excessive use of reducer are two primary causes of runs and sags.
- Excessive film thickness: Too much material in full wet coats leads to excess paint that runs.
- Insufficient flash time: Not allowing enough time for solvent to flash off of the first coat before applying next coat can also cause runs.
- Inadequate air pressure: Paint sags can result from insufficient air pressure at the tip of your paint gun. It’s also important to use the correct fluid tip and air cap, and the proper paint gun for specific materials.
- Poor technique: Runs and sags can be caused by improper gun tip position, the speed of the pass, the degree of overlap between passes, and the distance of the gun from the panel.
HOW TO FIX IT
If the paint is wet: Remove with solvent, clean the area, and reapply coating.
If the paint is dry: Sand out any runs and reapply coating.
What Causes Fish Eyes in Paint?
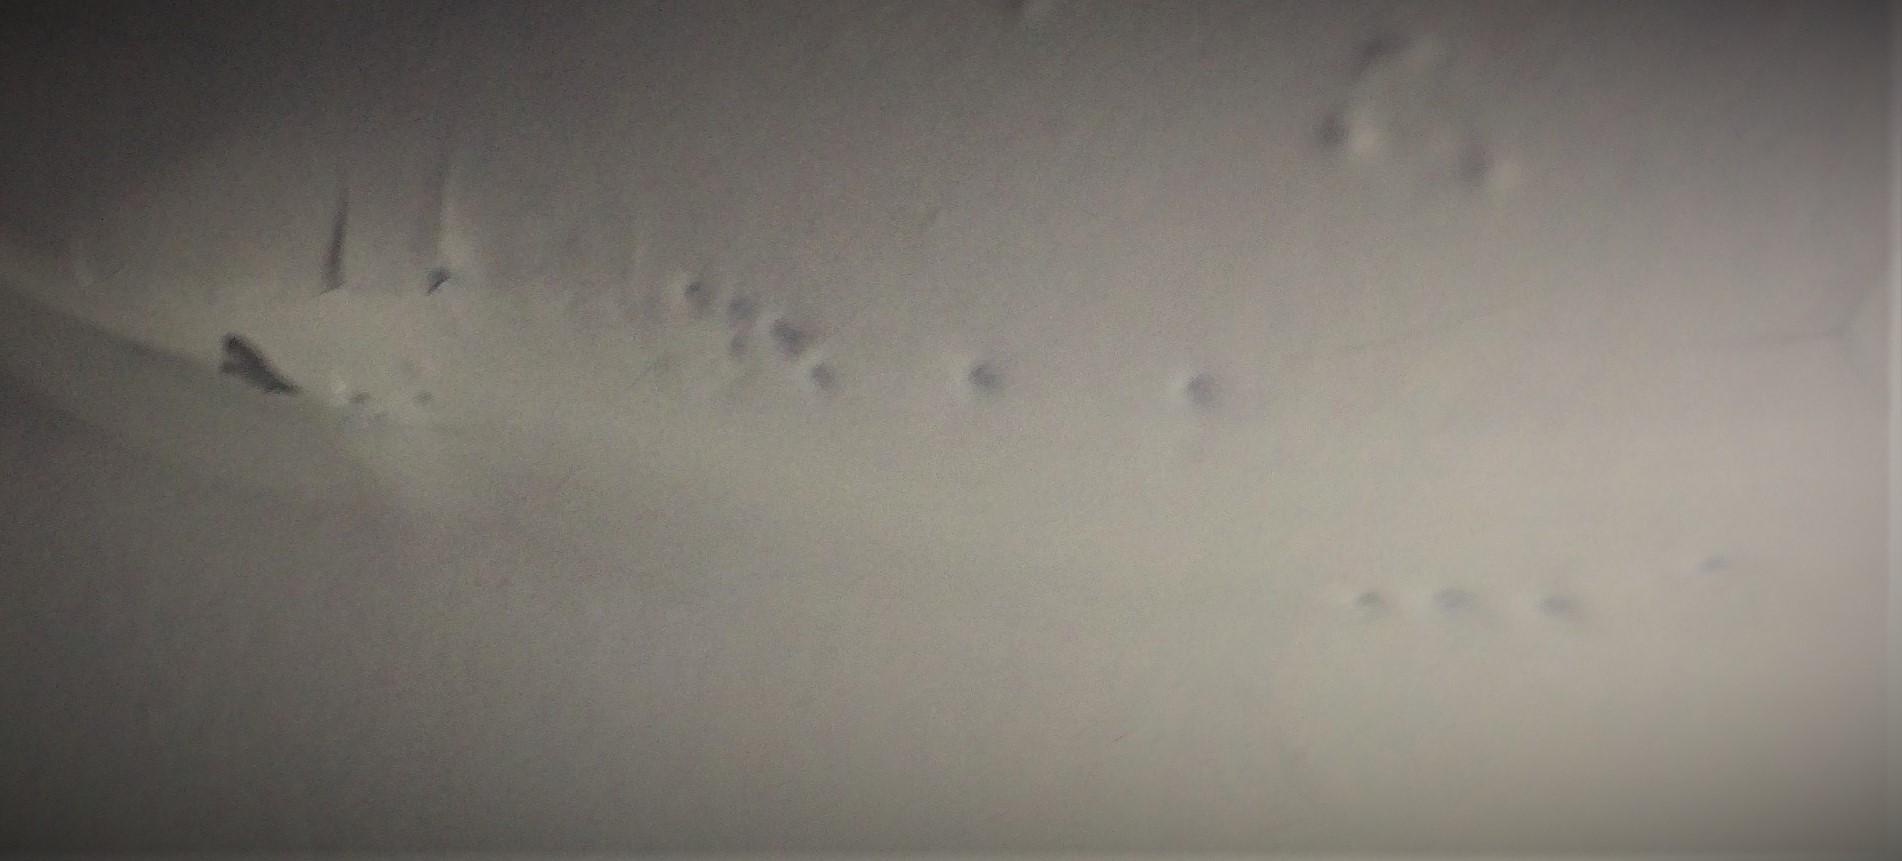
Appearing as small, circular craters spread throughout the paint film, fish eyes are a common enough problem that you can find specialized Fish Eye Eliminator.
How to Avoid Fish Eyes in Paint
Fish eyes typically (but not always) appear in a paint surface soon after application. There is one reason for the appearance of fish eyes: contamination.
Contamination found on the substrate (oil, water, grease, wax, etc.) is the main cause of fish eyes. Contamination that occurs during the application and/or prep process is the other common cause. This can occur when water and oil enter the air stream due to the absence of a water and oil separator, or the reuse of shop rags, which may have previously been used with silicone or other materials. Paints are extremely susceptible to certain waxes and silicone products, so care should be taken whenever car care products are used in the general vicinity of a paint shop.
HOW TO FIX IT
If the paint is wet: Remove with solvent, properly prepare the surface, and reapply paint material.
If the paint is dry: Sand out fish eyes, and then reapply paint material. Add a fish eye eliminator to the paint before reapplying. The surface should always be completely clean and dry before applying paint materials.
How to Avoid or Fix Paint Flaking and Peeling
It’s generally a bad sign when pieces of dried paint peel or flake off of your vehicle. If you’re experiencing this condition, delamination has occurred. The dried paint film is no longer adhering to the substrate, causing it to pull away in strips or flakes. Here’s how to avoid or fix that problem.
What are Common Causes of Paint Flaking or Peeling?
- Improper surface preparation: If the substrate is not properly abraded, or features surface irregularities and/or rust spots that are not addressed prior to the application of paint, delamination may occur (sometimes immediately, other times after a lengthy period). Remember, your vehicle’s finish is only as good as what lies beneath it.
- Insufficient film thickness: Consistent and adequate film thickness is important. Paint that has been applied too thinly has an eventual tendency to pull away from the substrate.
- Failure to follow application instructions: Adhesion may become an issue if specific application instructions are not followed. For example, certain undercoats that have fully cured must be sanded before taking a topcoat to avoid delamination.
HOW TO FIX IT
If the area in question is relatively small, remove flaking and peeling paint, and then reapply paint material as you would during a spot repair. For larger problem areas, sand the entire paint surface and reapply paint material. Take care to follow application instructions and build the material to a sufficient film thickness.
Why Does My Car Paint Lack Gloss?
A matte finish is nice if it’s what you really want. But if you’re expecting a nice gloss finish and you get a more satin or matte look—well, that’s bad. If your automotive paint isn’t giving you the gloss finish you want, there are a few possible causes. Keep in mind, though, that all paints will lose some degree of gloss over time due to everyday weathering.
How to Avoid a Gloss-Less Finish
- Insufficient film thickness: If the final coat of single-stage paint or a clearcoat is applied too thinly, finished paint film will not exhibit full gloss potential. This also may occur when material is applied too dry, causing orange peel.
- Insufficient flash time between coats: If solvent does not have adequate time to flash between coats, the result may be a loss of gloss in finished paint film.
- Excessive film thickness: A repeat suspect in multiple paint problems, excessive film thickness can prevent the finished paint film from achieving full gloss. Make sure to not apply too many full wet coats of paint.
- Wrong reducer: The wrong grade or temperature reducer for the conditions can cause solvents to evaporate too fast. This will allow the paint film to dry too quickly, leaving a satin or matte finish. This can also occur if too much solvent is used.
- Insufficient time between different materials: Gloss may be compromised if a topcoat or clearcoat is applied too soon, or in some cases, before the previously applied material has achieved a full cure.
- Poor cross ventilation: It is important to maintain air movement even after application. Failure to do so can impede the overall gloss development.
HOW TO FIX IT
Once paint film is cured, compound and polish to restore gloss or scuff sand and reapply paint.
Why Does My Paint Allow Imperfections to Show Through?
Is your dried paint allowing the substrate to show through?
While paints are designed for opacity, poor hiding can allow variances in the vehicle surface or previously applied coating material to be visible through the finished paint. Here are some typical causes:
Common Causes of Poor Hiding Paint
- Too much reducer: Reducers are totally transparent, so using too much reducer takes away from the normal hiding level of the paint.
- Wrong primer color: Certain color primers are more difficult to cover, depending on the color of the paint. For instance, a white paint will cover a light-colored primer faster than a black or dark gray.
- Uneven color on substrate: Body fillers and other variations in substrate color can cause an uneven appearance.
- Insufficient coats: Depending on the paint color used, a manufacturer’s suggestion may not be enough to achieve proper hiding and additional coats should be applied.
- Improper paint prep: Paint must be sufficiently agitated prior to use so that pigments can be mixed throughout the material. This is especially true with older materials, because pigments may easily settle to the bottom of a container if left untouched for long periods.
HOW TO FIX IT
Simply continue to apply properly agitated and reduced material until desired hiding level is achieved.
For more valuable paint help, including troubleshooting advice for other paint conditions, check out the Kirker Automotive Finishes website.
Thank you do much for the tips and advice you share with us do it your selfers. I’m planning on a complete make over on my dirt circle track car next year. I’m stripping black , green and what ever other colors beneath. Going back with the summit racing red on the body and doing white on chassis and interior. White because it shows cracks and other defects really well. Can’t wait hardly for off season, not.
No one has addressed after applying a second coat to my car chip repair an ugly ring formed under the final coat totally distorted my work happened after clear coating. As a. Chemist I’m sure was a reaction with the first coat because it will not sand out and it looks like an island surrounded by a river all the way around it. It was only a rock chip that has turned into a non solution disaster to my car
what can i do to hide curtains on my car paint job.
I’ve had luck in wet sanding an existing paint job in a small spot, and reapplying clear coat. All with rattle can. I’ve had good results. Tonight I had to attempt to put a bit of color on an area. I had such good results in wet sanding and reapplying a clear coat, that I figured I was up to spray a little primer on and color, then clearcoat. No fuss. Primer went on fine, but to my horror, the blue base coat immediately pock-marked, leaving large circles with primer showing through. I’m hoping a 2nd coat will at least get everything a uniform color, even if it’s the surface of the moon.
Couple theories, Did I mix two different types of primer/base coat. Such as enamal and laquer Going to check the labels after I finish this posst. Or.did I put the color coat on the primer too soon? I gave it about a half hour. Anyway, ugh, it’s just a spot job, but I think it’s going to look worse than the scratch I filled.
Wish me luck.
That luner surface you speak of is actually created from a hi surface tension. Try wetting the surface with water. You’ll find that the water beads up and runs off the surface quickly. Grab a grey scotch Brite pad and some powder comet cleanser, mix the comet with water until it becomes a paste, apply the paste to your scotch brite pad and scrub the area that the water would bead up on. Then rinse it again with water. You’ll find that the water will now stay a solid sheet on the scotch Brite and comet cleansed area. Make sure the water will stay a solid sheet every where you want to apply paint and your paint will go on beautiful every time.
This definetly solved my paint job issues ! . Thanks so much !
Can I go back, at a later date, and apply any additional clear, if I do not get the gloss I desire? (Referring to the next week or so)
Thank you
For a 2-stage paint system? Though every paint manufacturer’s system may be different, the short answer is probably no. An important part of the process is the adhesion that occurs between the clear coat and the base coat during the initial drying process.
In essence, the 2 layers bond to each other during that step, promoting better adhesion.
Now, that’s not to say you can’t touch-up clear coat later, but it’s probably not wise to add an additional full coat of clear outside the manufacturer’s recommended time window for the initial application.
Make sense?
I found that whenever the basecoat or single stage paints tend to leave fisheyes, I add a few drops of 30 weight oil to the paint mix and re agitate the paint,then respray. No more fisheyes!
Nice, Lyle. Exactly the kind of helpful commentary I’ve grown to expect from any ‘given’ Lyle.
Thank you for that information on feesheyes, I had a ton of them in some Rustoleum I sprayed yesterday, I wet sanded and didn’t have any 30wt so I tried about three drops of my 20-50wt Harley Synthetic Oil in today’s paint and it covered what was there and layed down great.
Rubbed clear right d oh wn to feather edge. After applying undercoat and paint came nice. After buffing a circle broke out and turned whitish. Please explain.
Hi I want to know if I used 2k gray primer without any hardener and then apply the basecout will there be any problems waiting for me in the future or not
Thnk you
And one more thing if I change the basecout
Coler can I paint right over it or can I prime over it
The primer won’t go hard can’t do it
Can fast hardener be applied on wall oil paint
My malibu was recently painted and the coveei g was fine but there are dull spots 8j n the paint glossy in other spots but dull in some, like a dry dust. It’s an acrylic enamel and I tried washing and waxing it but still the same results just not as worst how can i fix this problem
Recently i had given my Royal Enfield bike parts for painting matte black . Got done in 1 day but the paint was not glossy as showroom finish. It was like flat matte paint on the wall.
Wen i asked the painter he said he mixed 90% matte clear so its best like that.
But i refuse to accept him bcz i need showroom glossy matte finish.
What went worng ??
Any color associated with the term “Matte” will not be glossy like what it sounds like you’re looking for. There are several reasons why people aim for a matte finish, some being to reduce glare that glossy paint will give if the painted part is within your line of sight while operating whatever you’re having painted. For example, the top side of the fuel tank on your Enfield if painted with a single stage full gloss finish or cleared with a full gloss topcoat, could very well reflect so much light from the sun, ultimate obscuring your vision, which could potentially be dangerous for you or others on the road. I would imagine at some point in time, you’ve walked past a car window or walked past a storefront where the glare was so intense that you became blinded and afterwards saw spots… Being a painter and an avid Biker myself, it boggles my mind when riders insist on having their inner fairings color matched to the rest of their bikes, level of gloss finish and all. Which is the exact reason you’ll never see a factory motorcycle of any make or model come factory with a full gloss finish where the glare could potentially put the rider at risk of being blinded… Now, your painter having used a matte finish where he did, I have to assume he only did because it’s commonplace on the parts he was given… some are glossy, some are not… As of late, more of the Matte finishes have become a new-ish trend in recent years, however, if you think about the muscle cars from back in the day, late 60’s up to the gas crisis in the 70’s, just about every muscle cars hood / Bonnet, no matter the color of the vehicle overall, had either a matte finish decal, matte finish paint or even matte finish or Semi-gloss clear will all have the desired effect in preserving the color match, but as well, avoiding the glare or bright spots that could again, potentially blind the driver/ rider putting everyone involved at risk of harm… covering the majority of the hood, with a Flat, Matte or semi-gloss dampens any “sharpe” or blinding glare… that’s another reason why you’ll never see a shinny dashboard on a factory car or truck, and the very reason Armorall has a product specificity engineered for use on dashboards, because the “Original” Armorall is extremely glossy…
The short version in my opinion, is your painter used a semi gloss or a matte single stage or semi-gloss clear by design, again depending on what specific parts you gave him to refinish… especially if you asked him specifically for a “matte finish”….. if that’s the case, he just did exactly what you had requested… unfortunately you may have had your terminology mixed up… it happens…. But in order to retain a gloss finish at this point, the matte color will need to be scuffed and re shot with a gloss clear in the color itself, not a big deal, but if it’s got a matte clear or semi gloss clear, all of the clear will need to be sanded down to the base coat in order to achieve the gloss finish that it sounds like what you’re after… anytime you have a matte or semi gloss layer of clear down, even if scuffed in the attempt to regain the gloss you actually intended, if the matte layers at bit removed, any full gloss on top will cure looking matte, or at the very least, have a cloudy feel to it, or give the appearance of the clear “blushing” or it could always turn spots blotchy white… sorry to hear you’re having to deal with this…. I hope this helps explain what might have happened?
Can paint be sprayed with catalyst alone? If the reducer isn’t added, but enough catalyst is mixed in for the paint to spray through the gun, what will the result be? faster cure? darker finish? This is super informative-thank you!!
It is good to know that ‘fish eyes’ even have a special eliminator if they appear in our car’s new paint job. Painting your car can be a hassle in of itself because there is so much that might go wrong as you described. Having a solution to one of those problems that might pop up is priceless.
[…] the blush is located in a deeper region of the vehicle, then you will need a de-blush solution to elicit a more effective […]
Hi I would appear to have a very unique problem when spraying from cans whenever I try why to apply my clear coat which I have two different brands of what I am painting turns into a strange blotchy green colour it appears to be some kind of reaction between the grey primer and the clear coat as even when I I apply a coat of silver paint over the grey primer and spray the lacquer it turns Green but if I just use the silver paint and the lacquer on a test area it covers fine also if I spray the clear lacquer directly onto the grey primer it goes very green has anybody ever experienced anything like this as there is nothing on the internet
[…] thin nature makes it applicable to any type of air equipment. Besides, paint errors can be easily wiped clean with lacquer […]
I have in my garage a couple cans of Dynakote paint but I don’t have any hardener for them. I do have alot of hardener from LIC.
It’s LK40. Can I use this with the Dynakote or will give me problems. What can I use With the Dynakote.
Bob
Halo
Thanx for the information, it is very helpful and makes one aware of where I could have been going wrong but I have a few questions as a begginer in the paint industry.
I am learning how to paint mag rims and have a few questions of which I hope u could help me with
When cleaning a substrate (mag rim) should all out the prepaint be removed?
After cleaning the the mag rim is it advisable for me to clean the mag rim with thinners as it cleans and dries just as quick?
When mixing the paint (2k in this case) should is it advised to add the activator with the paint or to mix the activator with the clearcoat + thinners and then add after the paint has been applied?
Thank you for your time and hope u have a lovely day
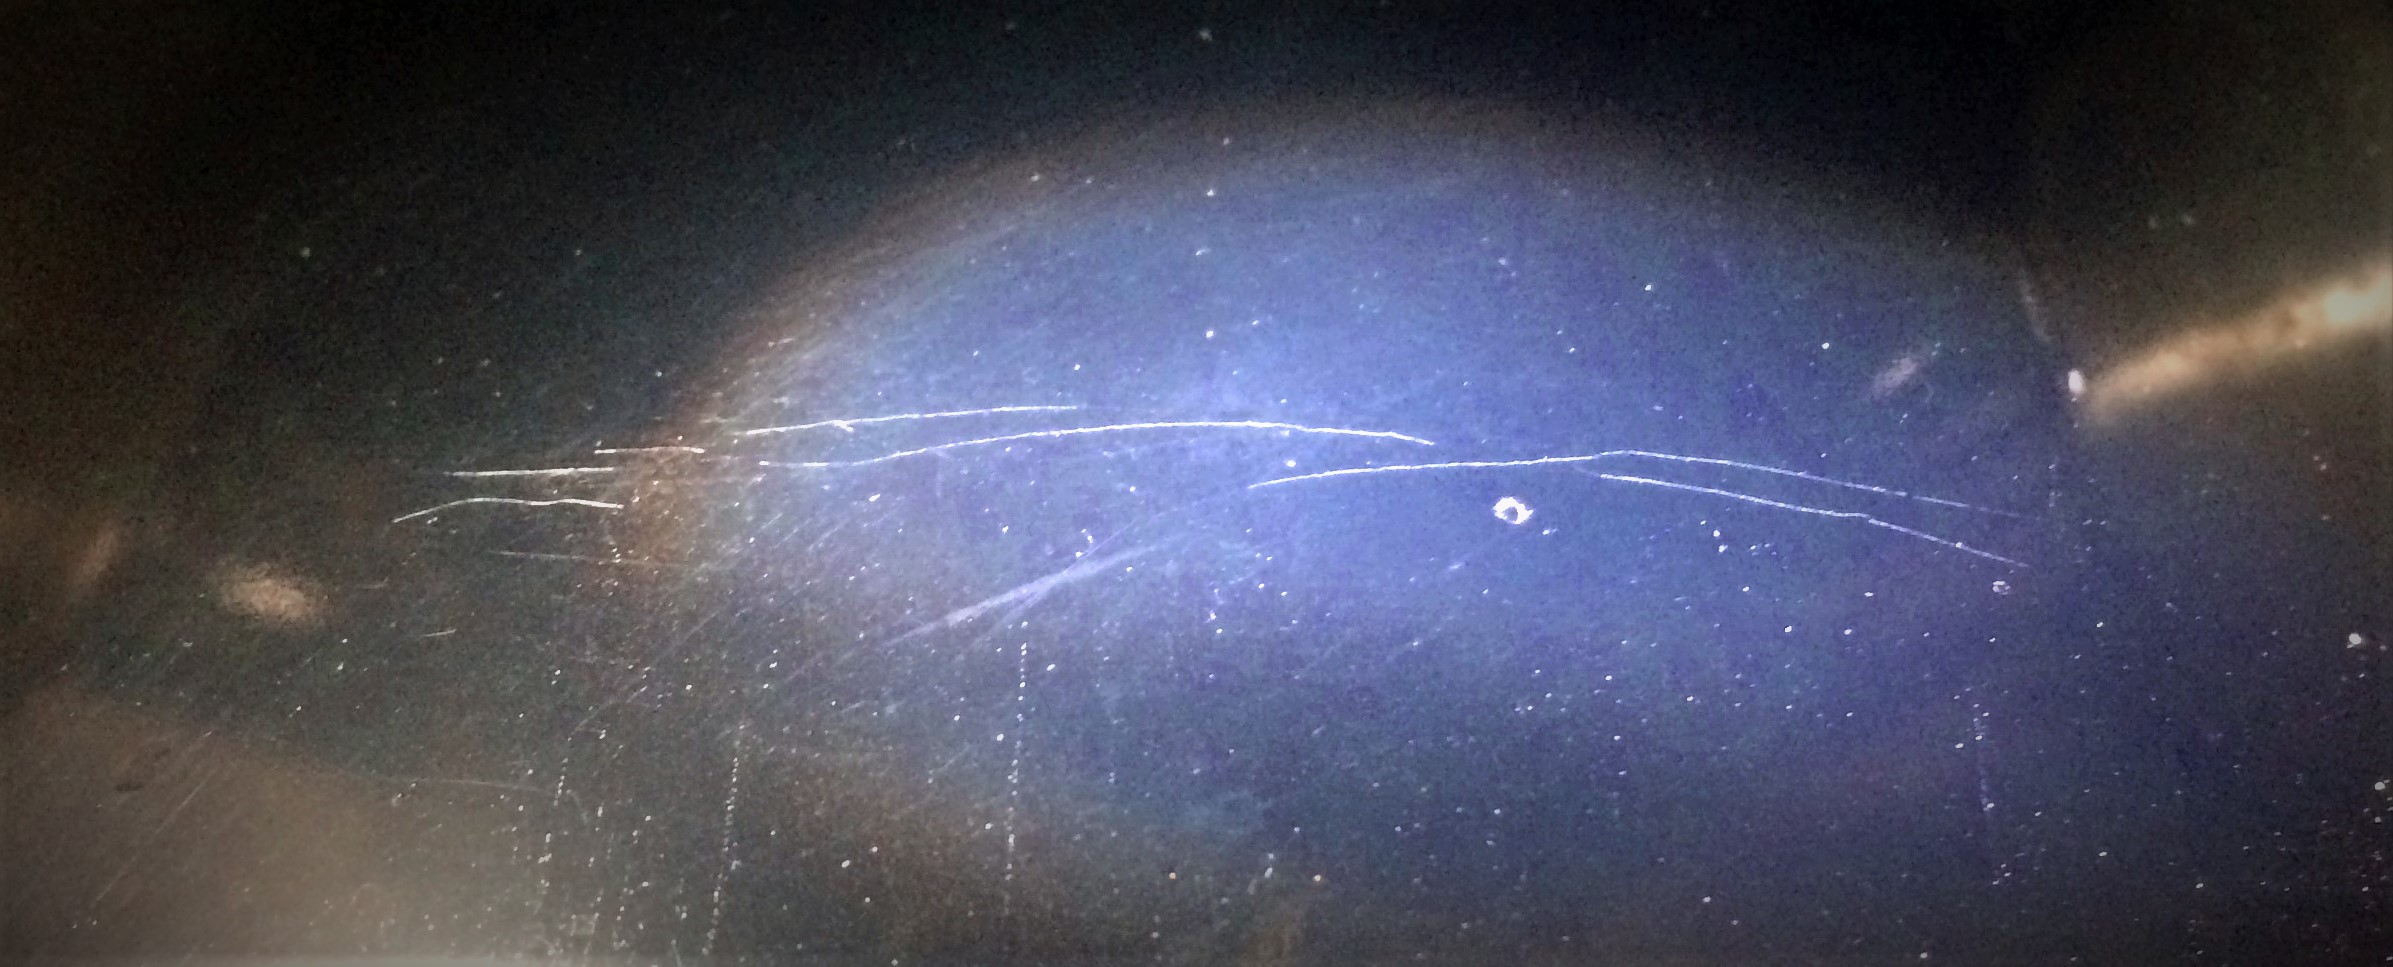
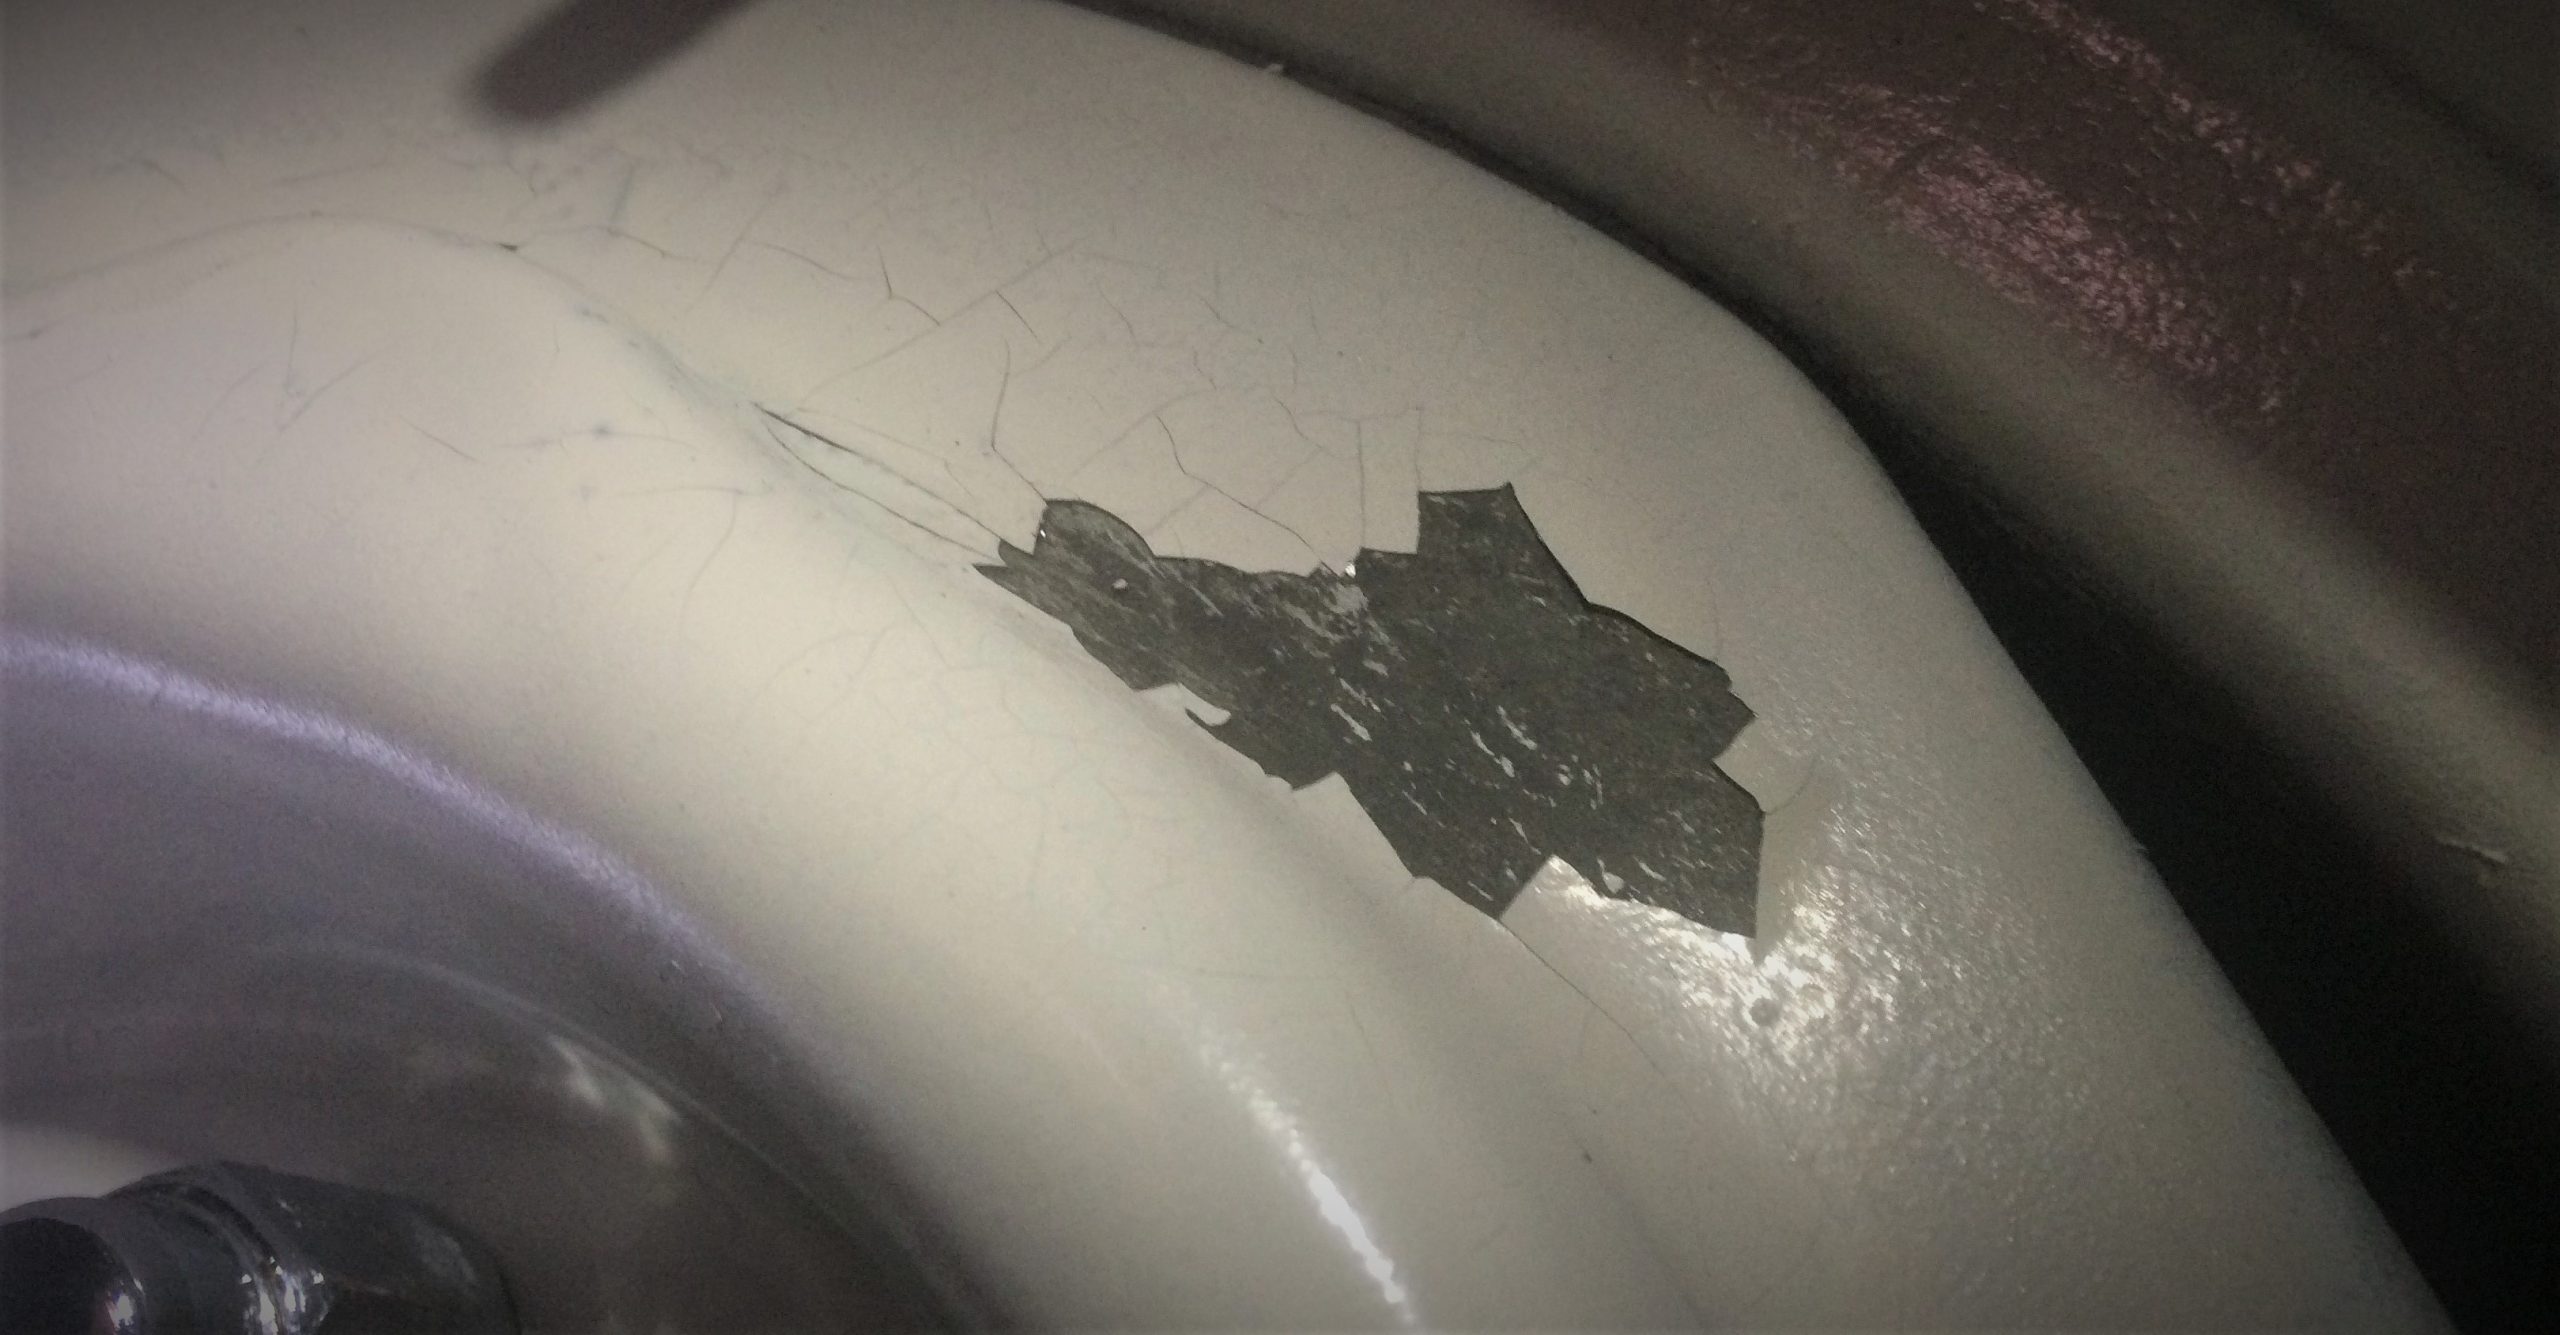
Hi any idea what has caused this picked the car up yesterday from the body shop now today this big crack has appeared
Hello. Maybe you can help me….I painted my engine with a non engine enamel paint. “Rust check” flat black. looks awesome but thinking now that it may be a problem. it went on thin but I wonder if it will turn grey? Didn’t give it enough thought.
Thanks for pointing out that film thickness is an important aspect of car paint that shouldn’t be overlooked. I’m thinking about getting a car paint correction service soon because paint near my tires have been getting flaky as of late. I hope that this is just an isolated case and is not the same as the more prominent parts of my car.
[…] But what if you did follow all these steps, yet the end result is not that great? […]
Amazing article. Can use this time and again as a perfect reference guide. Even if you haven’t had these problems it’s a good reminder to do what things properly in order to not have any of these issues. Although I’ve not had hardly any problems, it’s all to obvious that it can happen. Thanks for the attention you have put into this. I’m sure many will find that it will save them lots of time and trouble.
[…] to car paint, a clear coat must be applied properly. If not, it won’t hold on to the paint and after a while, you will start seeing patches on the […]
Question
I used a primer and thought the ratio was a 2 to 1 mix. I misread the can and it was a 1 to 1 mix. Its still a lil but soft but its drying. Should this be ok?
Can you just add more to correct the 2:1 ratio mix to make it 2:2?
I painted my 1988 gmc 5/17/22 with basecoat clearcoat very nice gloss but in has a uniform sandy look under the basecoat lve never seen this before what did I do wrong?
What causes sandy unform look and feel under the basecoat clear-cut it has a nice gloss but sand under neath it?
It’s really helpful for me.
And very easy way expressed.
That was very helpful, thanks!
I mixed 4 to 1 hardener to clear (finish coat) lm dyslexic. How fo I fix my sticky mess.