


Cars are filled with stuff that can make or break performance. The engine needs to be fed the proper amounts of air, fuel, and spark. The suspension and brakes must be in tip-top shape. The wheels and tires, transmission, cooling system, gauges—even the seats—must all function properly.
With all those things to worry about, many enthusiasts overlook the electrical wiring system. A lousy wiring job will keep your electrical accessories from operating at full potential—and that means subpar performance.
Many people are intimidated by the prospect of wiring a vehicle. But a proper wiring job doesn’t have to be a scary task—we’ve put together a few tips to help make the job a little bit smoother.
Round Up The Right Tools
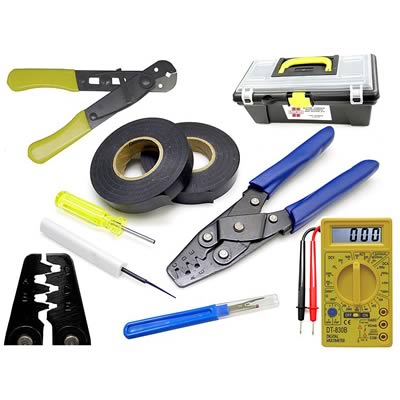
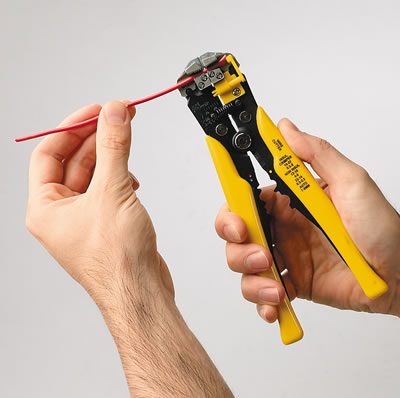
The proper tools will make your wiring job a whole lot easier. Start with a quality set of wire strippers. Wire strippers generally include a group of holes to fit most wire gauges. This allows you to strip the insulation off your wires without accidentally cutting into the wire conductors.
A good wire crimper is necessary when you install solderless connectors. Most quality crimpers have two or three sections on the nose to fit various lug sizes. You can even get crimpers with wire cutting and wire stripping sections.
A soldering iron is a must for splicing wires or securing oversized connectors that cannot be crimped. You will need solder designed specifically for electronics and wiring . It has a midly activated rosin core flux to clean the wire as it is being heated, removing oxidation and light corrosion. That allows you to solder with less heat, making the connections stronger with less electrical resistance.
Here are some other items that should be in your electrical toolbox:
- A wire brush for removing heavy corrosion, oil, or grease before soldering
- A volt/ohm meter to measure voltage and resistance levels in your circuits
- A test light to test for power within a circuit
- Shrink tubing to insulate connections from outside elements. The tubing slides over the connector or solder joint and permanently shrinks when heated
Gauge Your Wiring Needs
A factory wiring harness includes the necessary wiring for standard electrical components like windshield wipers, horn, headlights, etc. However, when you add electrical or electronic components to your vehicle, like high-end audio or racing electronics, you need to choose the proper wire on your own. There are three factors to consider: size, material, and color.
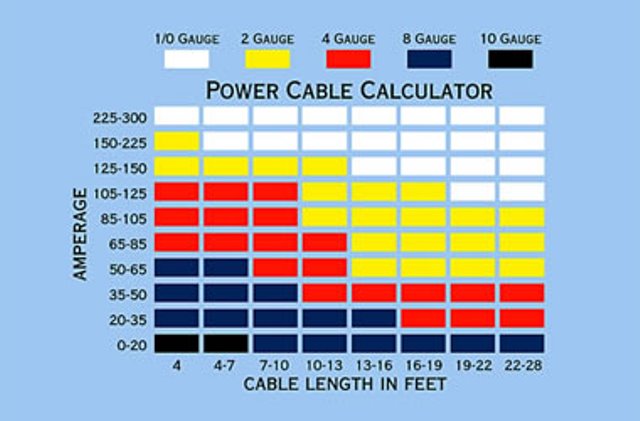
Wire size is measured by gauge—the smaller the gauge number, the larger the wire. The gauge you need depends on the current draw of the accessory and the wire length between the accessory and the power source. In general, the larger the current draw, the larger gauge wire you need to properly power the accessory.
Wire Gauge to Wire Diameter Comparison Chart
| Wire Gauge (AWG) | Wire Diameter (Inches) |
|---|---|
| 4-0 | 0.460 |
| 3-0 | 0.409 |
| 2-0 | 0.364 |
| 0 | 0.329 |
| 1 | 0.289 |
| 6 | 0.162 |
| 8 | 0.128 |
| 10 | 0.101 |
| 12 | 0.081 |
| 14 | 0.064 |
| 16 | 0.050 |
One factor to consider with long lengths of wire is voltage drop. The longer the wire, the greater the voltage drop. You can offset voltage drop by increasing the size of the wire. As a rule of thumb, try to maintain a less than .5% voltage drop to assure maximum performance.
Wire material is usually aluminum or copper. For automotive purposes, we recommend stranded copper wire for the greatest flexibility and conductivity.
Wire color may not seem important at first glance, but it becomes crucial when you try to trace a faulty circuit down the road. To keep yourself from tearing your hair out, color-code your wire by accessory. It will help you keep track of which wire goes where during installation and troubleshooting.
Make the Connection
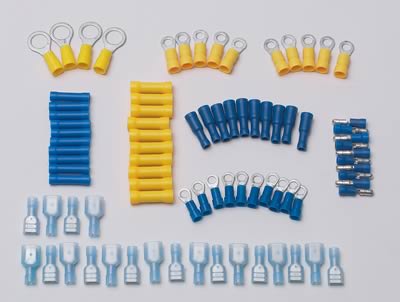
There are two main types of connectors: soldered and solderless. Soldered connectors are necessary with oversized wiring or if you’re splicing wires together. Solderess, or crimp, connectors can be used for most other wiring, and we’d recommend using them wherever possible.
Solderless connectors are the easiest to use and provide a good, strong connection. Usually, solderless connectors come with color-coded insulators, so you know which gauge wire they are designed for. Solderless connectors come in a variety of configurations:
Butt connectors are shaped like cylinders and are ideal for joining two wire ends together. A wire end is inserted into each end of the connector, which is crimped to complete the connection.
Spade connectors are ideal for components that are removed or serviced often. A male connector on one end of the wire fits into a female connector on the other end of the wire, completing the connection. To disconnect, just pull the connectors apart.
Ring connectors are used to secure wire to screw-type terminals; they are secured by the terminal screw.
When installing any type of connector—soldered or solderless—it is a good idea to use shrink tubing. Shrink tubing is relatively easy to install and provides added protection against electrical shorts and outside elements.
Choose the Right Components
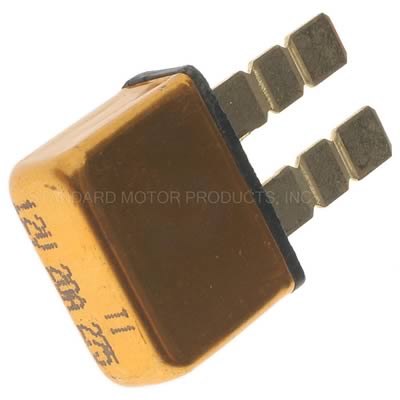
There is more to wiring a vehicle than, well, wire. For example, you will need some sort of overload protection to protect your expensive electronics. The three basic types of overload protection are fuses, fusible links, and circuit breakers:
- Fuses are designed to blow when the circuits they protect are fed more power than the fuses are rated for. Fuses are rated by amperage; popular sizes are 3, 4, 5, 6, 7.5, 10, 12.5, 15, 20, 25, and 30 amp. Always use a fuse rated slightly higher than the accessory. For example, if an electric fan is rated at 19.5 amps, use a 25 amp fuse.
- Fusible links are another option. They are special wires made from an alloy with a lower melting point than regular copper wire. The link is spliced inline with an accessory’s power wire. In the event of an electrical overload the link will melt, preventing power from reaching the protected accessory.
- A circuit breaker will switch off power to the protected accessory in an overload situation. When the overload has been corrected, the circuit breaker is reset. Circuit breakers come in manual reset and automatic reset versions, and in the same popular amperage ratings as fuses.
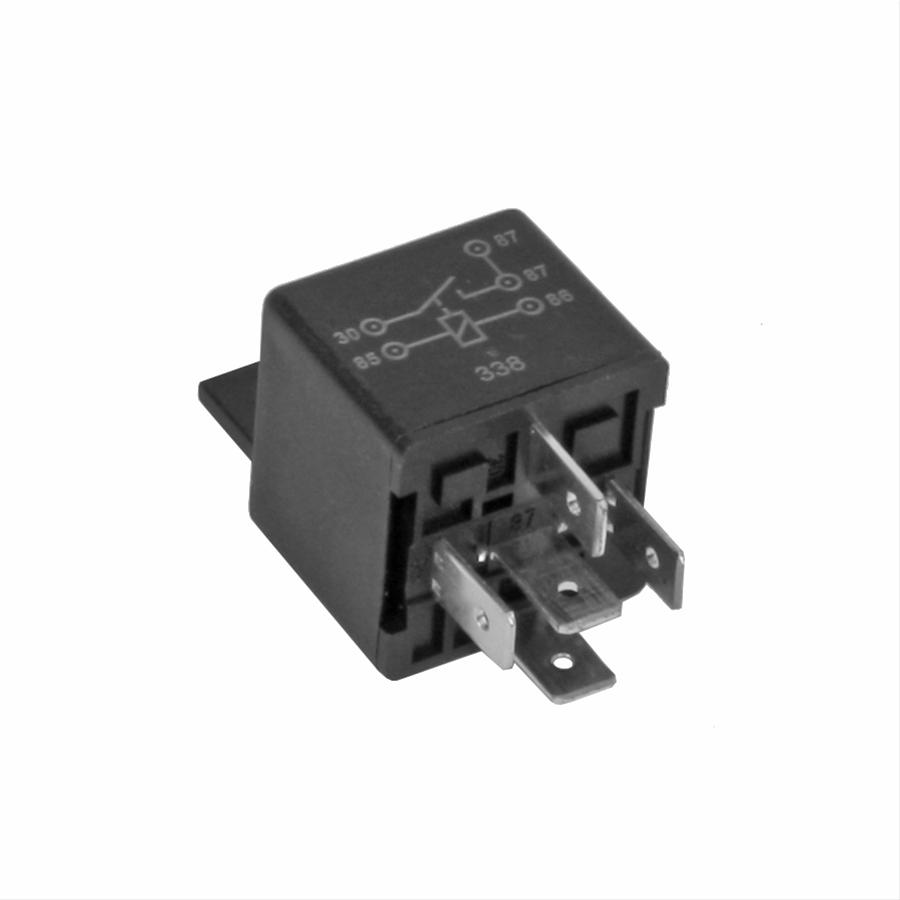
You should also install relays with your wiring if your electrical accessories require a bigger current draw than a standard power switch is rated to handle. And since most switches are designed to work with very limited currents, relays are required just about every time to wire a new aftermarket electrical accessory.

Relays are extremely useful for handling high-amperage electrical accessories like large electric fans, fuel pumps, and HID headlights. They are activated by an electric coil and controlled by a switch. When the relay is closed, no power goes to the accessory in question. When you flip the accessory switch, an electric coil in the relay opens, sending power to the accessory.
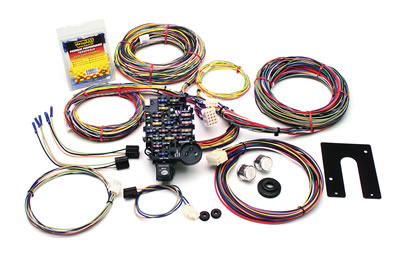
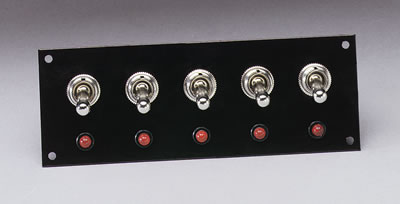
There are plenty of other products to make your wiring tasks easier, including switch panels, multi-circuit main and auxiliary fuse blocks, toggle, push-button, and remote-mount switches, and of course, wiring harnesses for everything from fog lights and gauges to complete vehicles.
Map Out a Plan
Before you begin your wiring project, map out a plan. Lay out the wiring or wiring harness so you know where each wire goes and that you have enough wire to complete the job. Locate the fuse box in an easy to reach location like your glove compartment or center console. Place the necessary relays, fusible link, or circuit breakers at connections between your power source and your electrical accessory.
If the wiring isn’t labeled already, label each wire or harness with the name of the components they route to. If the wiring or harness will be going through the firewall, use a grommet in the hole so the sheetmetal won’t cut through the wires. Don’t secure the connectors until the wiring is through the firewall.
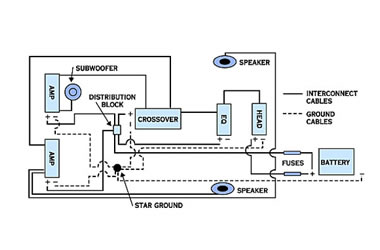
Choose a spot on or near the firewall for the common ground point for the harness, and one point for a chassis ground on the negative side of the vehicle. This method gives you a single path to the negative side of the vehicle and provides a more effective ground. Use 10 gauge or bigger wire to connect the common ground to your chassis ground.
Take your time, stay organized, remain calm, and you’ll be a wiring wizard before you know it!
“I had Prestige Motors build a 450 hp/383 sbc motor for me, I’m putting it in my 56 Chevy 2 door; my question is what’s the best correct way to upgrade my wiring? I had a 283 w/327 heads that I built in high school in 1974 so it has a ballast resistor, voltage regulator, 3 wire alternator; the new motor has an HEI distributor, 110 1 wire alternator, ac that I’ll convert w Vintage air at a later date. I’m also installing a Griffin cross flow radiator with condenser and electric fans. Aeromotive fuel tank w electric fuel pump and regulator. 85551- MSD Pro Billet Distributor 6425- MSD 6AL Series Ignition box W/Rev Limiter 8207- MSD Blaster SS, E core HP coil. 40,000 Volt”
Vaughn, we’d recommend you contact the Summit tech line at 330-630-0240. There will be a lot of back and forth questions, and this would be the best, quickest way to get your answers!
87 Honda Accord. Blew 70 amp fuse for battery can’t find one. Do I put the link in the positive wire
Always fuse the positive side.
I tried to quick charge my PT Cruiser, by using my 65 Bsrcuda running battery, now neither car battery will turn over each, what did I do?
Charge a battery with a mains charger – not another battery.
[…] lower the number, the bigger the wire. Bigger wires handle more current (amp) draw. Check out this cable calculator chart to learn […]
Sir! I have a question… I am directly wiring a 10 watt LED strip to a wire where a 4 watt bulb once was (underneath the dash…)
This under-dash factory lighting system has a 10 watt fuse, do I simply “upgrade” the fuse in the system by inserting a 15 or will that compromise the other lighting connected to that circuit/fuse
So far no one has been able to answer this and nobody seems to want to wire their led’s to pre-exsisting factory circuits…
my main aim is to get it to work in tandom with the cab dome light and for the doors to switch them on when opened…
Hey Philip, first off DO NOT simply install a higher rating fuse. The fuse is there to protect your wiring harness and the fuse rating (in amps, not watts) was specifically chosen by the engineers for that circuit.
We think you may be in luck with your project however. LEDs can often require less current (amps) than a traditional incandescent bulb. It’s entirely possible that your 10W LED actually pulls less current than the OE 4W incandescent bulb–even though it has a higher wattage.
The only way to be sure though, is to test your LED’s current draw using a multimeter. Its a relatively easy process. If you’re unsure how to do it, we found this handy tutorial here. Don’t have a mulitmeter? They’re relatively cheap and a must-have if you’re doing any electrical work.
If you’re hesitant to cut up your original wire harness, companies make LEDs with traditional bulb sockets (194, bayonet, etc.) that will install just like the original incandescent.
I kind of have a complicating situation. So the easiest way to go about this is to start at the beginning. I’ll make this as short as possible. Boyfriend was driving my 2001 Infiniti QX4 on the freeway, notices lights start blinking and truck is overheating. He pulls over at a convenience store. Waits a bit, Puts water in. Tries driving again and ends up having to park it on side of road cause he noticed the fan has completely come off the pulley bracket. Belt is off. Blew a hole in radiator. I have it towed home next day, get in contact with a mobile mechanic he comes out and diagnoses it. $50. Tells me what I need to get, so I purchase a new radiator, an electric fan, a new bracket, and a wiring kit to engage the electric fan. Pay the mechanic $300 to come install it all. Does it all in about an hour. Calls me at work, tells me it all works, everything is good. But thing is, is that my truck battery was dead from having everything disconnected. He never drove it afterwards or anything. I drive my truck next day everythings fine. Next day, I get on freeway and it starts getting hot. And rising. My neighbor takes a look at it cause it’s no longer starting right, starts rigging shit, cutting all the wires on the fan wiring kit, electrical taping shit, next thing I know it’s all ghetto. After all this I take a look under the hood, notice the battery wires are connected super bad, if barely at all. I get new 2 way battery cable connector things for both + and -, have to cut the cables and twist the thick gauged wires as much as I can in order for them to fit in the metal connector things. Then I notice that 2 wires that are striped red and white wrapped and connected into one (which I’m guessing are + and – which I also think are the acc wires but I’m not too too sure,) have been exposed and the red plastic connector has been completely taken off which was connecting those wires to the + battery cable. So now I had to souder those 2 wires (which were just stubs and couldn’t be held by the cable wire connector into the cable connector) in order for me to complete the connection to the + battery cable. But now it seems like the whole battery issues is worse. The jump starter I bought to jump it every time I have to start my vehicle gets drained now and sometimes it struggles to turn over. At times it doesn’t at all. I am waiting for my paycheck to purchase anything I need to get cause I’ve kind of lacked the proper things I need and I’ve put a lot of money into this already. I don’t trust anybody else to screw with it. If I can do this myself I will. I’m pretty knowledgeable of vehicles. I’m not a pro or anything but I know a little more than basic common stuff regarding vehicles and I’m usually a good troubleshooter for a girl. Please tell me what’s wrong and what to do!! And why I’m having such battery issues. Another couple things to help with what you think it could be, when I start my truck I can smell the sulfuric acid when I’m outside and through the a/c vents. Also, when my truck is idling or at a stop my a/c goes warm instantly and it’s only cold when I’m actually in motion. And as of the past few days all the dash lights and the battery light stay on while driving and at night when I’m using my headlights they go haywire and flicker on and off. Sometimes I have to physically go hit the front head light for it to kick on but then the other one goes out. Please help!! I’m about to sell this thing or start breaking it with a hammer. I’m fed up.
It appears there are a few things that may be going on here, you likely need a new battery and im betting there is an alternator issue.
Gentlemen,
My fuse block has the barrel glass fuses. I want to add a voltage gauge. I’ve grounded the gauge and its light ok,but my fuse panel is full- thus nowhere to plug the other two wires (light and power). How can I do it?
I remember decades ago, there was a connection available that saddled one end of the fuse and had a spade on its top side that one simply plugged in the wire for the power. I can’t find them anywhere. Thanks for your help. John
I have a unique situation. The key is stuck in the vehicle steering wheel. Got damaged when the children were playing and knocked the key crooked. I’m old school and tired of having to unplug the car after driving and plugging it up on cold days. I live in Michigan. I want to know how to put an old school toggle switch or a relay in the impala to cut the power from the battery to everything else without going under the hood. Thanks for any help given.
Assuming here that you don’t really want the starter isolated. The starter doesn’t draw any current until the starter wire is energised anyway.
Cut the wire that goes from the battery to the fuse box.
Connect the hot side (12V from battery) to the 12V input and the switch/coil input. Run a wire from the switch/coil ground (-ve) to the toggle swtich and wire the other side of the toggle switch to ground.
Connect the wire that goes to the fuse box to the 12V output / relay output pin.
You will need a relay that can handle the total draw of your electrical system. Easiest thing is to go off your alternator rating and double it.
Typically 4 pin relays have pins 85 and 86 for the coil input and output and power input pin 30 and power out pin 87. in my above example pin 30 and pin 85 would be wired together
May I use a batt operated auto jumper on me car batt cables to test wiring???
It was interesting to read that relays handle high-intensity parts of cars like HID headlights. My uncle has been wanting to rebuild a car but he’s got no clue as to what he’s doing with the electrical side. I’ll suggest he go talk to a professional for some help.
[…] Download Image More @ http://www.onallcylinders.com […]
Hi
I want to run wire for my auto stereo install under my truck, I have a 2010 f150.
I will be running a piece of 0/1 guage wire, 3 sets of rca interconnects, a blue wire to turn my amps on, 4 set of speaker wire.
I also want to run a 4 guage power wire to my box as well as the video wire for my back up camera.
How hard is it to remove the rocker panel covers where the wires are usually installed and replace the covers. One guy I talked to said he had a tough time getting them back on and they are still not right.
What are the best products to run the wires in when running them under the vehicle.
Thanks in advance
John
Is there a reason you want to run them under the vehicle the back up cam I understand but not so much the amp and radio stuff, you can do a clean professional install running such wiring under the carpet.
Thanks for pointing out that circuit breakers can reset manually and automatically depending on the type. I’m currently looking for a mobile truck repair service because I’ve been having problems with the electrical components of my truck and I’m afraid that if I try to troubleshoot it on my own, I might end up damaging it further. I hope I can find a repair service that will be able to diagnose and make repairs on the same day so I can save a good amount of time.
I have a 1989 E150 Ford Club Wagon. The wiring was trashed. I ran Positive Battery cable to solenoid. Negative batt cable to ground. One on body panel and one on engine block. I ran wire from solenoid to Ign switch (going through neutral safety switch) ran starter cable from neg side of sol straight to starter. When I short the sol I get the starter to turn. When I turn the key I get nothing. I have a new starter switch and key cylinder installed. Why can’t I get it to turn over?
[…] Automotive Wiring Basic Tips Tricks & Tools For Wiring Your Vehicle. onallcylinders.com […]
[…] Here’s a handy primer on automotive wiring that may help. […]
I’m doing a complete rewire on my ’66 MGB. An stock replacement harness has four glass fuse, total! A prefab performance harness is Megabucks. I want to use Weatherpak connectors but the Weatherpak crimping tool is really expensive. Is there a much less costly alternative?
Where does BPube wire connect?
[…] Confused about automotive wiring in general? This article can help clear things up: Automotive Wiring 101: Basic Tips, Tricks & Tools for Wiring Your Vehicle […]
I need to replace the wire located between the starter solenoid and (OEM) glow plug relay. I’m replacing the glow plug relay that is rated at 200 amps. The original wire is 6 gauge with two fusible inks attached at the end of the wire that goes to the starter relay. The connected wire is a constant hot wire. When tested, the wire showed no voltage. So, wondering what size wire and fusible link wire would I need for this new relay.
Okay guys this is the project I’m working on I have a 2007 Volkswagen rabbit four-door 2.5 l motor it’s 5 cylinder and the transmission for that out of my old rabbit. (I previously wrecked this rabbit in between two barriers on the highway concrete barriers that I thought that I could fit through because I had to make an emergency decision turns out I got squished like a pancake but save the motor and the transmission from all damage).
I bought a 2006 Volkswagen GTI body two door with the sunroof and it originally came with the 1.8 turbo motor in it but that was gone when I got the car so I am transplanting my 2.5 l 5 cylinder into this bad boy cuz it fits perfectly but my only hang up is wiring harness the computers are different and they use different size connectors but very similar now I have all the original wiring for both vehicles I’ve already tore out the rabbits wiring harness completely in one piece and I’m eager to get this put in properly to the GTI body but I don’t know where to begin and what I need to know if there’s anything to splice or if I need to trace back every single wire where it goes very confusing and someone can guide me and show me where to start at least to help me get this project done I need to get it done in a few days much appreciated thanks for the education guys