There’s a persistent narrative out there that bolt-on performance parts for the Jeep 4.0L engine just don’t work. That’s not true, you just have to manage your expectations. The problem is that because the 4.0 is a low-revving, low-end torque biased design, the power gains from individual parts can be underwhelming—we’re talking low single digits for the most part. Throwing all the available bolt-on parts at a stock 4.0L should net roughly 15 horsepower and 15 lb.-ft. of torque to the rear wheels, assuming the engine and transmission are healthy.
While that may not sound like a lot, let’s put it into perspective. A strong running four-wheel drive XJ Cherokee with the high output engine rated at 190 horsepower and 225 lb.-ft. of torque paired with the robust, but power-sapping, AW4 automatic like our project, should put around 135 hp and 160 lb.-ft. to the tires. This is using the common assumption of around 29% loss.
If we were to increase that rear wheel power to around 150 hp and 175 lb.-ft. of torque across the same rpm range (about 212 hp and 246 lb.-ft. at the crank), the result will be noticeable.
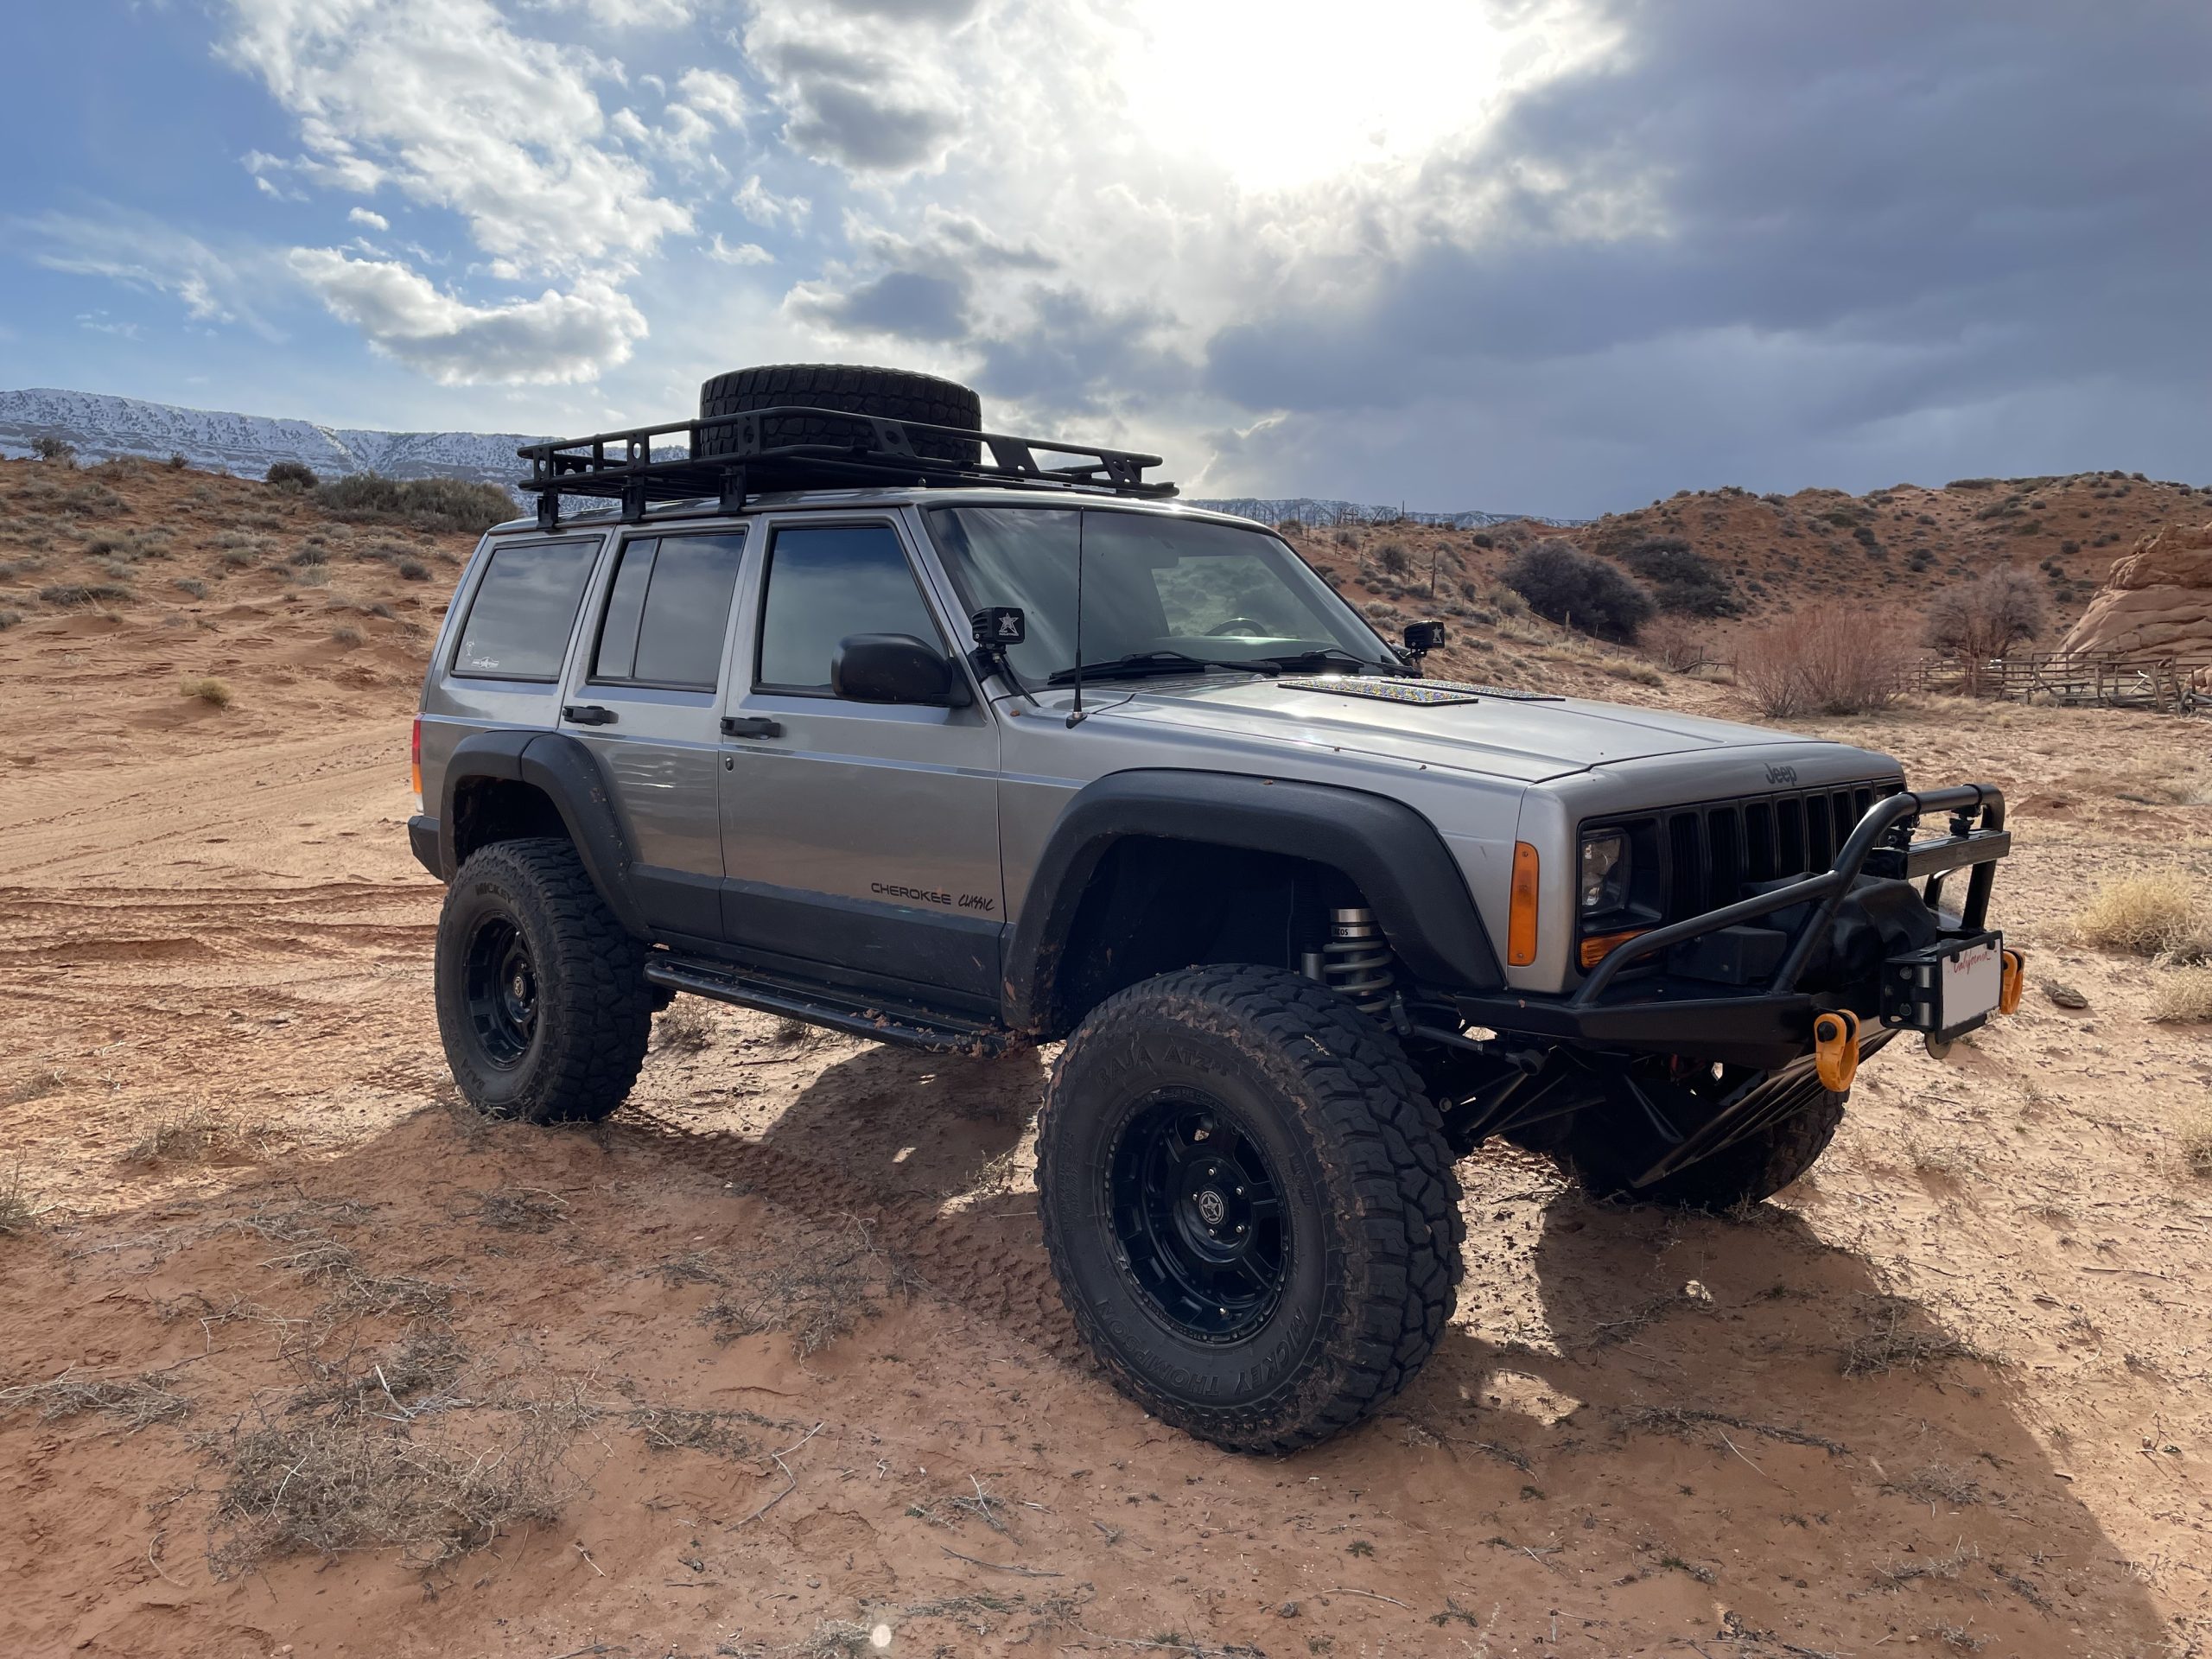
In any case, our goal here isn’t wrapped around peak horsepower or torque numbers. In fact, we don’t care what they are. We’ve added weight, height, aero drag, and rolling resistance to our Cherokee with off-road equipment, a lift, steel off-road bumpers, a roof rack and 33 inch tires, so what we’re after is a stronger and broader low to midrange power band that will improve off-road performance, allow us to cruise more comfortably at freeway speeds, and hopefully gain a few points of mpg.
We’ve also noted that our Cherokee has lost some power and mpg, so we suspect a clogging catalytic converter. Might as well make some improvements if we have to replace parts!
A Recipe for Making Power in a Jeep 4.0L Engine
For best airflow in and out of an internal combustion engine, ideally you want smooth, wide-open bores with as few bends as possible, and any bends should be as gentle as possible. An easy way to think of this is that air basically flows like water—it hates disturbances, squeezes, and sharp corners. While modern intake and exhaust system components have become much more optimized from the factory, our Cherokee has room to improve.
The key thing to remember is that an engine is a big air pump and, in stock configuration, they seldom have all the air they can use. In naturally aspirated form, only the vacuum created by the pistons moving down on the intake stroke draws air in, and only the piston moving upward on the exhaust stroke pushes it out. When air is easier to pump in and out via less flow restriction, the result is lower pumping losses (the power it takes to draw air against a restriction). In the case of tuned intake and exhaust systems, we also get the advantage of length and diameter tuning of the intake plenum and exhaust manifold to increase power.
To realize these gains, our plan is to throw the usual suspects at our Cherokee, including a tuned and free flowing exhaust with smooth mandrel bends and a free-flowing muffler, upgraded catalytic converters, and an improved air intake plenum that minimizes disruptions to achieve laminar air flow into the throttle body.
We know all this basic theory works well with high output muscle car and hot rod engines, so let’s see what we can do with the relatively low output 4.0L in our Cherokee!
Jeep Cherokee XJ 4.0L Exhaust & Air Intake Upgrade Parts List
Banks Power TorqueTube Exhaust Manifolds – GBE-51306
MagnaFlow California Grade CARB Compliant Direct-Fit Catalytic Converter (Y-pipe for EFN 2230) – MPE-447190
MagnaFlow California Grade CARB Compliant Direct-Fit Catalytic Converter (Rear for EFN 2230) – MPE-447224
MagnaFlow Universal Catalytic Converters (Y-pipe for EFN 2130) – MPE-444504
MagnaFlow Universal Catalytic Converters (Rear for EFN 2130) – MPE-441005
MagnaFlow Street Series Performance Exhaust Systems – MPE-16464
aFe Momentum ST Pro 5R Cold Air Intake Systems – AFE-54-46209
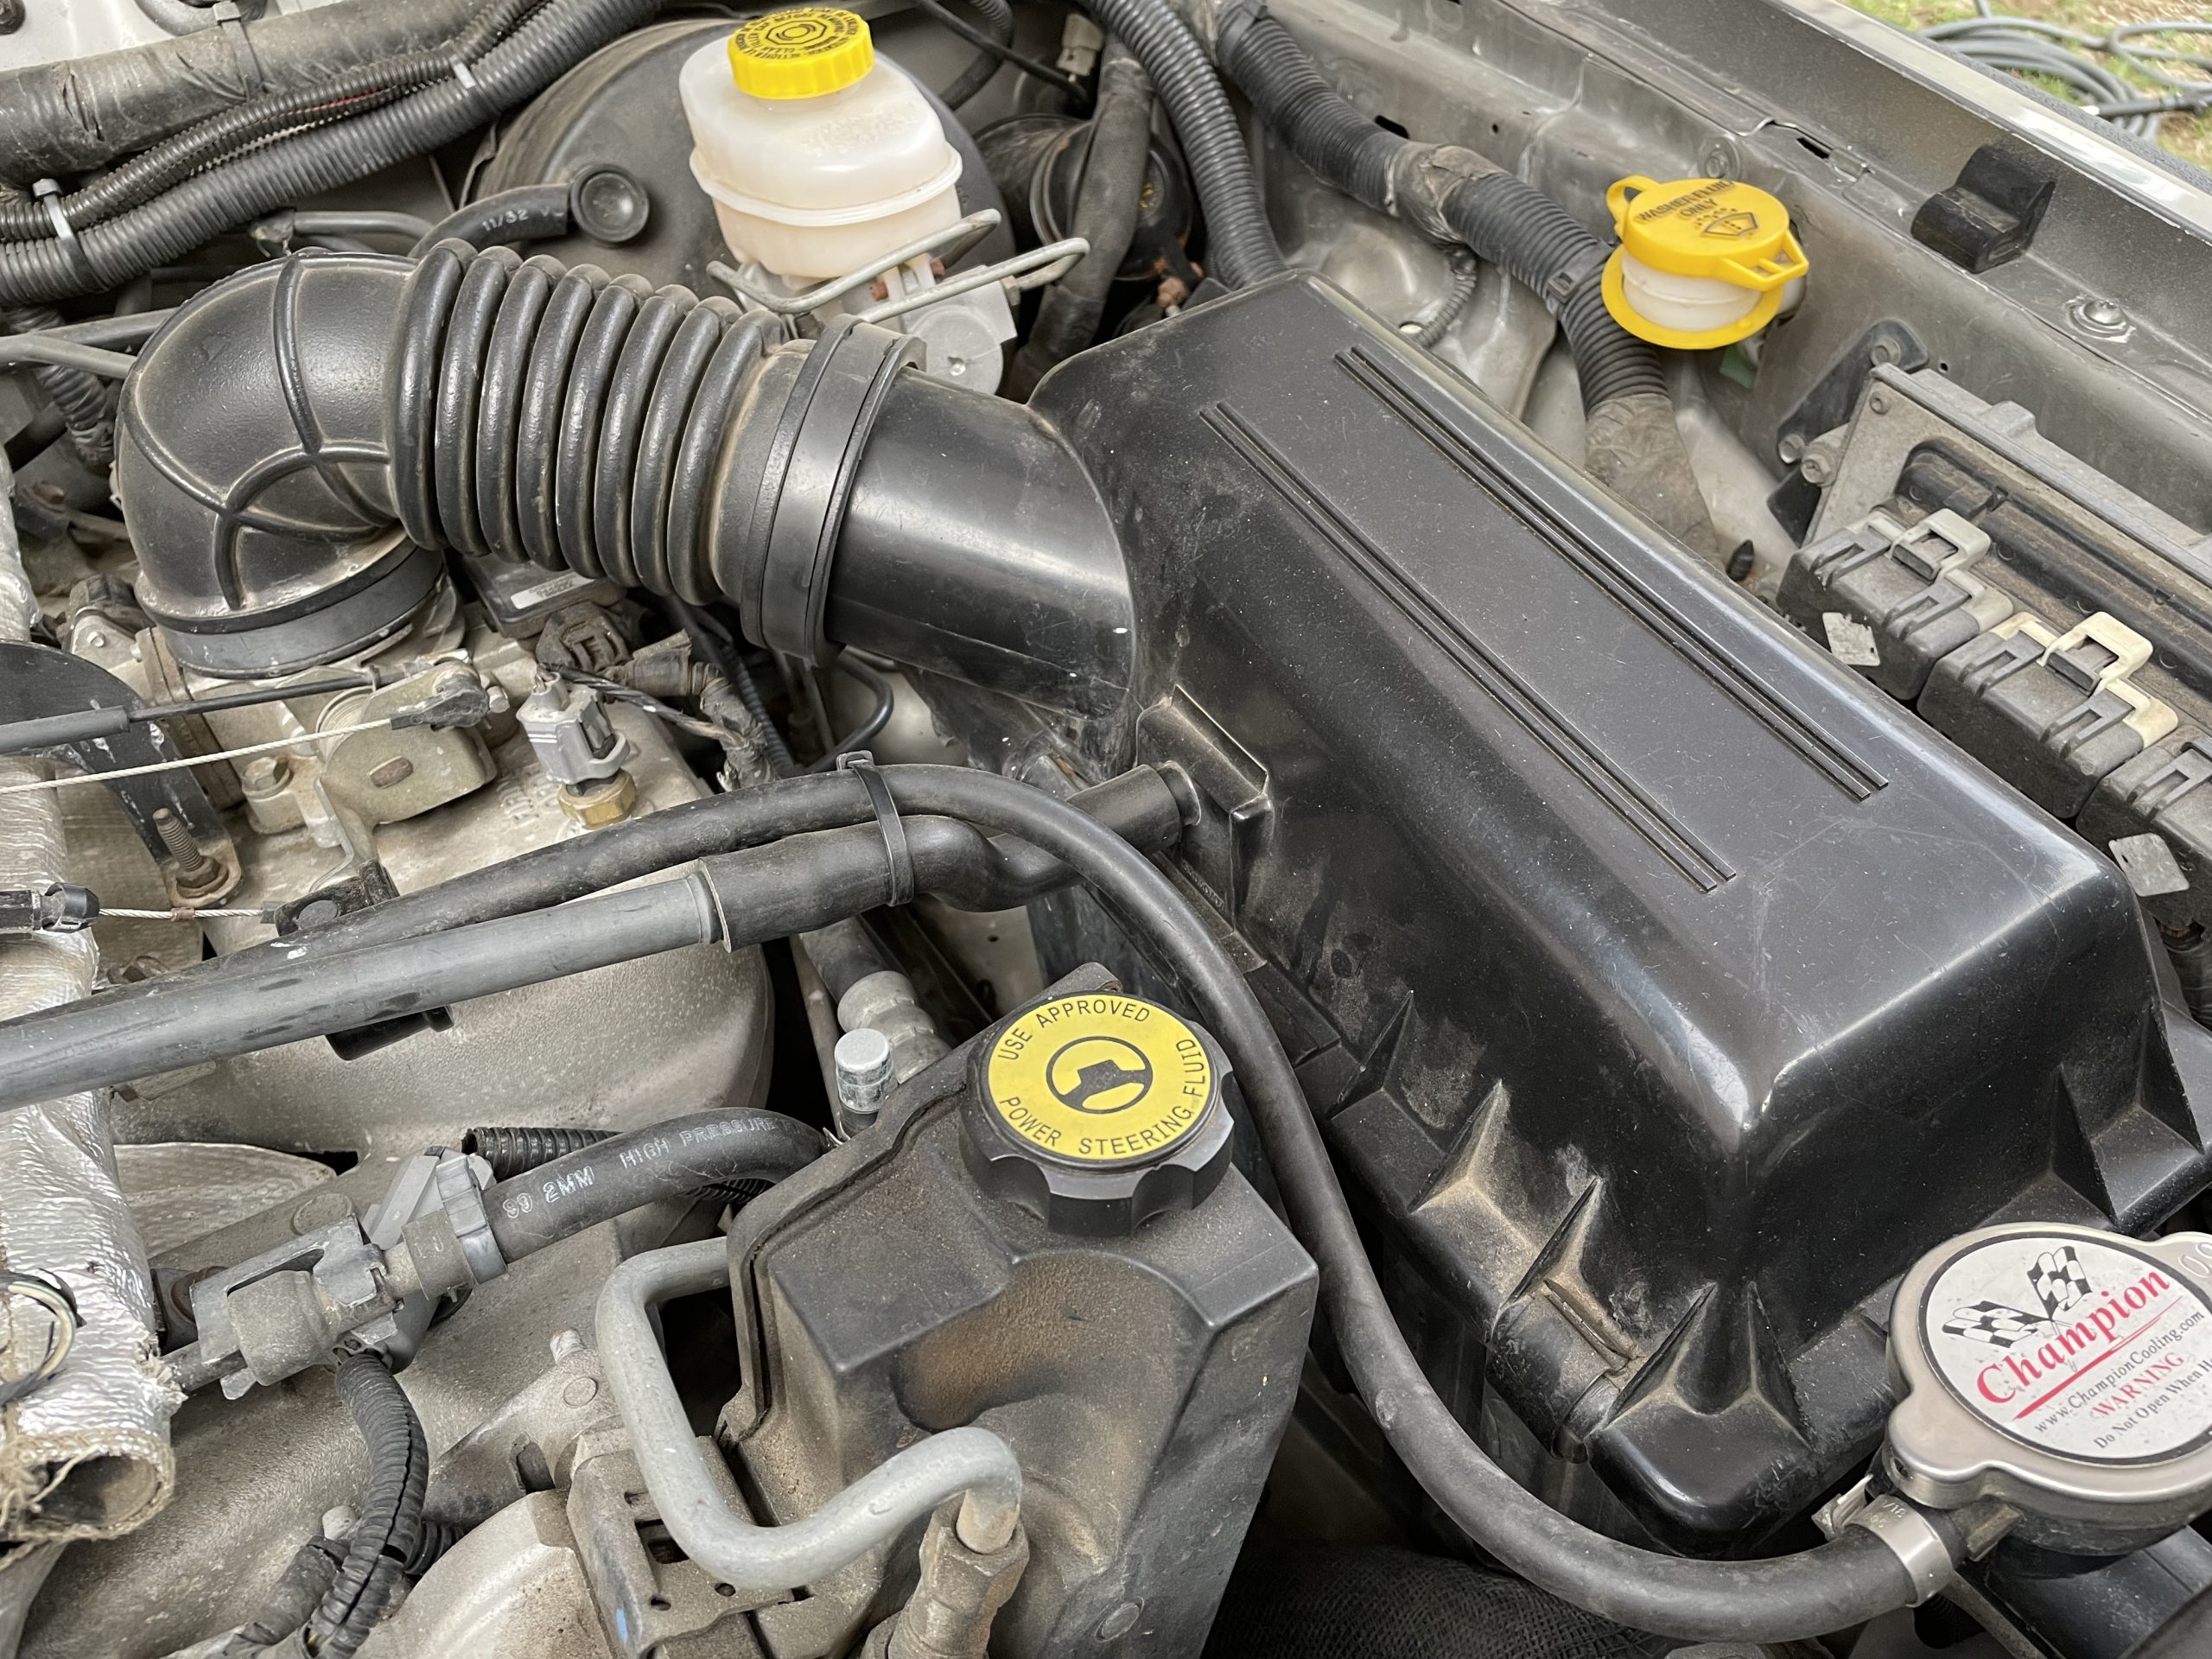
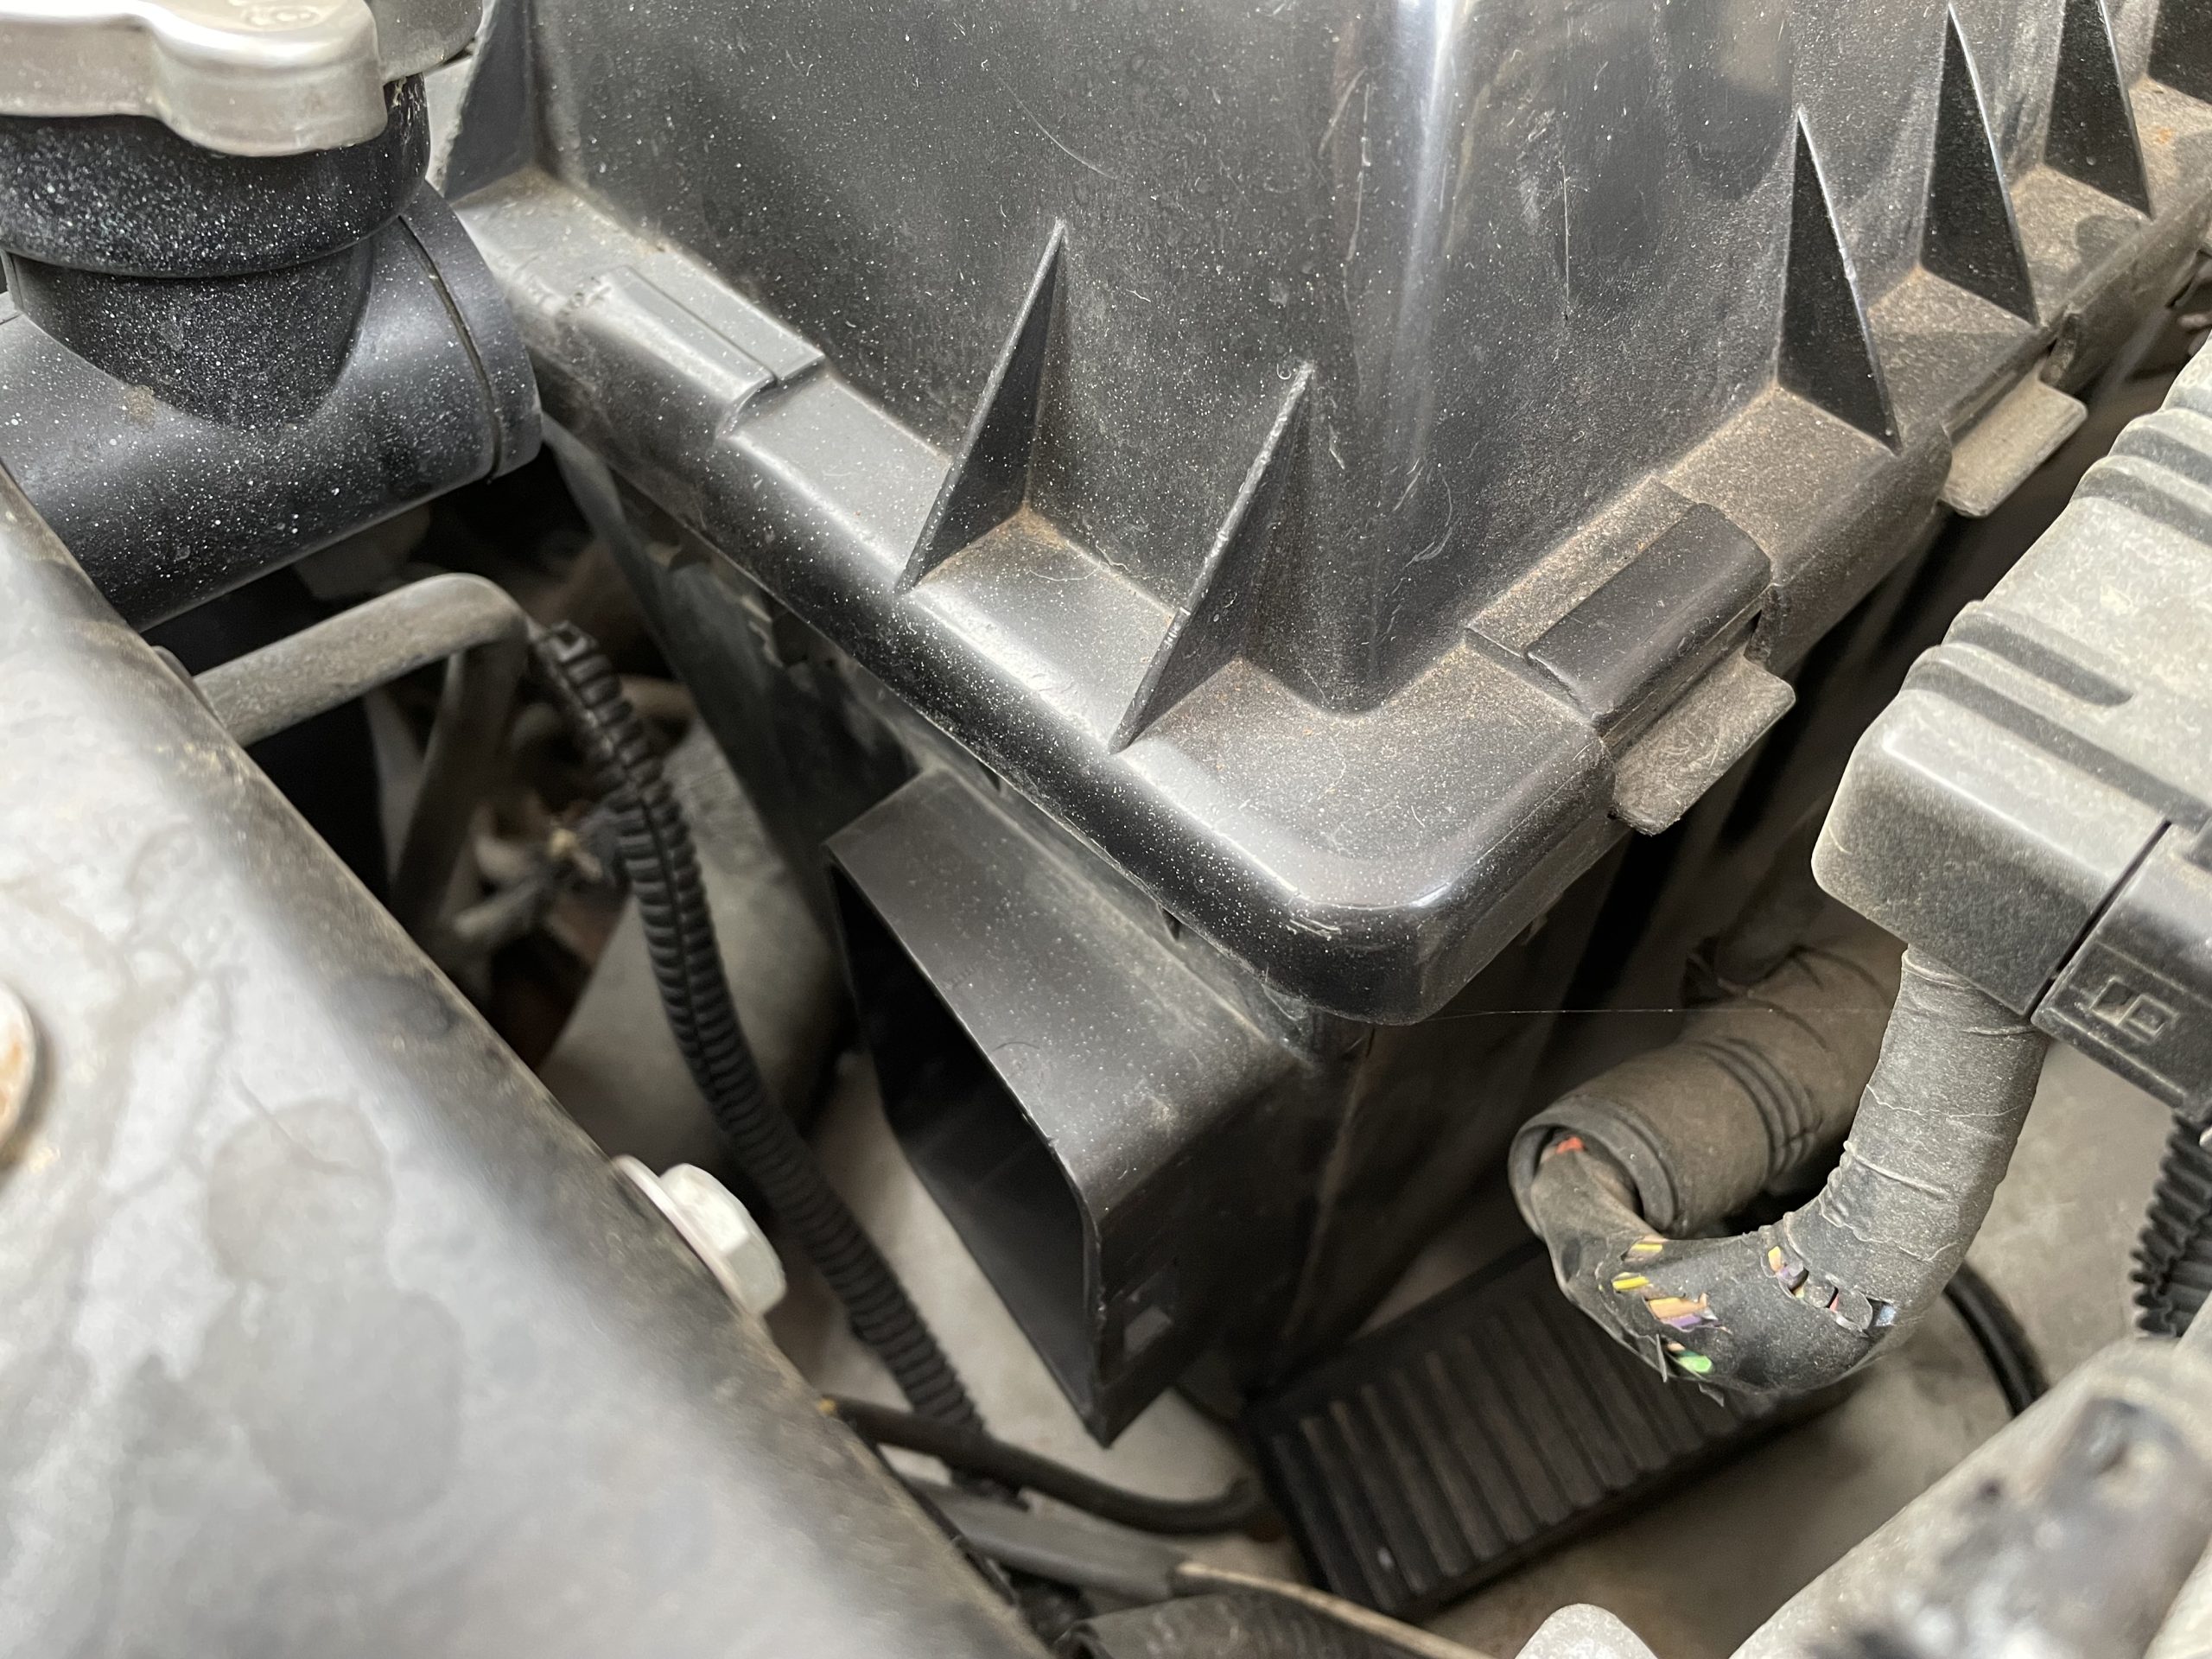
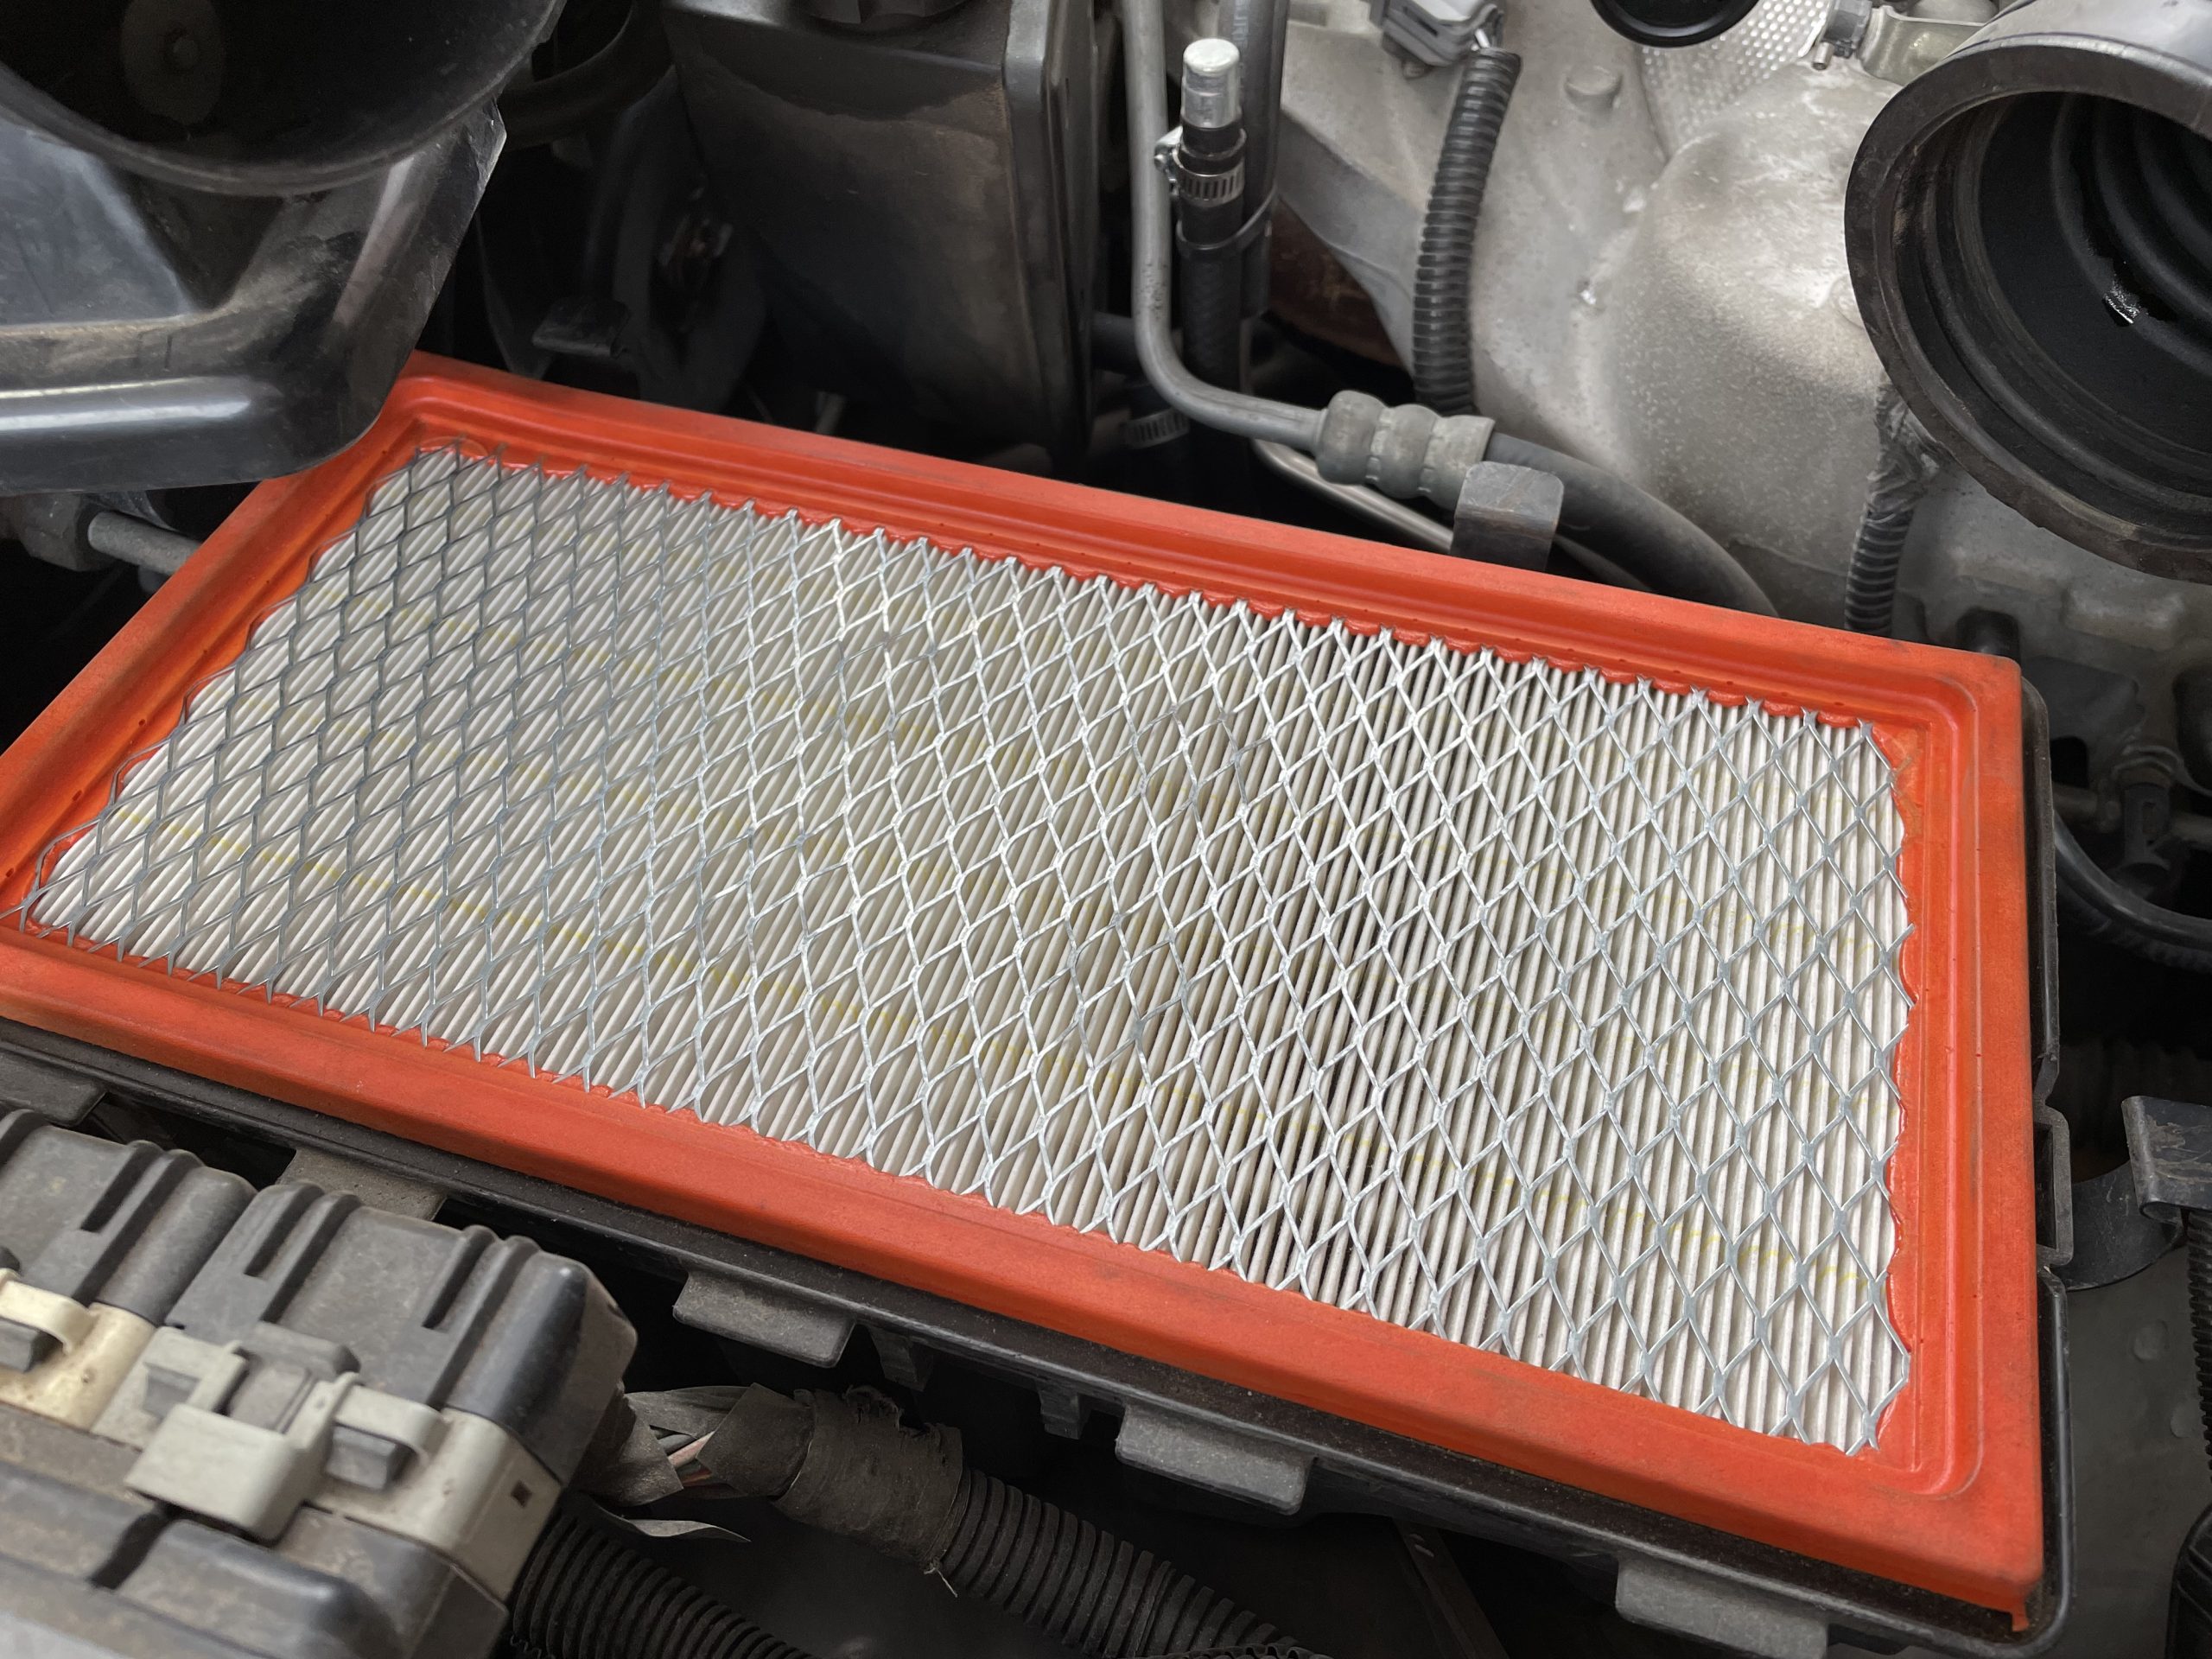
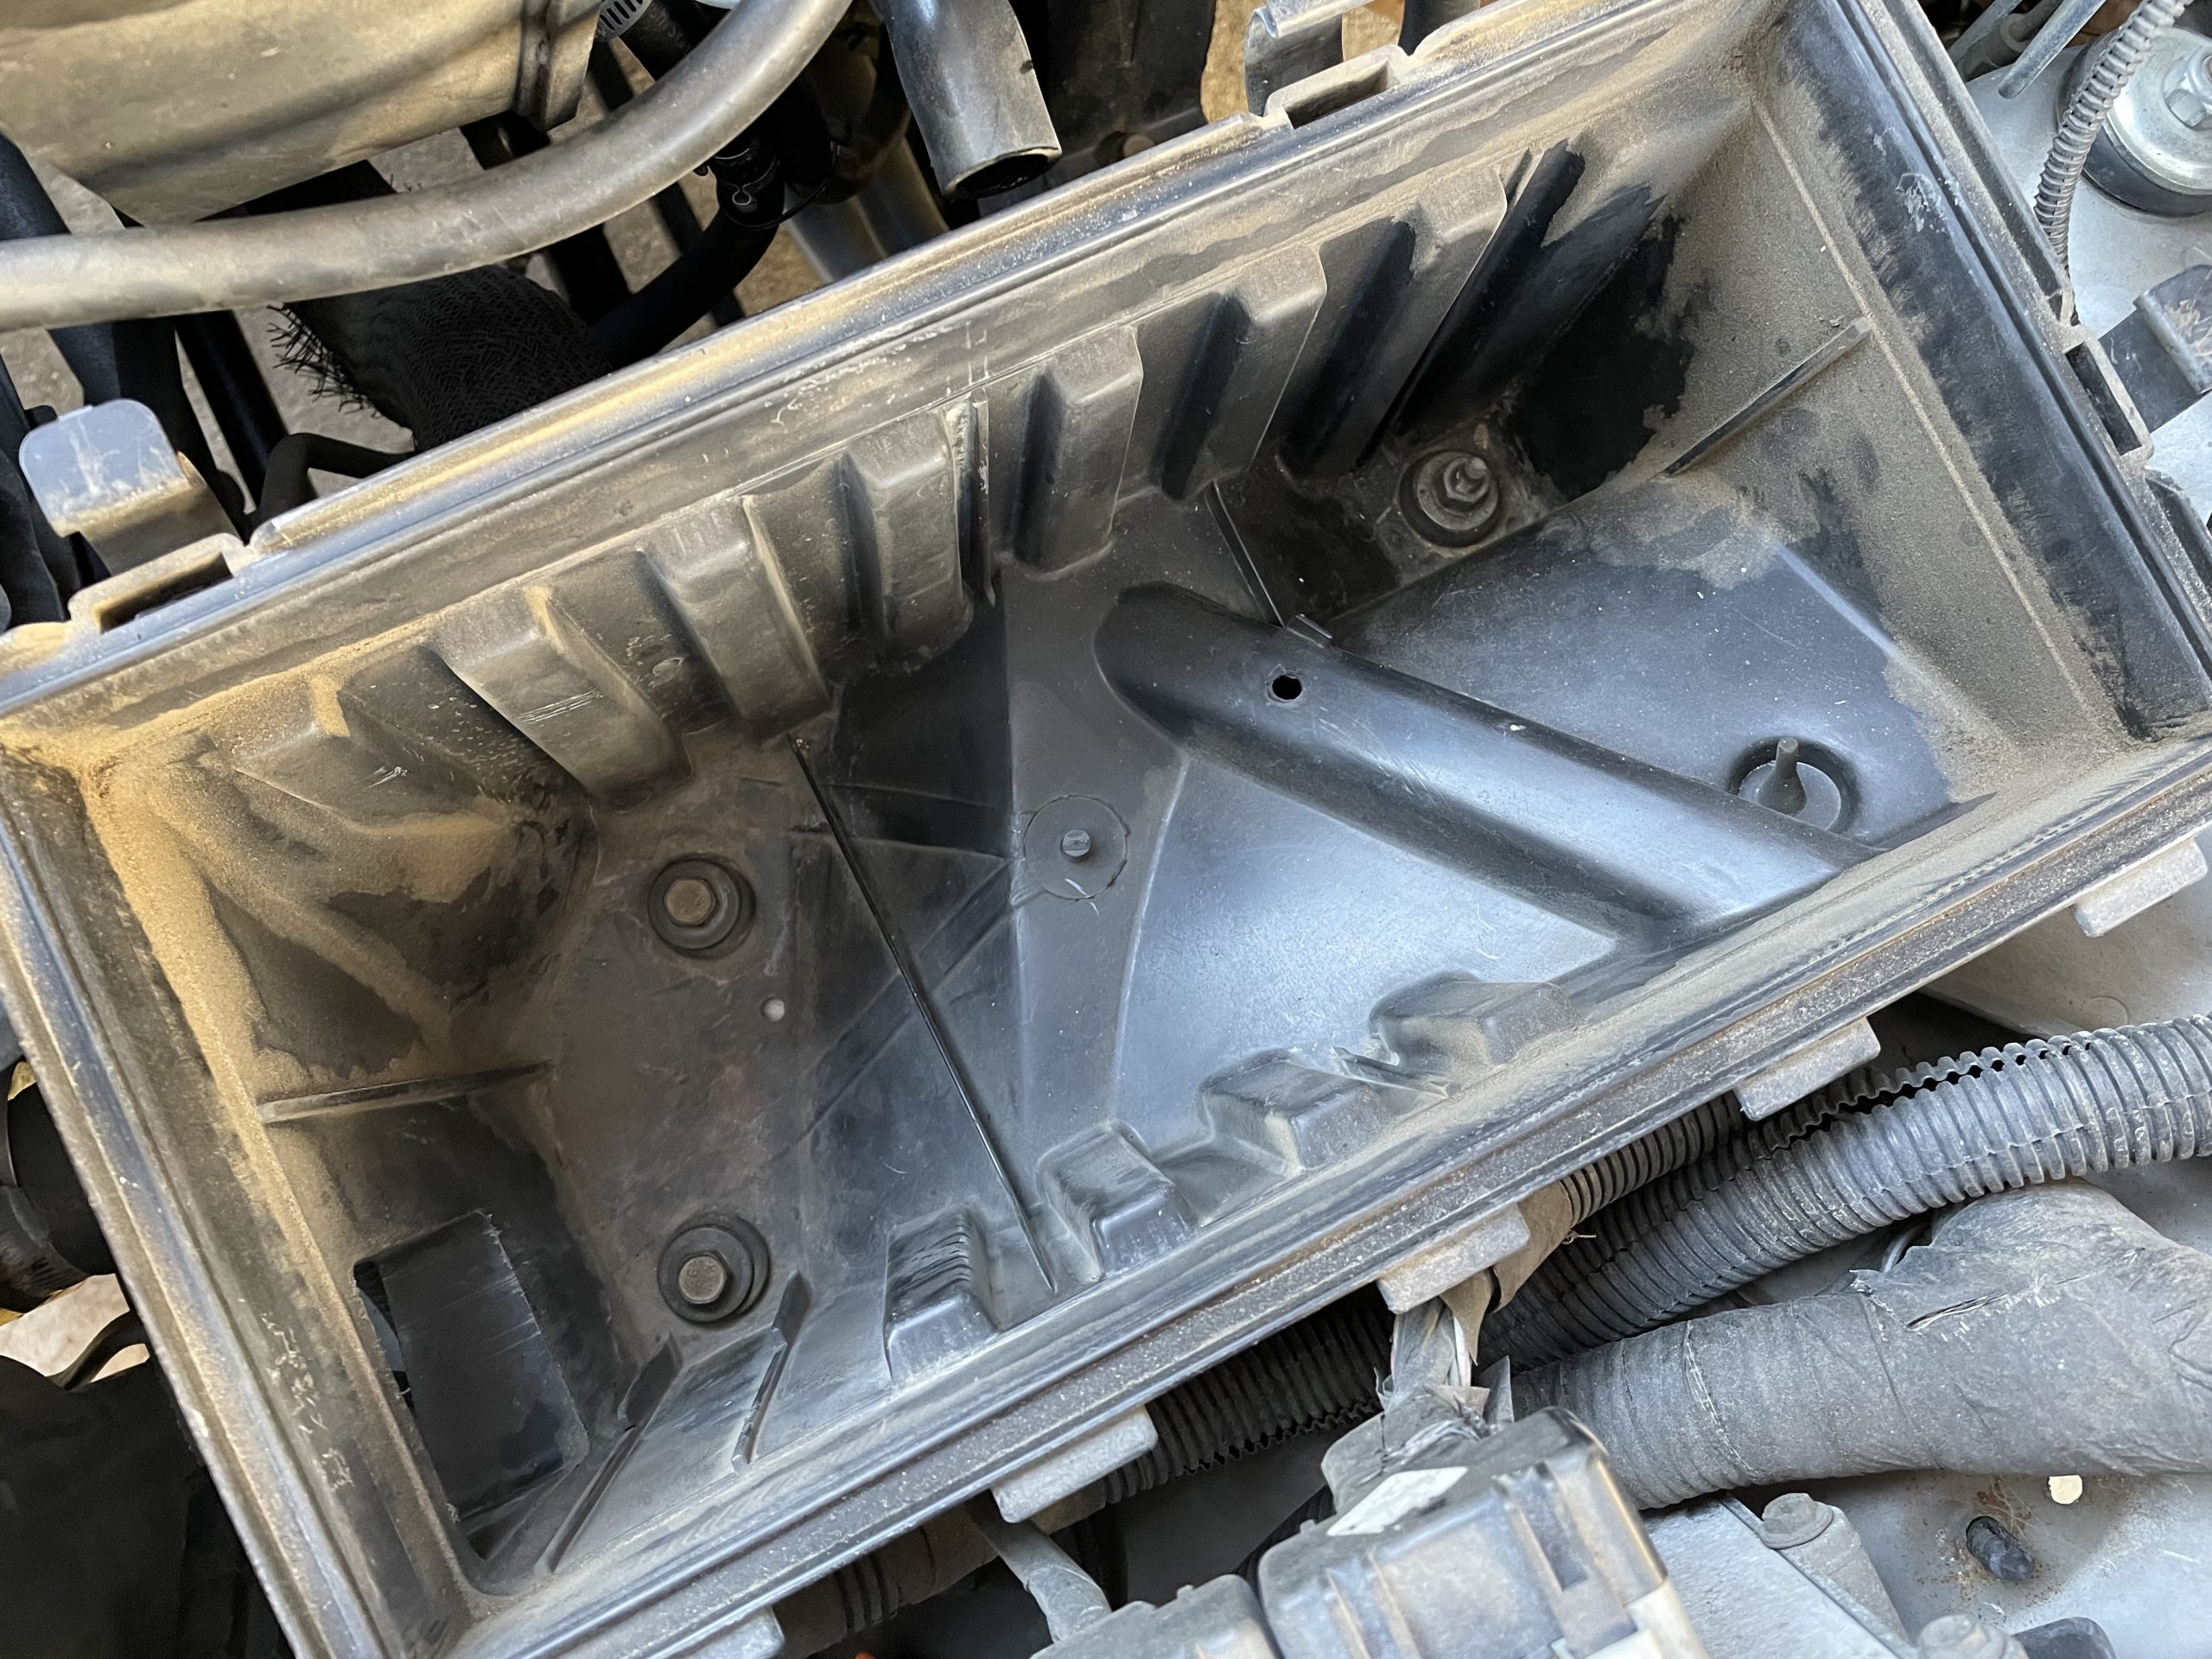
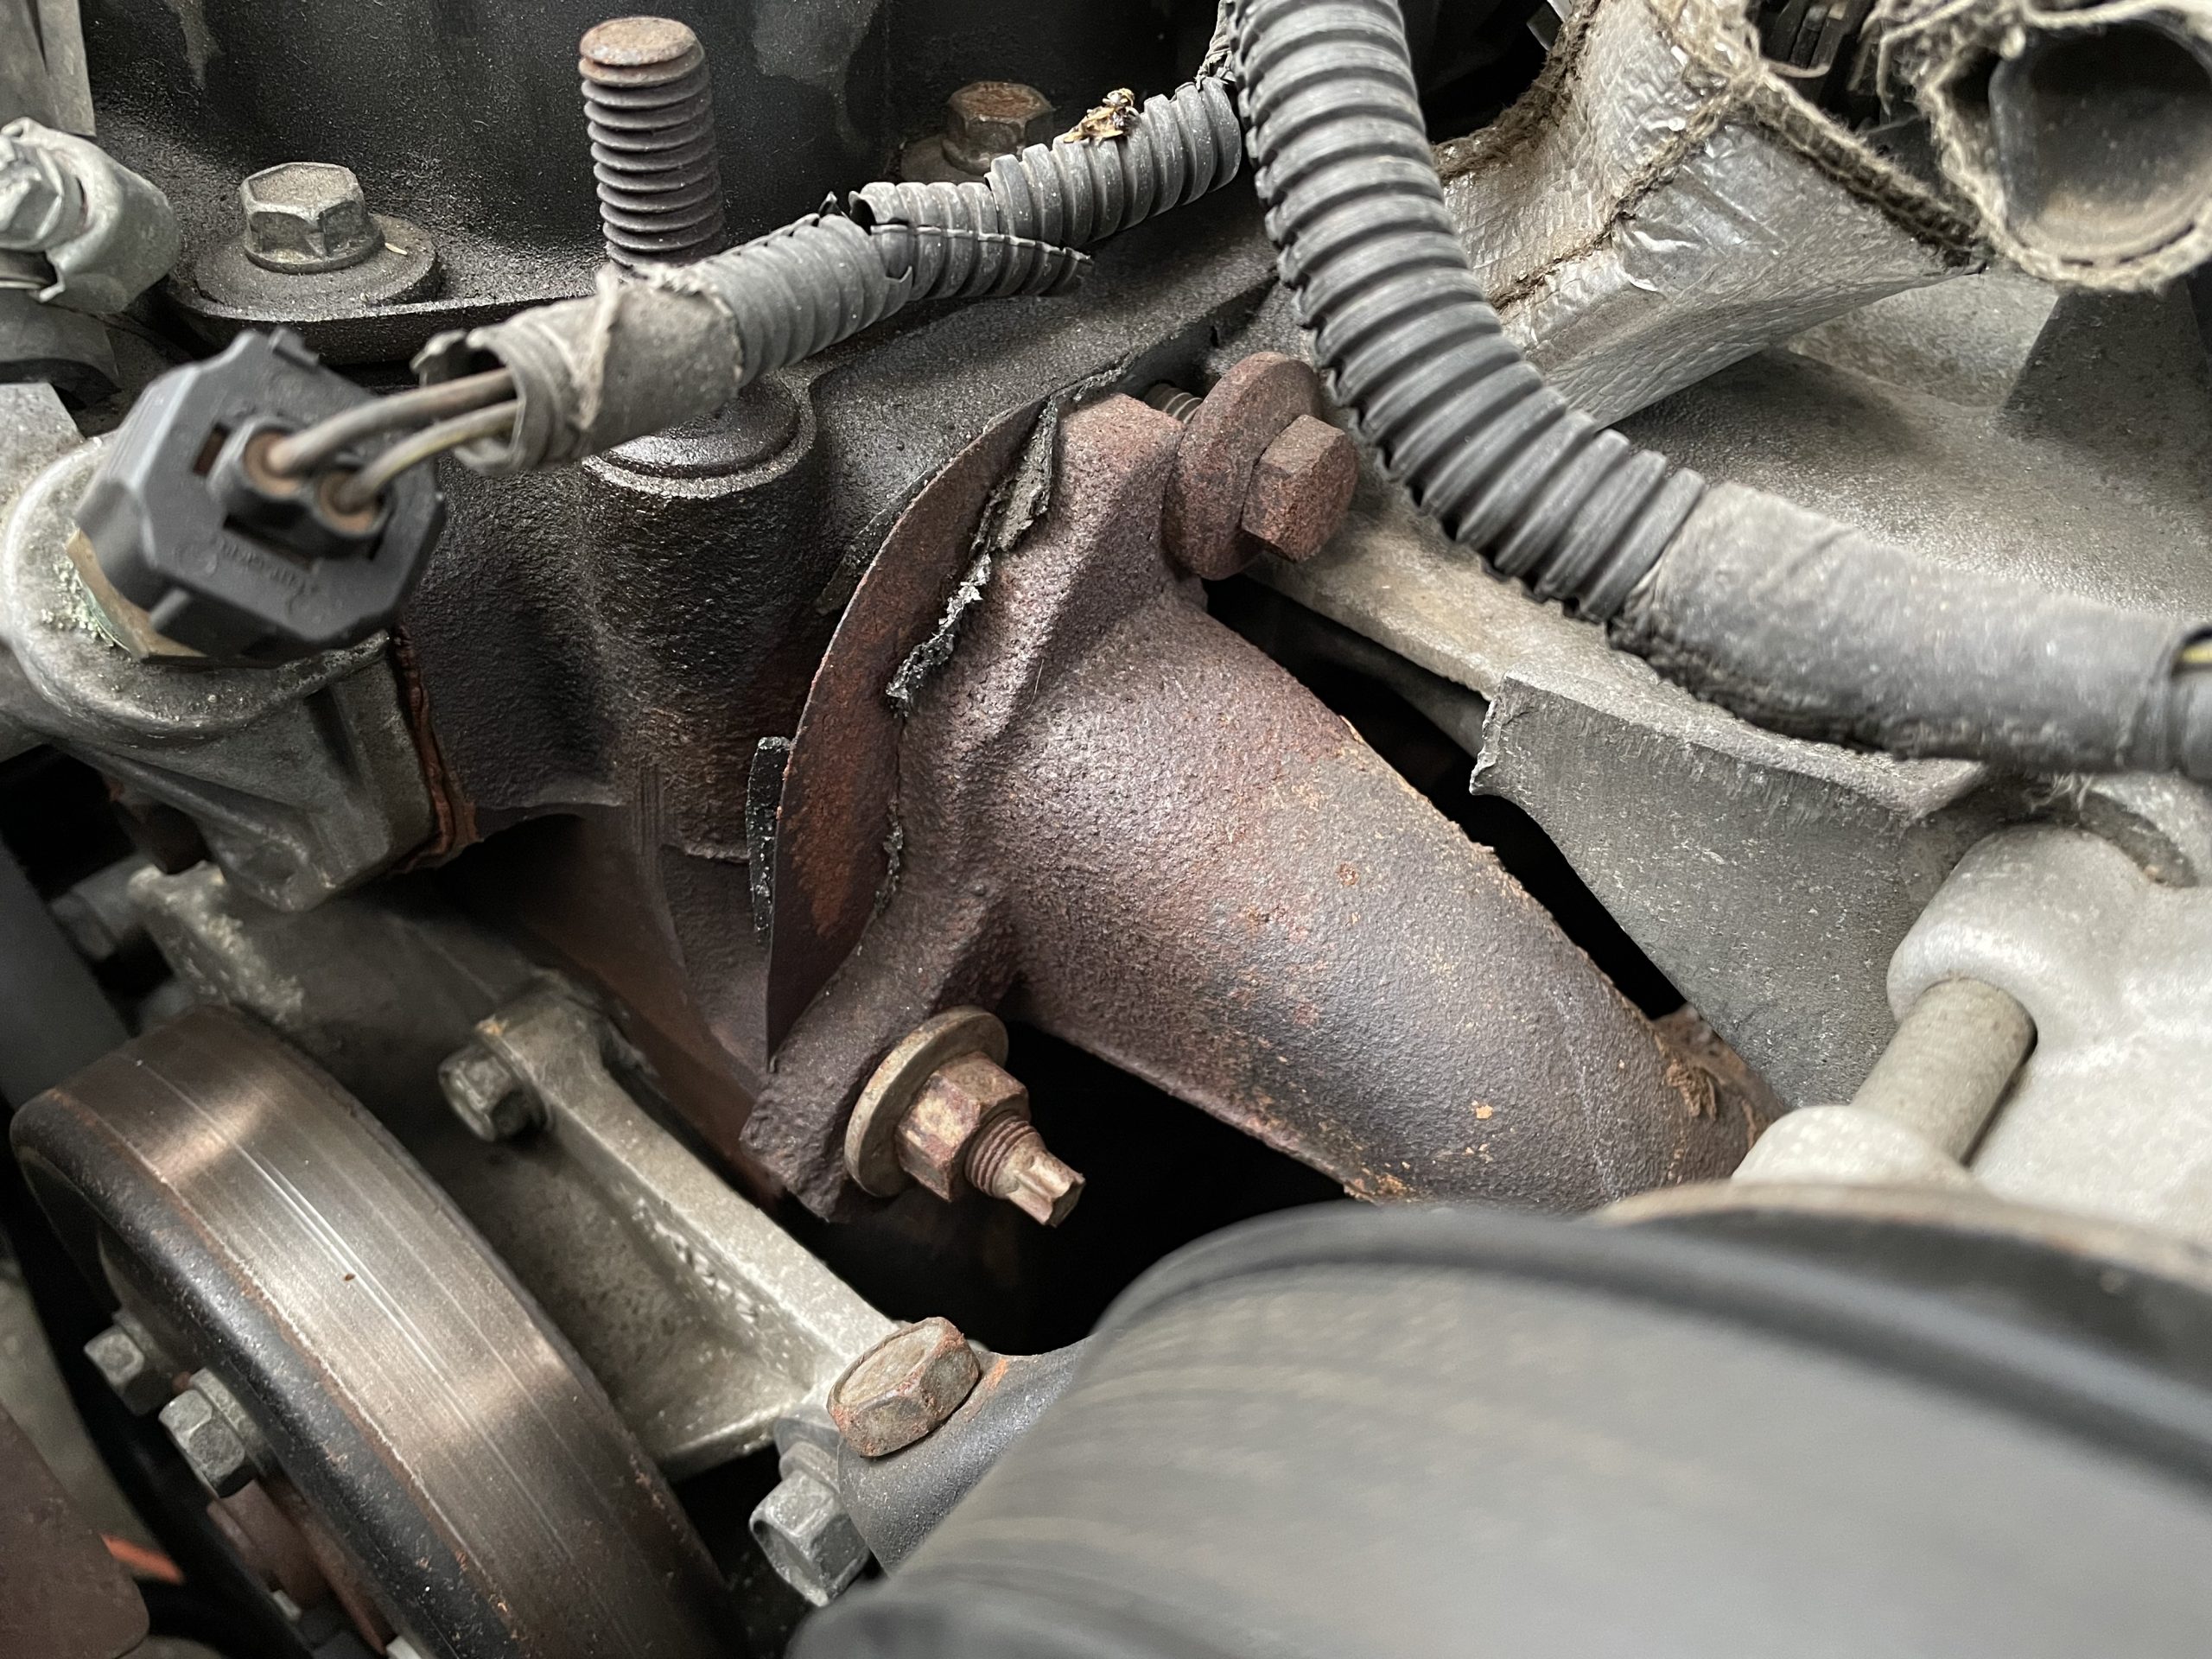
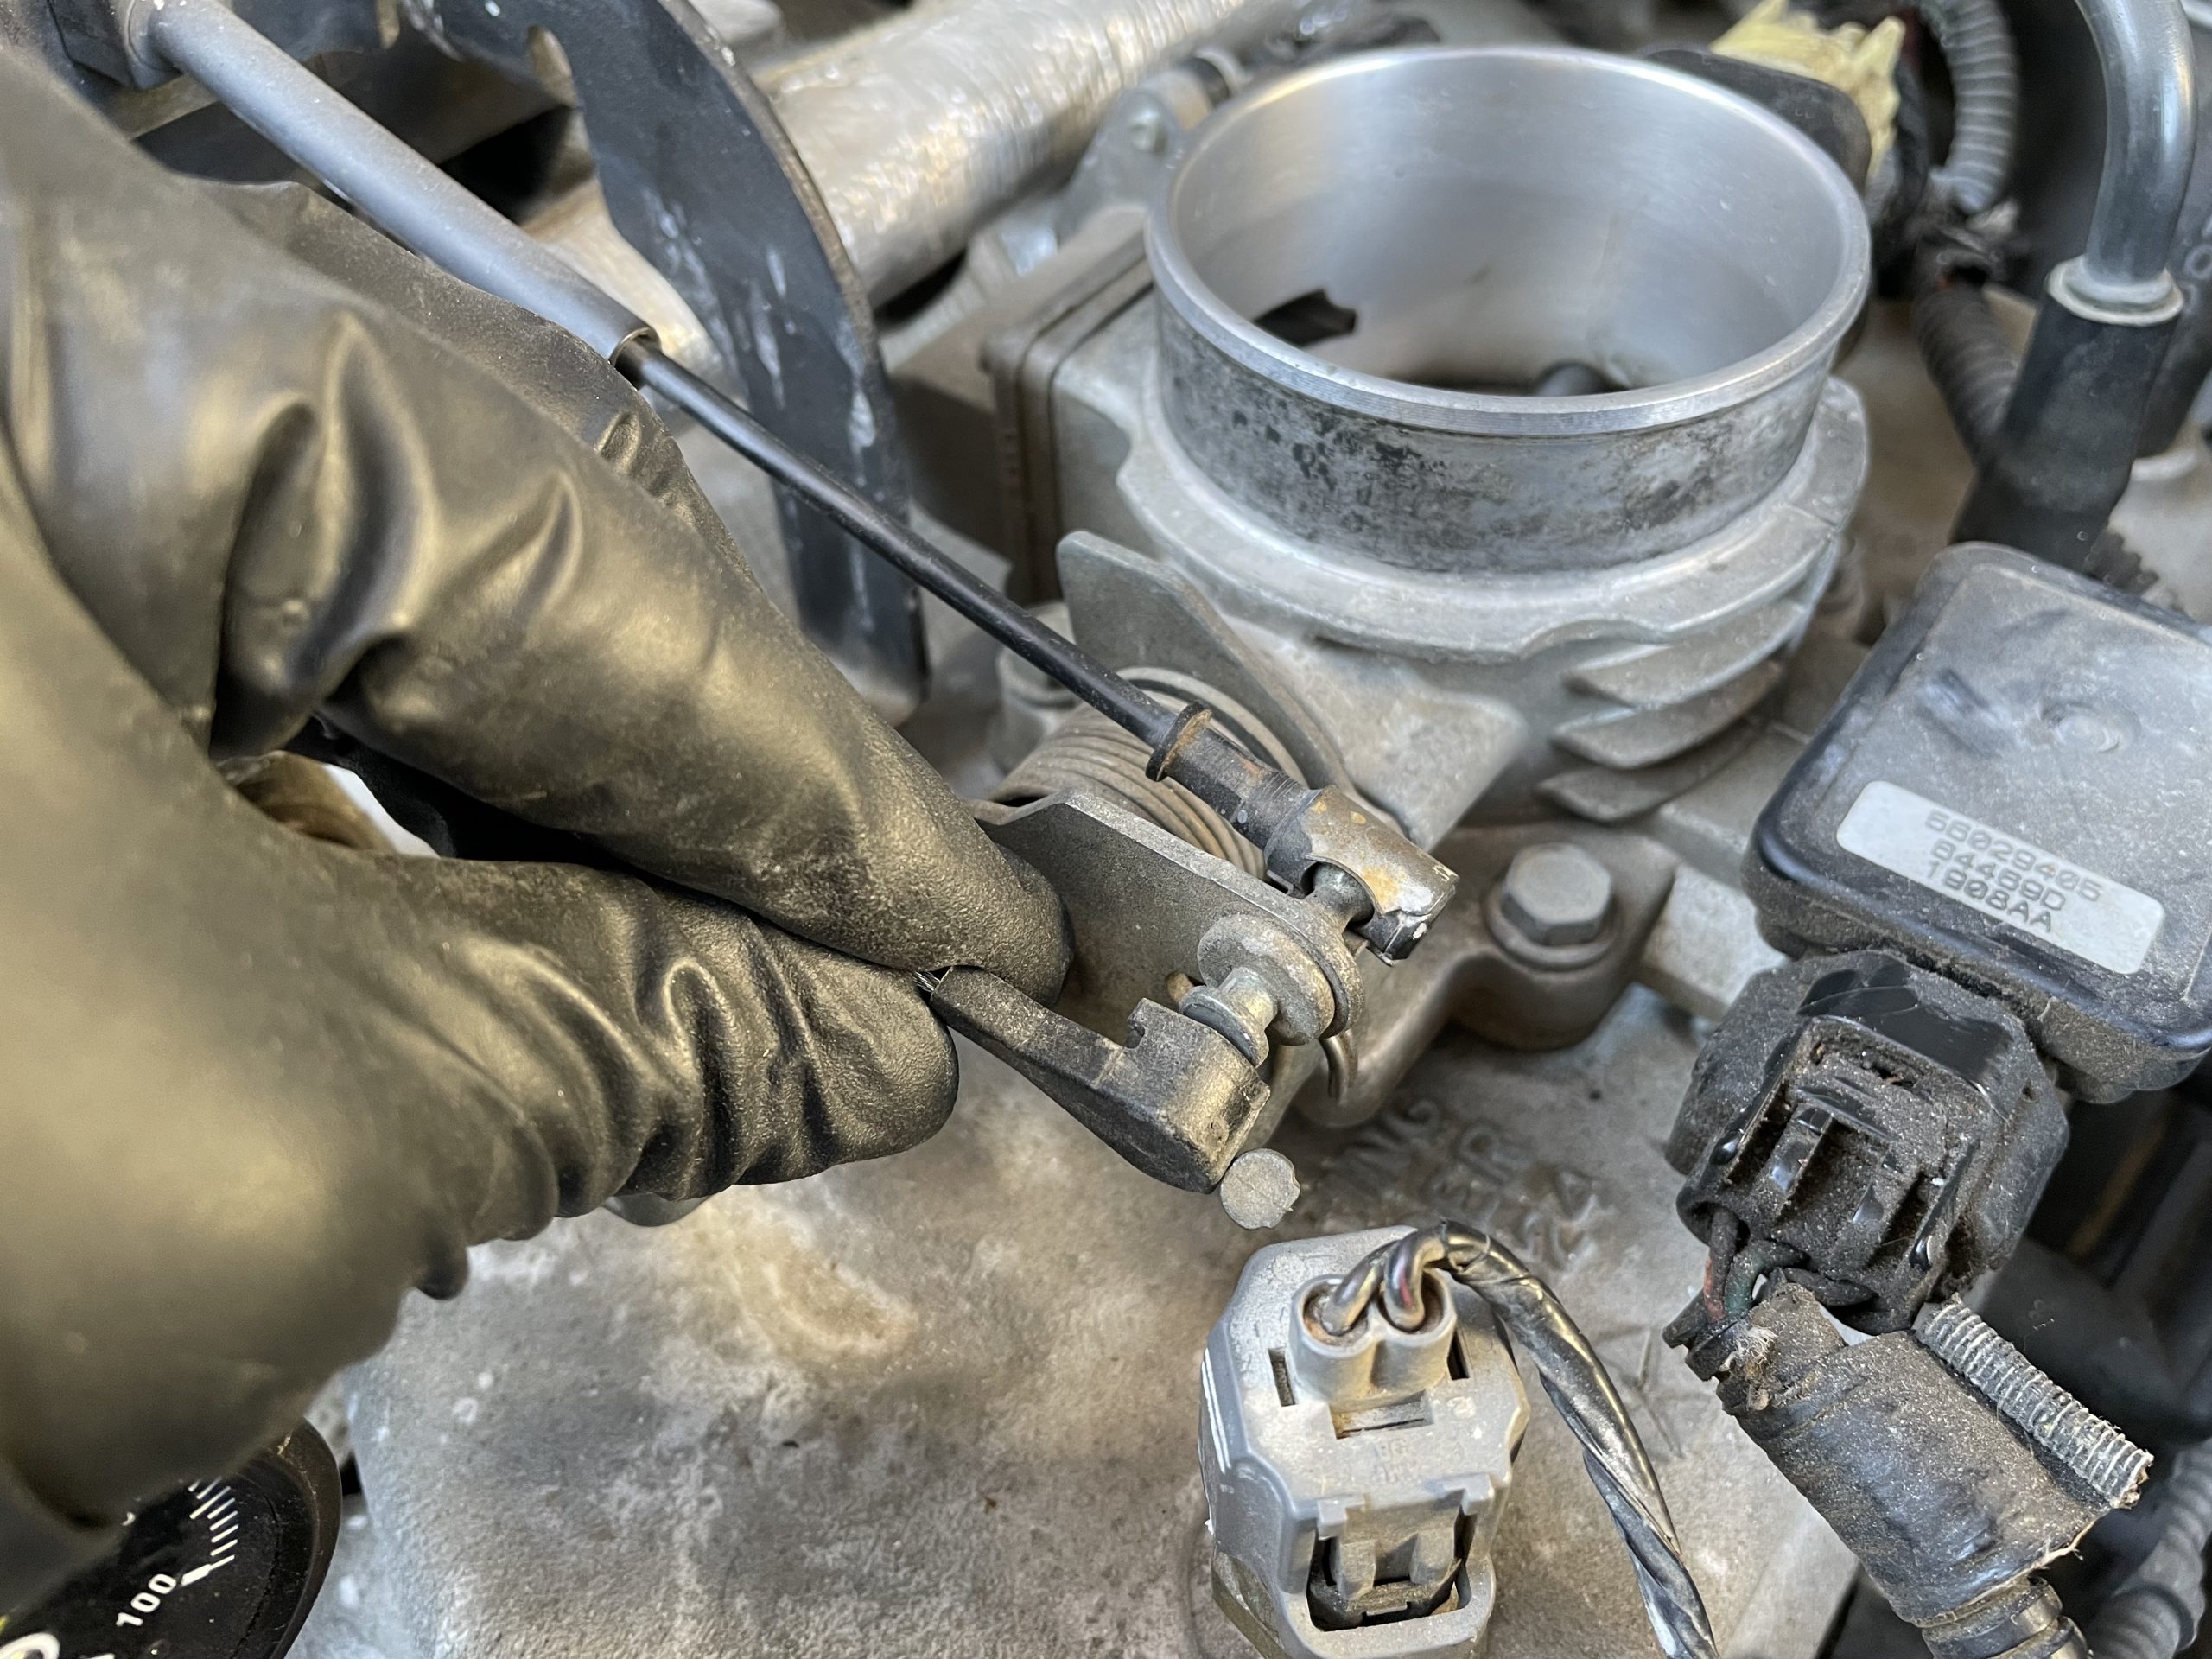
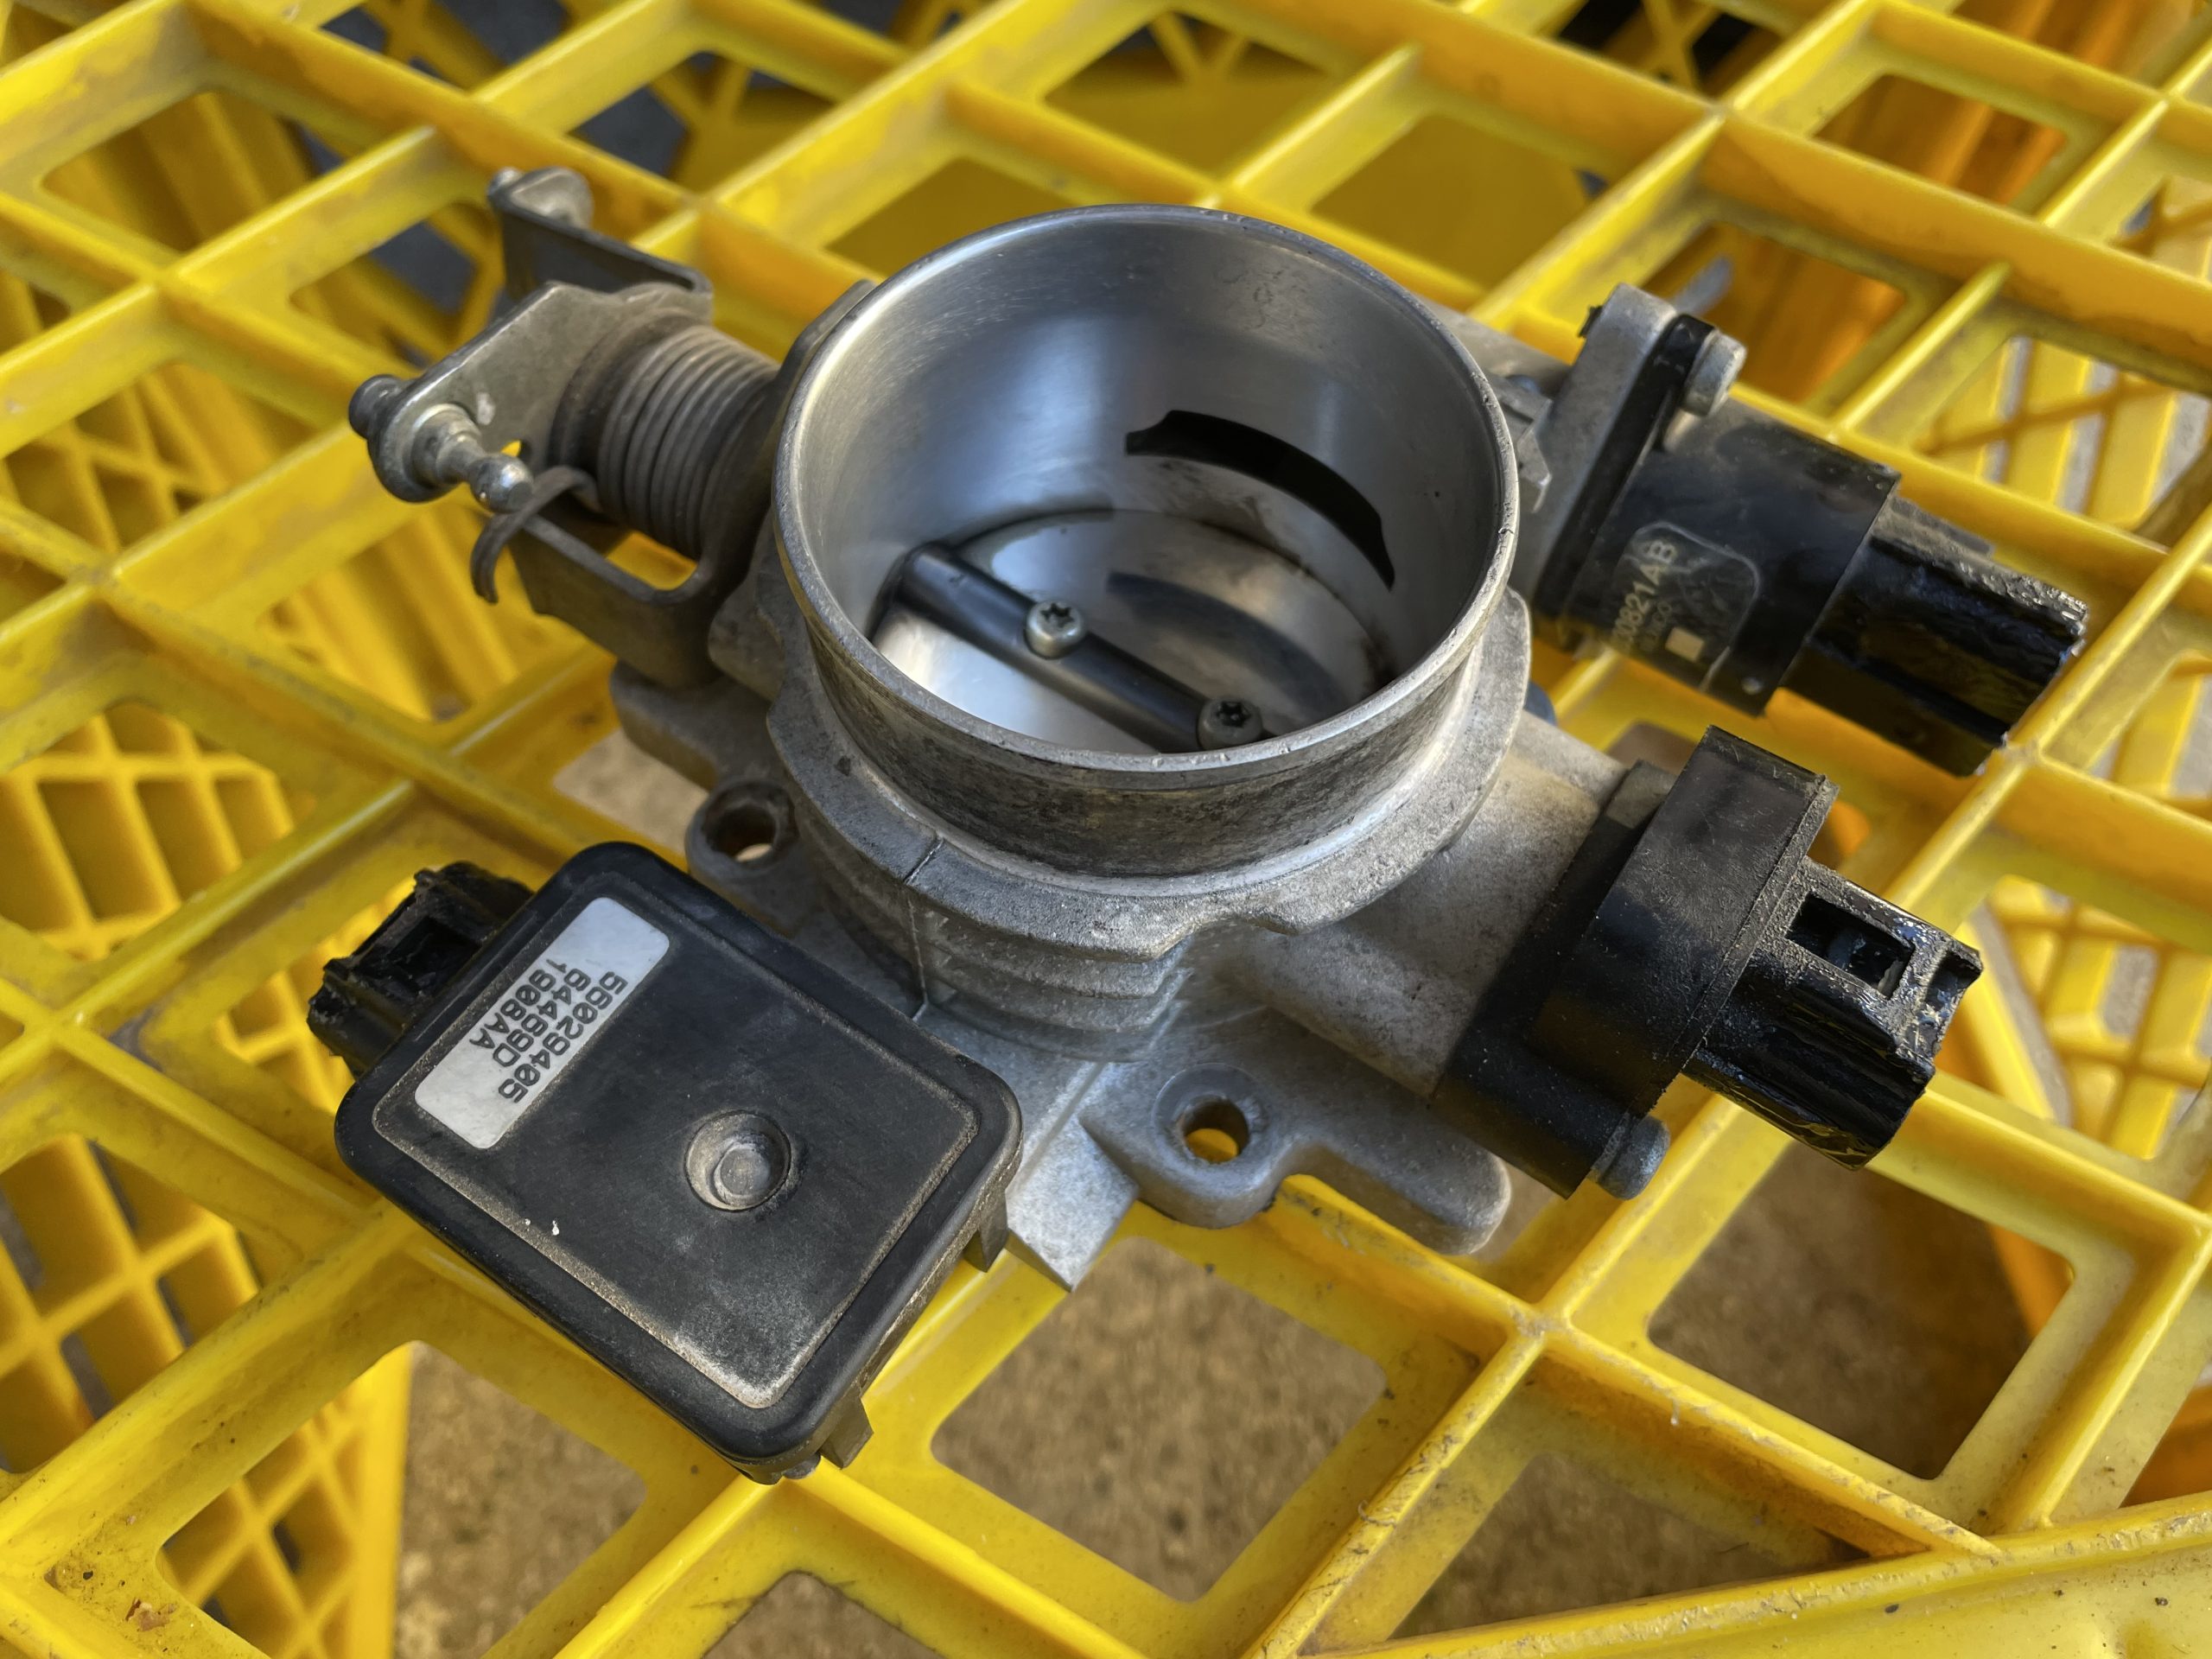
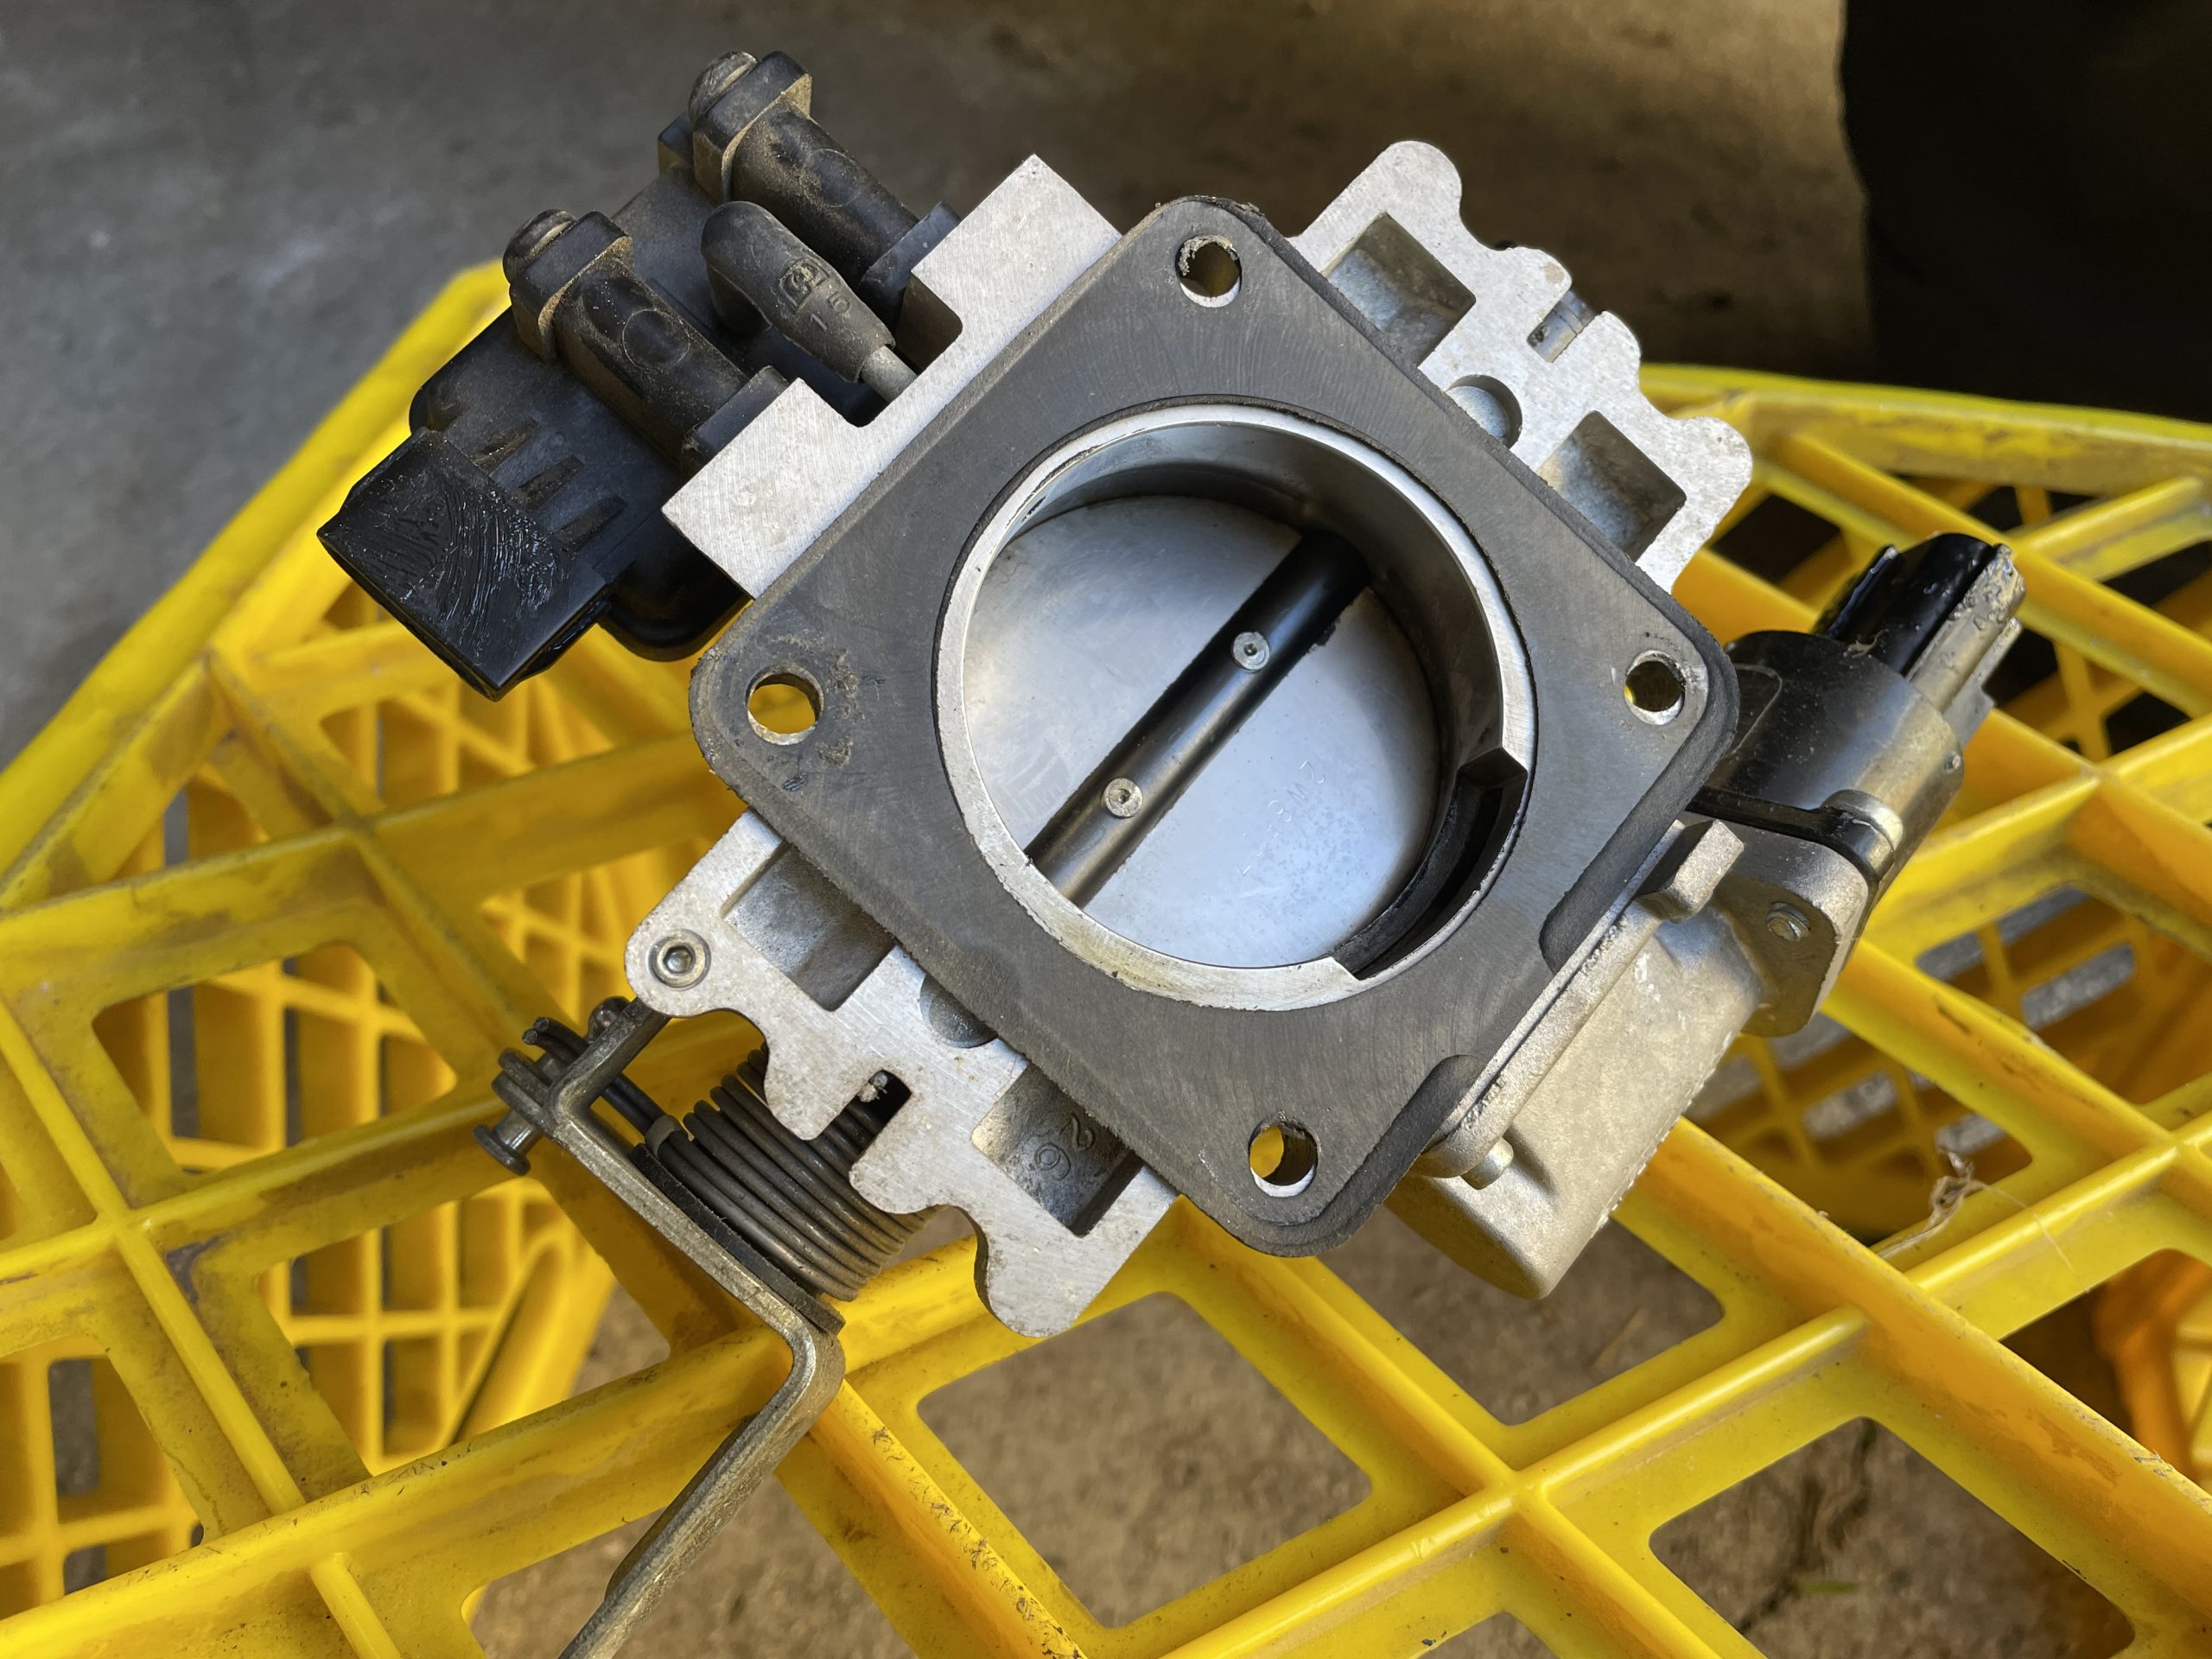
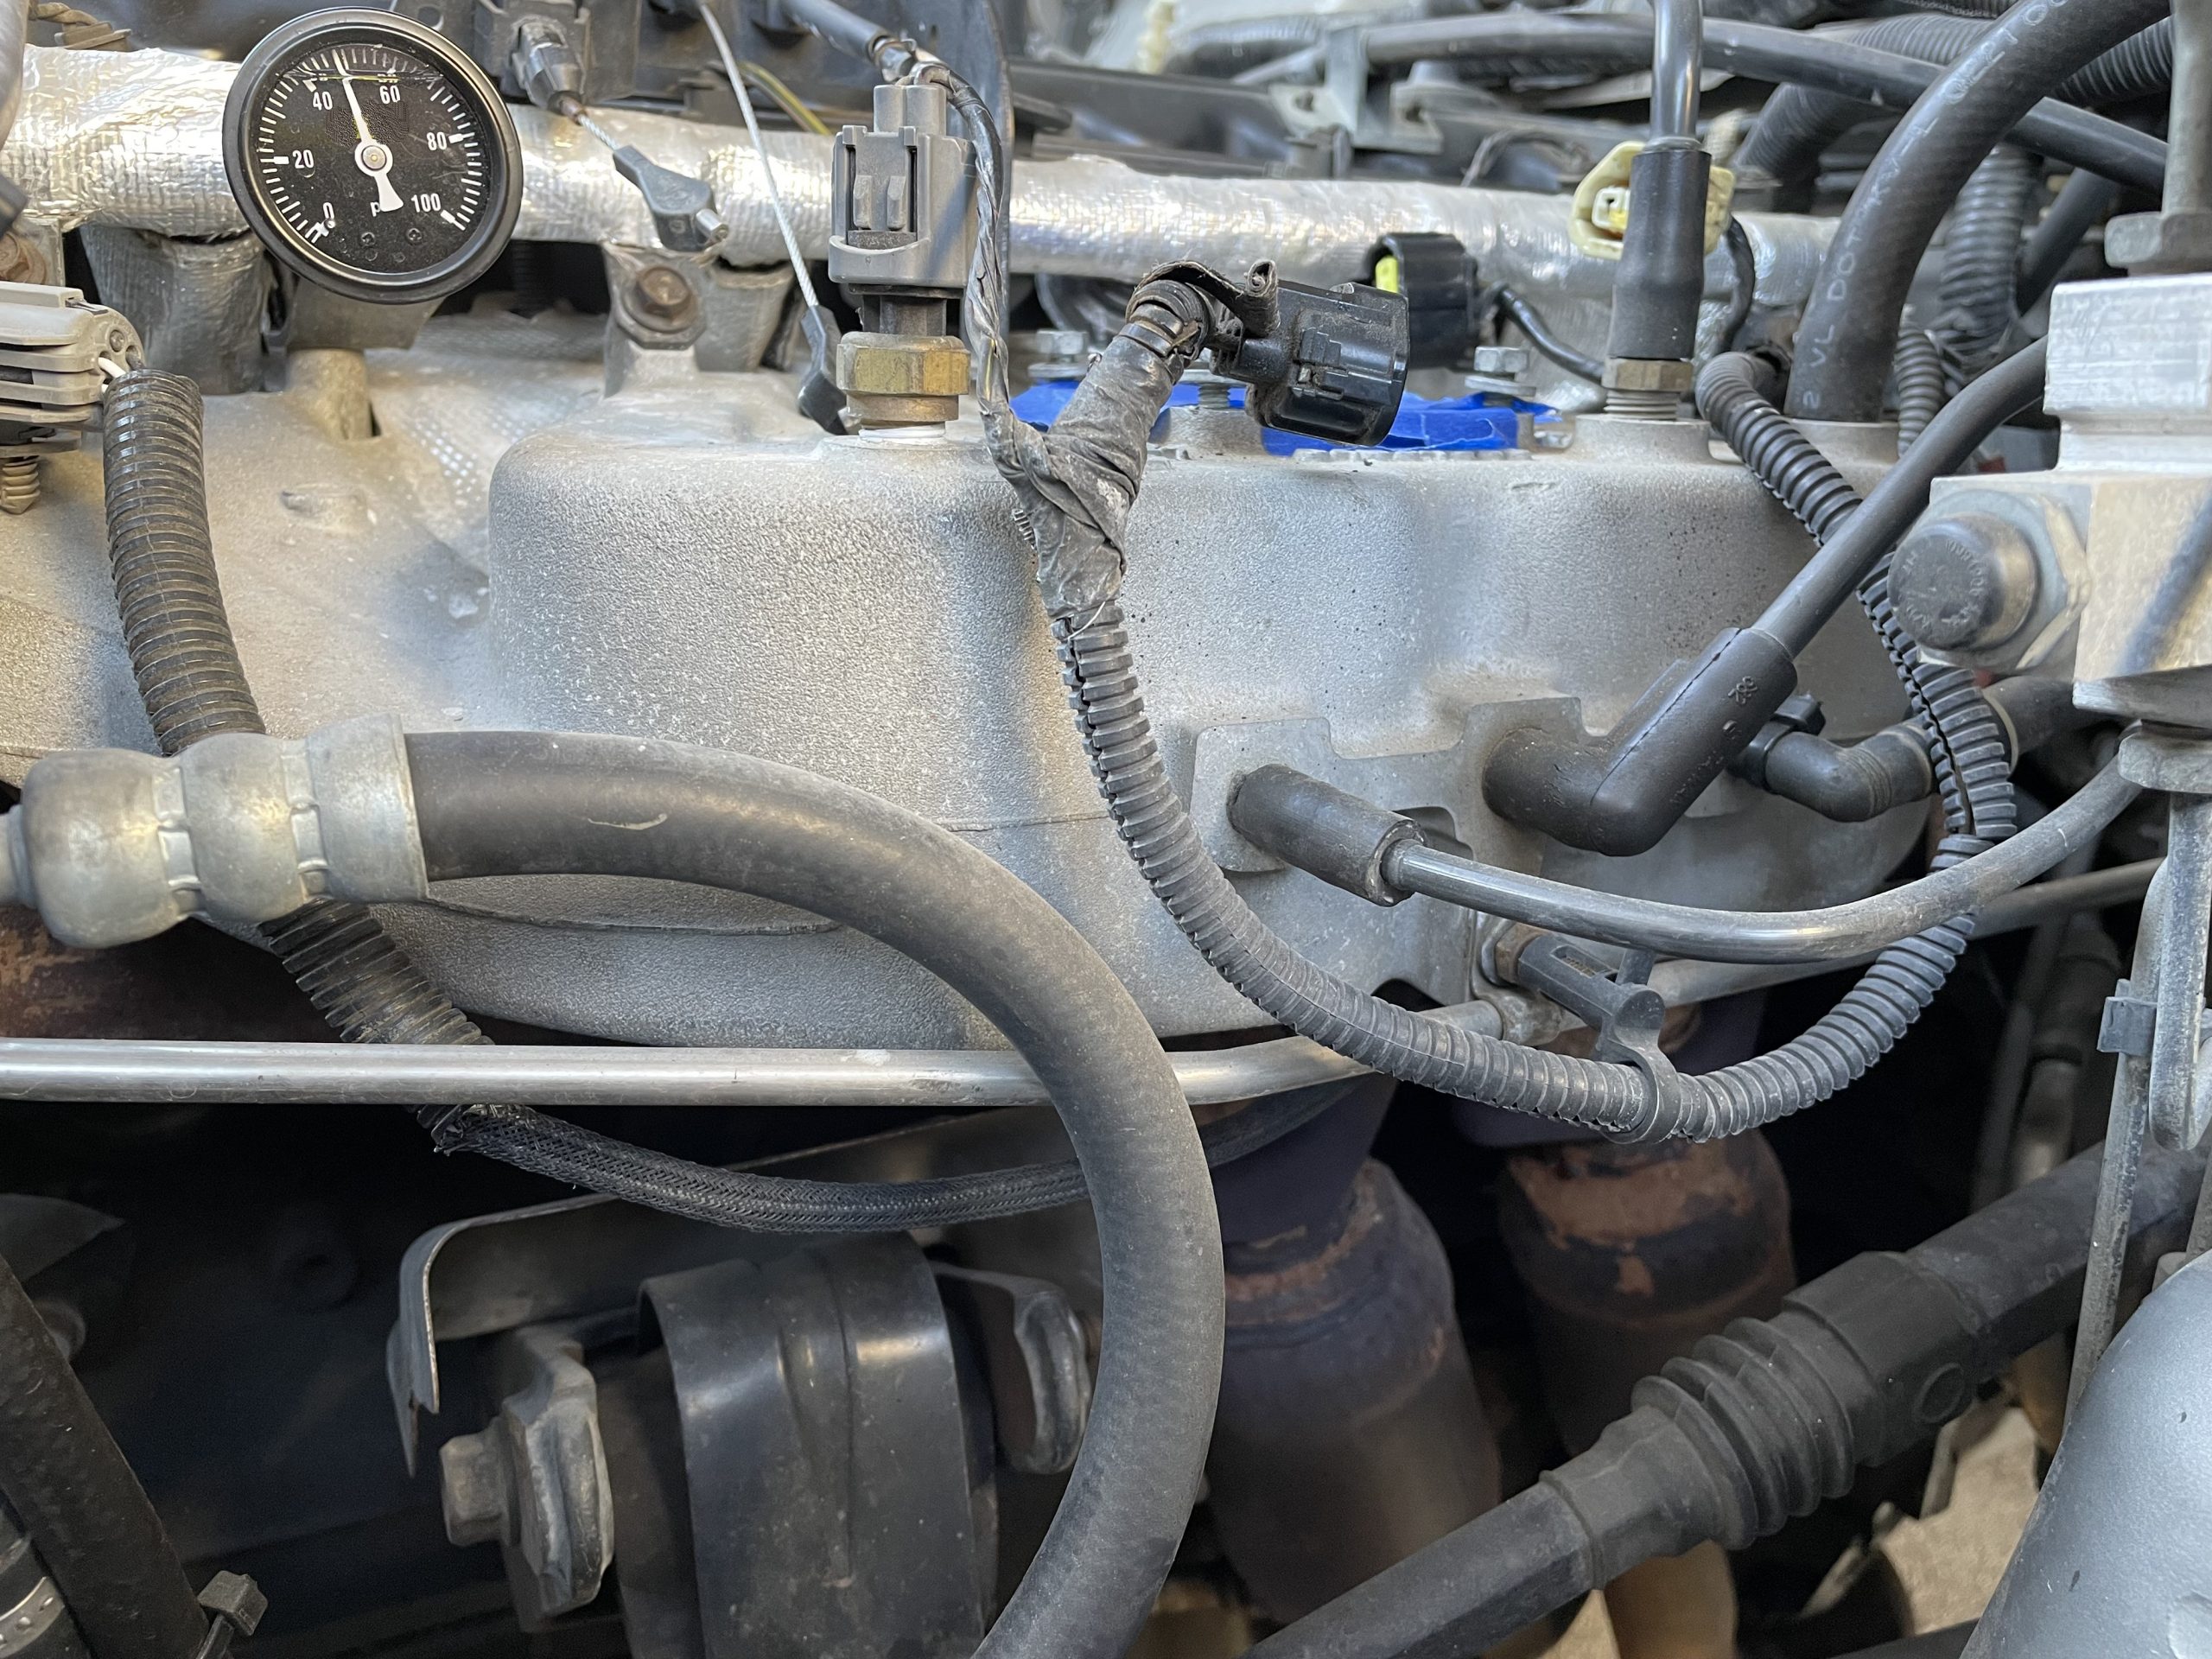
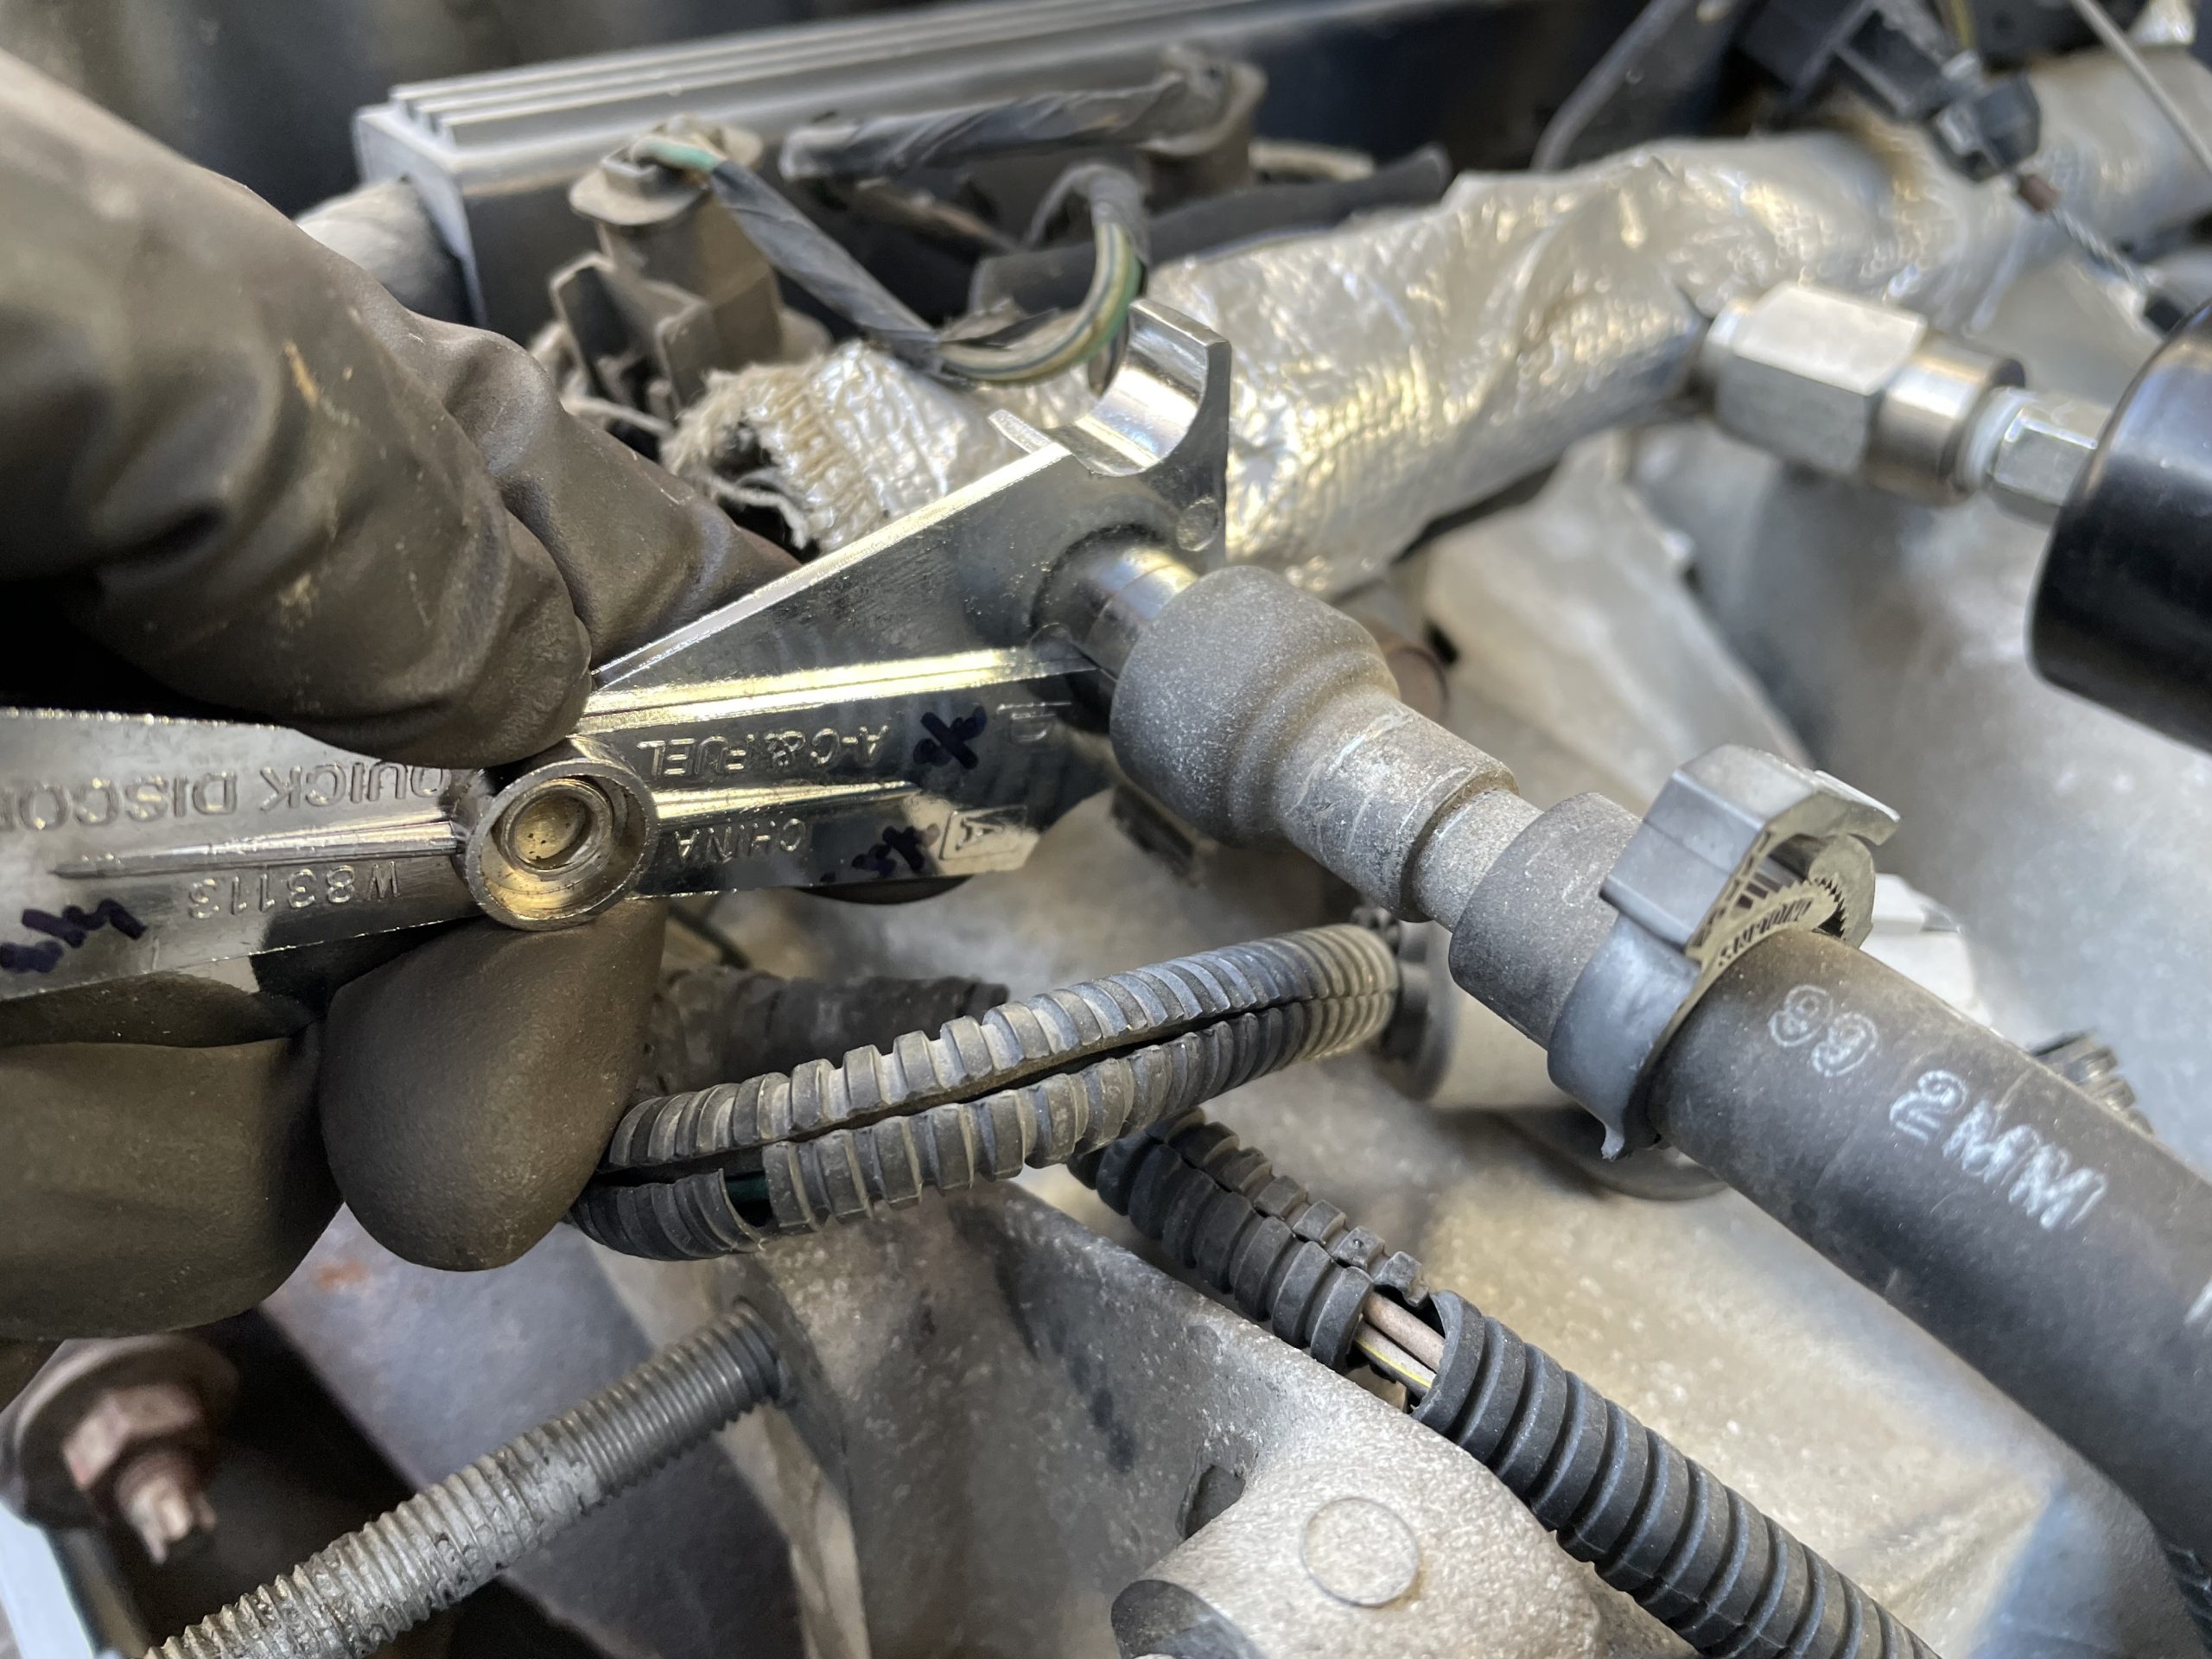
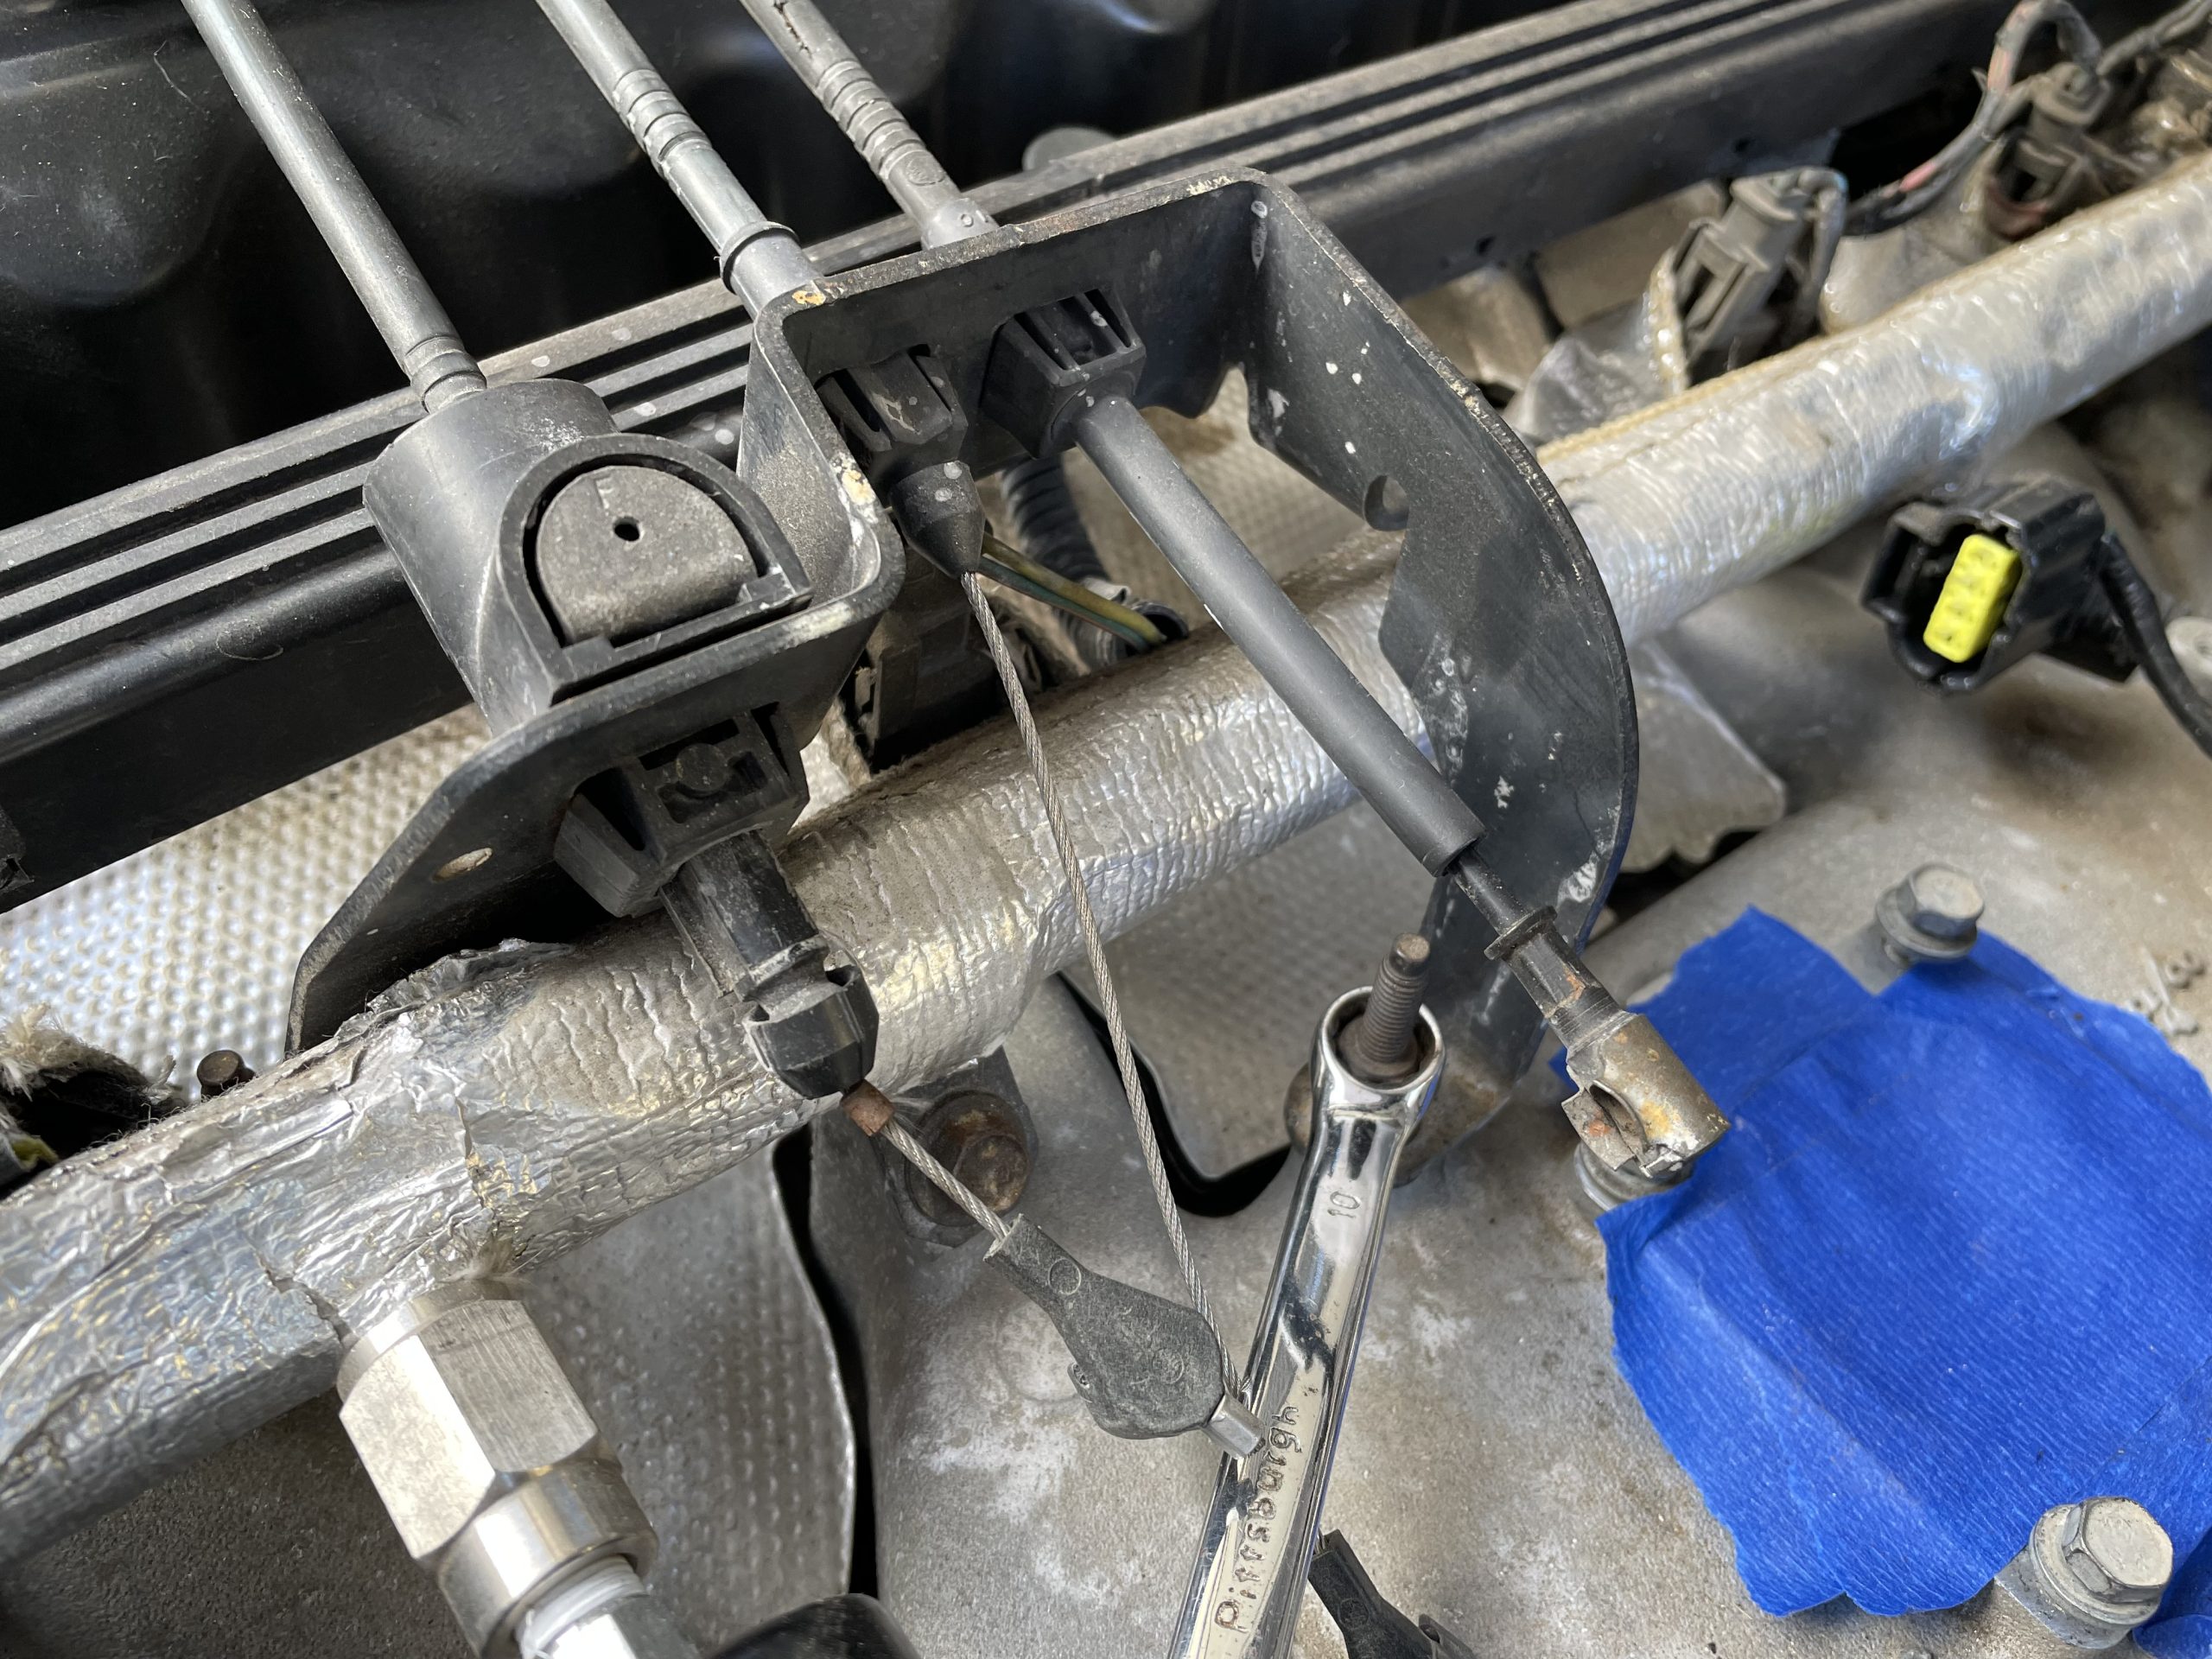
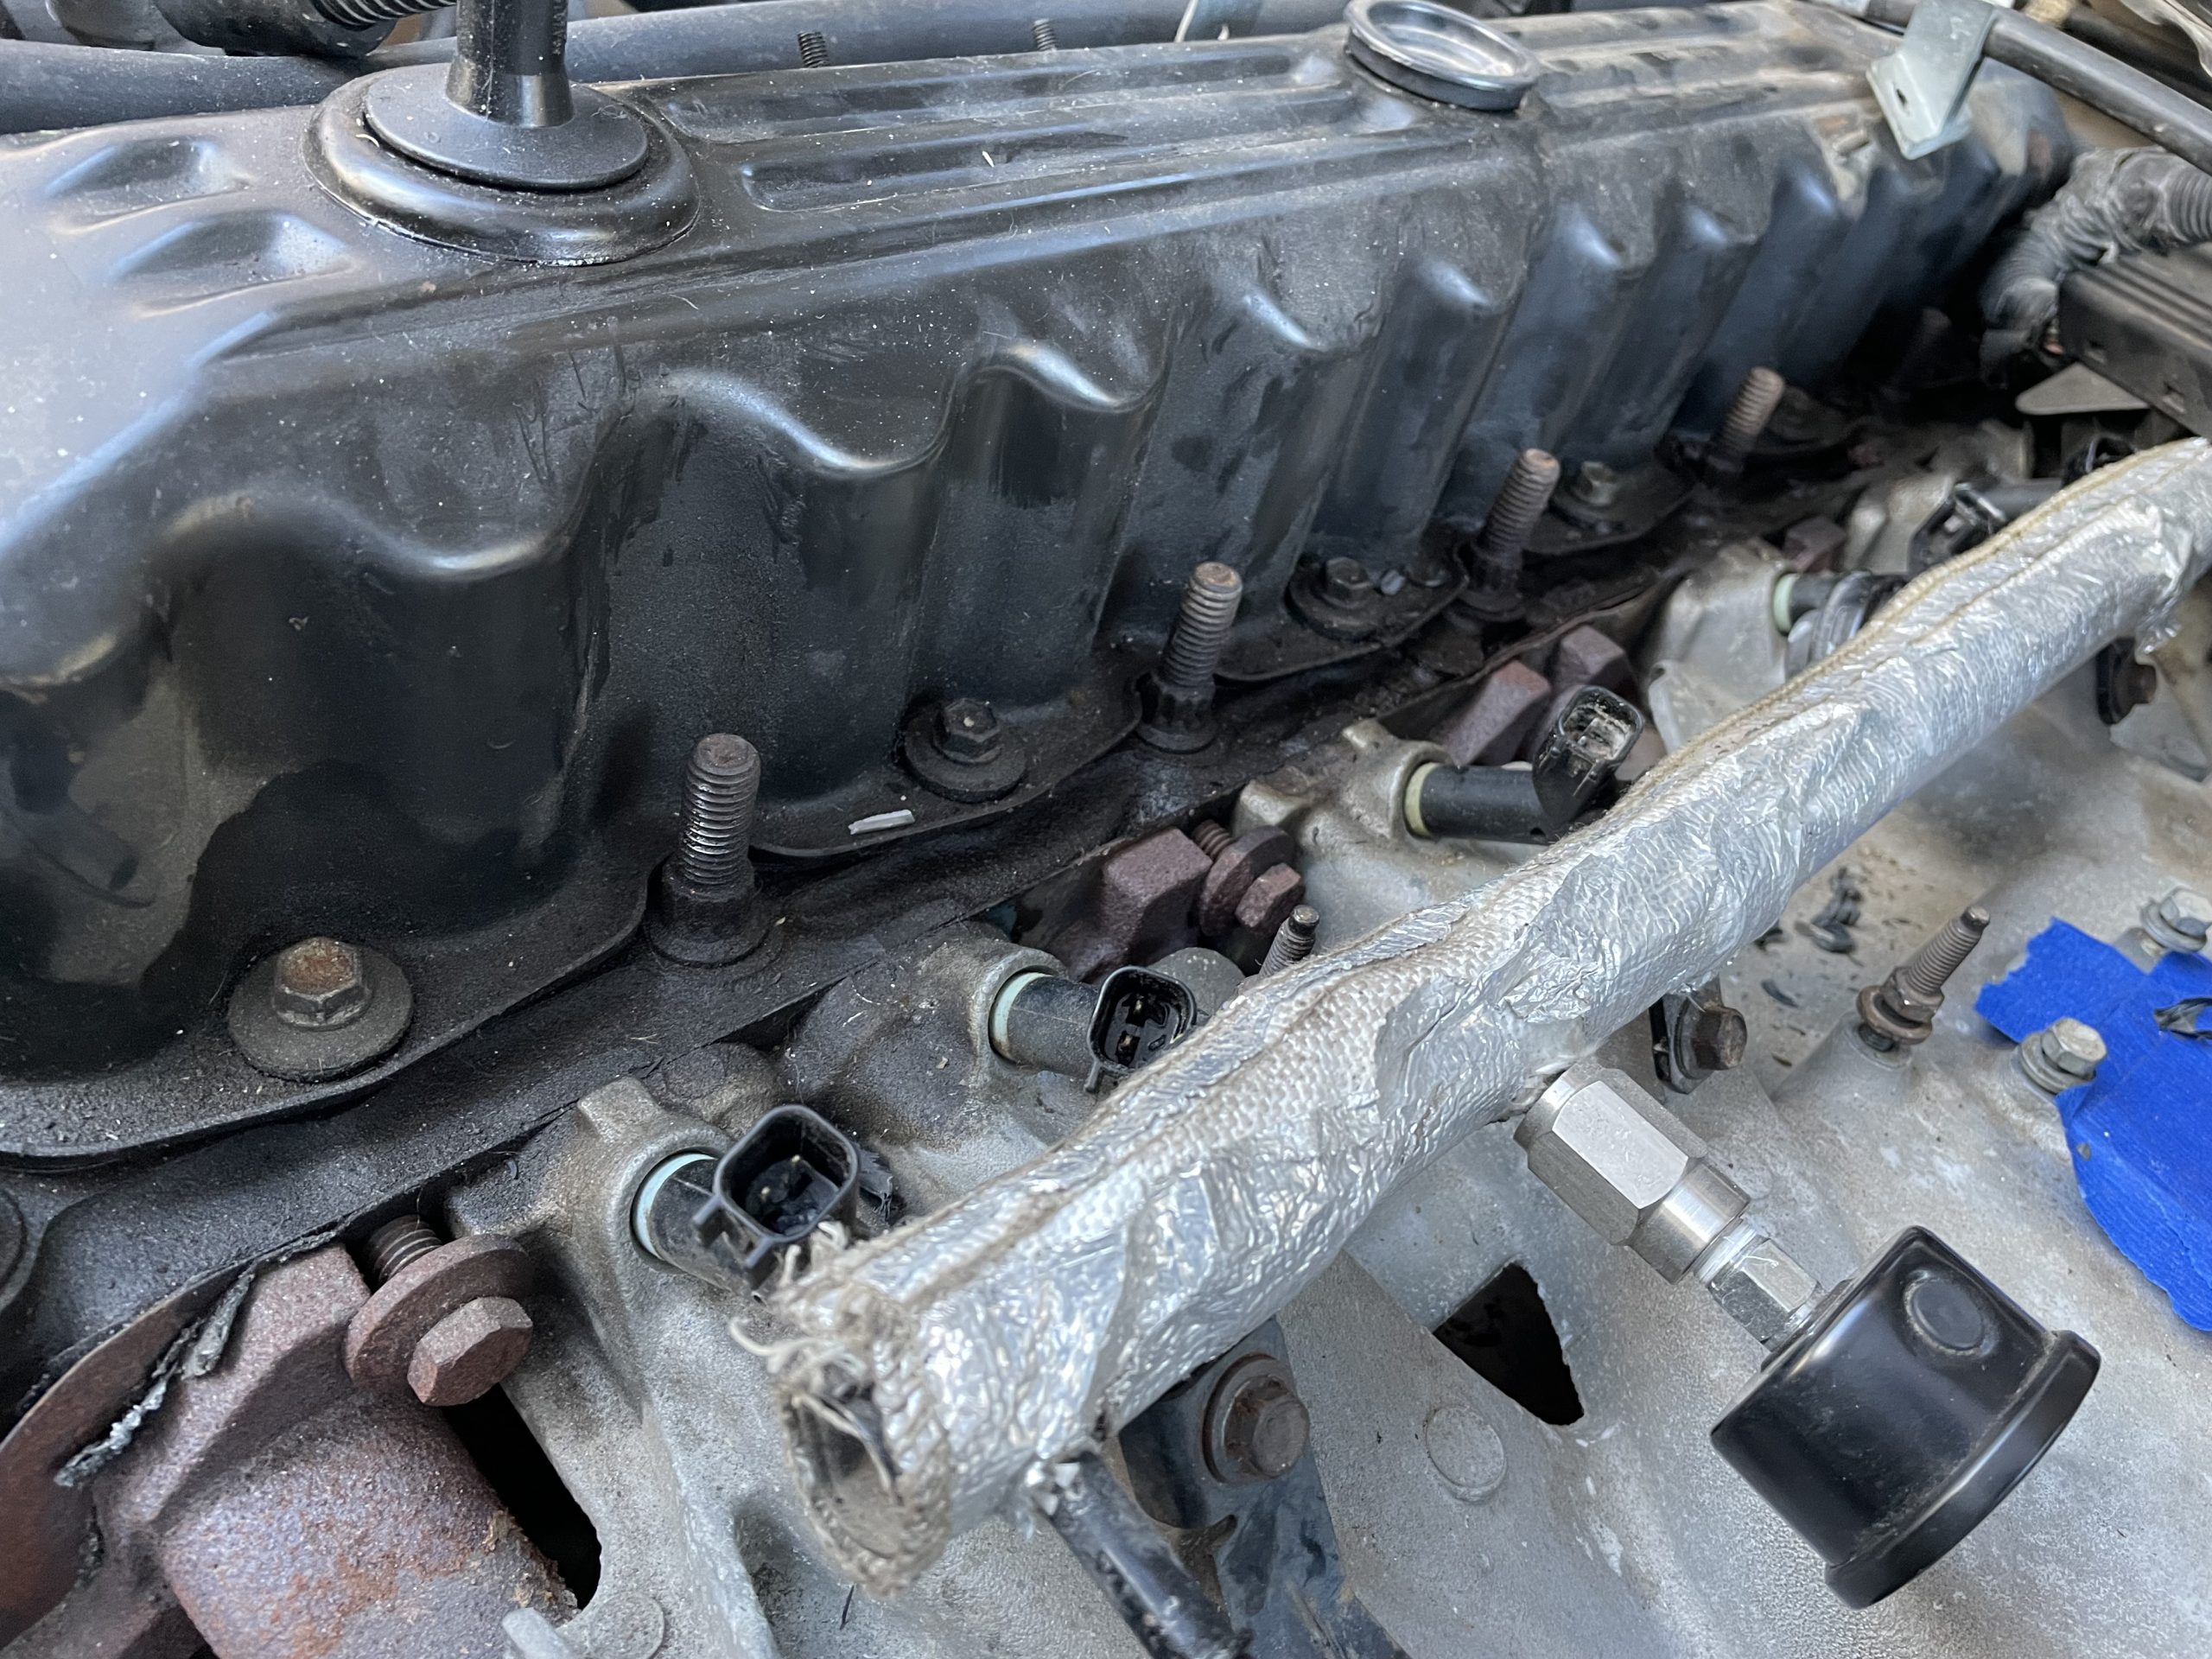
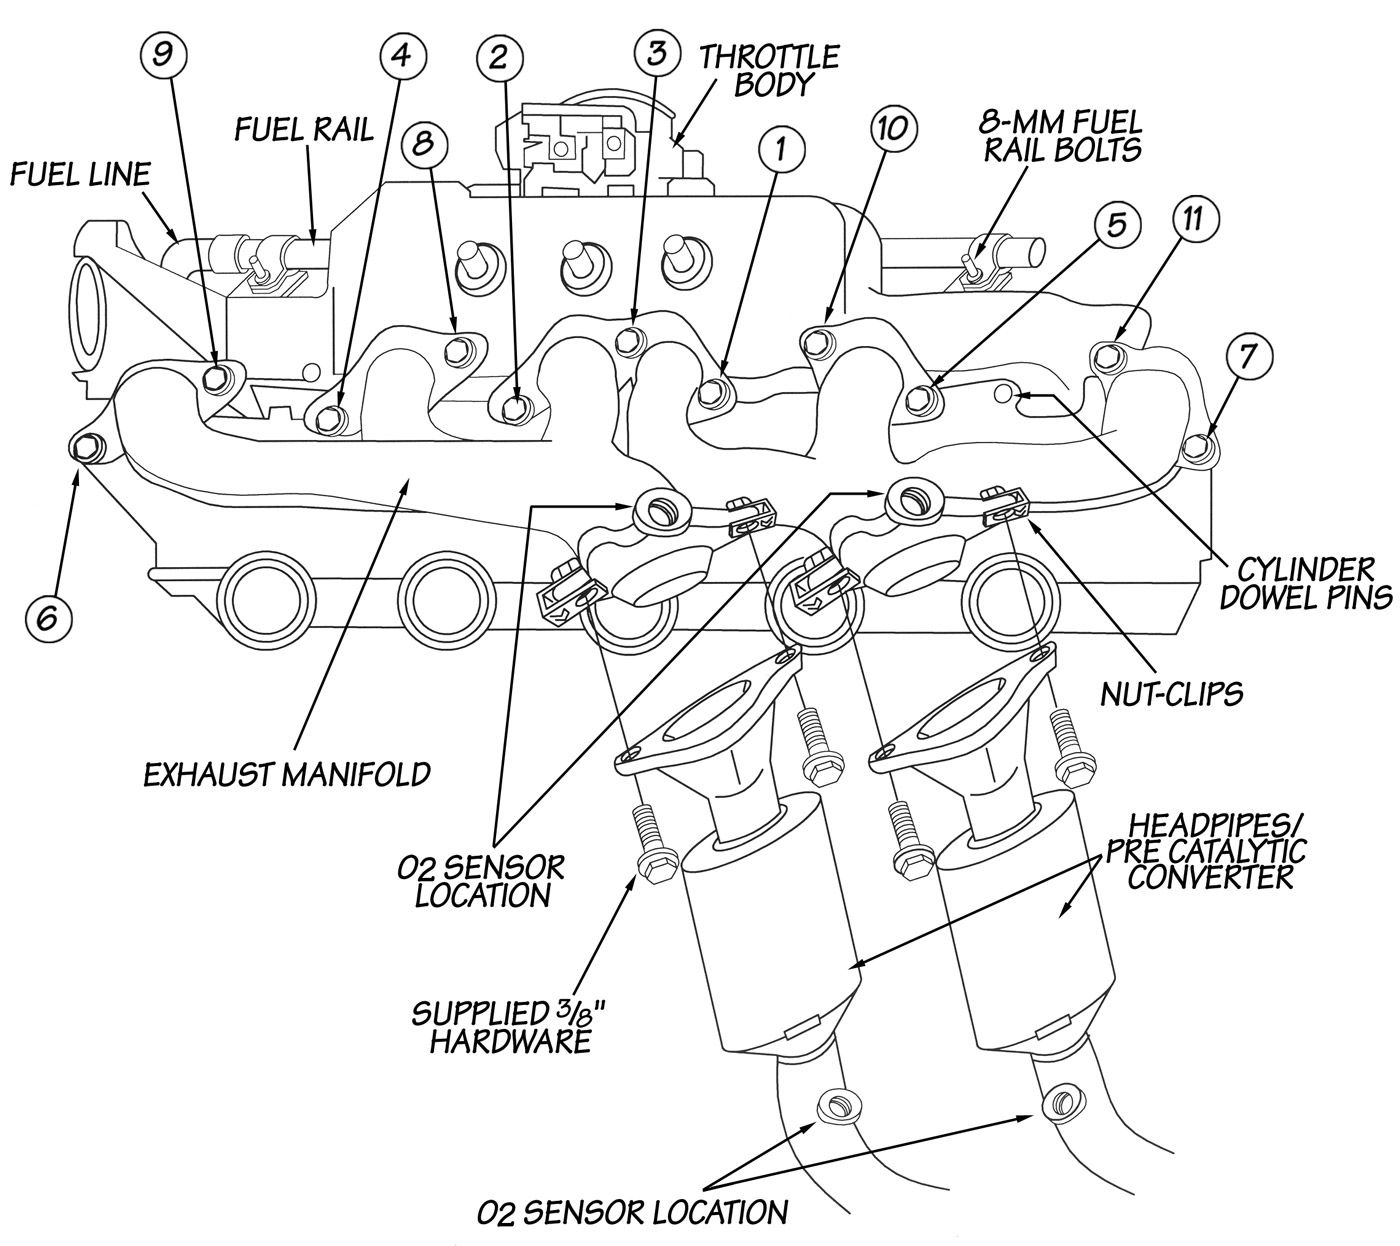
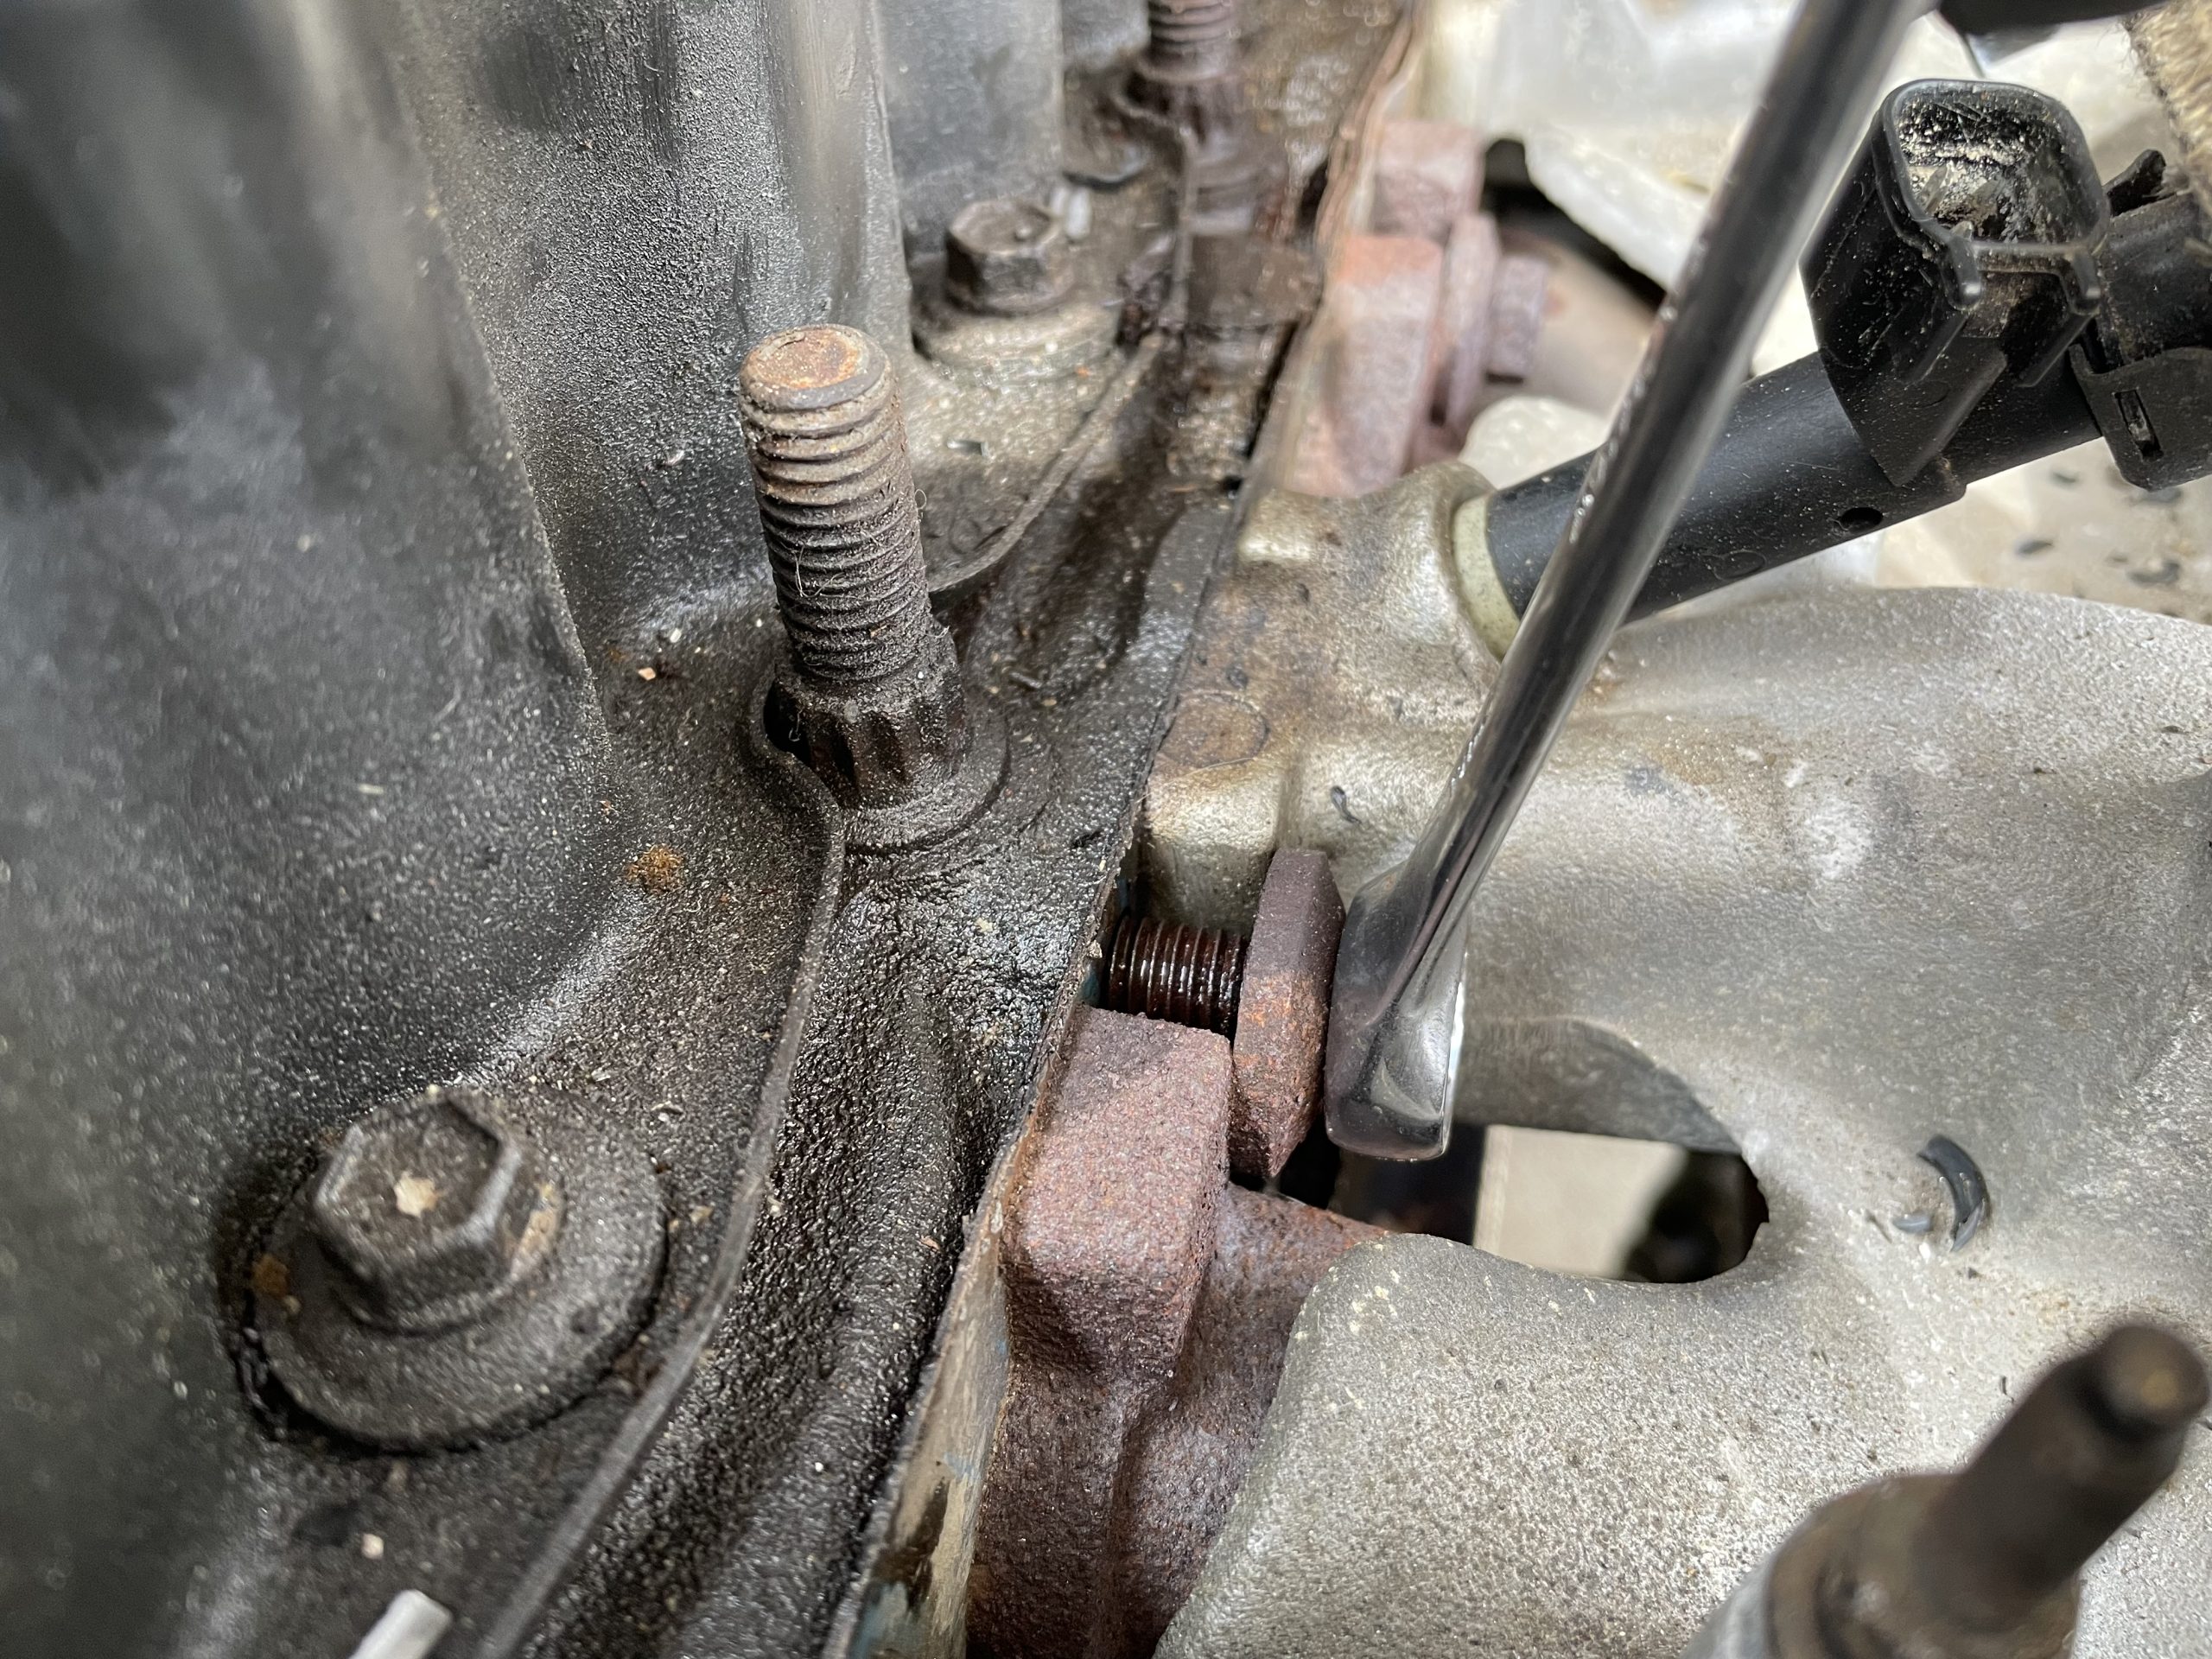
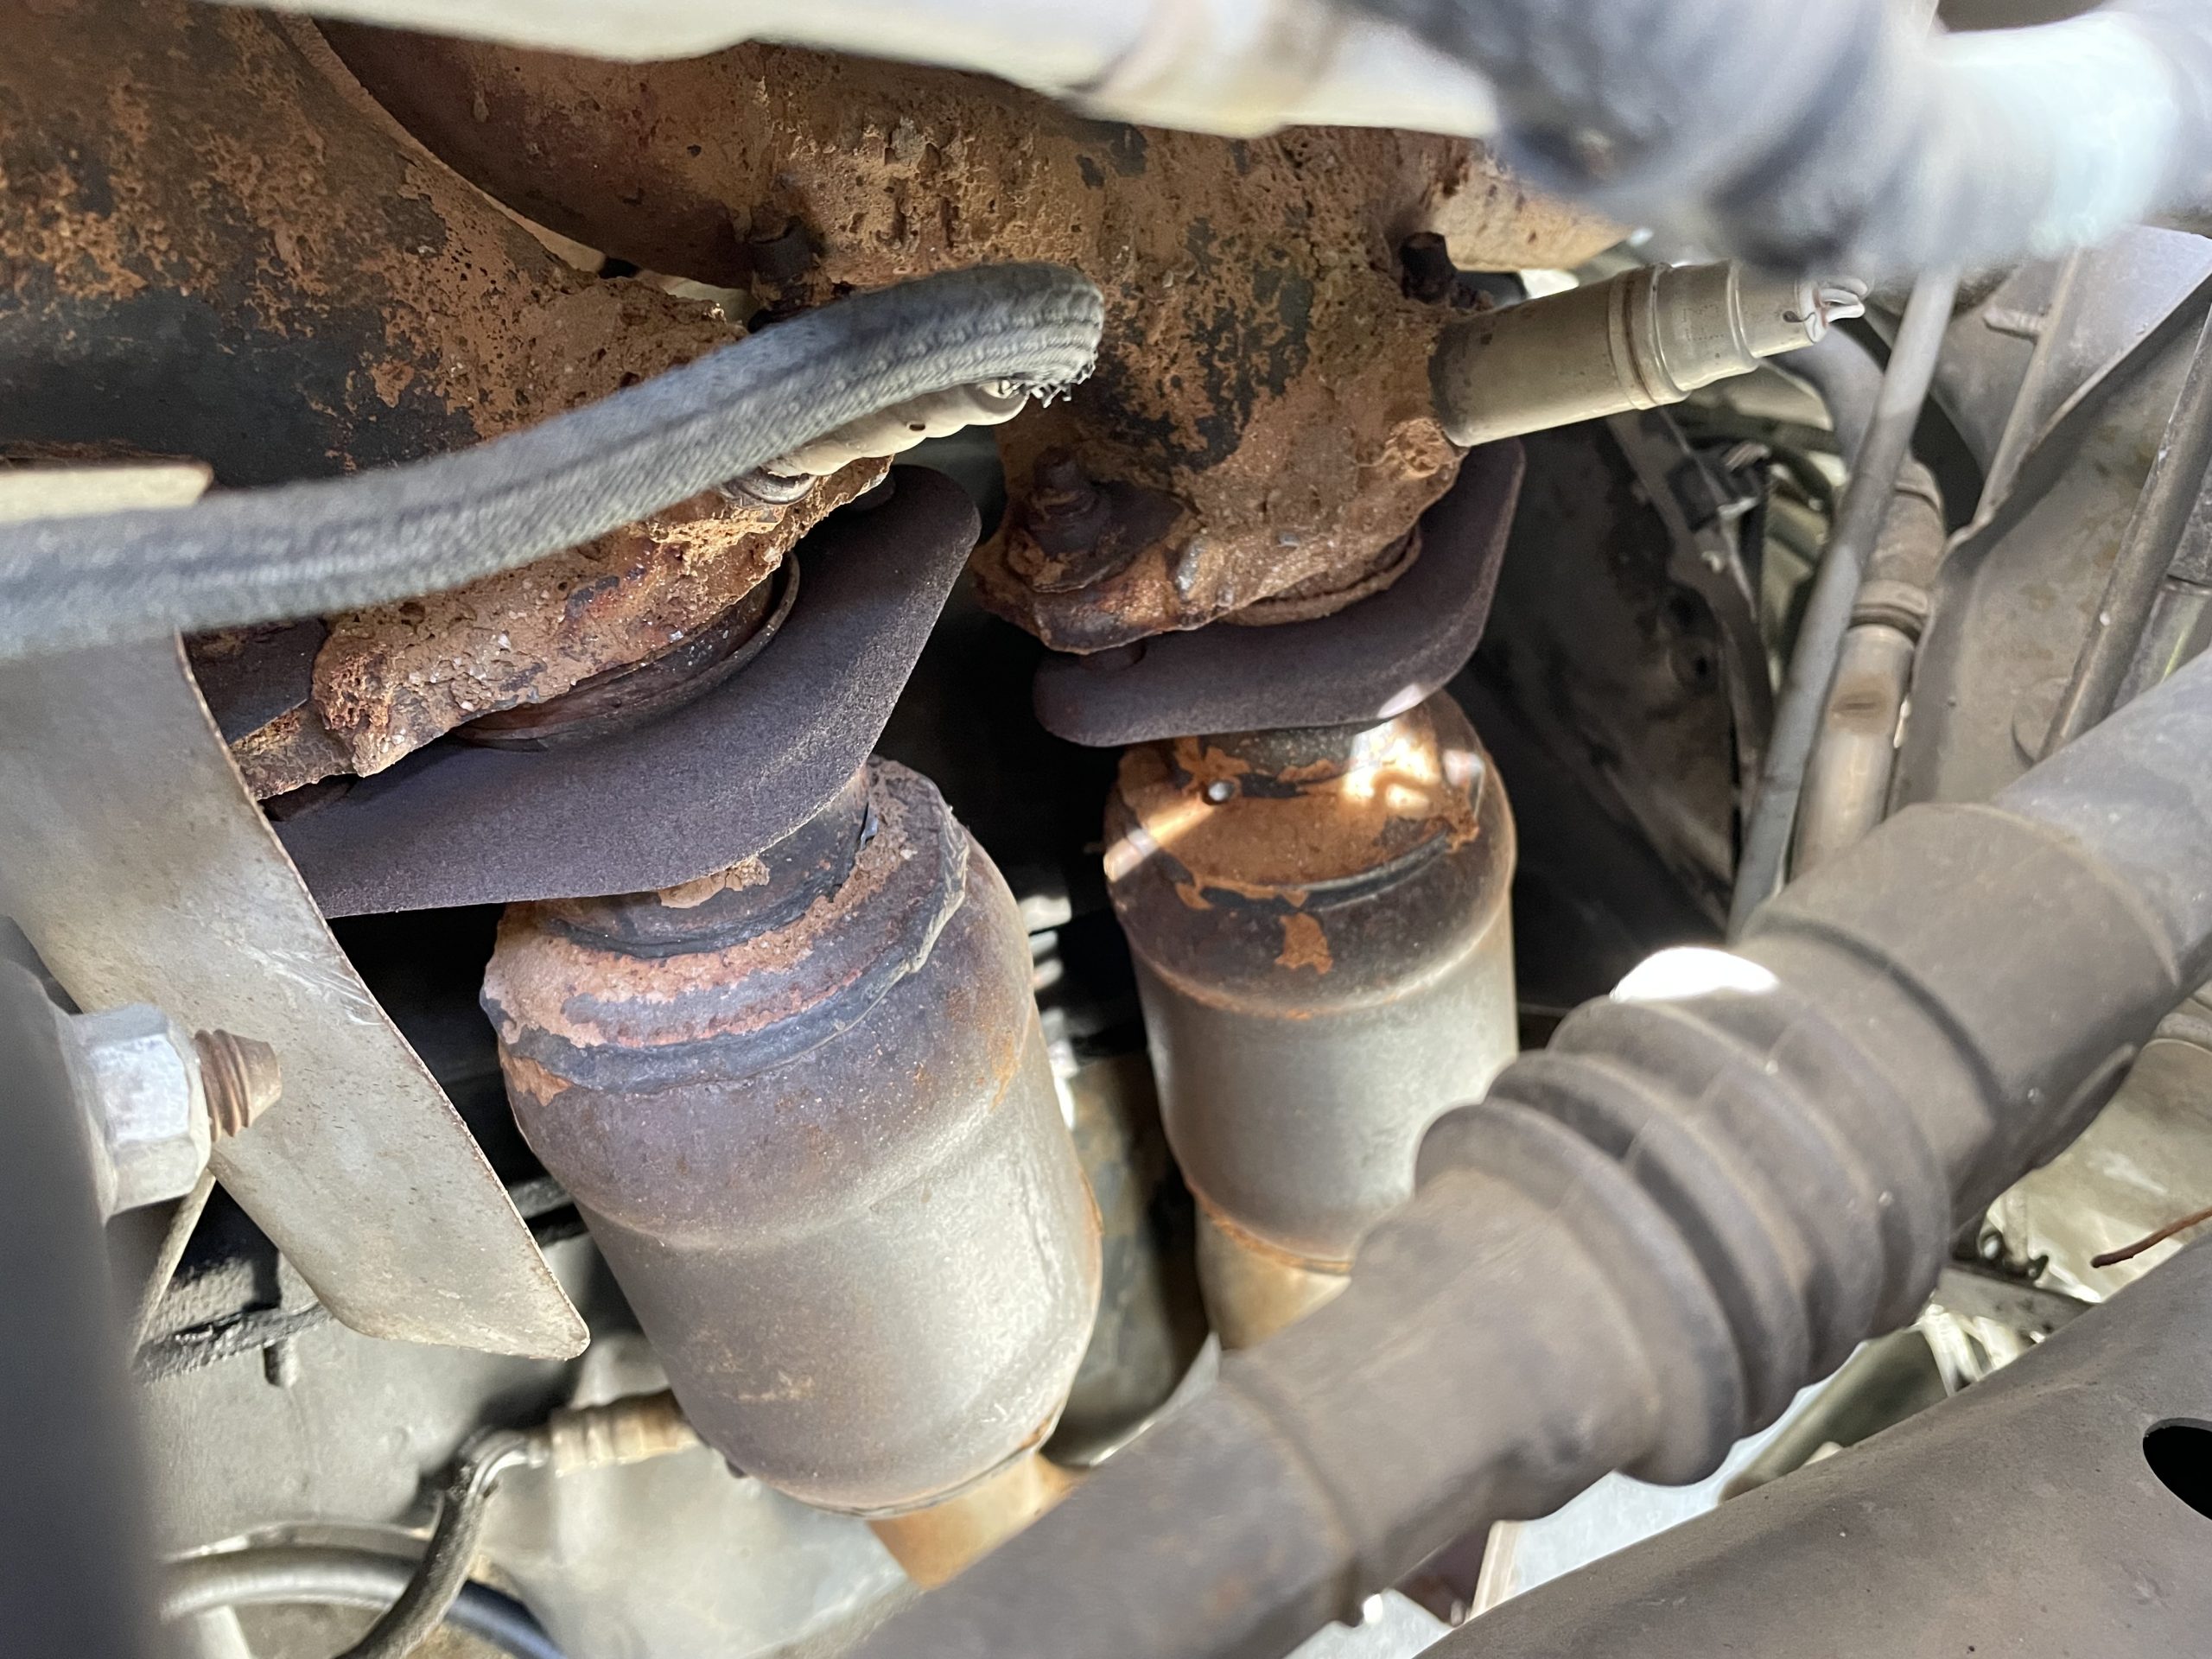
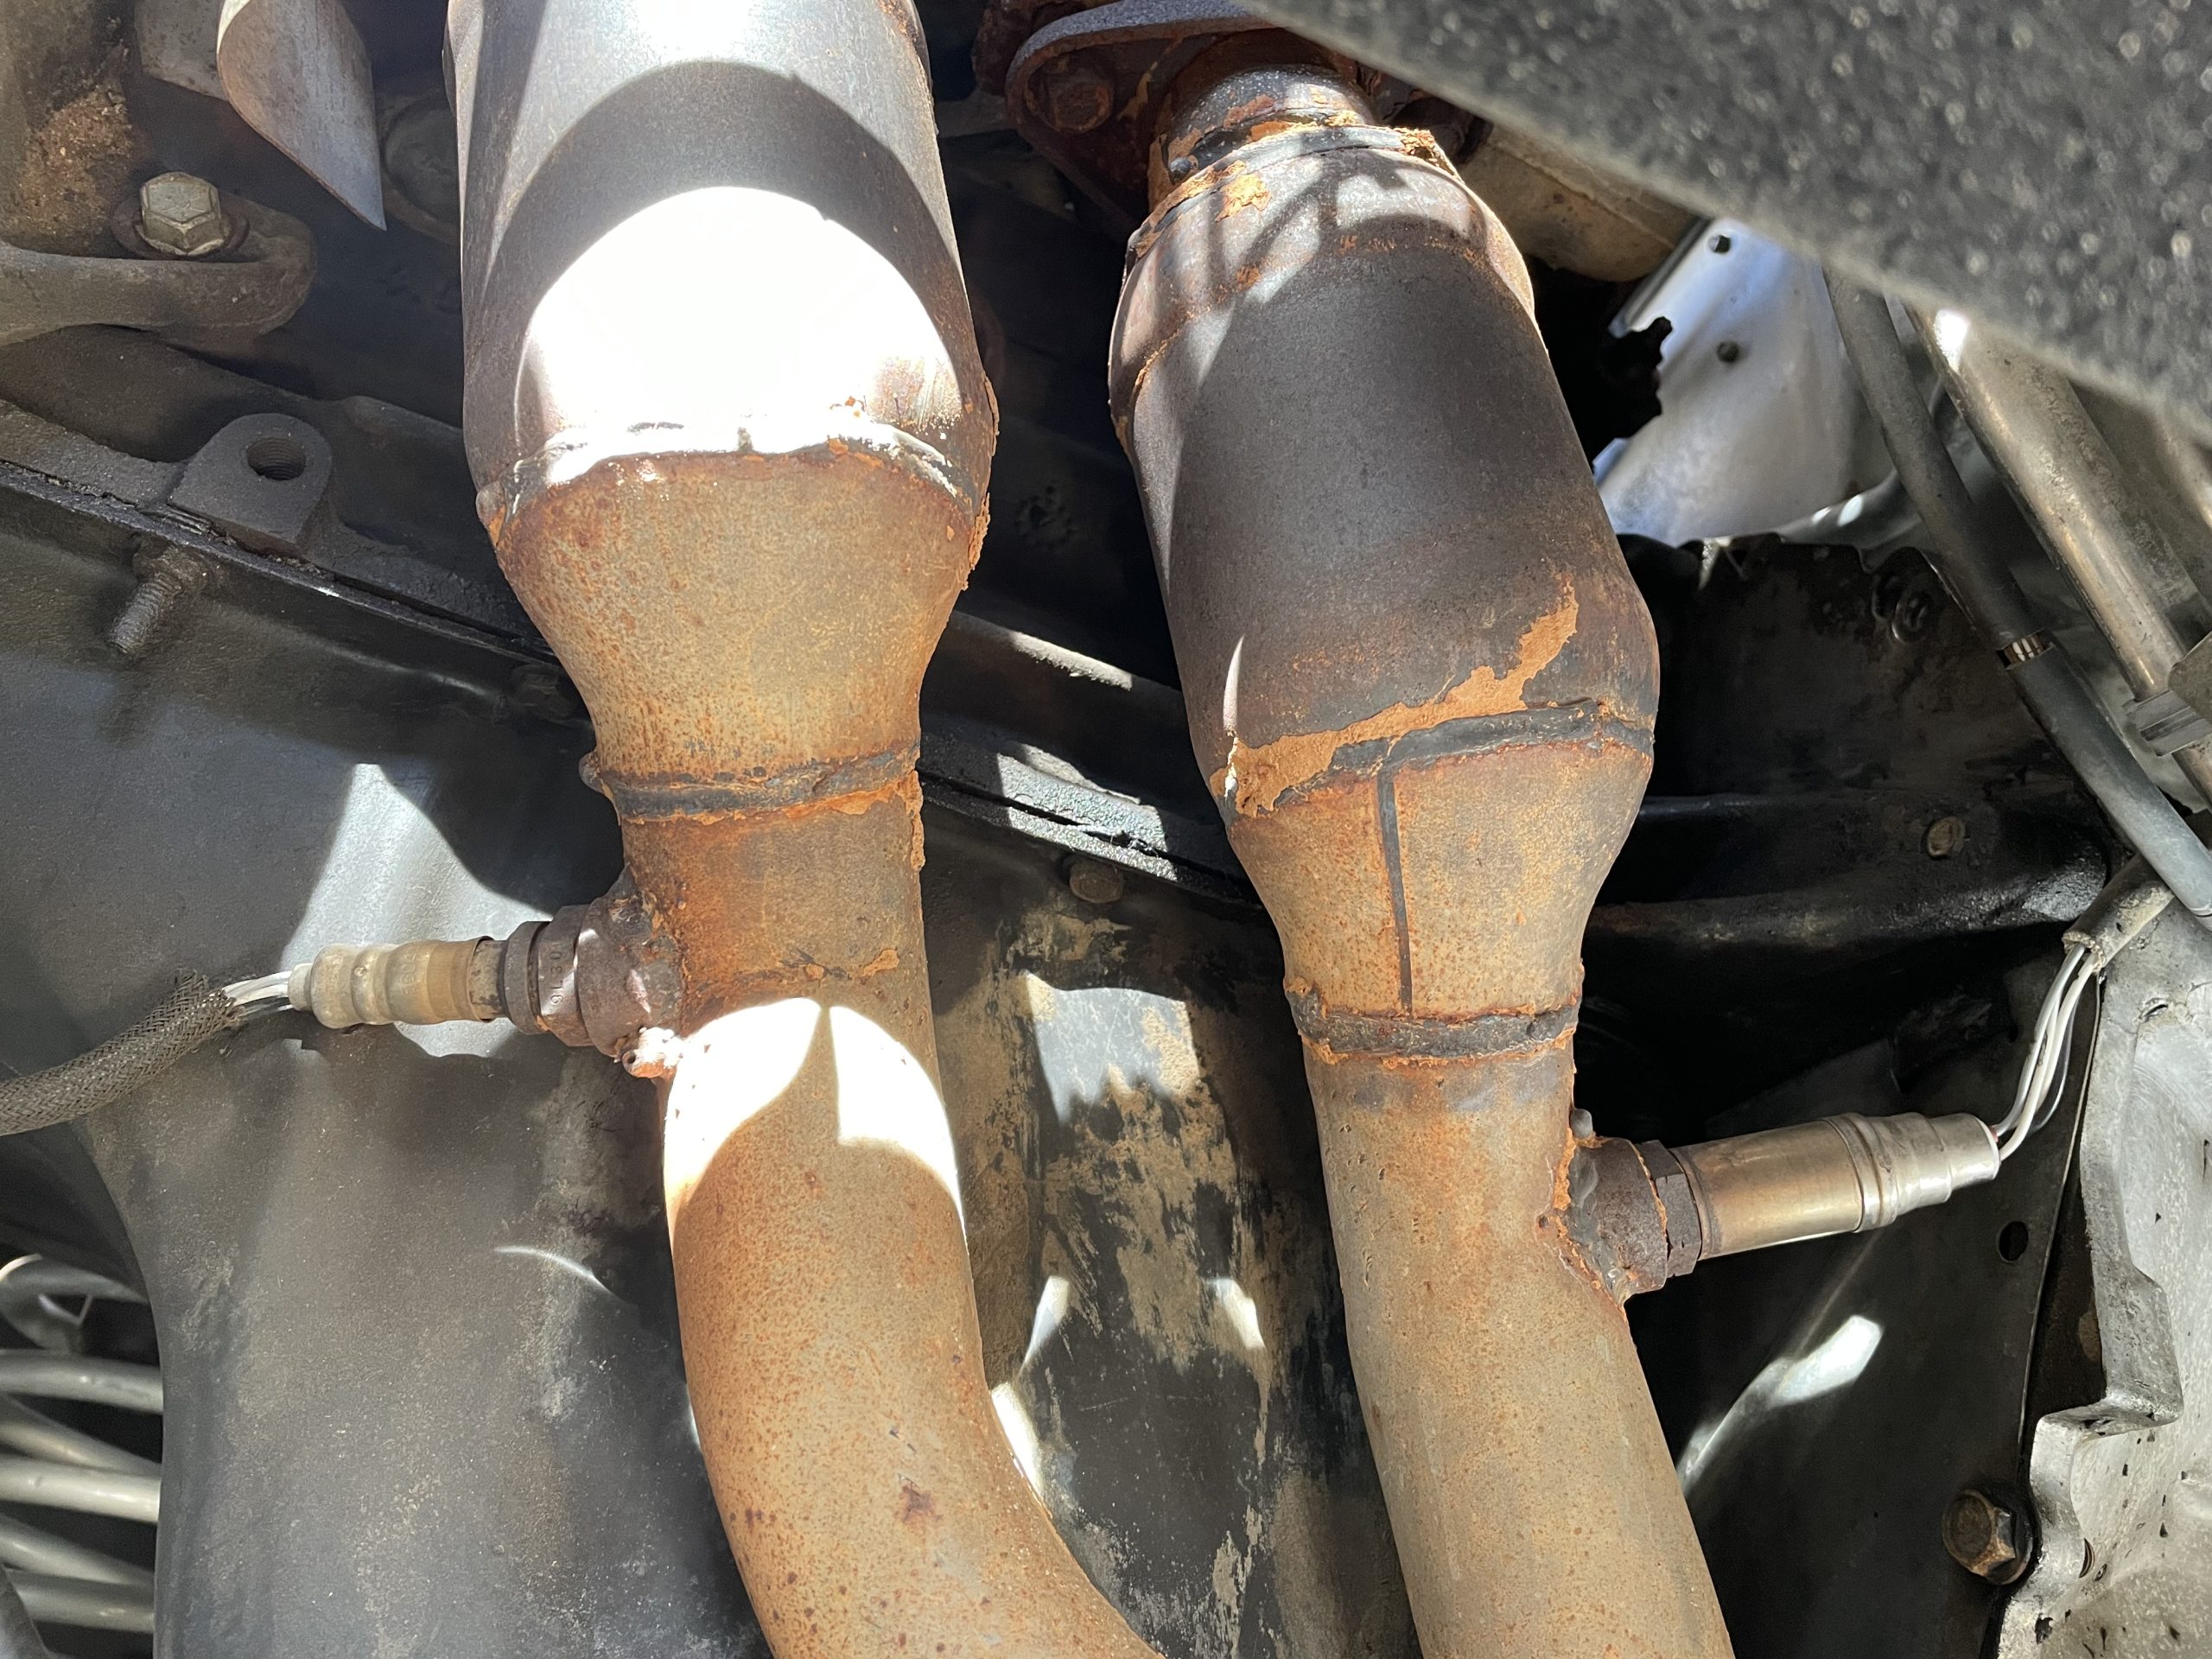
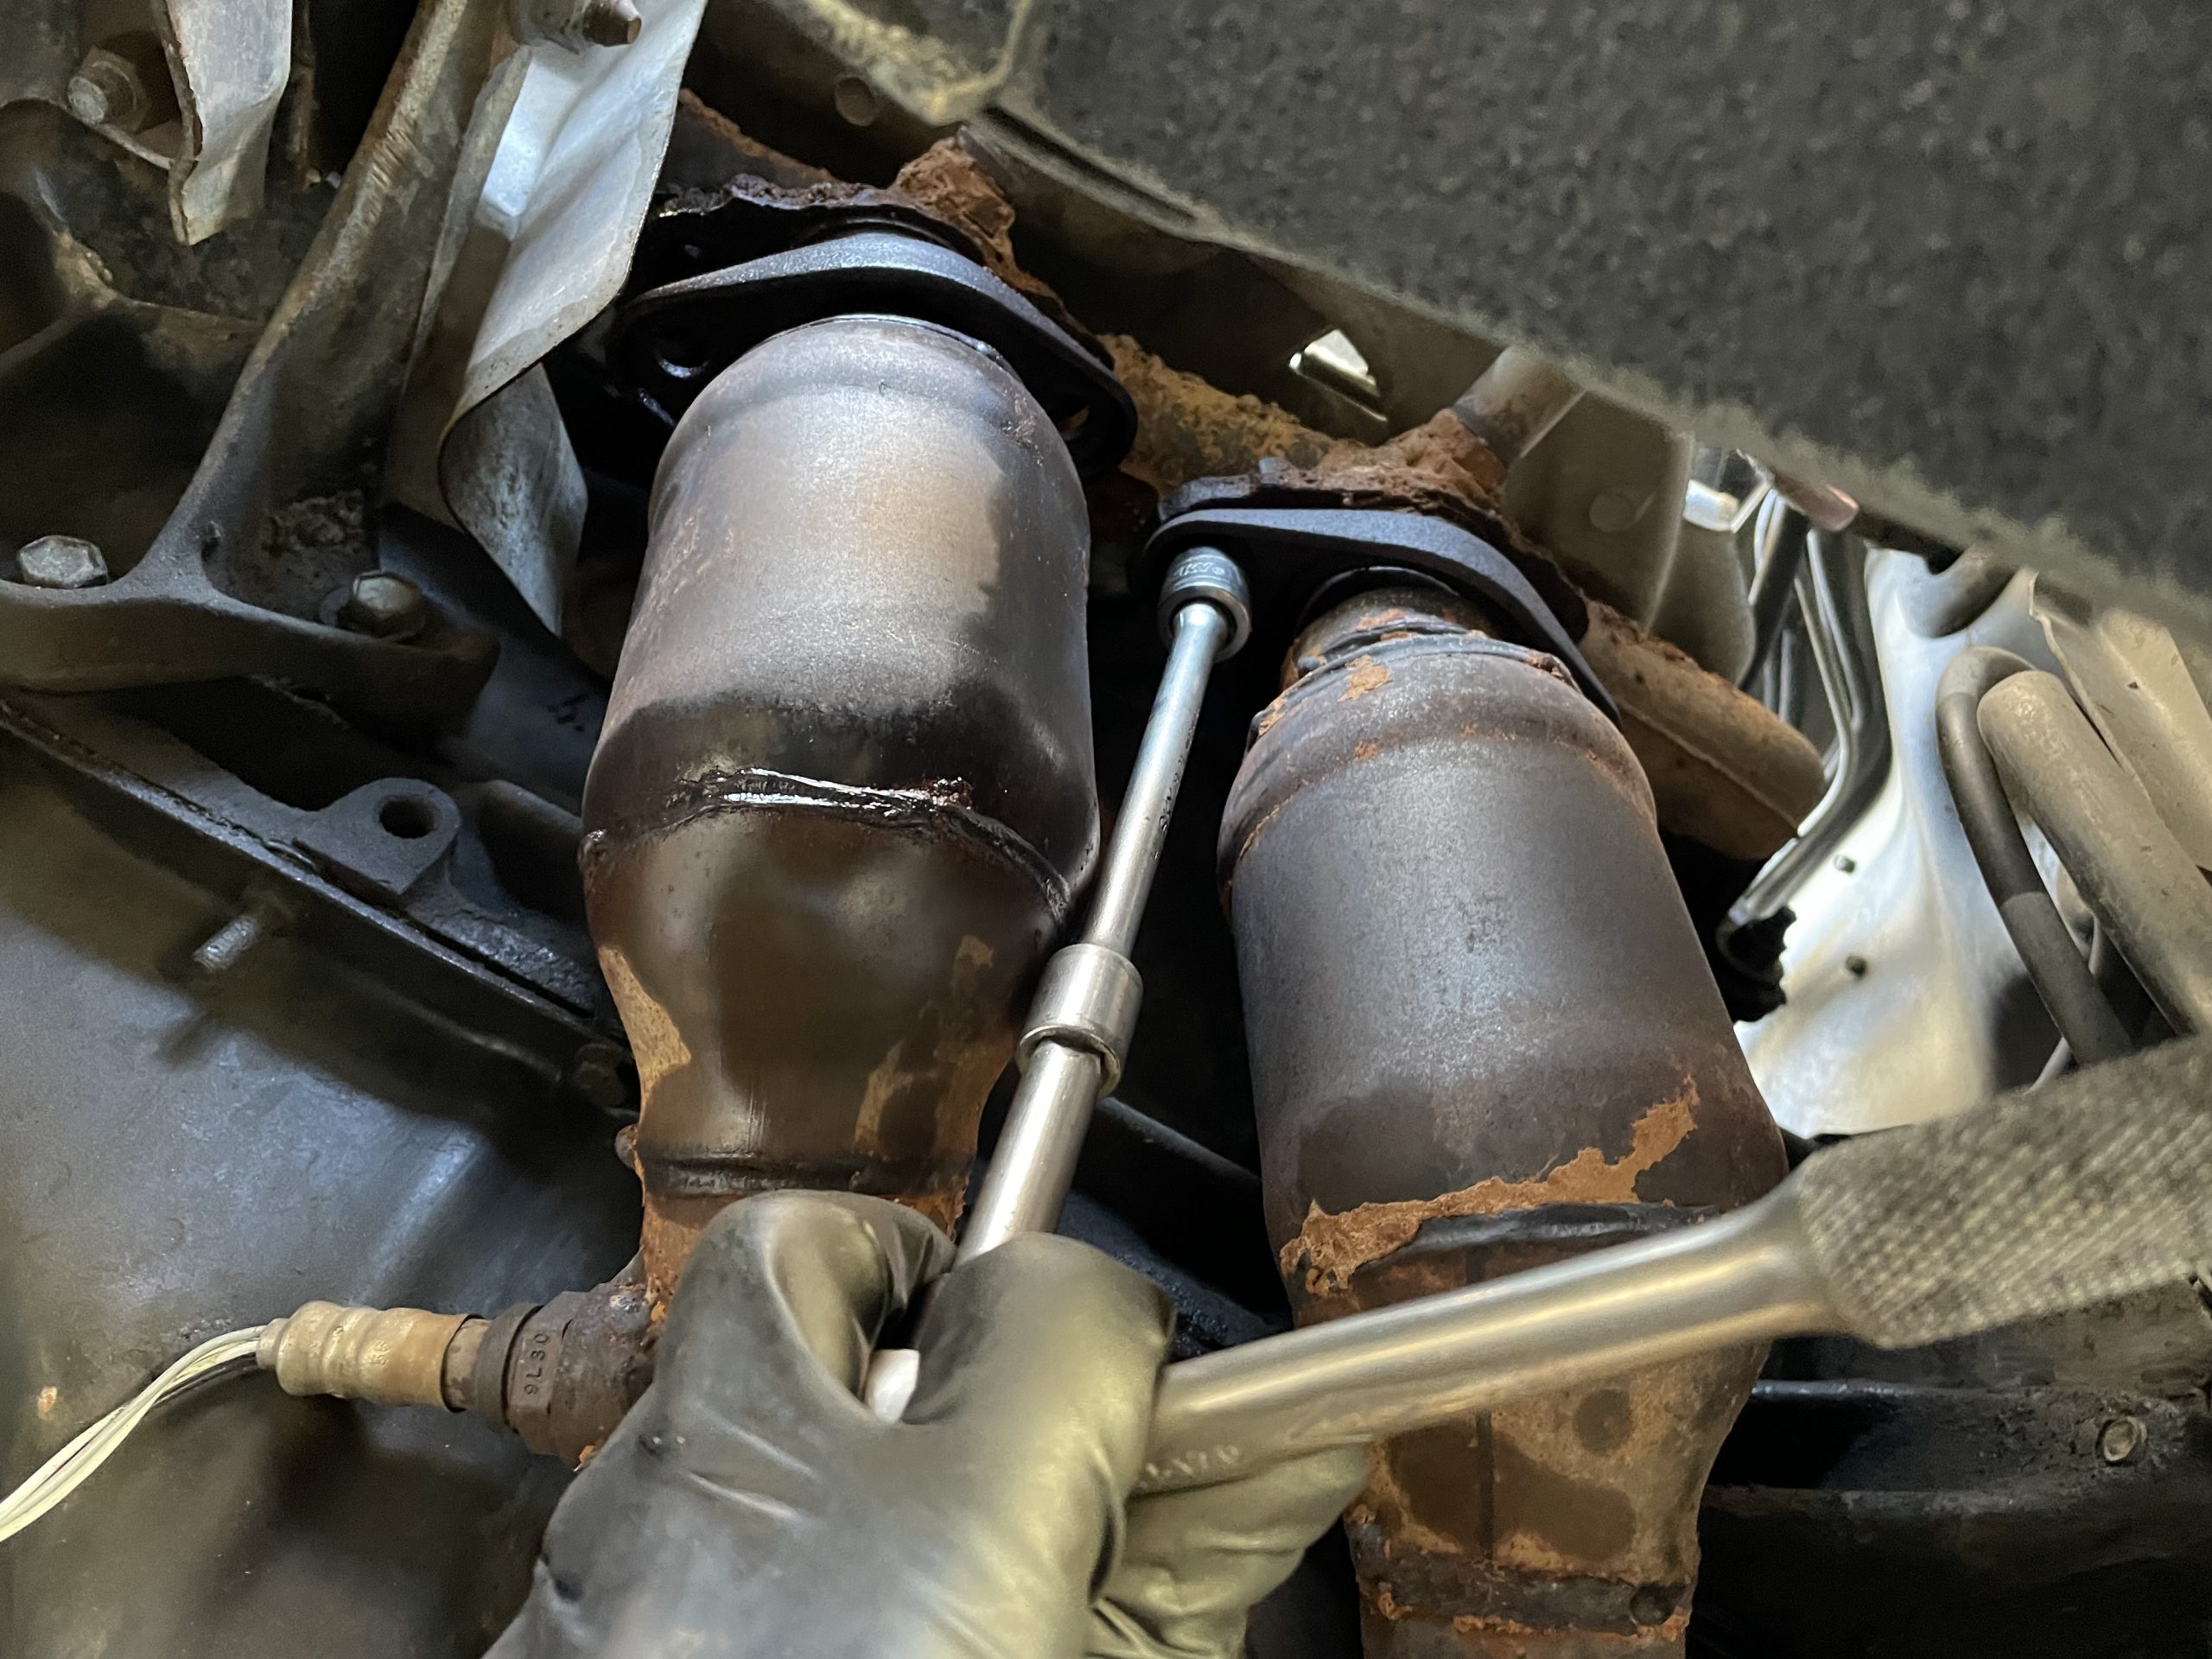
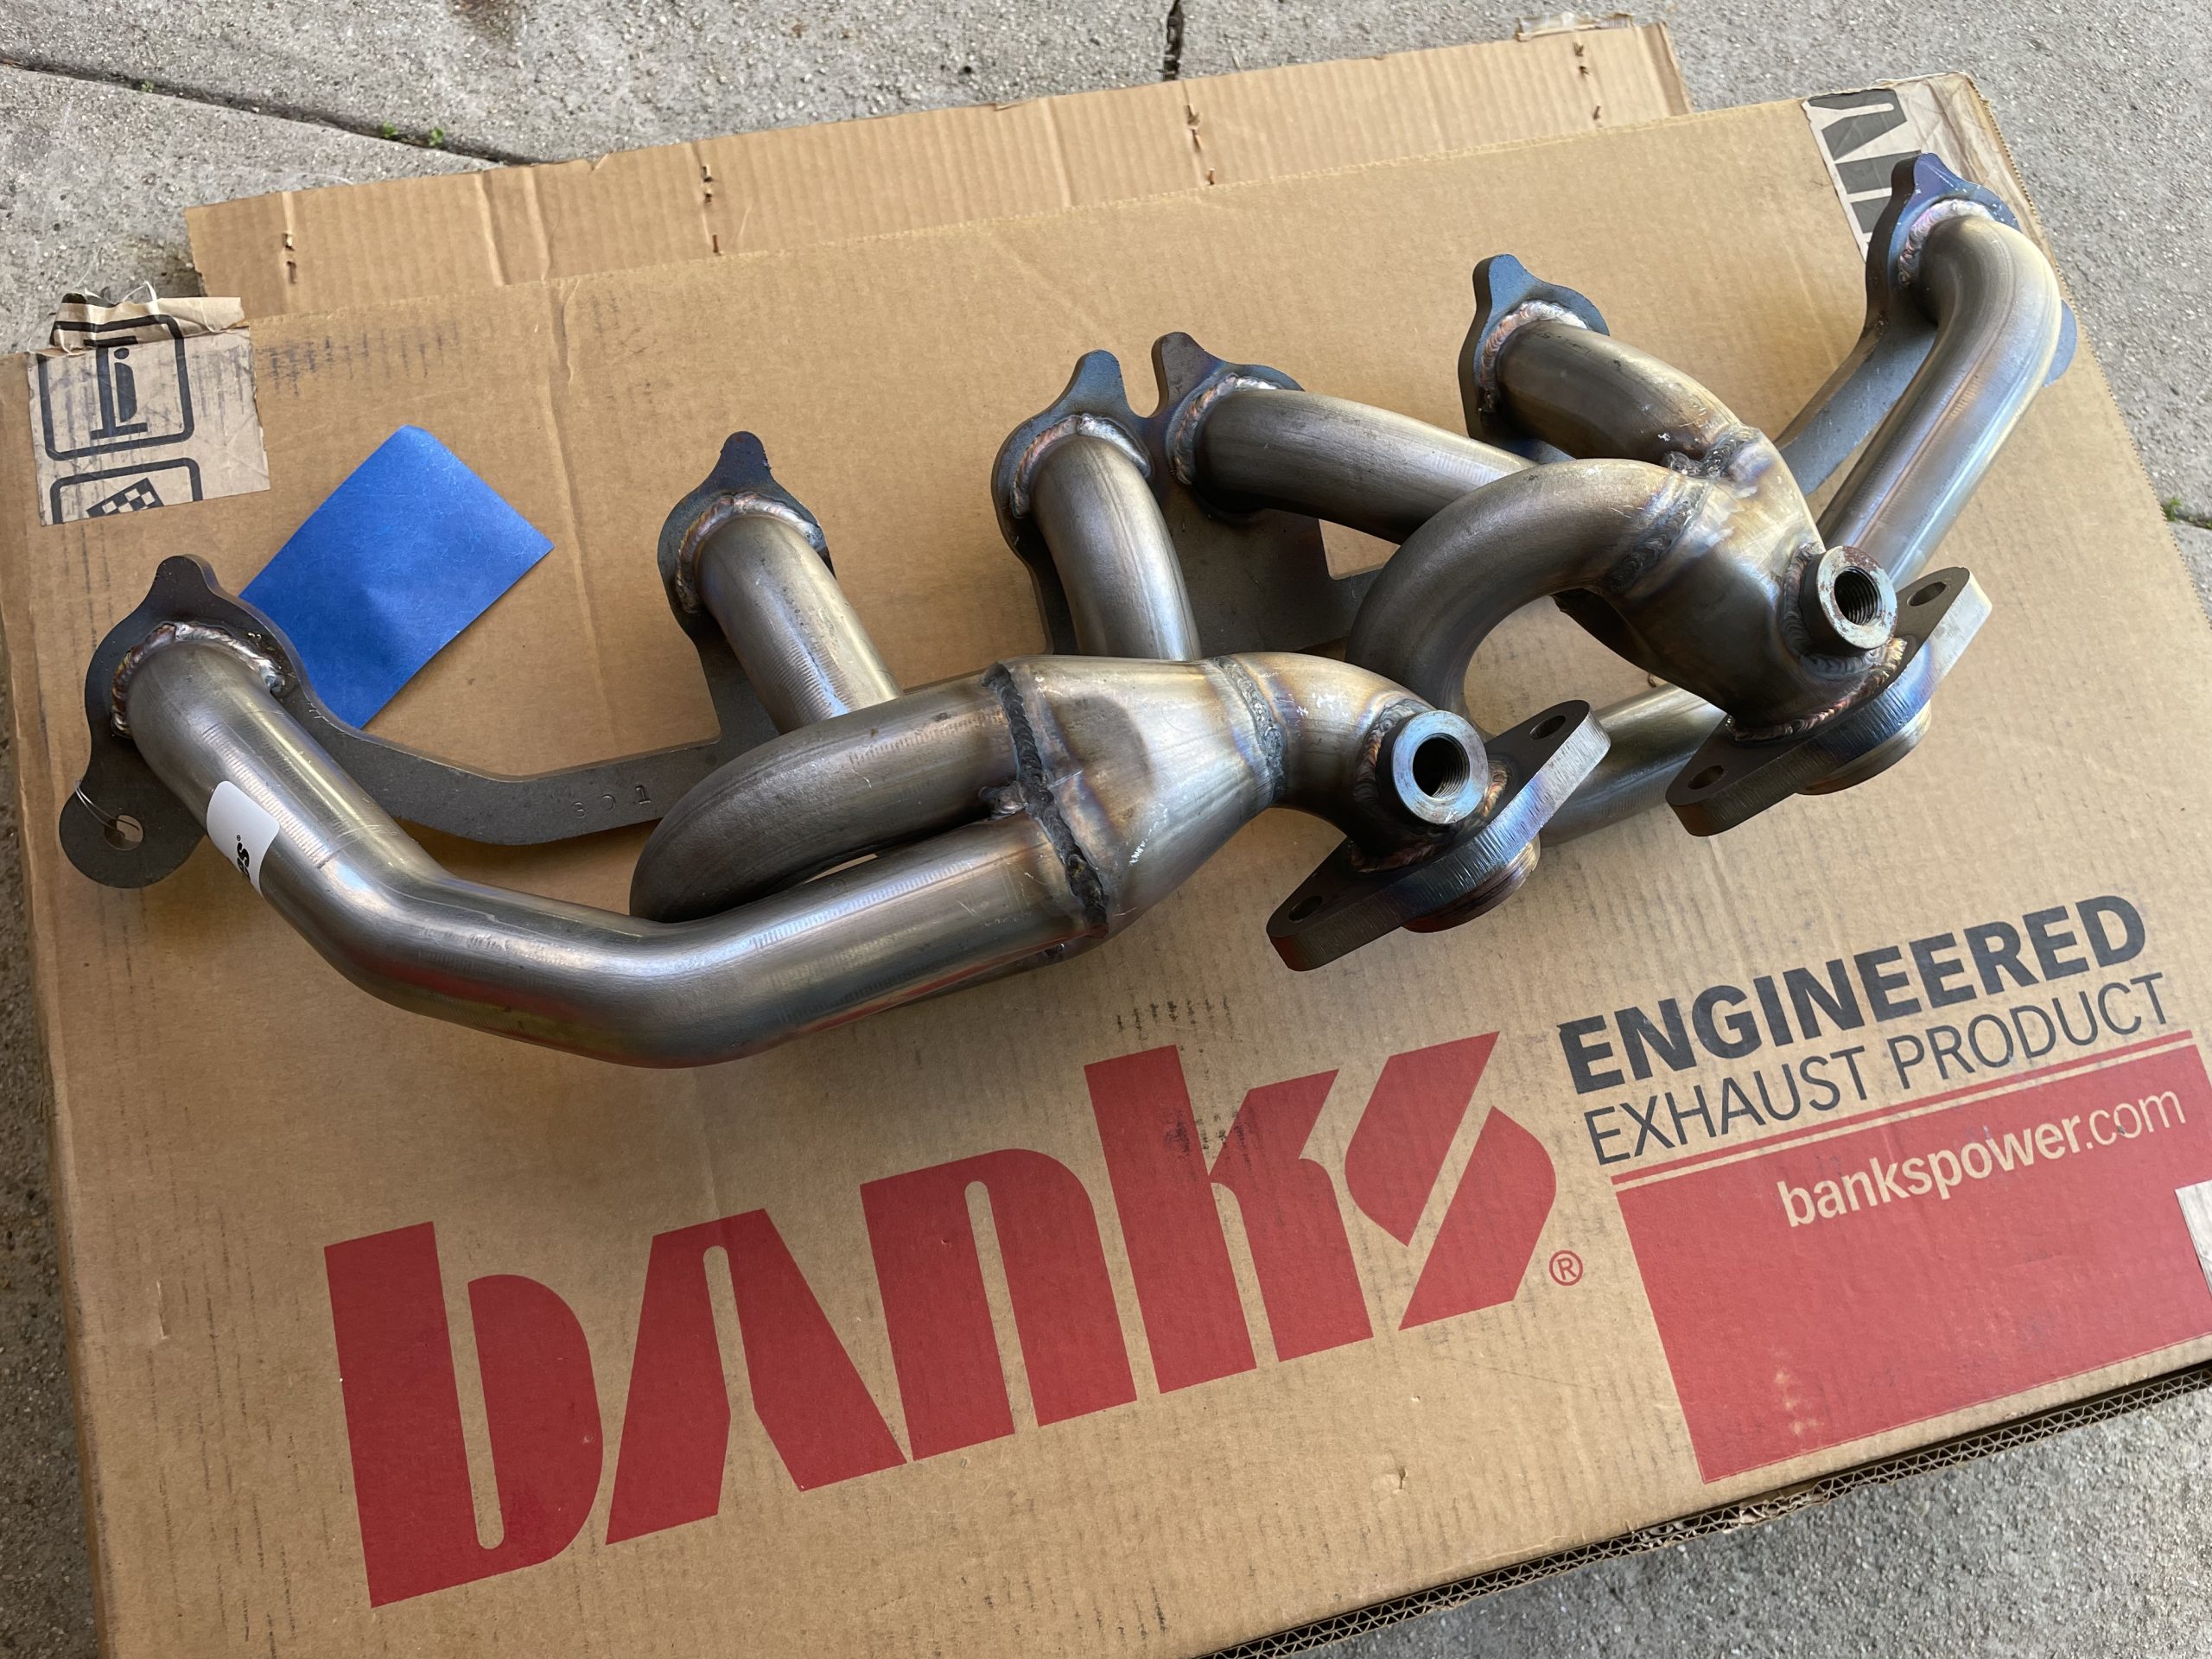
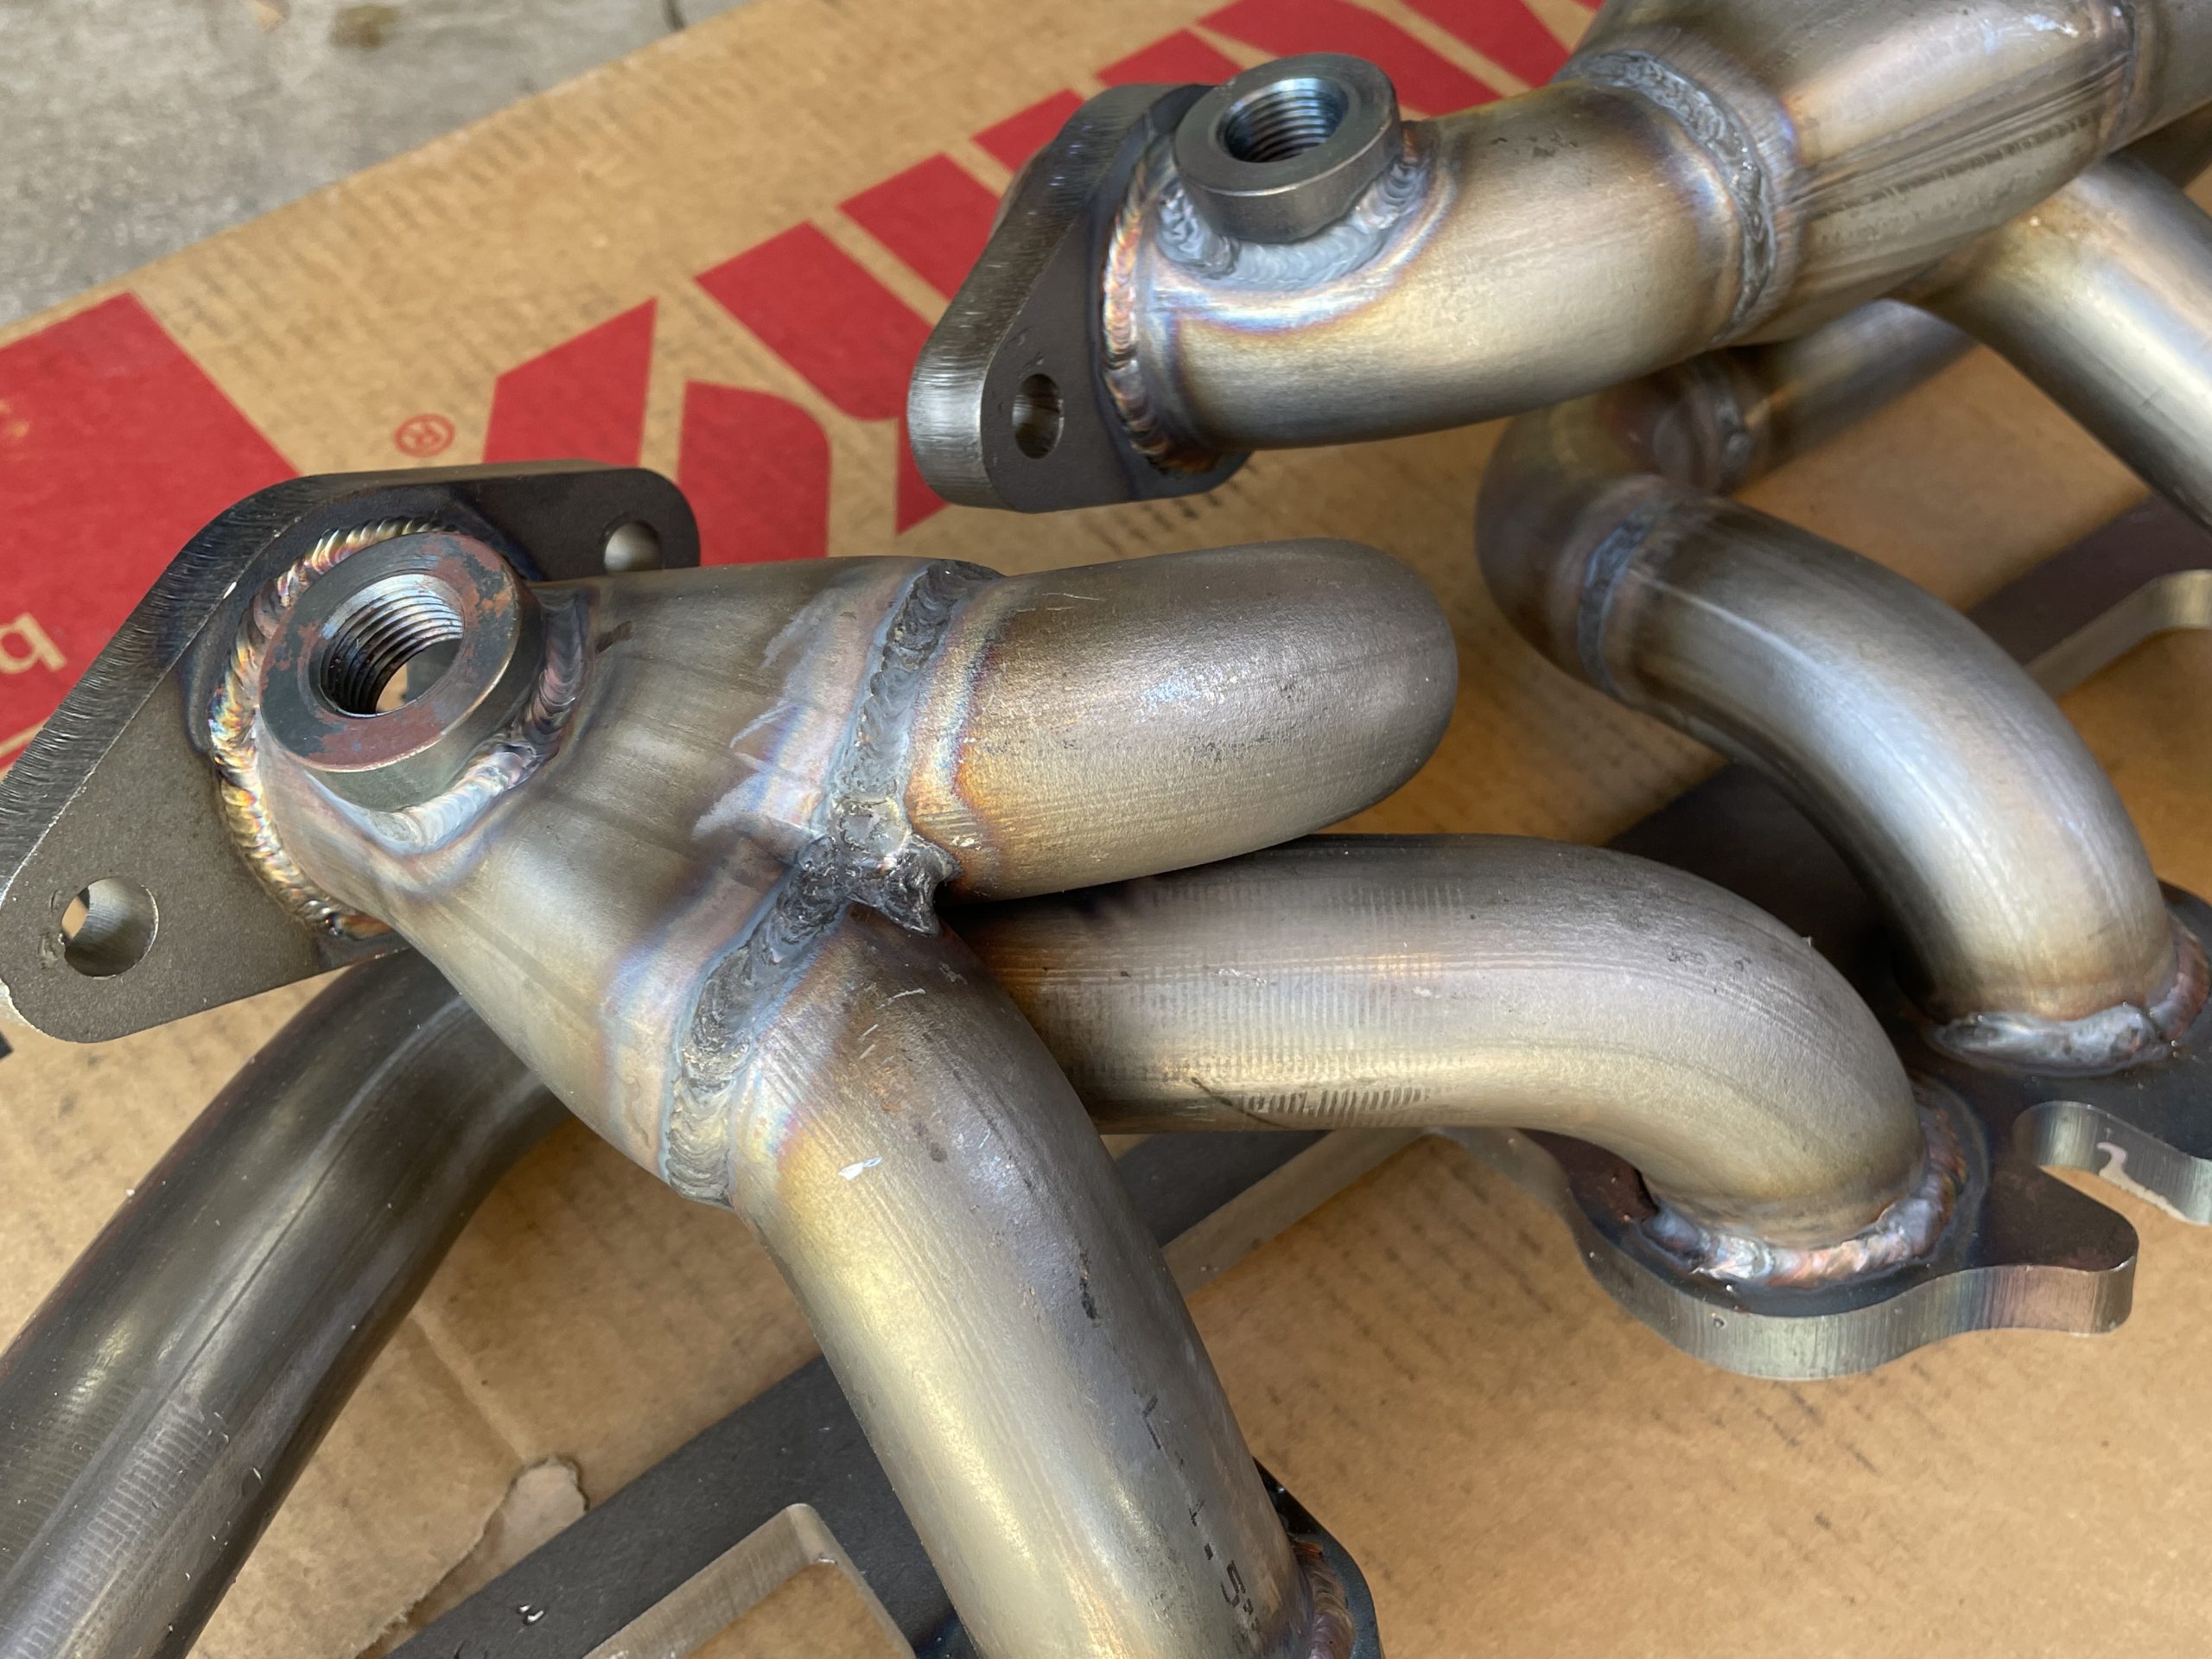
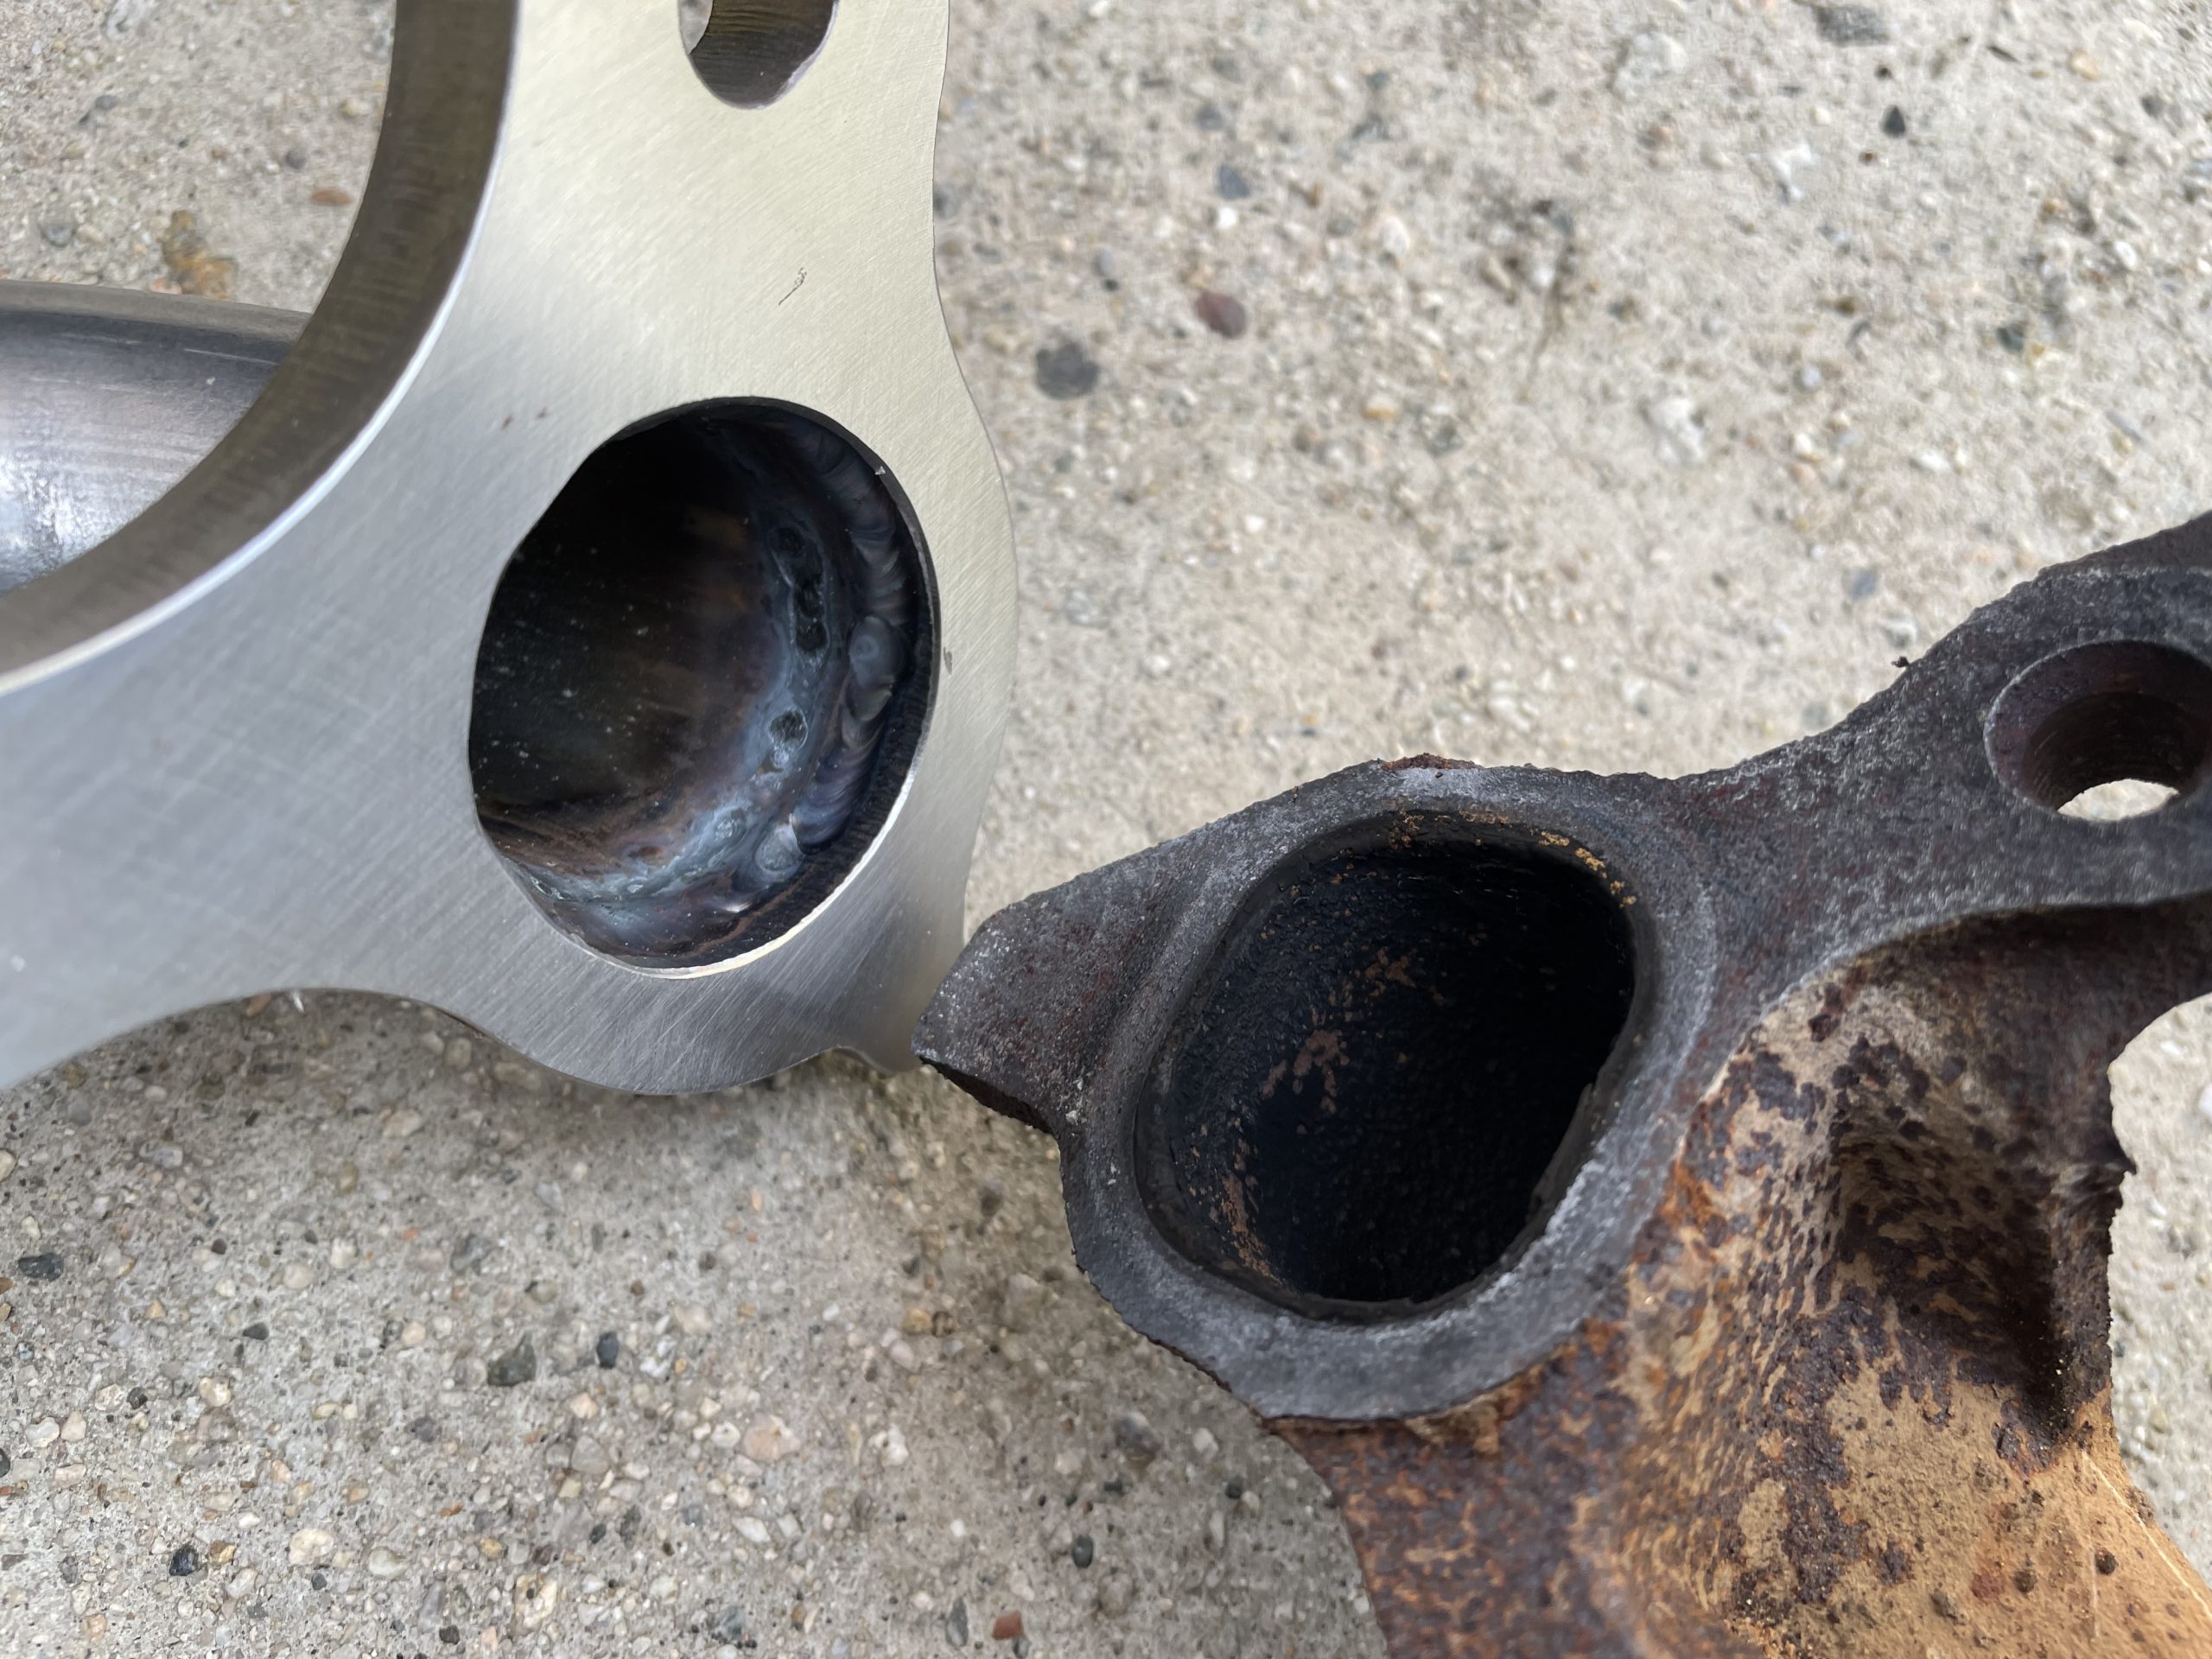
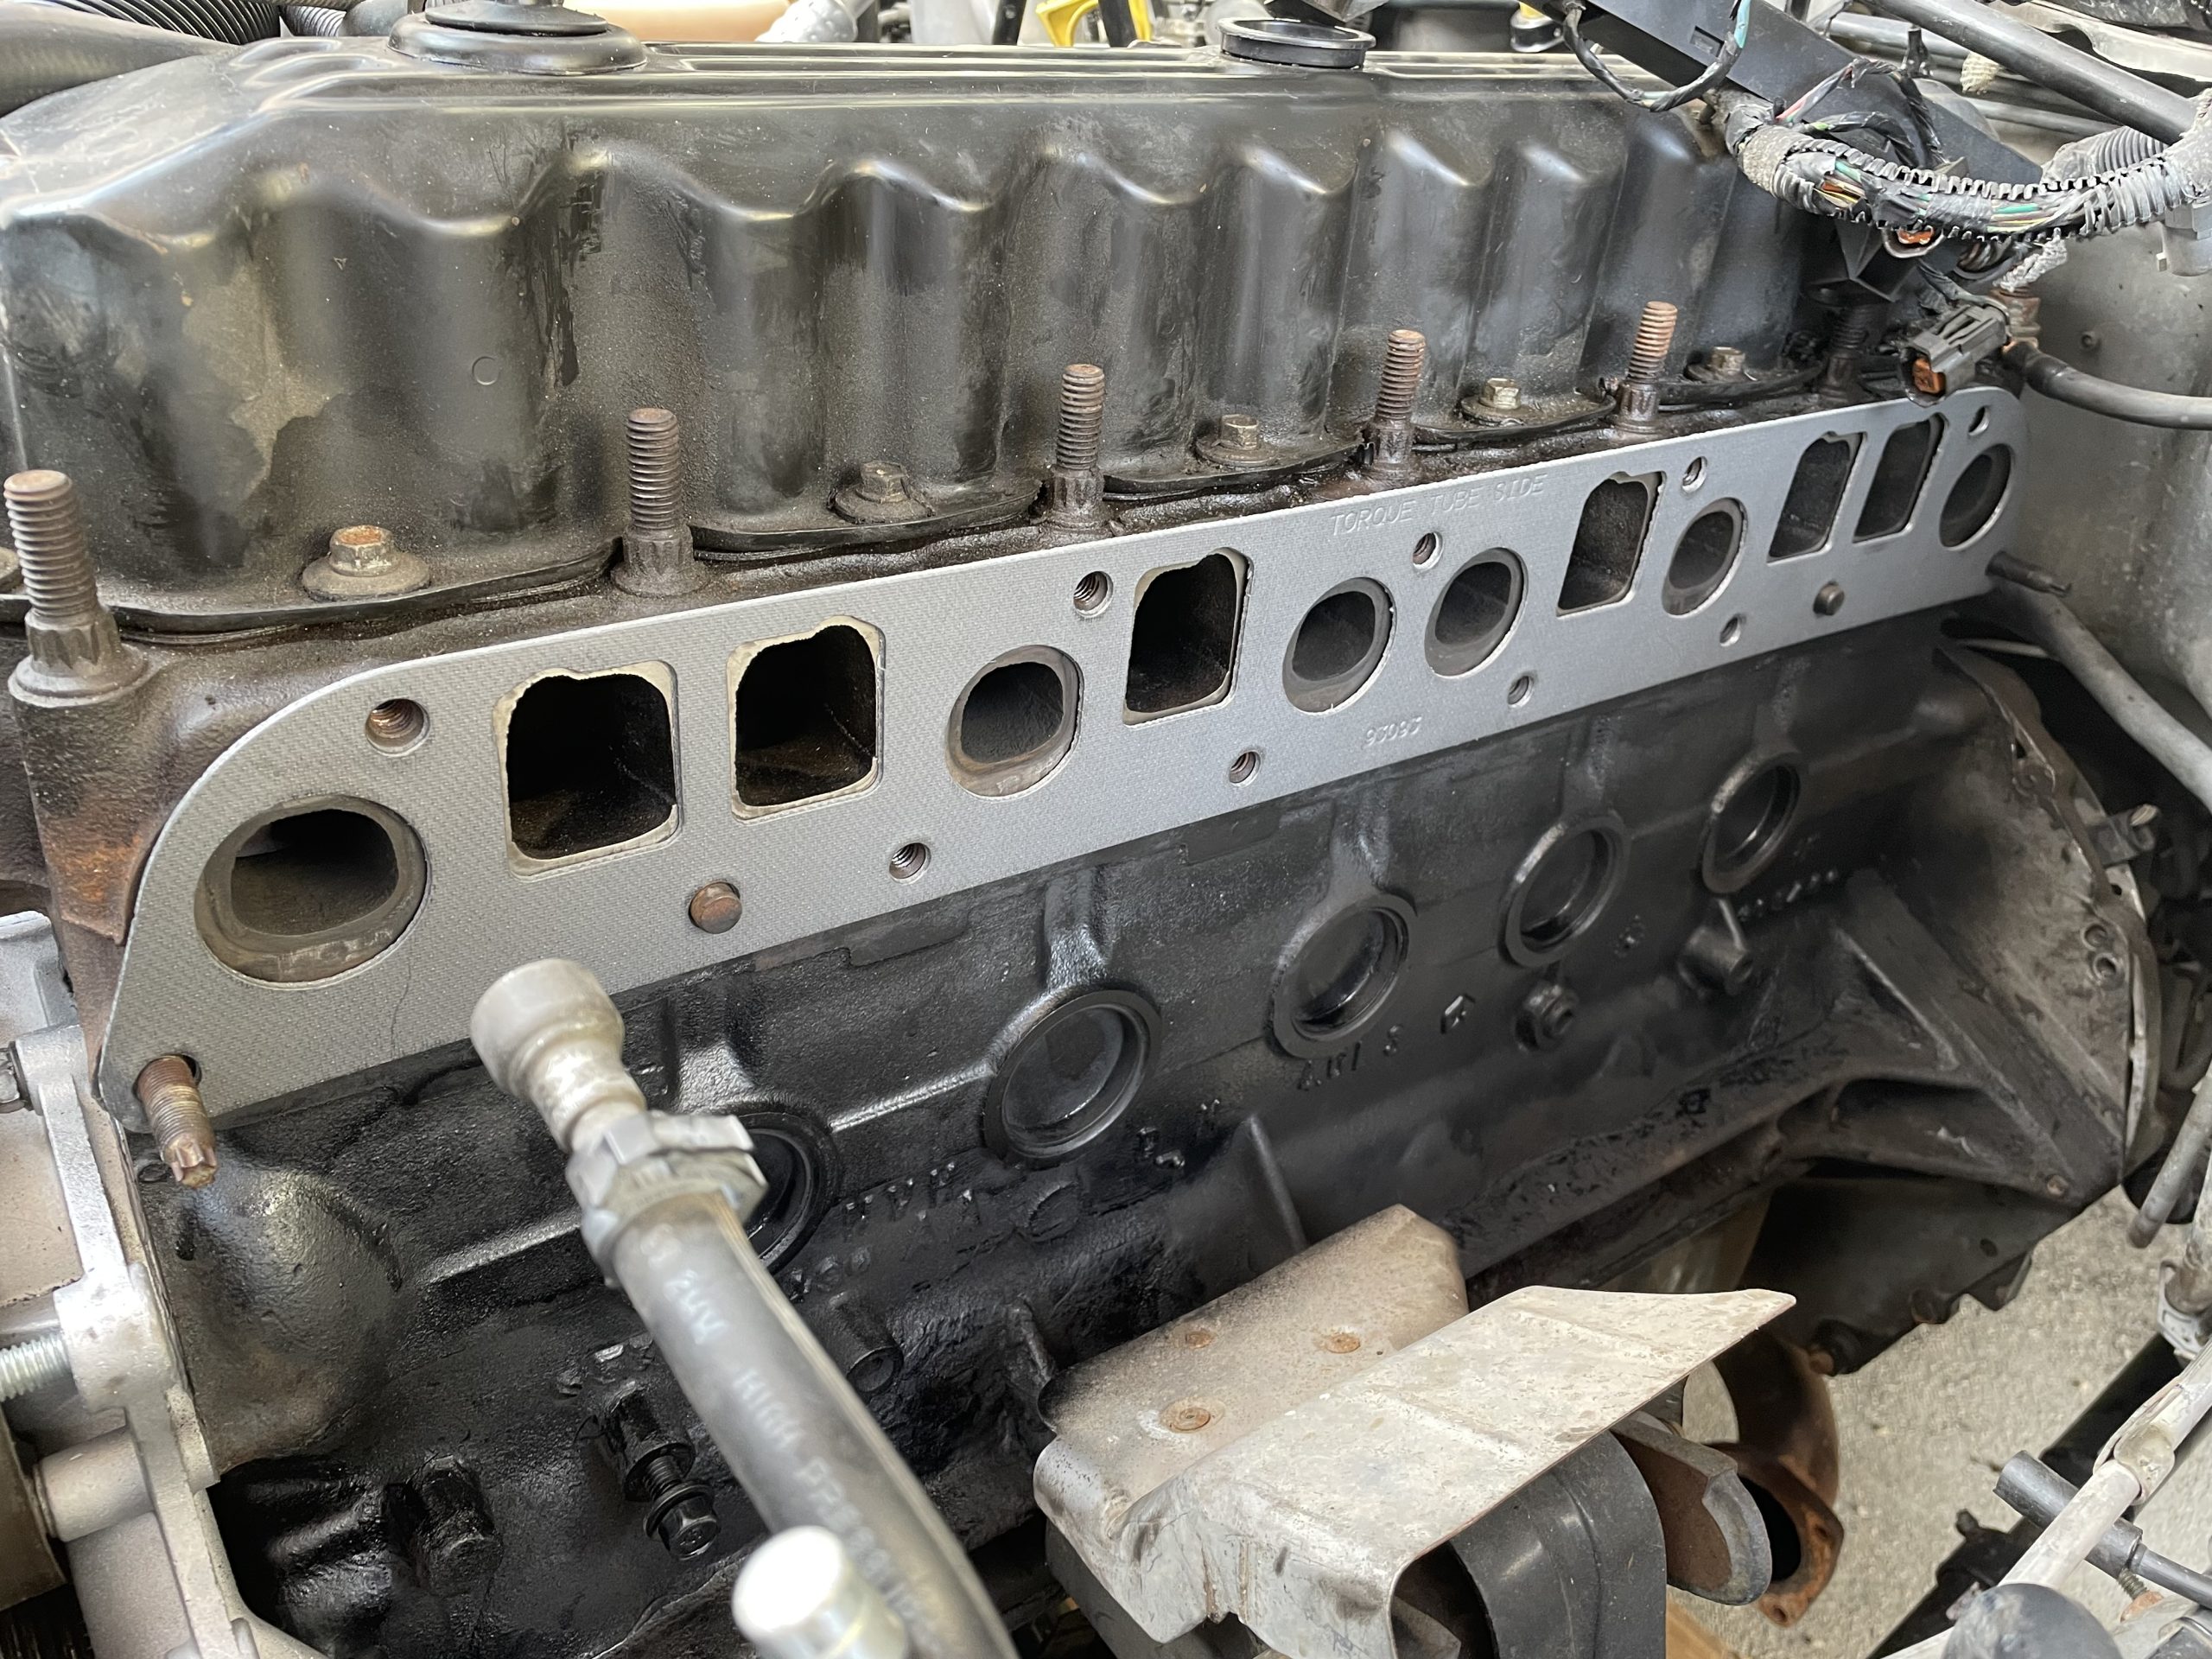
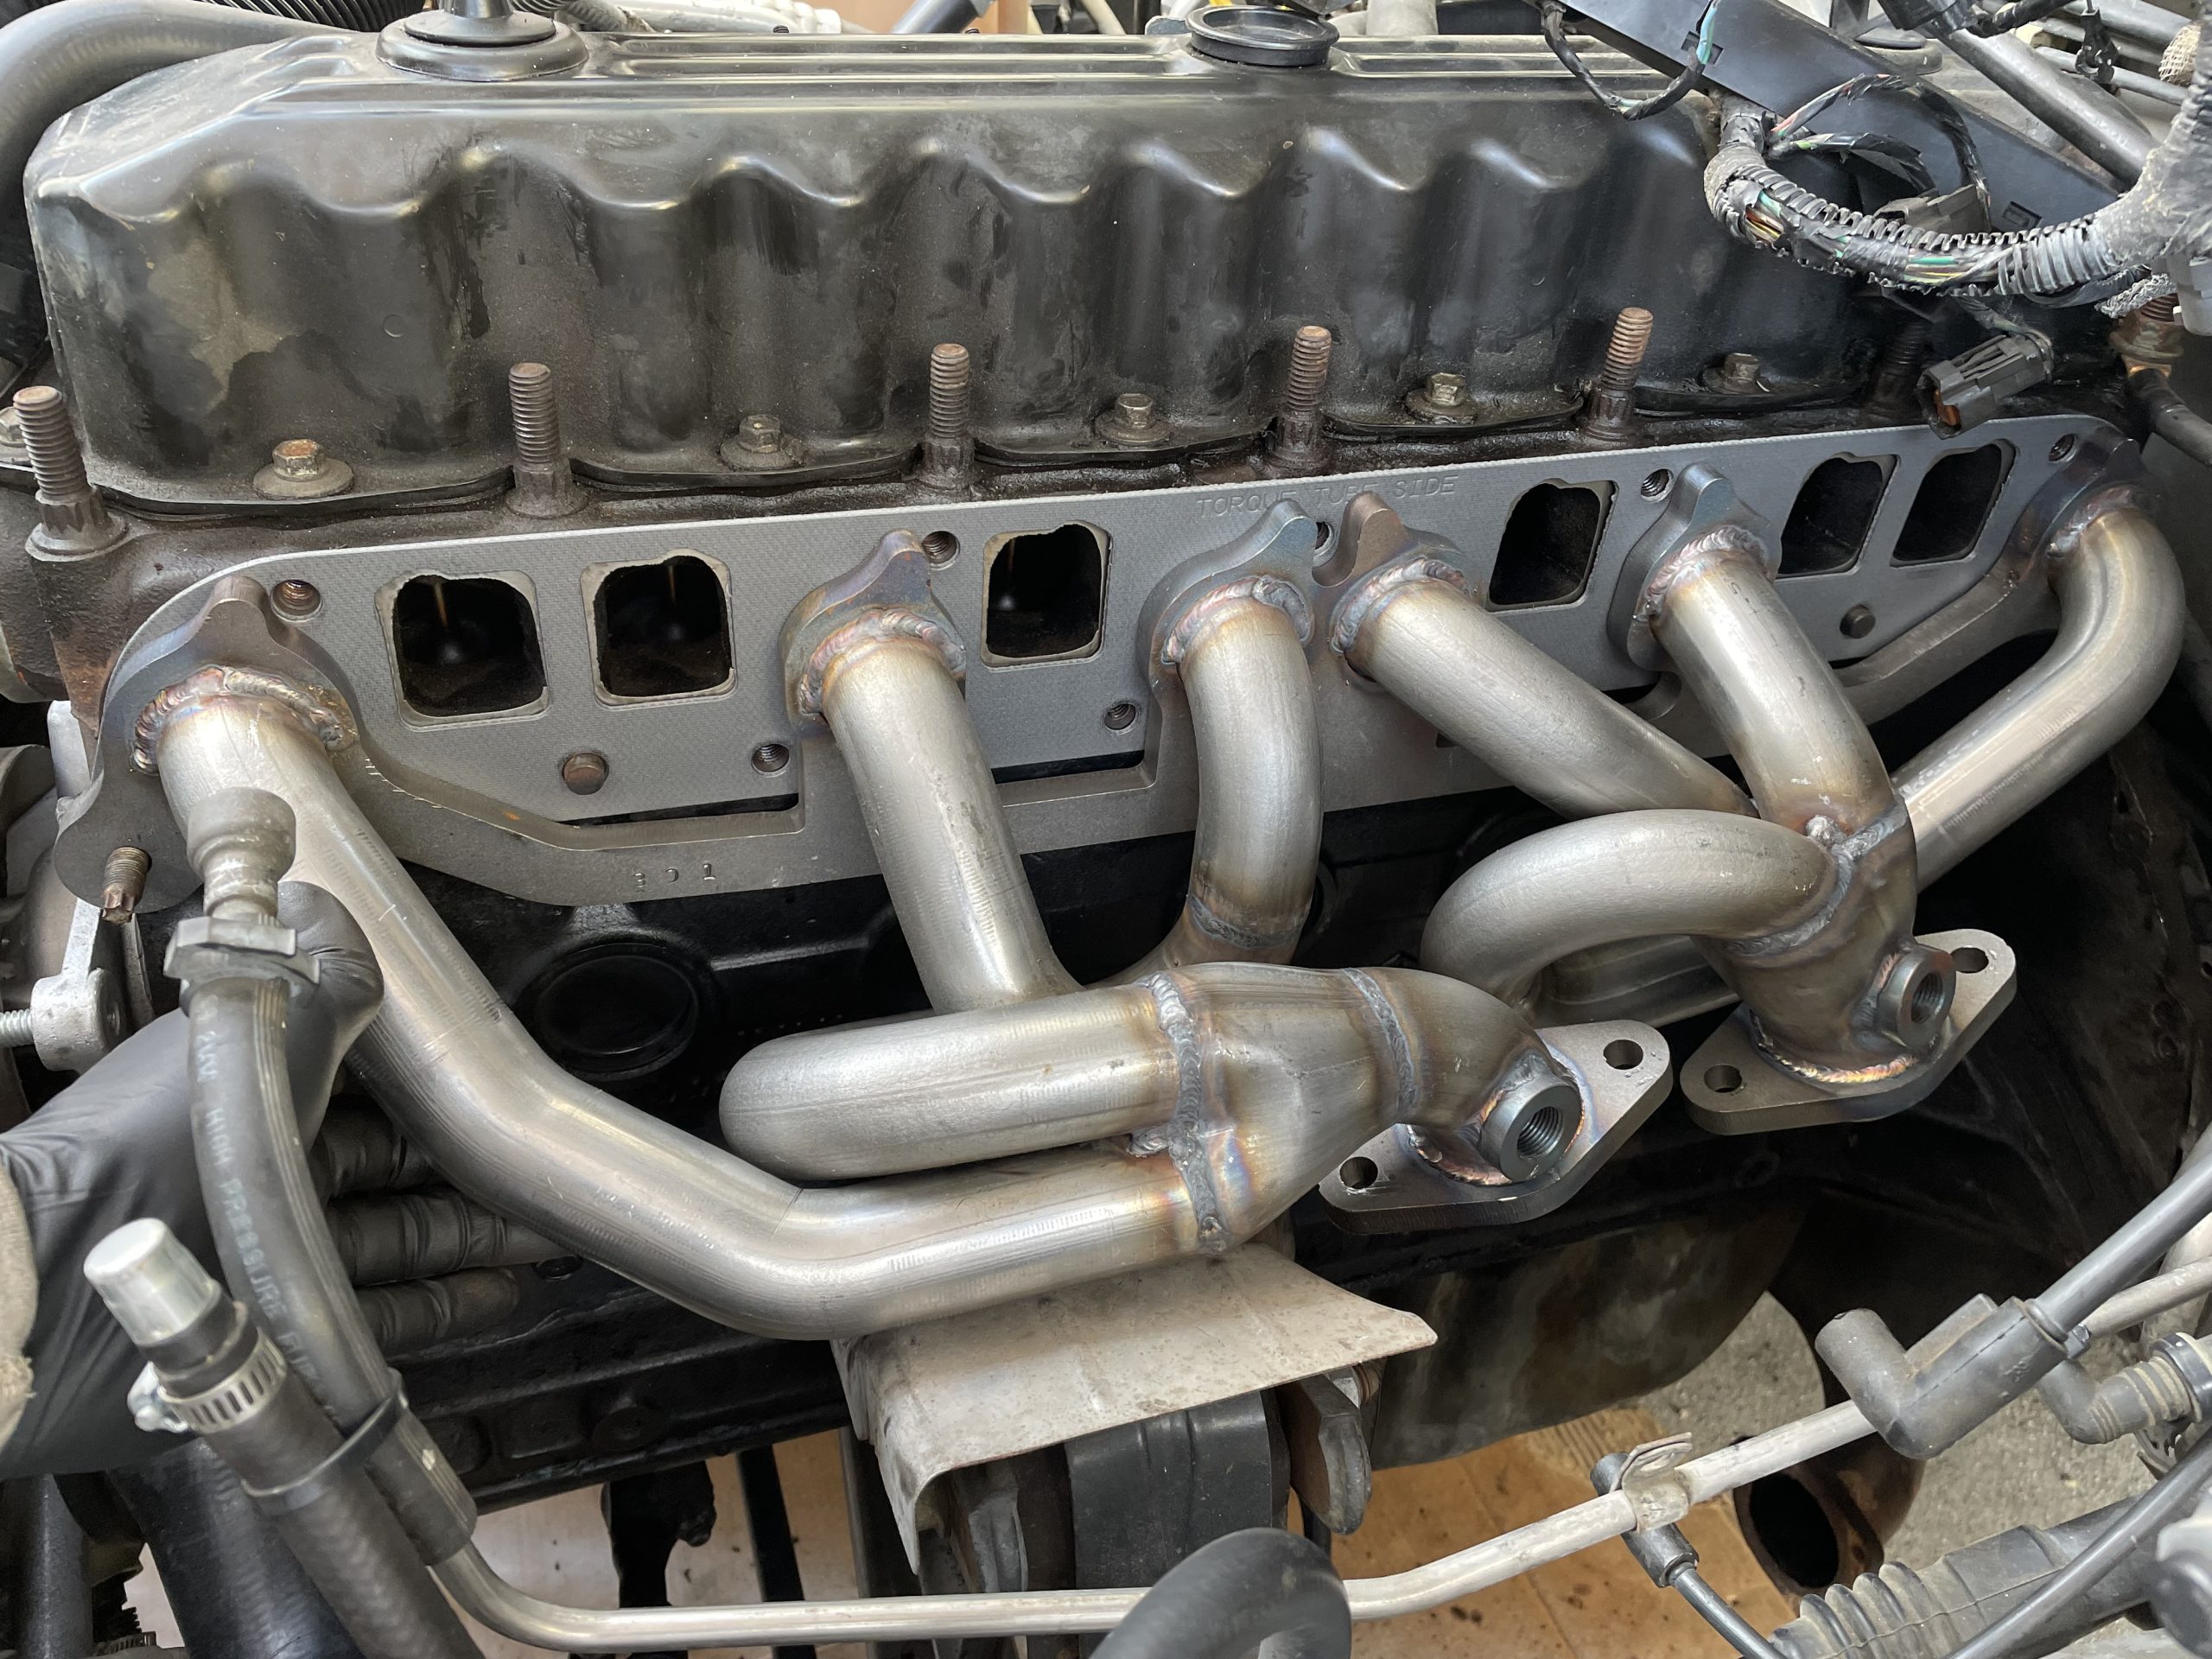
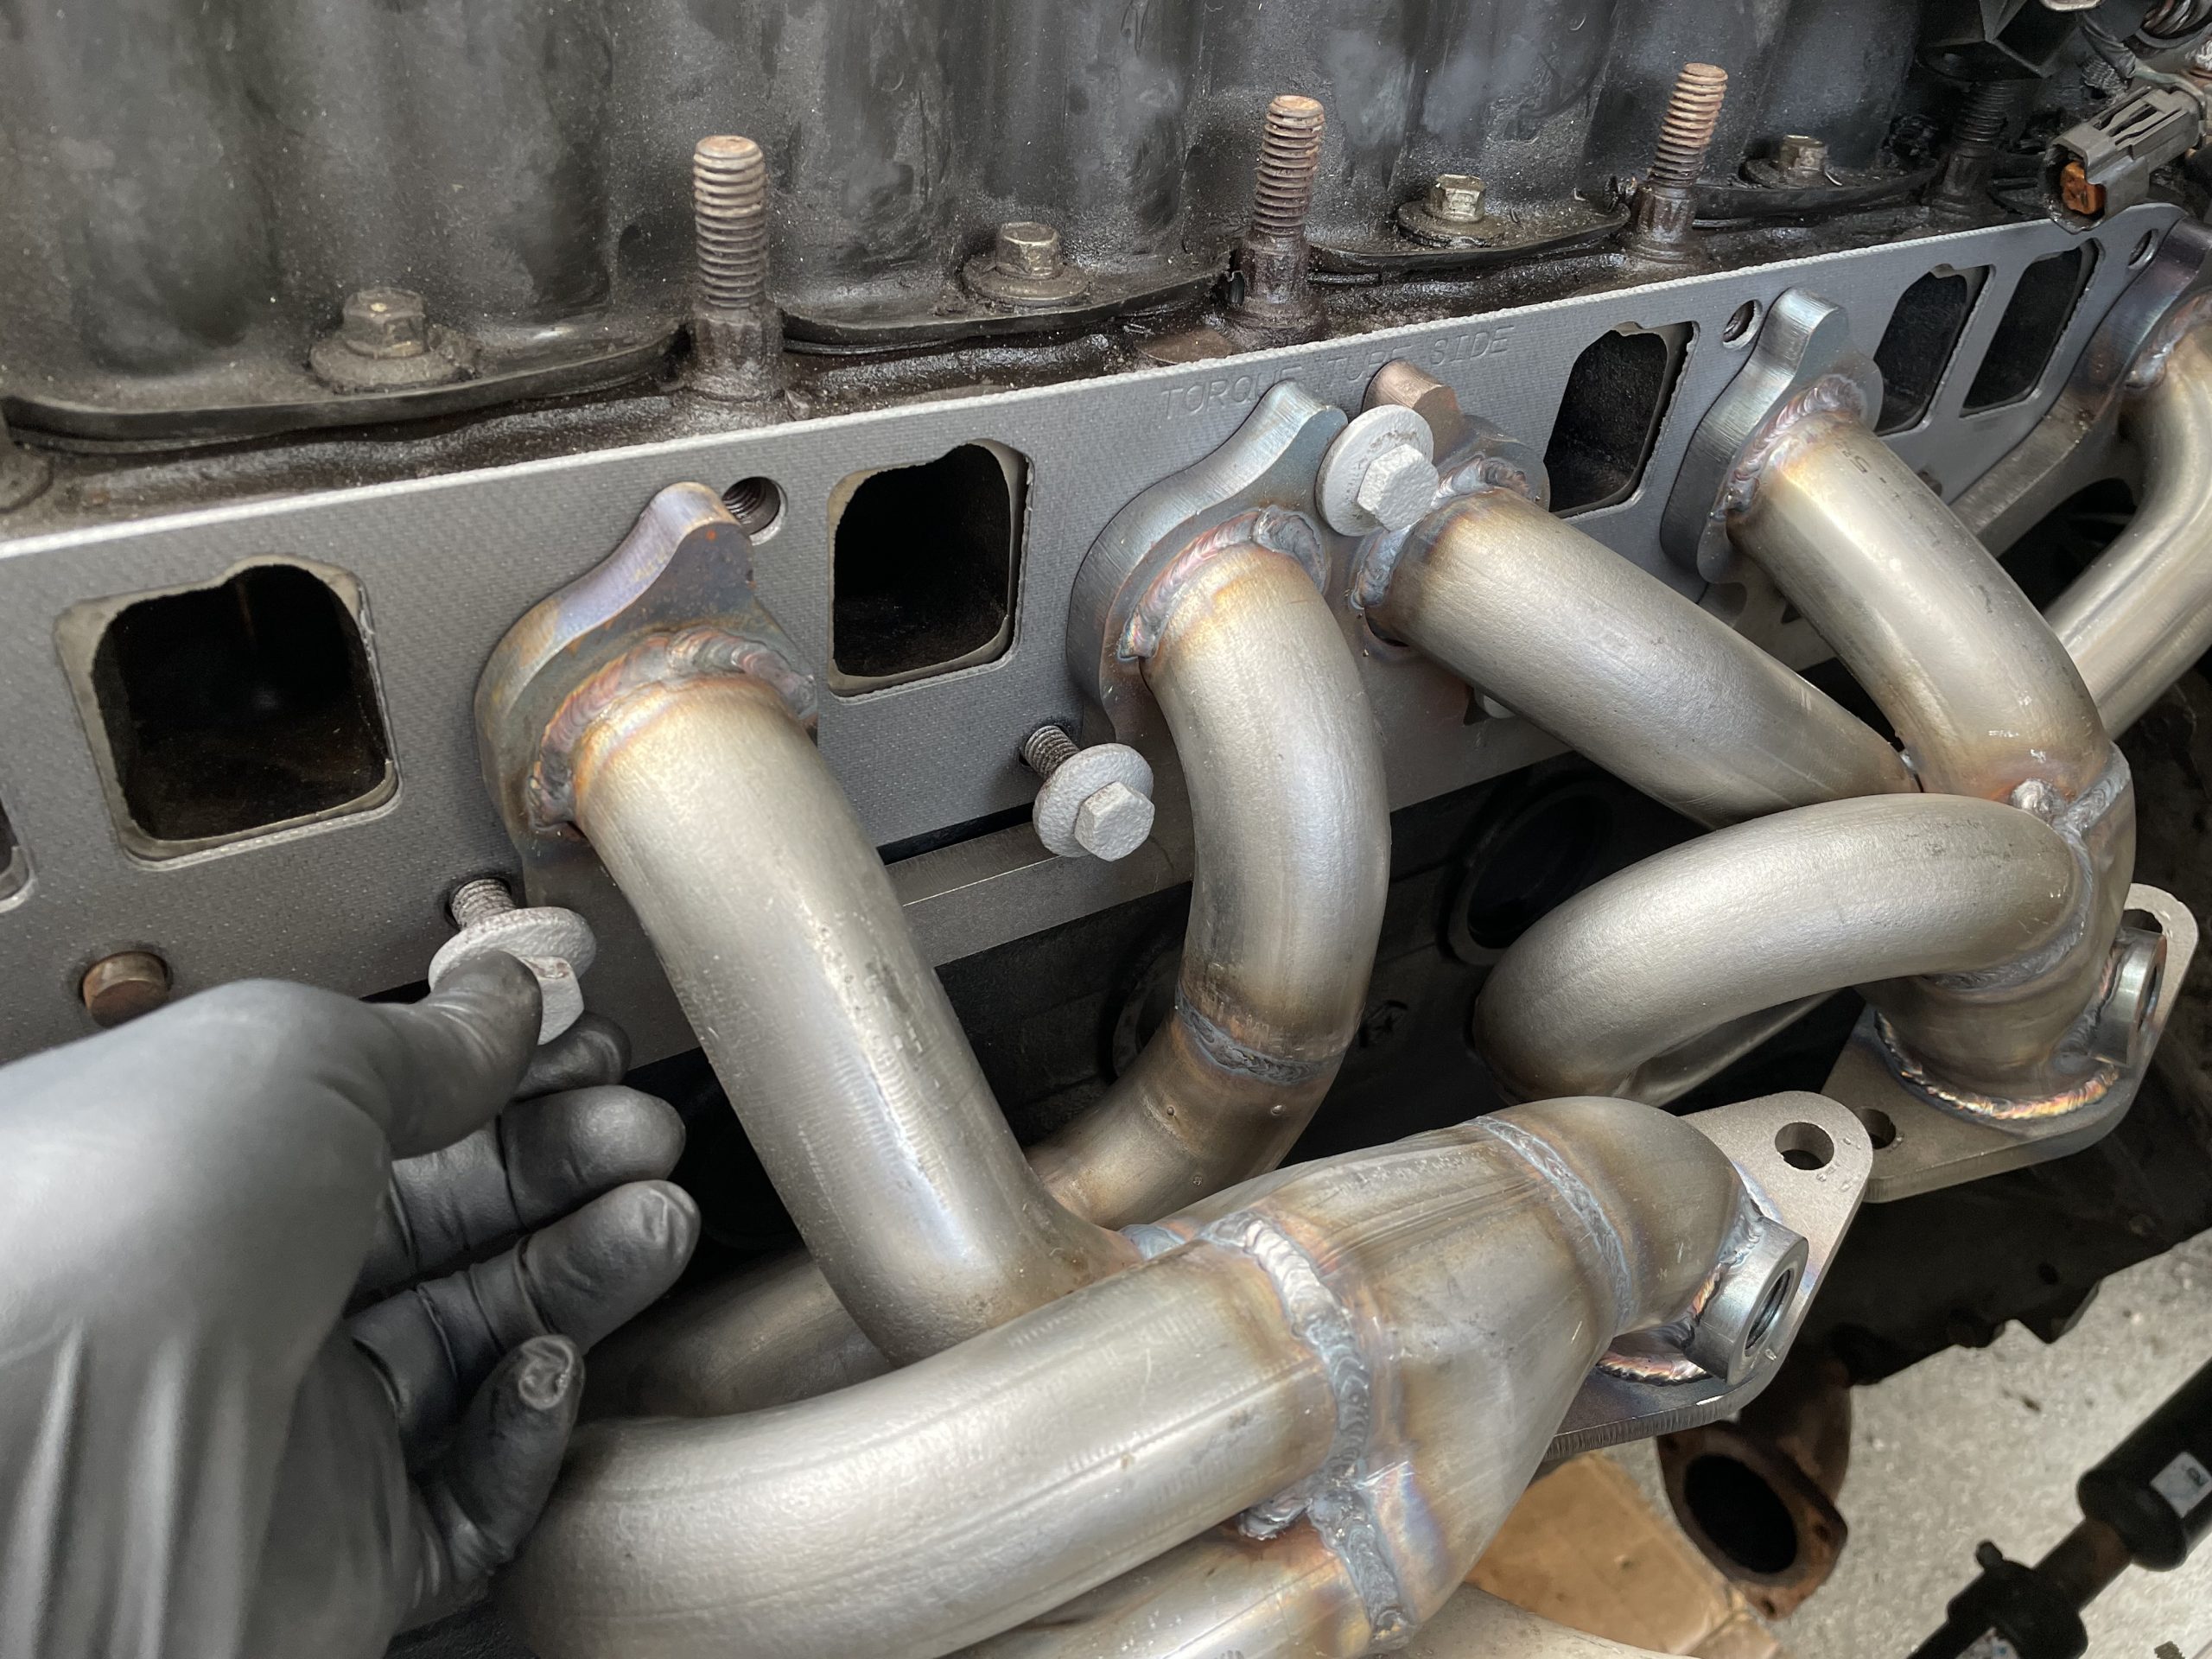
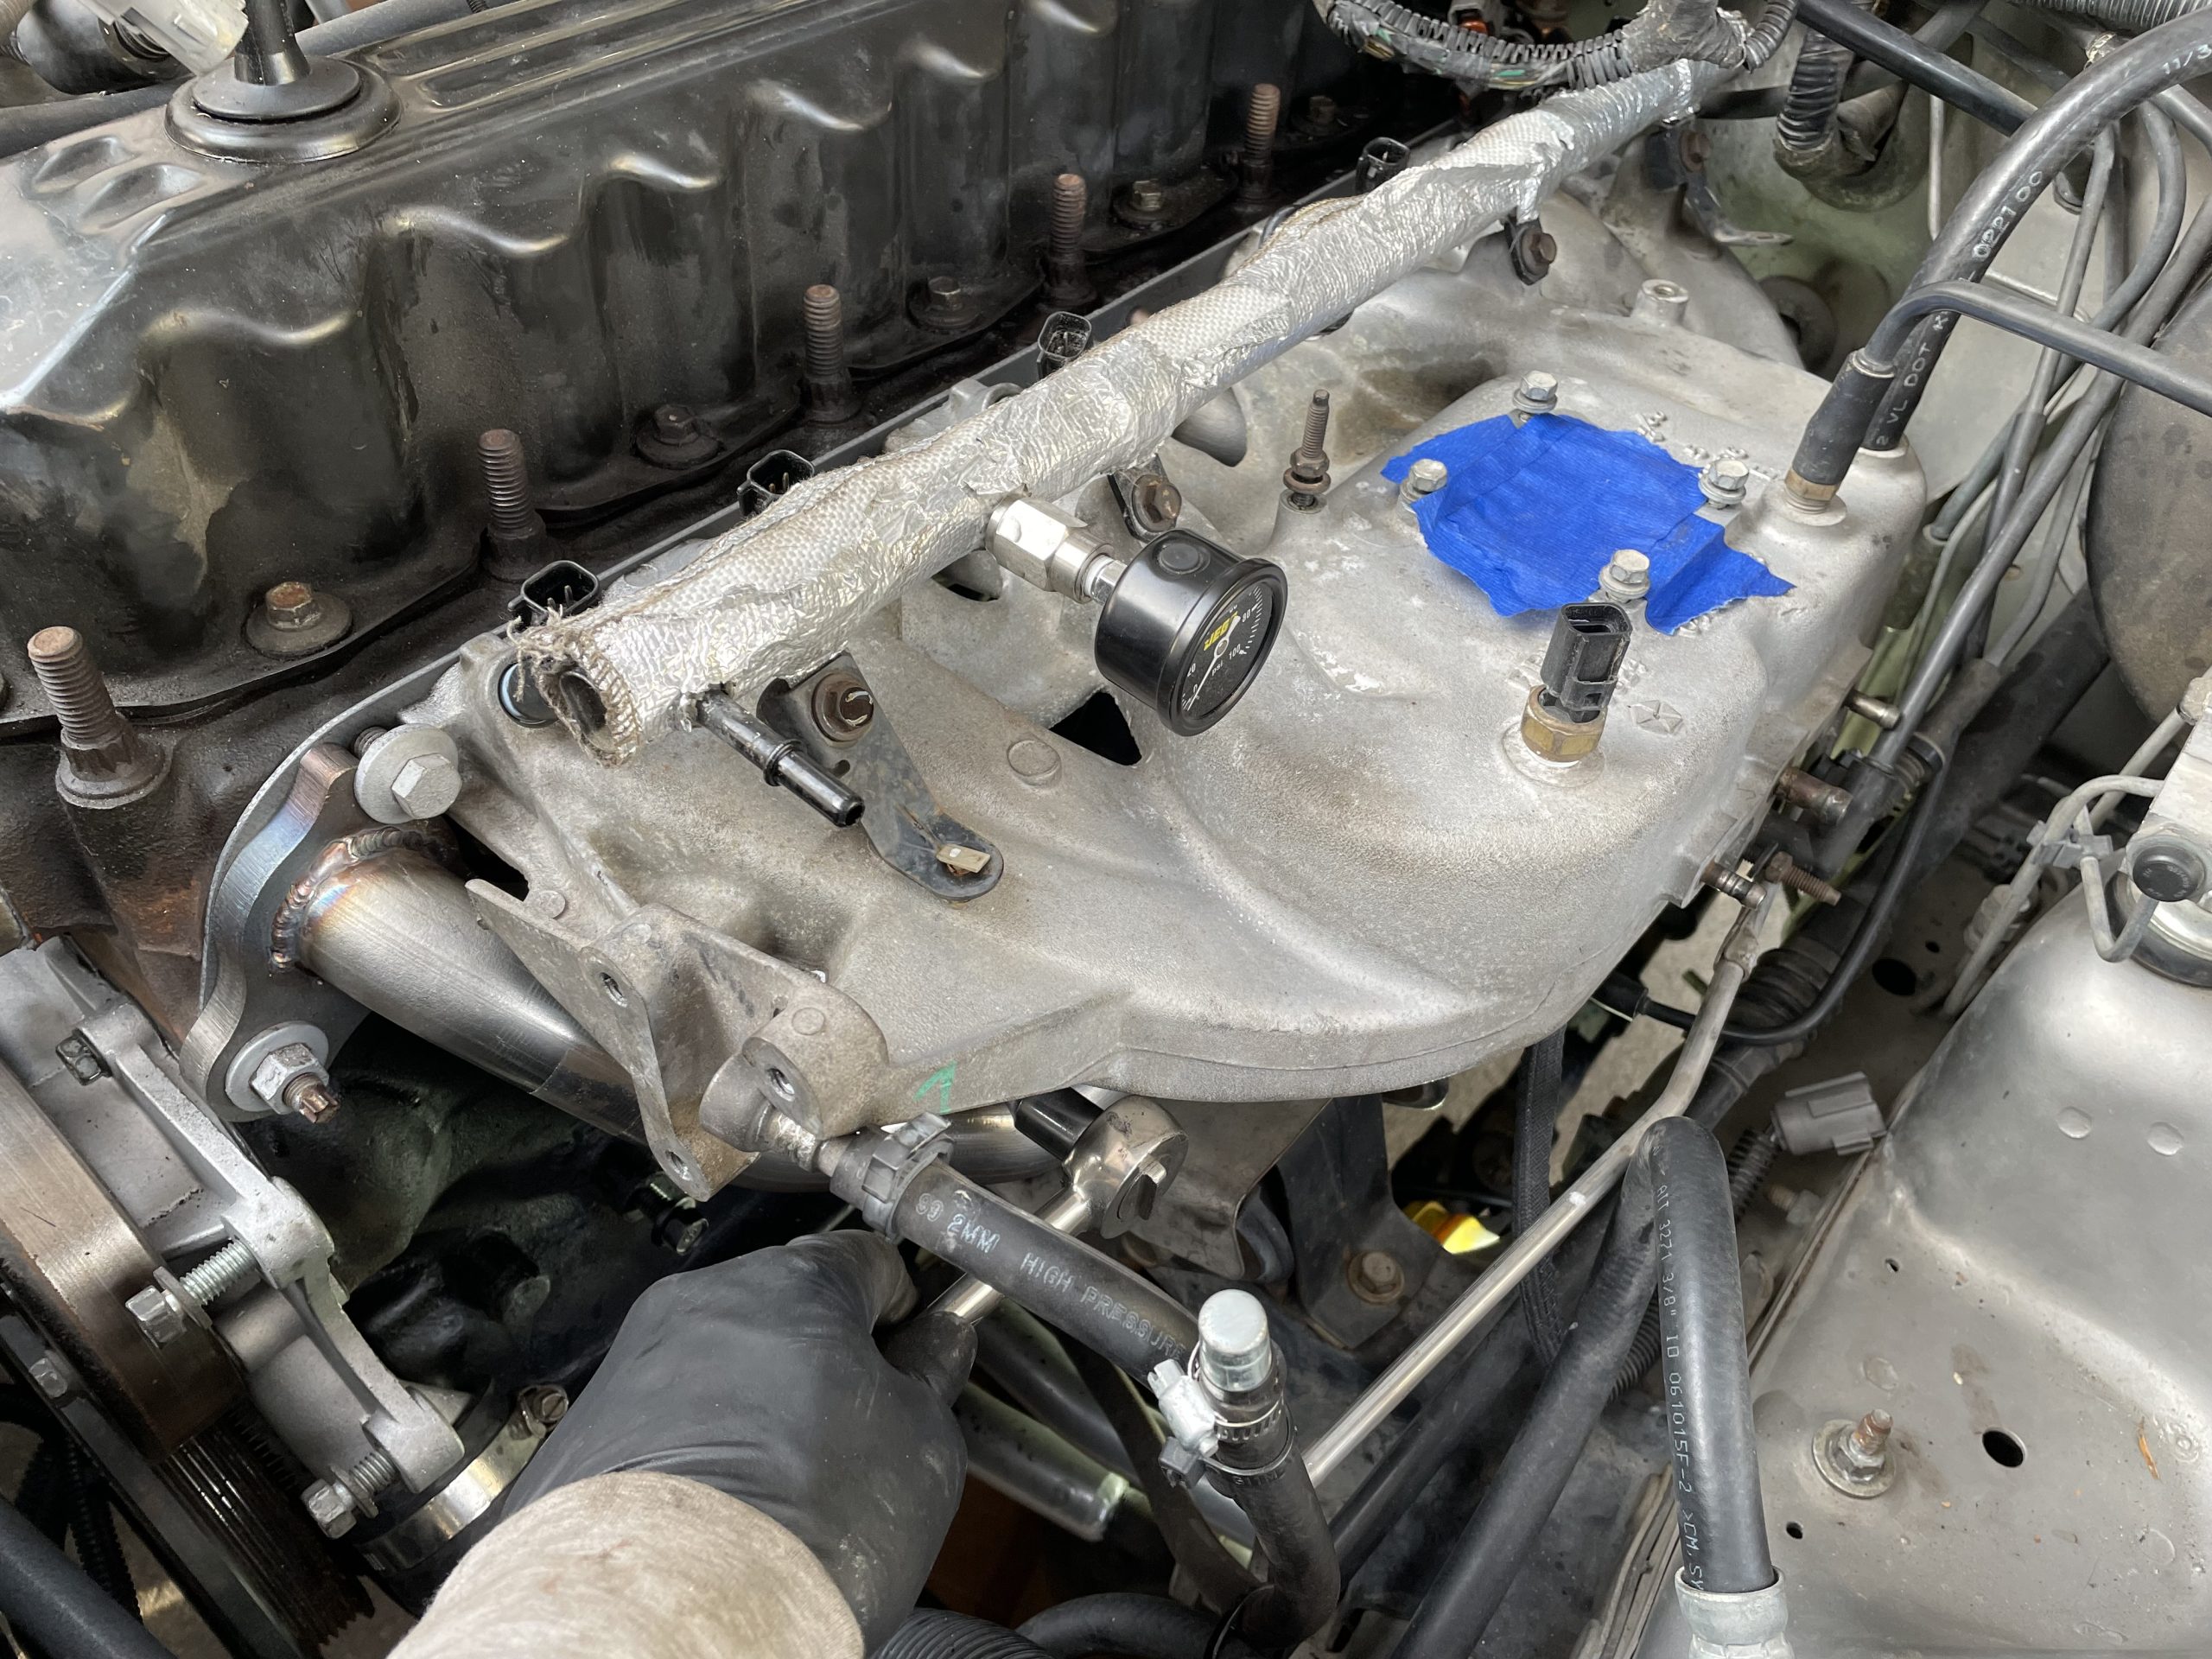
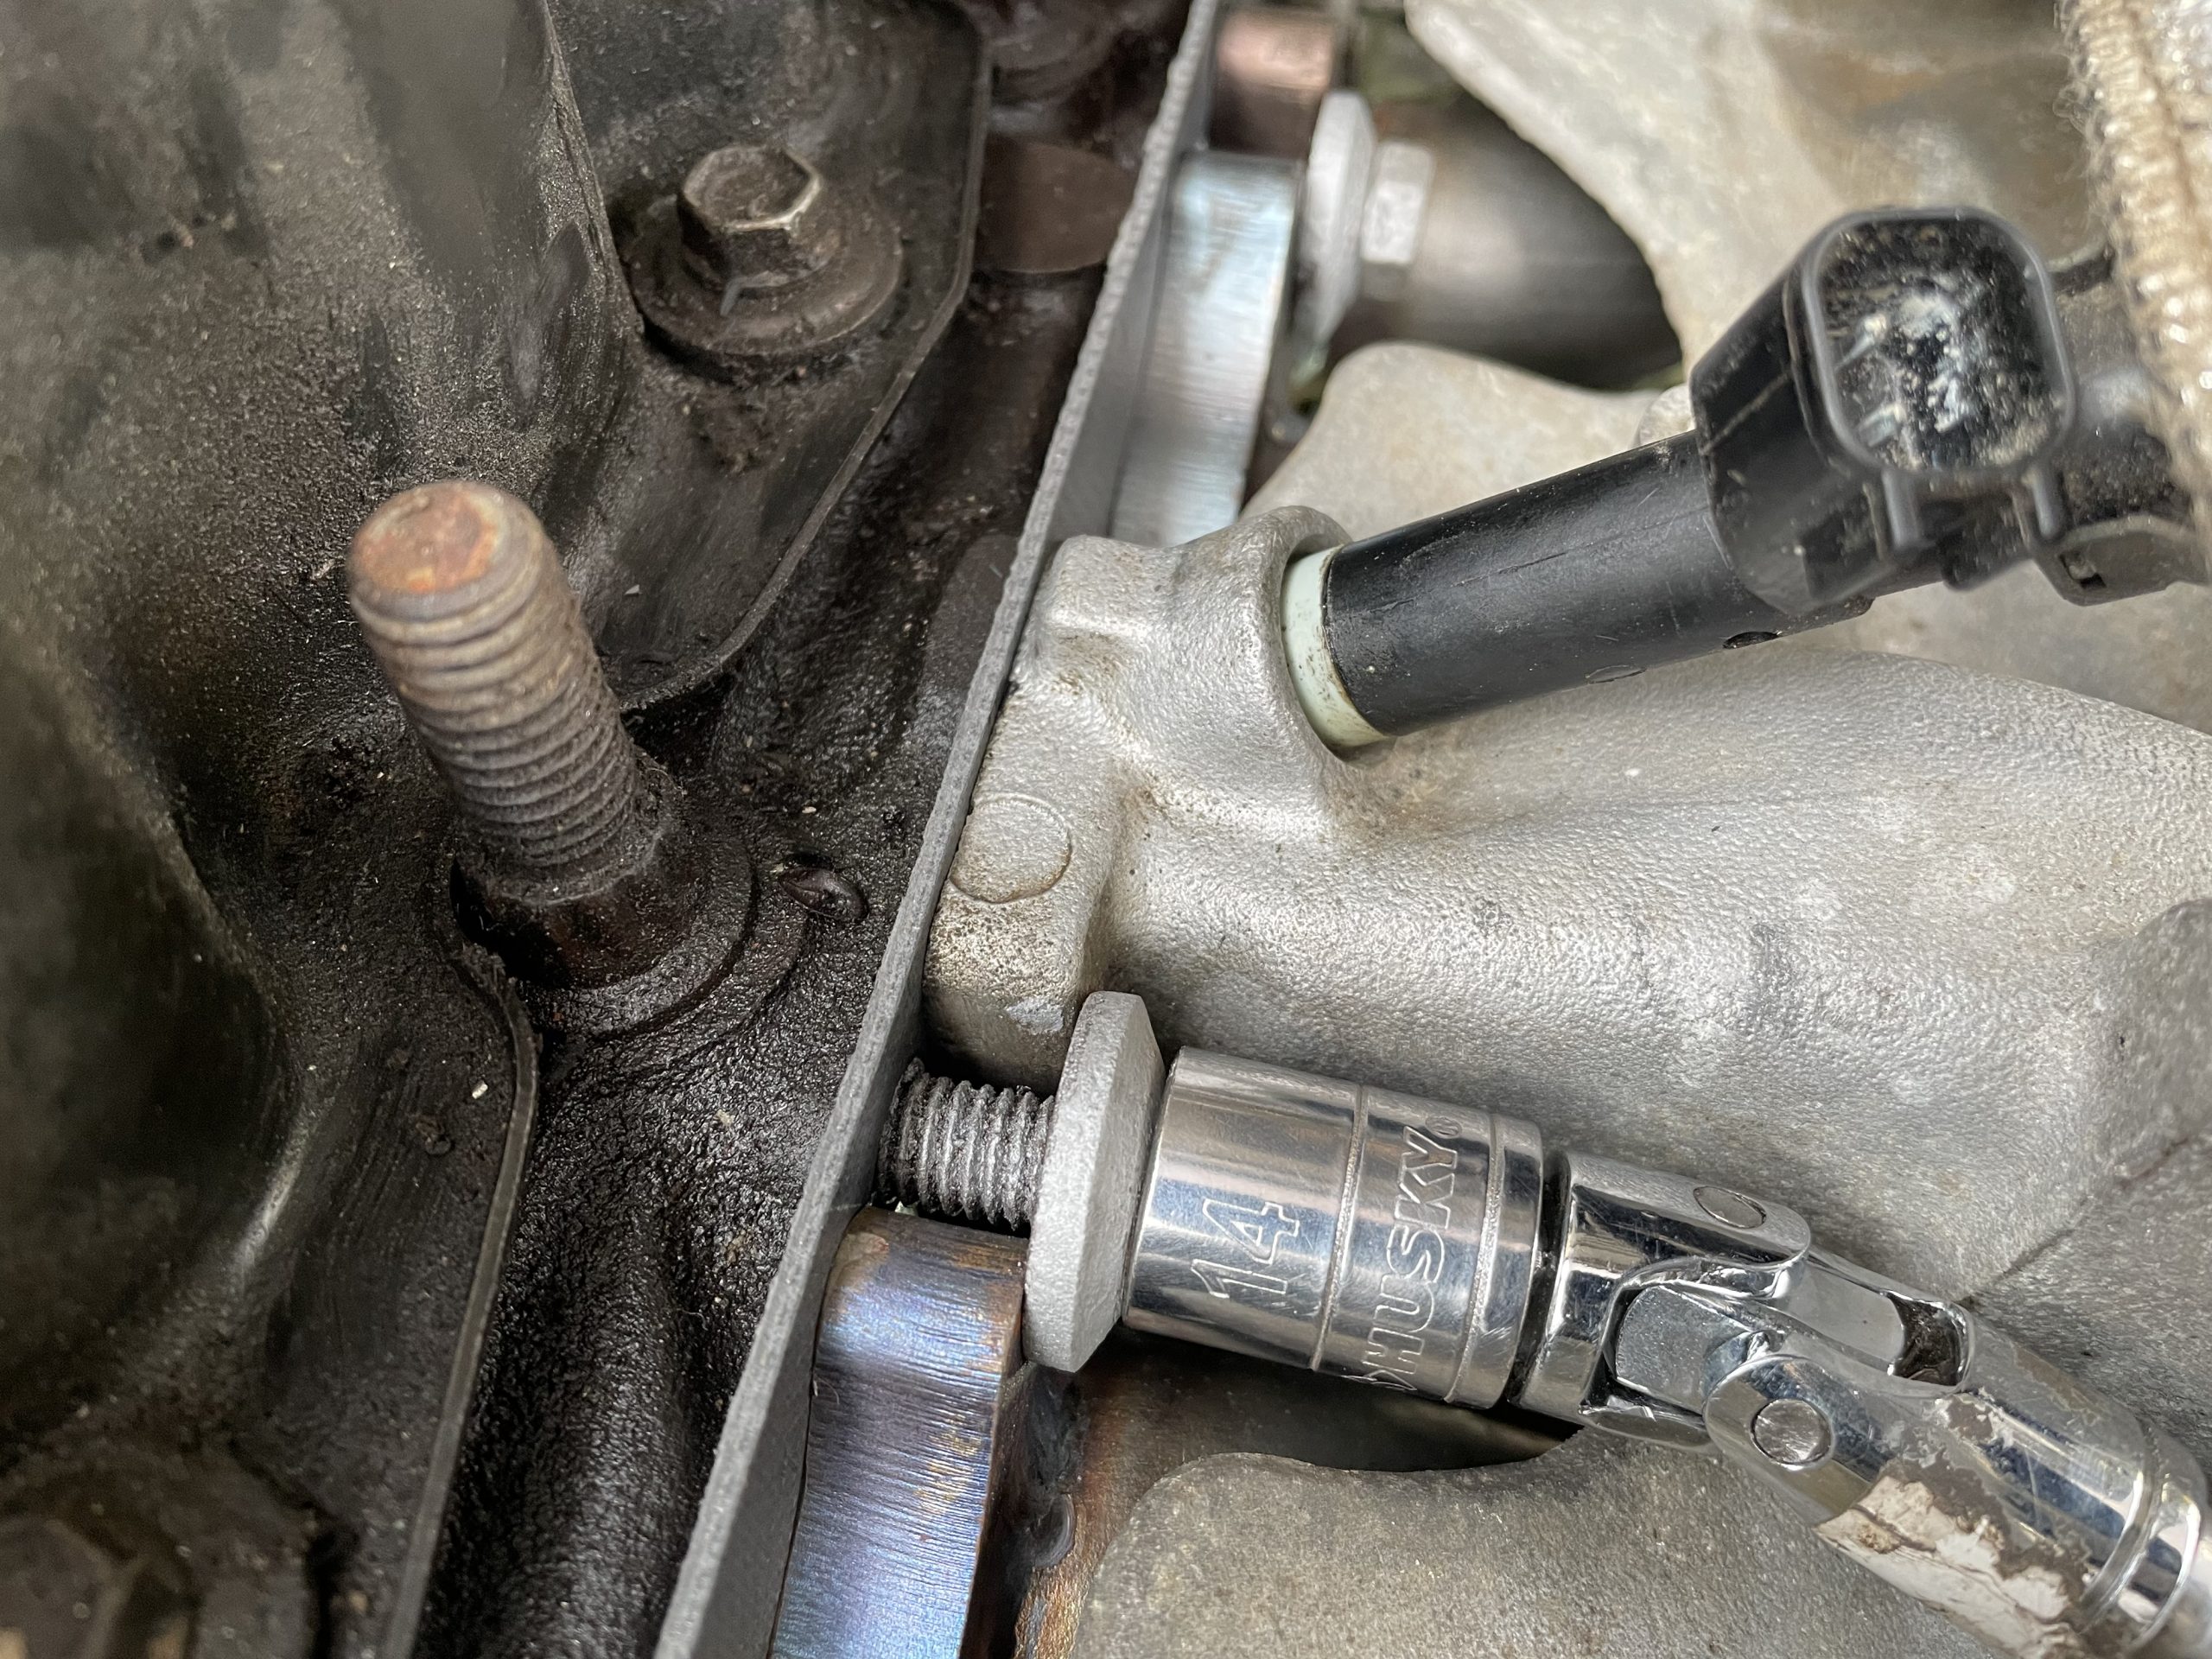
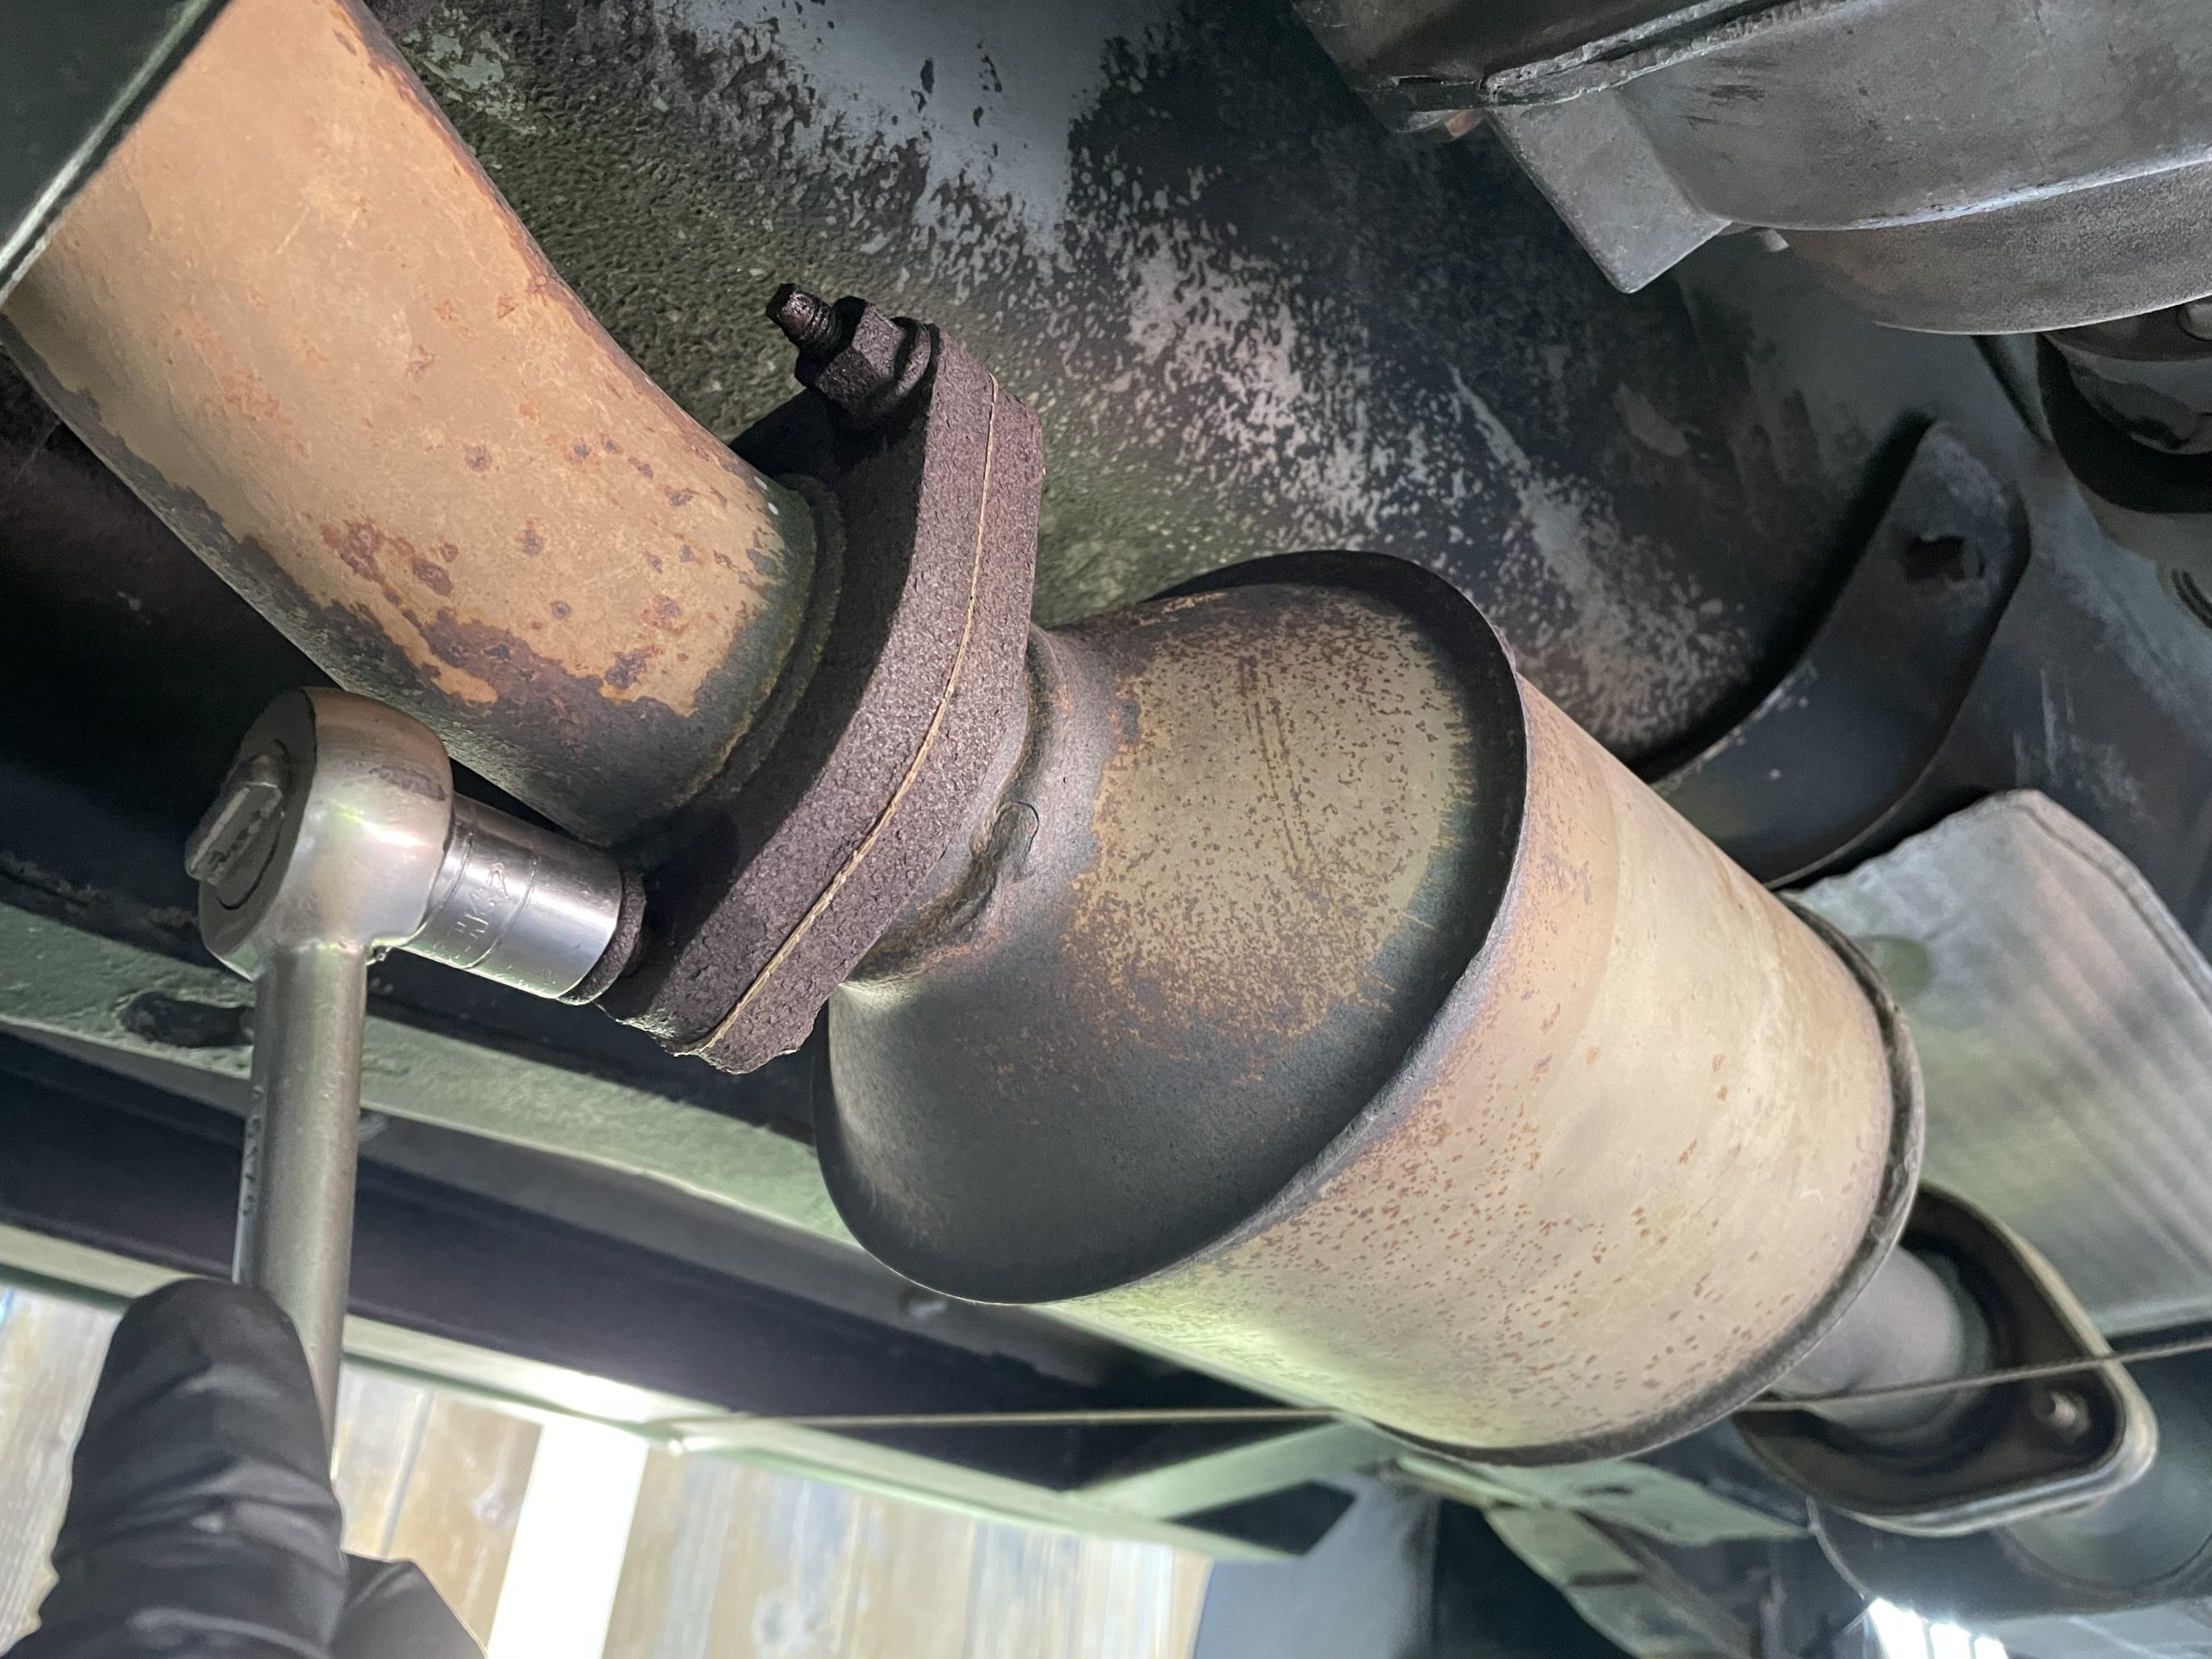
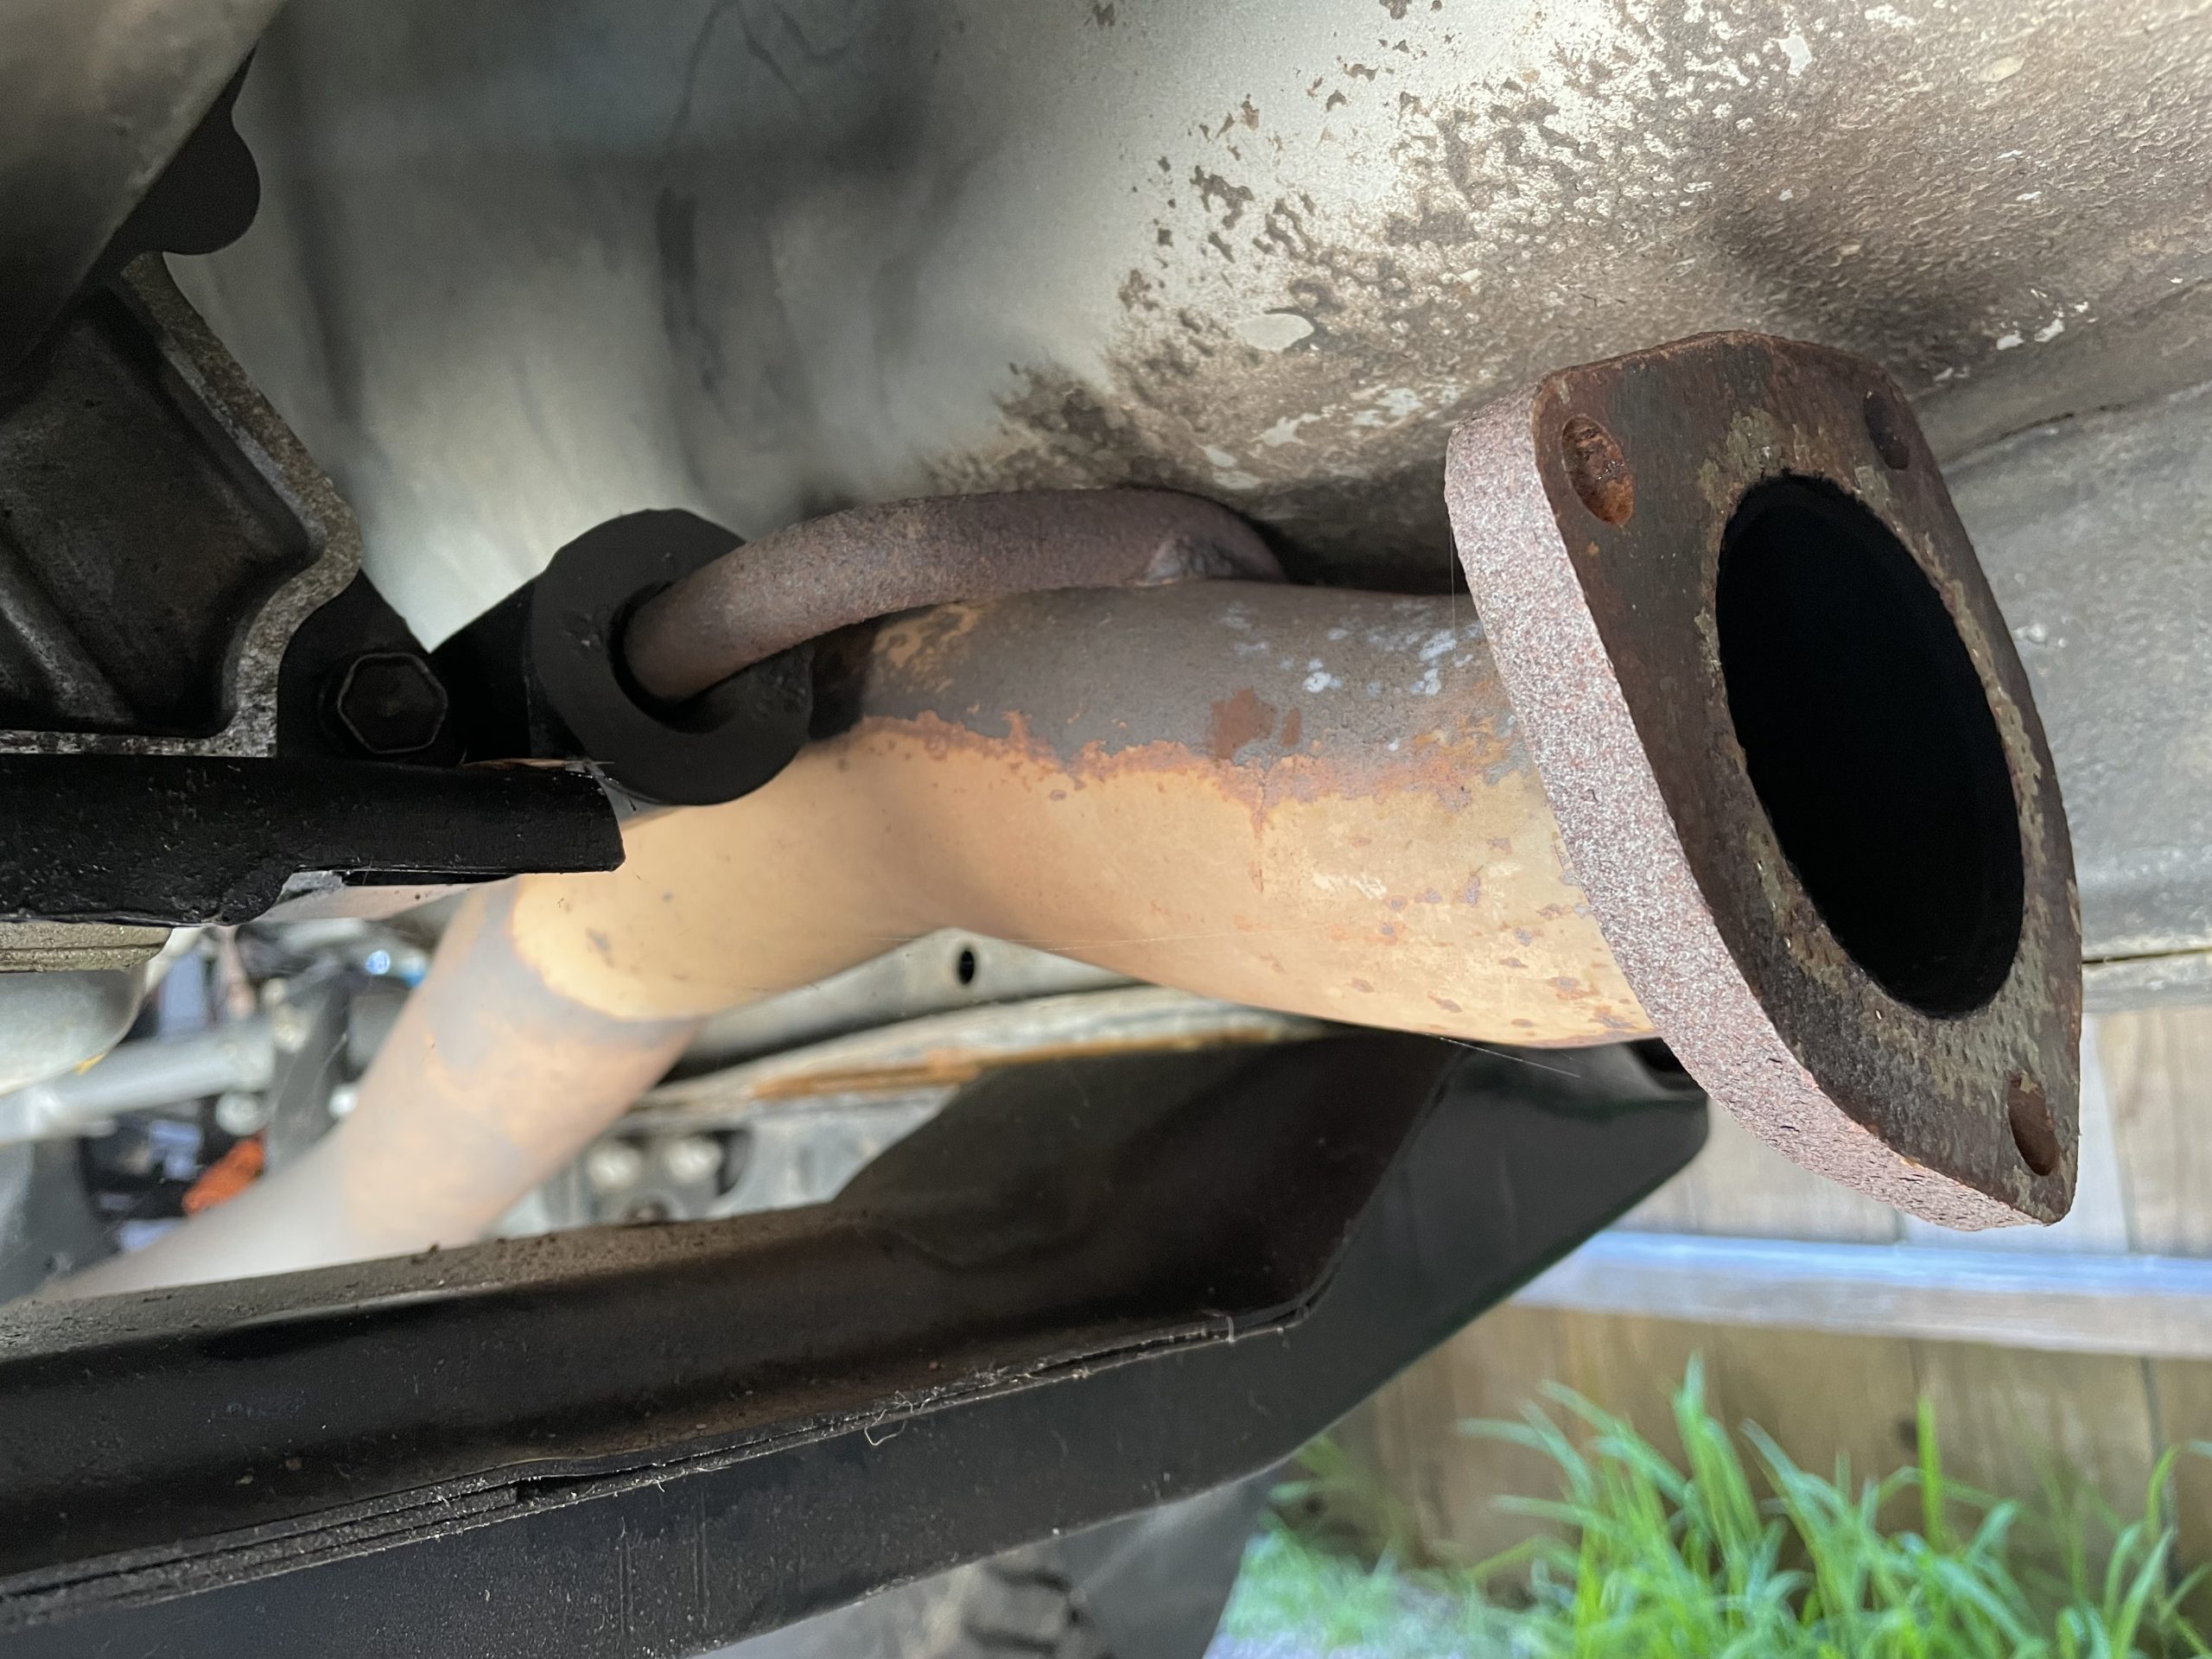
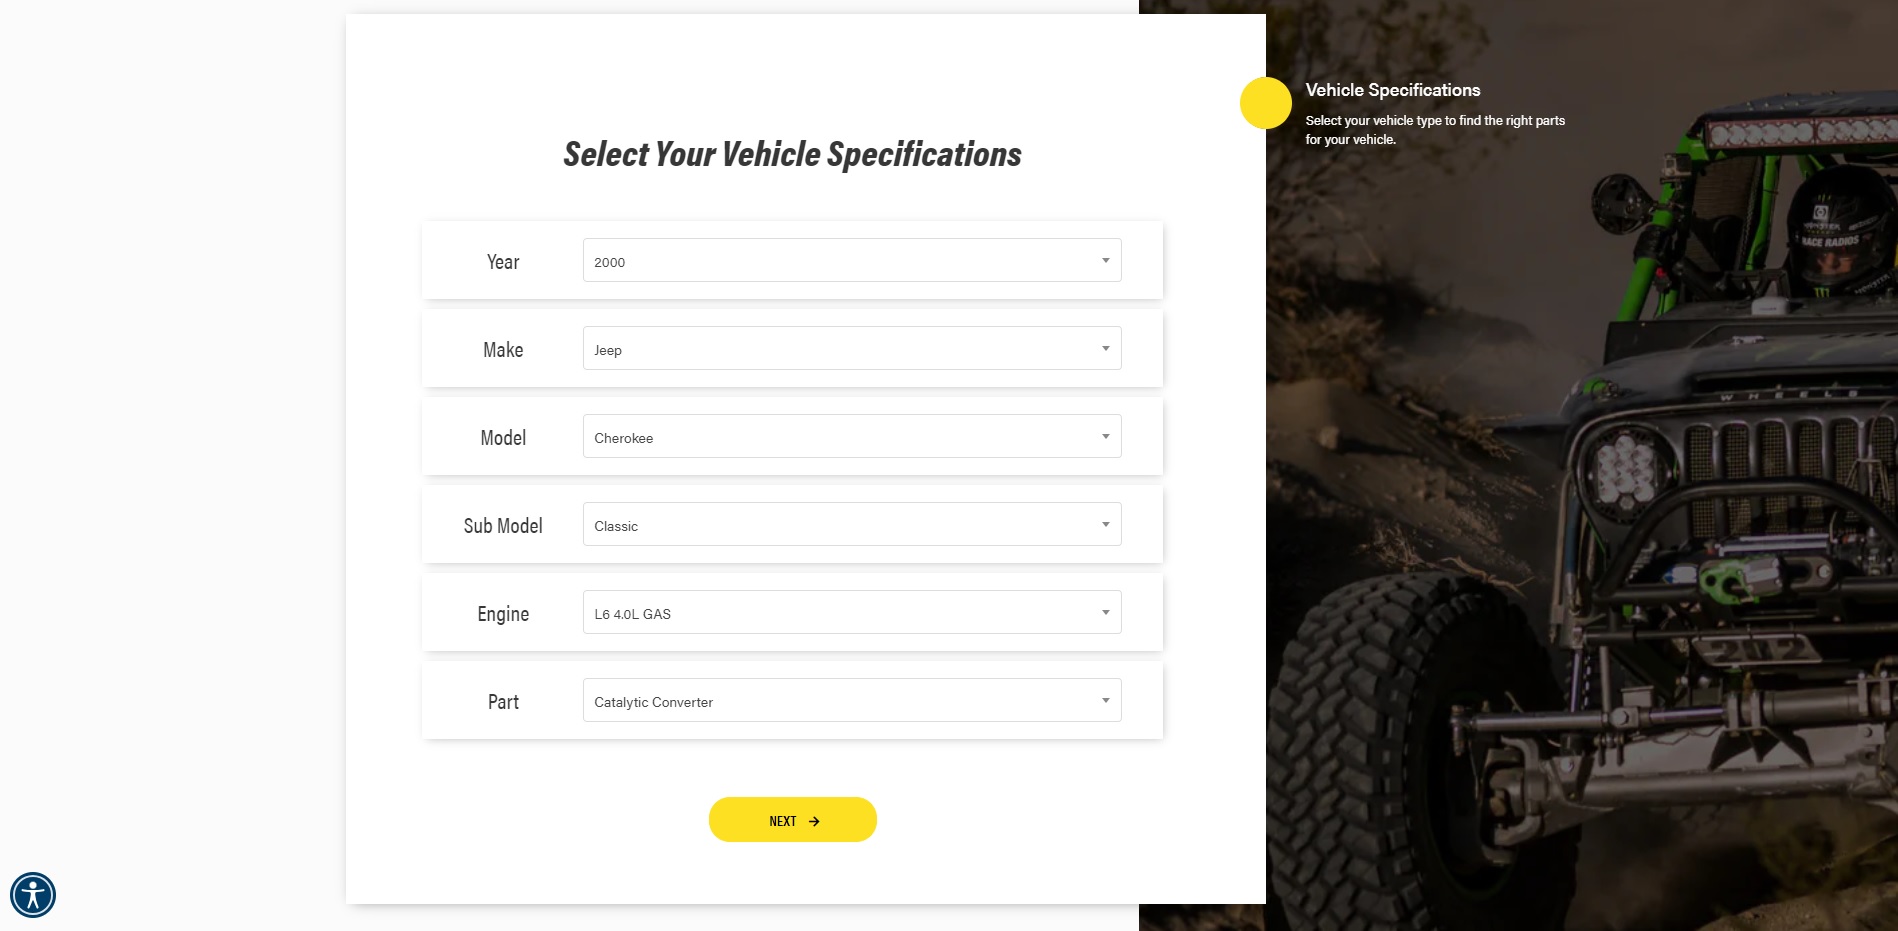
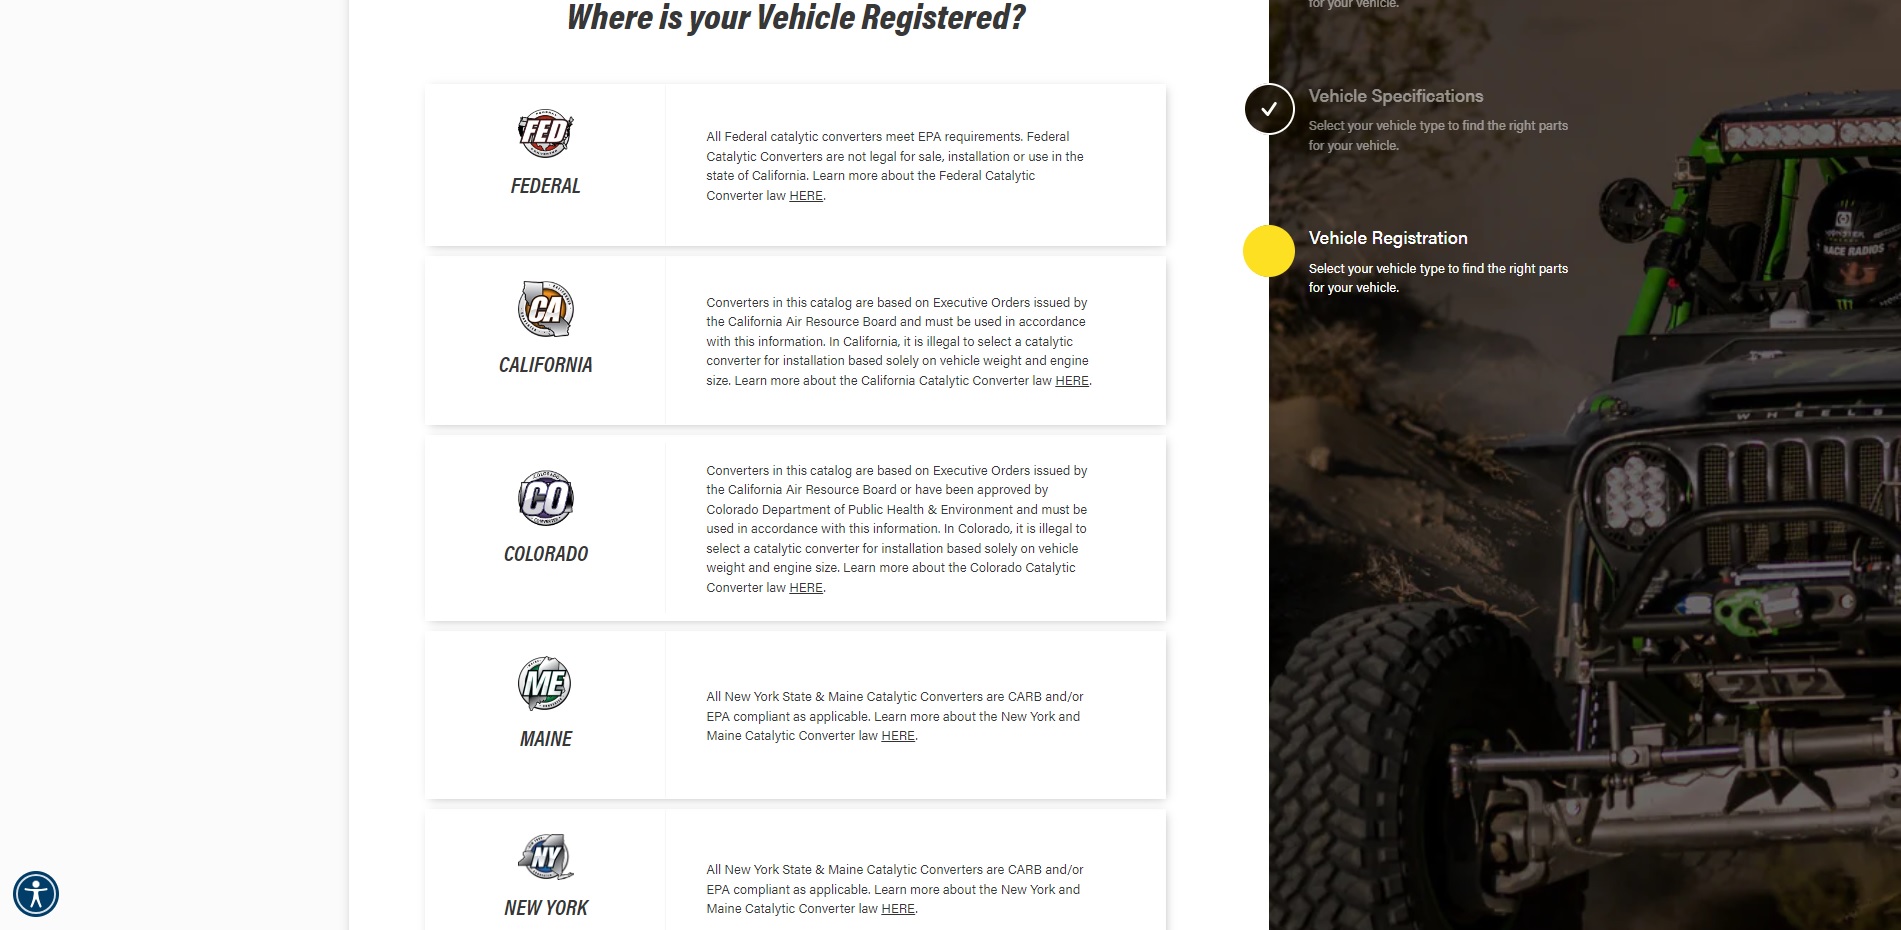
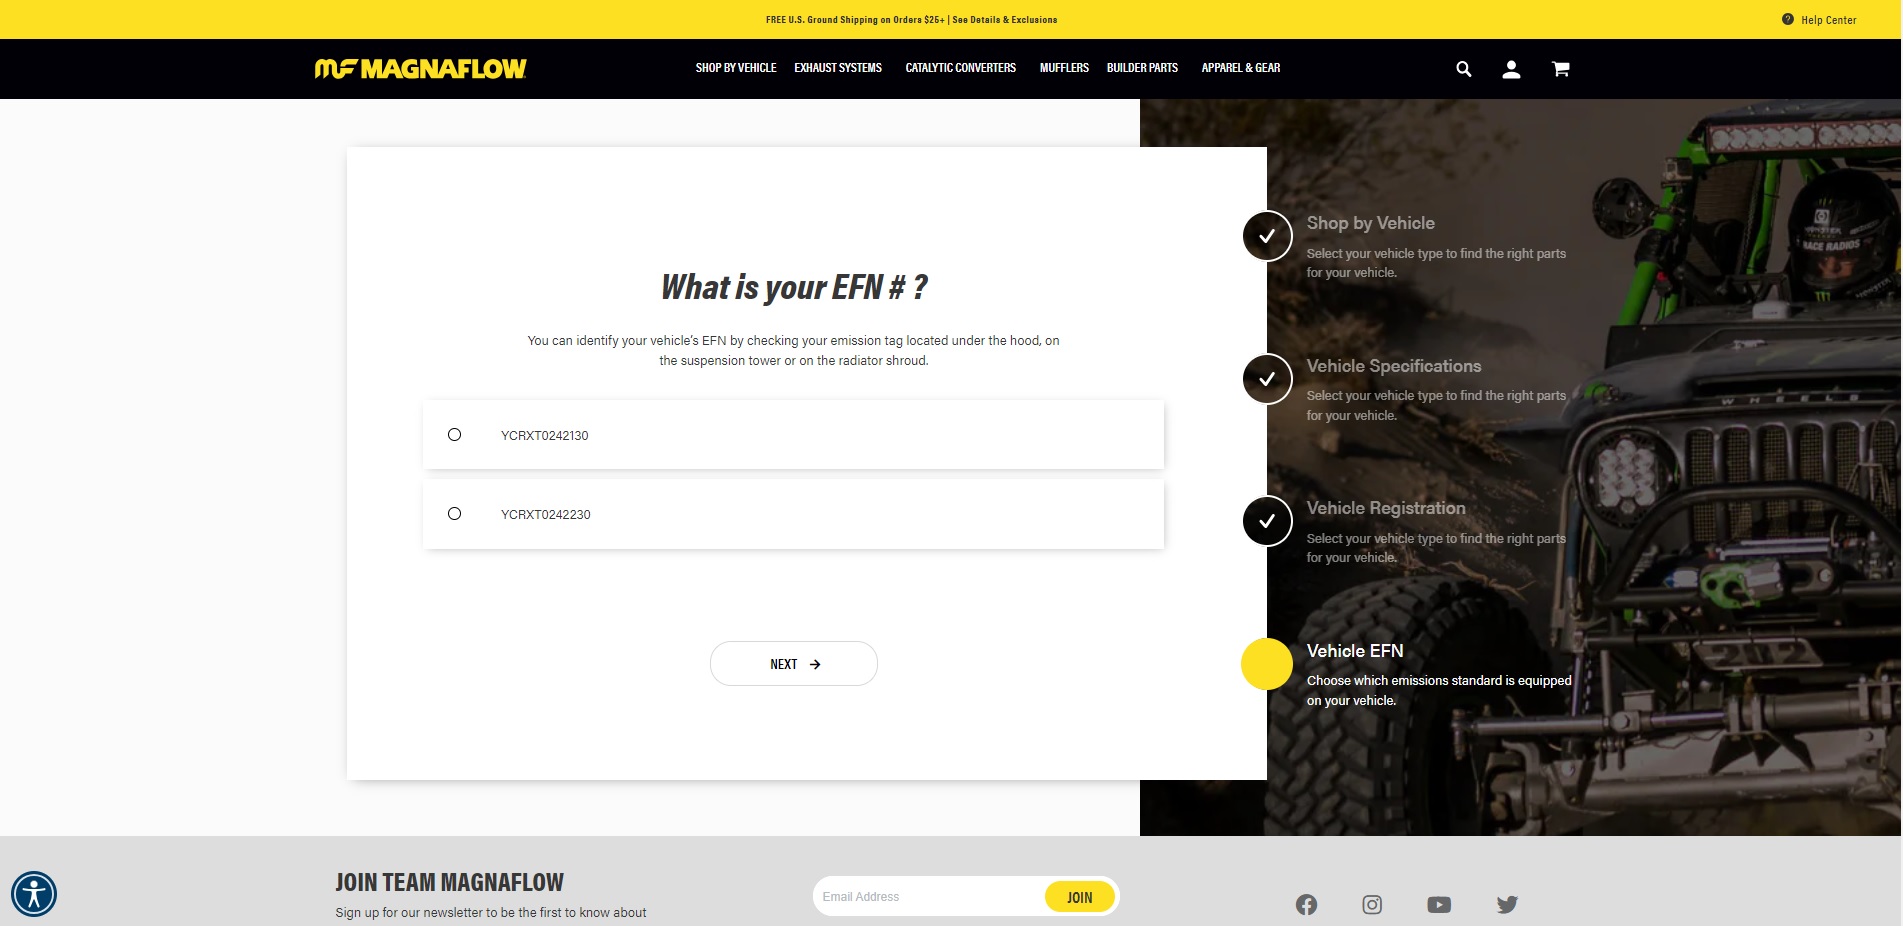
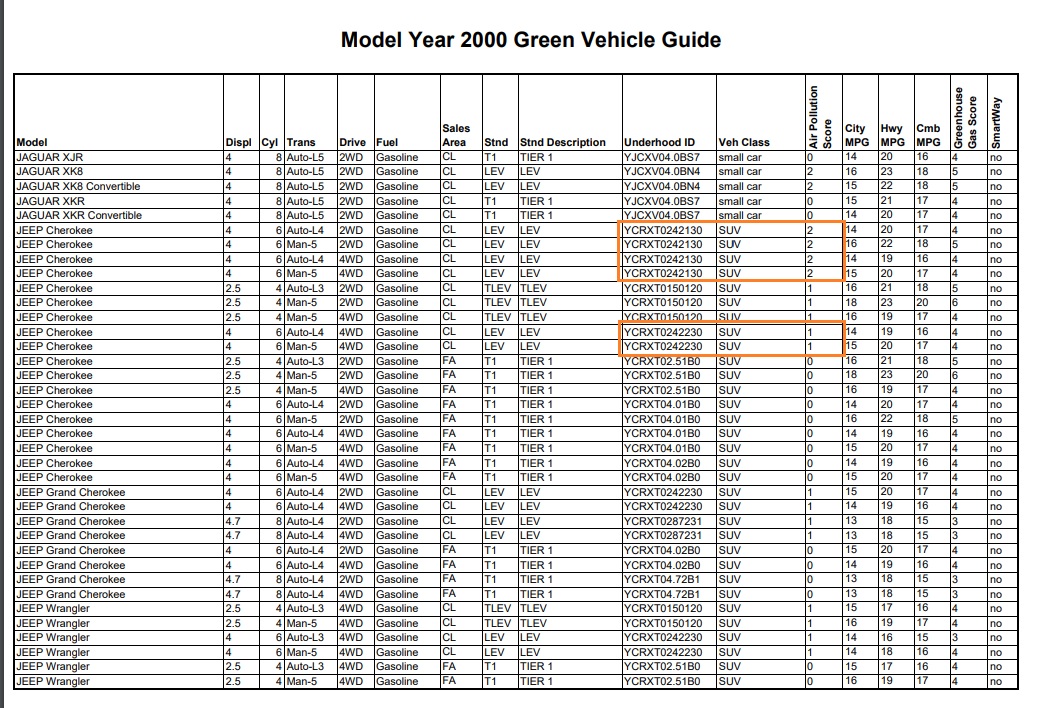
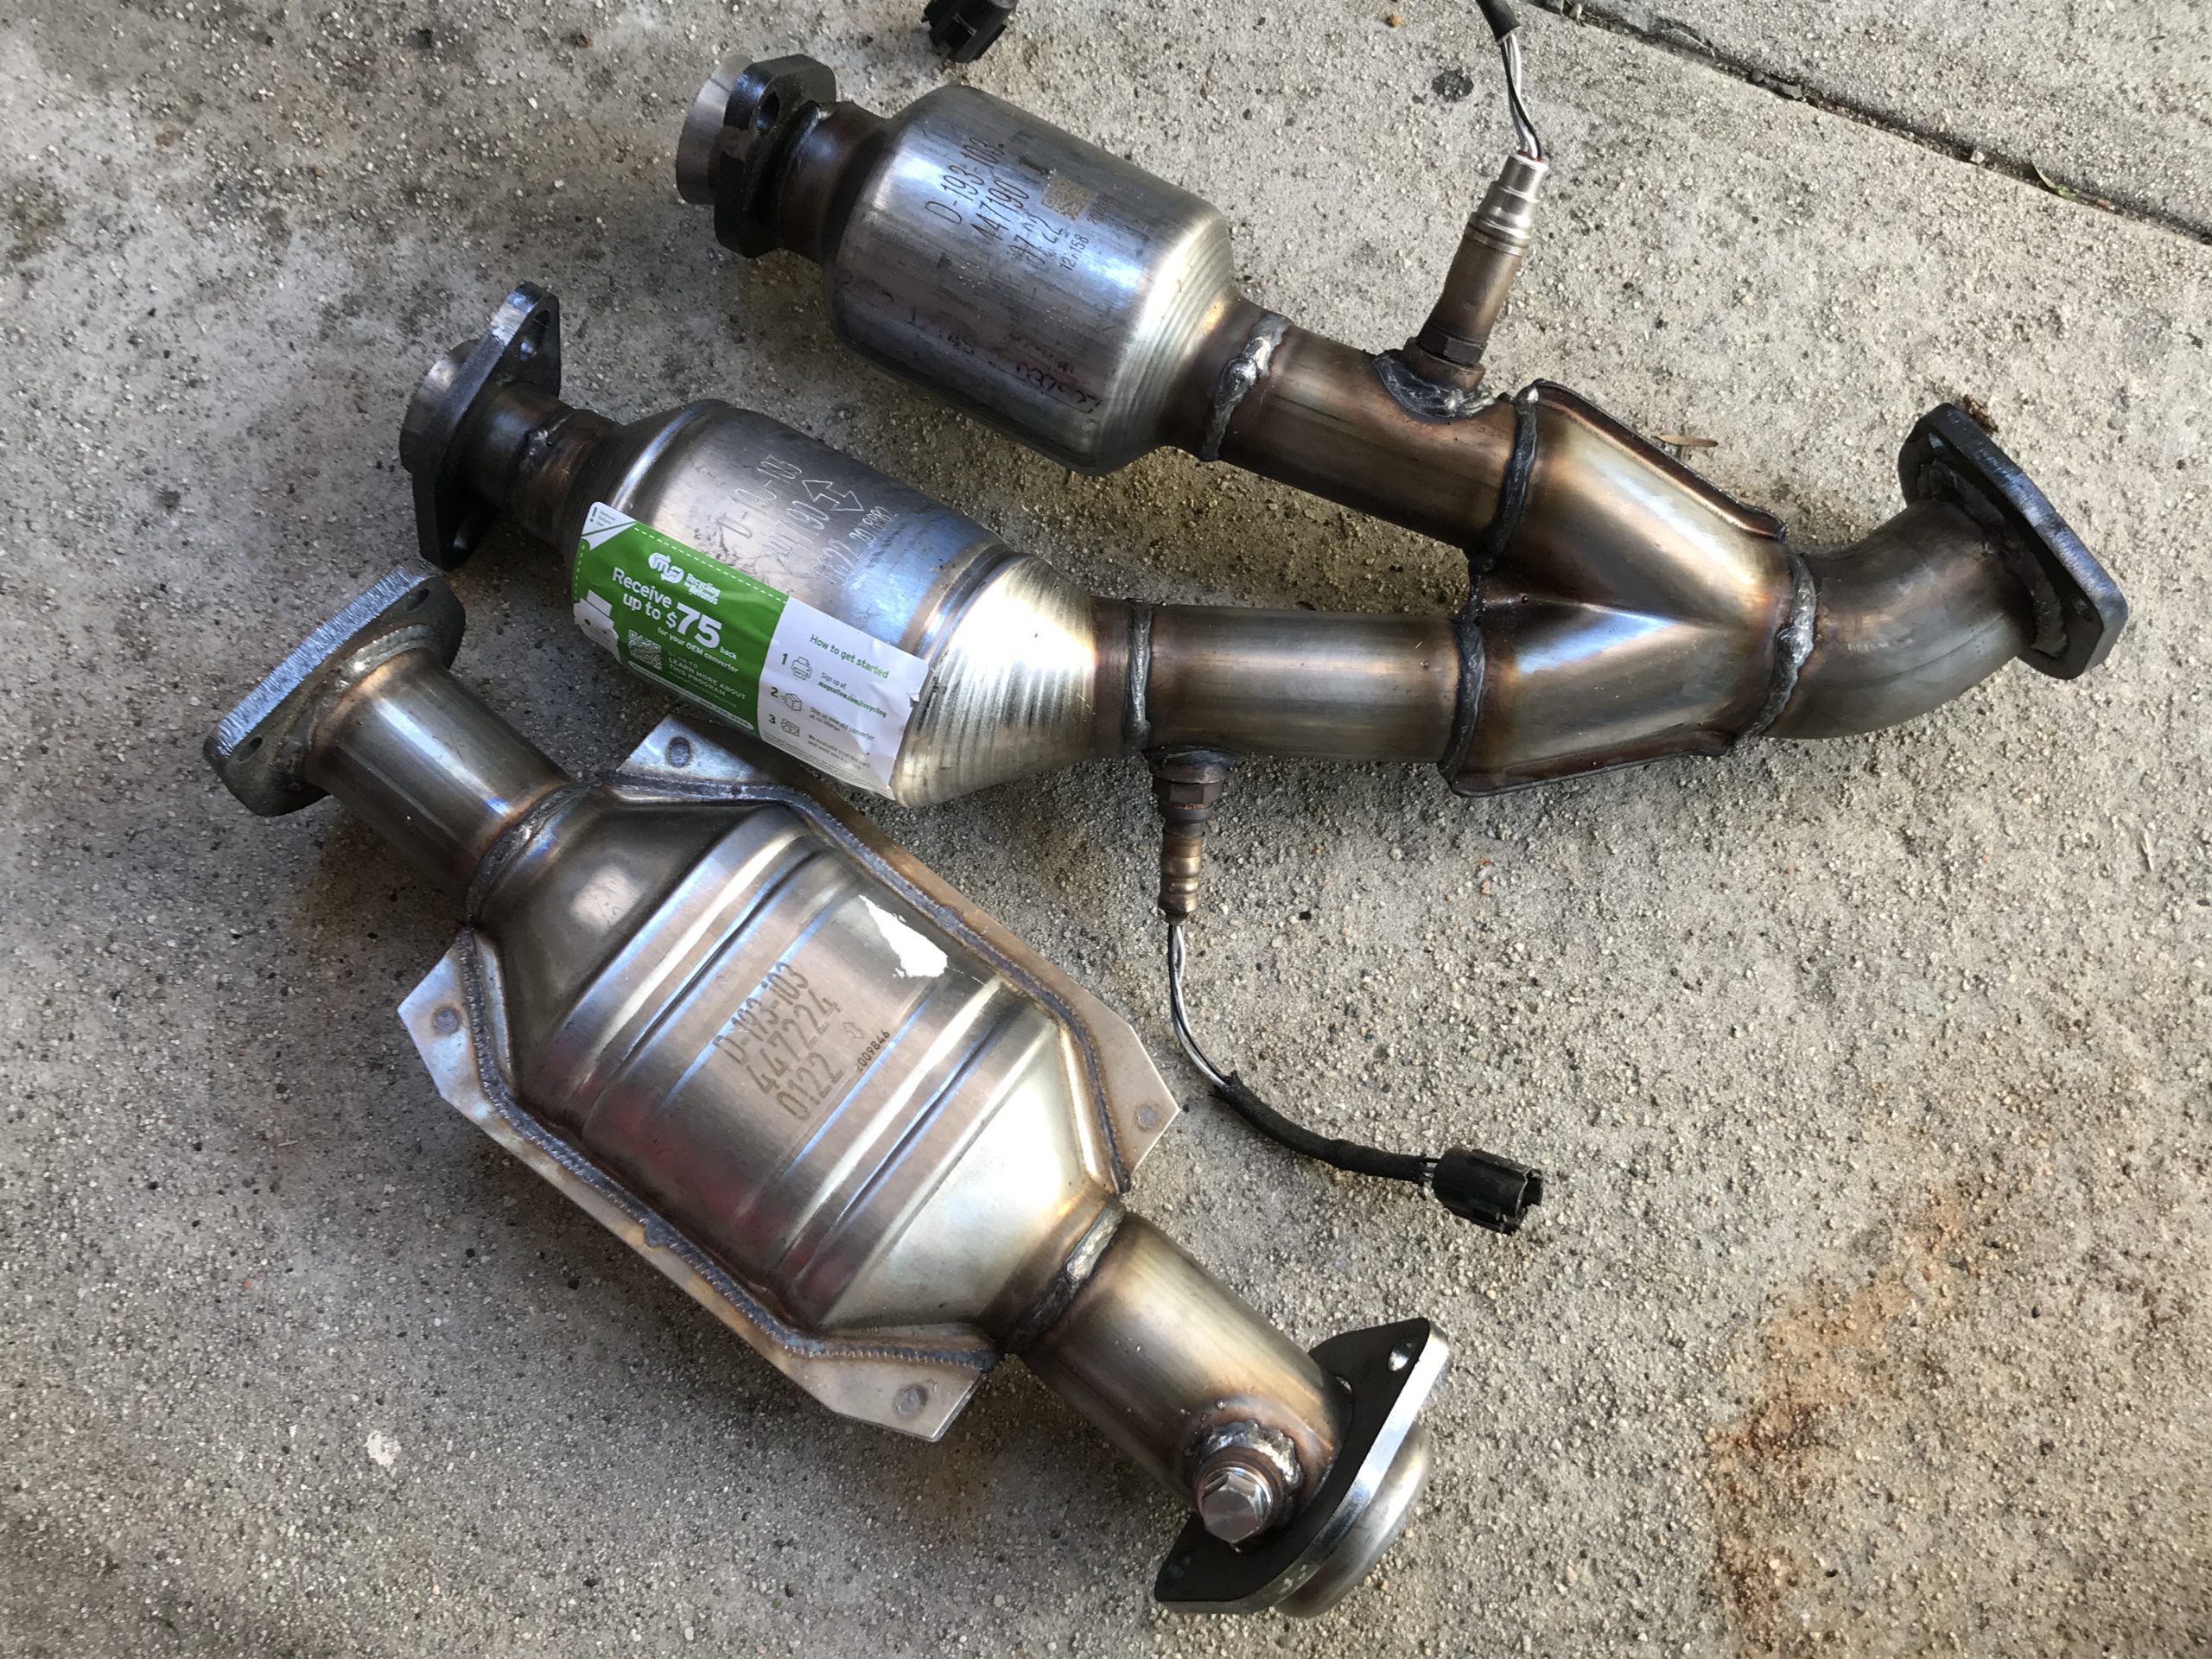
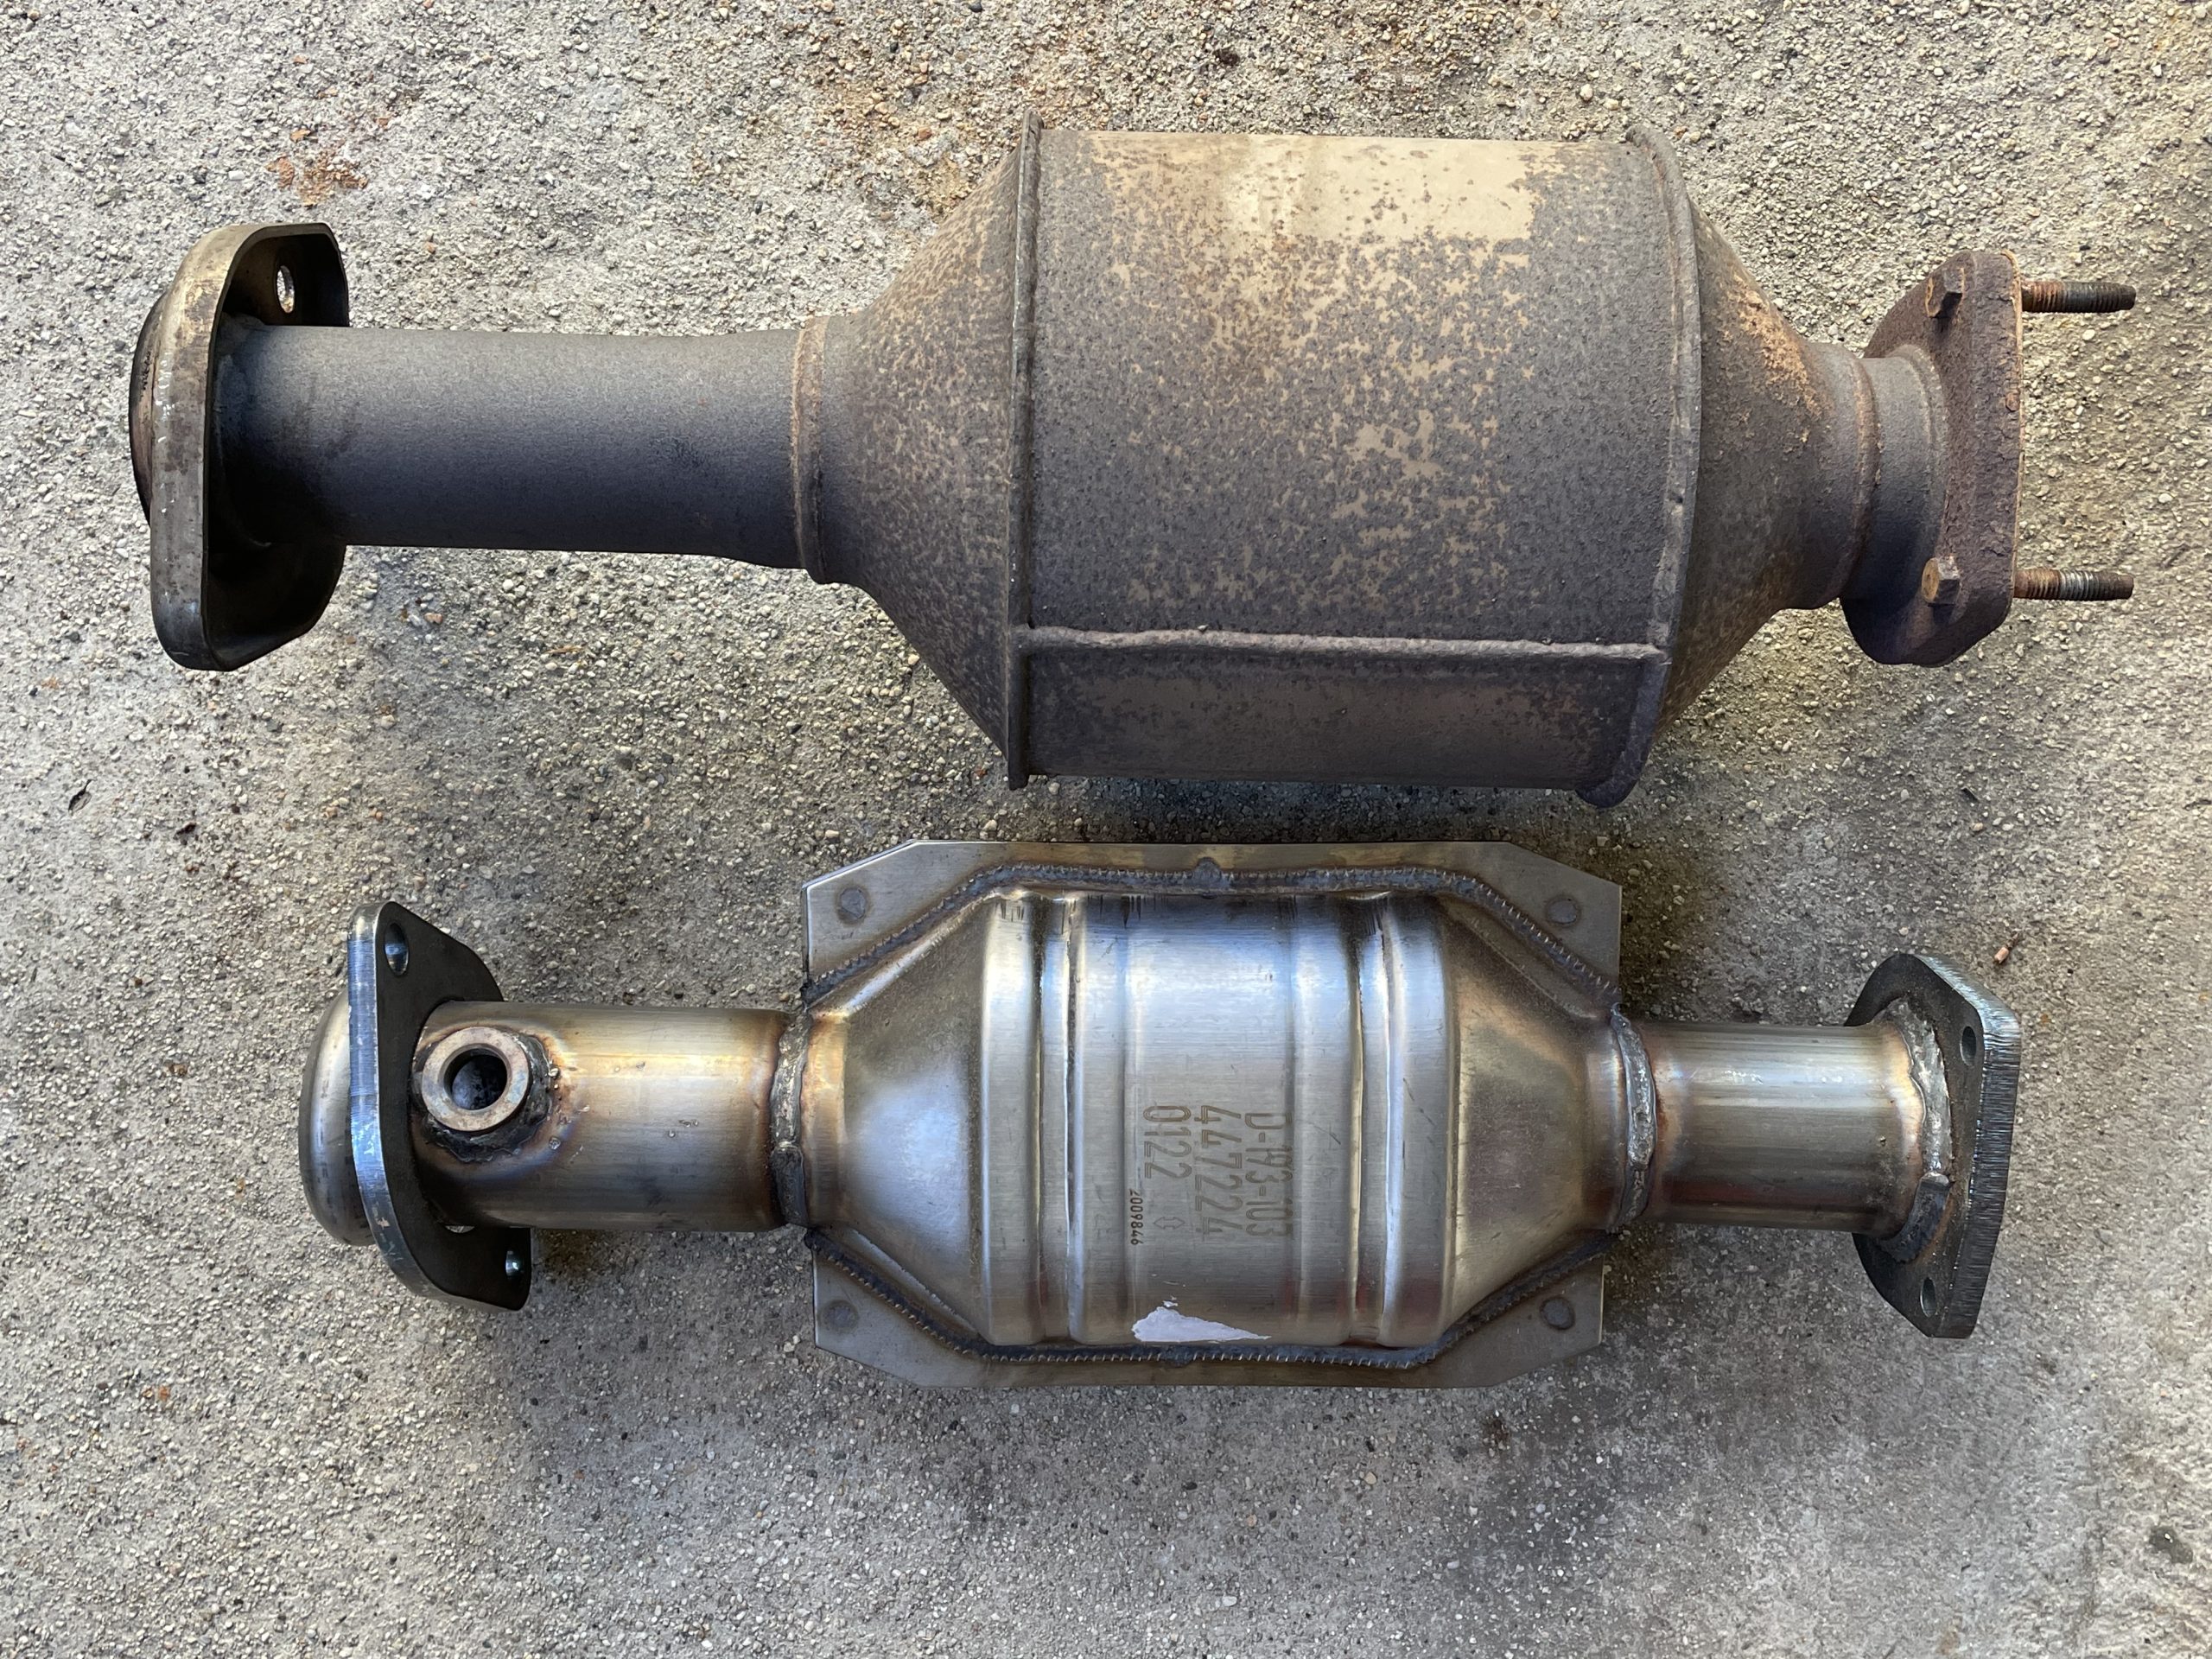
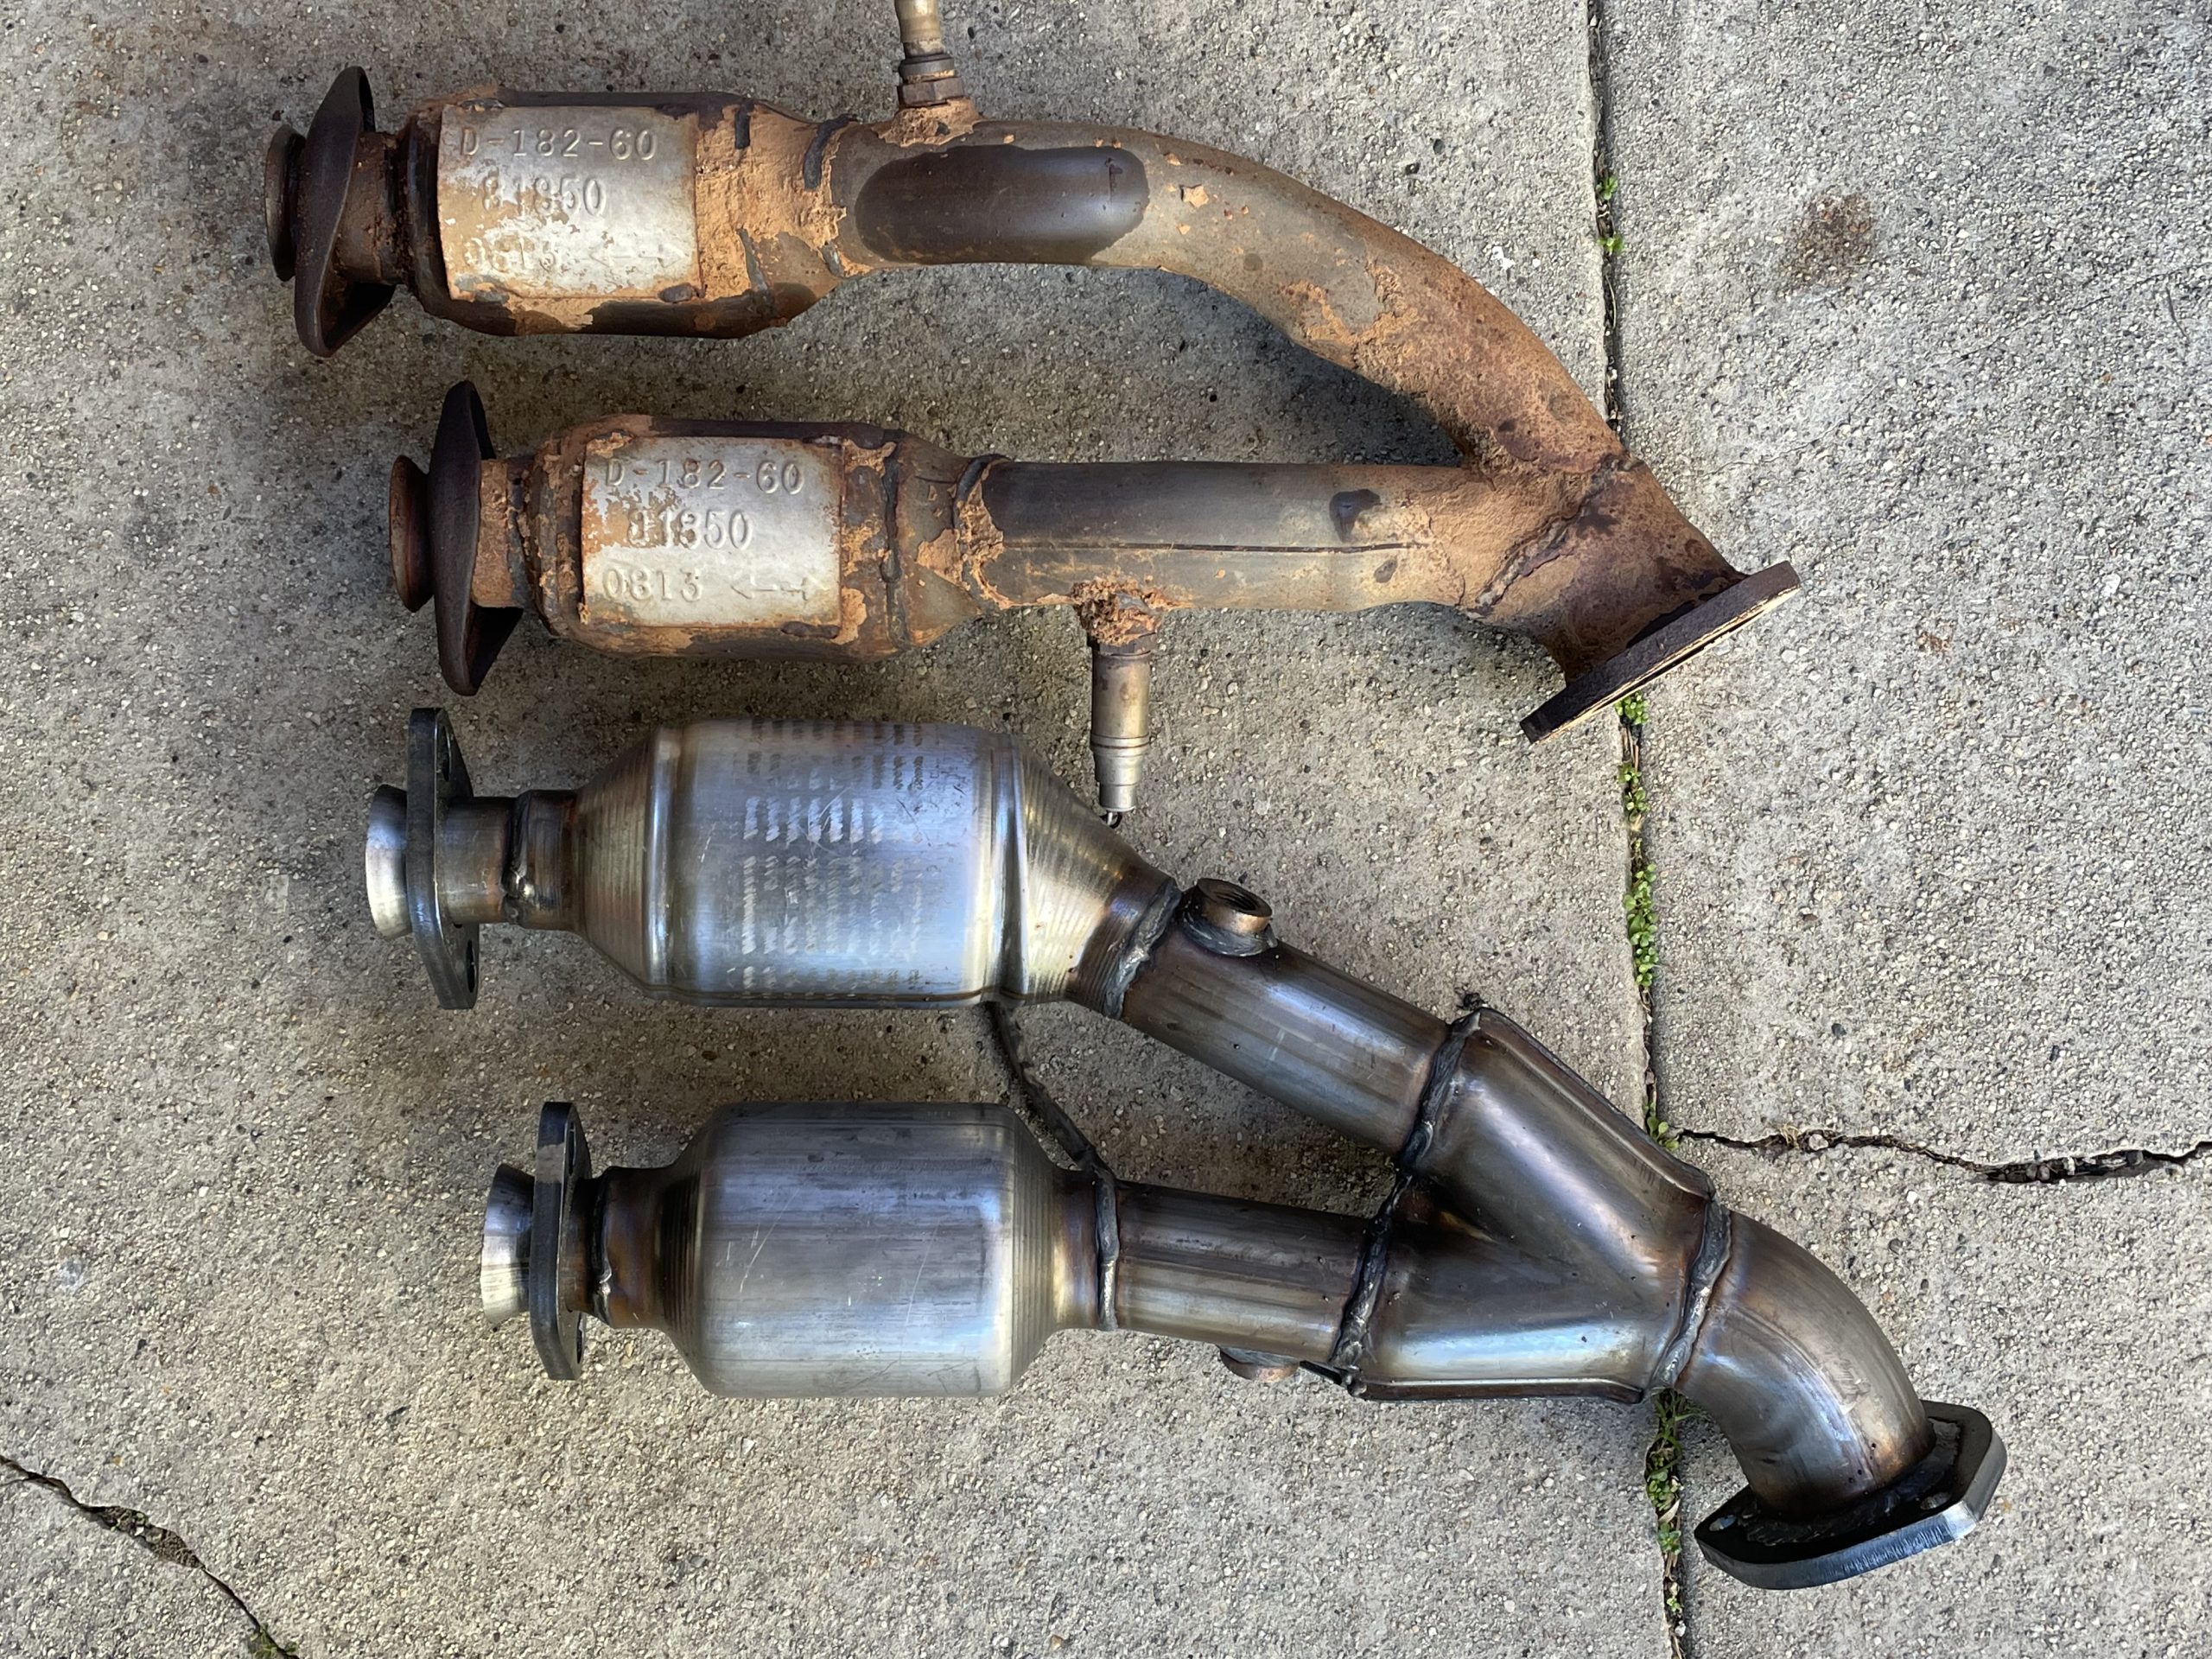
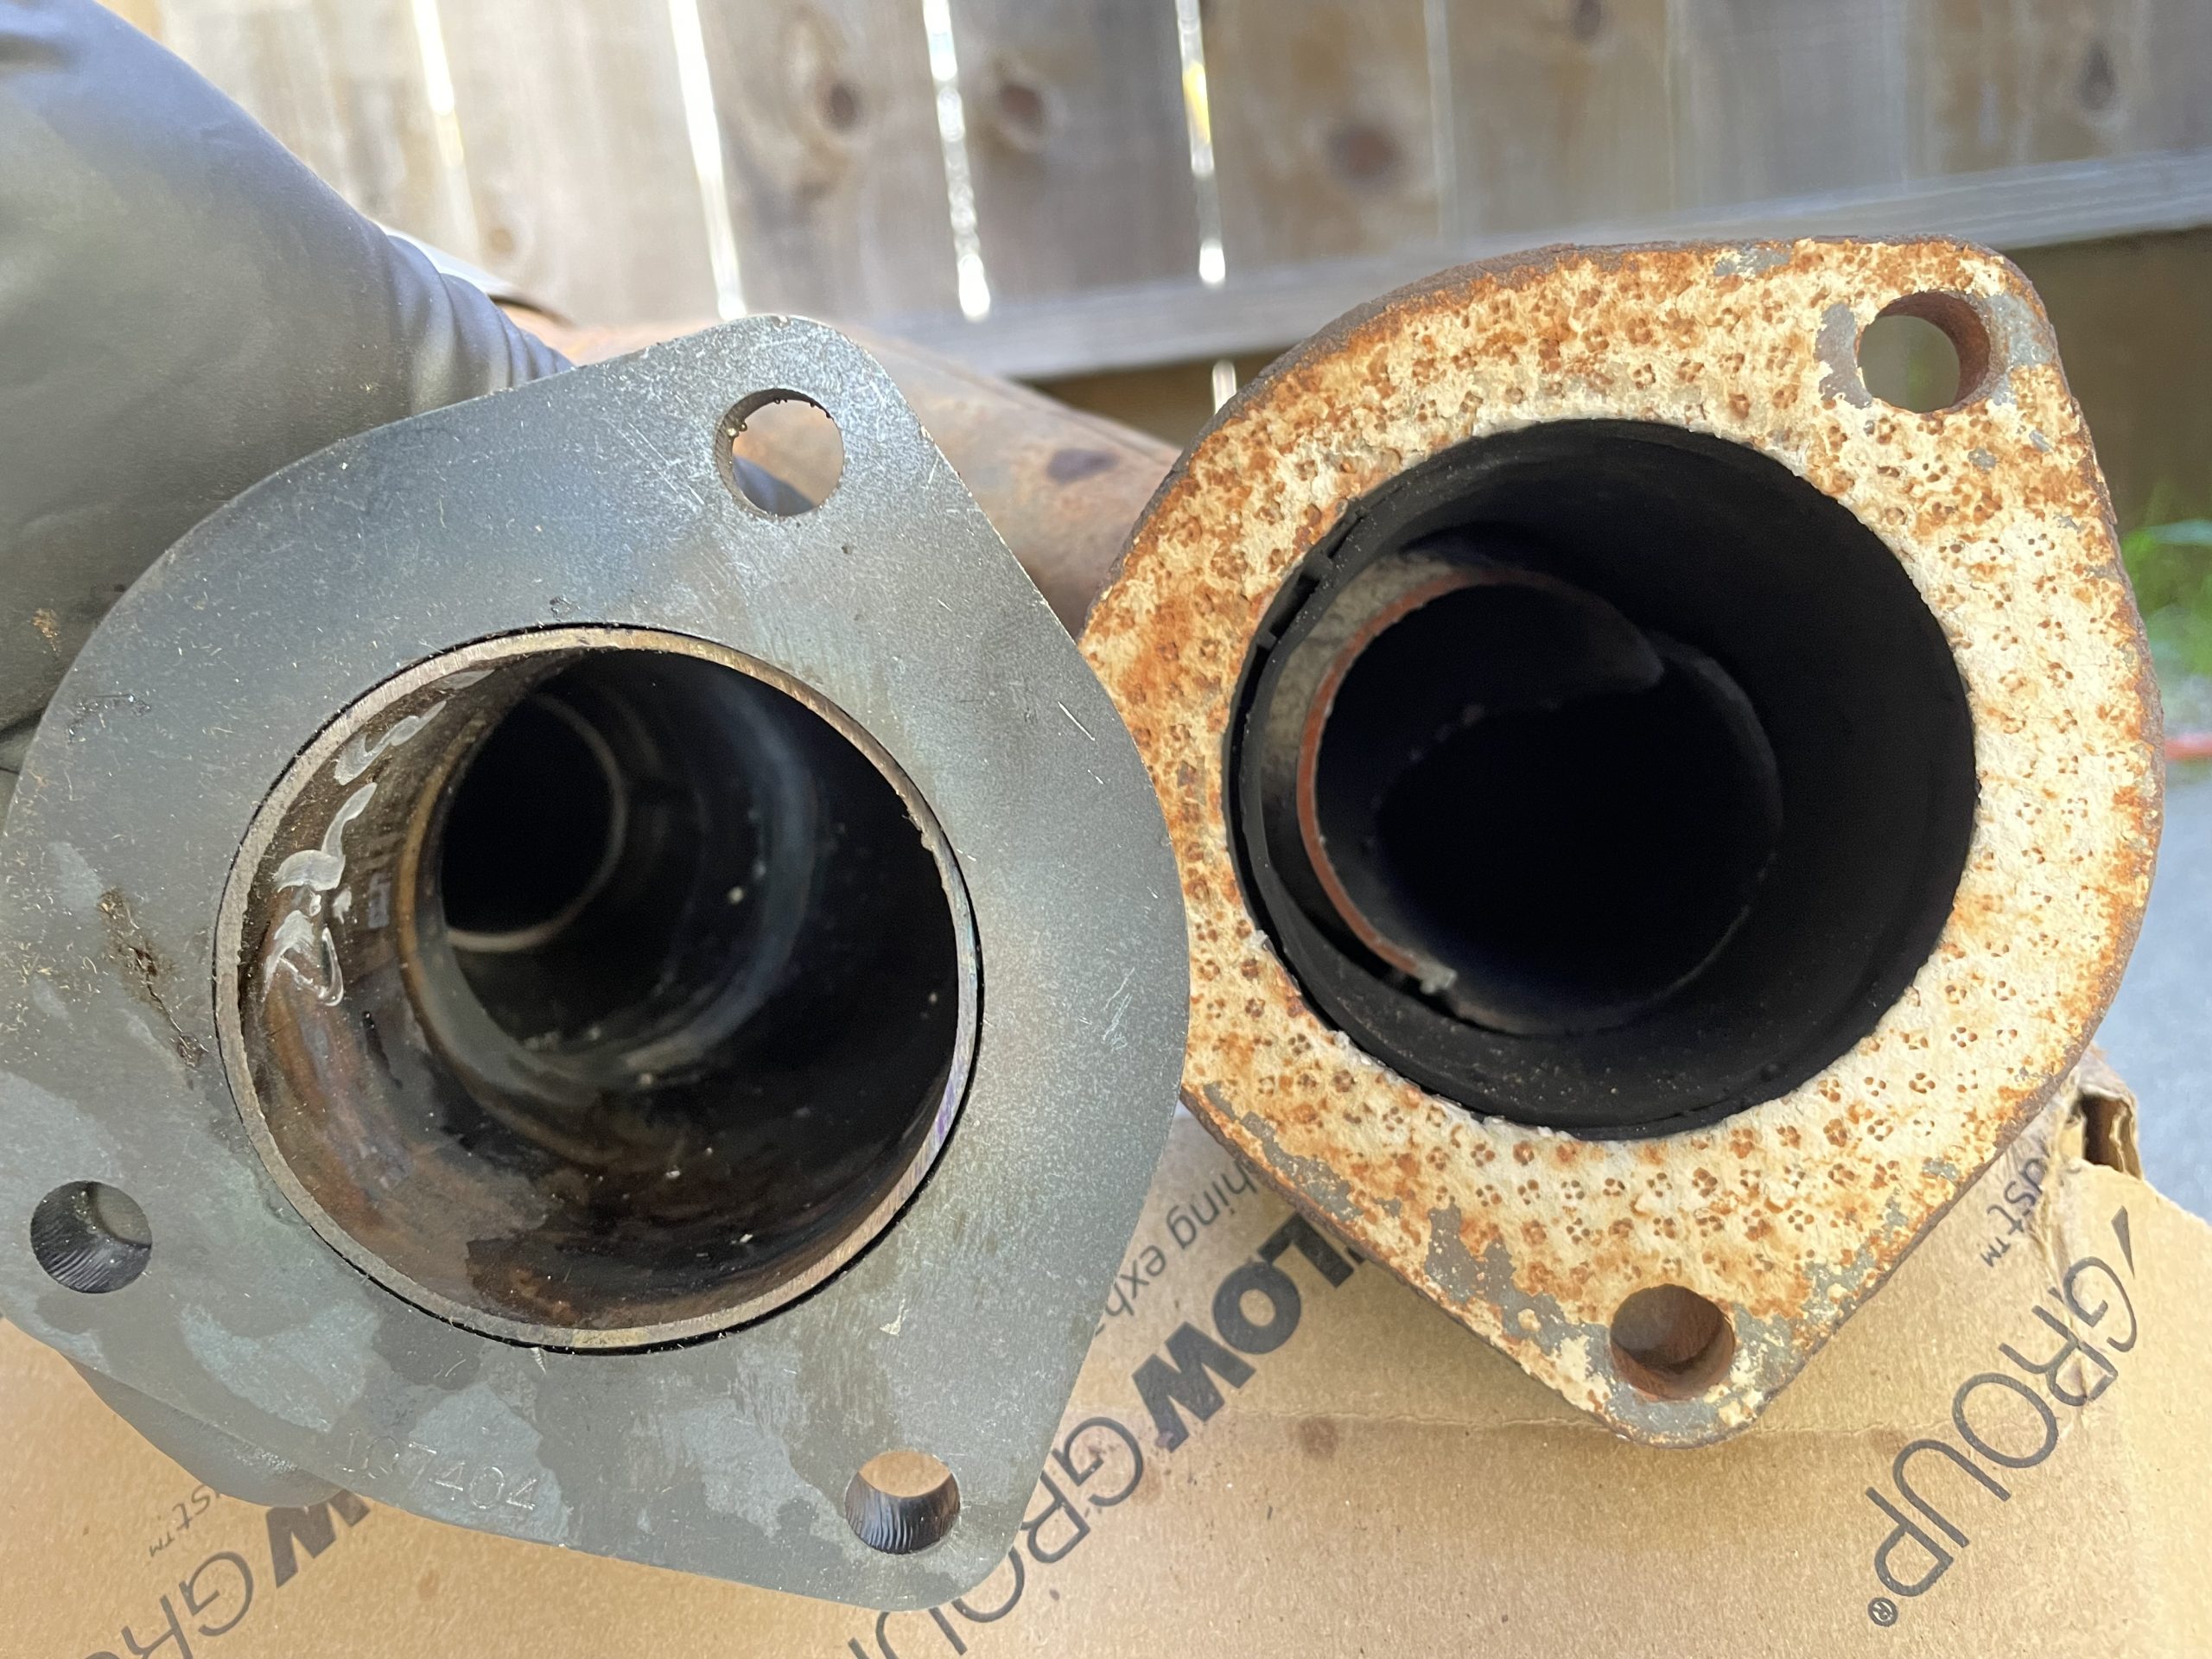
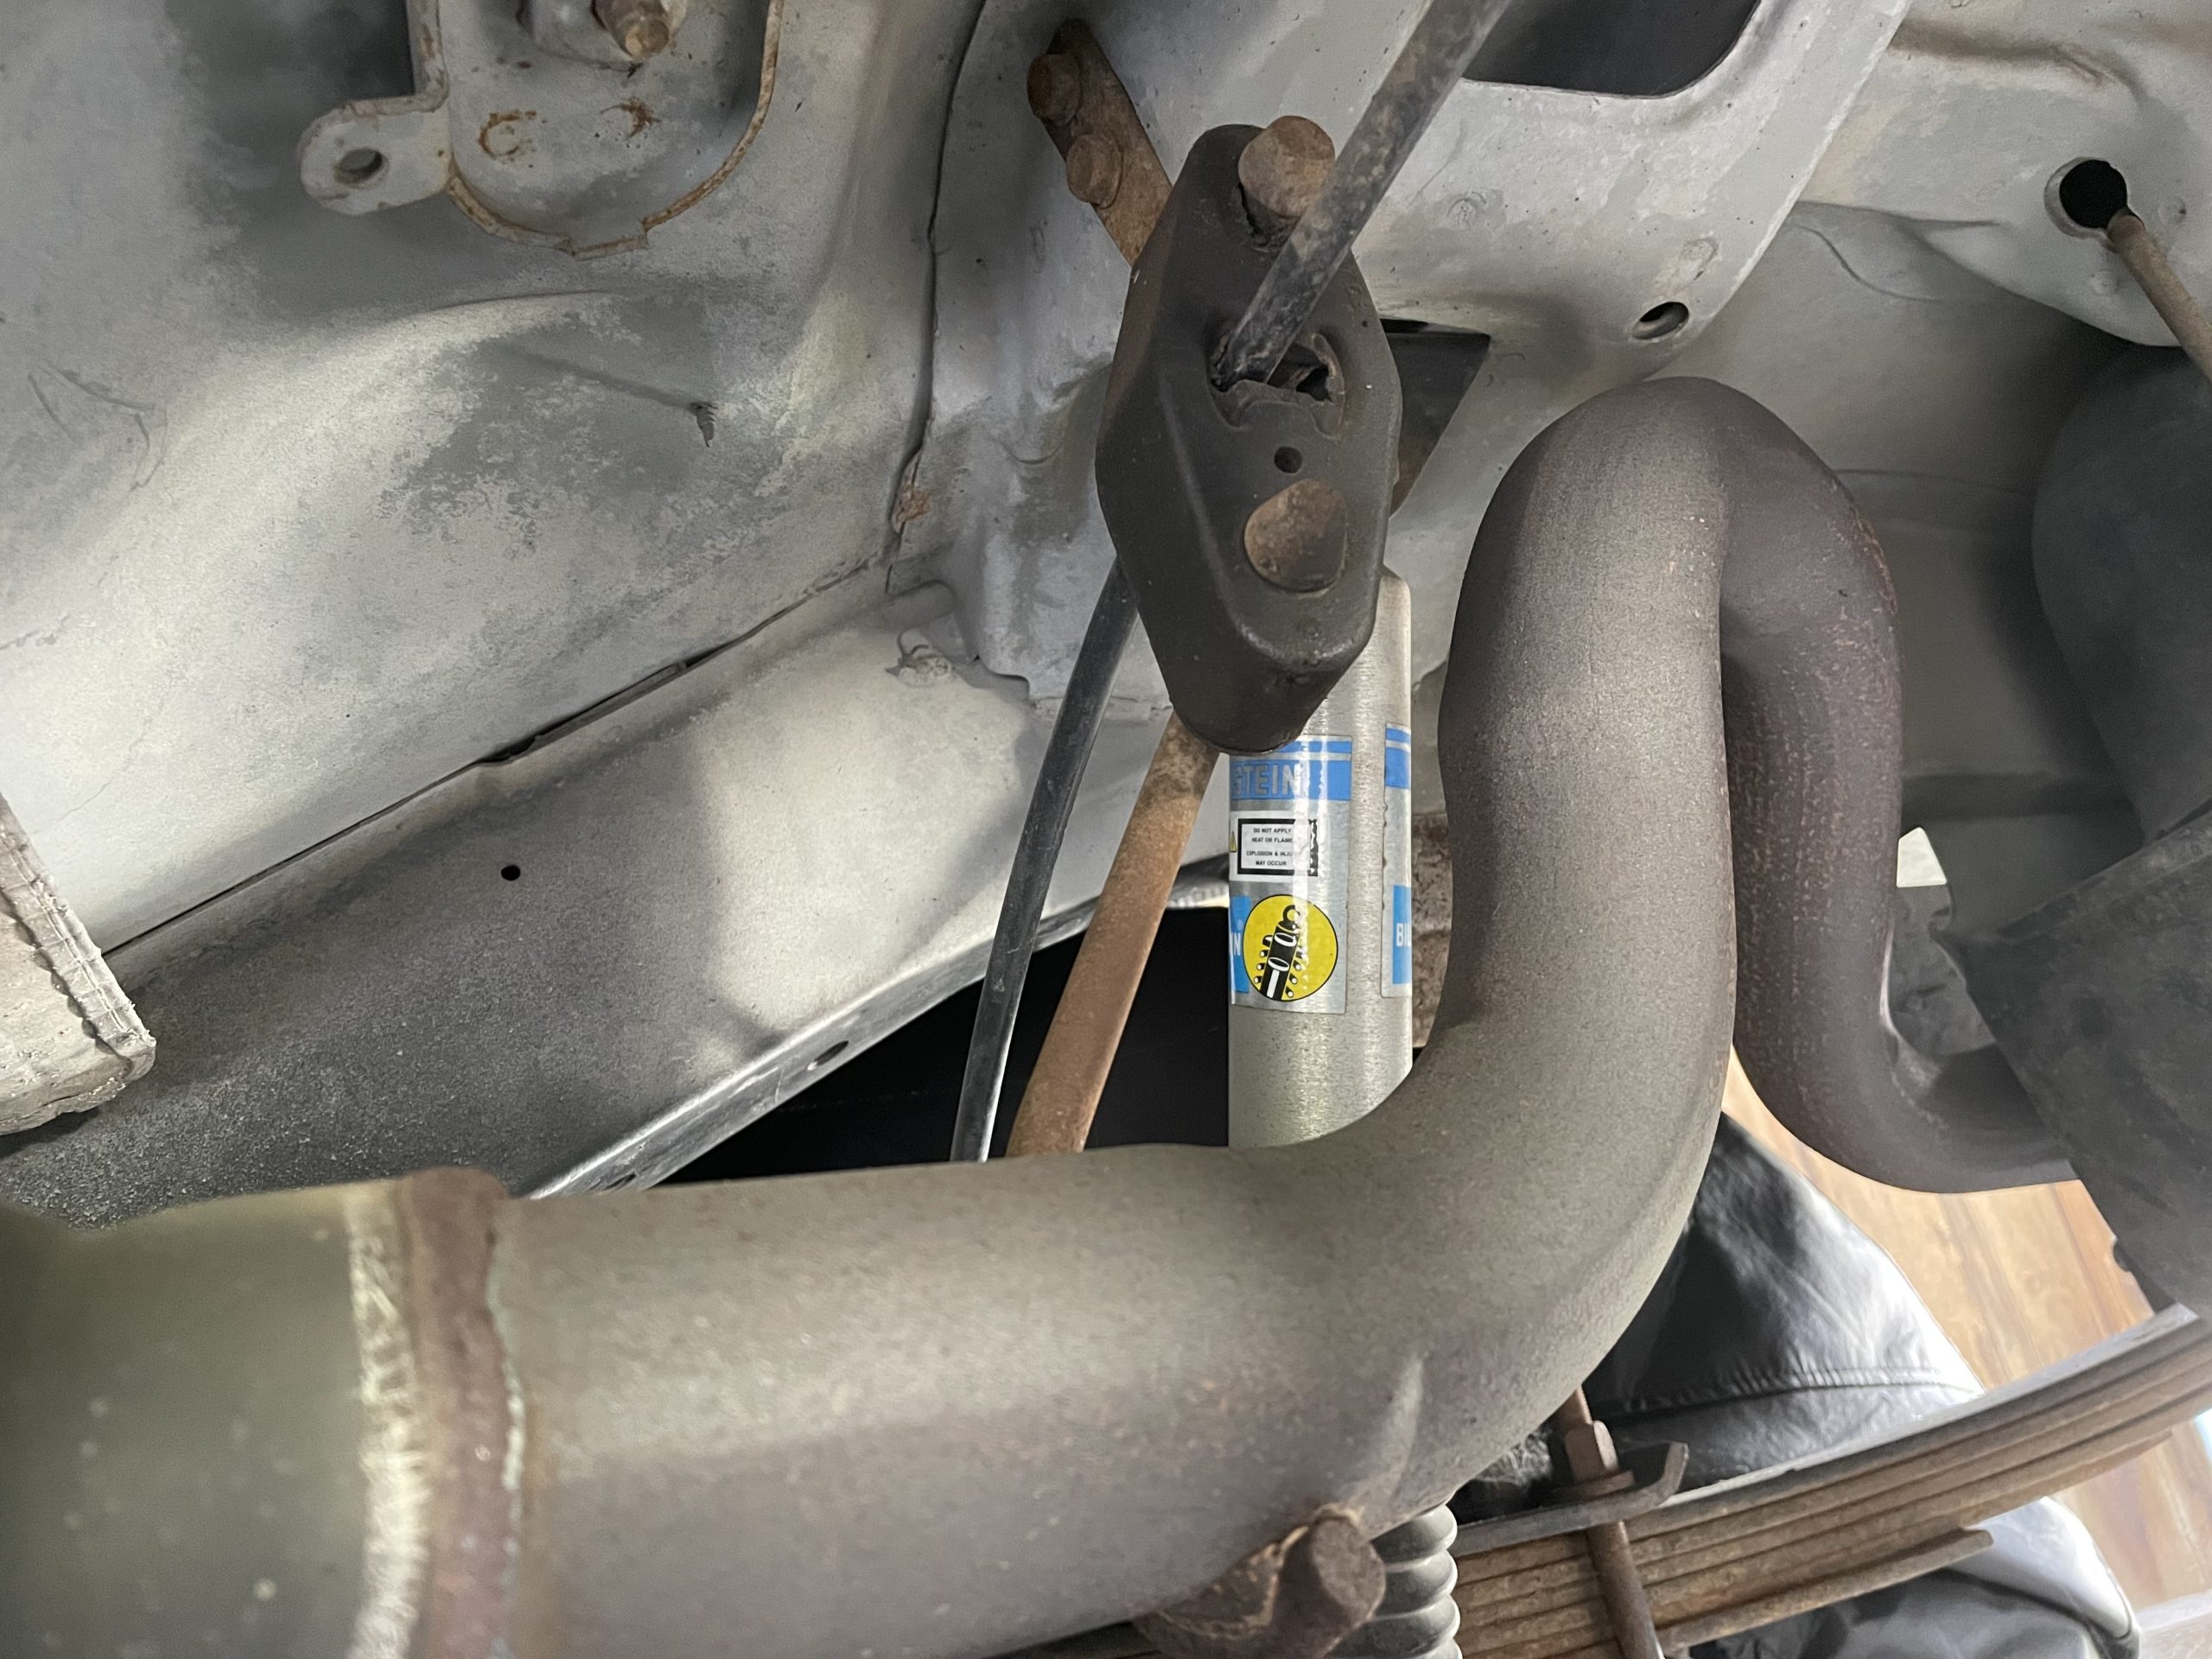
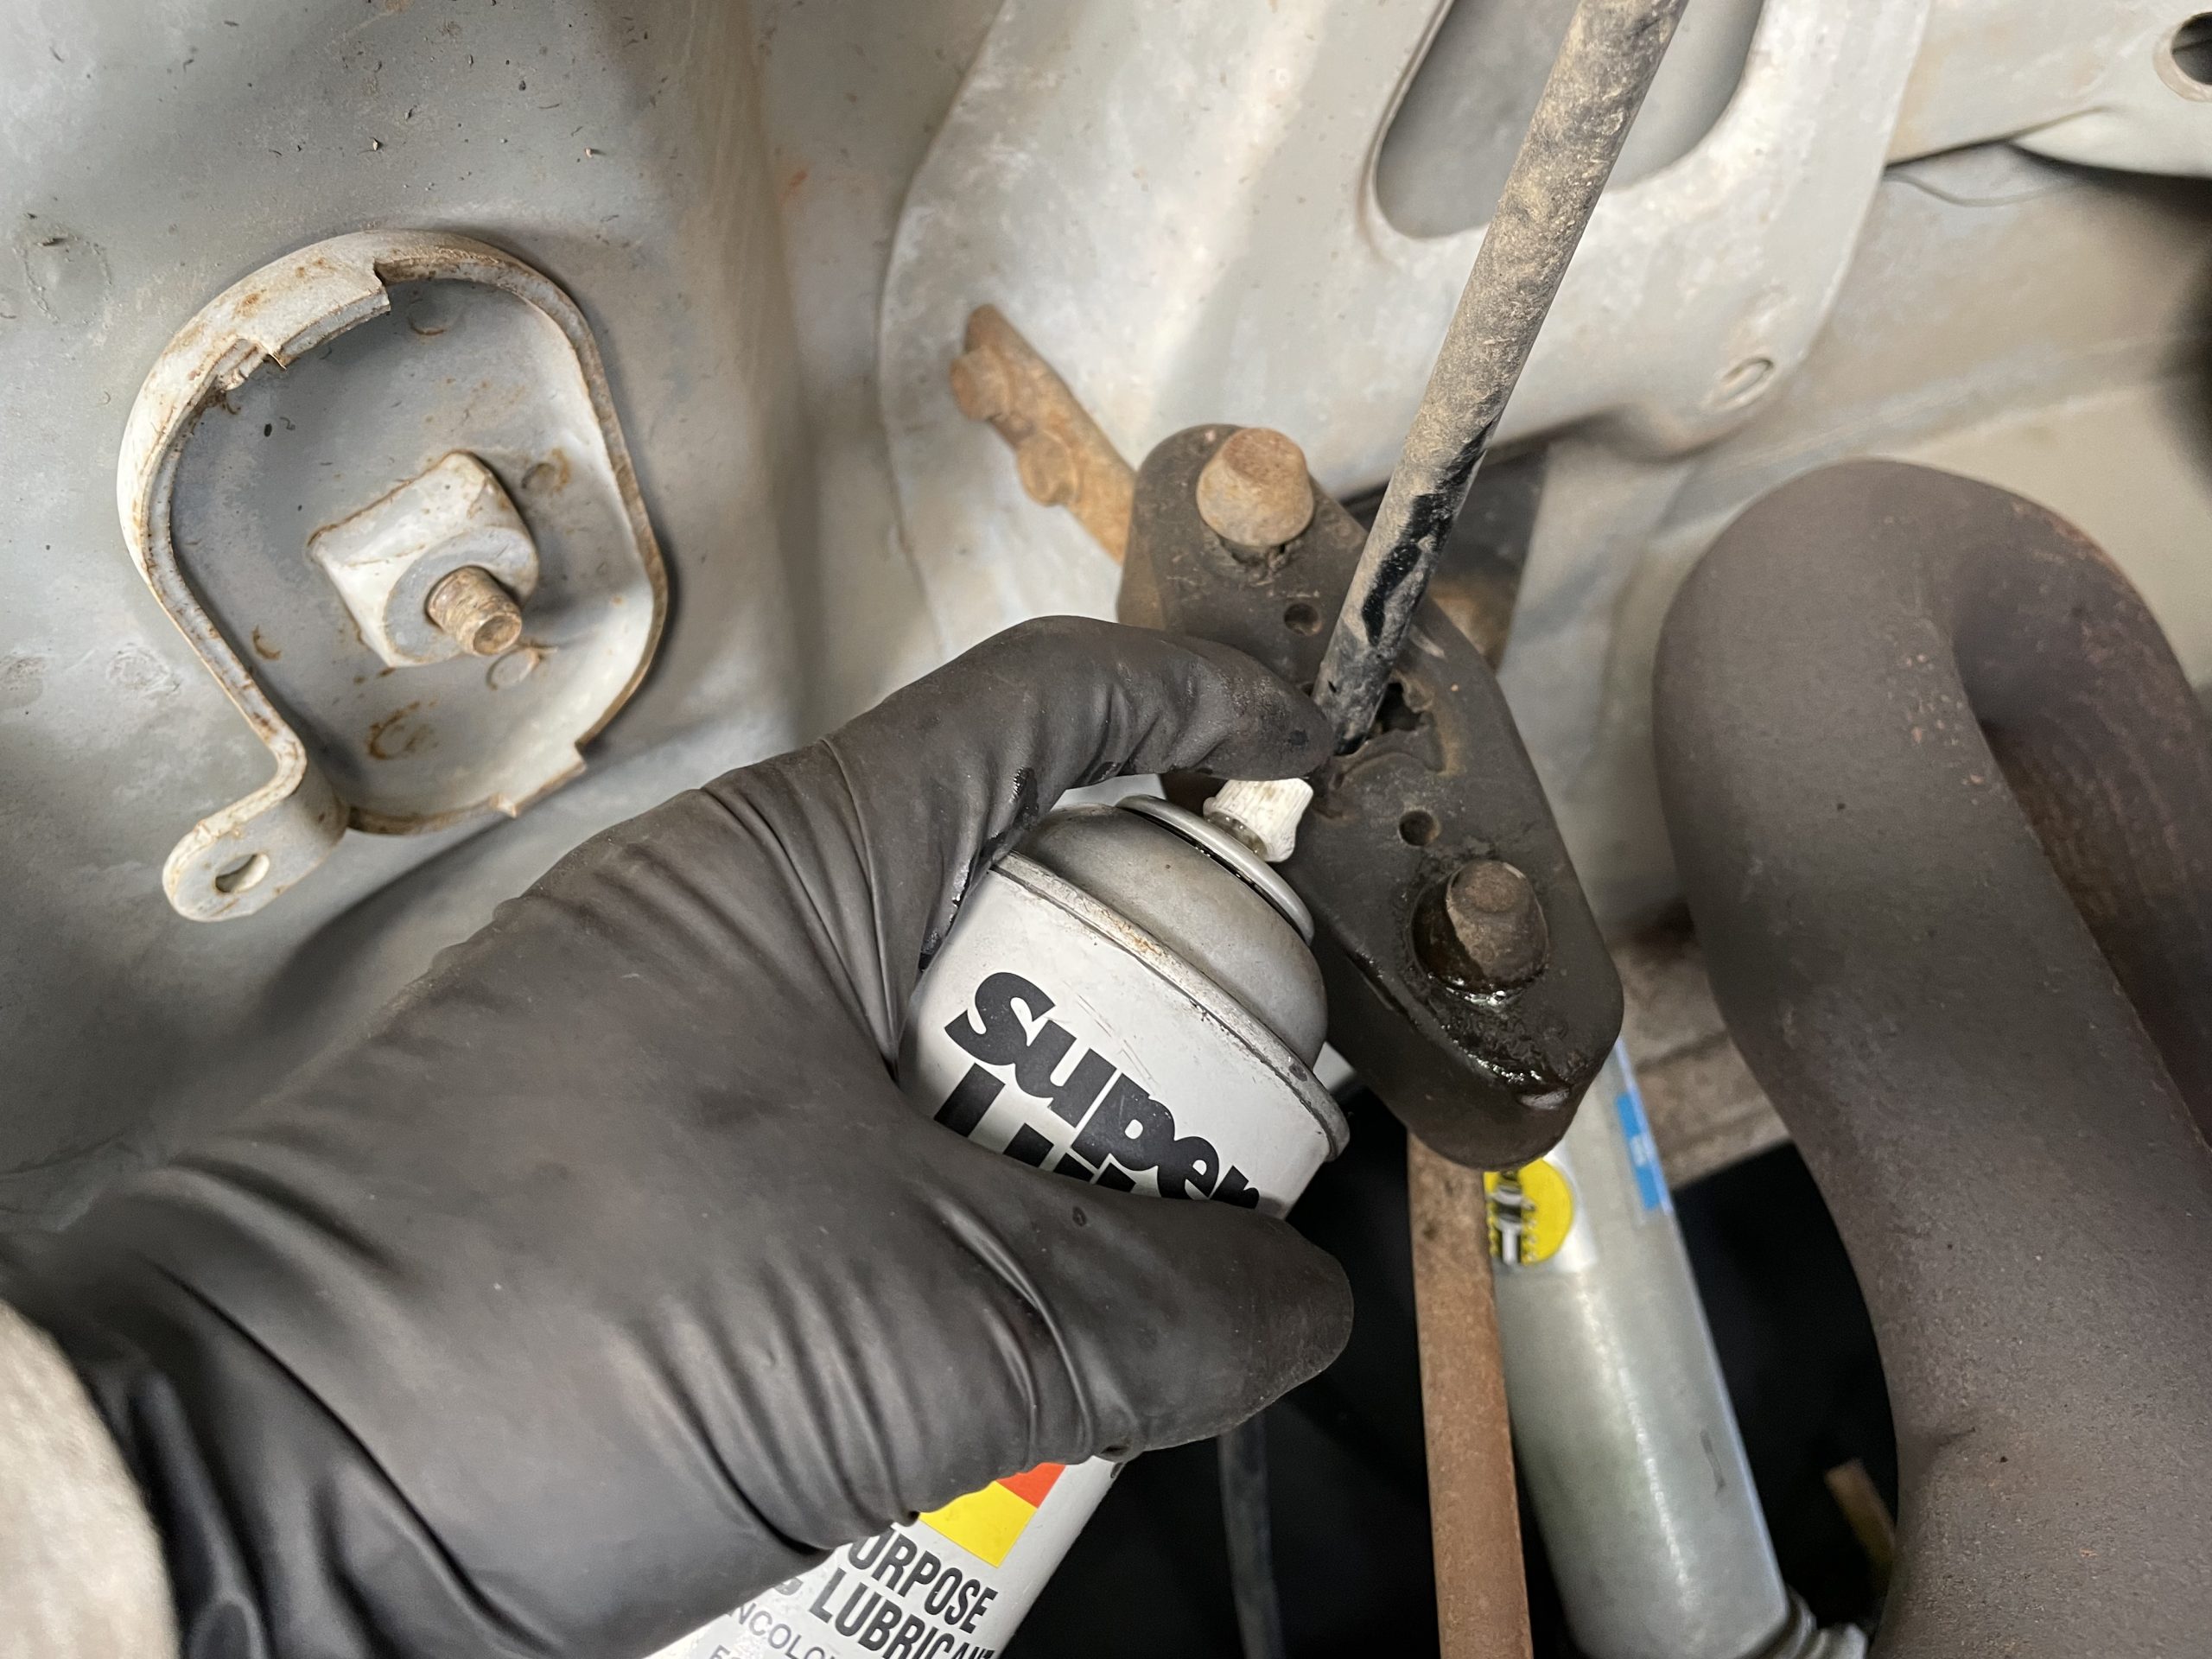
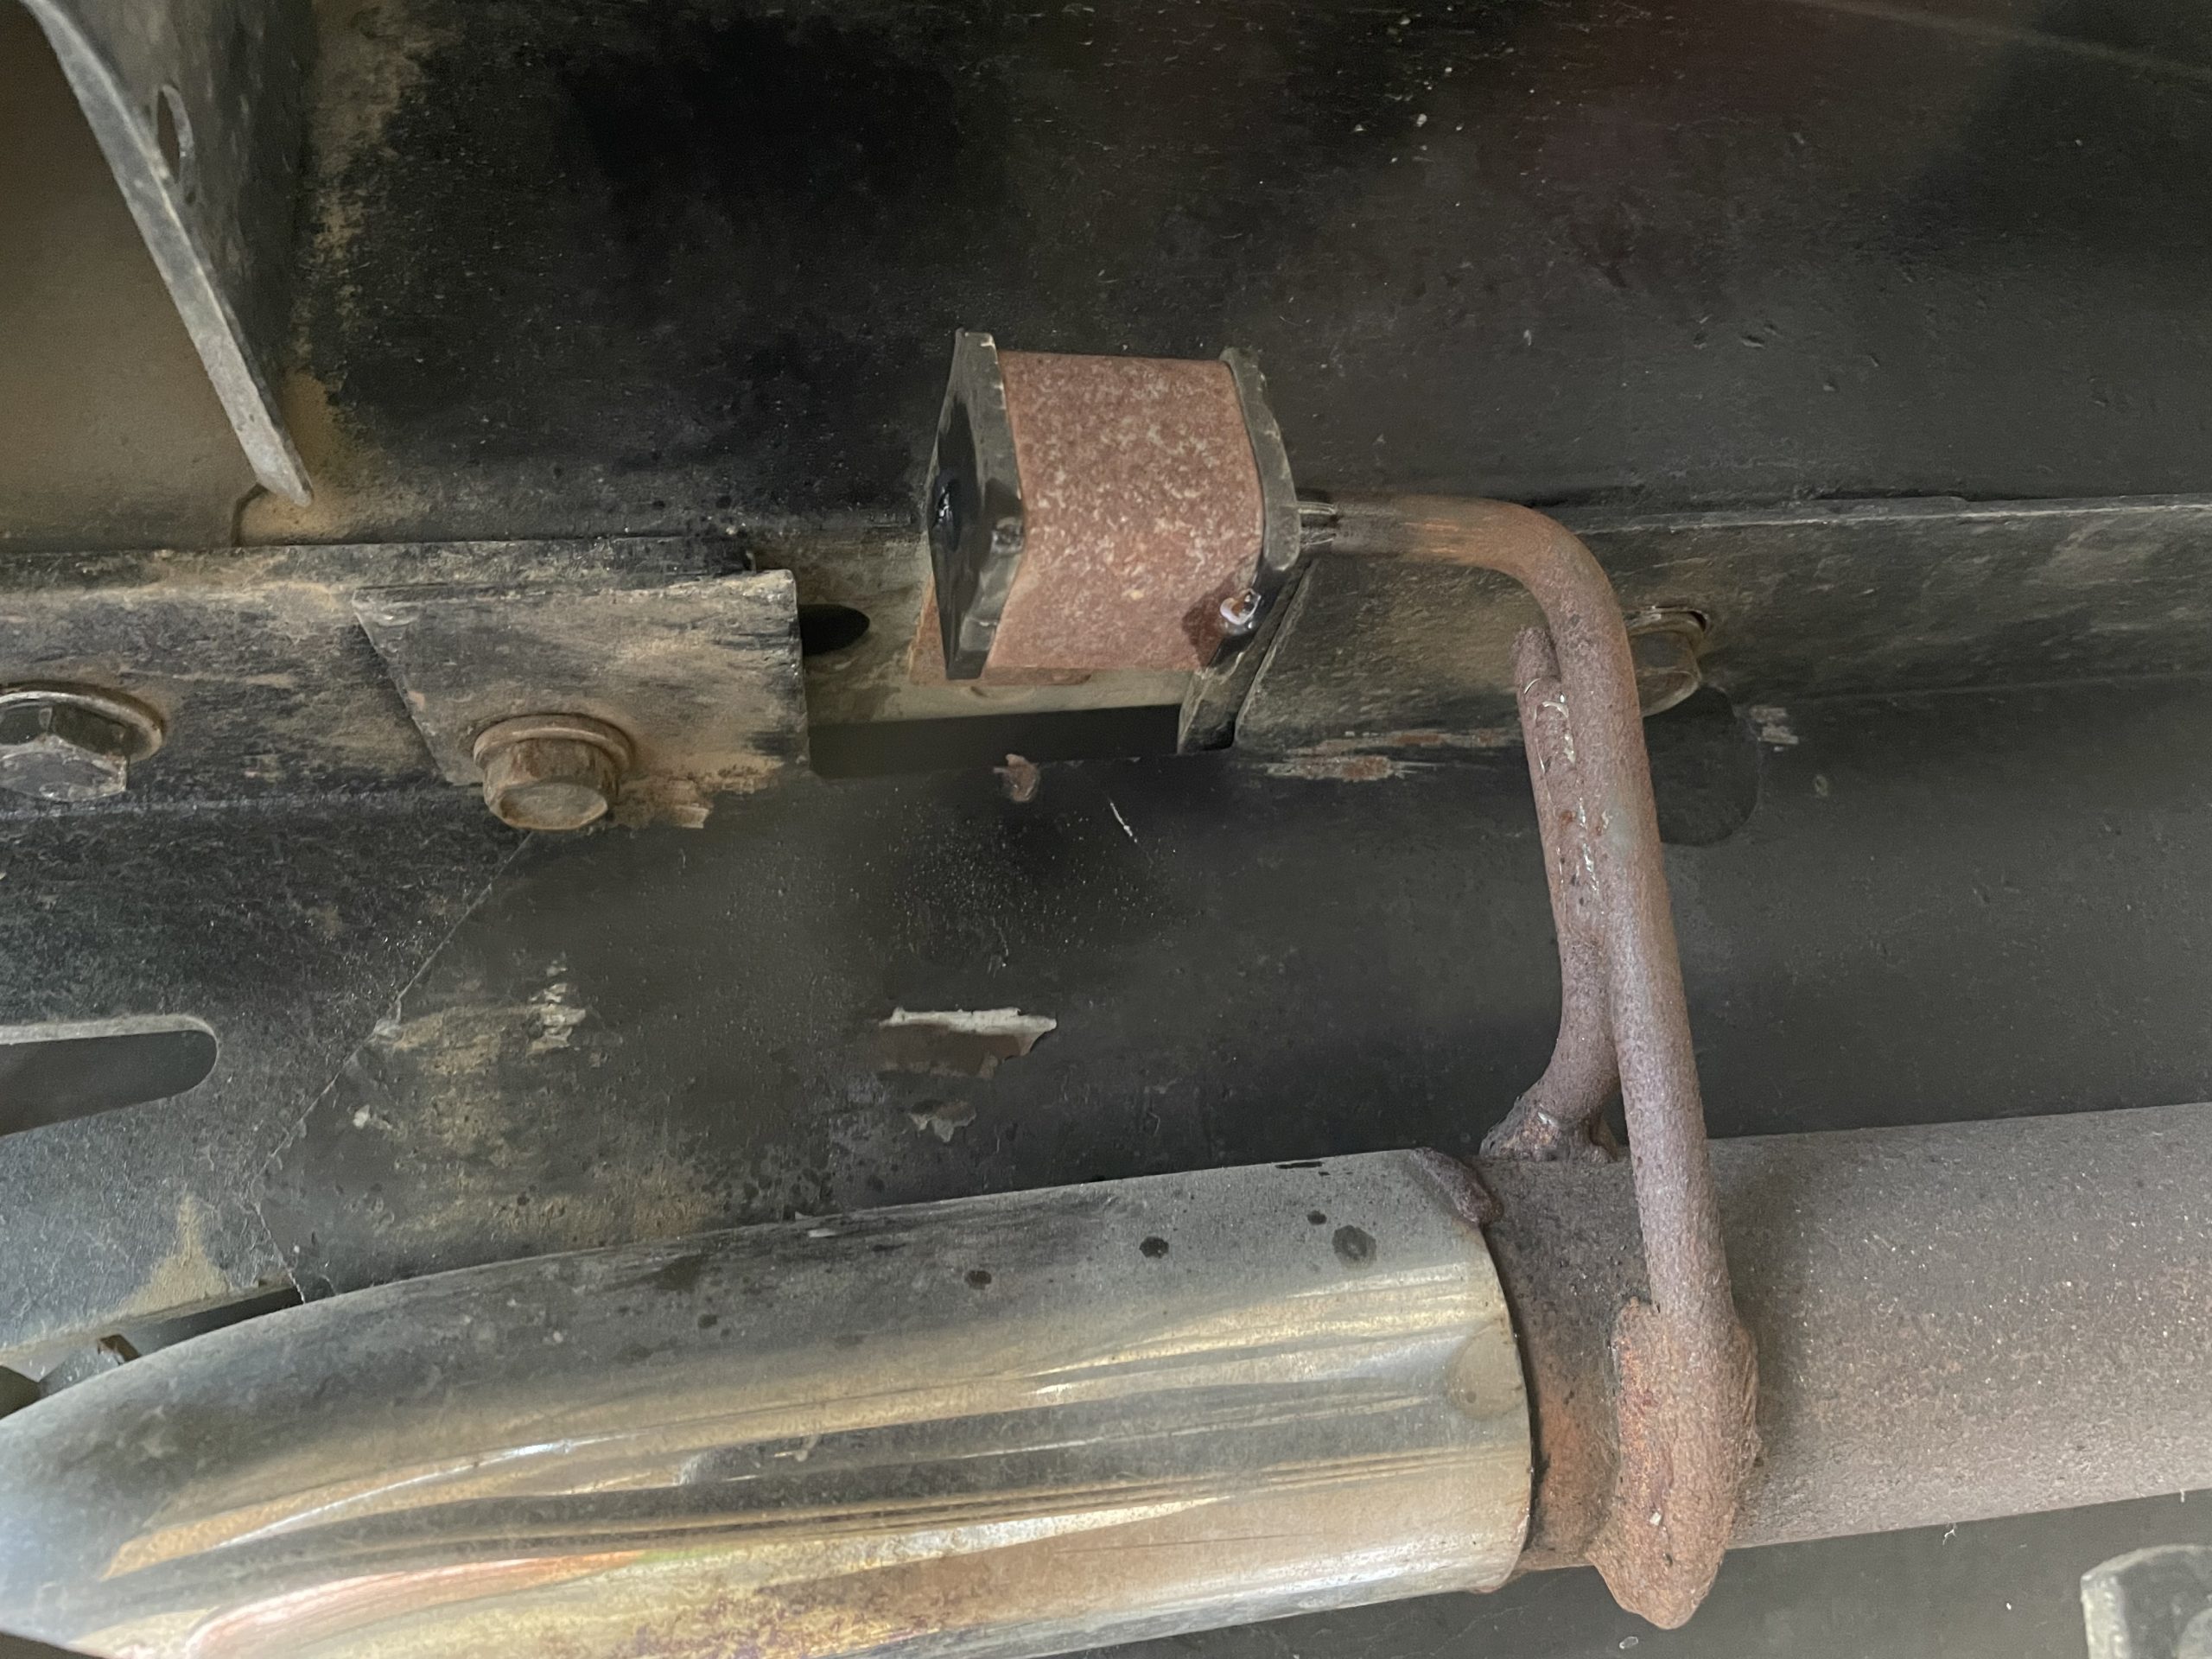
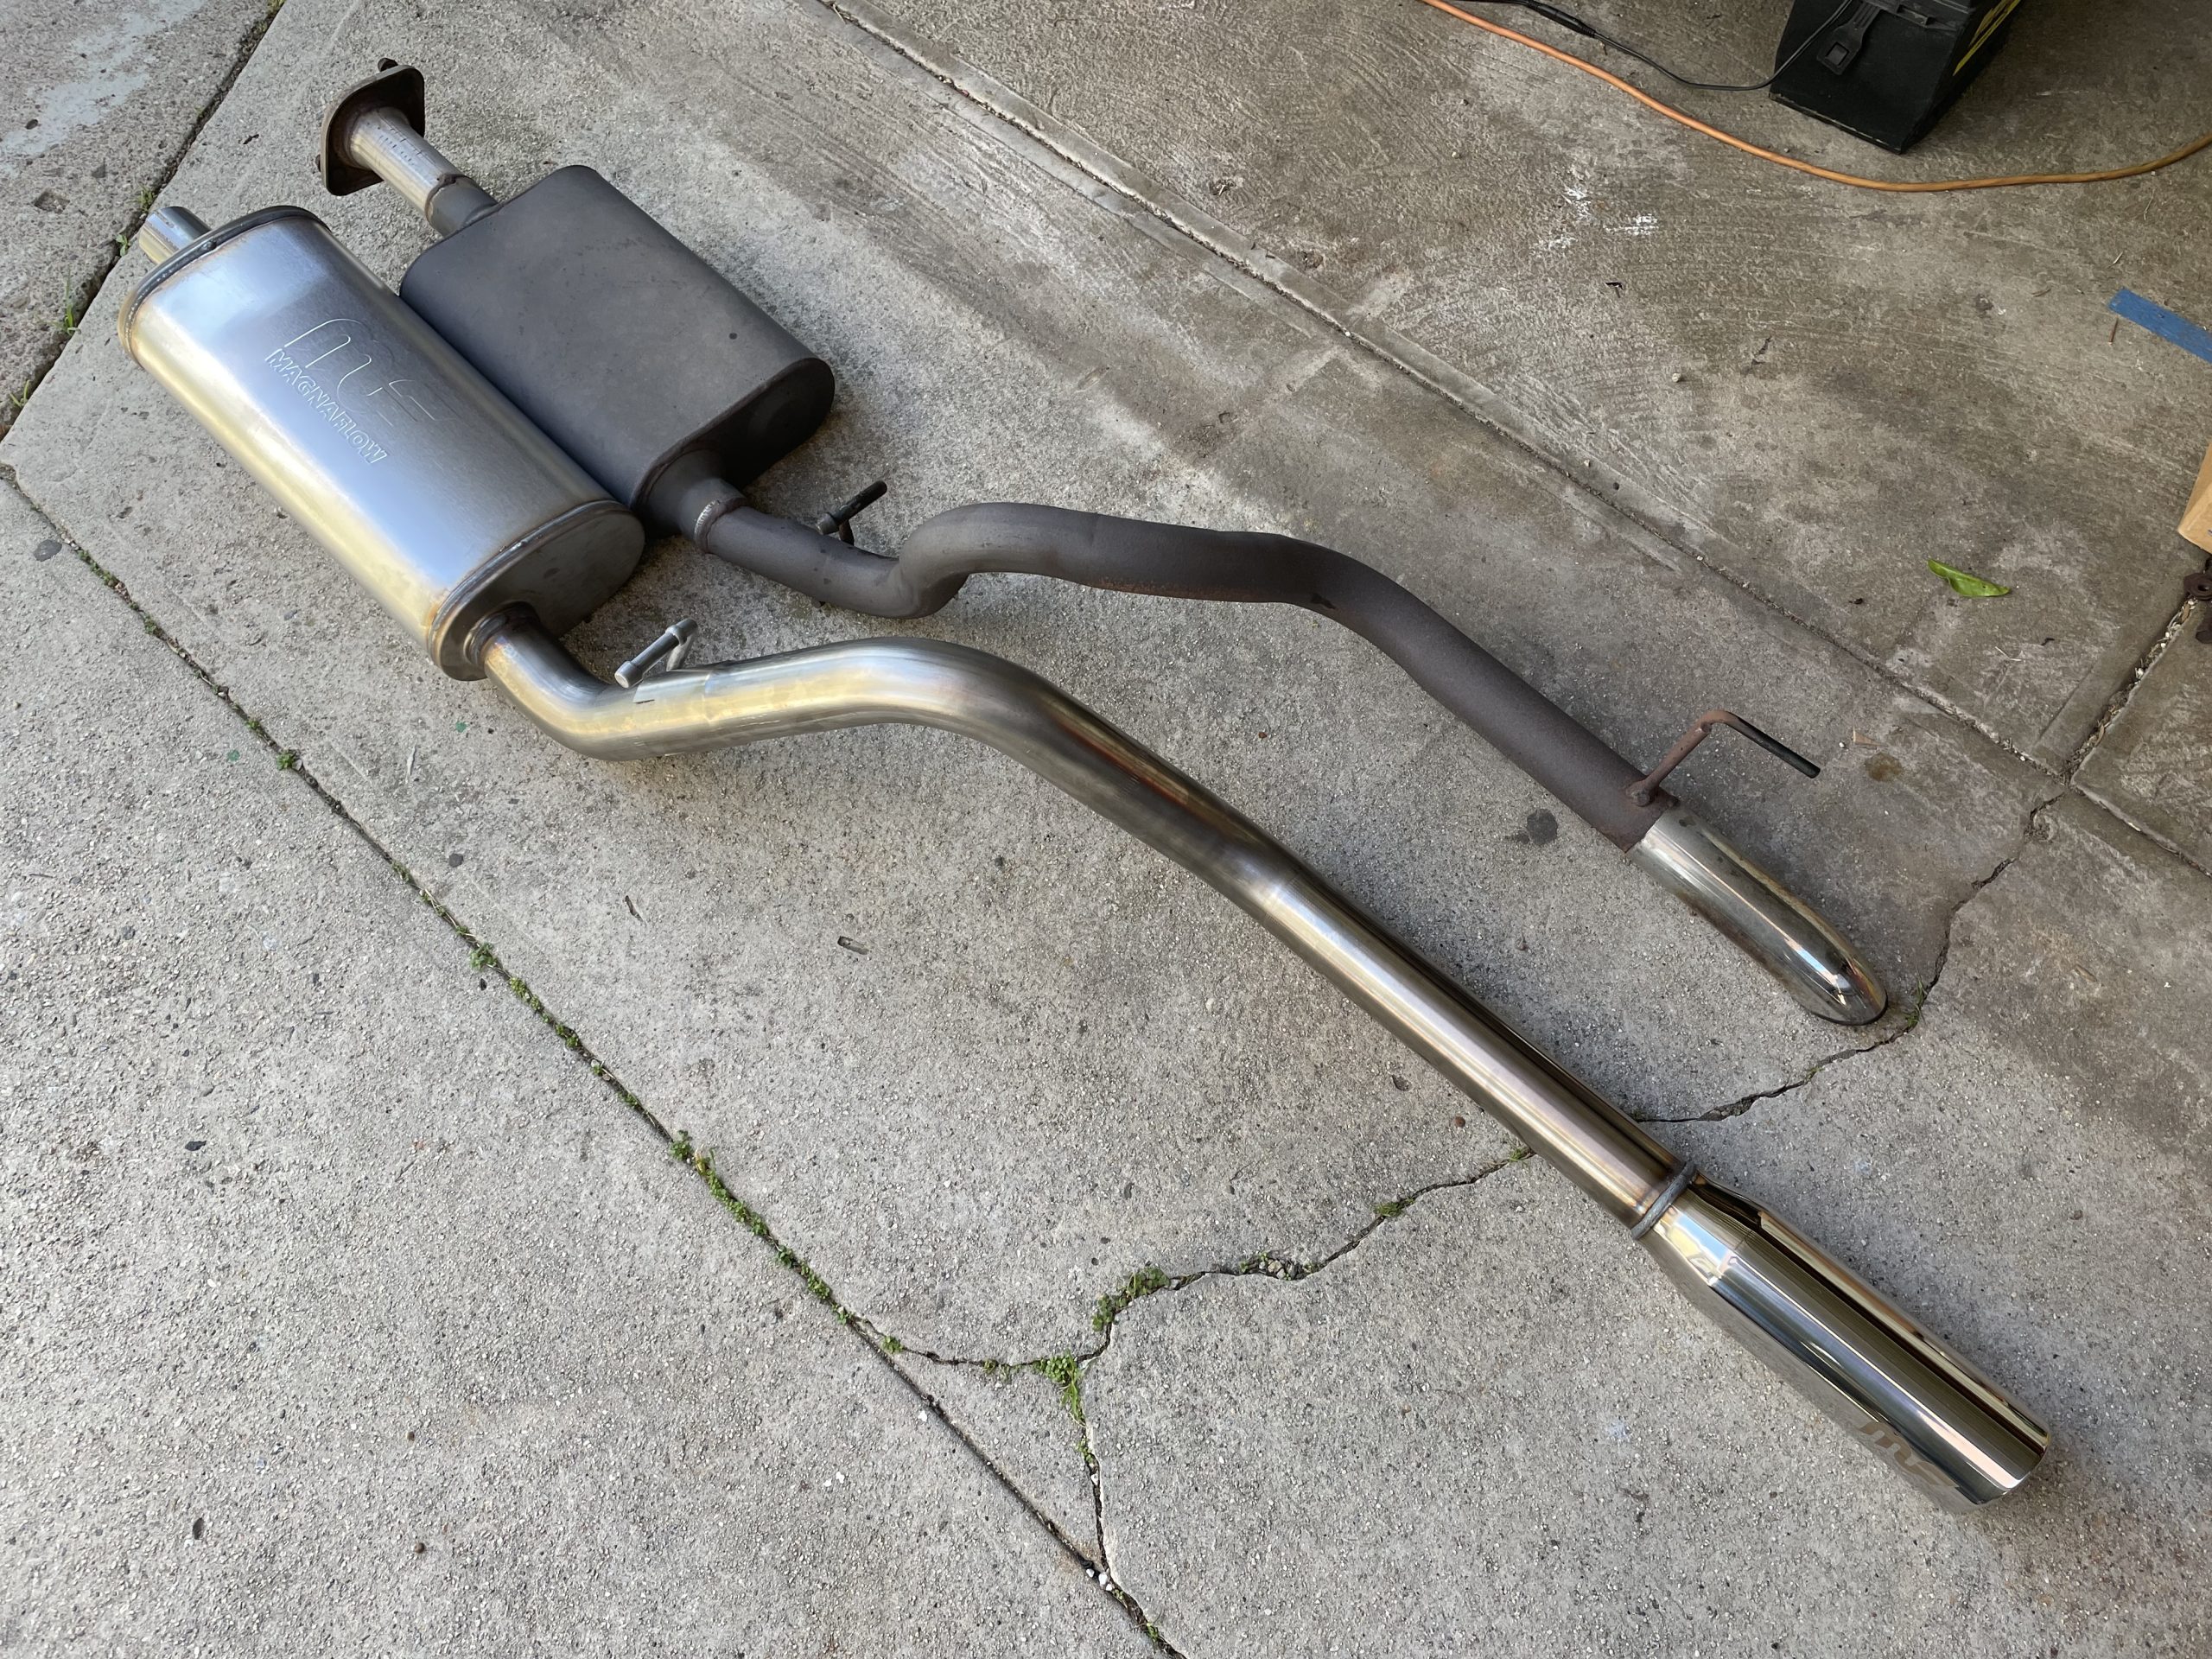
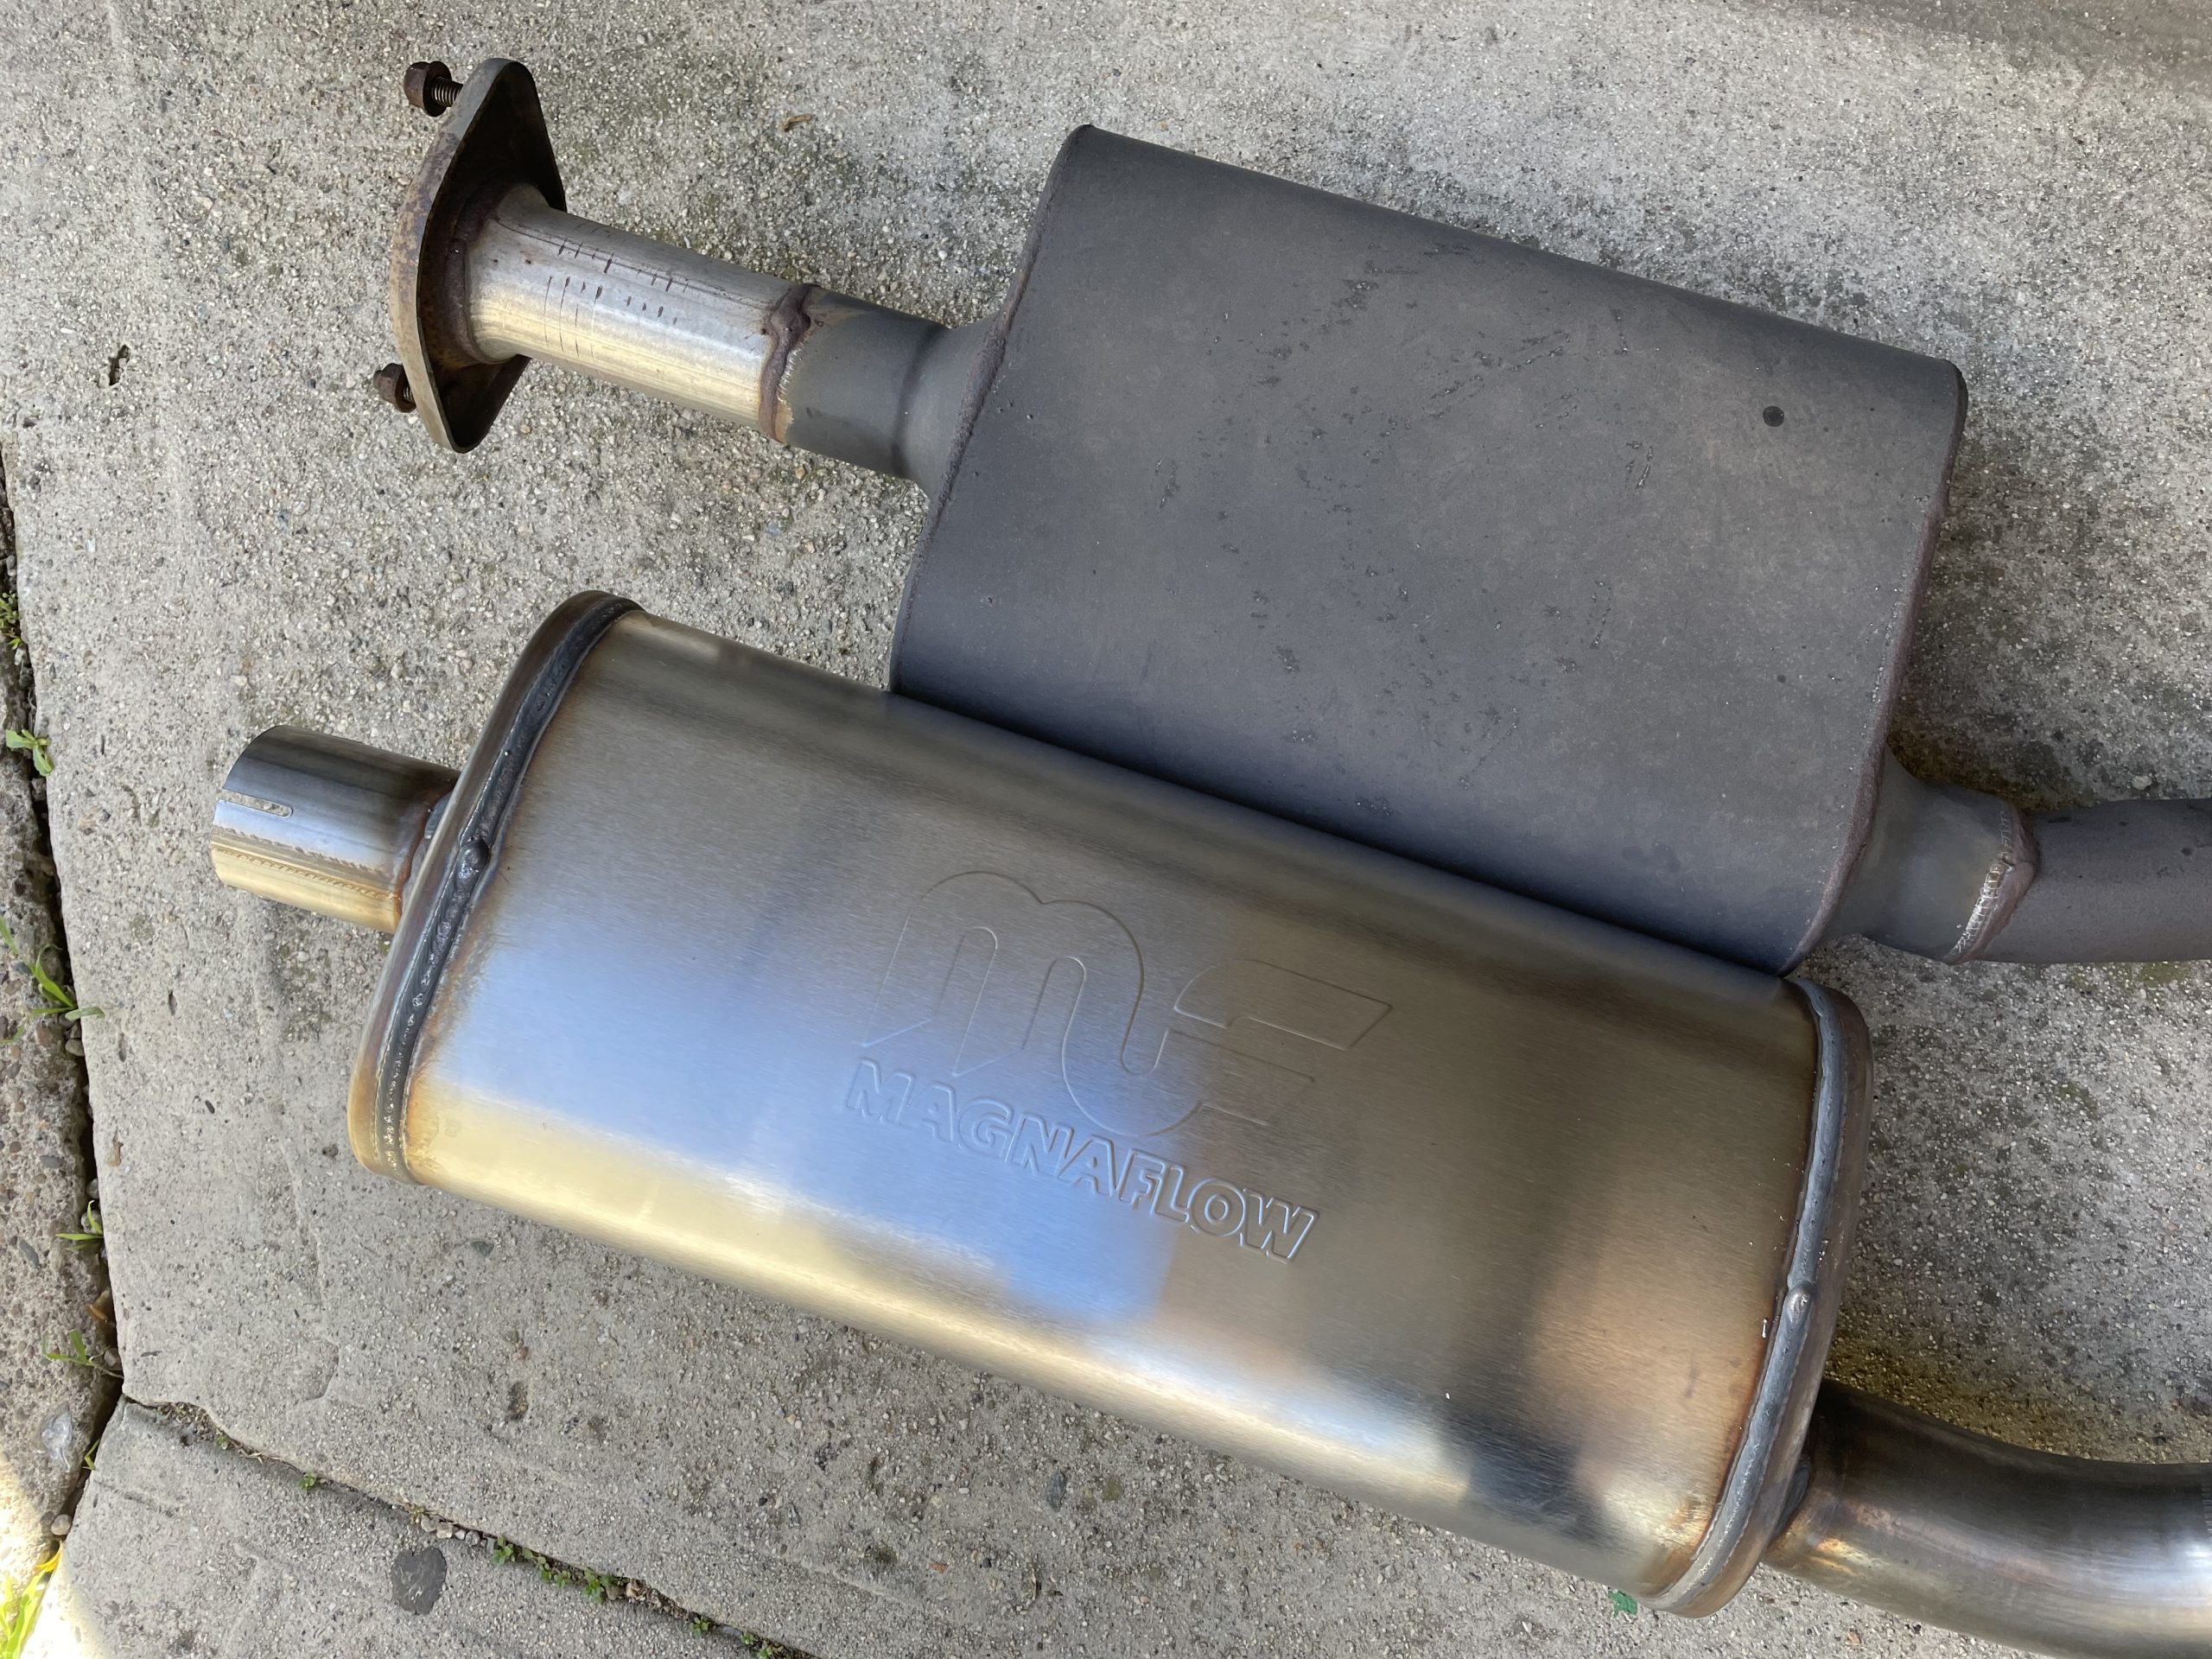
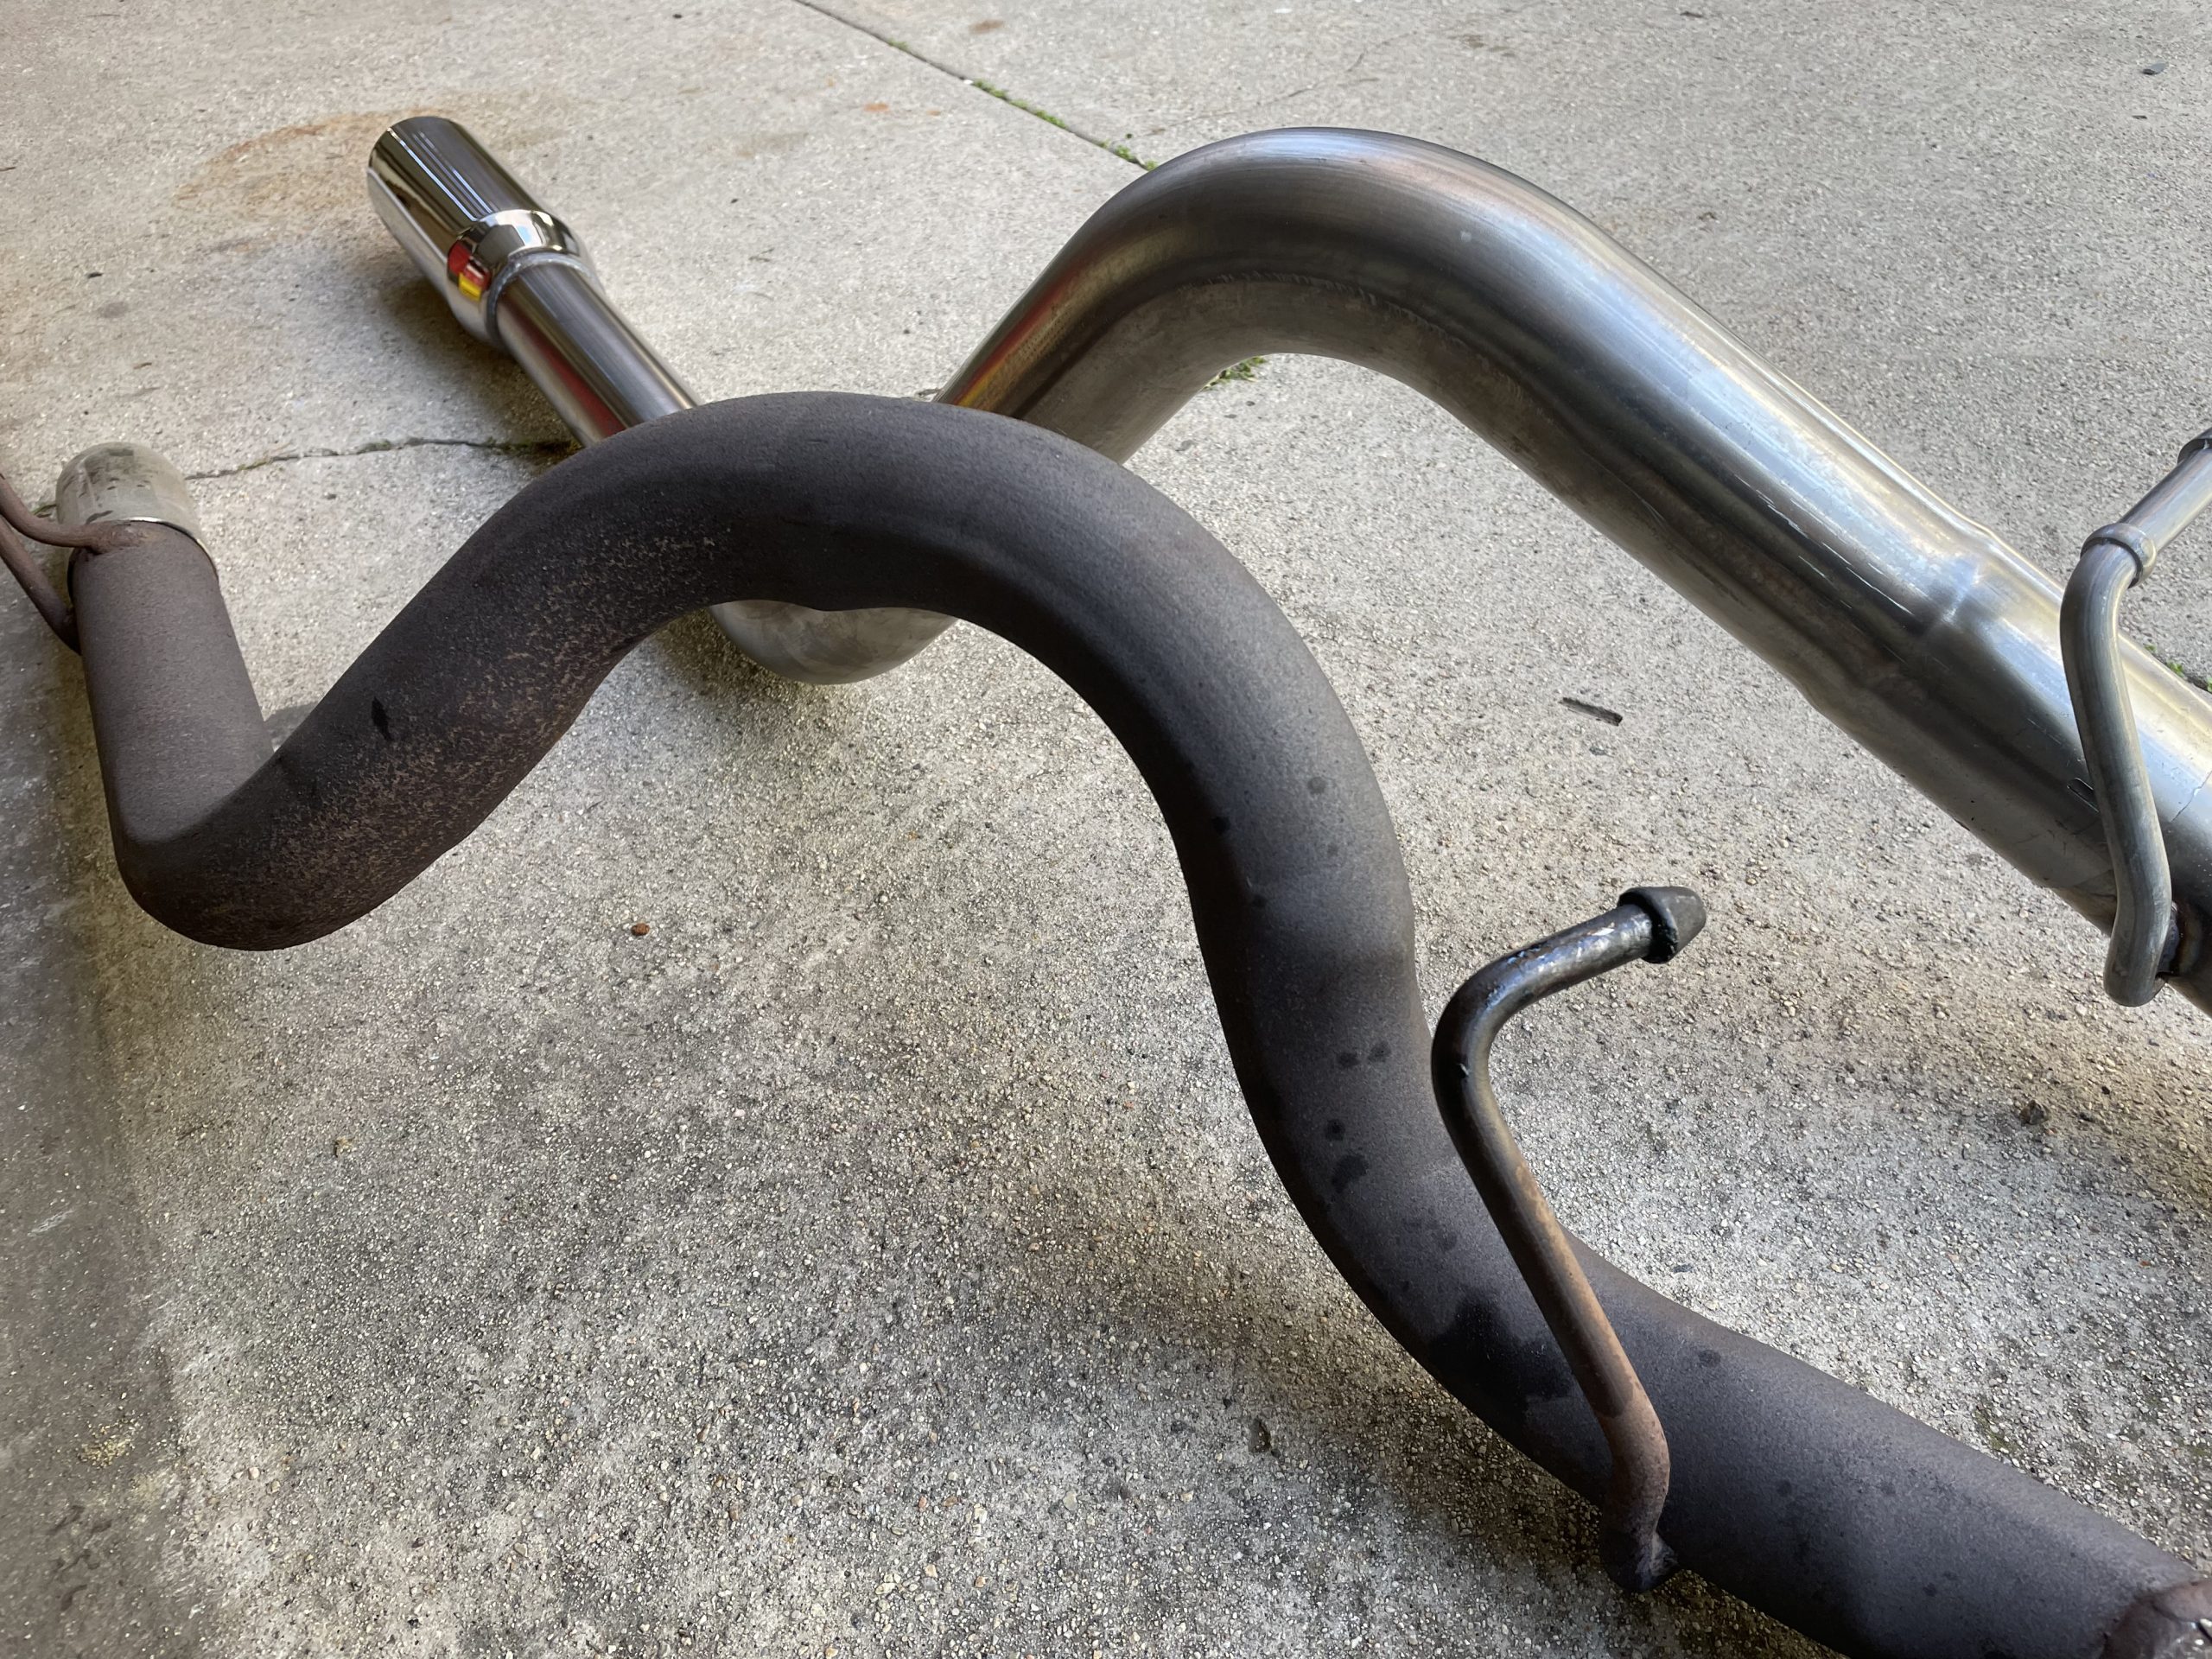
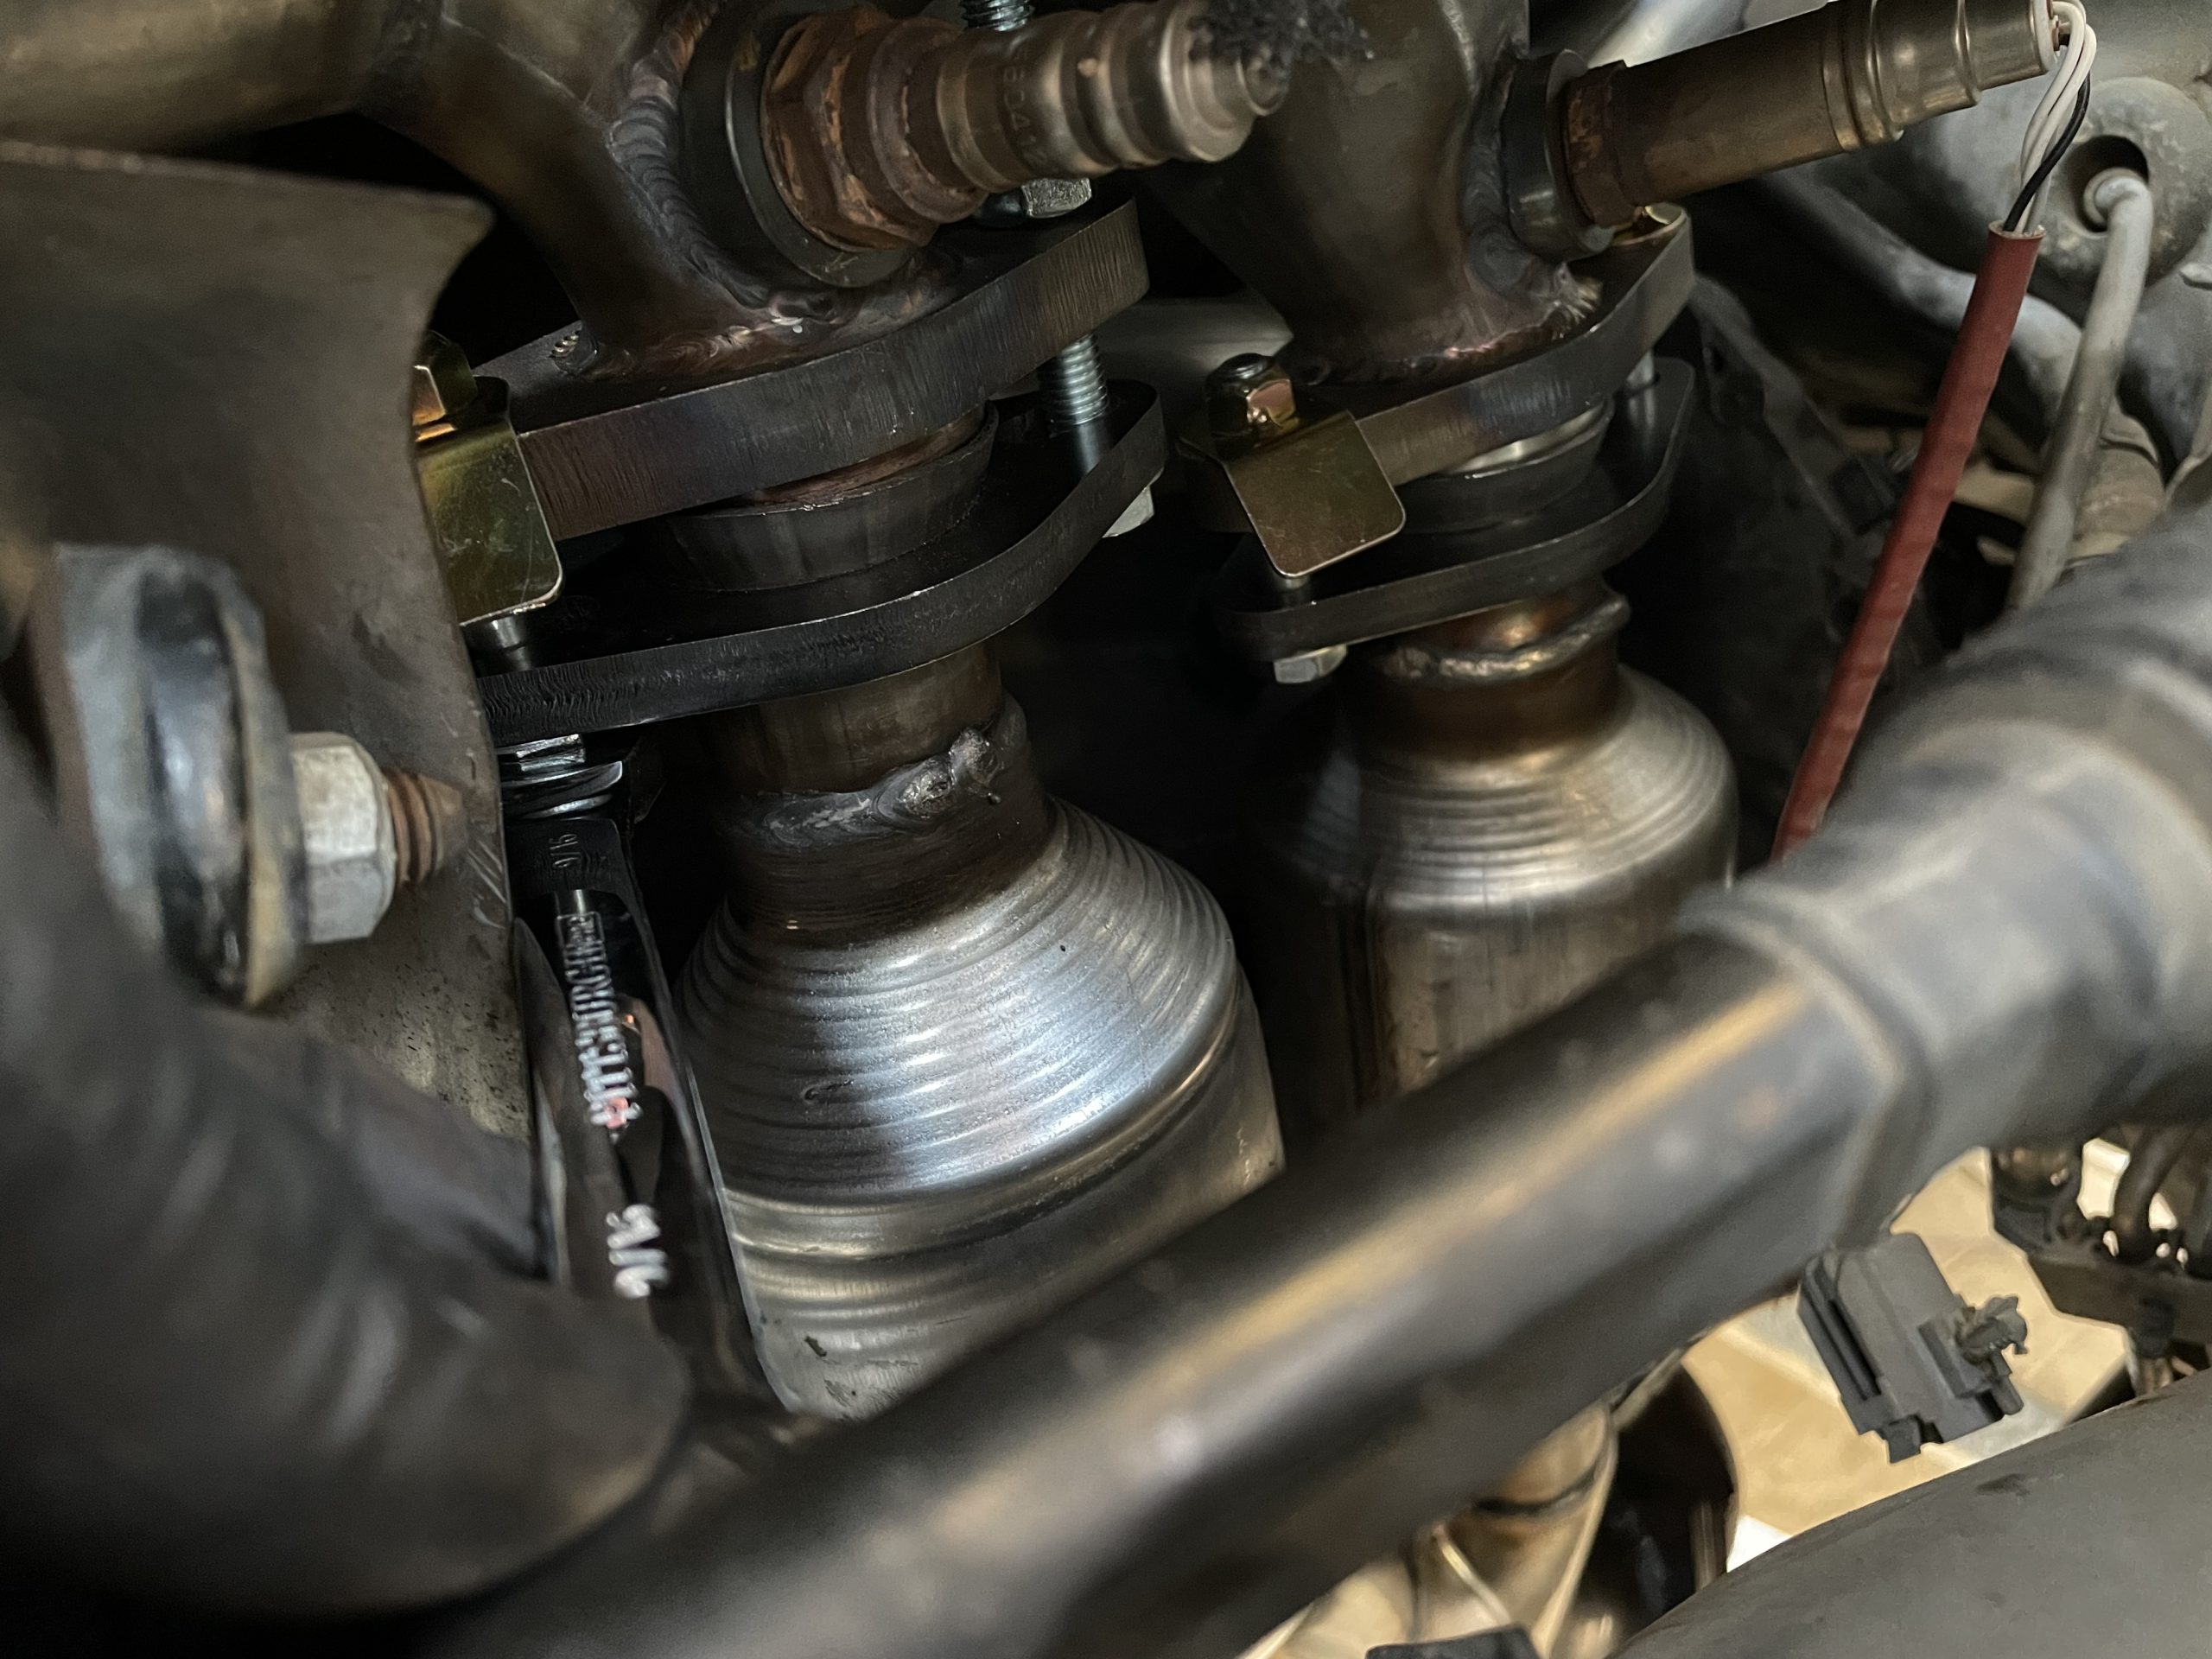
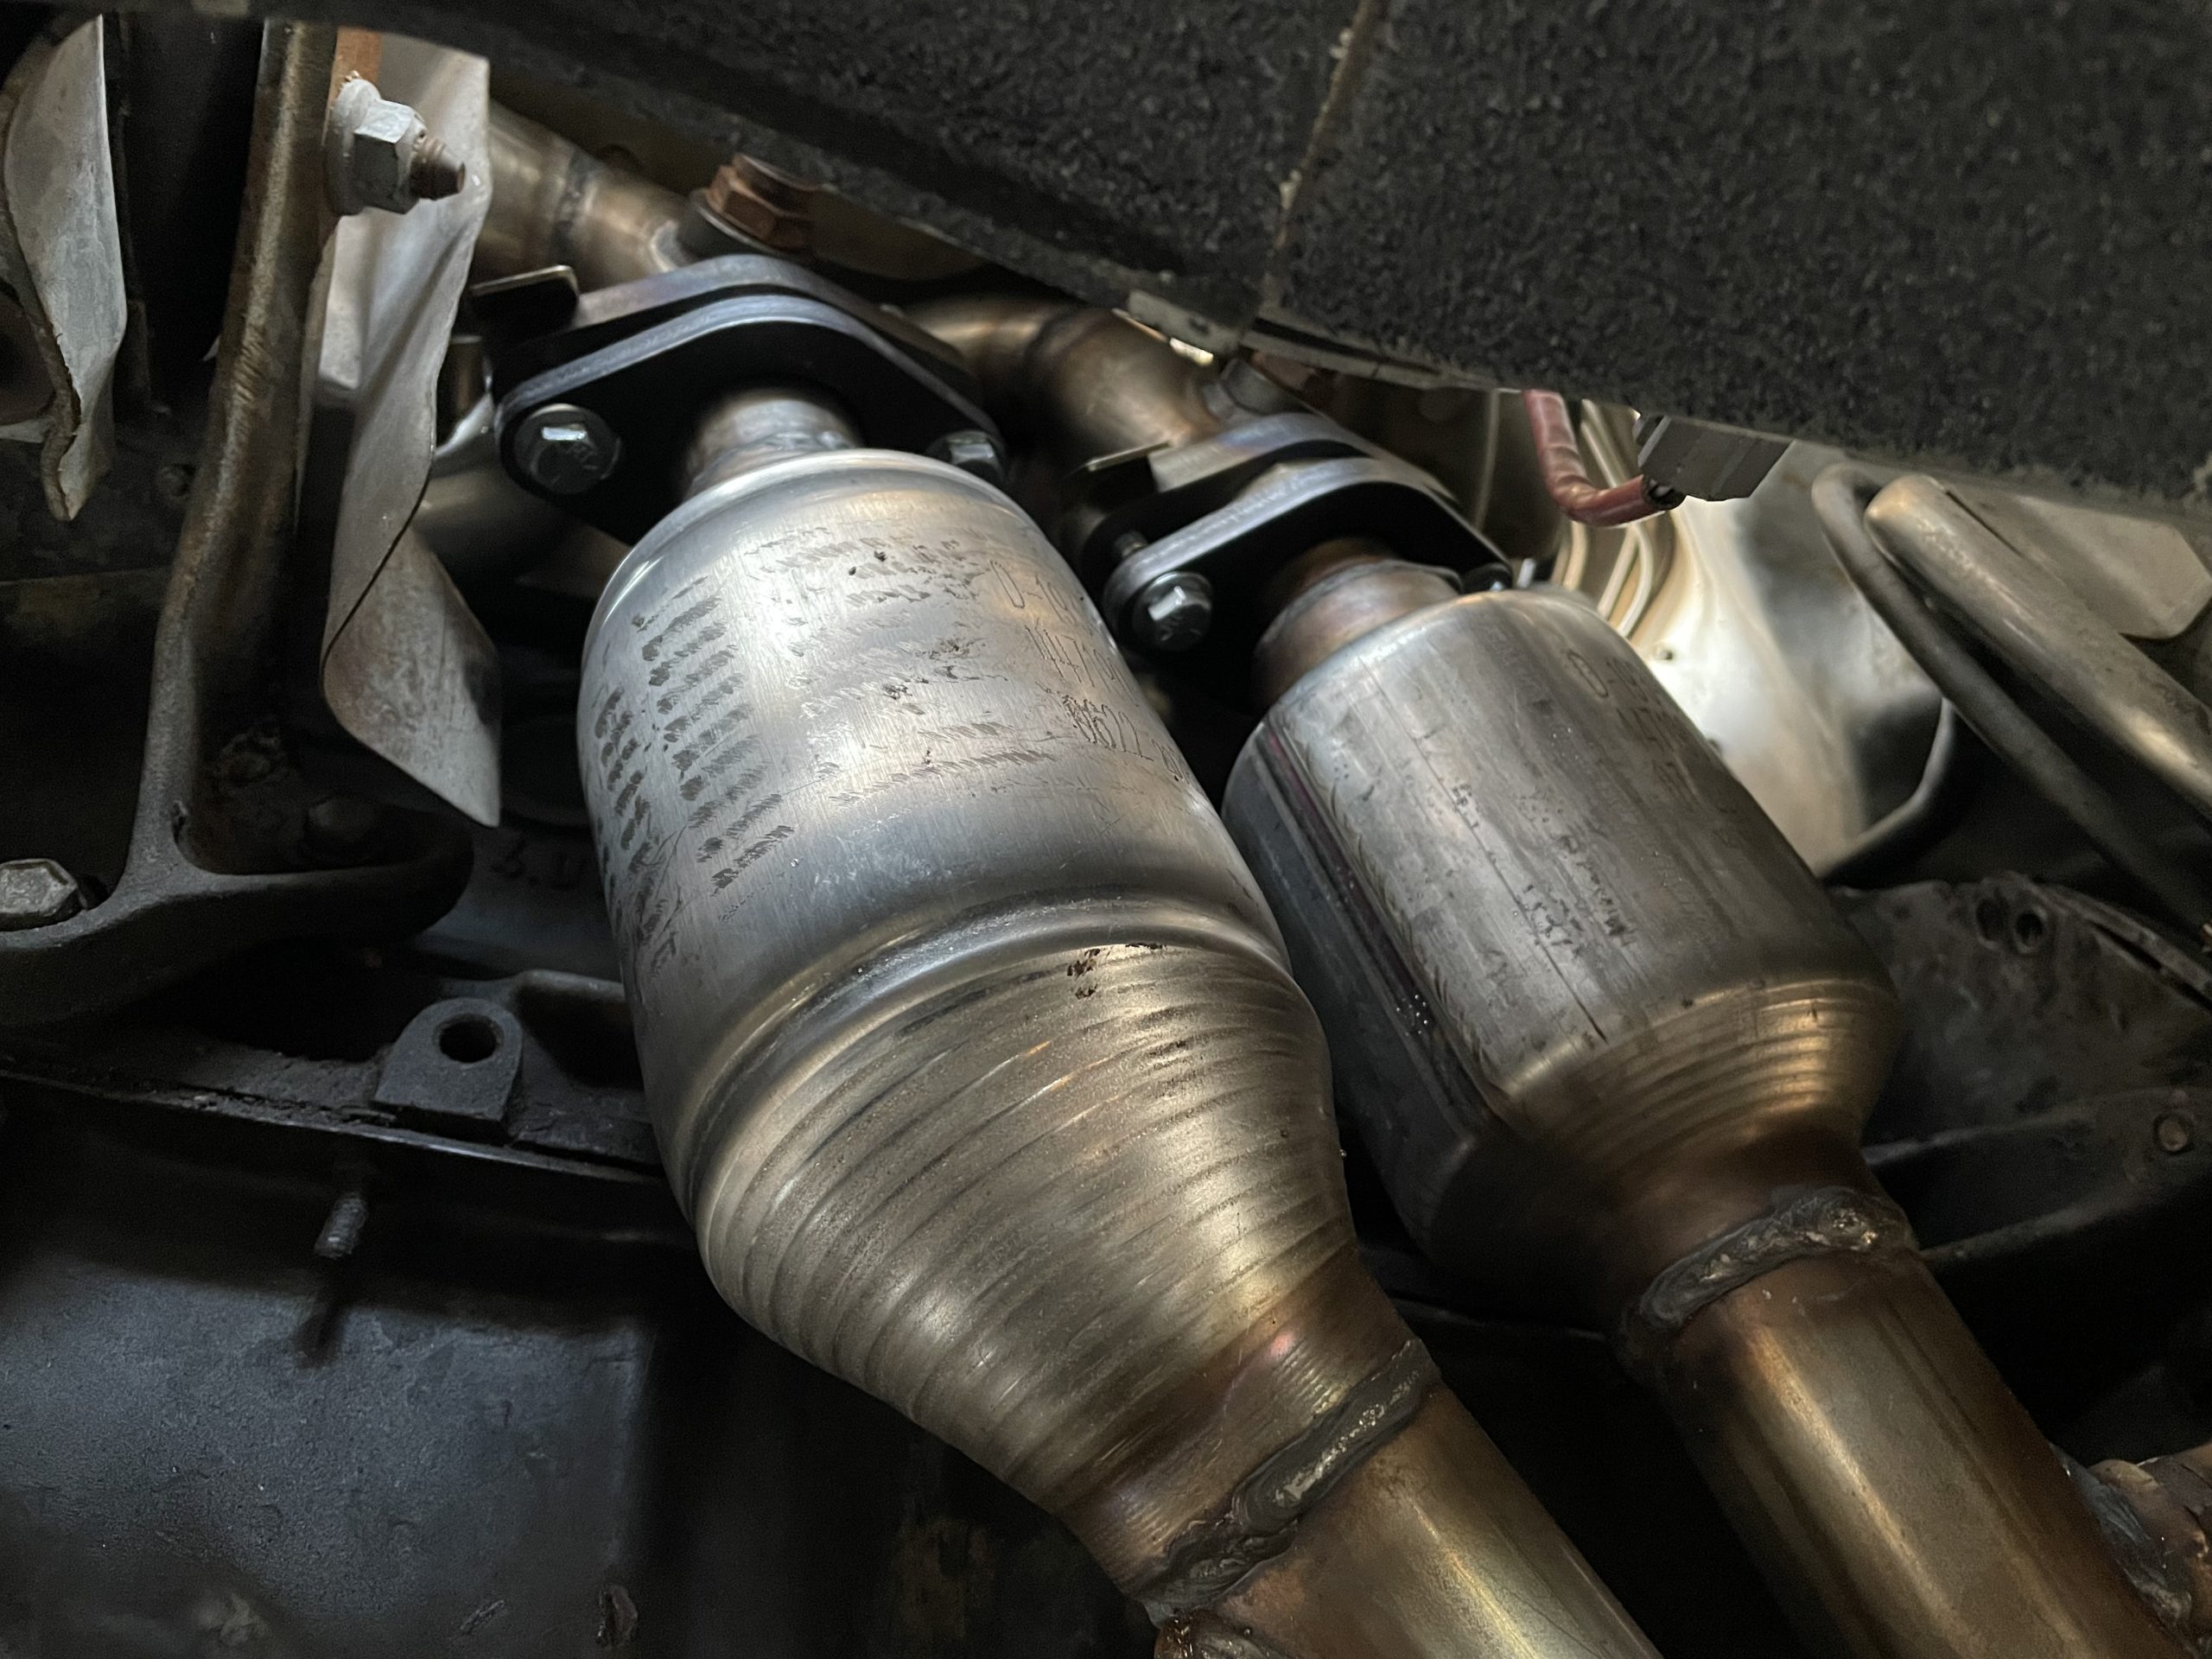
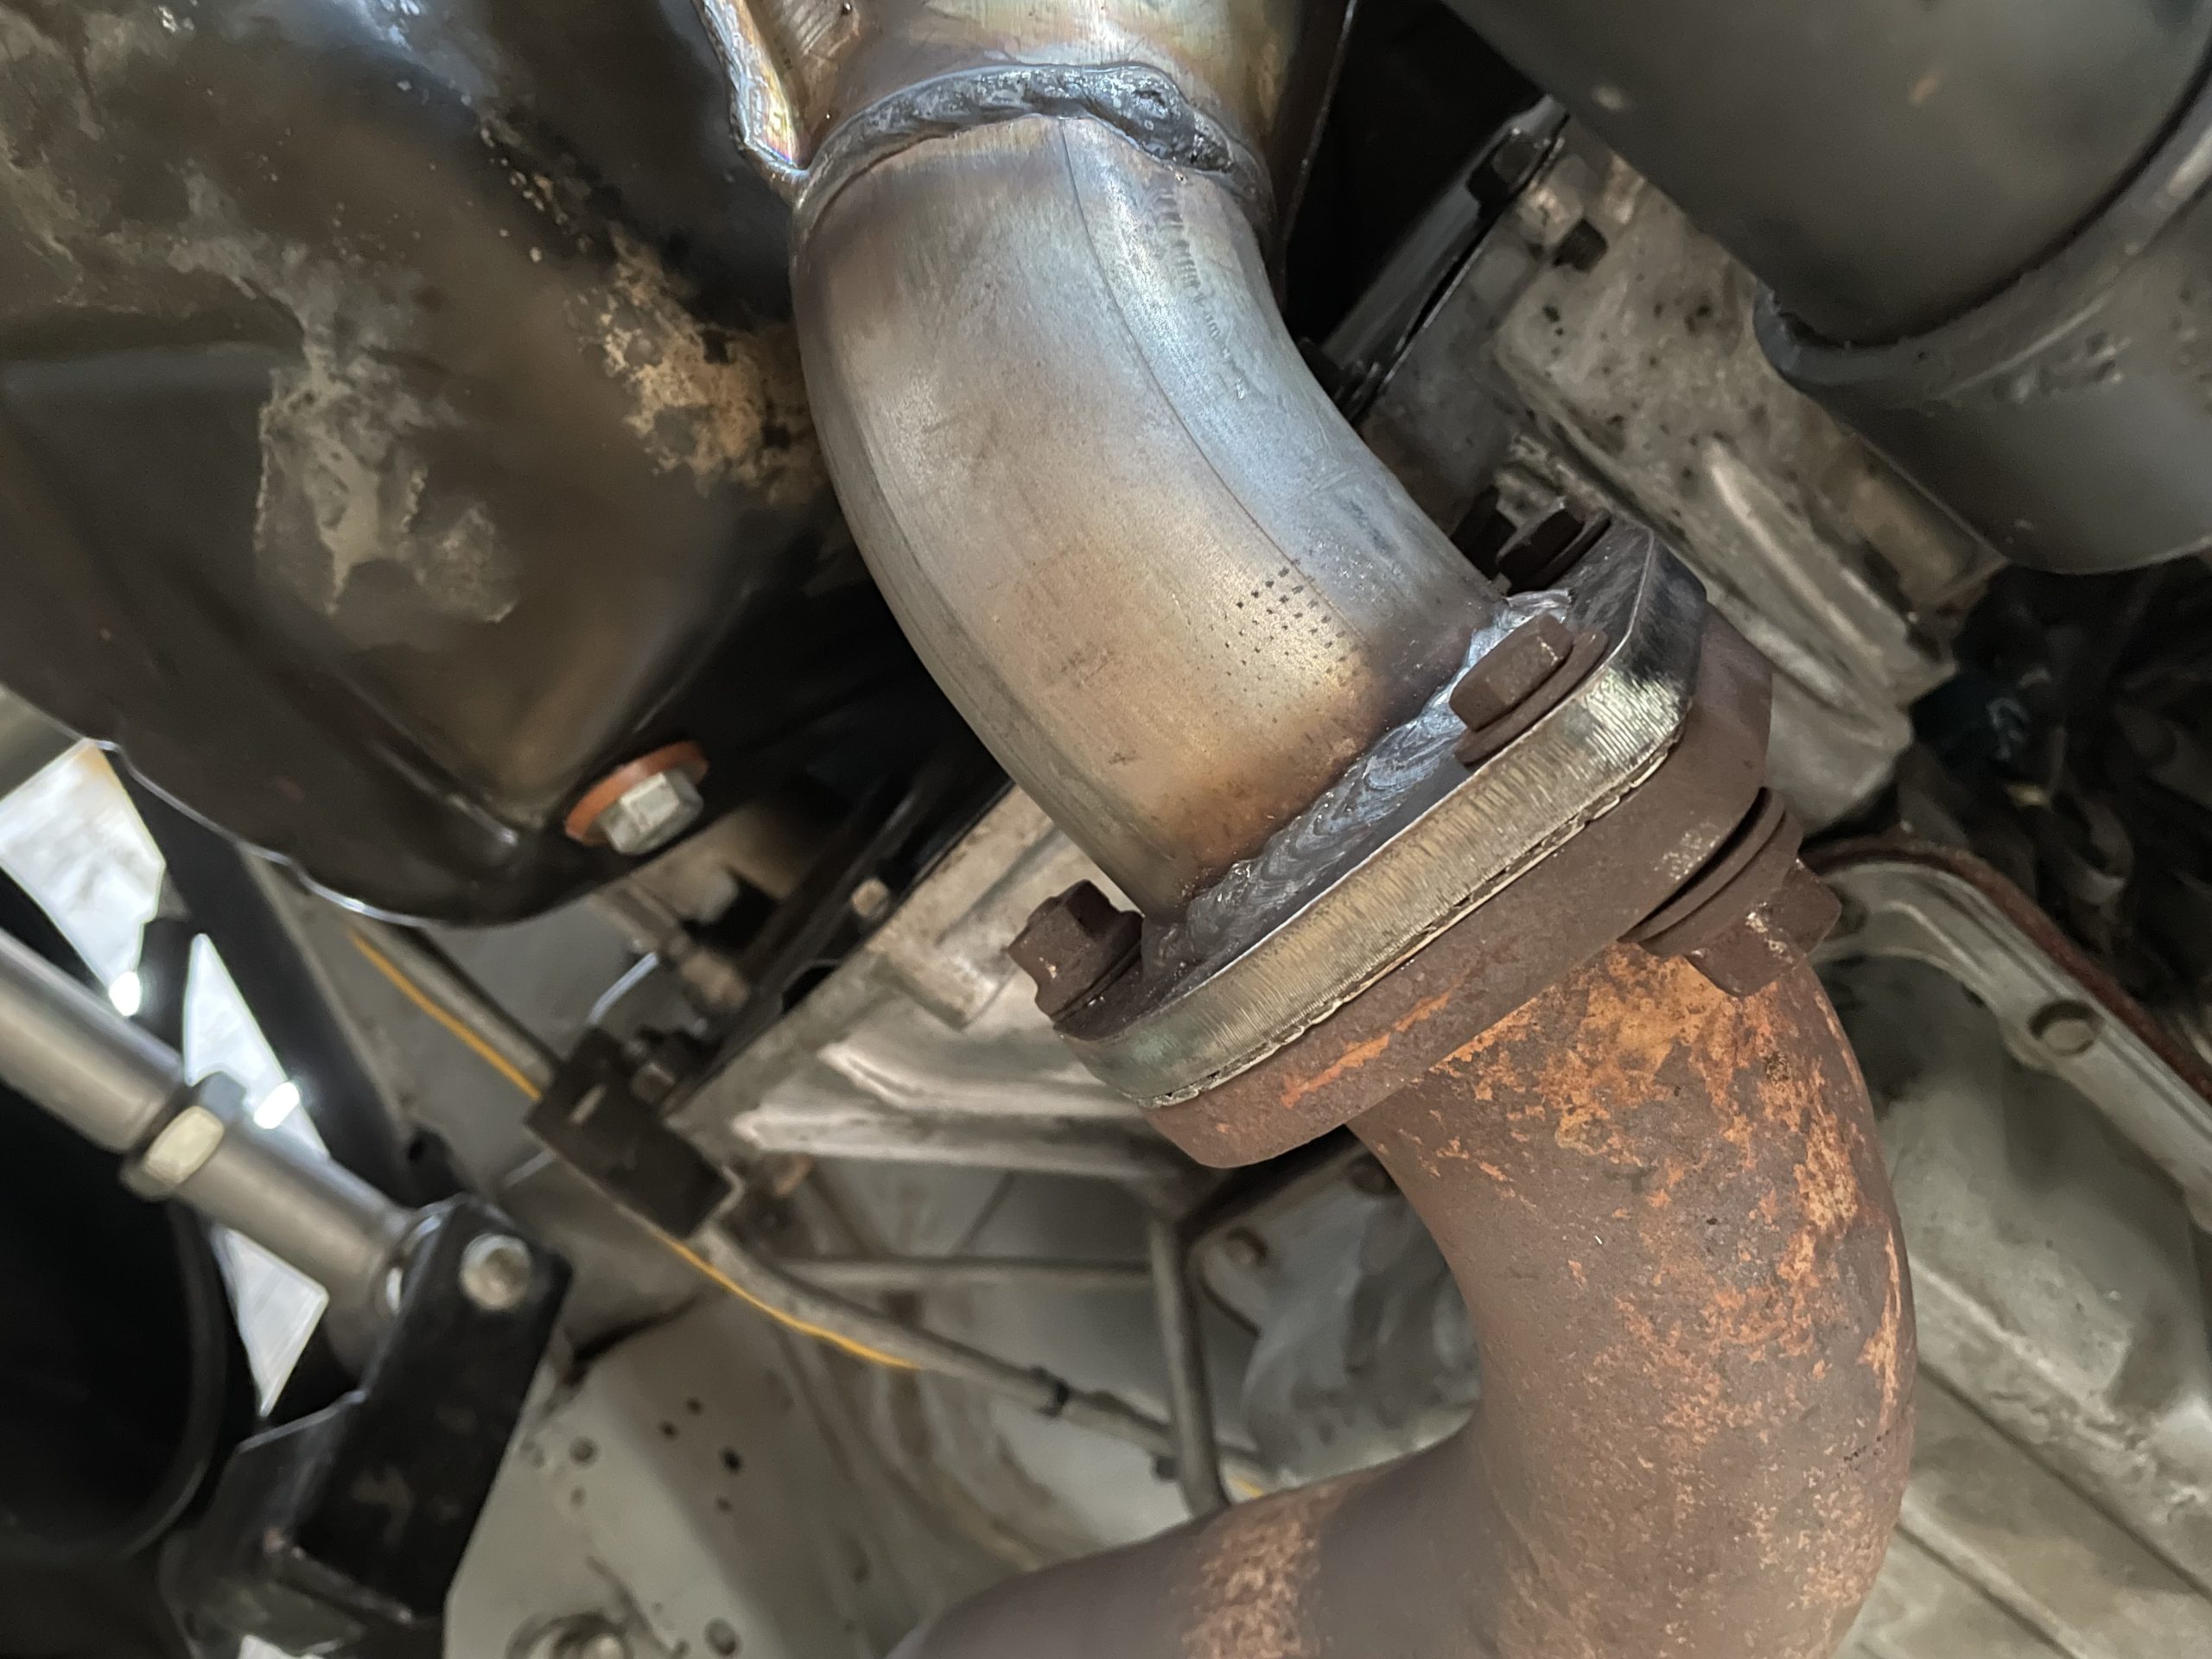
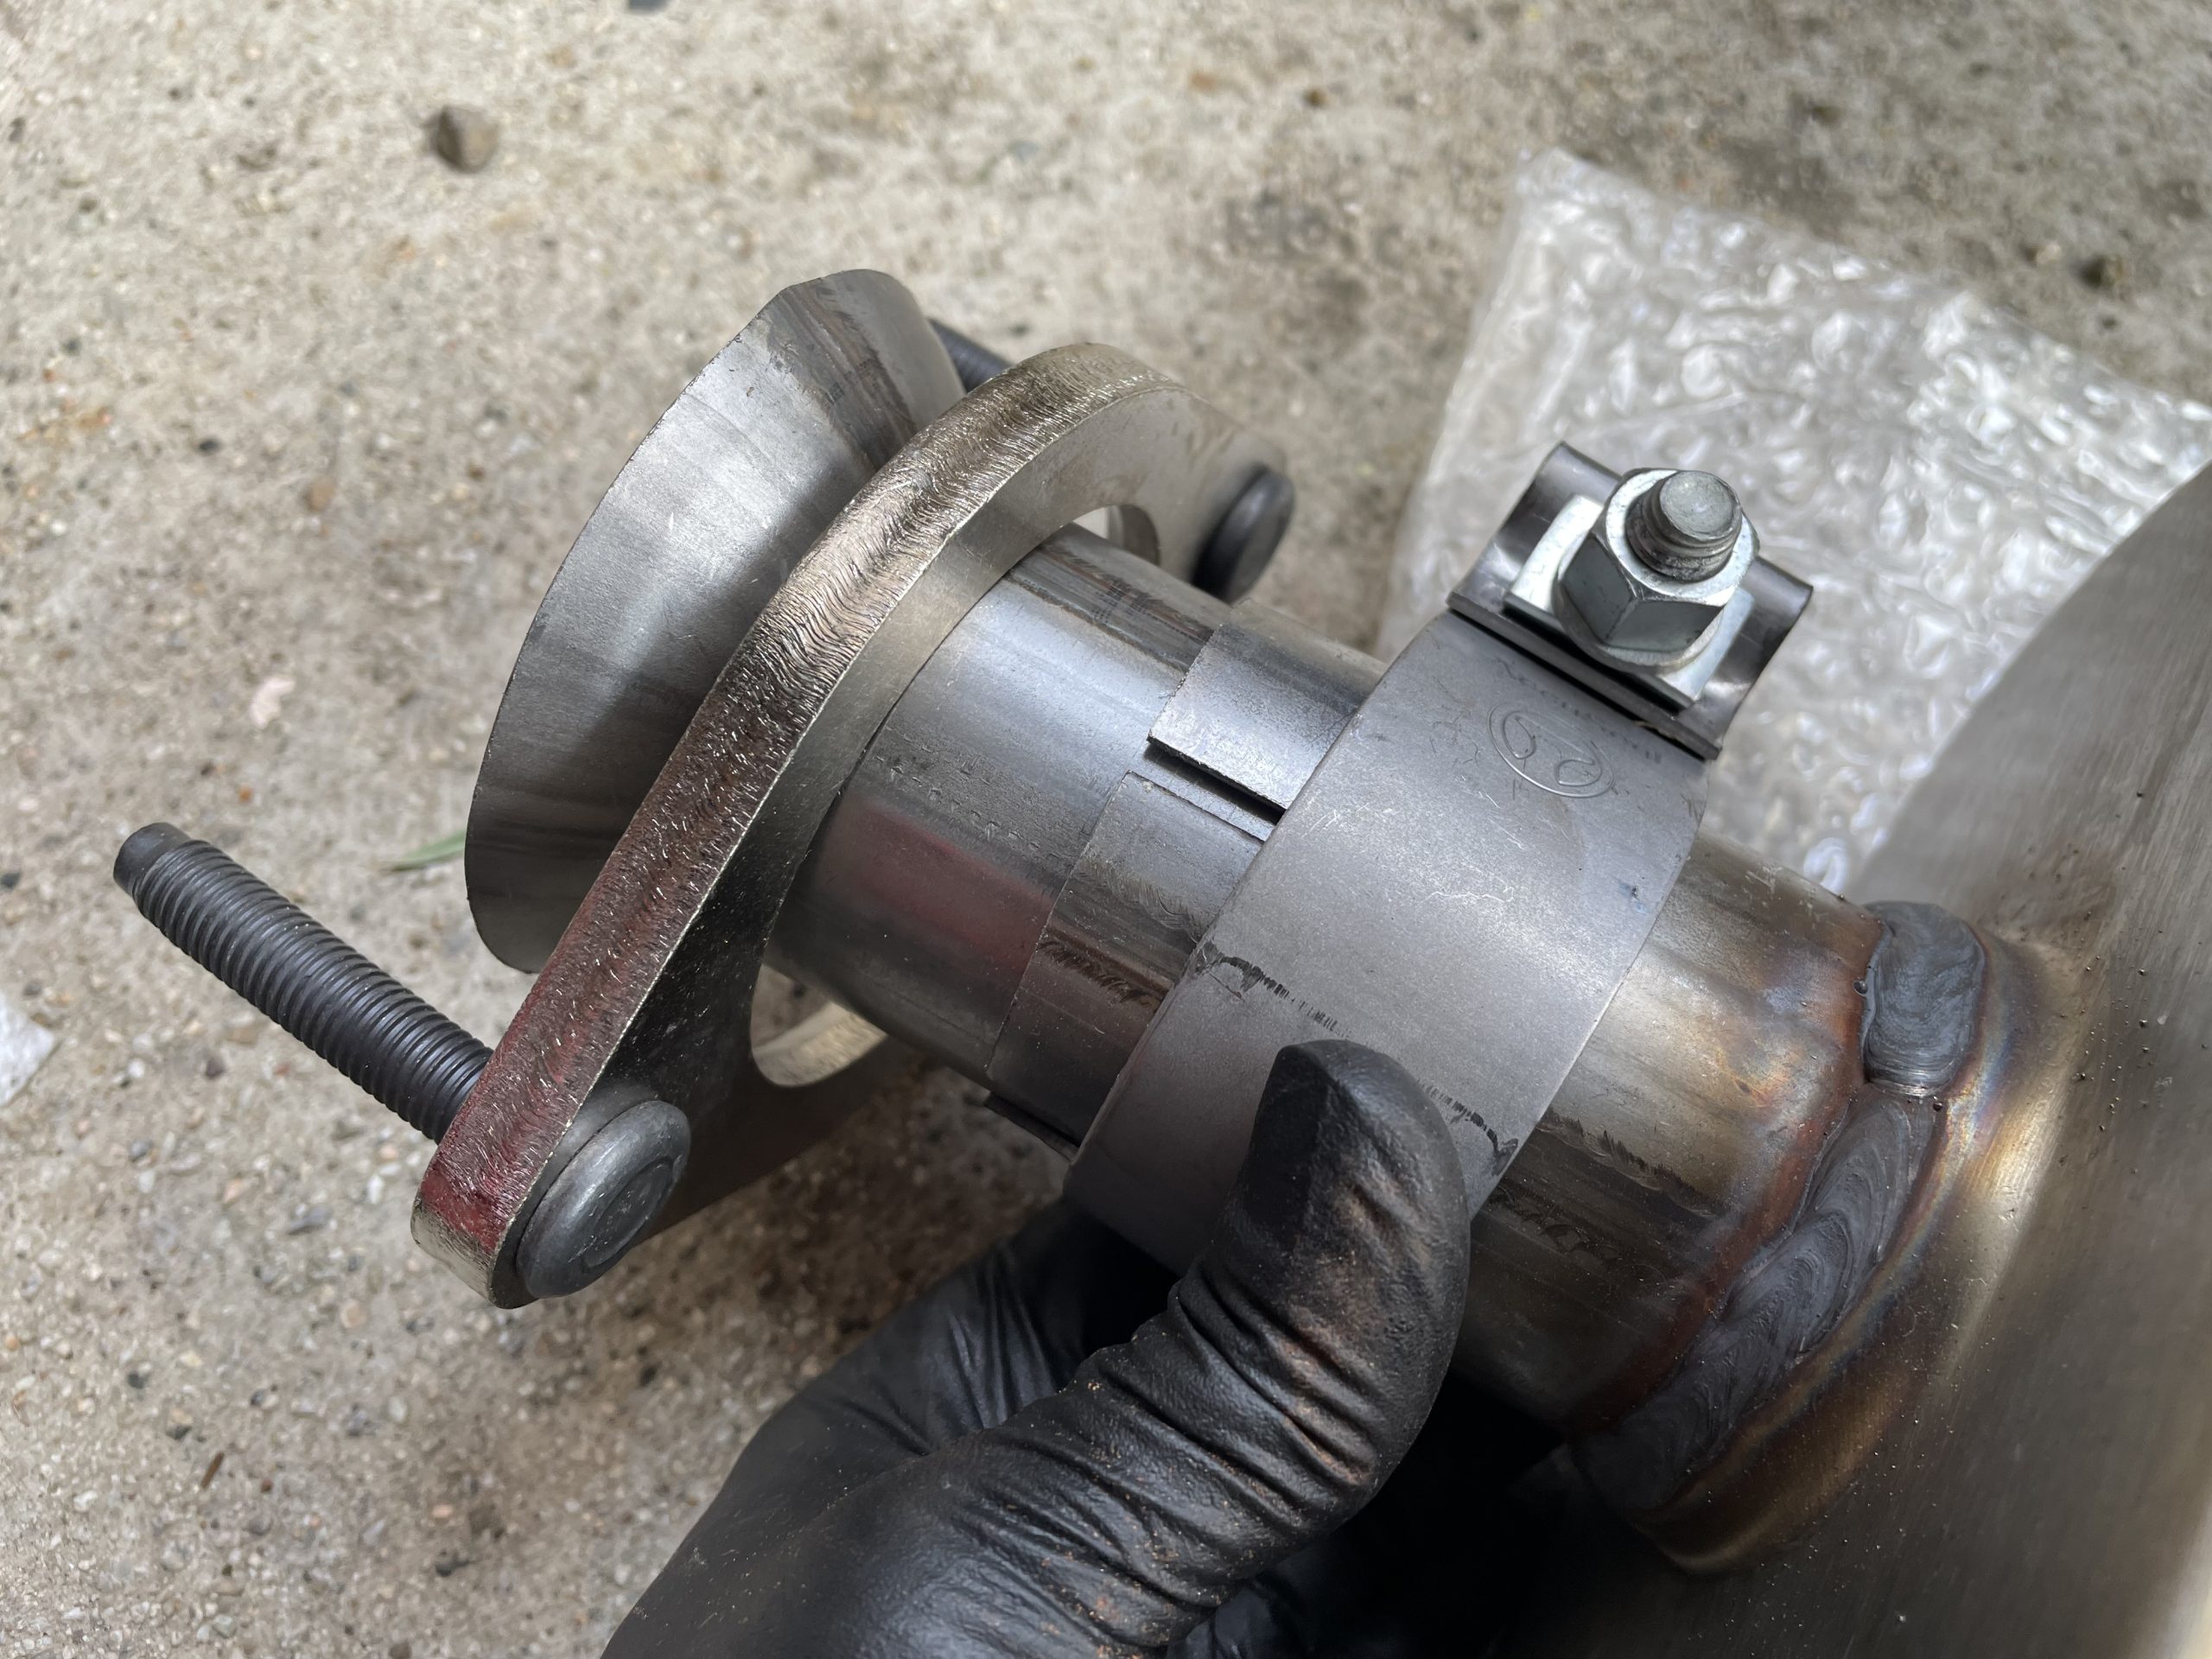
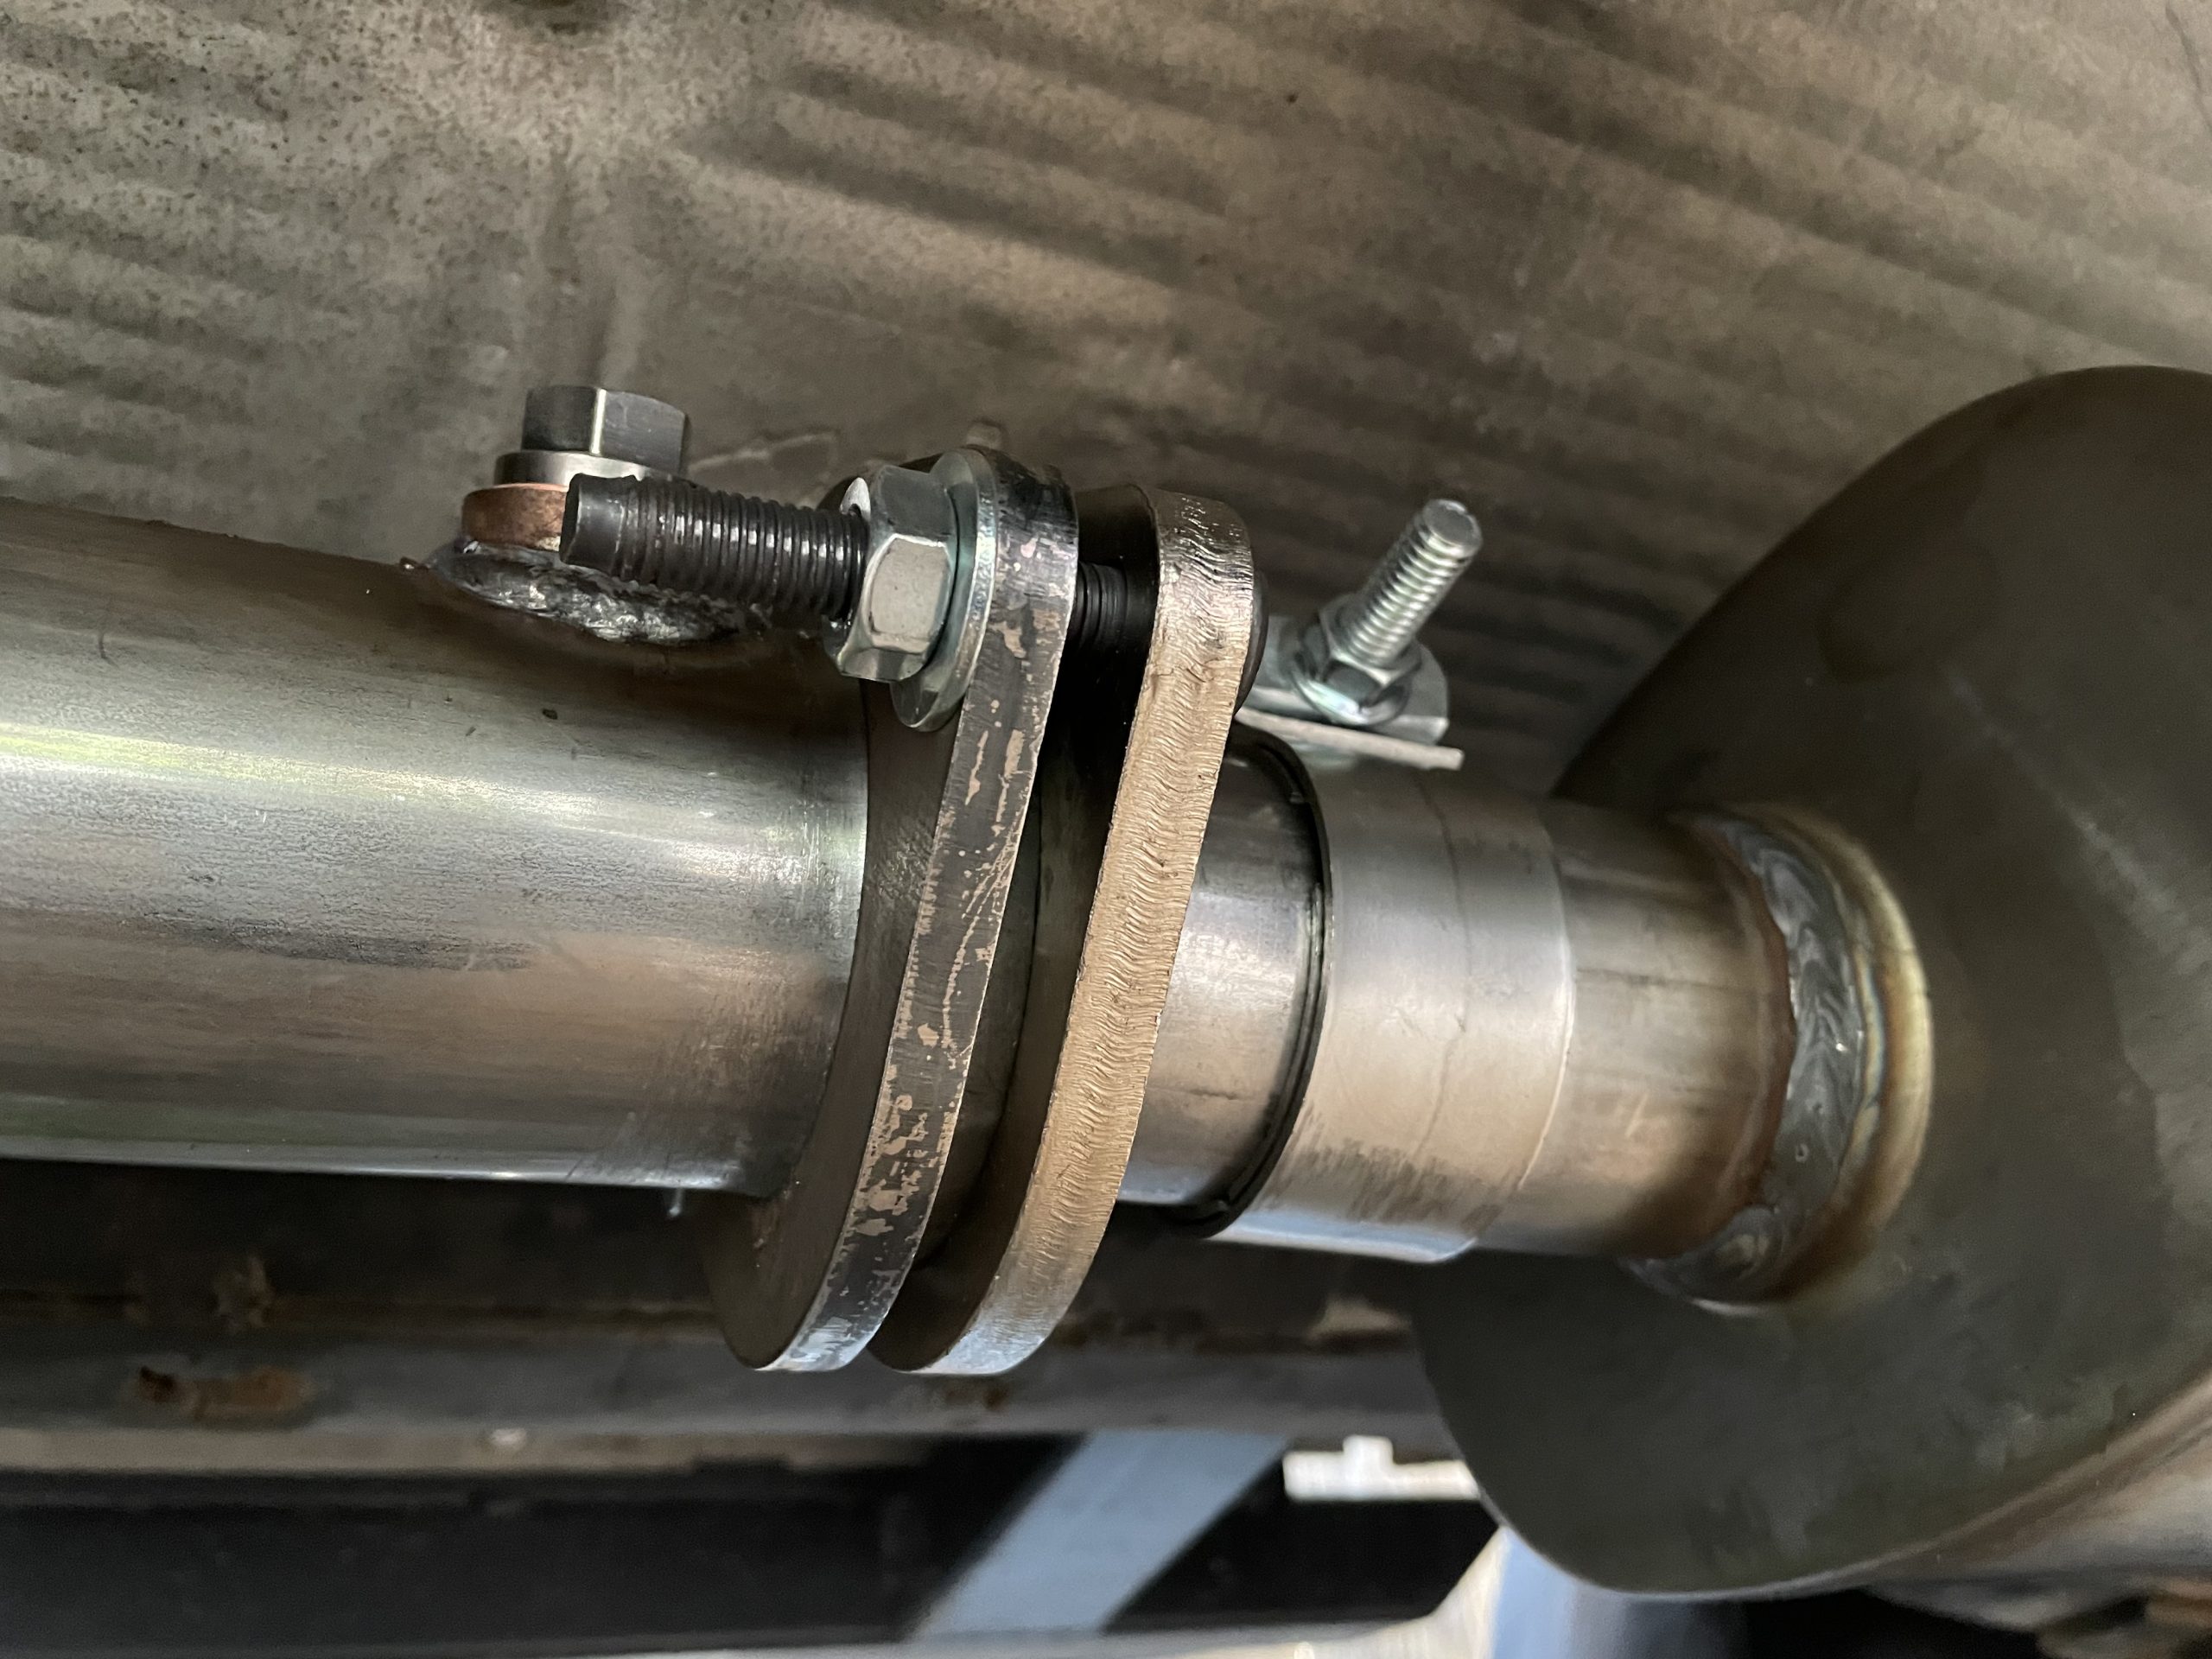
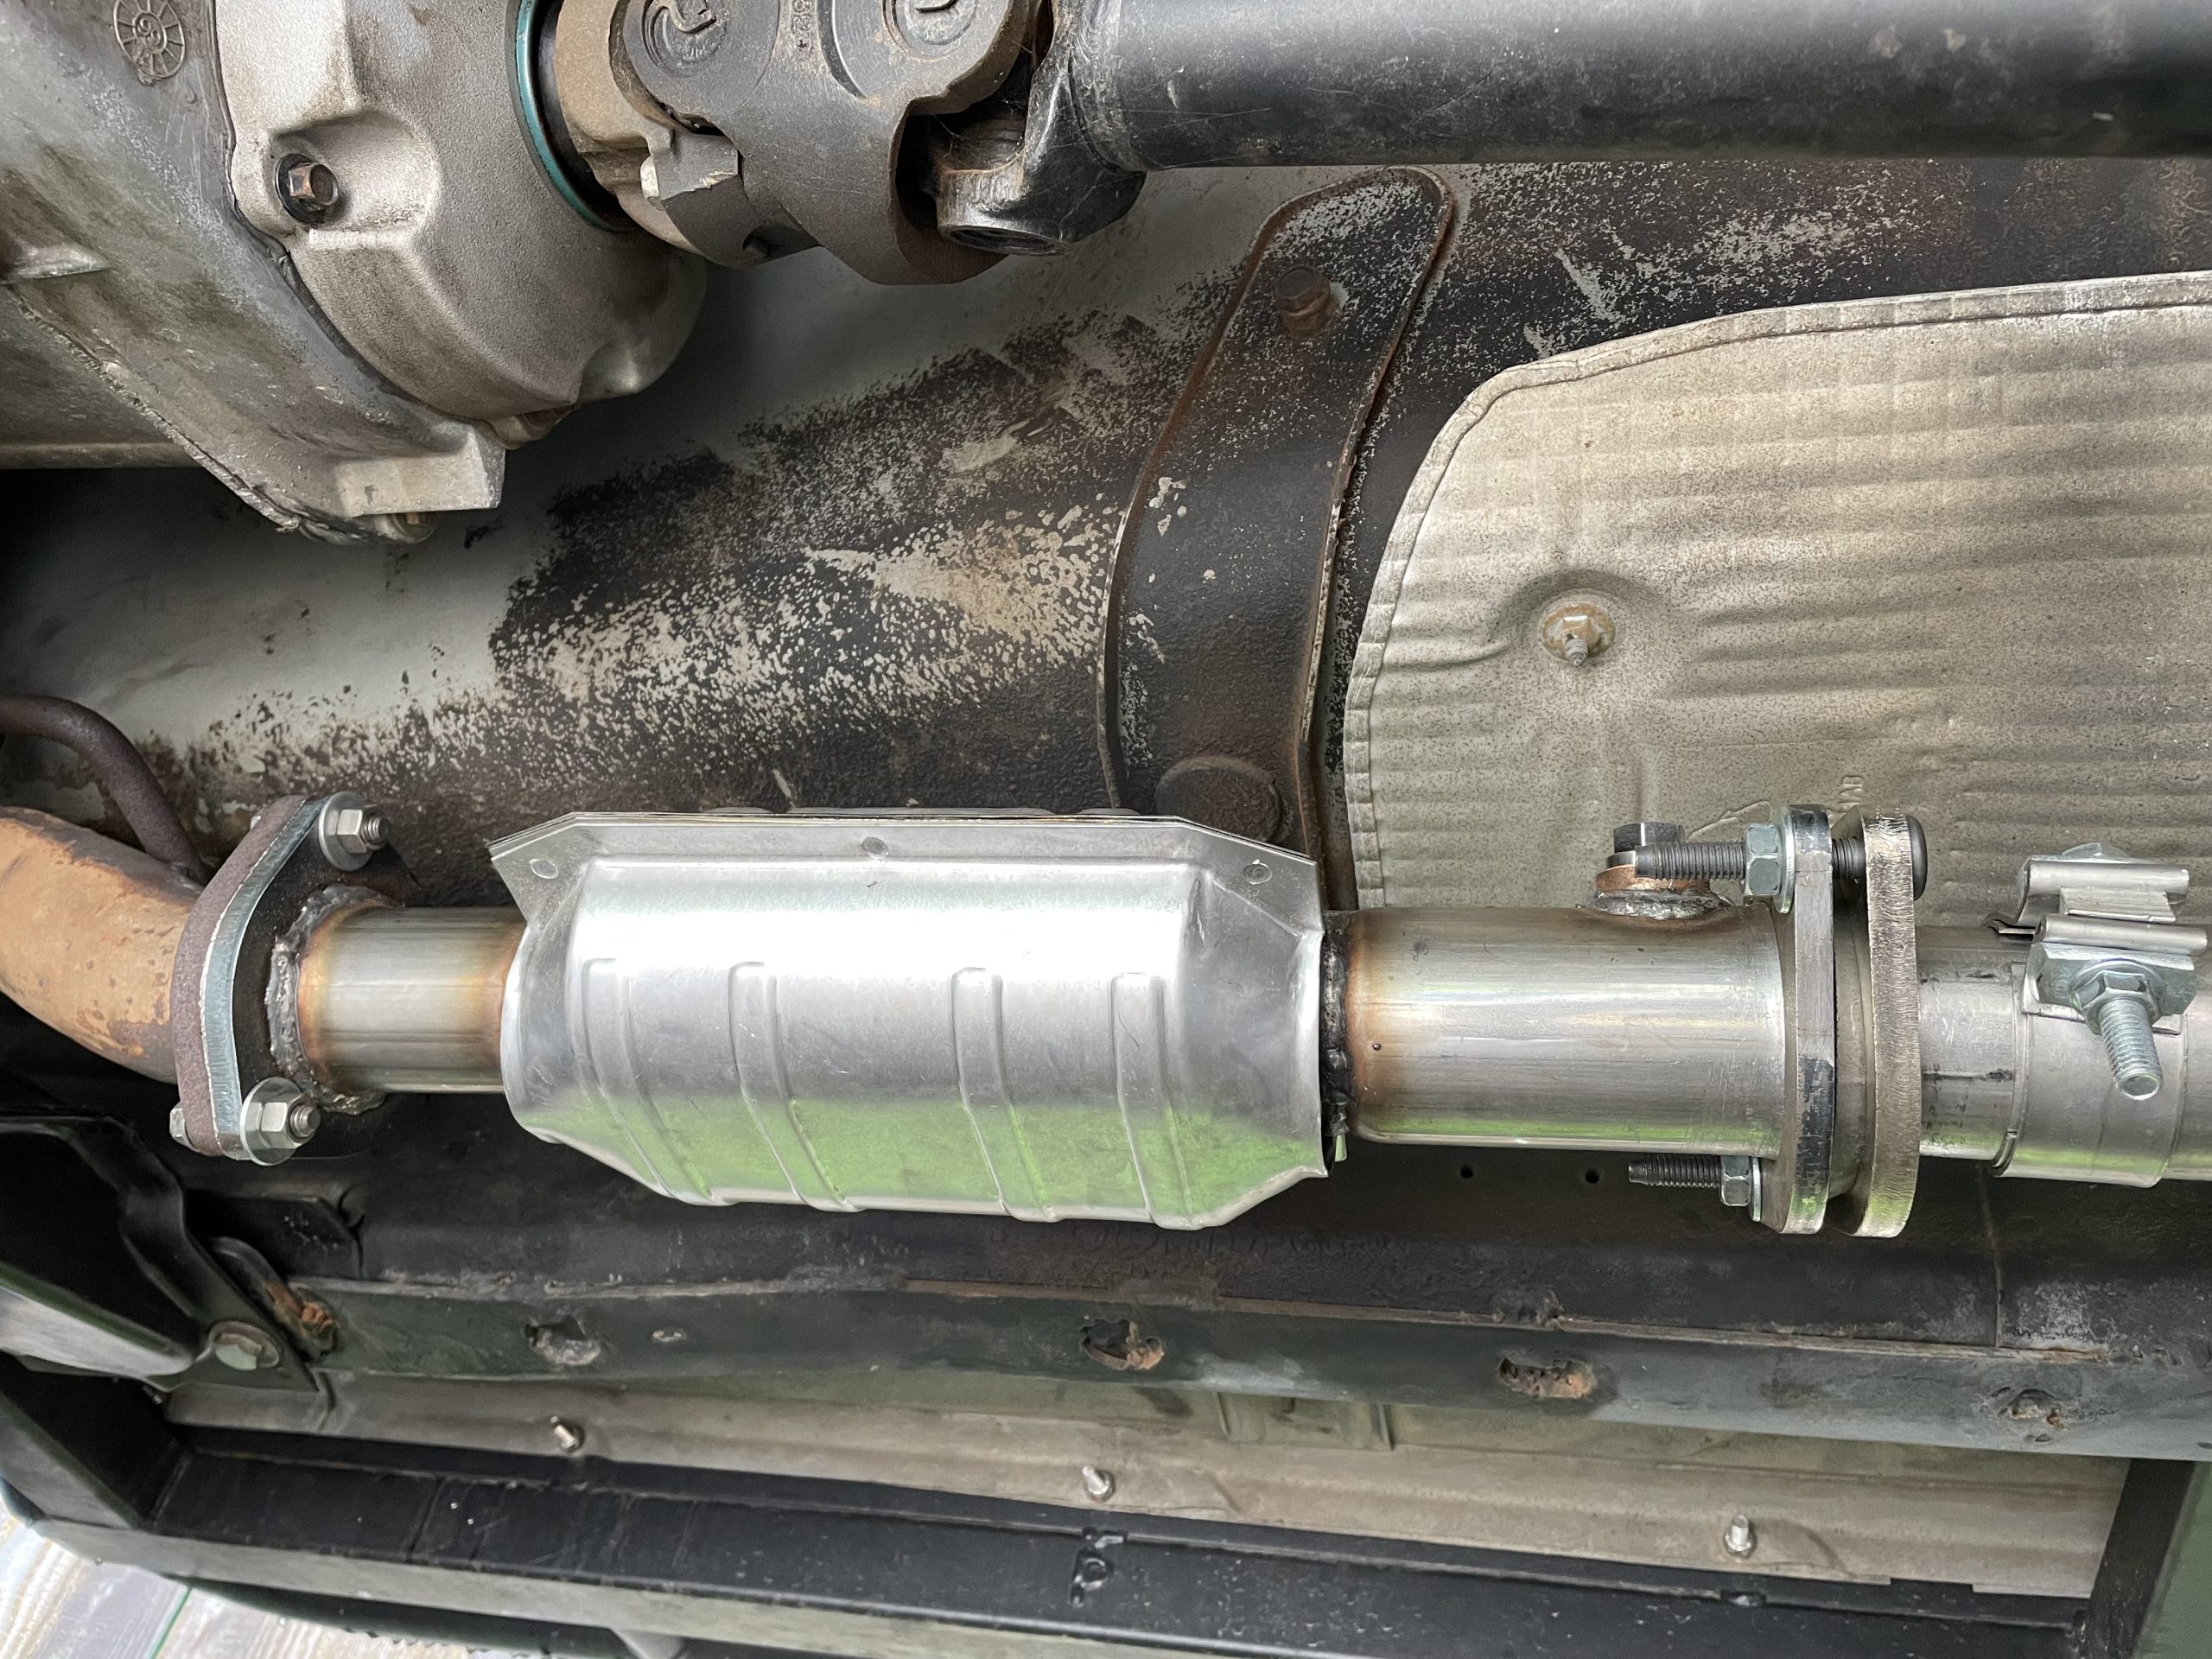
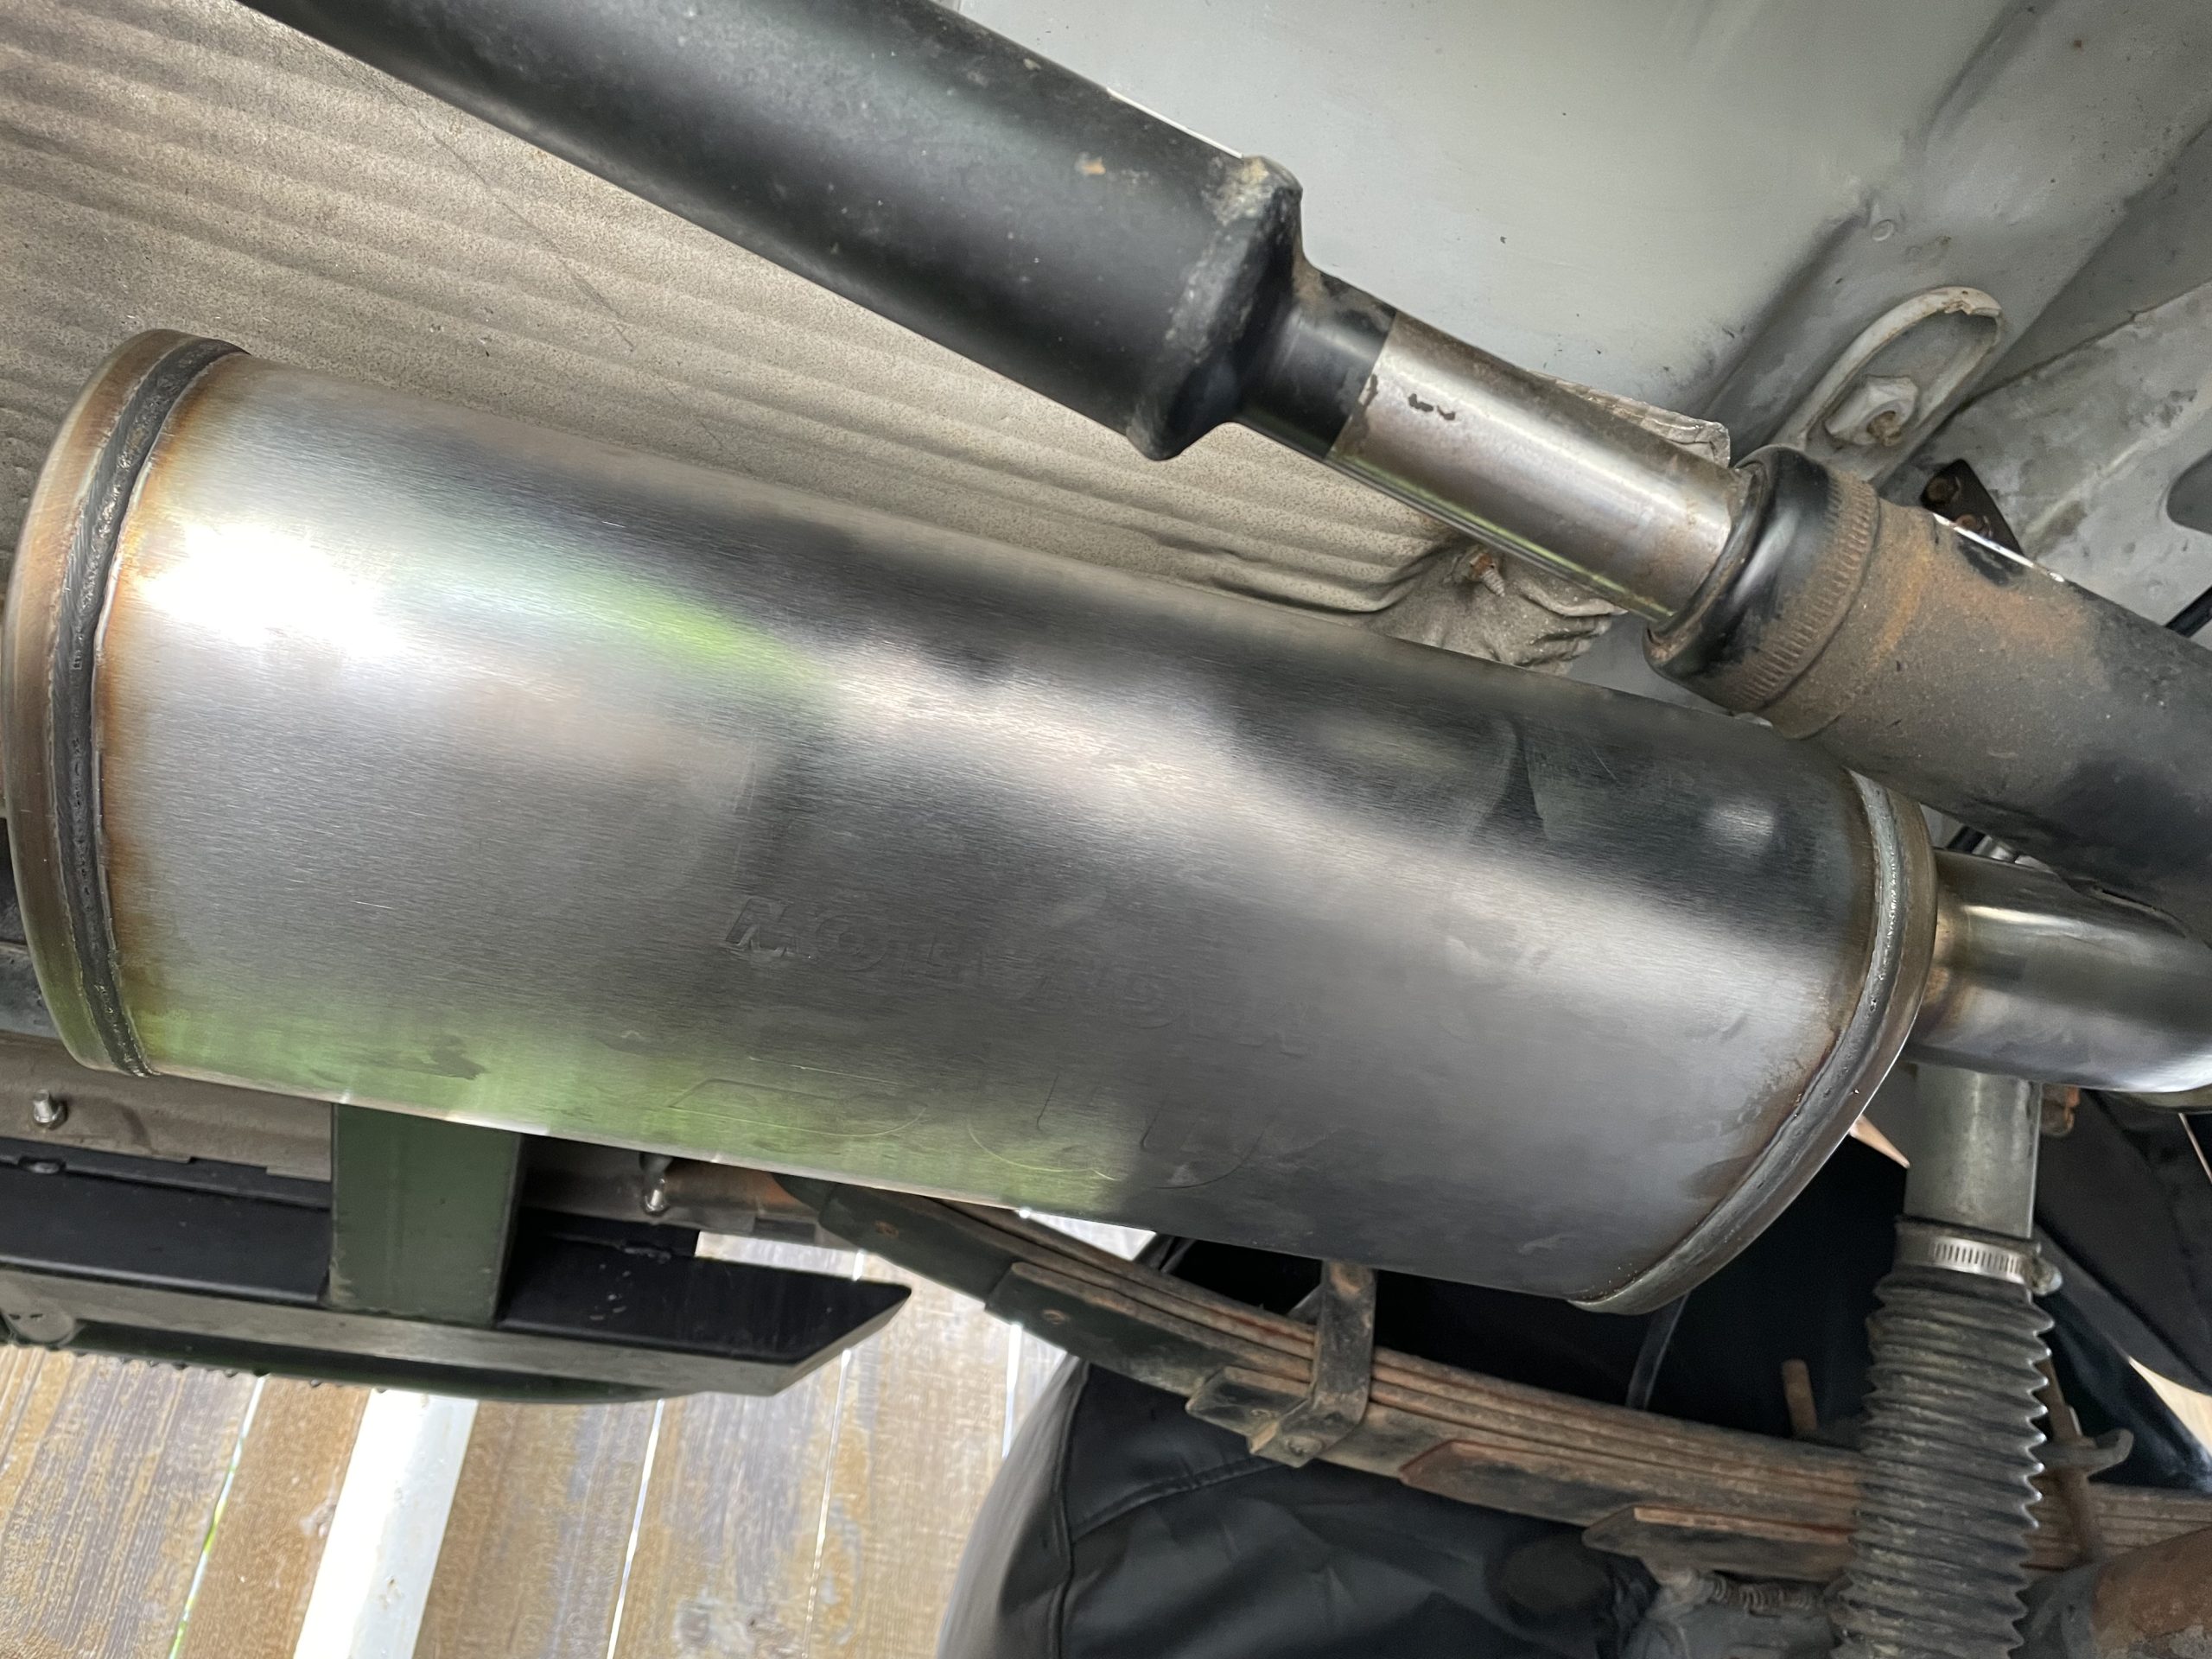
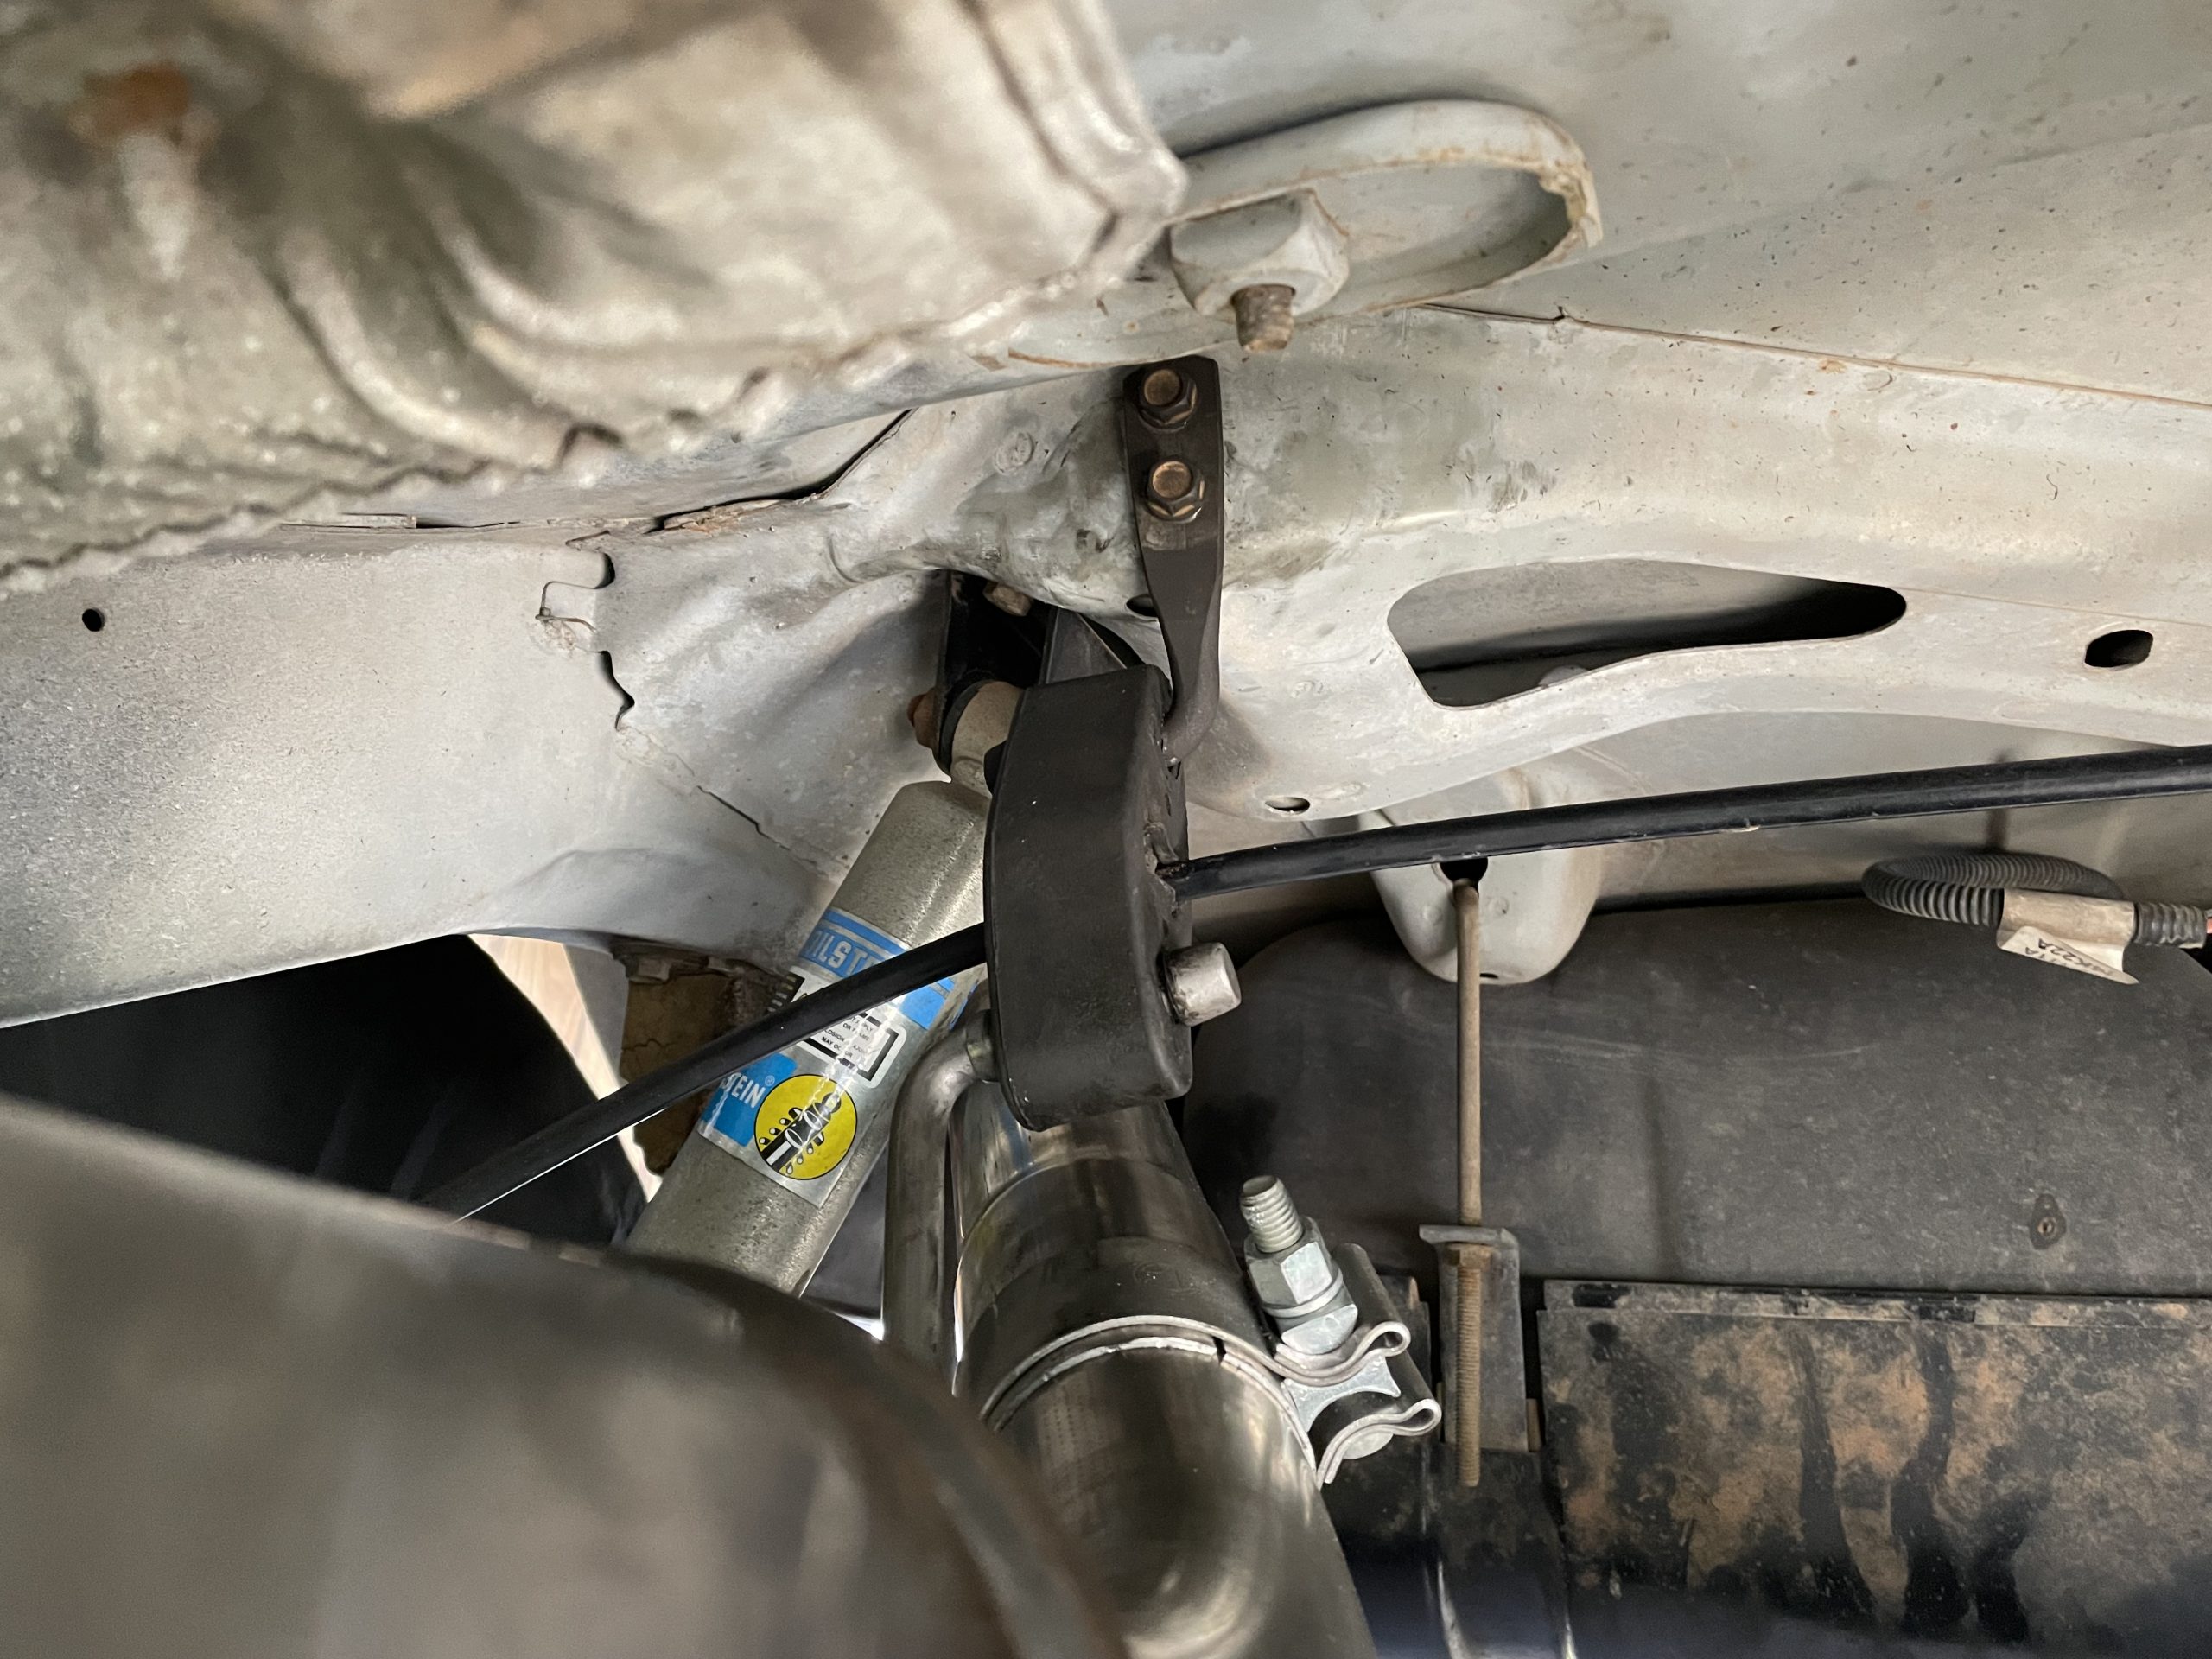
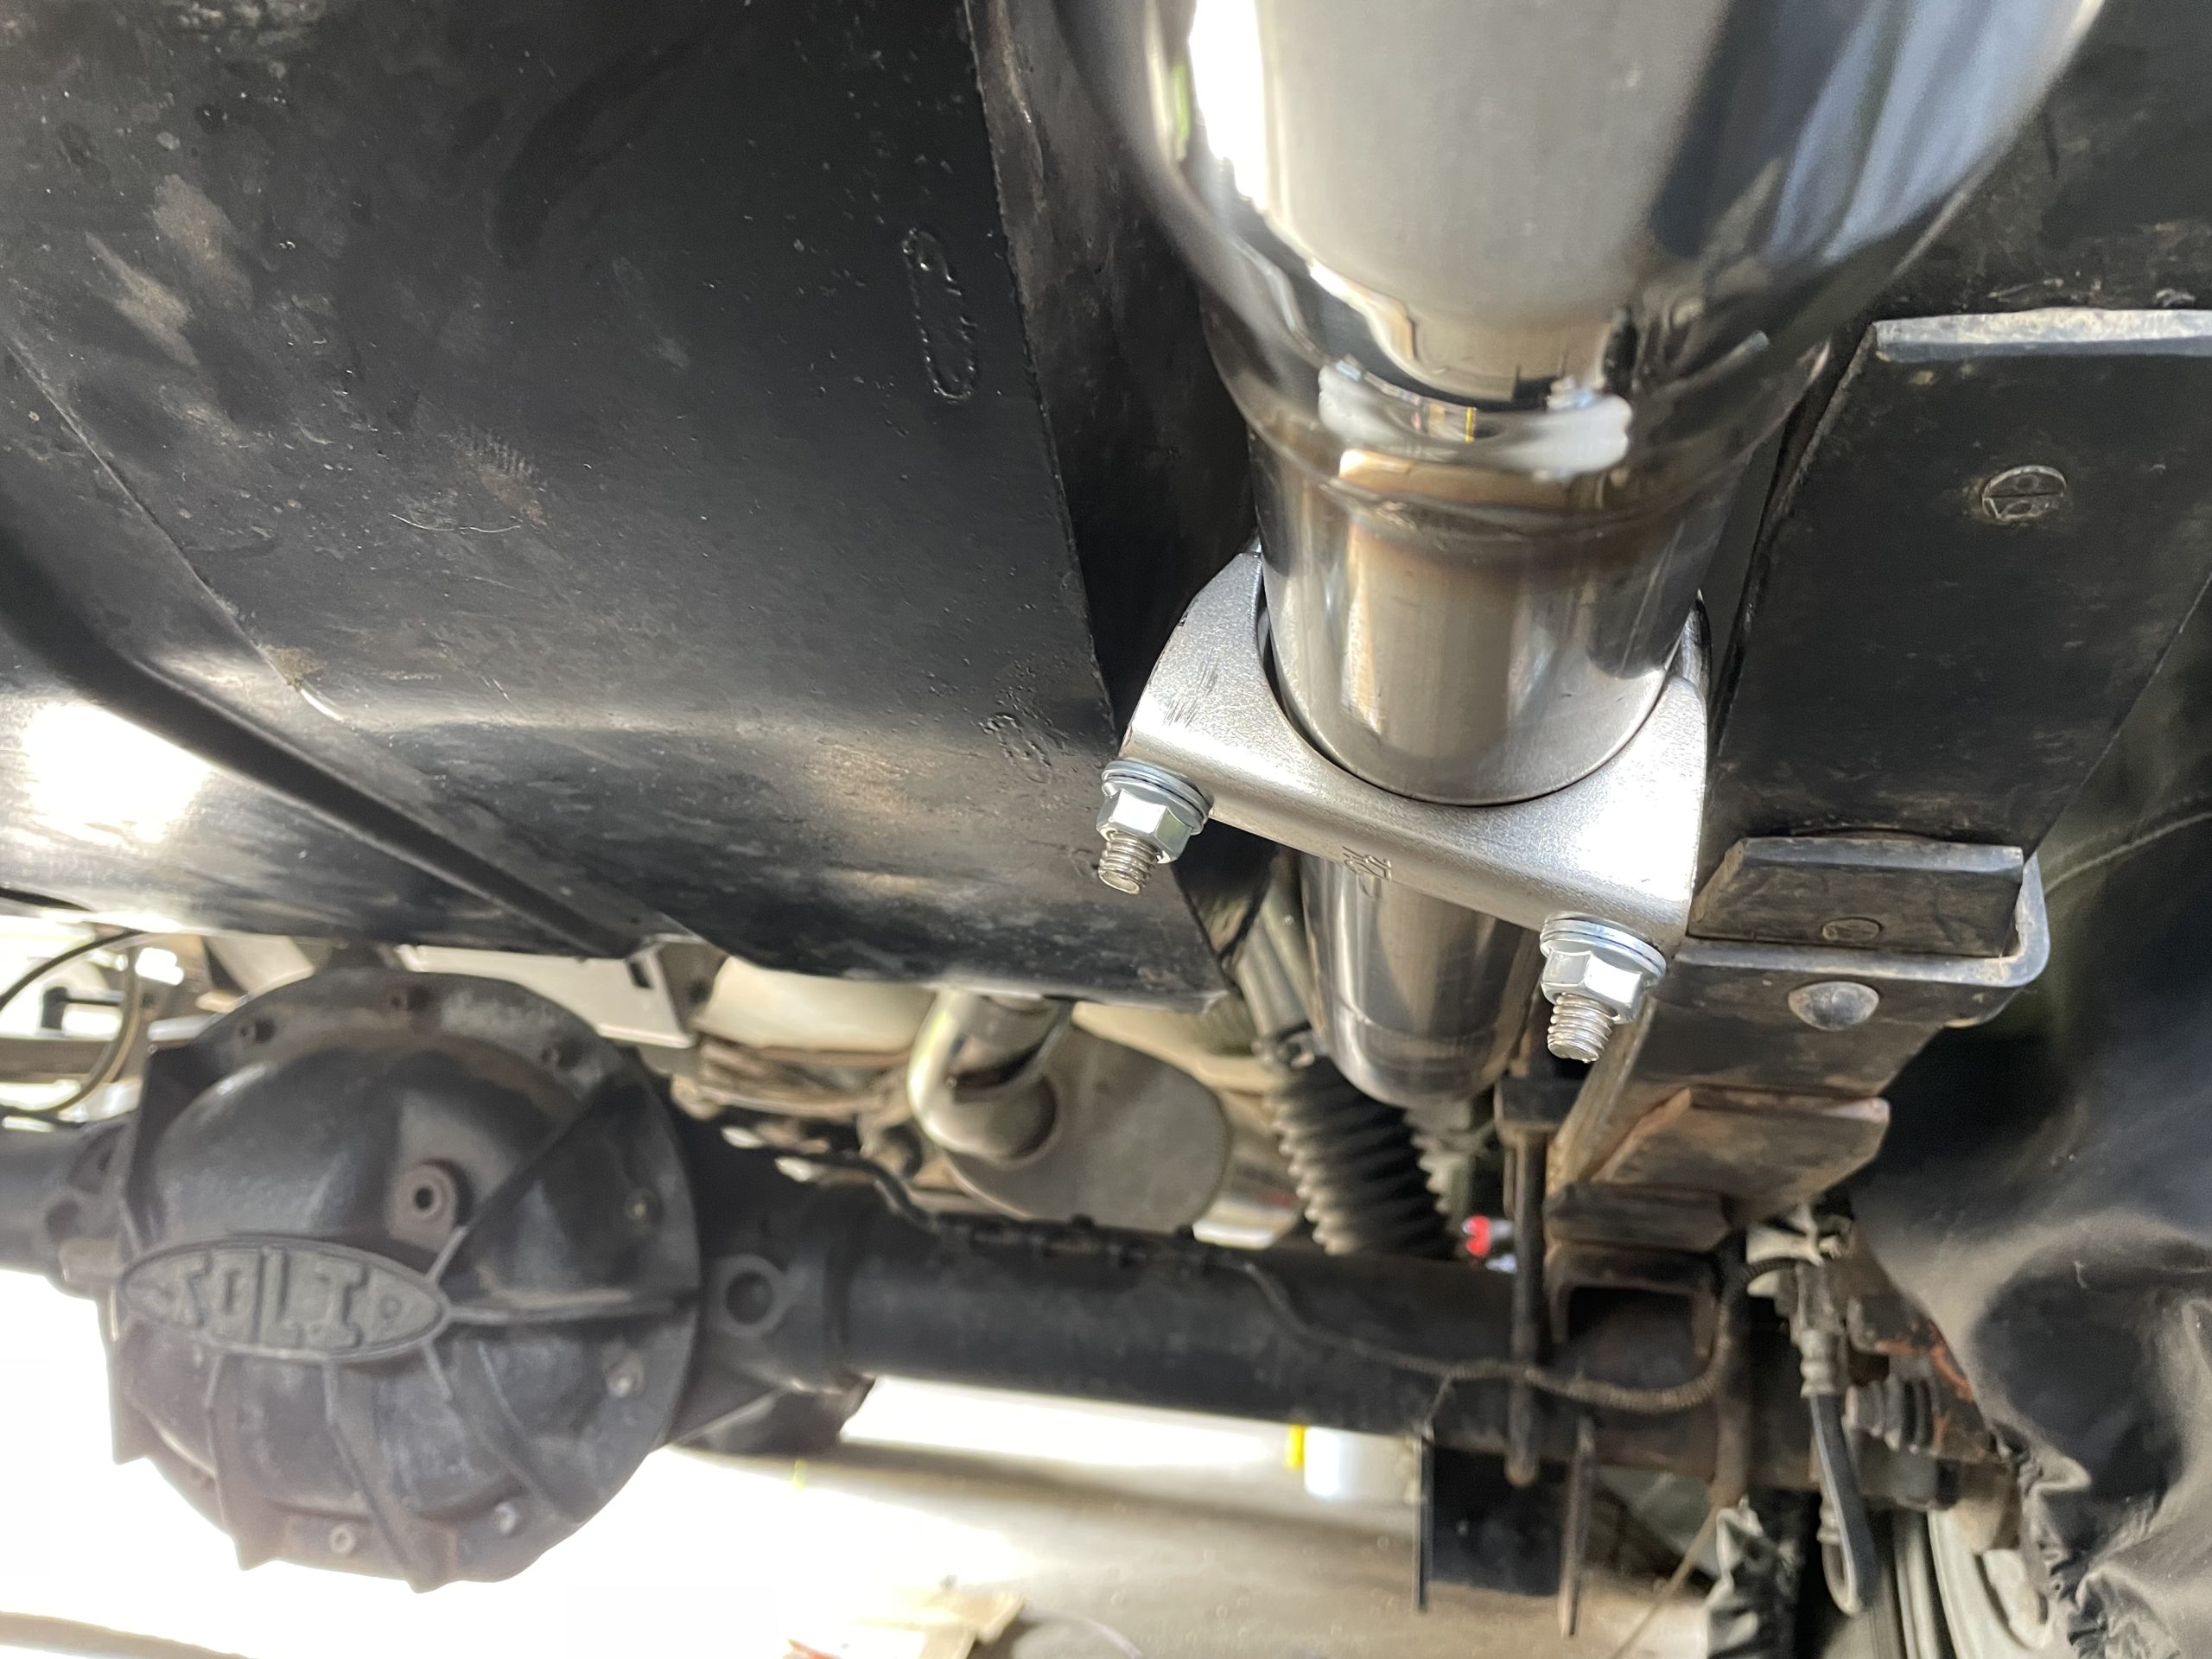
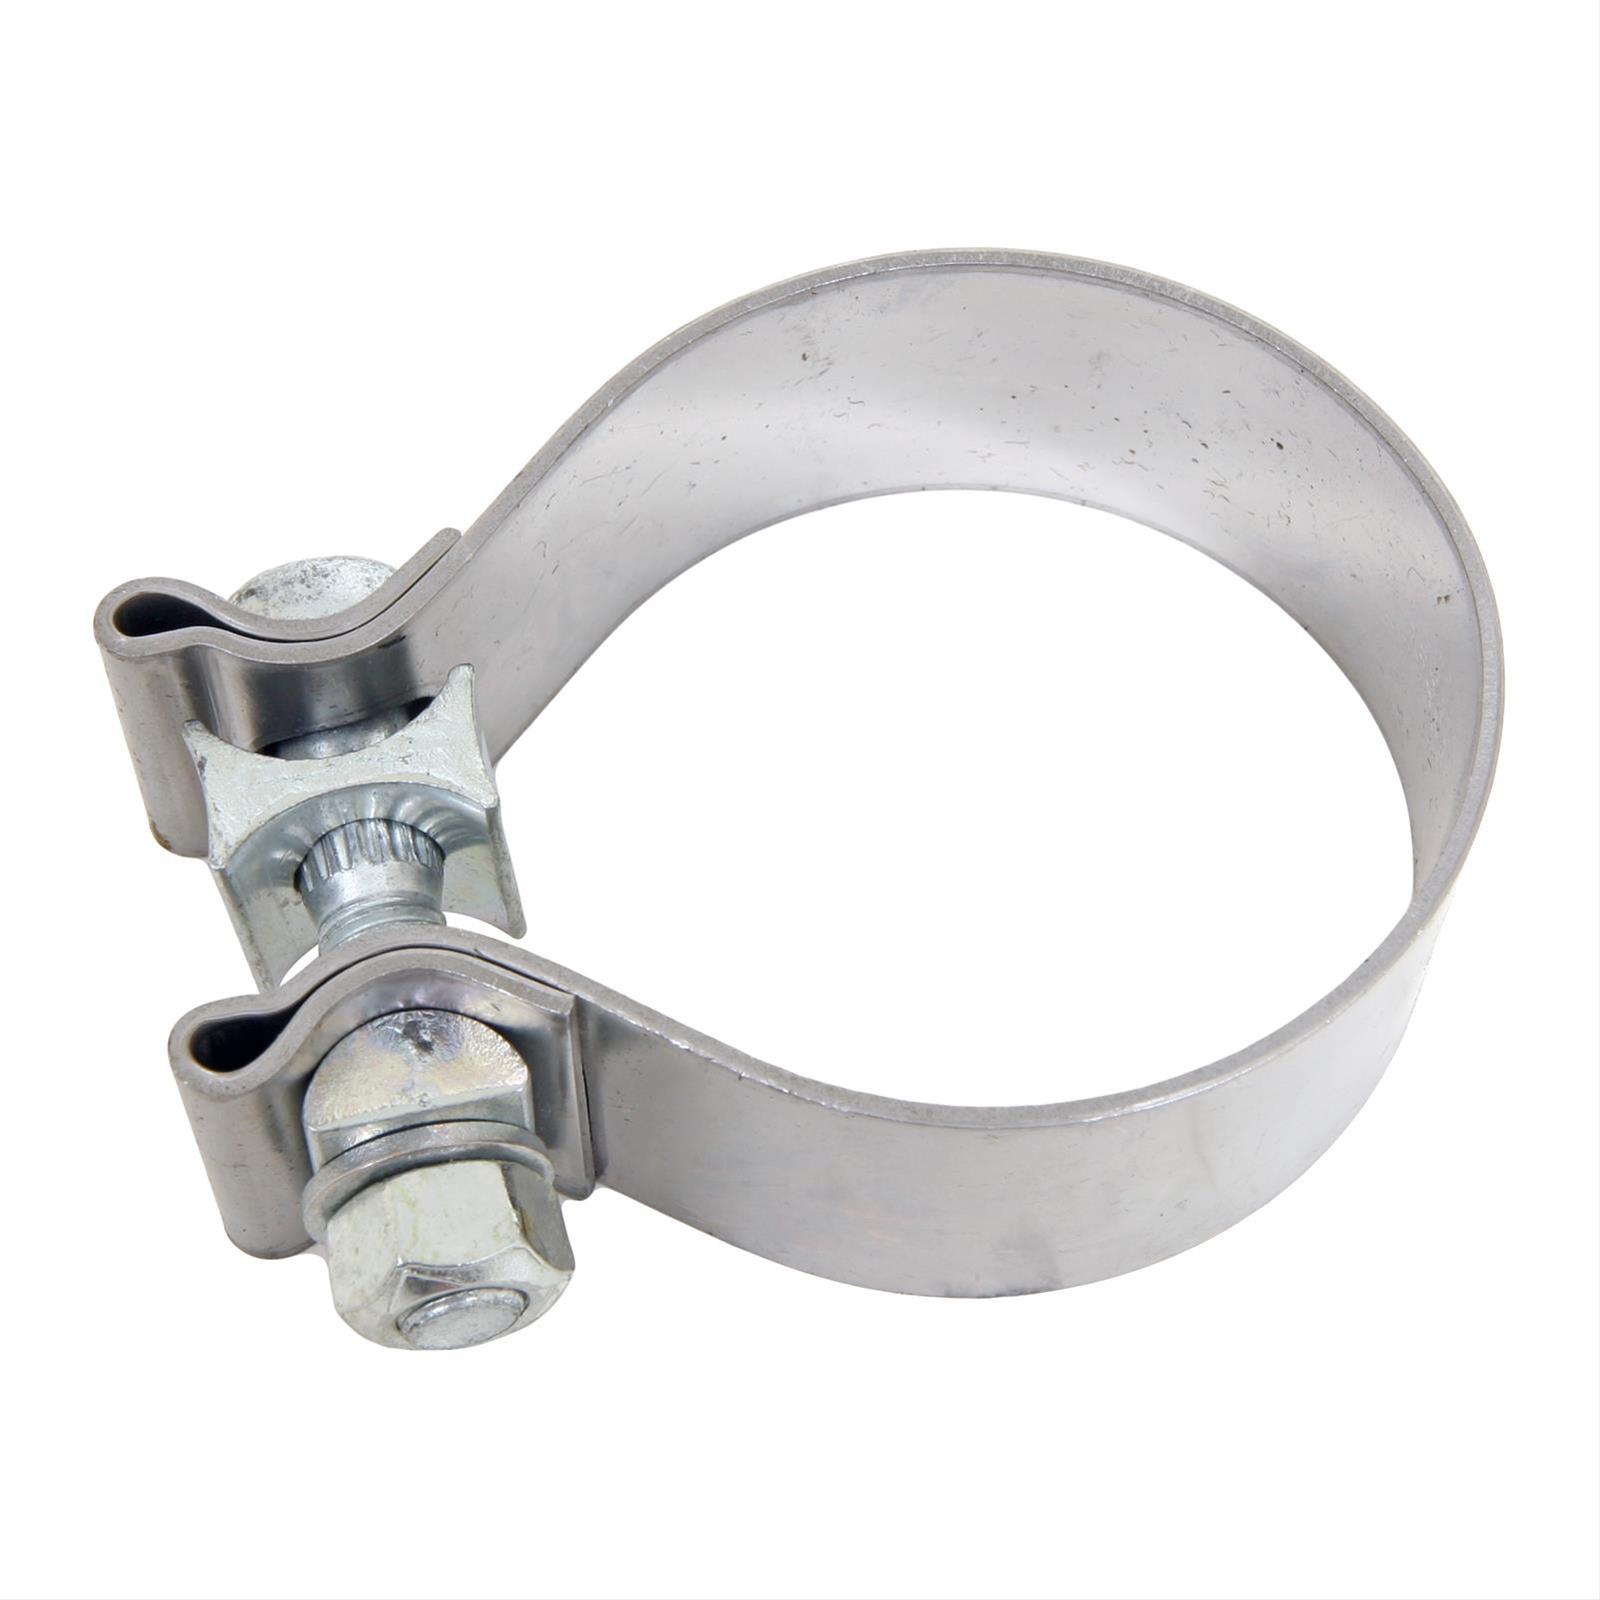
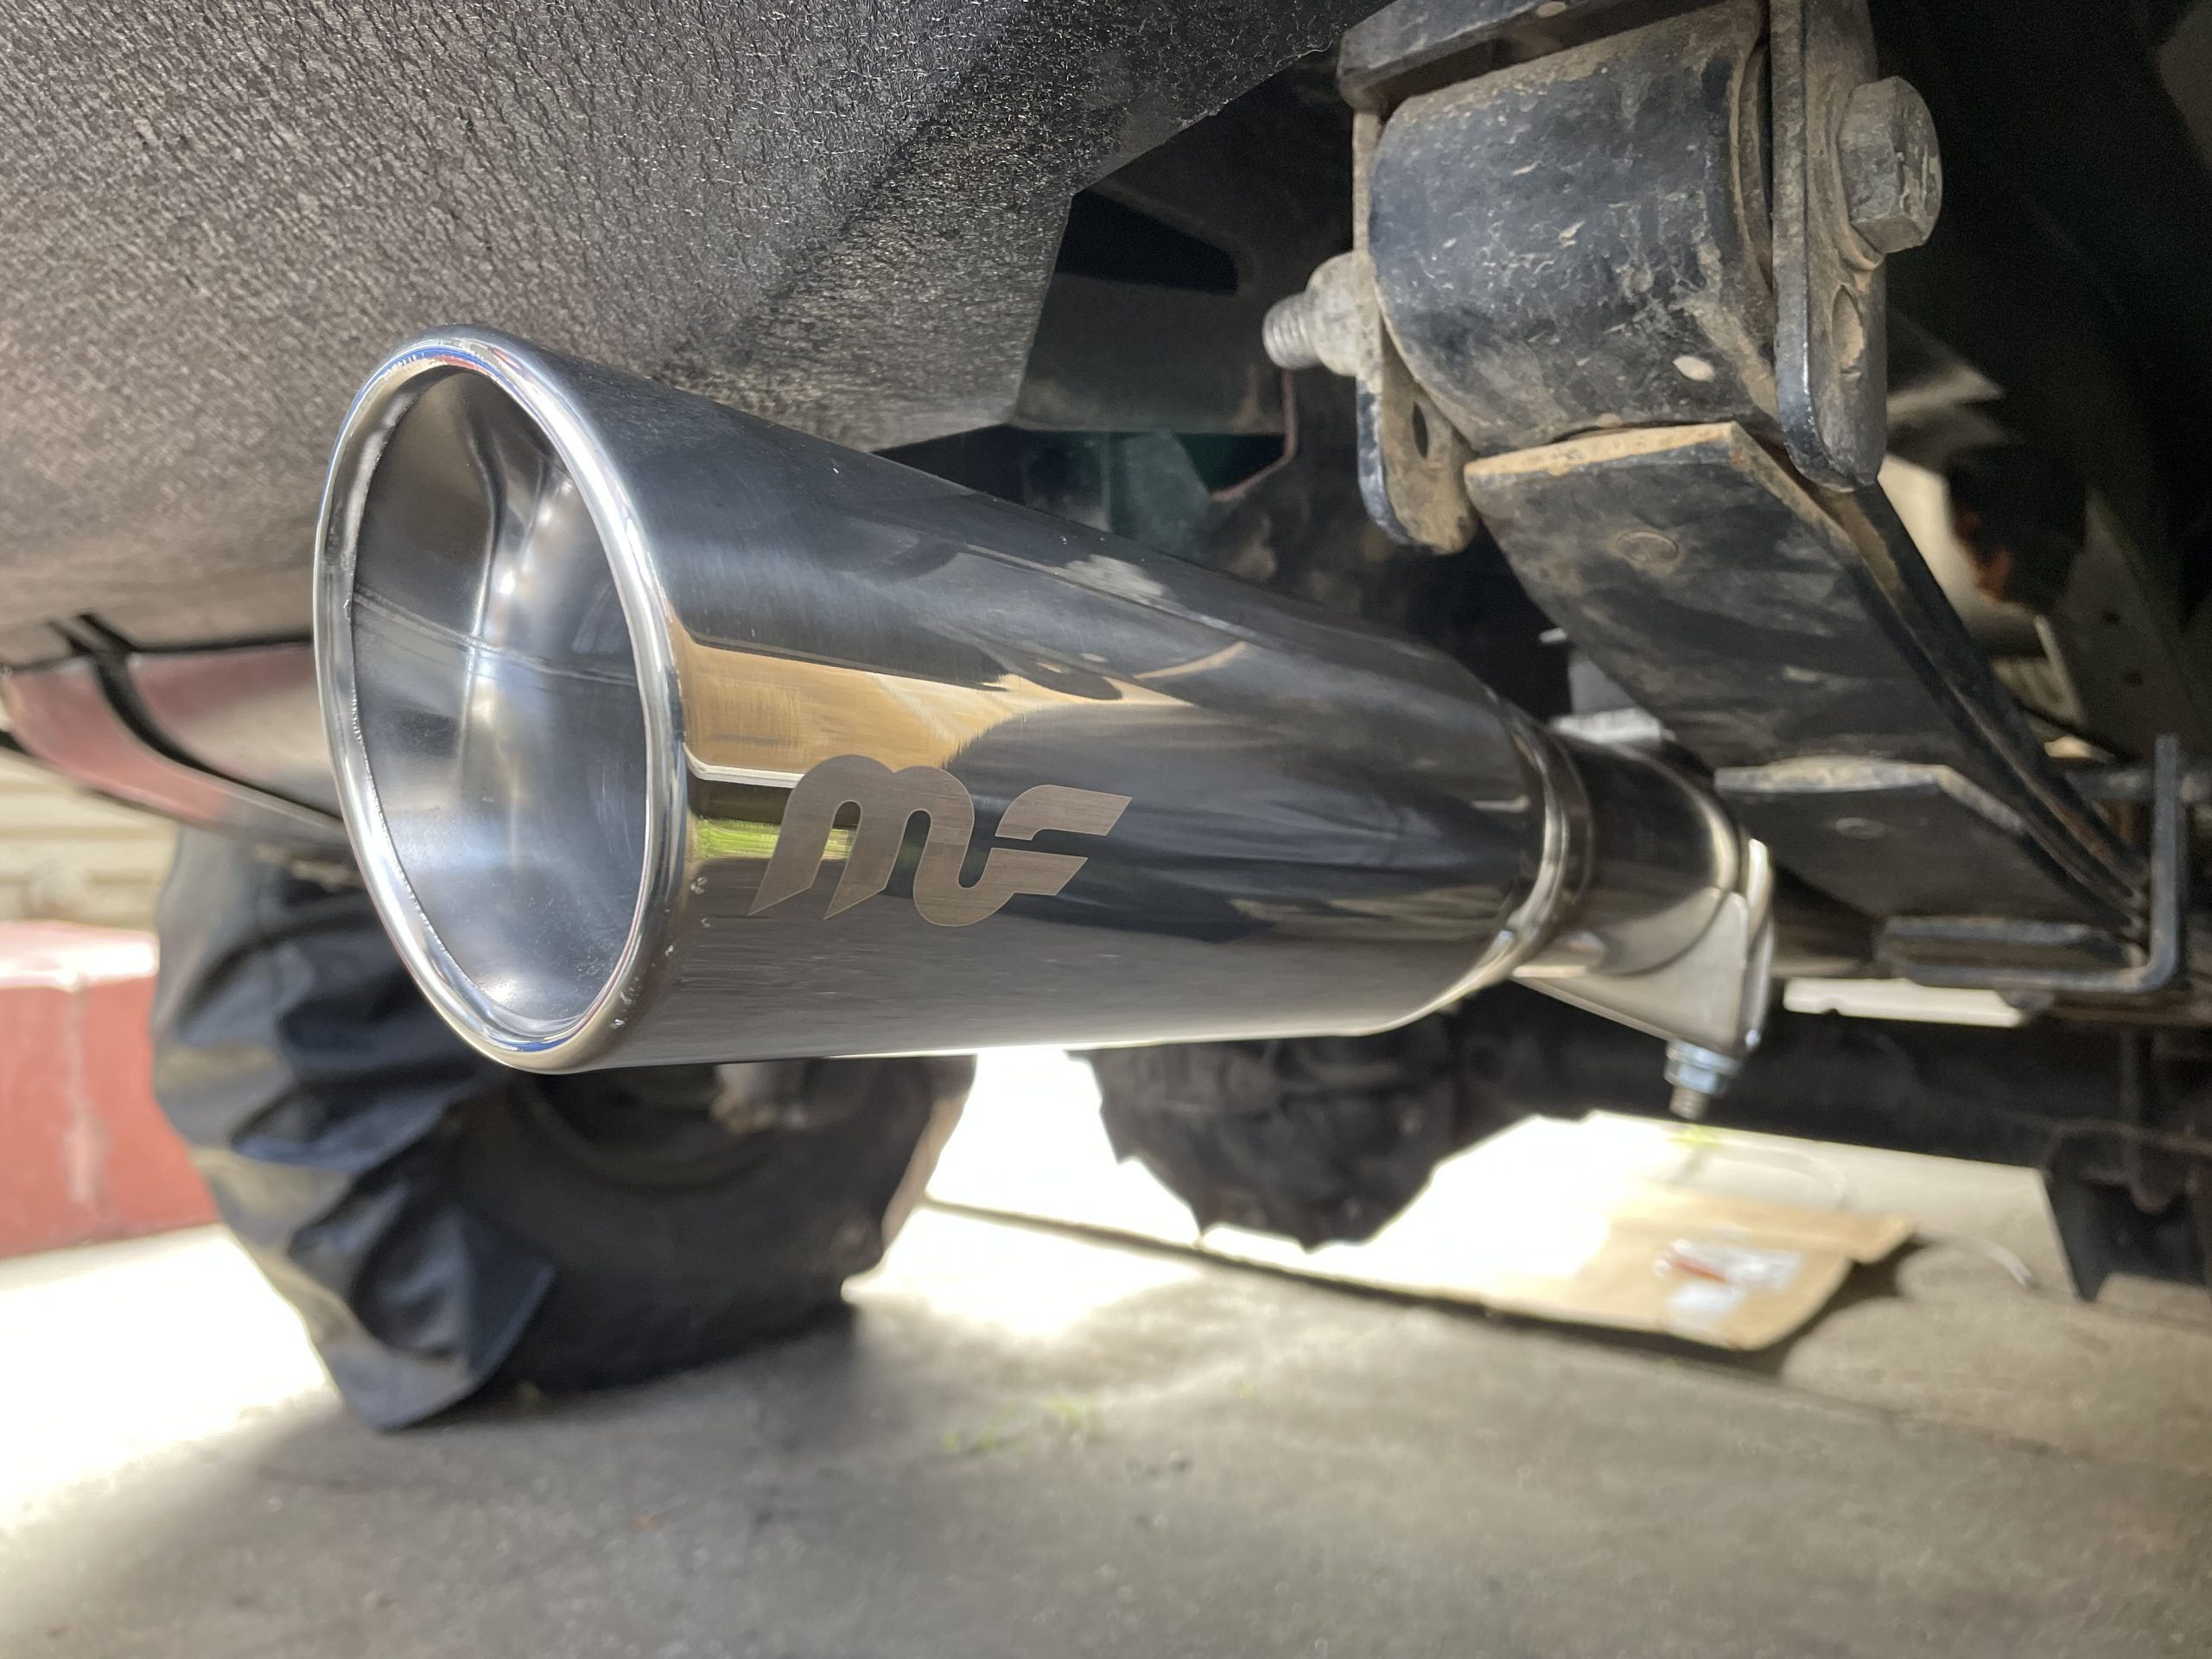
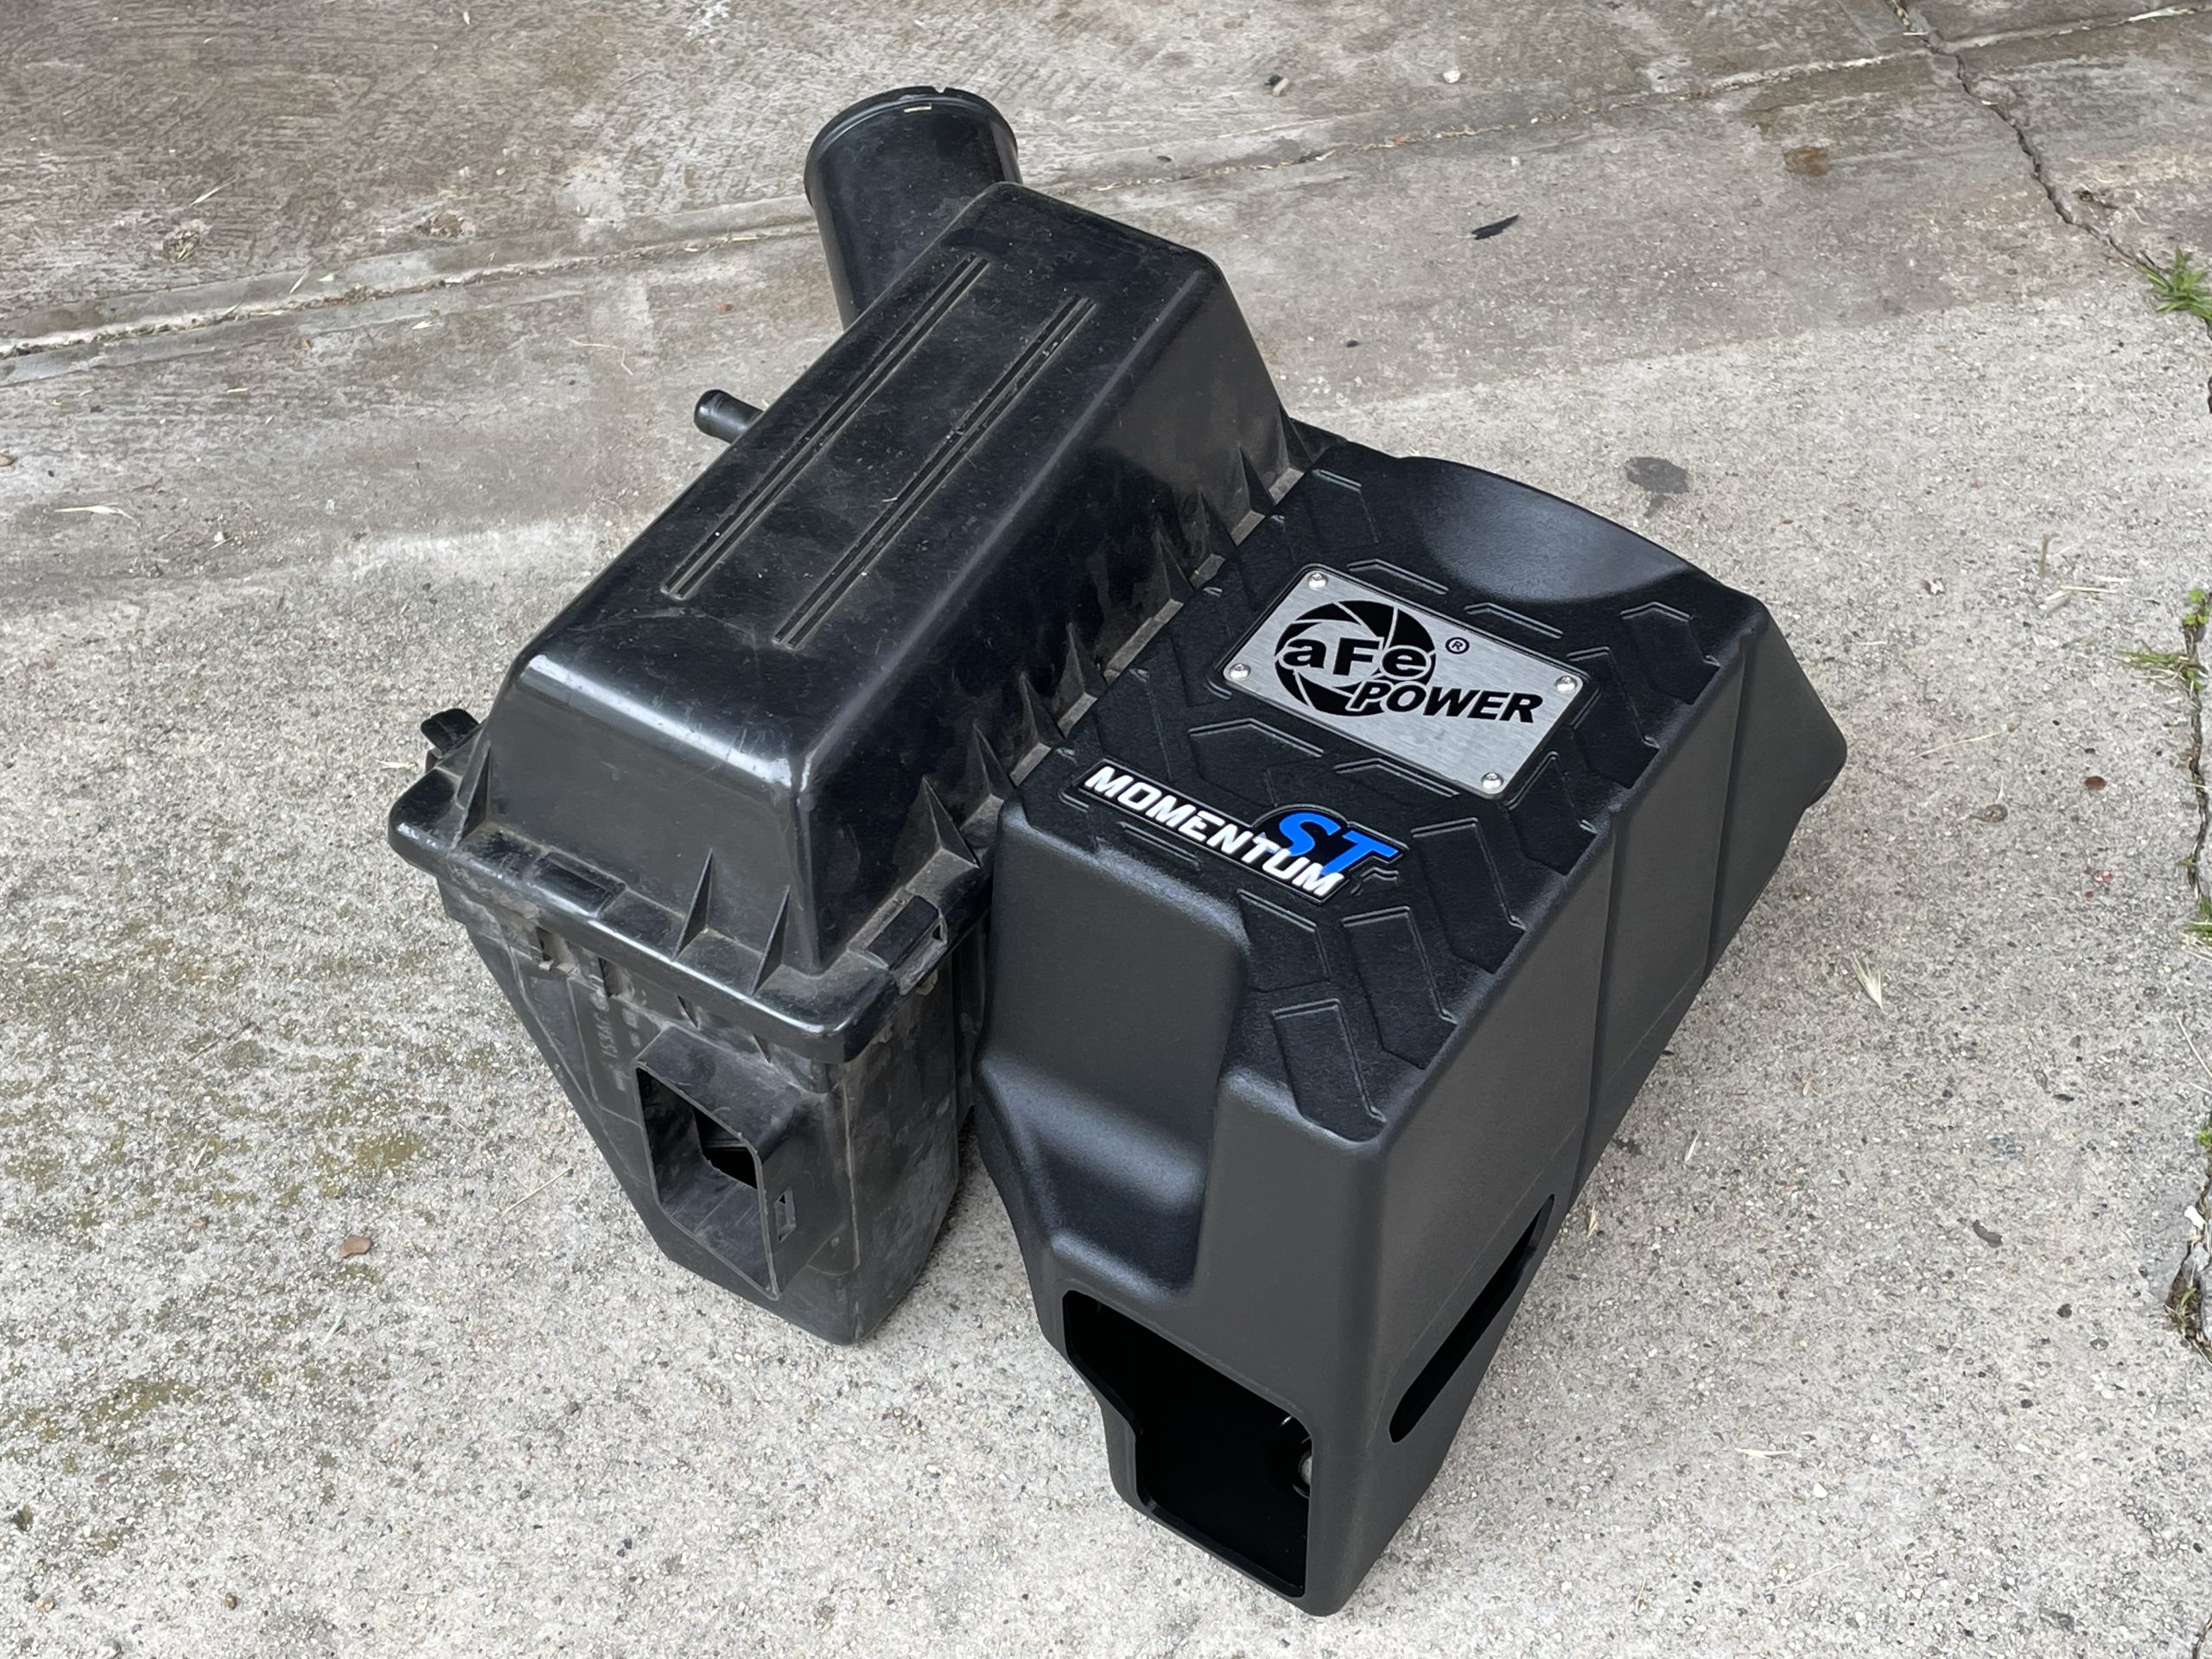
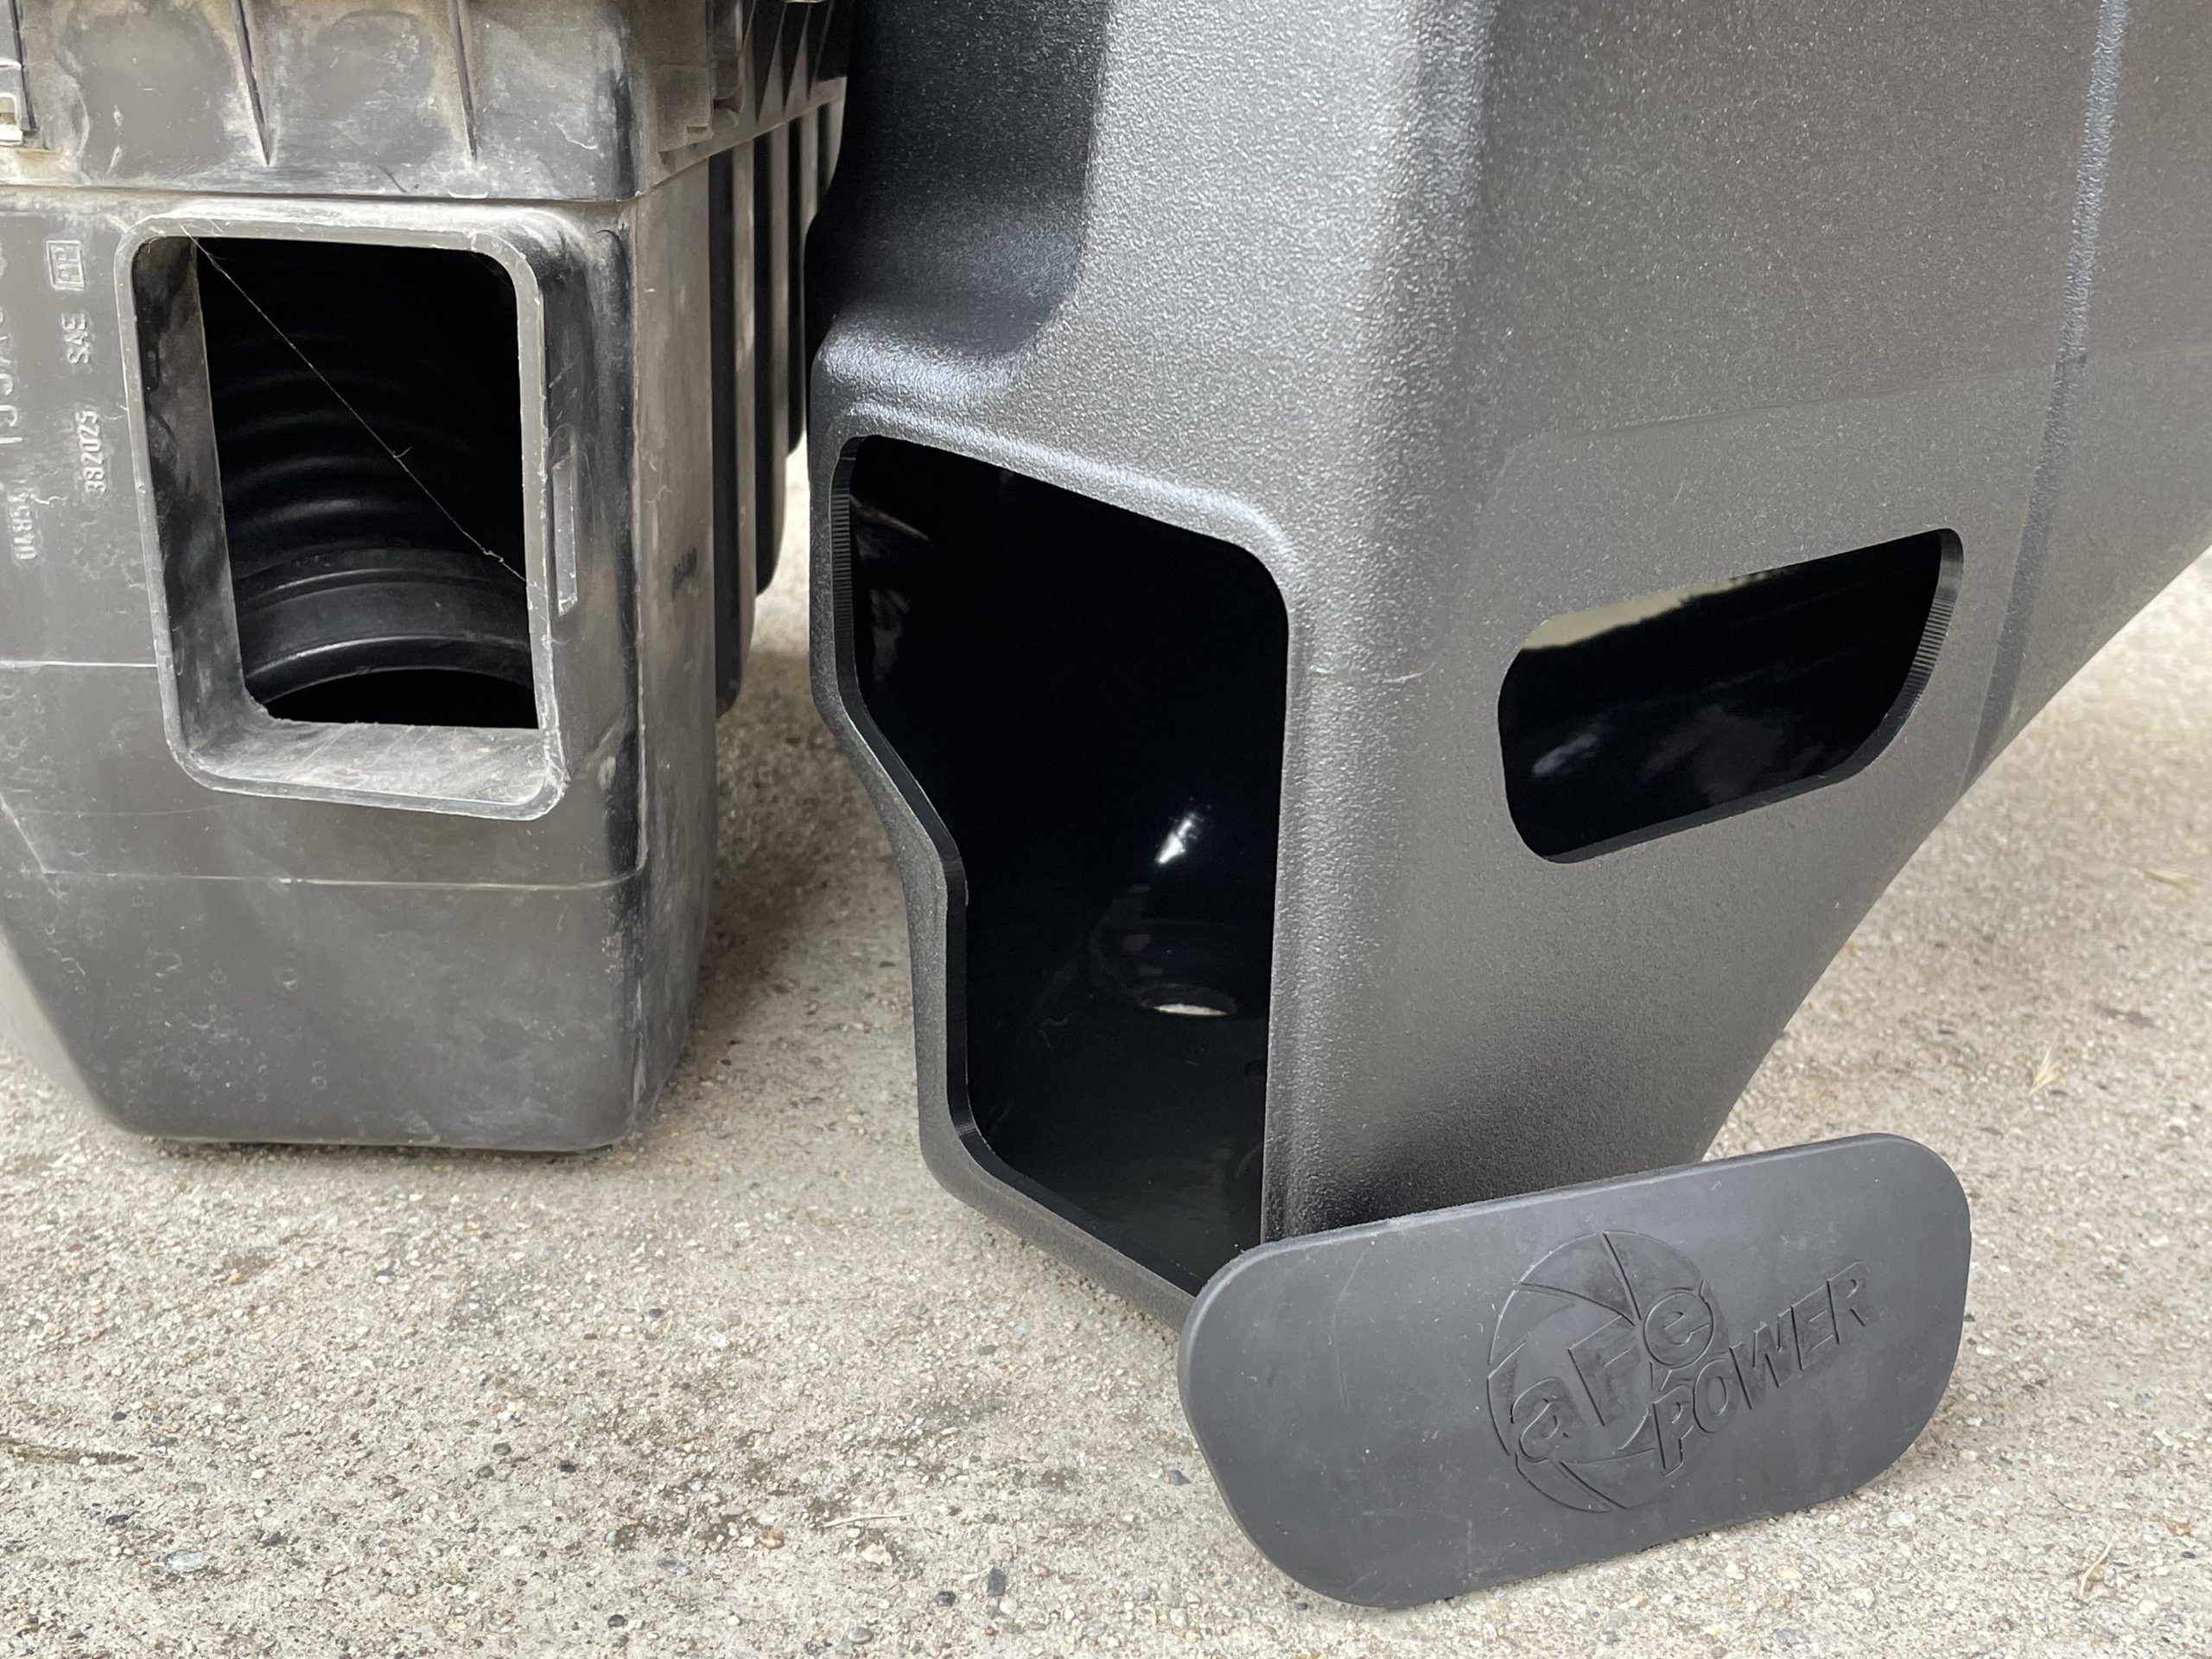
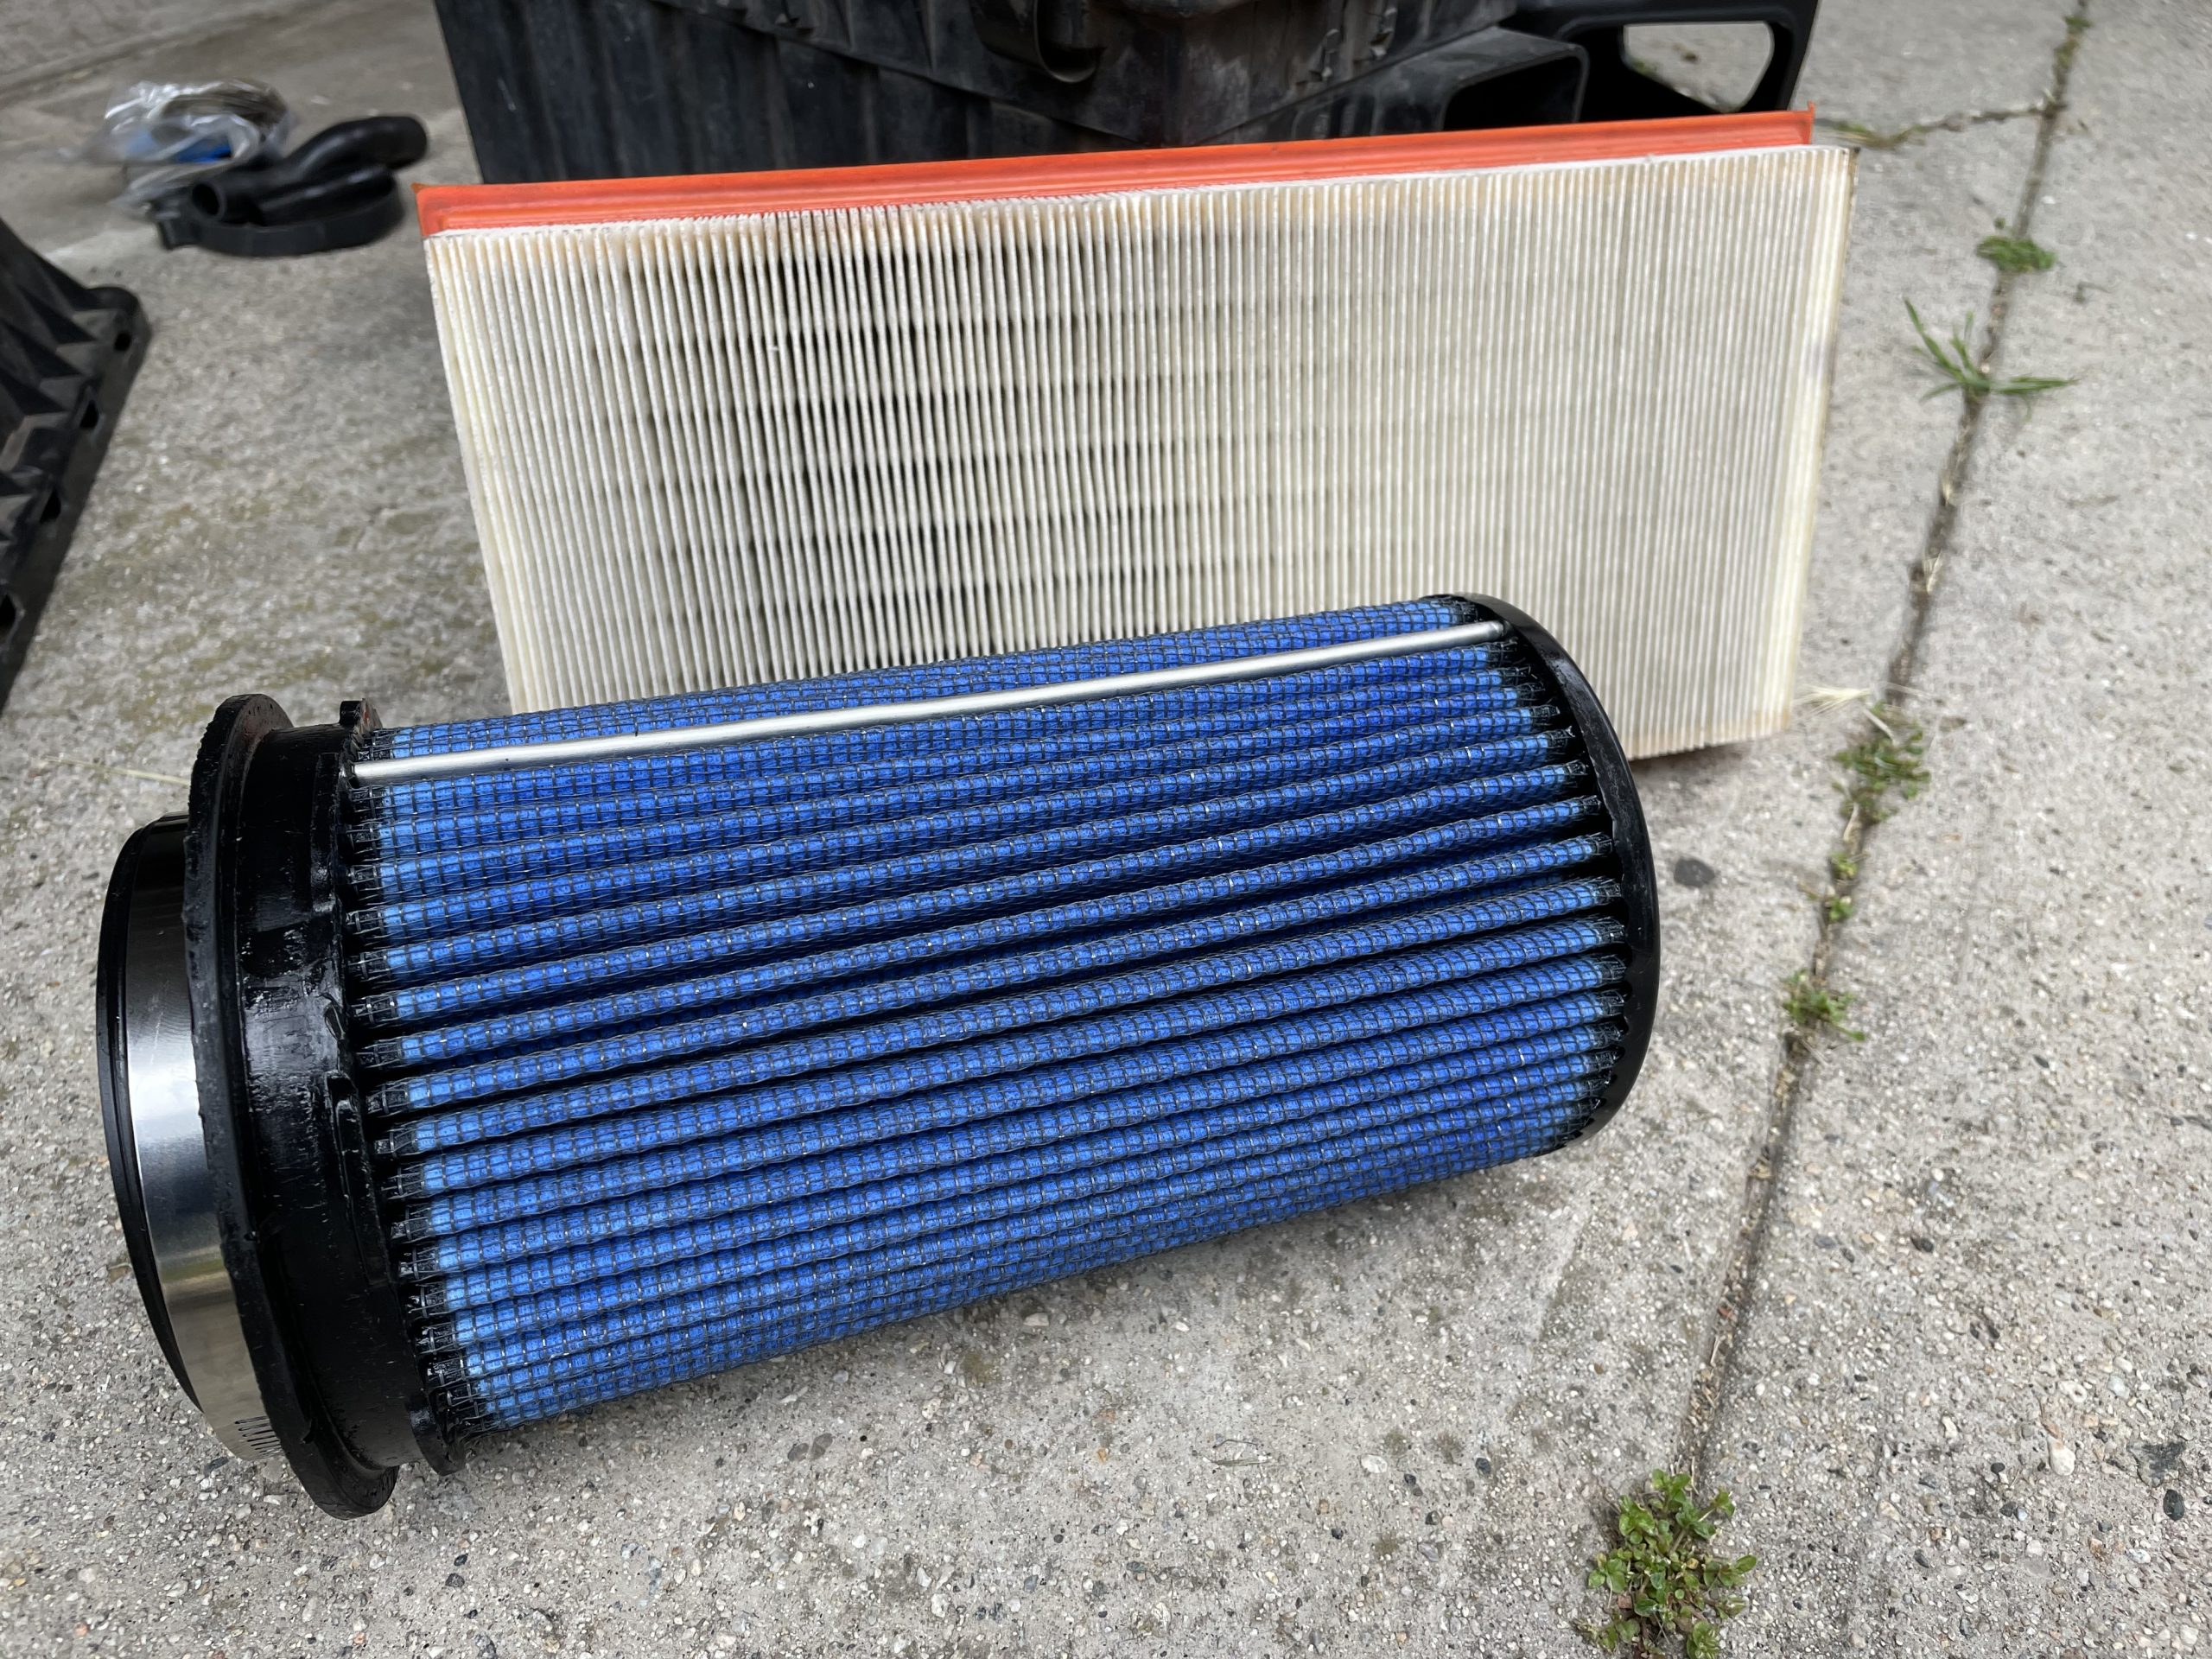
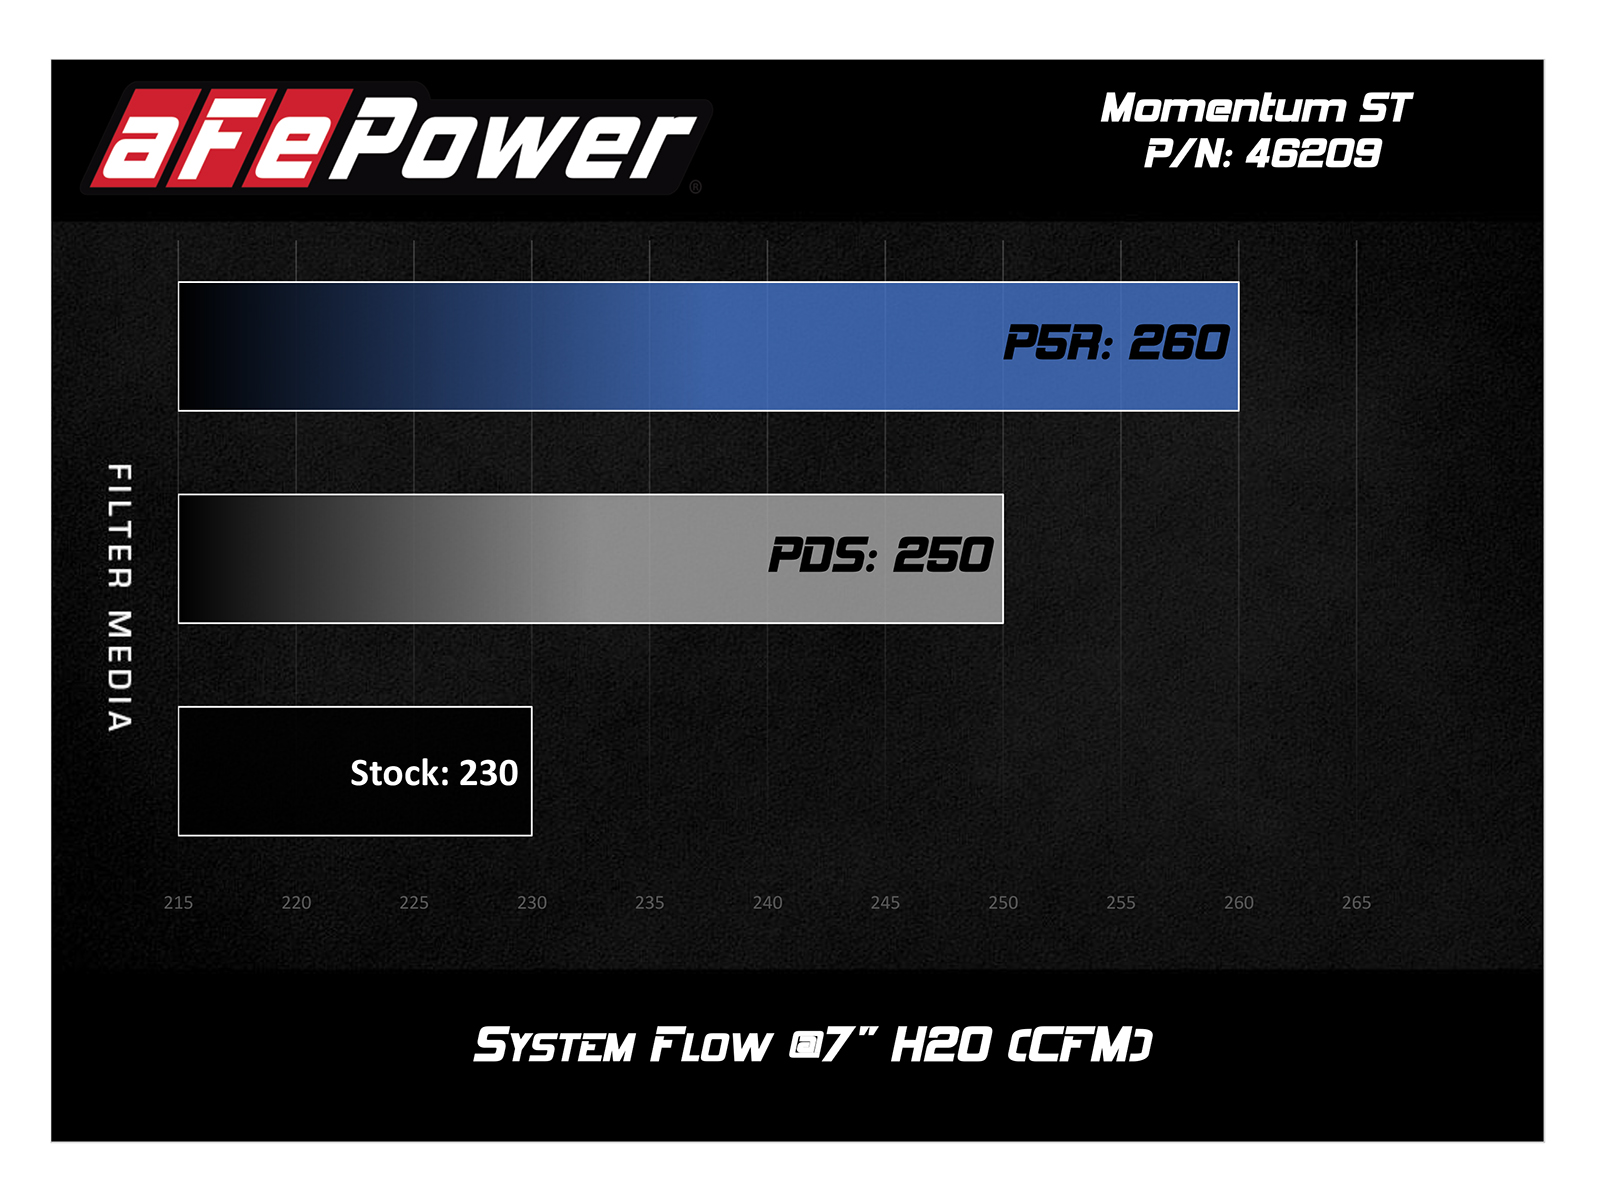
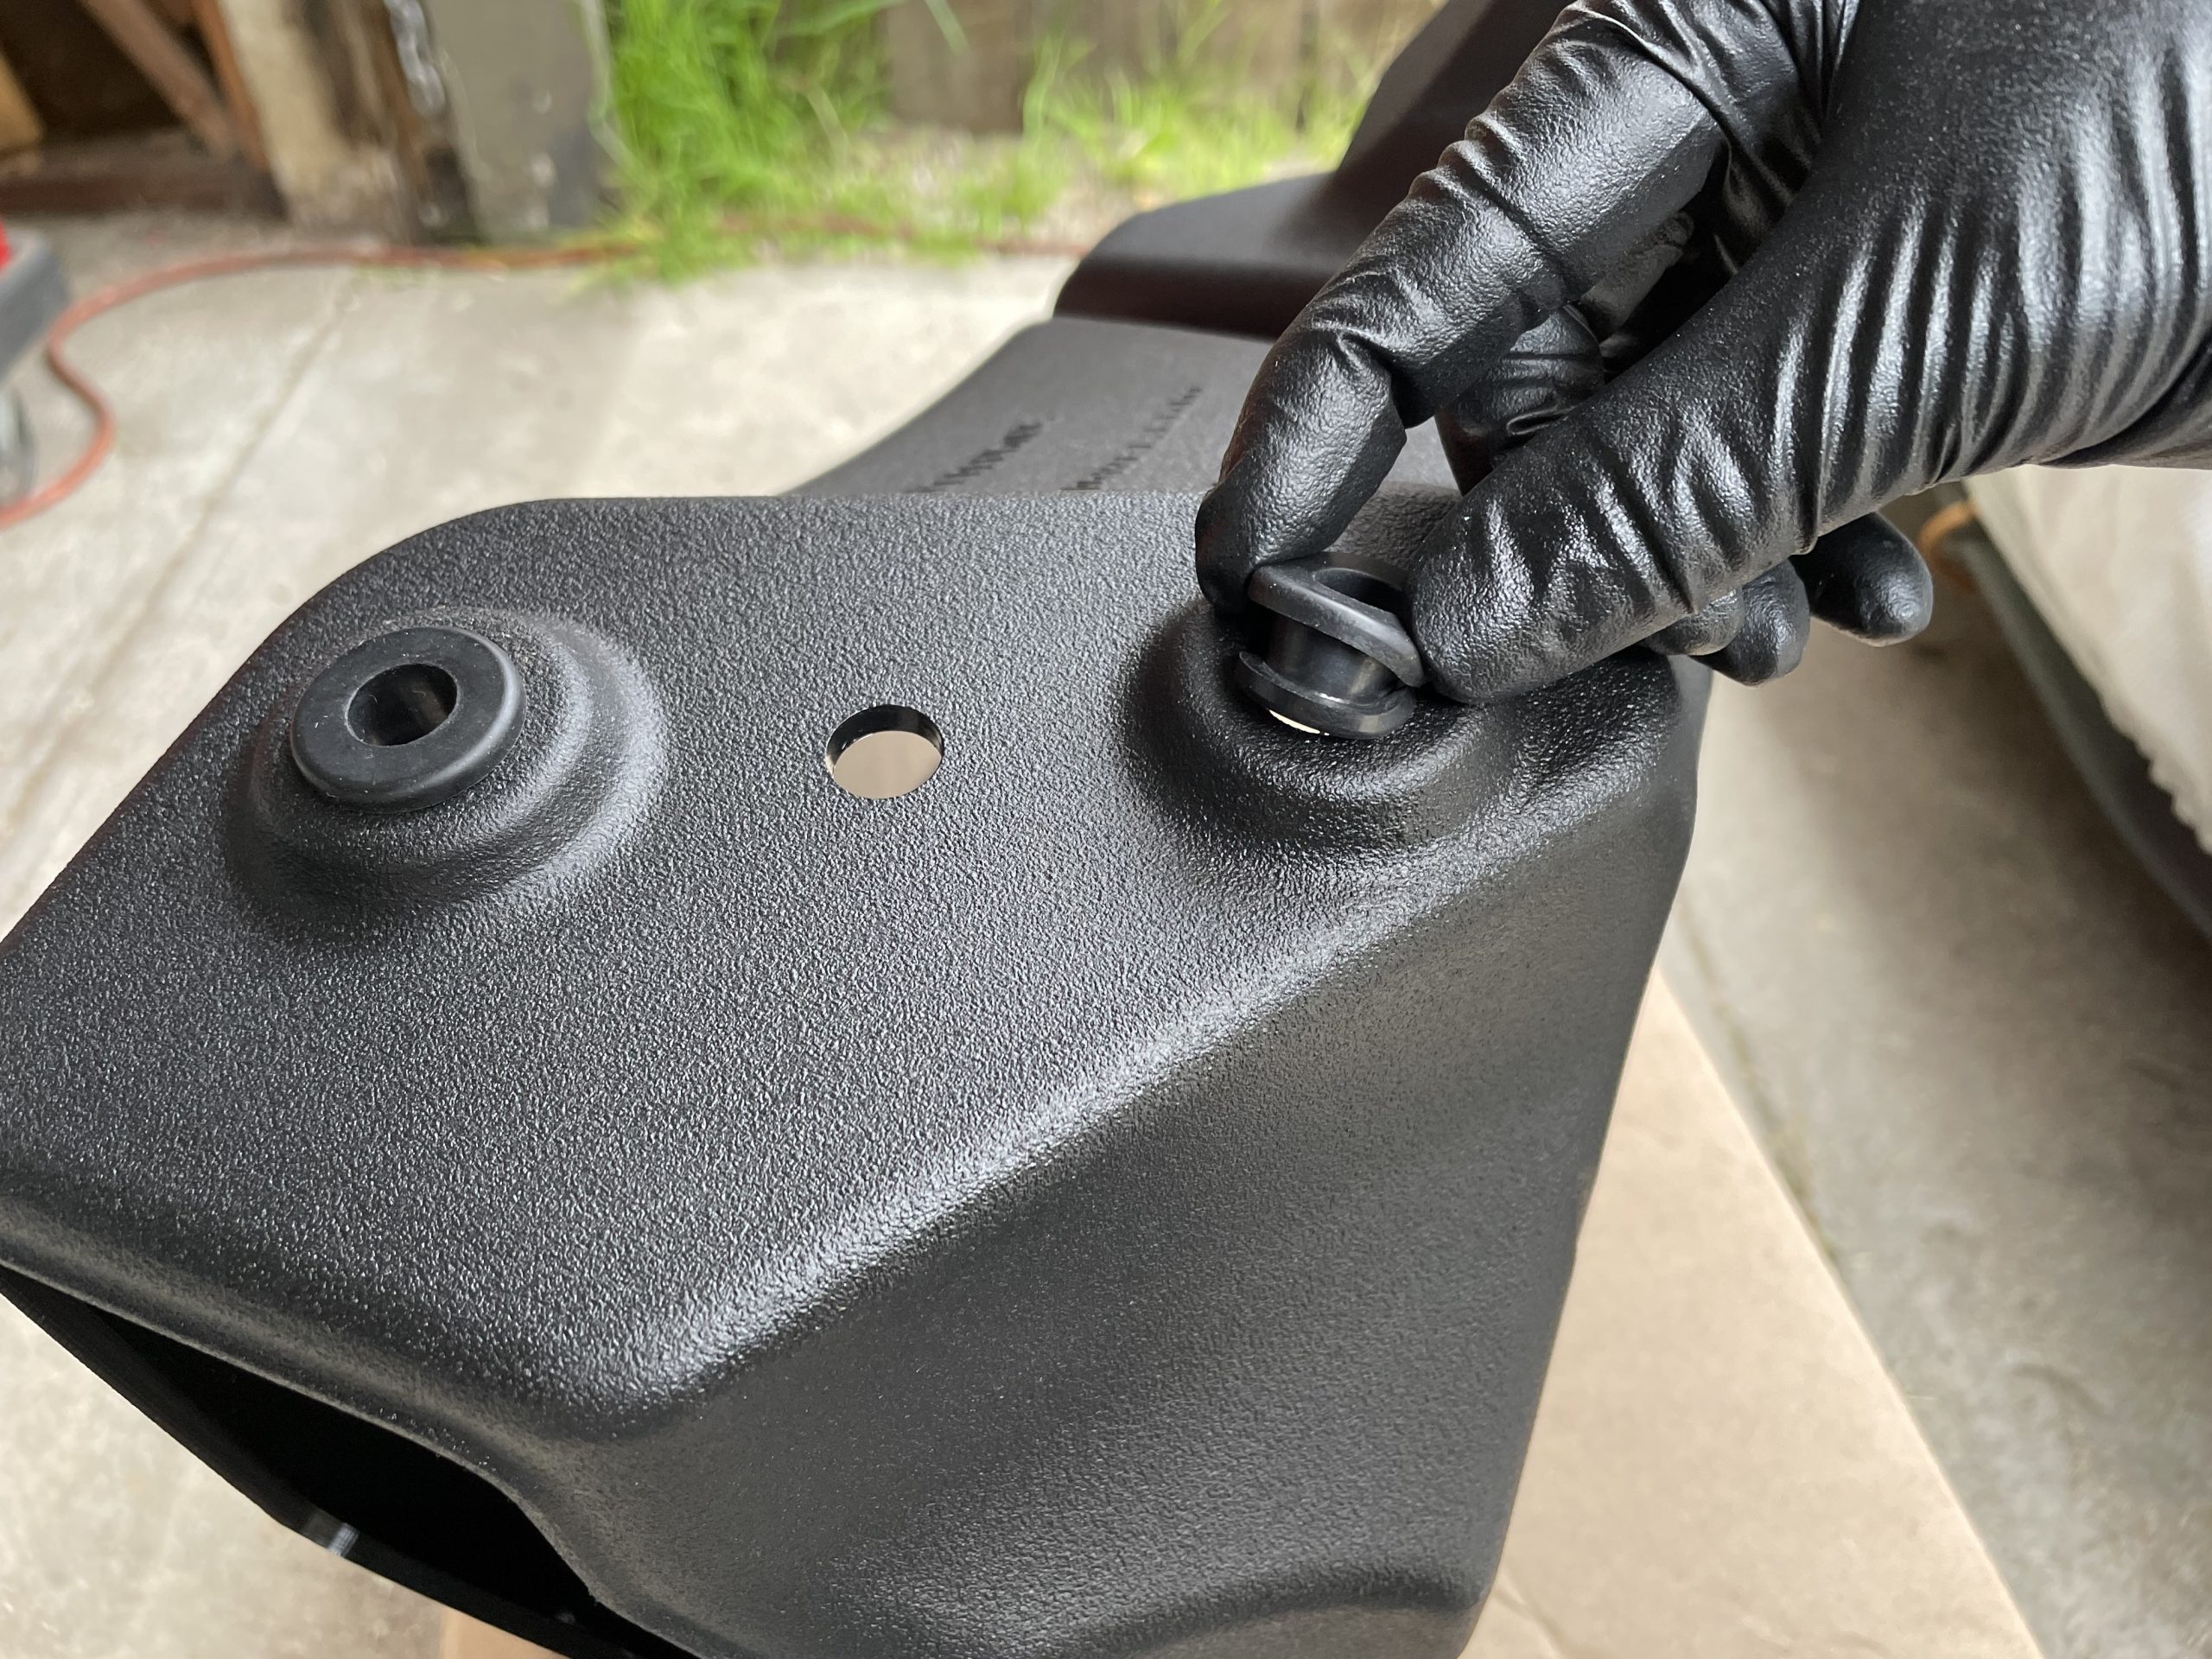
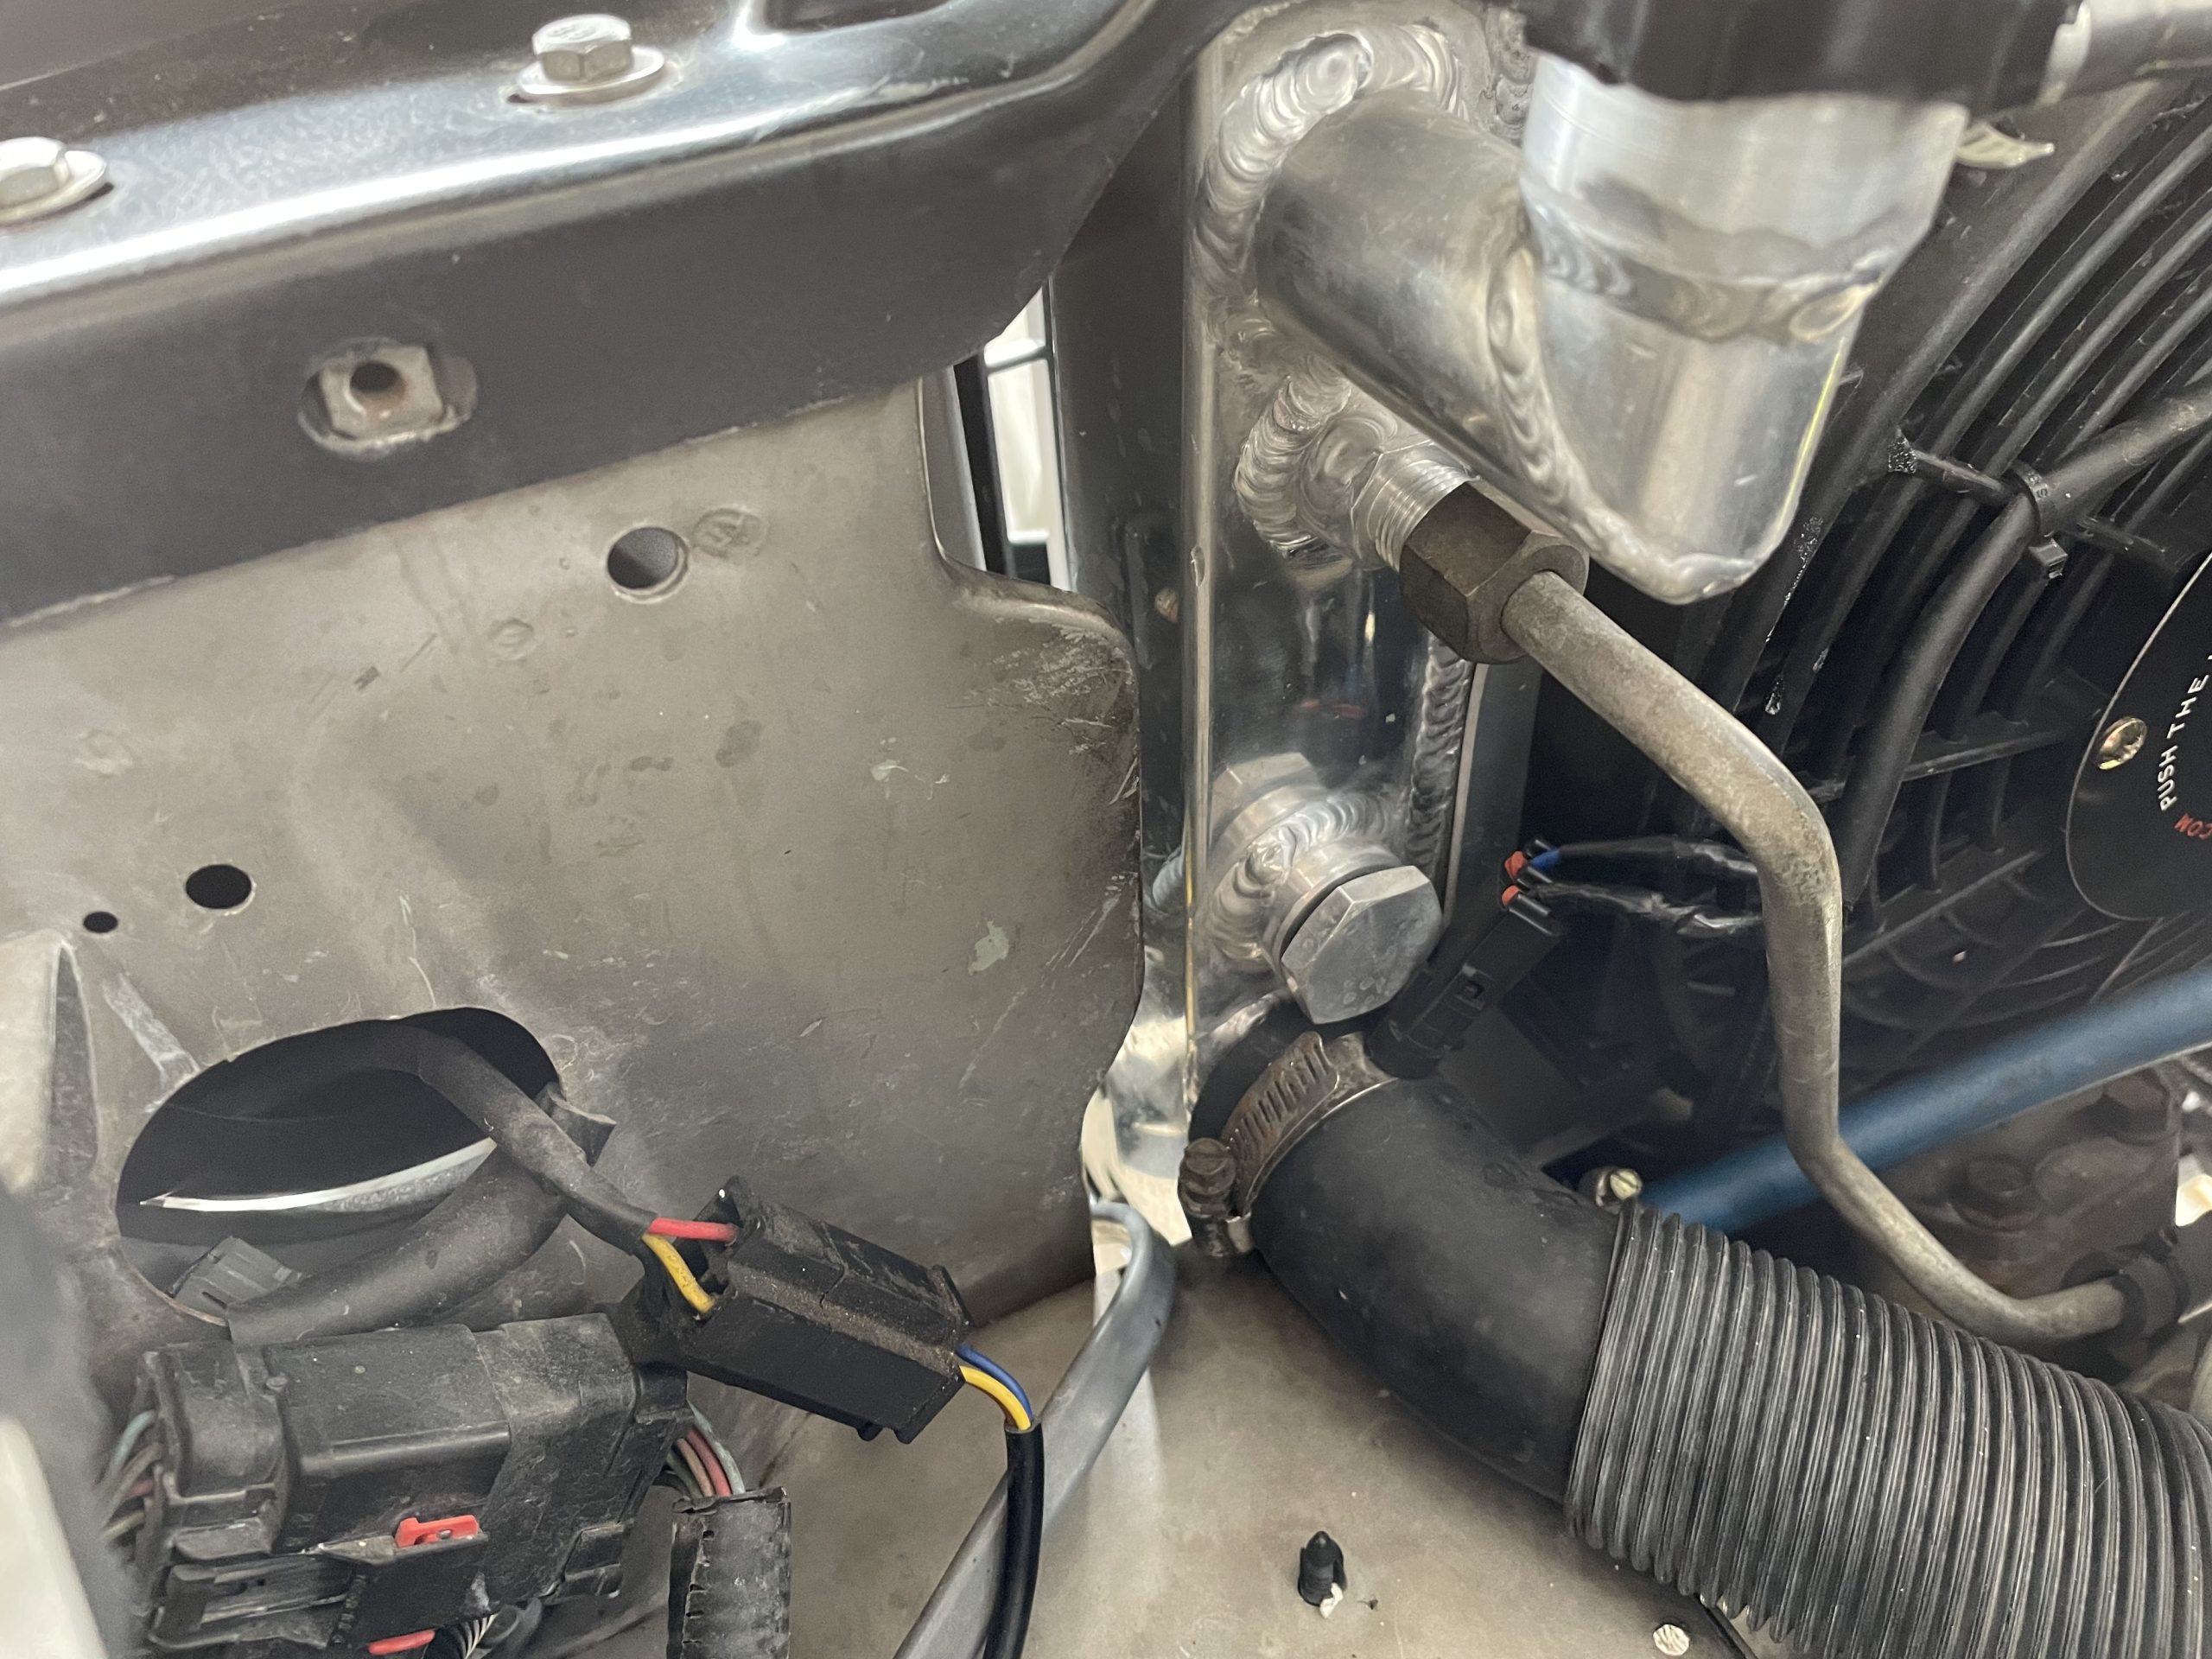
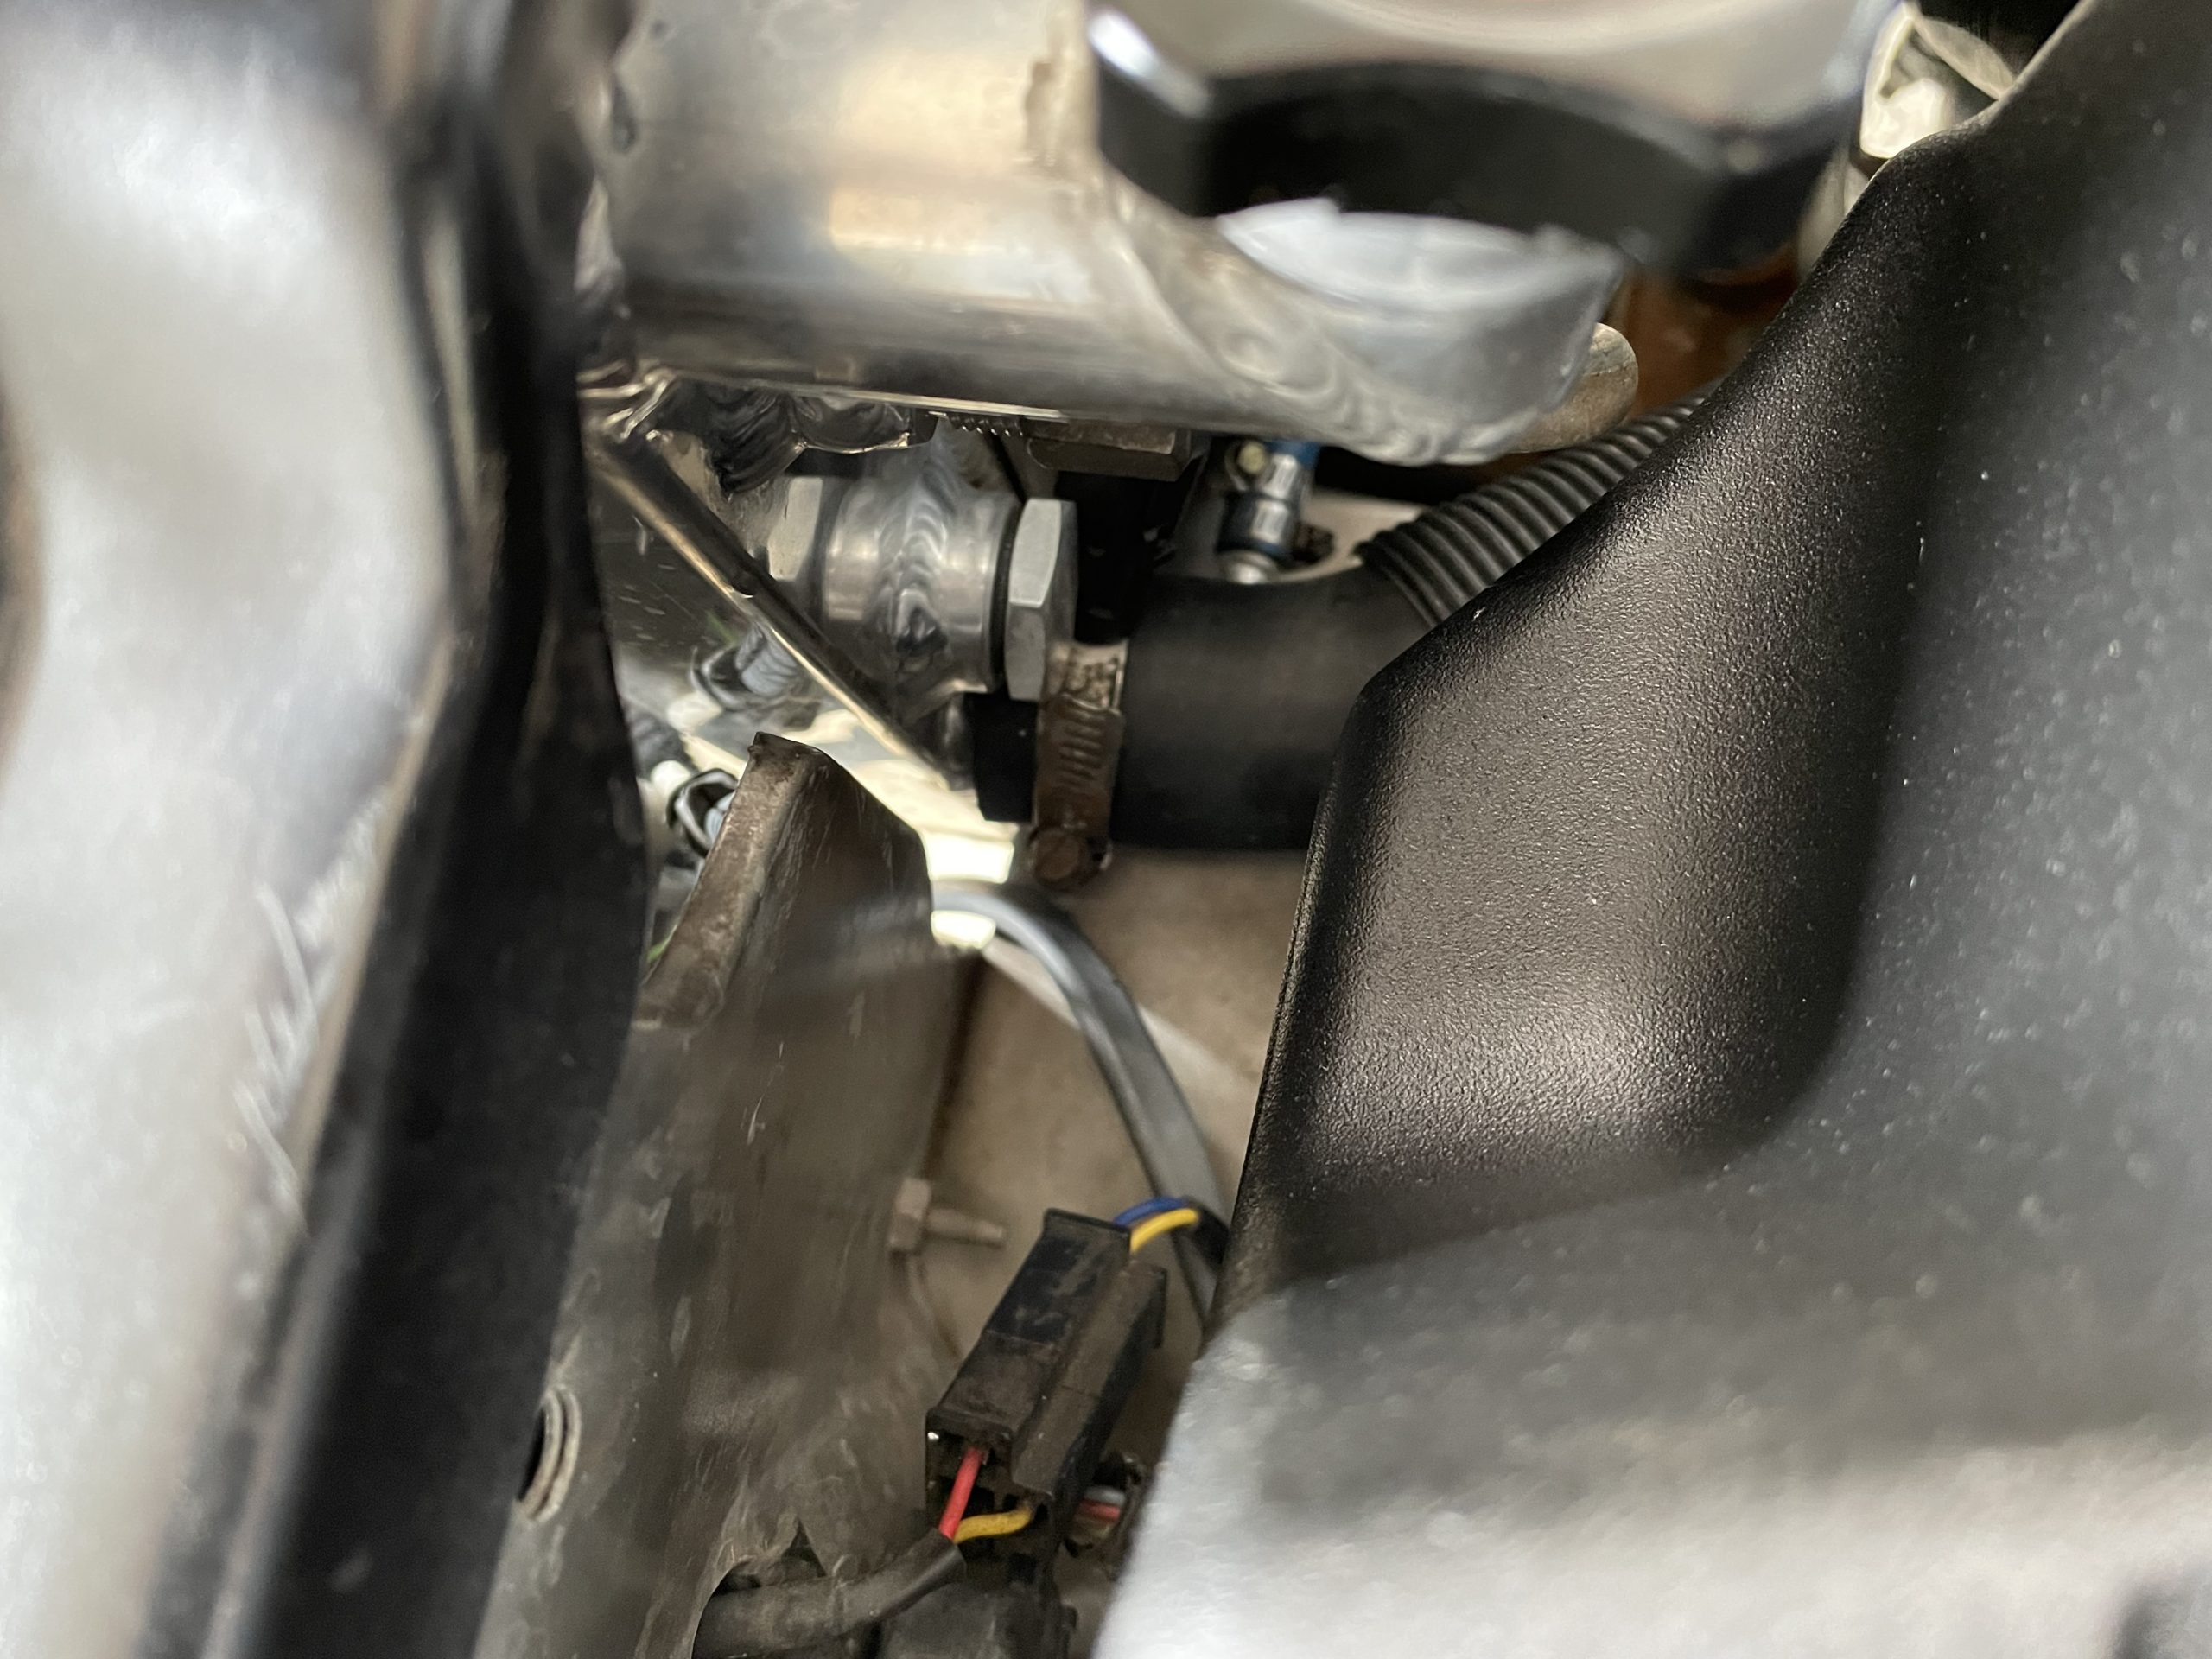
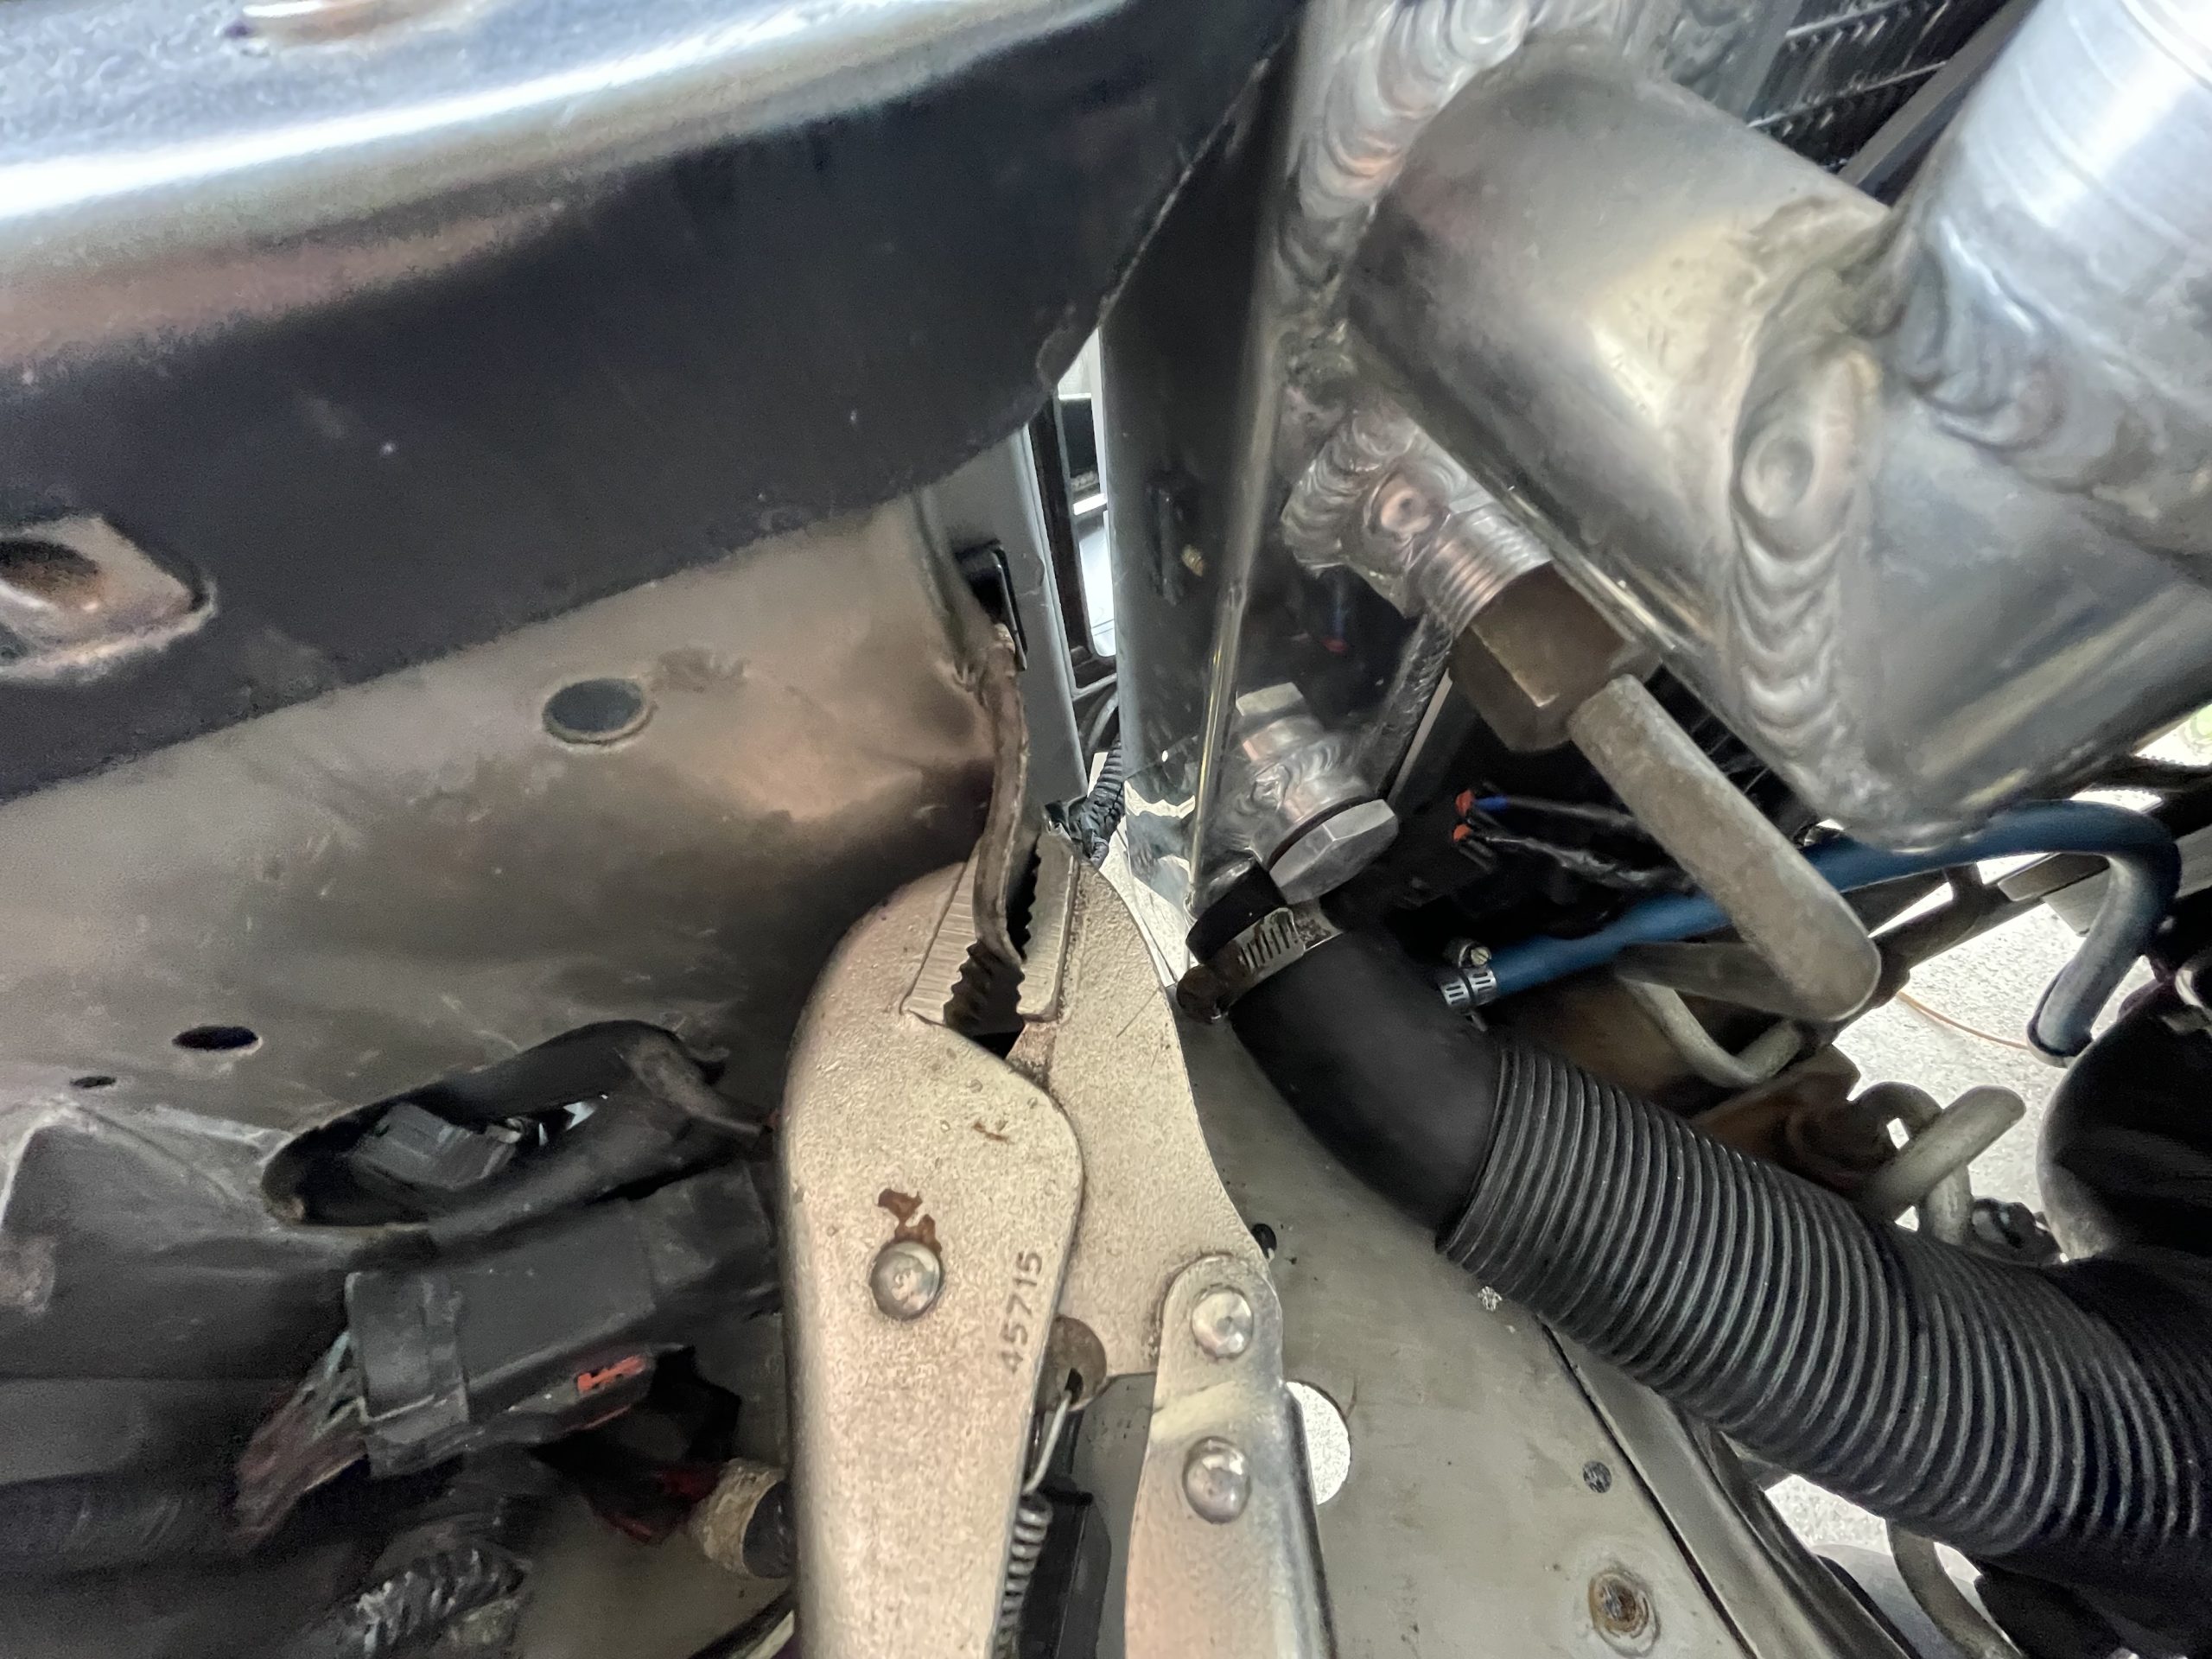
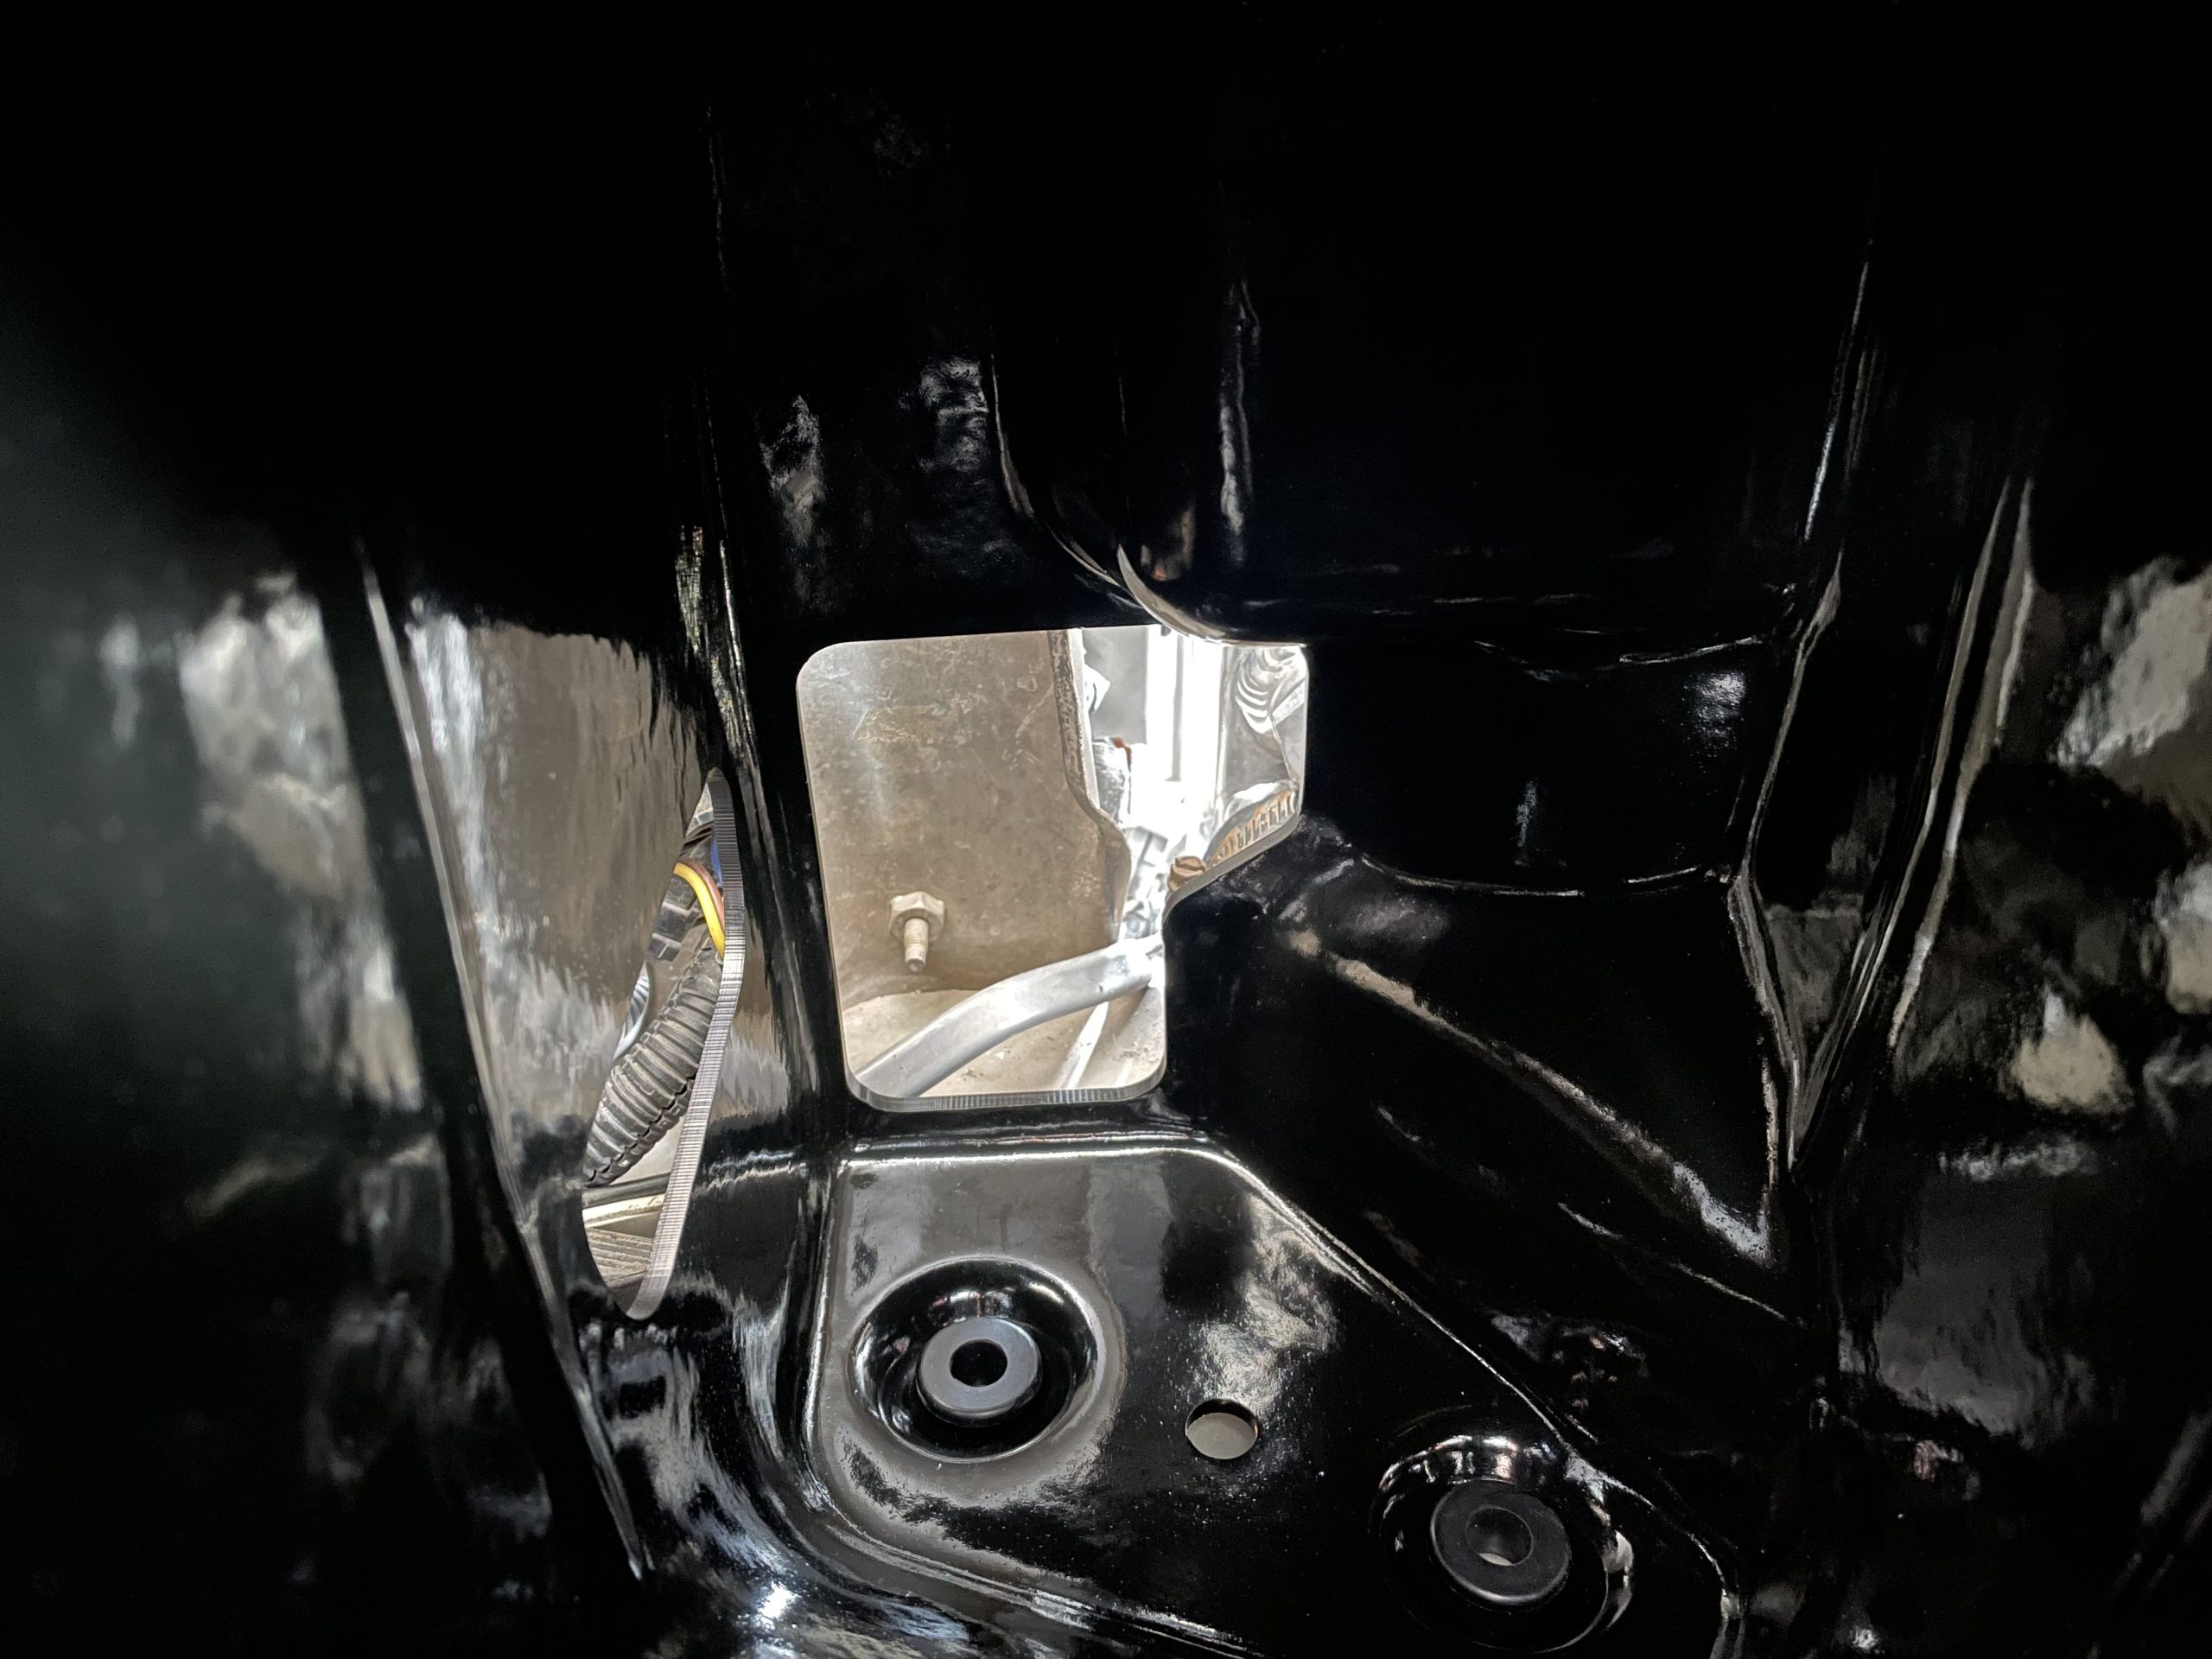
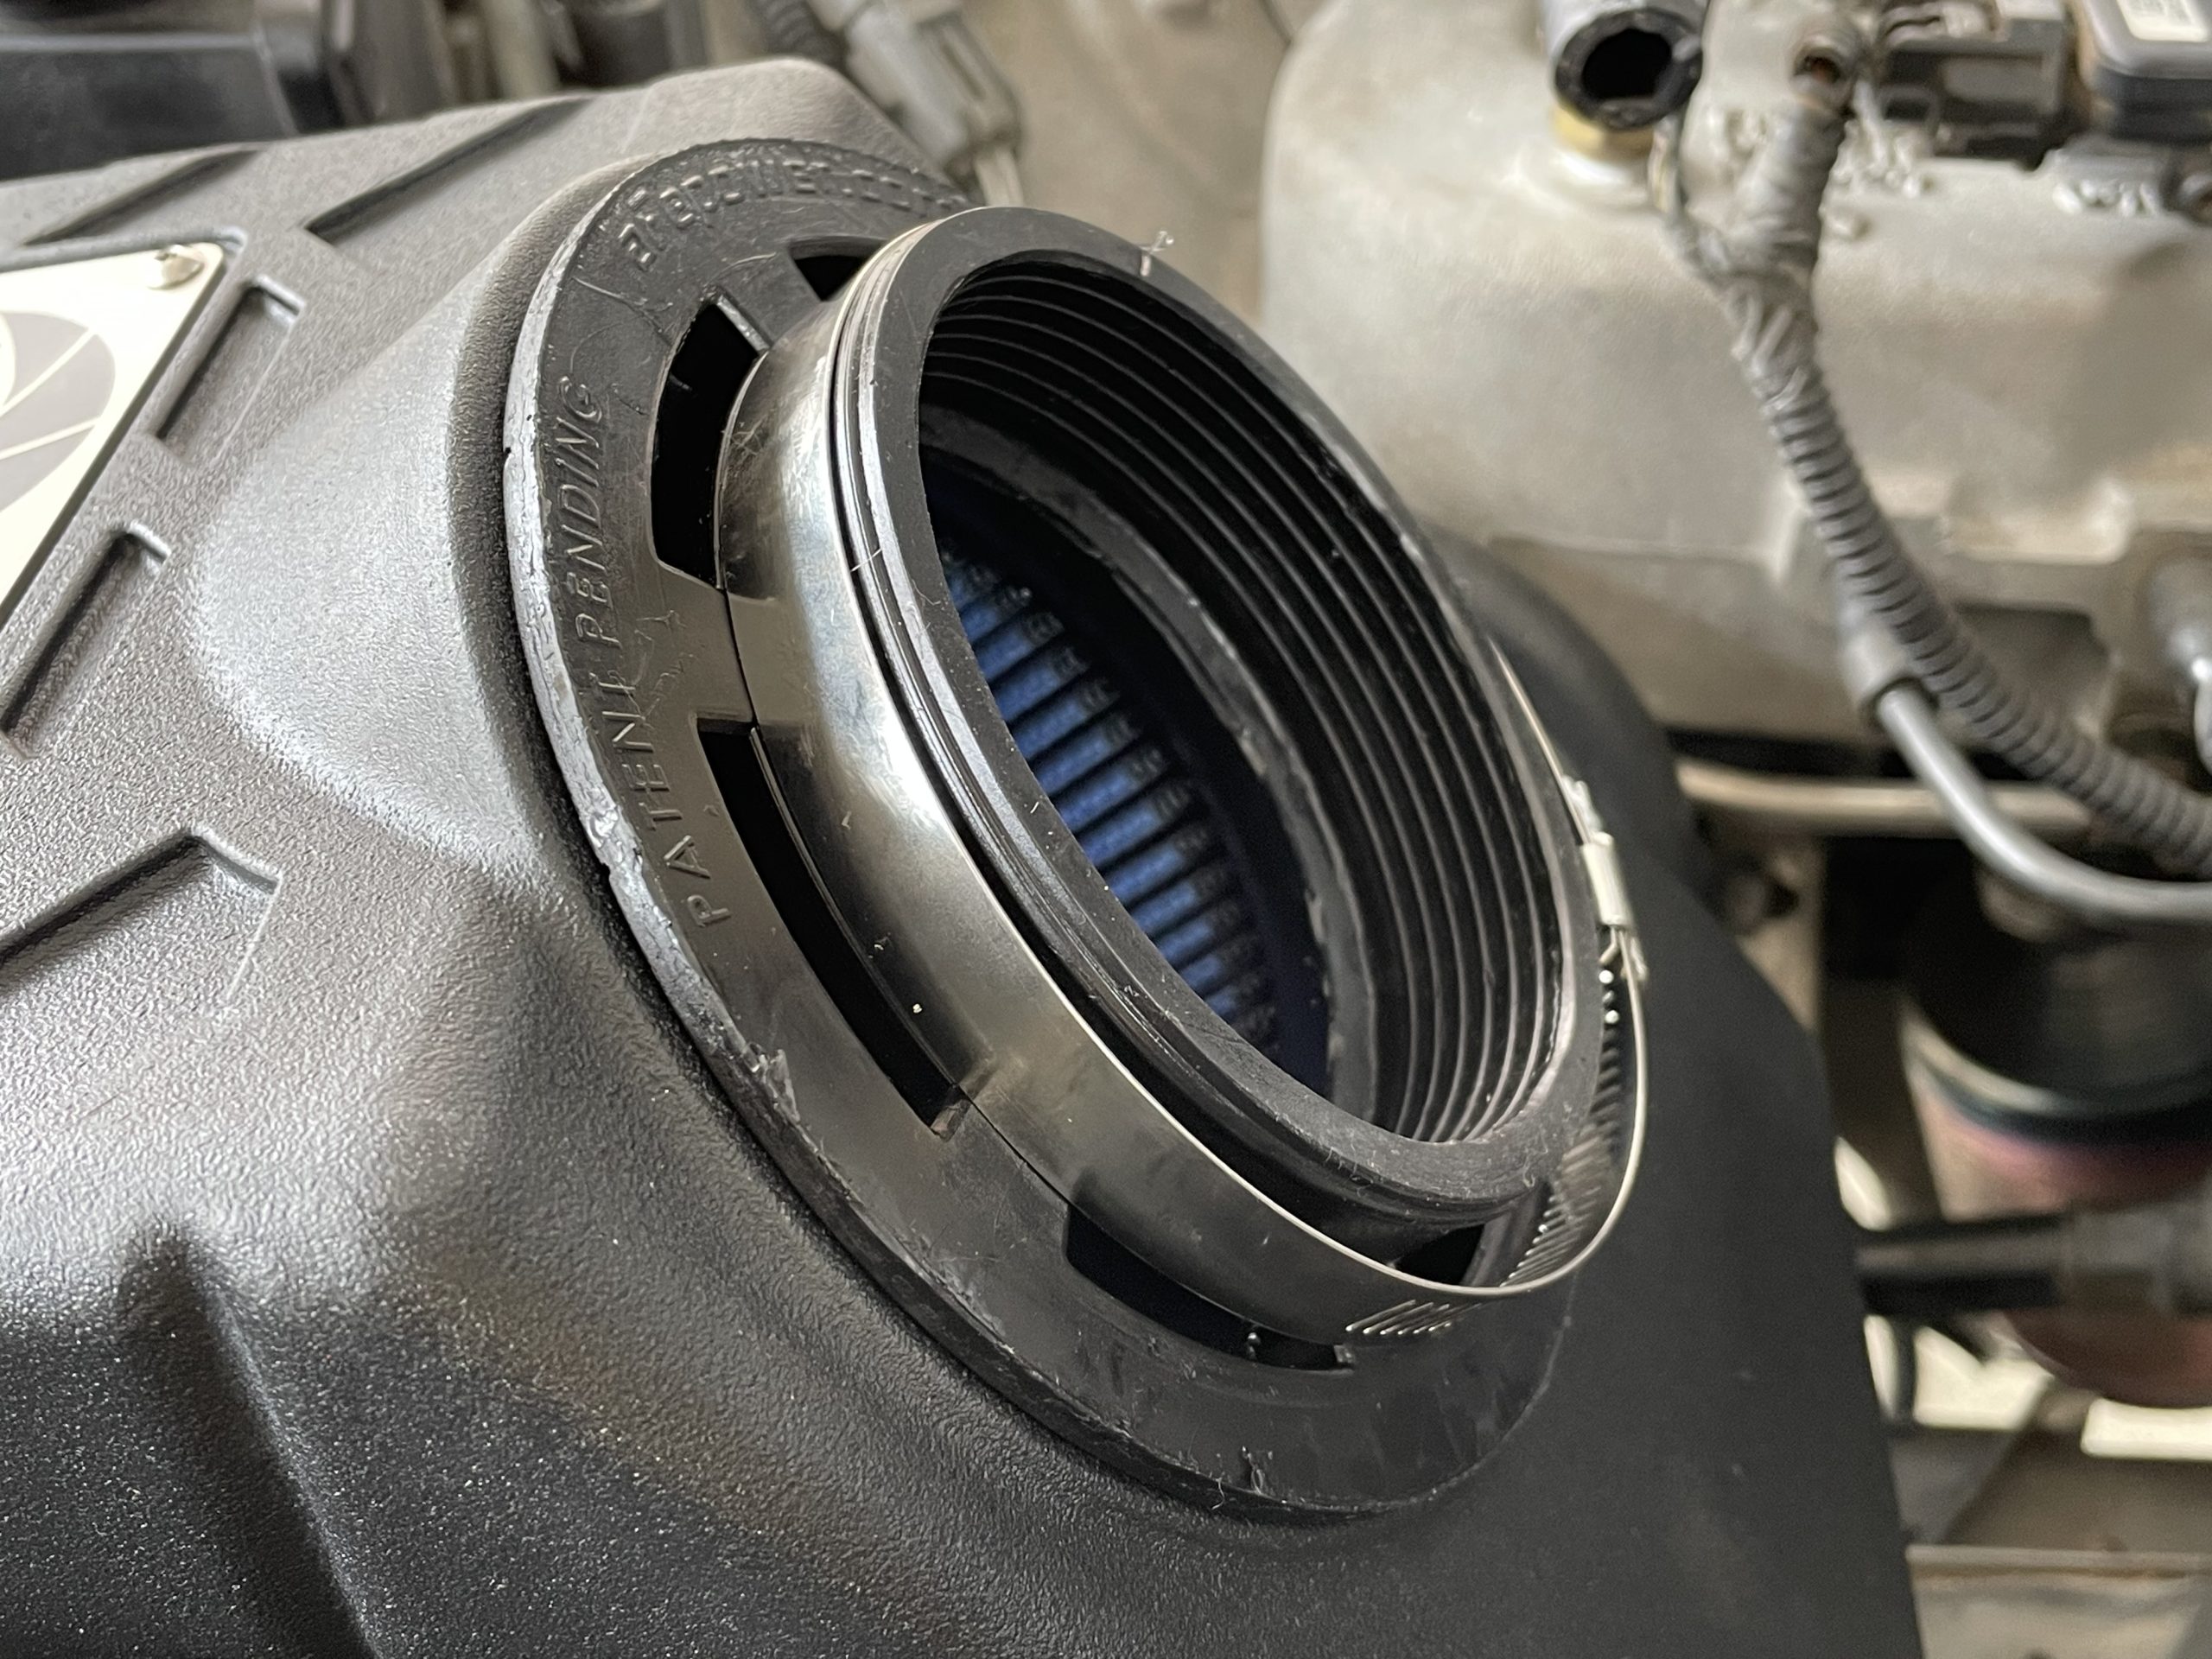
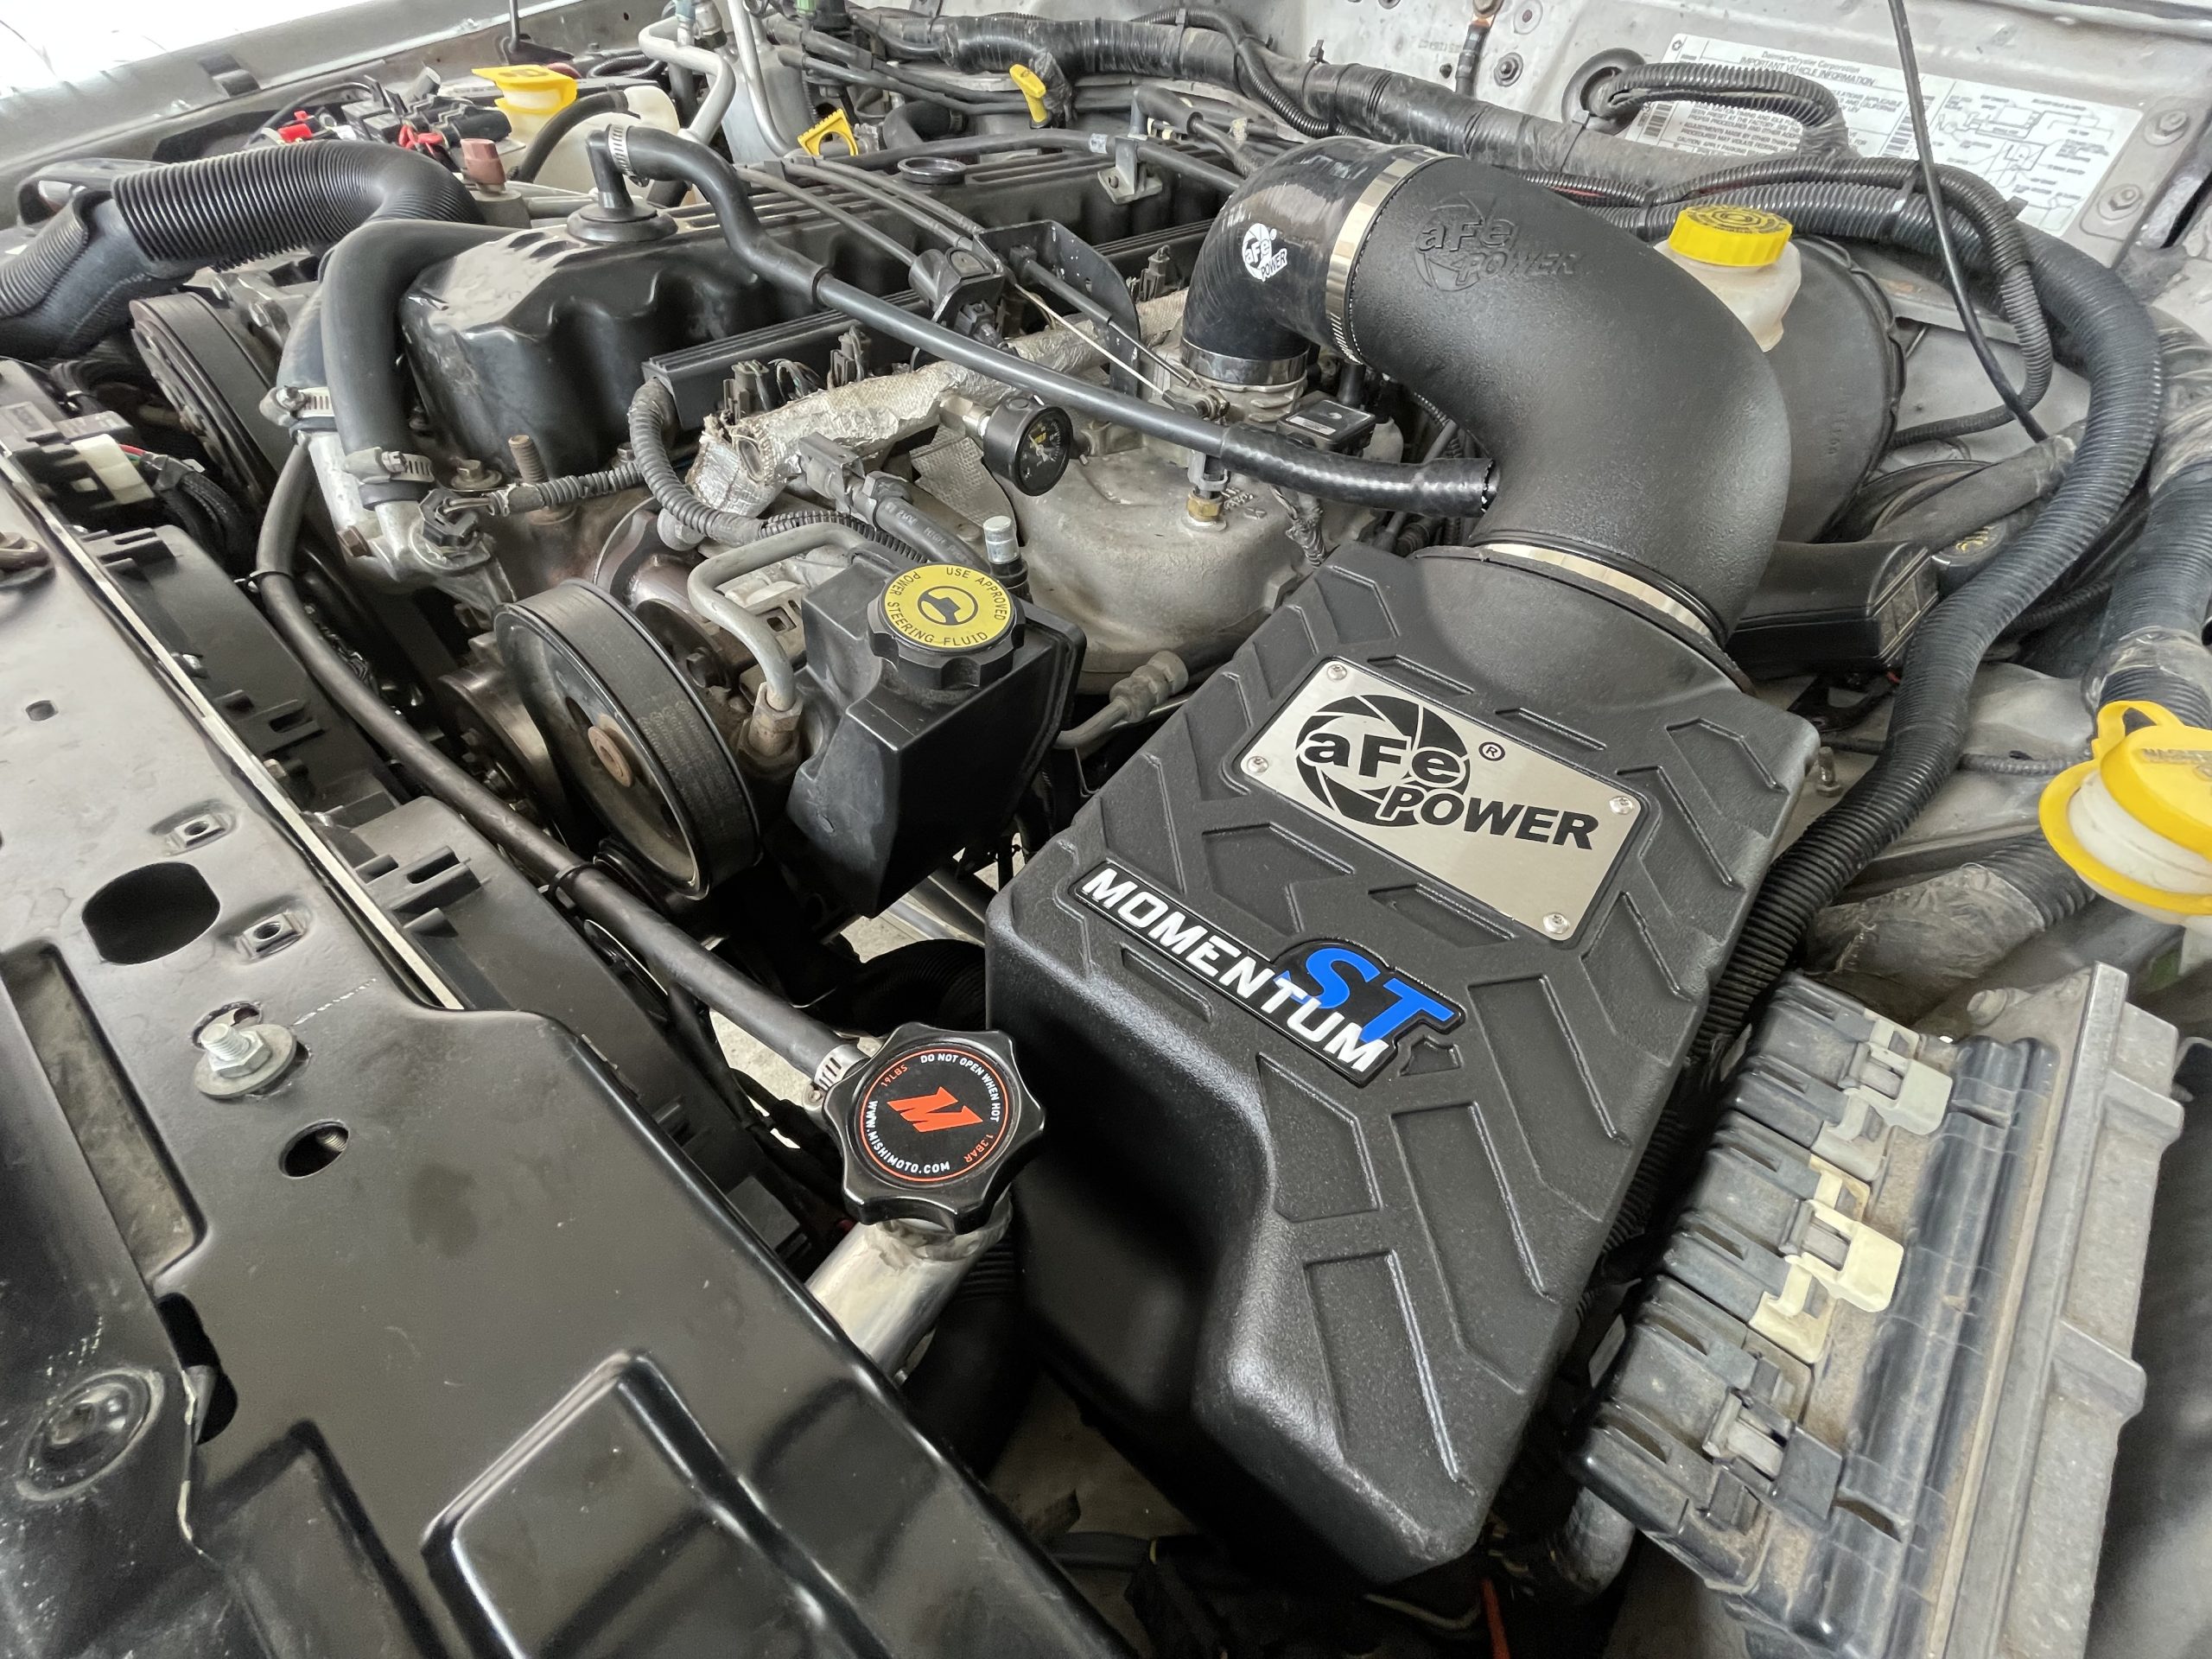
We should be clear, there’s nothing horribly wrong with the stock airbox for the low demands of the 4.0L. However, there is room for improvement, and it’s all about making it easier for the 4.0L to inhale on the intake stroke. (Image/Christopher Campbell)The factory air box has an inlet that pulls air from the little gap between the headlight and the radiator. Well, it’s at least pointed towards the gap to gather the coolest air possible. Our intake upgrade will be the last thing we install, but we’re removing the stock stuff first to make working room. (Image/Christopher Campbell)Per aFe testing, the flow numbers for the stock Cherokee airbox with a standard paper panel filter is about 230 cfm at 7 inches of H2O. That’s not terrible, but that’s also the best possible flow with a new filter. This number drops quickly with use. (Image/Christopher Campbell)Engine air flow is determined by the sum of all the restrictions in the air path. One key to gaining power from air flow is to minimize disruptions and obstructions to achieve laminar air flow, which means that the air is flowing smoothly in a largely parallel path. This convoluted section of the stock intake tube basically creates speedbumps for airflow. Removing it just requires unclipping the band that snugs it to the throttle body. (Image/Christopher Campbell)Whether you’re upgrading the air intake system or not, we highly recommend removing the airbox to gain some valuable room under the hood for the exhaust upgrades. The three bolts at the bottom are all that hold it to the inner fender. Also worth noting, the dust patterns indicate that our air filter may not be making a very tight seal. (Image/Christopher Campbell) Like many straight six engines, pulling the exhaust manifold on the 4.0L requires removing the intake as well because they share a common gasket and mounting bolts. Our gasket is looking a little rough around the edges anyways. (Image/Christopher Campbell)To pull the intake, we have to disconnect the transmission TV cable and throttle cable. The TV cable will slide off if you pull it forward. The throttle cable will pop off with a small amount of prying. (Image/Christopher Campbell)While not totally necessary, we opted to pull our throttle body off the intake for a thorough cleaning and a new gasket. (Image/Christopher Campbell)Speaking of airflow, the stock throttle body can be bored from 58mm to 63mm by a qualified machinist, which is actually the diameter of the opening on the intake manifold. We’ll be looking to make this upgrade down the road as well. (Image/Christopher Campbell)On the side of the intake manifold are several vacuum lines and a wiring harness mount that need to be pulled as well as a mounting tab for the fuel line. All will slide right off, and fuel line mount takes a 10mm wrench. (Image/Christopher Campbell)To remove the fuel line, you’ll need a 3/8 inch quick disconnect tool. We recommend relieving the fuel pressure via the Schrader valve on the rail before doing this. If you have a fuel pressure gauge occupying that port like us, unscrewing it slowly will also relieve pressure. (Image/Christopher Campbell) The bracket that holds both cables also needs to be removed from the intake. A 10mm wrench will get this one, but we recommend a deepwell 10mm socket for the second. Once loose, it can just be set aside on the opposite side of the engine. (Image/Christopher Campbell)With the fuel injector harness unclipped from the injectors and set aside, we can finally get a good look at the row of upper bolts for the intake and exhaust. From the look of that grime, we might as well throw a valve cover gasket on while we’re at it. (Image/Christopher Campbell)This graphic from Banks Power provides an overview of the mounting bolt placement for the intake and exhaust, as well as the suggested removal sequence and install torque sequence. To remove the intake, but not the exhaust manifolds, we want to leave bolts 6, 3, and 7. Those will hold the manifolds in place as we slide the intake off. (Image/Banks Power)In a few locations, a ratchet with a couple of extensions and a universal joint will work surprisingly well. (Image/Christopher Campbell)In other spots, you’ll need a good wrench. Once you remove all the intake bolts (except 6, 3, and 7), the intake will slide off and expose the factory exhaust manifold. (Image/Christopher Campbell)Next up are the pre-cats and Y-pipe. These are only present on 2000-01 Cherokees with California emissions, so if you have an earlier Cherokee (or 49 state emissions) you’ll have a longer factory manifold here. Besides improving exhaust flow, we’re swapping out our converters because they’re showing signs of clogging via an intake vacuum test. We’ve also noted overall sluggishness and low mpg. If present, the upper oxygen sensors should be removed and set aside. (Image/Christopher Campbell)The second set of oxygen sensors for 2000-01 Cherokees is on the bottom side of the pre-cats. These should also be removed and set aside. We’re paranoid, so we marked each sensor to put it back in the same location. (Image/Christopher Campbell)Before you get started on the bolts that attach the pre-cats to the exhaust manifold, soak them down with your favorite penetrating oil. A combination of extensions and universal joints, and a gear wrench will work to access the bolts. Get them loose, but don’t completely remove them yet. (Image/Christopher Campbell)Before completely removing the pre-cats bolts in the exhaust manifold, it’s a good idea to unbolt the intermediate pipe. This is the one piece of Cherokee exhaust that isn’t currently reproduced with nice mandrel bent tubing. Good thing ours is in good condition with no dents or rust holes. (Image/Christopher Campbell)With the pre-cats and intermediate pipe removed, the factory exhaust manifold will still be hanging on the head by three bolts. Back these off and the two-piece manifold with slide off. (Image/Christopher Campbell)Time to unbox new parts, and this definitely describes how we were feeling! (Image/Christopher Campbell)We enjoy the humorous Easter Eggs Gale Banks includes on this his packaging. (Image/Christopher Campbell)This beautiful piece of 400 grade stainless steel is the Banks TorqueTubes System for 4.0L equipped 2000-01 Jeep XJ Cherokee, 1999-2001 Jeep Grand Cherokee, and 2000-06 Jeep Wrangler. There isn’t a lot of space to work with thanks to the pre-cats, but Banks engineers were able to develop a tuned header that boosts both torque and horsepower. (Image/Christopher Campbell)Cherokee manifolds are prone to cracking near the collectors for various reasons, most of which have to do with worn and sloppy engine, transmission, and exhaust mounts. Banks engineers know this and the TorqueTubes header was designed with increased strength at the common points of cracking. (Image/Christopher Campbell)The TorqueTubes flange is a half inch thick, double welded, and machined dead flat and precisely fitted to resist warping and cracking at the head. We’re hoping this means no header leaks ever. (Image/Christopher Campbell)Here’s the TorqueTubes primary tube vs the factory manifold. Note the second flange weld inside the tube. The Banks tubes are also sized and shaped to match the 4.0L exhaust ports. (Image/Christopher Campbell)Our head surface was surprisingly clean under the original gasket. A green Scotch-Brite pad was enough to have the surface ready for the new Banks gasket. The studs at mounting positions 6 and 7 and the two locating dowels on the bottom row will hold it in place. (Image/Christopher Campbell)Make sure you see this embossed print over mounting position 3 facing outward towards the TorqueTube to ensure a good seal. (Image/Christopher Campbell)Look at those gorgeous tubes! The same studs will serve to locate the TorqueTube. Lightly tightening the bolt in position 3 between tubes three and four will keep it secure while fitting the intake manifold. Note the heat shield over the diver side motor mount. You will definitely want to keep this in place to protect the mount, but it may require a little bending to clear the TorqueTube. (Image/Christopher Campbell)Install bolts 1, 2, 4, and 5 from the diagram about three turns into the engine block. These will help locate and support the intake manifold. (Image/Christopher Campbell)Guide the intake manifold onto the cylinder head dowels, then loosely install all remaining intake/exhaust factory bolts. (Image/Christopher Campbell)Be sure the TorqueTube and intake manifold sit flush as bolts are tightened. If you see any gap or misalignment here, verify that the dowel pins are properly aligned in the intake manifold. Torque all exhaust and intake manifold bolts to 25 ft.-lbs. in the same sequence shown above in image #15. (Image/Christopher Campbell) (Image/Christopher Campbell)Time to tackle the rest of exhaust! This rear catalytic converter exists mainly to just help clean up whatever the pre-cats don’t catch. They’re usually not working that hard and aren’t even monitored by the emissions system. They are a restrictive older style of catalytic converter, so there are exhaust flow gains to be had by upgrading. (Image/Christopher Campbell)Worth noting here, the exhaust hanger on the transmission mount is the only thing holding up the exhaust from the header all the way to behind the muffler. This mount needs to be in good shape to offer good support and some flexibility to the system. Worn hangers with aged rubber can put stress on the system and cause cracks. If yours is original, we strongly suggest replacing it with a new rubber mount. (Image/Christopher Campbell)Choosing the right catalytic converter can be tricky, it’s not always as easy as just picking the year, make, and model. Believe it or not, there are often multiple certifications on the same vehicles in the same model year. One of the best way to make sure that you get the catalytic converters that are correct for your vehicle is to use Magnaflow’s online search. We’ll show you why this is an important verification step. You’ll start by entering the basic data about your vehicle, a 2000 Cherokee Classic in our case. (Image/Magnaflow)This is the screen where things start getting much more granular to your specific vehicle and where it’s registered. Ours is an original California emission vehicle and is currently registered in California. This is important for two reasons. One, the requirements for emissions are different per state, and two, specifications can be different per vehicle. (Image/Magnaflow)Here’s an interesting twist that we weren’t expecting. There are two Engine Family Numbers (EFN) for the same model year Cherokee with two distinctly different emissions certifications. This means that there are different converters for each EFN that cannot be mixed, or the result will not be emissions compliant. (Image/Magnaflow)What’s going on here? Well, all vehicles sold in the United States have a unique drivetrain identifier usually referred to as an Engine Family Number (EFN). This number determines the specifications and installed emissions control equipment. Because vehicles can have several different configurations, it’s important to check this number to ensure you get the correct parts. According to the Model Year 2000 Green Vehicle Guide on FuelEconomy.gov, Cherokees with an EFN ending in 2130 received an air pollution core of 2, while Cherokees with and EFN ending in 2230 received an air pollution core of 1. This means the emissions classifications are distinctly different and components cannot be mixed. (Image/California Air Resources Board – CARB)The Vehicle Emission Control Information label is what will display the EFN and is typically located somewhere in the engine compartment in a clearly visible position. For our Cherokee, it’s on the driver side cowl near the brake booster. This diagram shows some other typical locations for the Vehicle Emission Control Information label. (Image/California Air Resources Board – CARB)If you’re fortunate enough to have a California emissions Cherokee with EFN 2230, Magnaflow has you covered with beautiful direct bolt-in converters that will exactly replace your factory parts. If you have a Cherokee with an EFN that ends in 2130, Magnaflow still has your converters, but they will be a weld-in style requiring reuse of the original Y-pipe. For this article, we’ll be working with the more user friendly, and more common, 2230 EFN that has direct bolt-in options. (Image/Christopher Campbell)Here’s the original rearward catalytic converter vs. the new Magnaflow 50-state legal version. Not only is there a huge size difference, the Magnaflow is less than half the weight, thanks to a much more efficient modern catalyst design. Note, this is a universal converter that has been CARB approved for the XJ Cherokee, so there is an unnecessary oxygen sensor port that will require a plug. (Image/Christopher Campbell)Here is the factory pre-cat Y-pipe vs. the Magnaflow 50-state legal version. While not as ideal for power as a full-length header, these cats are more efficient and better flowing than the original. They’re also unfortunately slightly larger in diameter. It’s just enough of an increase to make installing the nuts quite a bit more challenging. Both sets of converters are eligible for Magnaflow’s recycling program and could be worth a nice chunk of money. Get the details on the converter recycling program here. (Image/Christopher Campbell)In addition to the improved cats, the Magnaflow Y-pipe features a much better collector design that helps improve exhaust flow. (Image/Christopher Campbell)Back underneath the Cherokee, let’s finish yanking out the factory tailpipe. The second exhaust hanger is located near the rear shocks. Note, the factory tailpipe is not mandrel bent, so the internal diameter decreases by as much as half an inch through these bends. (Image/Christopher Campbell)Sliding the hangar out is a bit of a challenge if you’re retaining the rubber isolator. We found that a silicone spray lube and a flathead screwdriver work well to pry it out. (Image/Christopher Campbell)Our rear hangar is obviously a custom piece, but removing this or the factory part only requires removing a single bolt. (Image/Christopher Campbell)Viewing the original tailpipe highlights the Magnaflow kit’s priority on exhaust flow. The mandrel bends do not loose radius, and the curve over the axle is much smoother and less abrupt. The Magnaflow is also significantly longer than our system, so we’ll see how that works with our custom rear bumper. (Image/Christopher Campbell)Our restrictive factory muffler is long gone and was replaced by a chambered style muffler. However, we didn’t care for the drone we experienced at freeway speeds, so we’re looking forward to the additional muffling from the longer case Magnaflow. It also features a straight-through design which helps improve overall exhaust flow. (Image/Christopher Campbell)Another comparative view of the mandrel bends and smoother curve in the Magnaflow tailpipe vs. factory. (Image/Christopher Campbell)Because we’re doing a Banks header at the same time as our Magnaflow pre-cat Y-pipe upgrade, we have two sets of hardware to choose from. The factory style flag bolts that came with the Magnaflow are what we’re going to use, but either set will work. (Image/Christopher Campbell)We found that one of the bolts from the Banks kit worked perfectly to help locate the Y-pipe. Unfortunately, snugging them is going to be mostly a wrench affair due to the larger pre-cat diameter. Don’t fully tighten these bolts yet, you’ll need some slack in the system to install the rest. (Image/Christopher Campbell)The view from below illustrates why a ratchet with an extension won’t get you very far. Even with a universal joint, there isn’t enough room. No complaints otherwise, the Y-pipe fits nicely. (Image/Christopher Campbell)This connection is where you’ll need the wiggle room on the Y-pipe the most. These flanges need to meet flush with zero bind on either side. The Magnaflow Y-pipe comes with a new gasket. (Image/Christopher Campbell)Time for the muffler. Since our Cherokee system has a rear catalytic converter directly ahead of the muffler, this adapter flange is required. The muffler slotted to allow the clamp to squeeze it tight to the adapter. (Image/Christopher Campbell)The rear flange of the converter and the adapter on the muffler pull together to create a leak-free seal without a gasket. (Image/Christopher Campbell)This is how the rear catalytic converter should look when installed. These CARB approved converters are permitted for use in several vehicles, so you may have seen them before. They’re also not valuable to thieves due to their very low quantity of rare materials—hopefully they know that. (Image/Christopher Campbell)The Magnaflow muffler case is the largest you could easily squeeze into a Cherokee with stock exhaust configuration, which is exactly what we want. The straight through flow design doesn’t sacrifice any power, but it does keep the exhaust note mellow and should eliminate drone at highway speeds. (Image/Christopher Campbell)Things are a little snug as the pipe snakes up and over the axle. We found that flipping the exhaust hanger to face towards the passenger side instead of the driver side helped greatly. (Image/Christopher Campbell)We have fuel tank armor, which was a major contributor to our lack of space. Some light persuasion from our BFH (big freaking hammer) gave us enough room to slip the tail pipe through and allow for some wiggle. (Image/Christopher Campbell)The Magnaflow kit does not include a rear mount. We dropped by our local parts store to pick up this basic exhaust hanger. One 90 degree bend and it fit like a glove. (Image/Christopher Campbell)The Magnaflow kit includes this stainless-steel exhaust clamp. Even after grinding large portions off both sides, it just wasn’t going to clear the leaf spring and the fuel tank armor. (Image/Christopher Campbell)Our easy solution will be to swap in a Summit Racing stainless steel exhaust clamp with a notch cut into it for the hangar. These things are plenty strong and will provide the maximum room available. (Image/Christopher Campbell) We absolutely love the way the 3.5 inch, polished, and double walled Magnaflow tip looks! If you’re a hardcore rock crawler (we’re not), you may find that you need to trim this back for clearance. (Image/Christopher Campbell)Airbox upgrades on XJ Cherokees are points of extreme division. The stock box is adequate, but we’re going to step firmly on the side of “things can be improved.” Namely, airflow. The aFe Power Momentum ST box can be thought of as an airflow engineer’s redesign of the stock box. It fits in the stock position and still protects the air filter from engine bay heat and excessive dust, while also greatly increasing the engine’s ability to breathe easier. (Image/Christopher Campbell)The Momentum ST features a much larger intake port on the front of the box to allow for easier flow into the box vs. stock. The side port can be left open or be blocked off with the included rubber plug. (Image/Christopher Campbell)Part of the secret of the Momentum’s 13% increase in airflow is the ability to house a massive six inch base x eight inch tall conical filter with a three inch flange. The 5R material included with the kit will offer the best horsepower and mpg results. Since we often road trip our Cherokee long distances to trails and camping, we’ll use this on the street and probably swap on one of aFe’s 10R or Pro Guard 7 filters to protect the engine when we head into any high dust conditions. That will keep our street filter clean and lower maintenance. (Image/Christopher Campbell)aFe’s flow testing of the stock Cherokee paper panel filter vs. the 5R material showed gains of 30 cfm at 7 inches of H2O. The much larger surface area of the aFe filter will also allow it to keep that flow rate much longer as it loads up with dirt. (Images/aFe Power) Remember what we said about air hating turbulence and tight bends? The Momentum ST’s intake tube removes out all of the factory convolutions and makes the curves as swooping as possible to keep air moving smoothly. (Image/Christopher Campbell)Installing the Momentum ST is almost the same process as the stock airbox. These rubber vibration isolators squeeze into the two outer holes. The middle is a drain hole and should be left open. (Image/Christopher Campbell)When people say there’s no true way to get cold air into a Cherokee, this is what they’re talking about. This is the part of radiator core support that the airbox inlet faces. As you can see, there is only a small gap next to the radiator that allows airflow through the grill. (Image/Christopher Campbell)Here’s how the Momentum ST lines up with that gap. We’ve got an idea. (Image/Christopher Campbell)Let’s be clear, this is our hairbrained idea, you do not have to do this to install the aFE Momentum ST. We’re using some locking pliers to bend back the flap on the core support to allow a bit freer flowing air to the Momentum ST inlet. This is surprisingly easy to do and is also completely reversible. (Image/Christopher Campbell)We really don’t want to open up too large of a gap that could allow excessive airflow to go around our Cherokee’s upgraded Mishimoto radiator, so we wedged a pool noodle in the upper section to close off part of the gap and left the bottom section towards the Momentum ST inlet wide open. (Image/Christopher Campbell)Here’s the air cleaner element’s view of the newly opened up core support from the inside of the Momentum ST. Not bad. When in motion, ambient air should easily make it through. (Image/Christopher Campbell)The aFe filter has a proprietary flange that seals it tightly to the Momentum ST box. There’s no chance of dust intrusion here. (Image/Christopher Campbell)The Momentum ST kit includes a length of hose that allows use of the stock crankcase vent tube. We found it fit best with the factory S-shaped vent hose turned this direction. (Image/Christopher Campbell)It takes a little wiggling to get the intake tubes to line up perfectly, but once you have the right English on it, the Momentum ST box fits like factory equipment. It looks great under the hood too. (Image/Christopher Campbell)So, did it work? We drove our Cherokee on the same route from SoCal to Sothern Utah that we took last year to find out. Previously, we found ourselves constantly shifting out of overdrive, and we were never able to really cruise at comfortable freeway speed. On the long grades, we were struggling to maintain even 55 mph. This time, we were able to easily hold 65 to 70 mph at all points and with much less downshifting. The 4.0L felt like it had more power and torque throughout the rev range, it revved higher with ease, and it accelerated from a stop noticeably quicker. The ability to stay in overdrive more often also gave us a solid mpg increase over the 2,000 miles trip. Our intake and exhaust upgrades paired with our previous cooling system upgrades that eliminated the parasitic drag from the mechanical fan netted us 15 to 16 mpg on the freeway when previously we were seeing 11 to 12 mpg. That’s pretty significant given the current cost of fuel—plus the overall driving experience is so much better. (Image/Christopher Campbell)
Christopher Campbell has been heavily involved in the automotive world since he began building his first car, a 1967 Ford Ranchero, with his dad at the age of 14. That started a lifelong passion with custom hot rods and muscle cars. After graduating from Cal State Long Beach, he went to work for HOT ROD magazine as Associate Editor. From there he became Technical Editor at Popular Hot Rodding magazine. Currently he creates freelance content for OnAllCylinders as well as many diverse enthusiast magazine titles such as HOT ROD, Muscle Mustangs and Fast Fords, Mopar Muscle, Super Chevy, Mustang Monthly, and 8-Lug.


Comments