Do you remember when classic Mustang enthusiasts said late-model 1979-93 Fox Mustangs would never be collectable?
Well, there’s nothing quite like the indigestion that comes from eating your own words. The 1979-93 Fox Mustangs are back and hotter than ever.
Why? They’re popular for the same reasons classic 1965-73 Mustangs were 30 years ago — nostalgia. They remind us of our youth. It’s time to reconnect with them.
Fox and SN-95 Mustangs are user-friendly rides to enjoy and cruise in the true spirit of Mustangdom, be it a 1979-93 Fox or a 1994-95 SN-95.
Building More Power in our Ford 5.0L
Nice thing about the Ford 5.0L pushrod small-block V8 engine is its simplicity. No overhead cams to sweat out. It actually has a distributor.
The small-block Ford V8, introduced in 1962 as the “90-degree Fairlane V8” displacing 221 and 260 c.i.d., enjoyed a long production life that spanned four decades making it one of Ford’s most popular performance engines ever.
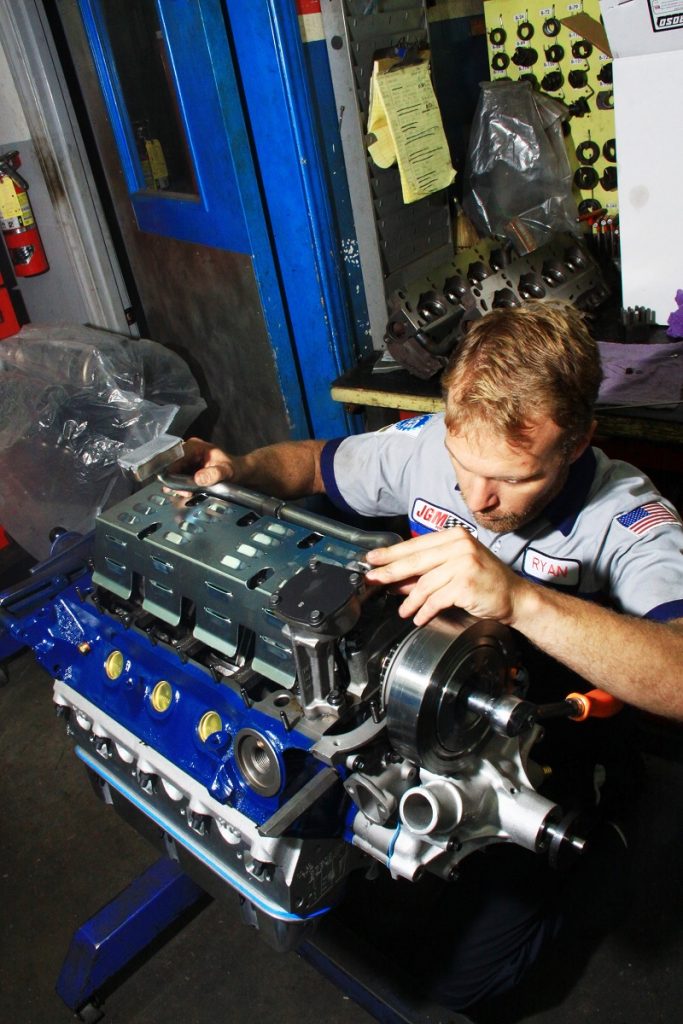
We wanted to understand what we had under the hood of a dusty-dirty-forgotten 1989 Mustang GT convertible snatched from a San Fernando Valley driveway for $500.
When we put it on the dyno, the well-worn 5.0L High Output (H.O.) engine managed 220 horsepower and 230 foot-pounds of torque at the wheels — not bad when you consider how abused this engine was.
This means Ford’s tried and proven 5.0L engine makes 300 hp and 300 ft.-lbs. pounds torque at the crank from the factory. The seller included the car’s original unmolested 5.0L engine with the sale.
We put together a plan to make 400+ hp and 400 ft.-lbs. of torque at the crank by merging great engine building technique with terrific speed parts from Summit Racing.
The result was in excess of 400 hp and 400 ft.-lbs. of torque proven on the chassis dyno at Full Throttle Kustomz in Fillmore, CA along with a custom tune.
We wanted a good streetable Mustang with road manners that we could drive anywhere.
We looked to Air Flow Research (AFR) for off-the-shelf cylinder heads, Crane Cams for the bumpstick and valvetrain, Holley for induction, MSD for ignition, BBK Performance for innovative power adders, Fel-Pro for terrific gasket technology, ARP for fasteners, and Ford Performance Parts for an assortment of speed components.
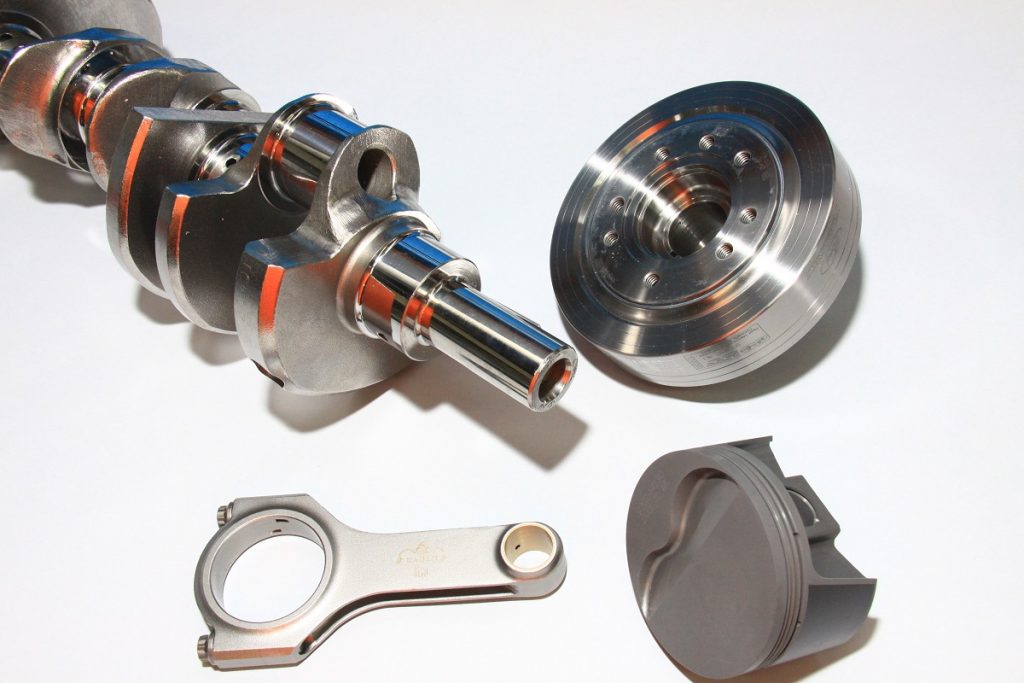
Down under, we reached out to Eagle Special Parts for a 4340 steel crank, H-beam rods, and Mahle coated and forged pistons; and Centerforce for the Dual-Friction clutch and flywheel.
We unbuttoned the Mustang’s original 5.0L H.O. engine, which had a spun rod bearing and a damaged crank.
We hit pay dirt when we discovered that we had a standard bore block and that the heads had never been off. We took this original matching number 5.0L engine and hauled it to JGM Performance Engineering in Valencia, CA.
We’ve assembled a great formula for streetable/weekend racing performance — a balance of brute power on demand and civil street manners for the daily commute.
We wanted a smooth idle along with abundant power when the throttle was pinned. AFR asked us what we wanted in terms of horsepower, torque, and overall performance. Then — AFR went to work in its research and development lab fine-tuning a pair of custom AFR 185 “Renegade” cylinder heads for our blueprinted Summit Racing 5.0L small-block.
To get the desired compression, 10.67:1, AFR shaved the heads to achieve 48cc combustion chambers, then, massaged the ports and chambers along with a nice custom valve job with 2.02/1.60-inch intake and exhaust valves.
The 10.67:1 compression ratio was achieved with .041-inch thick Fel-Pro Perma-Torque #1135 head gaskets right off of the shelf. AFR enabled us to build a 400-500 horse small-block from a 4.030-inch bore and 3.000-inch stroke (306 c.i.d.).
We investigated what Crane had available for this application and came up with a nice grind from an off-the-shelf hydraulic roller with 110-degree lobe centers — .584/.550-inch intake/exhaust, duration at .050-inch 222/226.
For greater valve lift, Crane suggested its Gold 1.7:1 ratio roller rockers along with single-piece .080-inch wall thick hardened pushrods. We have a slightly lumpy idle, which is tolerable at the traffic light, and offers gangbuster power when the light turns green.
When you’re planning 400-500 hp, you want an engine that’s going to stay together at 6,000-6,500 rpm.
We grabbed an Eagle ESP Armor 4340 steel crank with a 3.000-inch stroke off the shelf with H-beam rods and coated Mahle forged flat-top pistons with valve reliefs large enough to clear our cocktail-table-sized 2.02-inch intake valves.
Eagle’s ESP Armor Plate ESP treatment is a revolutionary new surface finishing process developed exclusively by Eagle Specialty Products and is available from Summit. Eagle stresses that this is not a coating. The material you see is the same material on the surface you have always seen — just micro-finished to perfection.
BBK Matching 2.5-inch High Flow Short Mid X Pipe with Cats
Moroso Road Race Oil Pan/Windage Tray/Pick-Up
Speed Pro High Volume Oil Pump
Centerforce Dual Friction Clutch & Flywheel
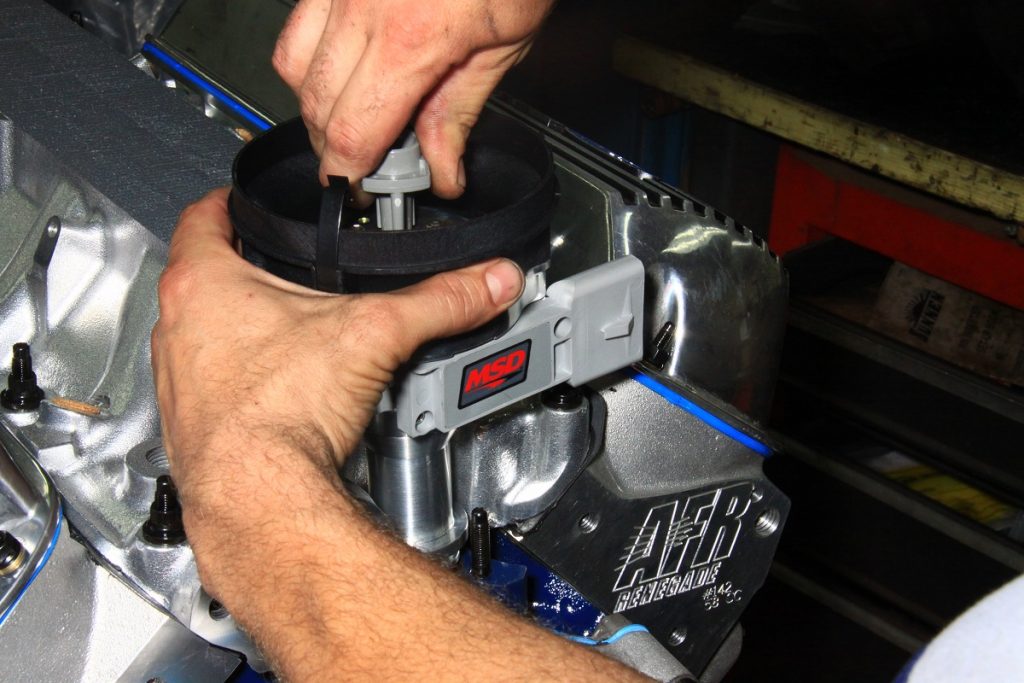
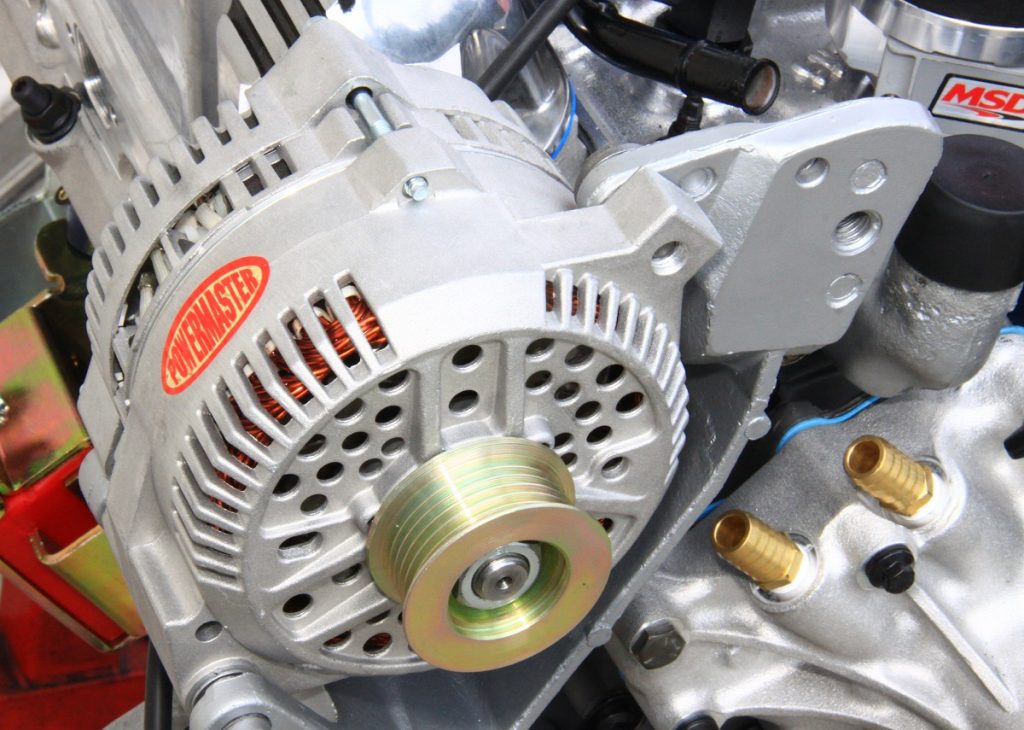
Summit/Powermaster 130-Amp Alternator
Summit Trunk Mount Battery Kit (better weight distribution)
Mishimoto Silicone Cooling System Hoses from Summit Racing
Edelbrock Water Pump
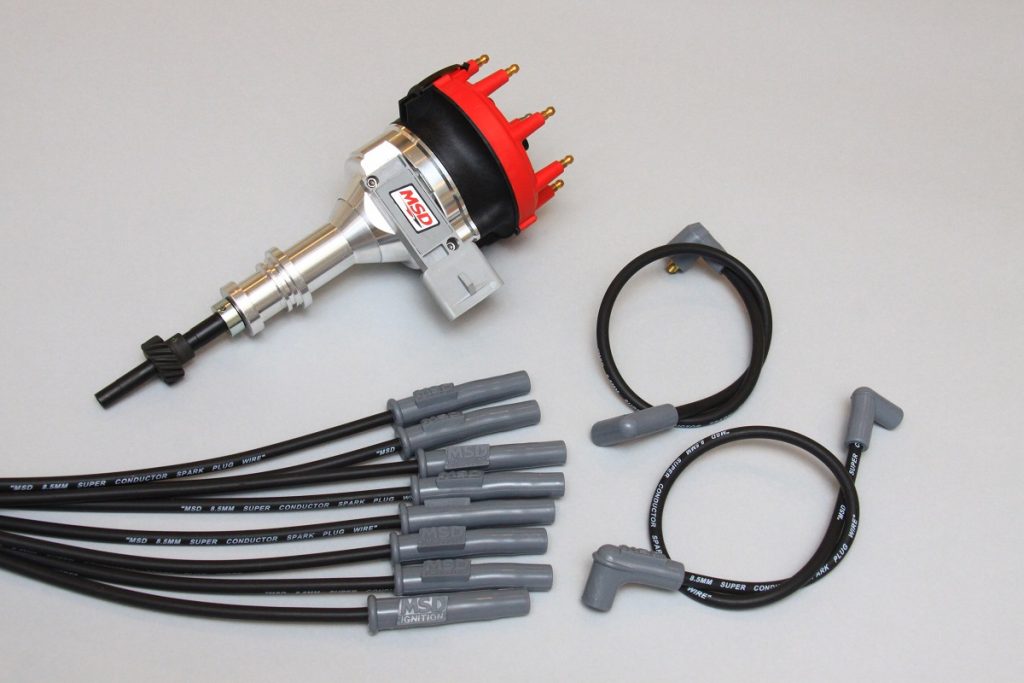
MSD Thick Film Pro Billet Distributor
MSD 8.5mm Ignition Wires
MSD Blaster HVC Ignition Coil
MSD 6AL Ignition Box
ARP Fasteners including Head and Block Studs
Ford Racing Valve Covers (Used and detailed)
Fel-Pro Gaskets throughout
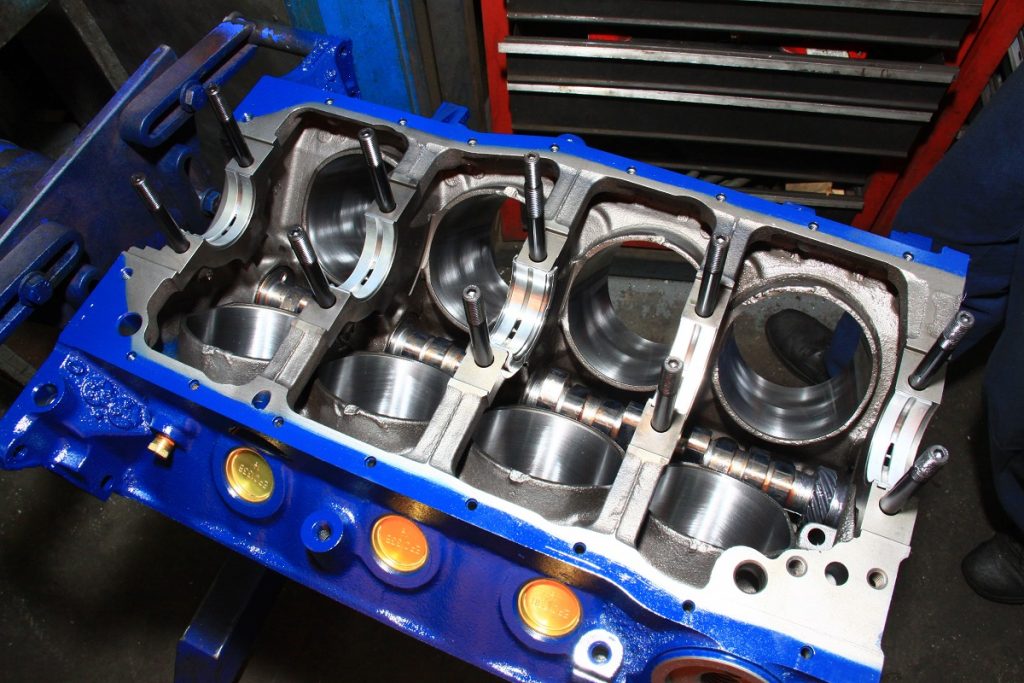
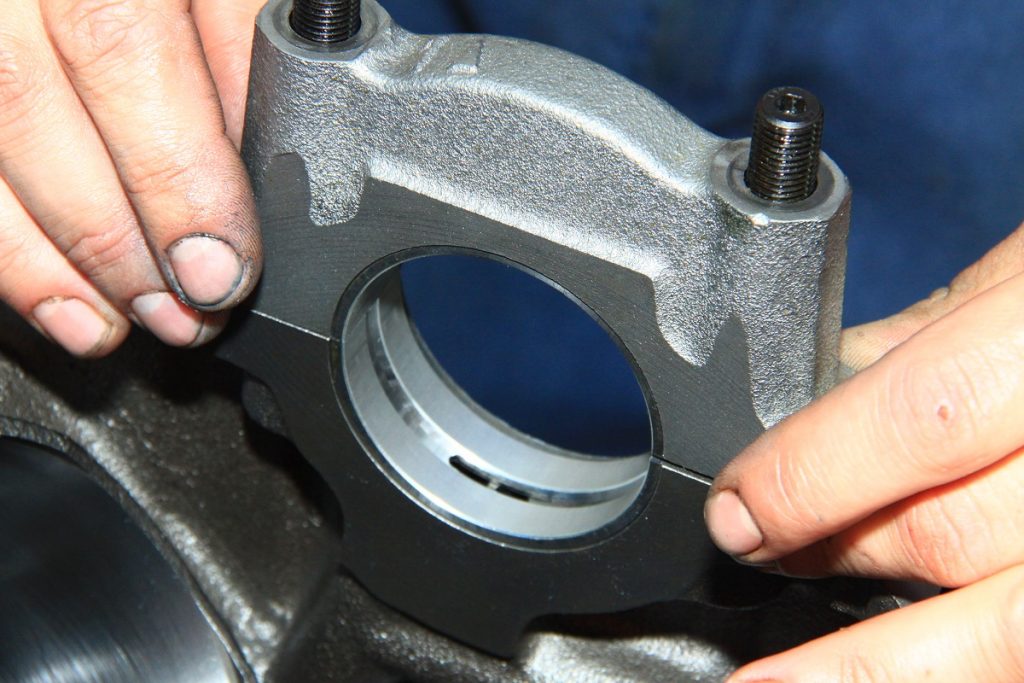
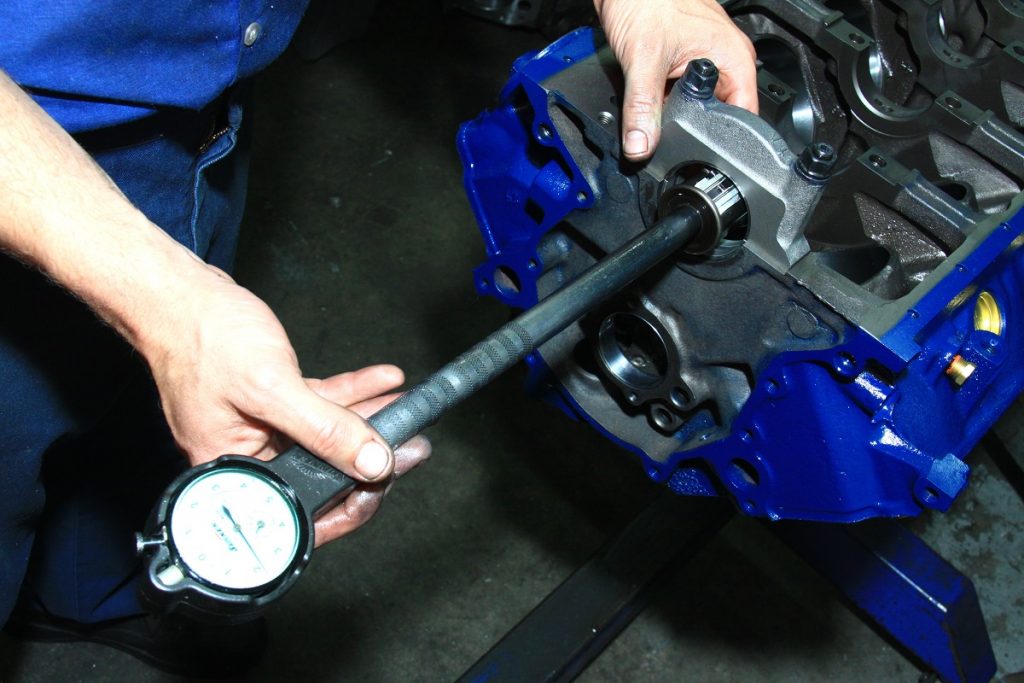
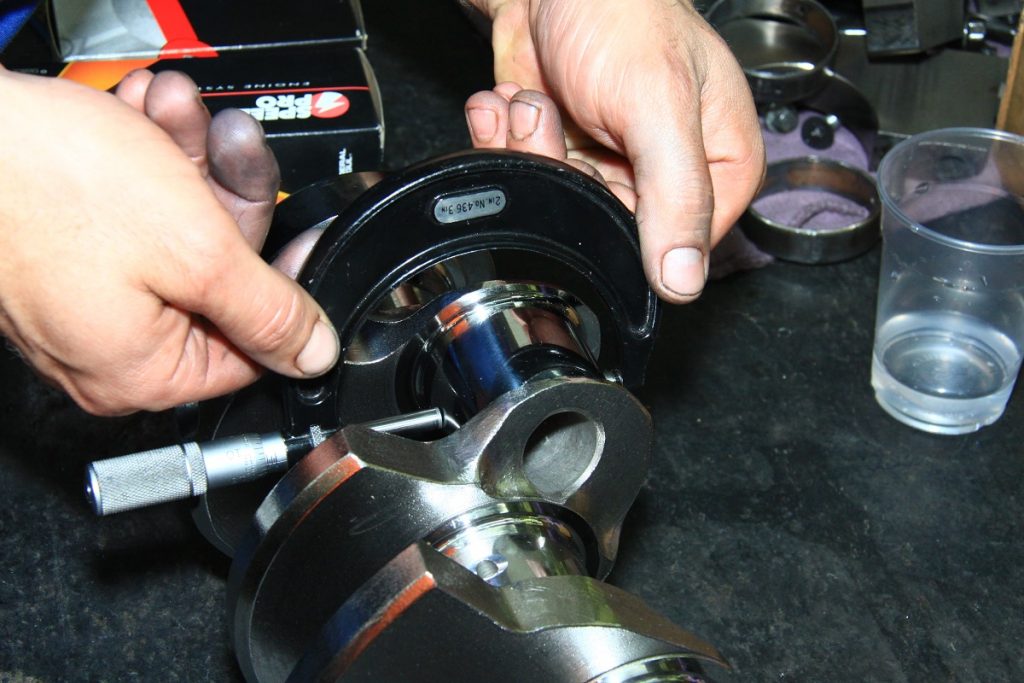
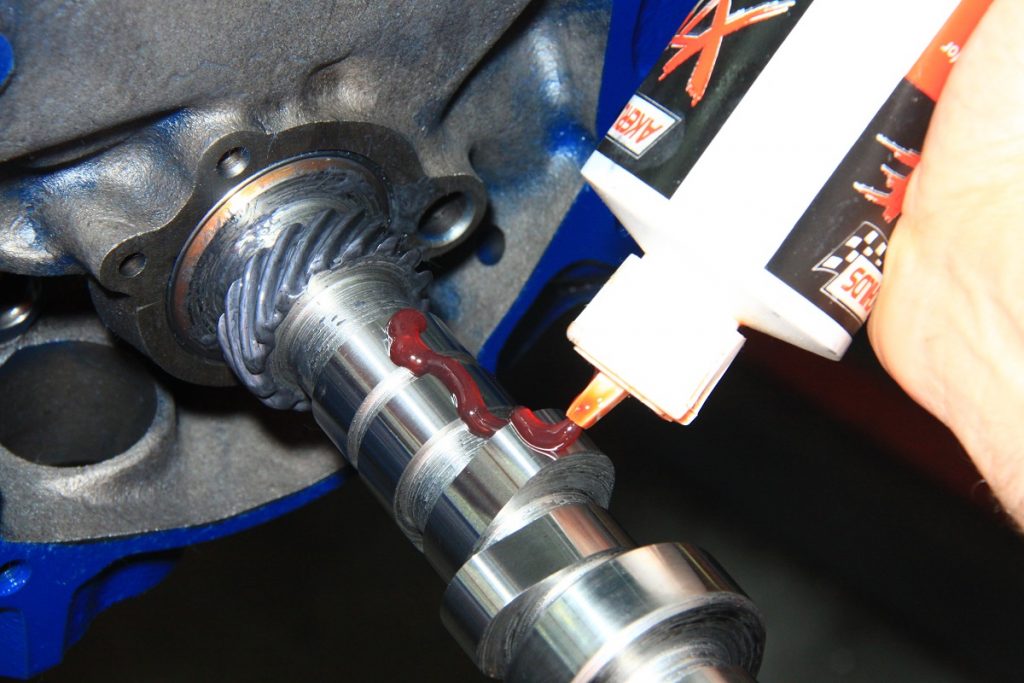
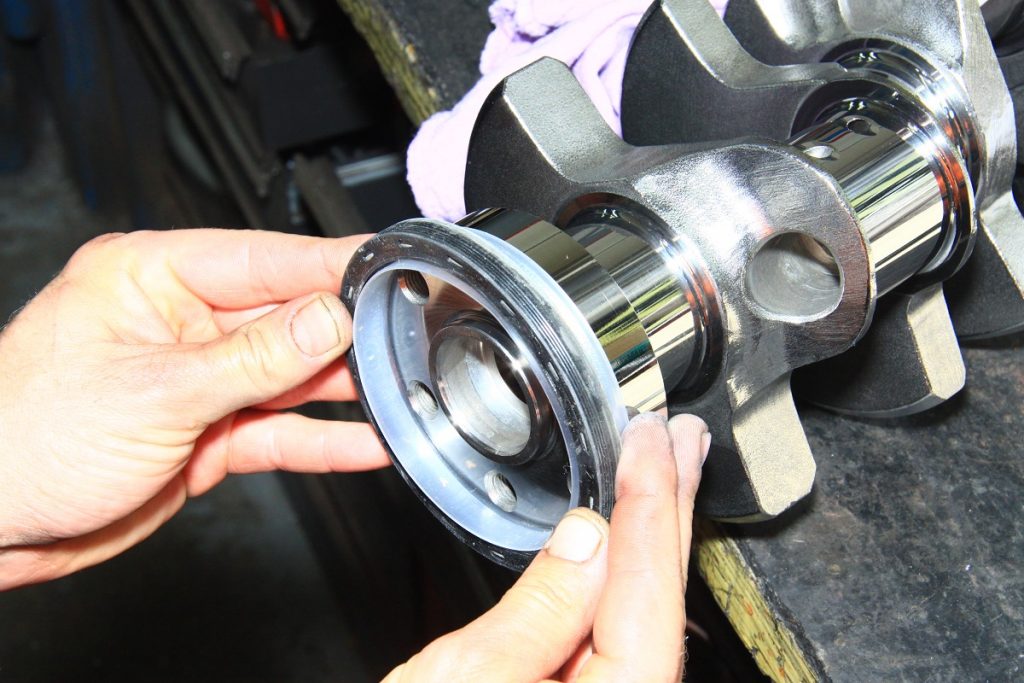
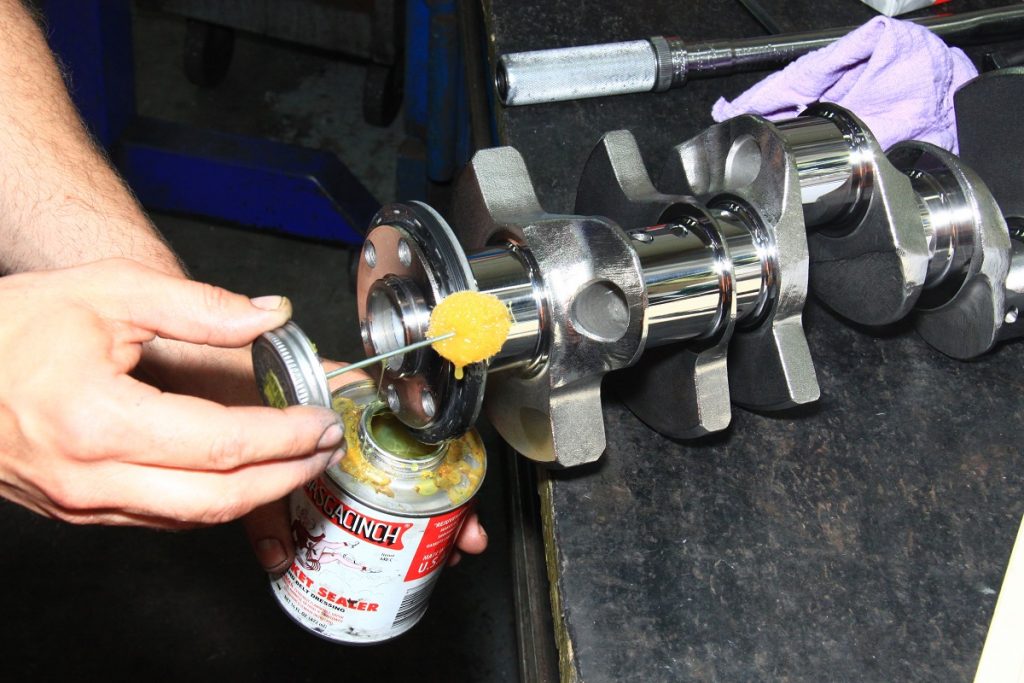
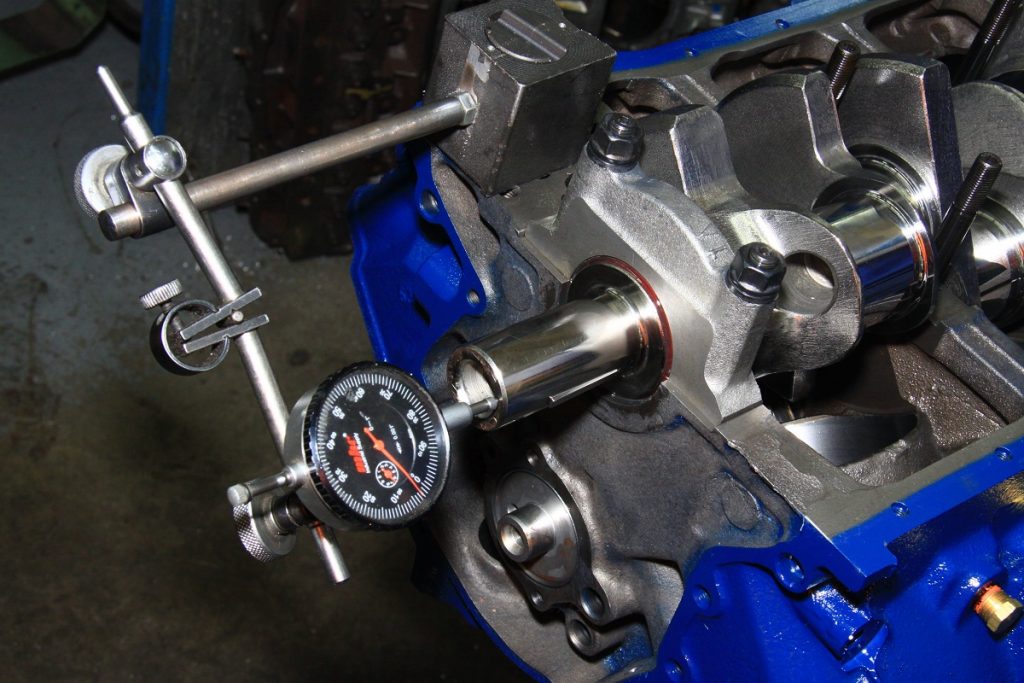
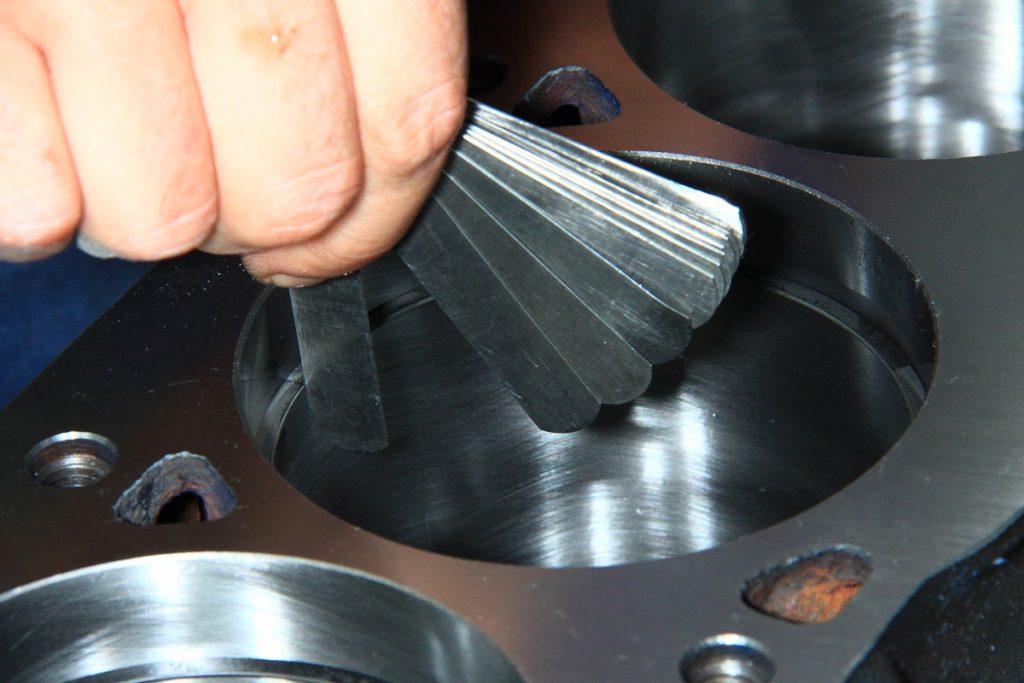
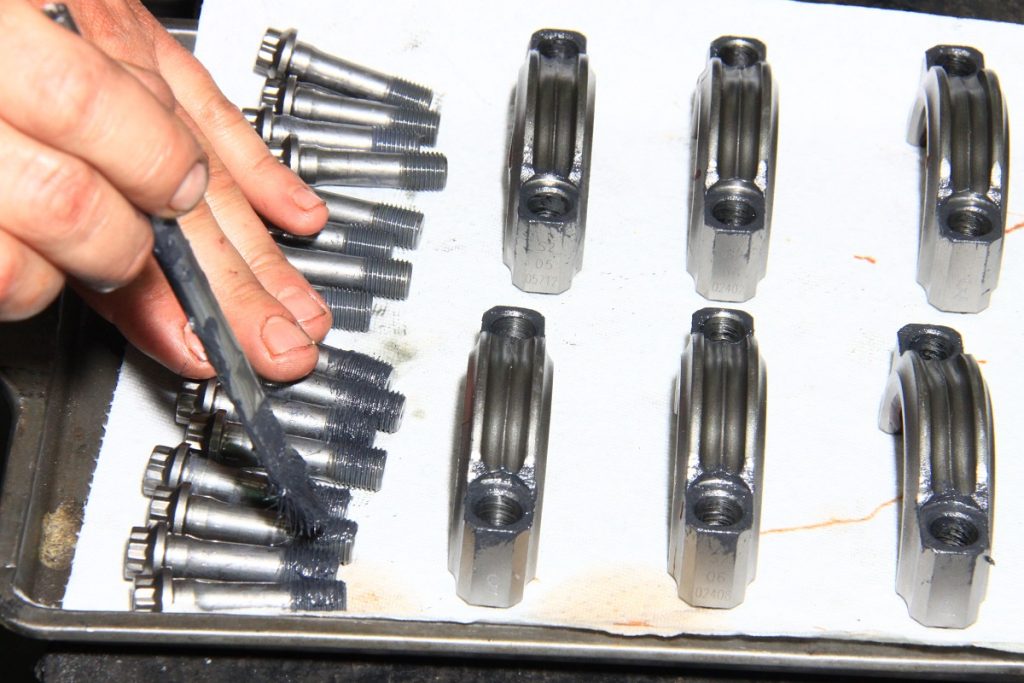
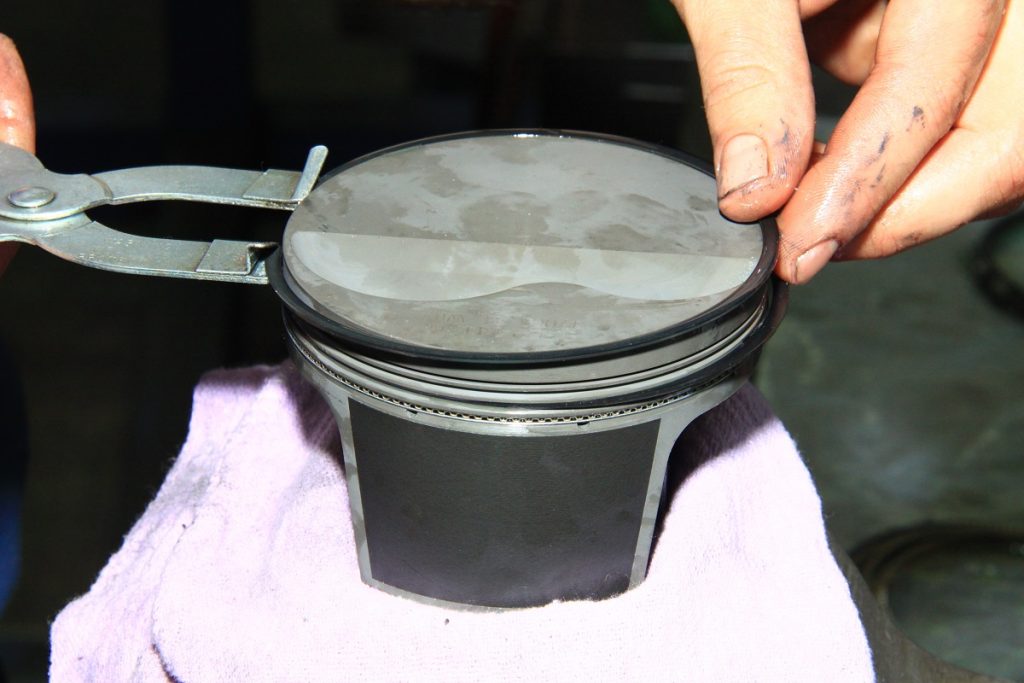
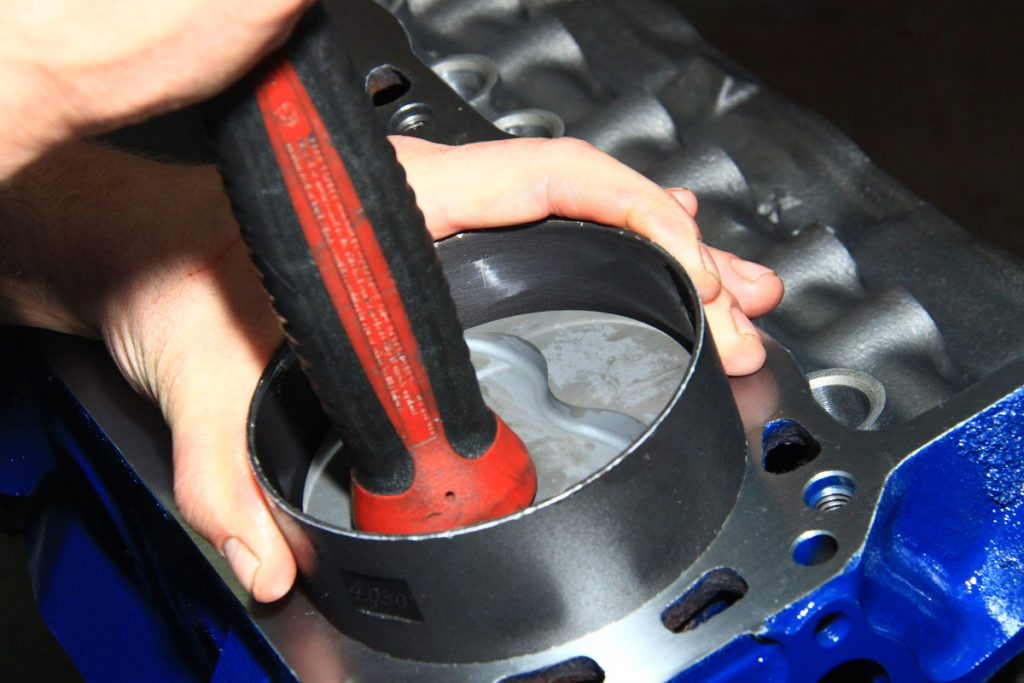
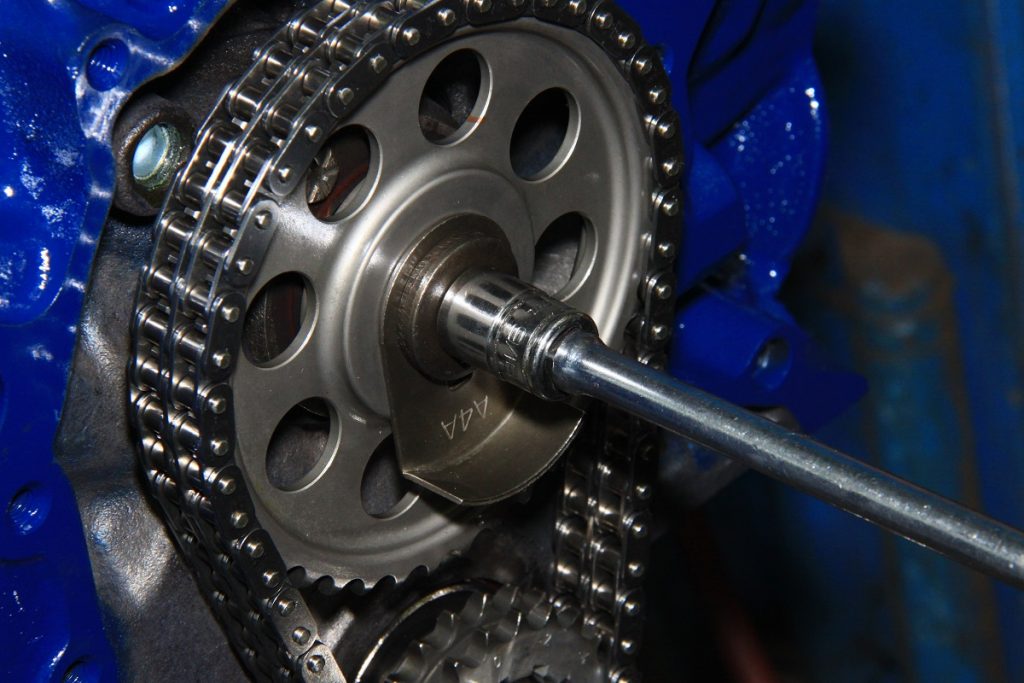
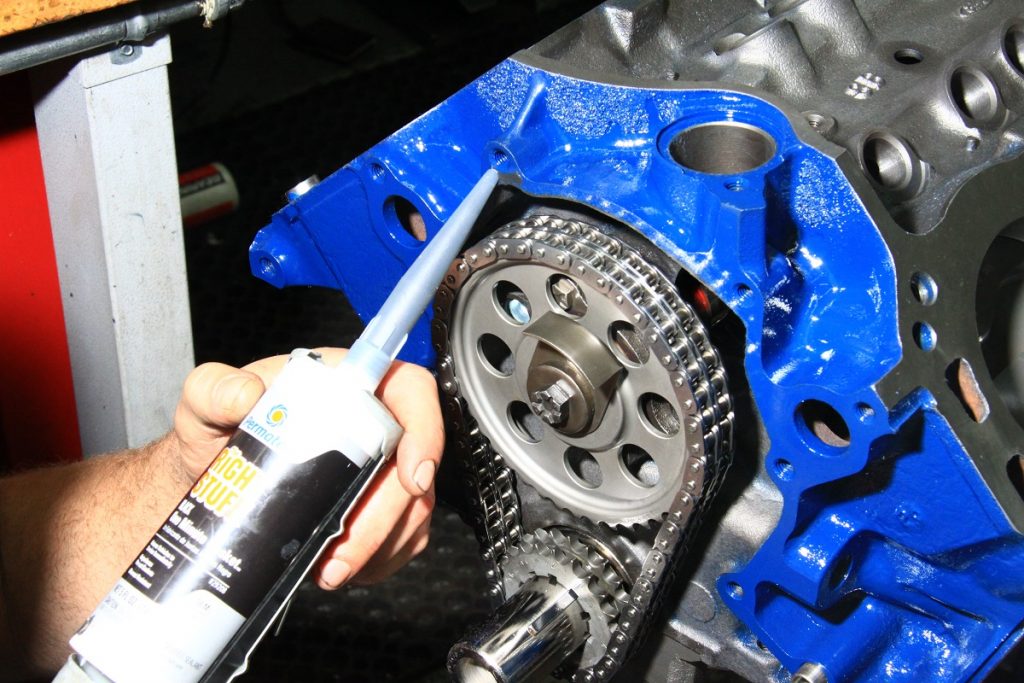
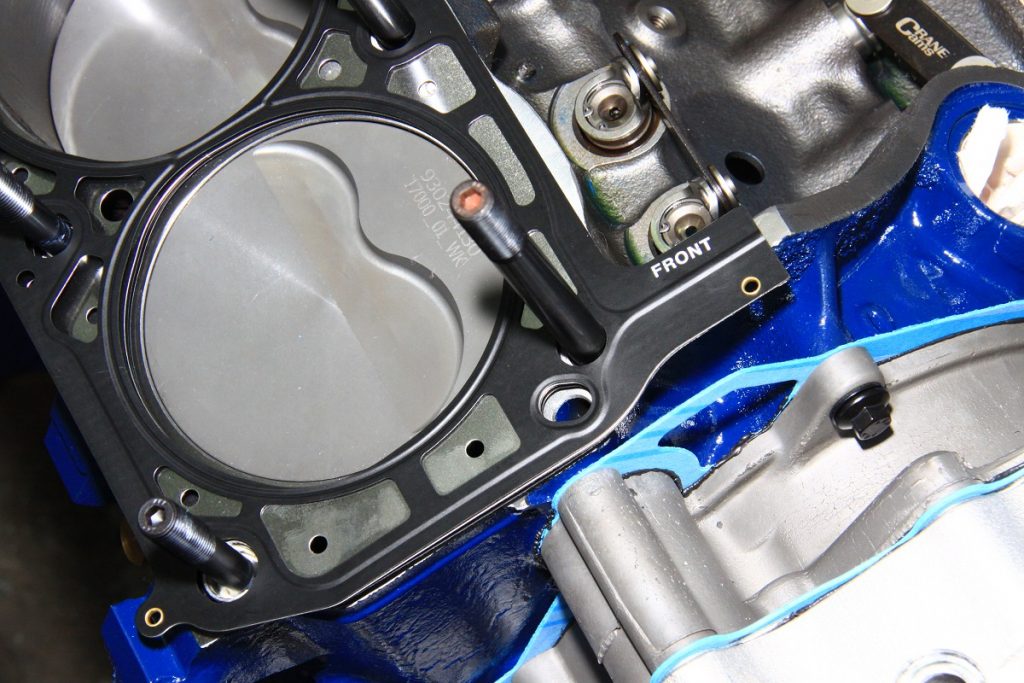
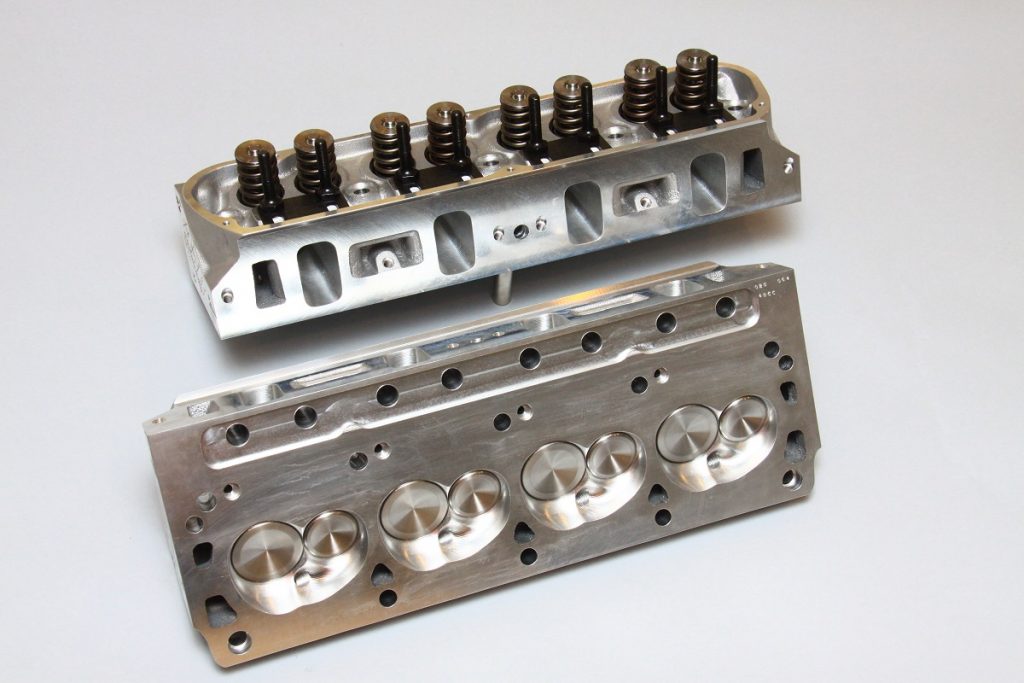
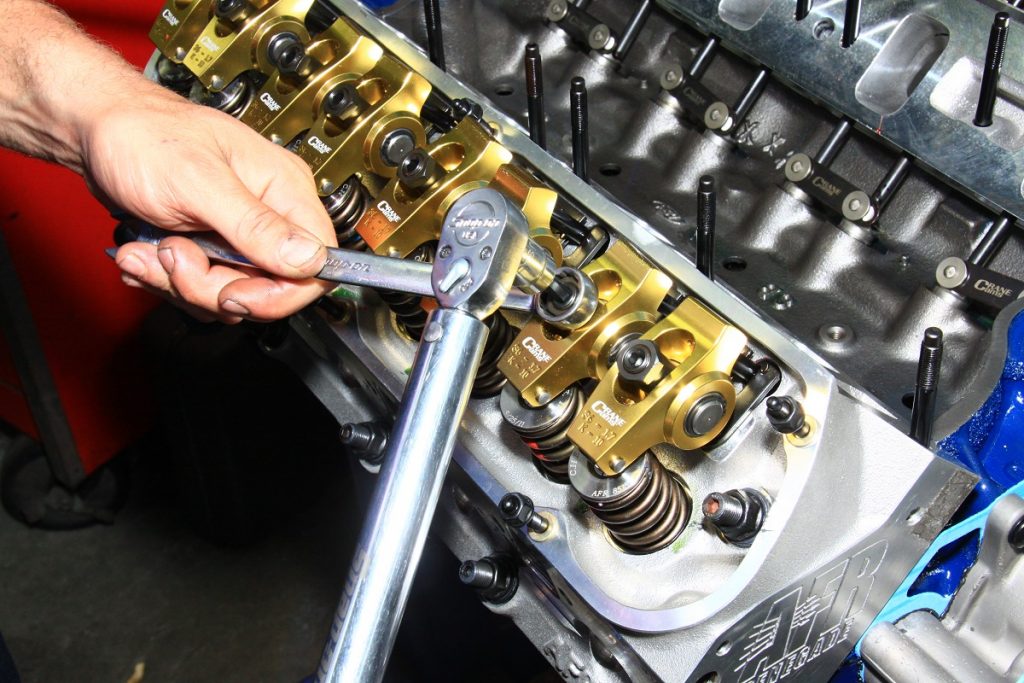
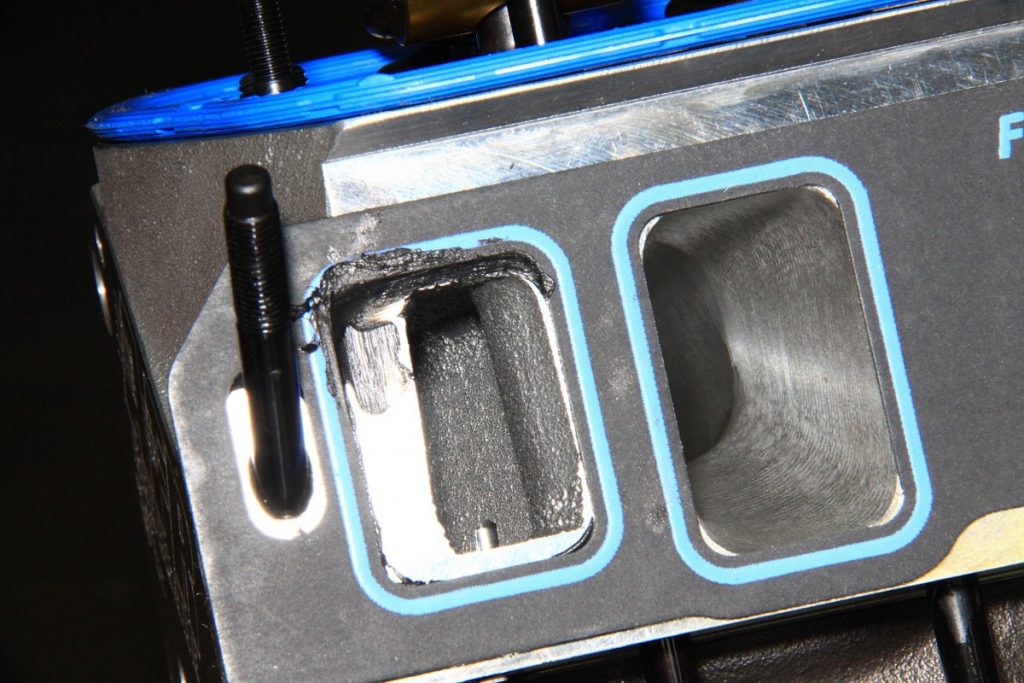
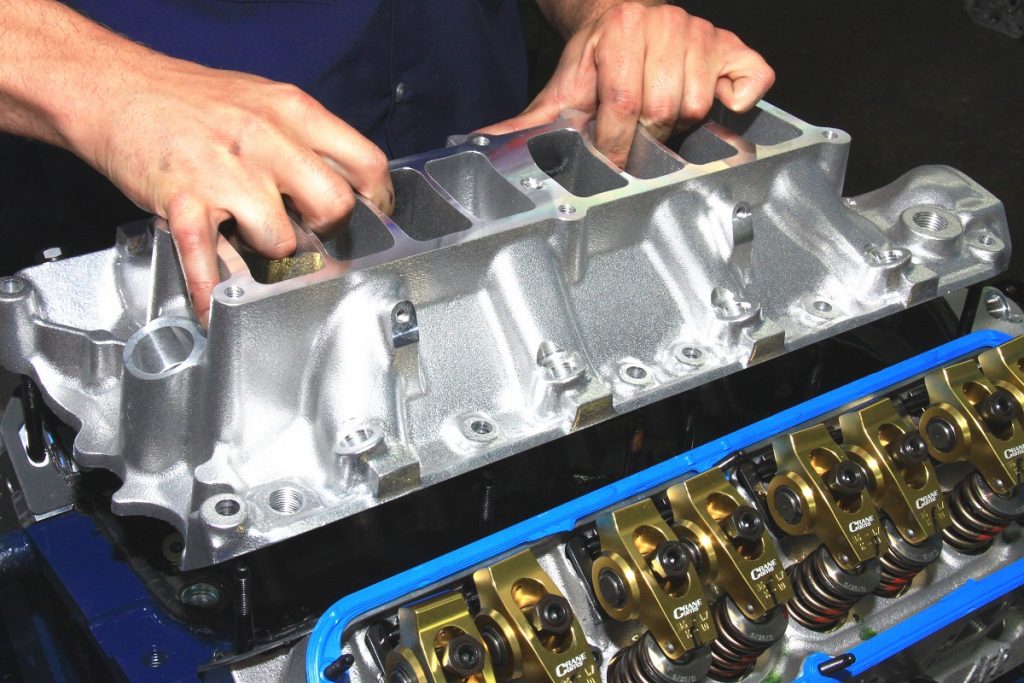
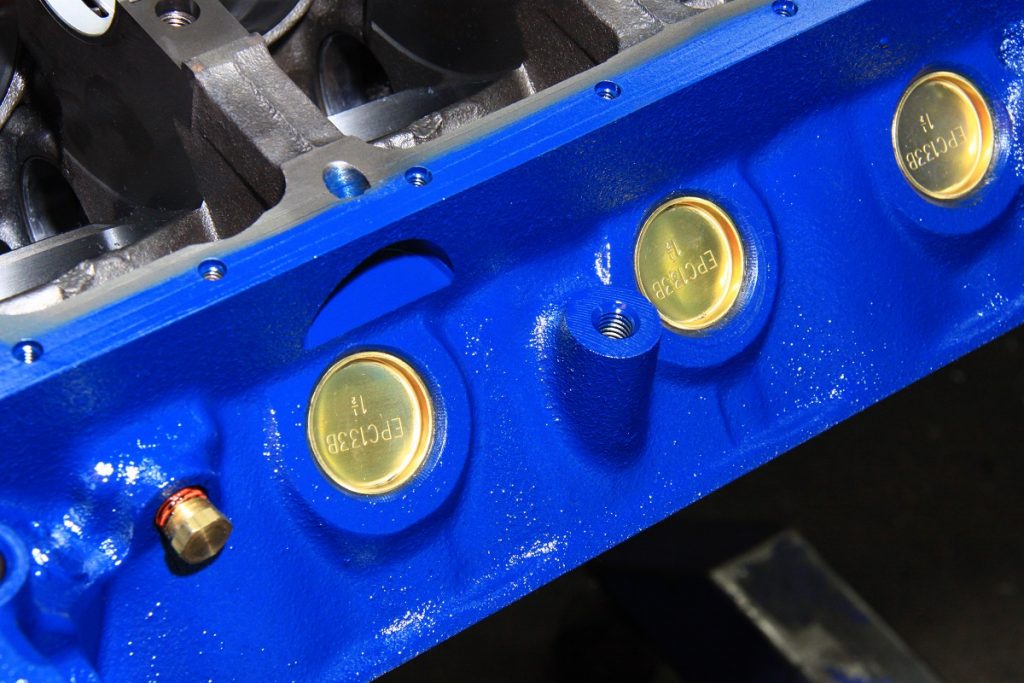
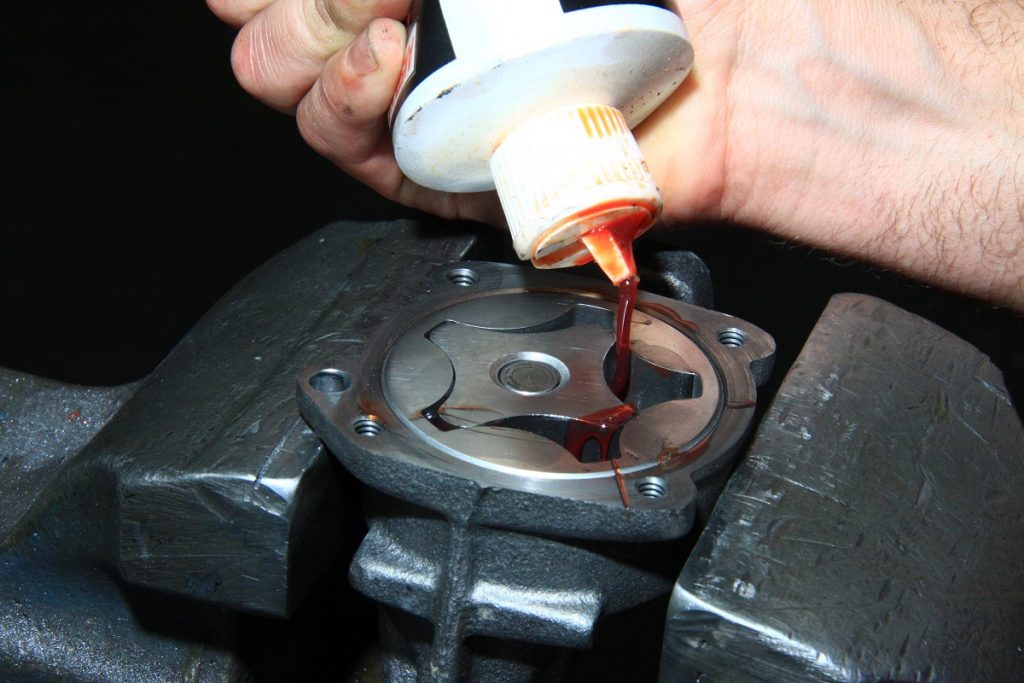
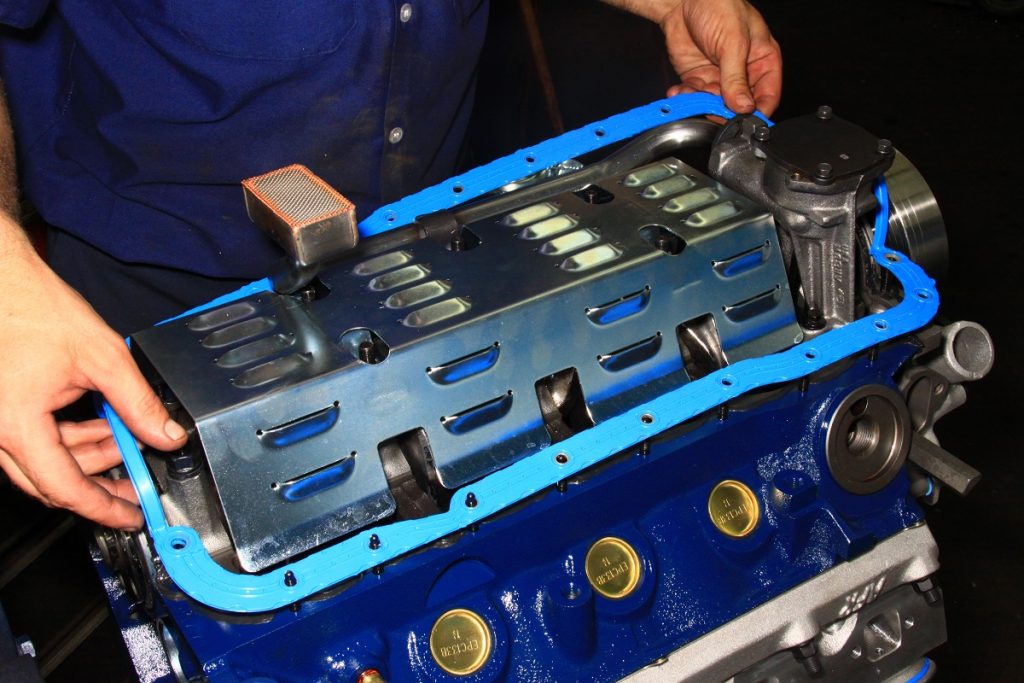
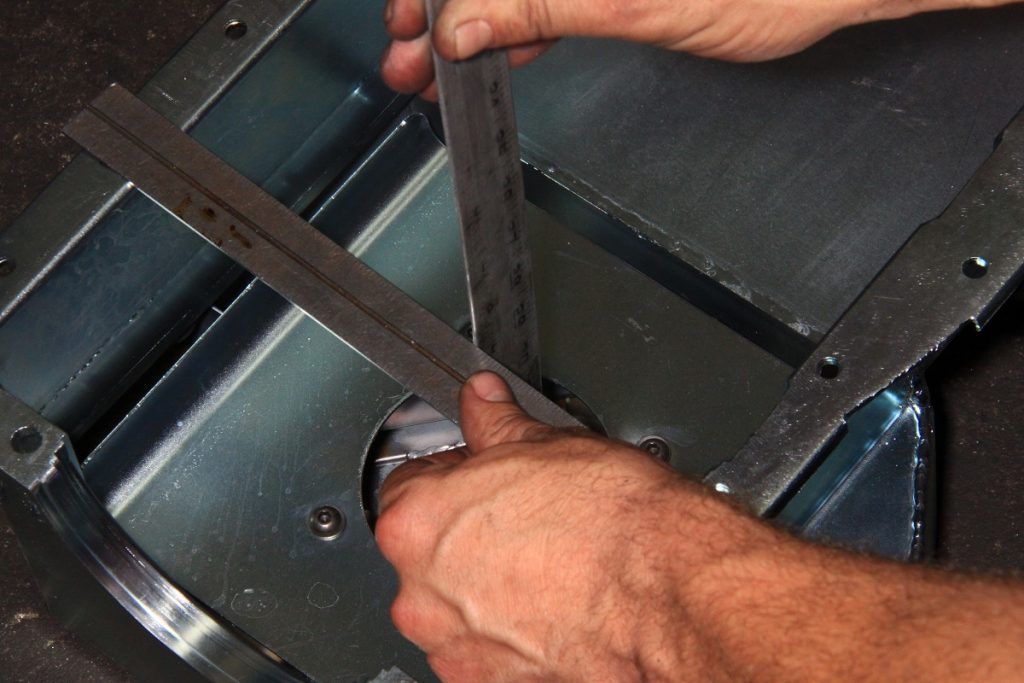
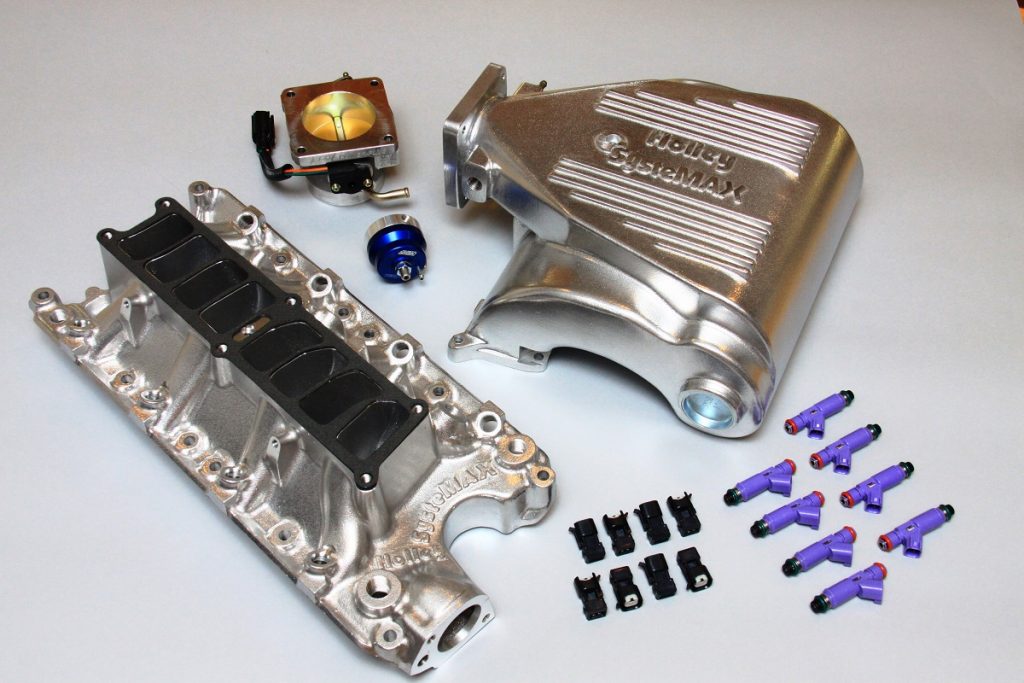
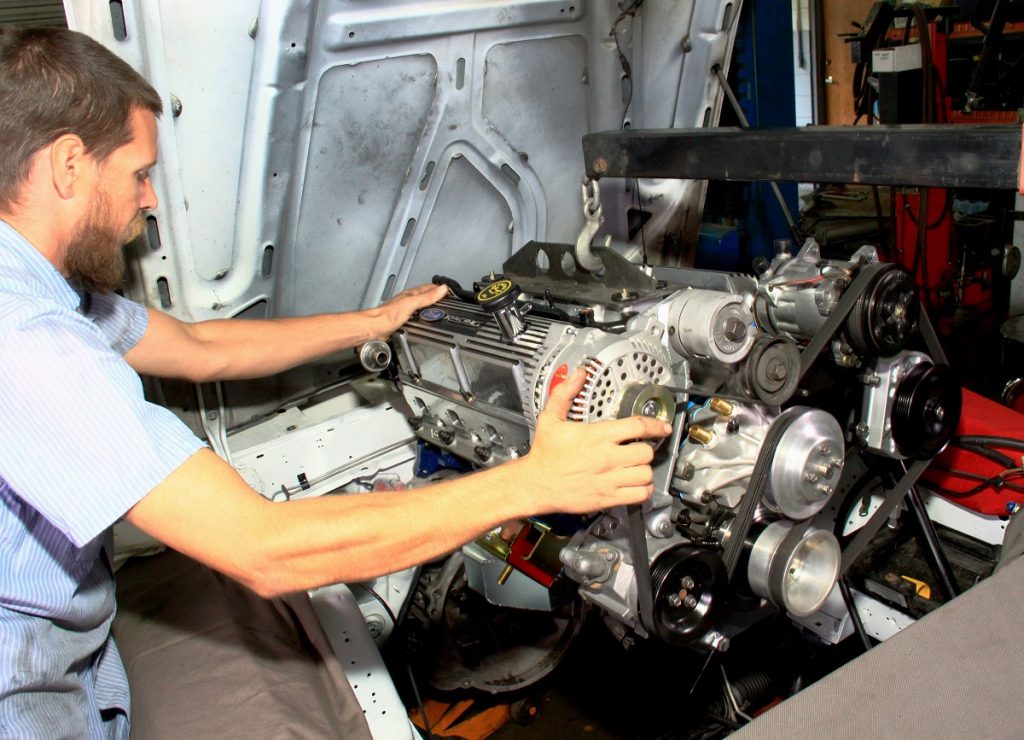
We’re working with a E7TE 5.0L roller tappet block, which is an improved casting over the earlier roller blocks in terms of durability. JGM has completely machined this block including line honing, bore and hone to 4.030-inch, plus cutting the decks. We’ve ARP-studded the block and fitted it with H-Series bearings. (Image/Jim Smart)Summit Racing has a huge selection of engine kits from Eagle, Scat, and our own unique bottom end kits for the most popular engines. This is the Eagle ESP Armor 4340 steel crank with a 3.000-inch stroke off the shelf with H-beam rods and coated Mahle forged flat-top coated pistons to give us 306ci. The valve reliefs are huge and large enough to clear 2.020-inch intake valves. (Image/Jim Smart)We’ve opted to stud the main caps with ARP studs for greater durability. (Image/Jim Smart)(Image/Jim Smart) Next order of business is checking bearing clearances, which is done with the main and rod journals. Here, Ryan Peart of JGM checks main bearing sizing, then, he will “mike” the main and rod journals on our Eagle 4340 steel crank. (Image/Jim Smart)AFR suggested this Crane roller hydraulic PN 44HR00217 cam and 1.7:1 ratio roller rockers from Summit to enhance valve lift. The result for us is crisp throttle response and a broad torque curve. This 5.0L mill likes to rev to 6,500 rpm where torque hands off smoothly to horsepower as rpm increases. (Image/Jim Smart)We’re installing the one-piece Fel-Pro one-piece rear main seal from Summit. These one-piece seals must be installed as shown dry. Never lubricate these seals with engine oil or assembly lube, which will damage the seal and cause leaks. Use the plastic seal lip protector and gently slip it over the crank. Then, remove the protector. (Image/Jim Smart)Gasgacinch has been around forever and is one of the best gasket sealers around. Use it sparingly around the outside perimeter of the rear main seal before setting the crank. We suggest doing a bottom end mock-up before permanently assembling the engine. We do this to make sure everything clears, especially with an aftermarket crank and rods. But, you should do a mock-up even with stock components. (Image/Jim Smart)Crankshaft endplay is checked next using a dial indicator as shown. You’re going to want .005- to .006-inch of endplay. Make sure the thrust bearing is properly seated and the crankshaft properly centered before checking endplay. If endplay is too tight, use 1200-grit paper and a piece of plate glass as a true surface and massage the thrust. (Image/Jim Smart)Mahle piston ring end gaps must be checked, even if you’re working with pre-gapped rings. Suggested ring end gaps range from .018- to .032-inch depend on the engine’s intended use. A stock 5.0L street/strip engine should see .018- to .020-inch. If you’re running crazy amounts of boost or nitrous, .032 to .036-inch for both top and secondary rings. Set the ring end gaps at the top, middle and bottom of each bore and aim for an average. (Image/Jim Smart)All fastener thread should be lubed with ARP Ultra Torque thread lubricant from Summit. It is specifically engineered for fastener threads, which helps yield accurate torque readings. And, when you tighten a fastener, apply torque smoothly and never jerk the torque wrench. Torque fasteners in one-third values. Then, go back and check torque values. (Image/Jim Smart)There are two approaches to piston ring installation. One is to use an expander as shown. The other is to gently roll the rings on. Ring gaps should be 45-degrees apart. Make sure the oil ring expander ends butt against each other and never overlap. (Image/Jim Smart)JGM has a variety of billet piston ring compressors. However, most of us have adjustable ring compressors. Get your ring gaps 45-degrees apart and lubricate both ring and groove with 30-weight engine oil. Protect the rod journal and make sure bearings are properly located and seated. Hand snug the rod bolts, then, torque the rod bolts to proper specifications per the rod manufacturer in one-third values. Hand crank and observe resistance to rotation with each bore. (Image/Jim Smart)Locate #1 piston to top-dead-center and ascertain proper location of the cam and crank sprocket timing marks. Use Permatex’s High Strength threadlocker on the cam sprocket bolt threads and torque to 45 ft-lbs in one-third values. (Image/Jim Smart) Anytime you build an engine, you must degree the cam, even when you know exactly what you have. Always good to double and triple-check your work. The first step of cam degreeing is getting #1 piston to true top-dead-center (TDC). Slowly turn the crank until the piston reaches TDC. You will need a piston stop bolted to the top of the block. We’re using a dial indicator to ascertain top-dead-center. After installing the stop and degree wheel, turn the crank by hand until the piston contacts the stop. Mark the degree wheel with with the engine’s timing pointer. Rotate the engine in the opposite direction until the piston again hits the stop and mark the wheel. Split the difference and add a third mark in the middle. (Image/Jim Smart)Once you’ve determined true TDC, install the degree wheel and set it up. While slowly turning the crank, observe valve timing events, write them down, and see how they compare with the cam card. You can advance the cam 2-degrees and gain torque depending upon how your cam compares with the cam spec card. Retard the cam 2-degrees and you gain horsepower but lose torque. (Image/Jim Smart)A word about the use of sealer—less is more. You need only a very thin bead of sealer (The Right Stuff, by Permatex) for items like the timing cover, oil pan, and valve covers. Sealer is there only to fill in imperfections. Gaskets are there to oil and fluids inside. (Image/Jim Smart)We’ve opted for Fel-Pro Performance head gaskets right off of our shelves to get the latest and best gasket sealing technology into a classic 5.0L High Output engine. Due to the irregularities of engine blocks and heads, put a modest dab of The Right Stuff at the corners where the intake manifold and head gaskets meet. (Image/Jim Smart)Summit carries a complete line of AFR heads for your Ford 5.0L project. These are custom-ported AFR 185 Renegade Cylinder Heads shaved to get 48cc chambers to increase compression ratio. We’ve got 2.02/1.60-inch intake/exhaust valves, with 185cc intake ports, 70cc exhaust ports. Intake Port Dimensions are 2.045-inch x 1.205-inch with a 3/8 radius. Exhaust Port Dimensions are 1.355-inch x 1.360-inch. We also stock a complete line of Trick Flow Research cylinder heads for your specialized needs. (Image/Jim Smart)Set valve lash is by following the firing order of your 5.0L engine one bore at a time. With each valve fully on its seat at the base circle of the camlobe, on compression stroke, slowly tighten the polylock until you can’t twirl the pushrod with your fingertips. Slowly tighten ¼-turn and tighten the Allen screw. (Image/Jim Smart)As a rule, we don’t like to see excessive amounts of sealer used with high-quality gaskets. However, allowances must be made for surface irregularities in the cylinder heads and intake manifold. Use a very thin film of The Right Stuff in vulnerable spots around cooling passages and along the bottom of the intake ports. (Image/Jim Smart)We’ve installed ARP intake studs to make light work out of installation because they guide the manifold into perfect positioning. And, because they are studs, they offer secure uniform torque when tightened properly. (Image/Jim Smart)We stress the importance of brass or stainless steel freeze plugs, also known as Welsh plugs due to their corrosion resistance. Run a thin bead of The Right Stuff around the perimeter and gently drive them into place. Use the widest freeze plug available. If you’re going racing, use JB Weld on the freeze plugs. (Image/Jim Smart)We’re running a Speed Pro high-volume oil pump. As a matter of practice, it is suggested you never install an oil pump, or any component, without a thorough inspection and preparation. Oil pump clearances should be checked along with the pressure relief valve for freedom of movement. Then, filled the pump cavity with engine assembly lube. We’re running an ARP oil pump shaft—never a stock shaft. (Image/Jim Smart)(Image/Jim Smart)We’ve opted for a Moroso road-race pan and windage tray to tame oil windage down under. Fel-Pro’s best gasket technology ensures easy installation and keeping oil off the garage floor. Use The Right Stuff at the joints at the ends at the timing cover and #5 main bearing cap. (Image/Jim Smart) Oil pan sump depth if checked and compared with pump and pick-up depth. The pick-up and windage tray cannot touch the pan. (Image/Jim Smart)(Image/Jim Smart)As with most of our engine builds, we’ve opted for a complete MSD ignition system consisting of the Thick Film Pro Billet Distributor, 8.5mm Ignition Wires, Blaster HVC Ignition Coil, and the 6AL Ignition Box. It has always been tricky getting any distributor to seat in a small-block Ford. The thick film module should be pointed toward the radiator. (Image/Jim Smart)Complementing the AFR heads is a complete Holley Systemax induction system from Summit with the Holley SysteMax intake manifold PN 300-72S, Ford Performance 24-pound Injectors, BBK 75mm Throttle-Body PN1503, BBK 75mm EGR Spacer PN1600, BBK Cold Air Kit, BBK Mass Air for the 24-pound Injectors, and a BBK Adjustable Fuel Pressure Regulator. (Image/Jim Smart)We’ve opted for a Powermaster 3G alternator for our 5.0L engine project, which replaces the lame 2G Motorcraft alternator the car originally had. (Image/Jim Smart)We assembled as much of the engine that we could, including all of the front dress, to minimize labor during installation. (Image/Jim Smart)
Jim Smart is a veteran automotive journalist, technical editor, and historian with hundreds of how-to and feature articles to his credit. Jim's also an enthusiast, and has owned and restored many classic vehicles, including an impressive mix of vintage Ford Mustangs.
Comments
8 responses to “Building a Ford 5.0L for an ’89 Fox-Body Mustang”
I like to know how i can get a budget build. I’m Disabled and on SSI. that’s why. so far i have a 306 with the GT 40 P heads to start with. Please let me know.
Hey Gregory – there are a lot of options. You can build a powerful 5.0L Ford small-block with those P heads – which are improved over the stock iron E7 units. You will want to explore hydraulic roller cam options. Summit has a huge array of cam choices. For street use, you want to keep lobe centers modest for a tolerate idle. The quickest way to power is by increasing compression. You just don’t want too much. The highest you want is 10.5:1.
[…] Do you remember when classic Mustang enthusiasts said late-model 1979-93 Fox Mustangs would never be collectable? Well, there’s nothing quite like the indigestion that comes from eating your own words. […] Read full article at http://www.onallcylinders.com […]
Hello Jim,
Have a 1998 Explorer roller block and intend to use the GT40P heads as well like Gregory. Knowing the P heads give a 9.1 CR what is your suggestion to remove material raising the CR to ? that will have good idle etc. ? What suggestions to prepare the P heads properly and spring kit. Will use either an Eagle or Scat kit for the complete bottom end.
Thank you in advance.
Mark Weber
Would it be possible to use water, alcohol to get higher compression
Is it possible to get 475hp at the crank with 331 NA on 93 octane pump gas?
I have a ’93 Mustang GT Hatch. The entire drive train was upgraded to a 331 stroker with a V-7 Vortech supercharger. It dynoed at 750 HP
Who sells an engine like this already assembled?