I have a ‘67 289 out of a Falcon Futura sports coupe that I rebuilt with all new internal guts. The heads and block have been decked and has hydraulic lifters. It’s got an Edelbrock dual-plane aluminum manifold with a 600-cfm Holley carburetor and Hedman headers. The problem I’m having is it keeps fouling plugs. When I take them out, I can pour gas out of them and that’s after running pretty hard. It’ll run really good for about three or four minutes and then it’ll start missing. I’m running Autolite 42 spark plugs should I be running something else? — G.S.
…
Jeff Smith: We’ll first assume that the choke is not stuck closed. It should be obvious if it is. The engine won’t run properly.
Check this first. If there is some question, adjust it so it remains full open ensuring that it’s not an issue.
Without knowing anything else about this combination my first thought would be that if your Holley 600 is an older version built before 1992 then it may have suffered a ruptured power valve.
Holley’s power valves are designed to add additional fuel to the main metering circuit when manifold vacuum drops below the valve’s rated value. These valves are constructed with a thin rubber diaphragm that is held open by a light spring. With manifold vacuum above the spring load, the valve remains close. Once manifold vacuum drops below its rating (6.5 inches of vacuum for example), the spring pushes the valve open and allows fuel to enter the main metering circuit.
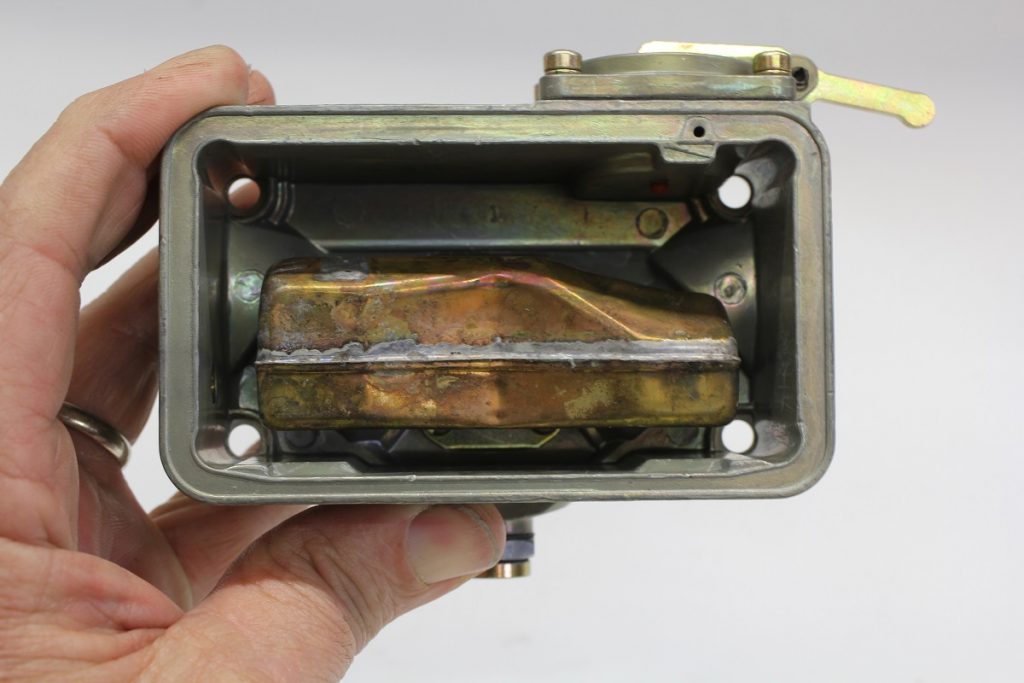
The power valve is located in the primary metering block and sits in a cavity in the main carburetor body. There is a small hole drilled in the bottom of the cavity that has direct access to intake manifold vacuum. An engine back-fire can rupture that thin rubber diaphragm. If this occurs, fuel is allowed to leak past the valve and enter the cavity in the carb body where the manifold vacuum will pull it straight into the intake manifold.
Newer Holley carburetors built in 1992 and later are equipped with an anti-backfire check ball that closes when positive pressure pushes the check ball into a seat. This prevents pressure from damaging the power valve.
If the power valve leaks, this creates a very rich mixture at all engine speeds but especially at idle.
This could easily foul out the spark plugs and cause the condition that you described. The fix is easy. You can test the power valve to see if it leaks, but that will require specialty tools. They’re somewhat expensive and really only justified if you intend to work on lots of carburetors.
For you, just replace the power valve with a new one of the same opening point (a 6.5-inch Hg version is the most popular) and reassemble the carb with fresh gaskets.
It would also be a good idea to re-adjust the idle mixture screws to make sure the engine idles as cleanly as possible.
Start by lightly bottoming each idle mixture screw, counting the number of turns. If they are more than two turns out, readjust them to 1½ turns on both sides as an initial setting.
Before re-assembling the carb, with the primary bowl removed, turn the bowl upside down and note where the carburetor float sits. With the bowl inverted, the float should be equal-distant between the floor and ceiling of the float bowl. If the float is closer to the roof of the bowl, the float level is too high.
This can be verified once the engine is running, but this initial setting should be very close.
With all these settings accomplished, the engine should start and idle cleanly. At idle, make sure no fuel is leaking from the main boosters into the venturi. Let the engine warm up and then reset the idle mixture screws to the highest idle vacuum possible. This will be slightly rich.
If you want, you can turn the mixtures screws in slightly from the highest engine vacuum reading. This will make the idle mixture leaner.
This might also be a good time to check the initial timing.
It won’t have any impact on the air-fuel ratio, but it will affect how the engine runs. Set the initial timing to around eight to 10 degrees before top dead center (BTDC). This is also a good time to check to make sure you have good advance with the mechanical and vacuum advance.
With all of that set, your engine should run much better—assuming the power valve was leaking.
It would also be a good idea to replace the spark plugs. I looked up the stock plug recommendation for a ’67 289 and it came up as an Autolite 45. The 42 and 45 plugs are projected-nose spark plugs which helps drivability.
It’s possible that the float level was too high. The diagnosis is fairly simple.
With the engine running and the air cleaner off, look down the carb to check for fuel dripping from the boosters in either the primary or secondary side.
If there is fuel dripping from the boosters at idle—the float level is too high. If your carb has a plastic float, it’s possible that it has absorbed fuel— making it heavy and allowing the float level to rise.
If the level in the bowl gets high enough, fuel will begin to drip out of the boosters at idle. This could also cause your problem. The quick solution is to lower the float level but if the float is bad it should be replaced.
A heavy float is somewhat rare since Holley’s floats don’t normally have that problem, but it’s possible. You might try lowering the float level first and see if the problem goes away. But if it comes back, then the float is bad. This could also happen on the secondary side, so look at both sets of boosters and check the float level on both ends.
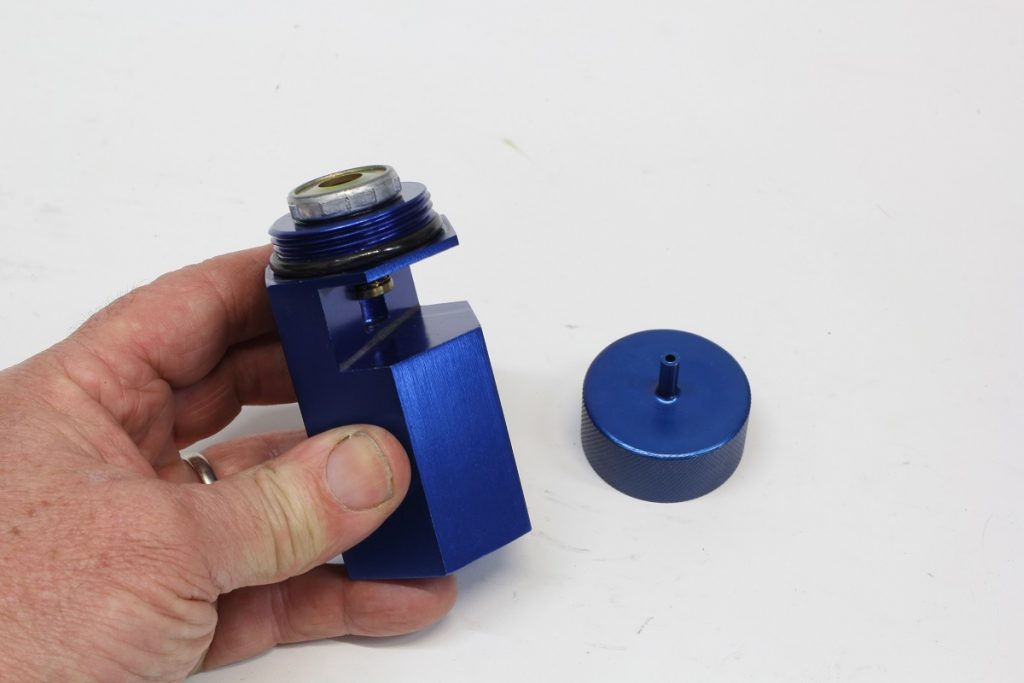
Lowering the float is easy—loosen the straight screwdriver lock screw on the top of the carb and then use a 5/8 end wrench and turn clockwise to lower the float level. A 1/2 to 3/4 turn is a good start but it might take more to get the level down to just beneath the sight plug on the side of the bowl.
I would also recommend changing the oil and oil filter before you fire the engine as it will likely have lots of gasoline diluting the oil and reducing its lubricating properties. This should get your engine running properly.
This guy got a lot of bang for his buck. Jeff sure gave him a very concise and all inclusive answer. He got a free education and so did a lot of others as well, thanks Jeff.
[…] I have a ‘67 289 out of a Falcon Futura sports coupe that I rebuilt with all new internal guts. The heads and block have been decked and has hydraulic […] Read full article at http://www.onallcylinders.com […]
Hi Jeff, I have 1967 Mustang fastback I’ve had stood outside covered in my yard for 25 years.. finally started working on it change the oil new radiator antifreeze, don’t know much about engines got the car started I was running sounded pretty good heard a little noise in the engine, shut it down check the plugs driver side third Bent over, antifreeze in the engine. Hopefully you can shed some light.
Hey Jim, you mean you saw coolant in the cylinder bores? It could be a few things, but seems likely that you’ve got a head gasket leak.
Hi Jeff
The 2 bbl Autolite on my 289 ’65 Mustang sprayed gas around the manifold, twice, in 6 months. I couldn’t find the leak. The outside of the carb was clean. I assumed it was leaking from the power valve housing. It had also been hunting in park and drive idle. So I put a Fuelmiser FD-301 kit through the carb, replacing the power valve, as well. I didn’t touch the idle or mixture screws or choke. Afterwards, during the test warm up, it didn’t leak, but now the idle is hunting up and down for its RPM, and in gear, worse than ever.
So could the power valve be incorrect? Trouble is, neither the old or new power valves have any markings. What else could it be?