(Image/Wayne Scraba)
Converting from a carburetor to electronic fuel injection can be both easier and less expensive than some believe, and the Holley EFI unit we’re exploring today is a shining example of that.
First, we got up close and personal with MSD’s entry-level Atomic EFI—which simplified installation, eliminated the need for a laptop computer, and offered budget-friendly pricing.
Second, we turned to MSD’s sister company Holley Performance Products and their Holley Terminator Stealth EFI. The throttle body looks remarkably like a 4150 Holley carb, which is great for anyone wanting classic looks and modern performance.
Today, we’re diving into another Holley EFI offering—the Holley Sniper EFI Self-Tuning Fuel Injection System, which may be the easiest-to-use EFI system ever conceived.
Also, it’s pretty easy on the wallet.
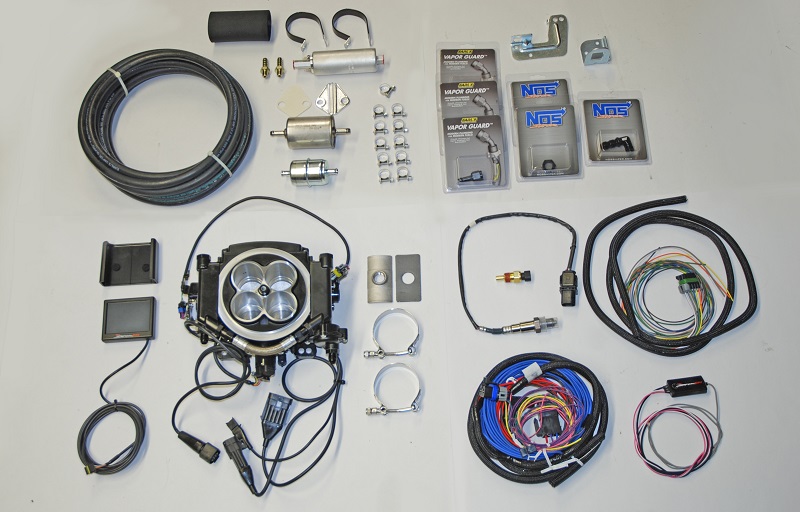
The Sniper kits are available in three different finishes—gold, polished, or black—and are offered as a basic kit ($999.95*) or a master kit ($1,249.95*).
(*Prices as 12/15/2017)
What makes them tick? Let’s see.
A Closer Look at the Holley Sniper EFI System
Throttle Body
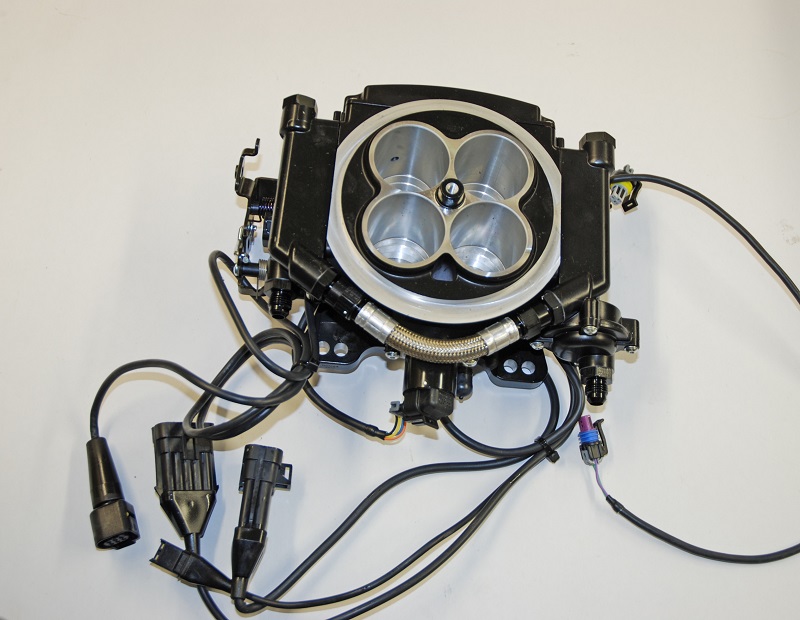
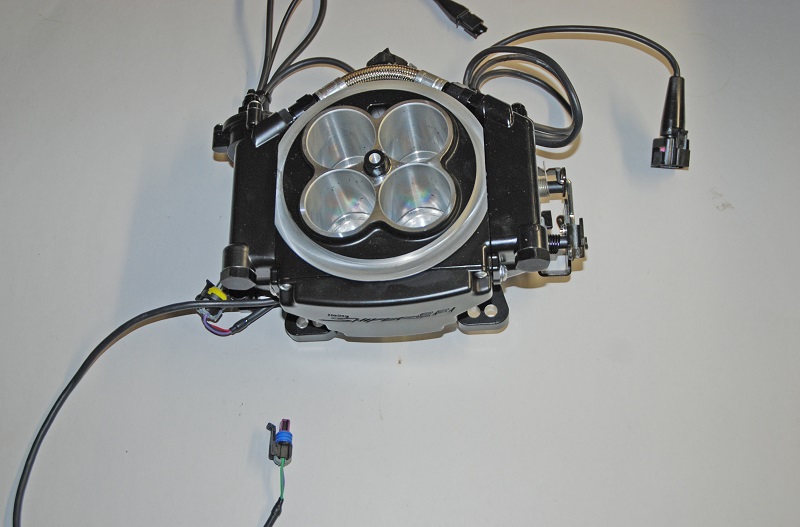
The Sniper EFI could very well be one of the easiest to set-up fuel injections systems ever. Much of the system is encased right inside the throttle body—and that includes the ECU. (Image/Wayne Scraba)
The throttle body is a bolt-on replacement for a carburetor.
It flows 850 cfm and can support up to 650 horsepower.
But the really cool part is that there’s no extra ECU box to install. Holley figured out a way to mount the ECU within the throttle body.
Internally, the throttle body is fitted with four injectors (just like the Stealth system). It incorporates a built-in fuel-pressure regulator (pre-set at 58.5 psi) along with a built-in MAP sensor, a built-in throttle position sensor, and a built-in air inlet temperature sensor.
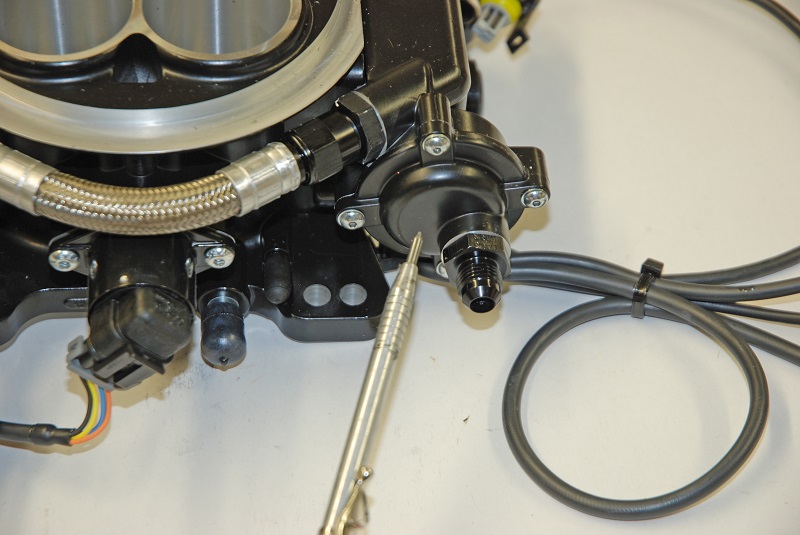
Fuel is delivered conventionally to the throttle body. There’s even a built-in fuel pressure regulator. (Image/Wayne Scraba)
Linkage on the side of the throttle body allows easy hookup for manual transmissions as well as GM Turbo 350-style transmissions or 700R4/2004R overdrive automatics. Included in the kit are throttle cable brackets for either stick-shift or automatic transmission applications. The automatic pieces allow for the installation of a kick-down assembly.
The fuel inlet can be configured in multiple ways, but the easiest way is to use the as-produced setup. It comes fitted with an external AN line that joins both the front and rear “bowls” (they’re not really bowls, but passages for the pair of injectors on each end of the throttle body). You then plumb into the “in” side of the throttle body along with an “out” fuel line for the fuel pressure regulator bypass. The bypass also goes to the fuel tank, which we’ll talk more about in a bit.
Just like a carburetor, the throttle body is fitted with multiple vacuum ports: One large 3/8-inch port for power brakes, a small 3/16-inch port for timed spark, and another small 3/16-inch port for conventional vacuum.
There are three vacuum ports on the Sniper throttle body: The large one is for power brakes while the other two are for manifold vacuum or ported vacuum. (Image/Wayne Scraba)
During installation, you simply choose what you need for your application and plug off what isn’t required. That’s not the end of it either: Holley includes new “carb” studs, nuts and washers, a new base-plate gasket, an air cleaner gasket, and a new air cleaner stud. The gaskets and hardware install just as they would on a carbureted application.
…
Sensor Installation
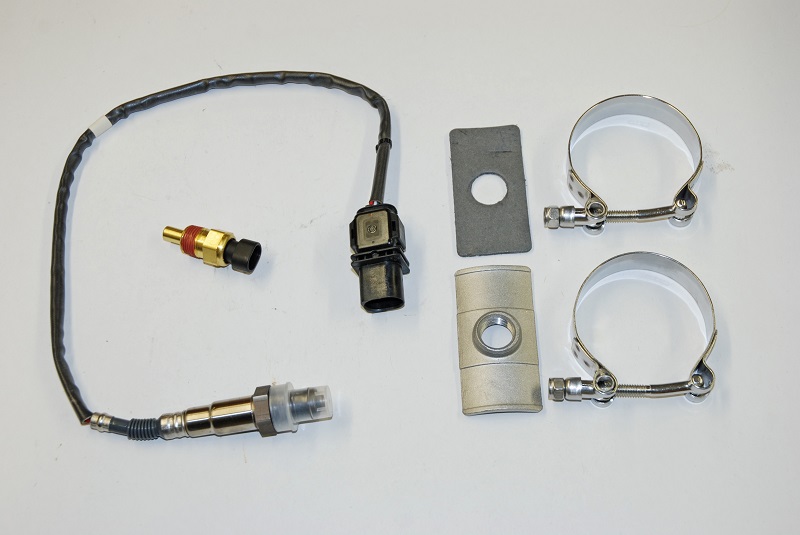
Holley includes the wide band oxygen sensor along with a coolant temperature sensor. The O2 sensor installs in the exhaust without welding. You simply clamp it in place. (Image/Wayne Scraba)
There are only two sensors to install with the Holley Sniper EFI system—a wide-band oxygen sensor and a coolant temperature sensor.
These sensors are identical to those found in Holley’s Stealth EFI we looked at earlier. The coolant temp sensor can be installed in a cylinder head or intake manifold crossover (but not into the thermostat housing).
The oxygen sensor is more involved, but not much (it’s also the key to the EFI system’s learning capabilities).
The Sniper system tunes as you drive, maximizing the fuel economy and power from your engine. Although it’s possible to weld a bung into a header collector (or exhaust system downpipe) where all cylinders on the bank converge, it can also be bolted in.
Placement Tips:
- When drilling the hole for the sensor, Holley notes there must be at least 18 inches of exhaust pipe after the sensor.
- If your vehicle has catalytic converter, the oxygen sensor must be located between the engine and the catalytic converter. The sensor can be mounted on either side of the collector or down tube. With the bolt-in arrangement, it’s a simple matter of fastening with the supplied clamps.
…
Reworking the Fuel System
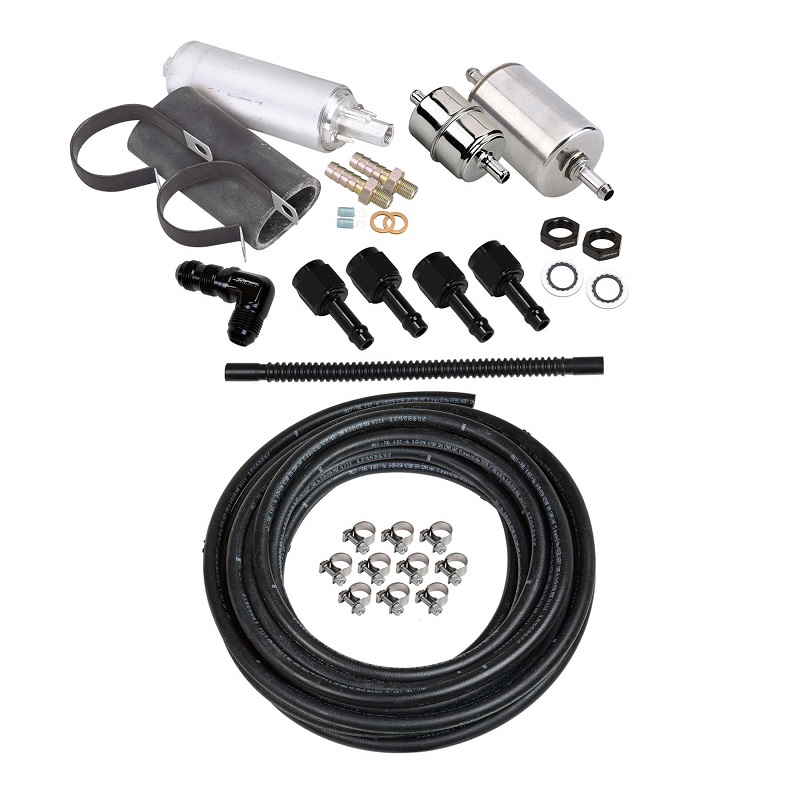
With Holley’s fuel kits, everything you need to plumb the fuel system is included: A high-pressure electric fuel pump, before and after filters, high-pressure fuel hose, clamps and fittings. They even include a block off plate for the mechanical fuel pump (small block Chevy applications). (Image/Holley)
The other thing you’ll need is an EFI-capable fuel-delivery system.
Holley provides the necessary components in their master kit, which includes a pre-pump filter, a high-pressure electric fuel pump, an after-pump filter, and all of the high-pressure hoses and fittings you need for assembly. Additionally, the kit includes the hose and fittings necessary to install a return line on most vehicles.
Holley recommends never using vapor canister lines for the return. Instead, a special bulkhead connection is supplied with the master kit.
Fuel System Installation Notes:
- The bulkhead fitting must be installed through a flat surface where the nut can be tightened from the bottom. It must also be installed in a location where the fuel cuff will not interfere with the sending unit float.
- If possible, Holley strongly recommends removing, cleaning, and drilling (a 9/16-inch hole) right into the sending unit. That makes installation pretty easy.
…
Holley Sniper EFI Sensor & Electrical Wiring
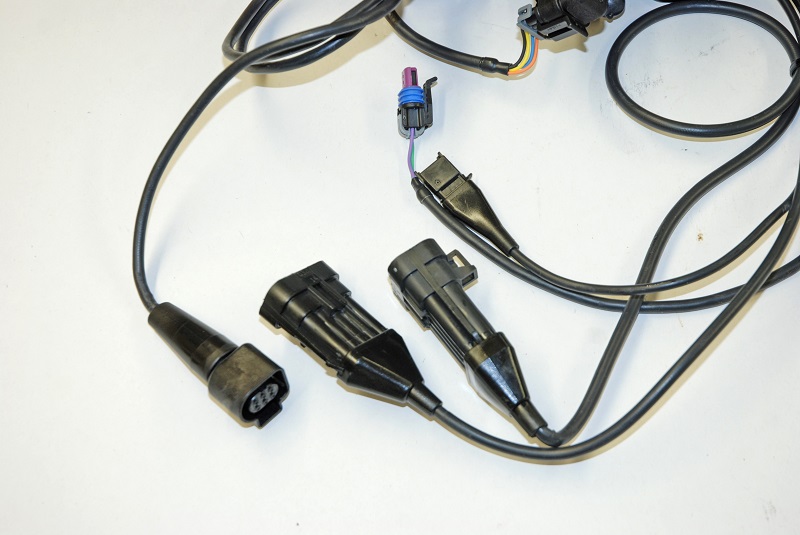
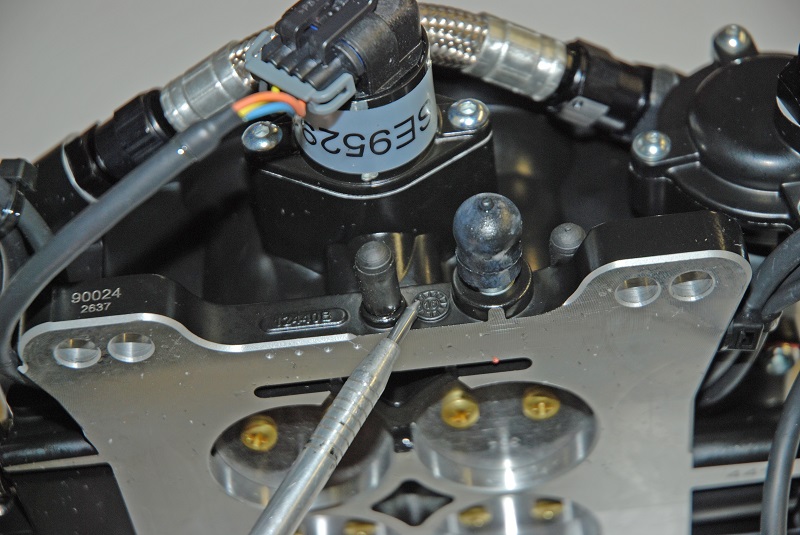
In terms of wiring, there is a single hookup for the coolant temperature sensor, another for the oxygen sensor, one more for the hand held controller (display), one for the main harness and one for the optional accessory (input-output) harness. (Image/Wayne Scraba)
Wiring the Holley Sniper EFI system is equally easy.
For the most part, the small harness is plug-and-play.
All of the wiring begins at the throttle body and connects outward from there.
There are five significant plug connections to make from the throttle body:
- Plug into the oxygen sensor.
- Plug into the coolant temperature sensor.
- Plug into the 3½-inch LCD display monitor.
- A seven-pin connector with loose pigtails that must be wired to the following:
- Pink to 12V switched
- Heavy Red to battery positive
- Heavy Black to battery negative
- Blue to fuel pump relay
- Yellow to negative post on ignition coil
- Violet to ignition crank signal positive
- Dark Green to crank signal negative
- The 10-pin connector is used for the following optional components (only eight of the pins are used):
- Pin A: Orange Input #1 (-) Optional—Connect to a ground triggered A/C relay
- Pin B: Yellow Input #2 (-) Optional—Connect to a programmable ground input
- Pin C: Light Blue Output #1 (-) Optional—Connect to Fan #1 relay ground trigger
- Pin D: Light Green Output #2 (-) Optional—Connect to Fan #2 relay ground trigger
- Pin E: Grey Output #6 (-) Optional—Connect to ground side trigger of A/C shutdown relay
- Pin F: White Points Output used to trigger a CD ignition box or the included Coil Driver Module
- Pin G: Dark Brown Tach Output used to drive an aftermarket tachometer
- Pin H: Tan Digital Gauge Output used to drive Holley EFI analog gauges via 554-130 Gauge Module

Here’s a look at the wiring harness. As you can see, everything is clearly marked. Much of it is simply plug and play, and what isn’t is clearly illustrated in the manual. It doesn’t get much easier than this. (Image/Wayne Scraba)
…
Wiring the Ignition to Holley’s Sniper EFI System
Holley provides two options for ignition.
If you have a CD box (for example, an MSD system), then the Violet and Dark Green wires go to a small one-wire ignition adapter (included with the system). The ignition adapter has a single Purple wire attached to a two-pin connector. Connect this wire to the distributor connector on the main harness. The Violet wire from the Sniper EFI seven-pin connector should plug into the Purple wire (the Green wire won’t be used). The loose end of the Purple wire will then be terminated to the tach output wire on the ignition box. On an MSD 6AL, the wire is Gray. NOTE: Never connect the Purple wire to the ignition coil!
The other ignition option is to use the Yellow wire on the Main Harness; this wire will be labeled Coil (-) Input. This wire can either go to the negative side of the ignition coil, or to “Tach” label on a GM Large Cap HEI distributor with an internal coil. Never run the YELLOW wire to the negative side of a coil while using a CD Ignition box.
The controls for the system are included in the 3½-inch touchscreen LCD display.
…
Touchscreen Control and Setup
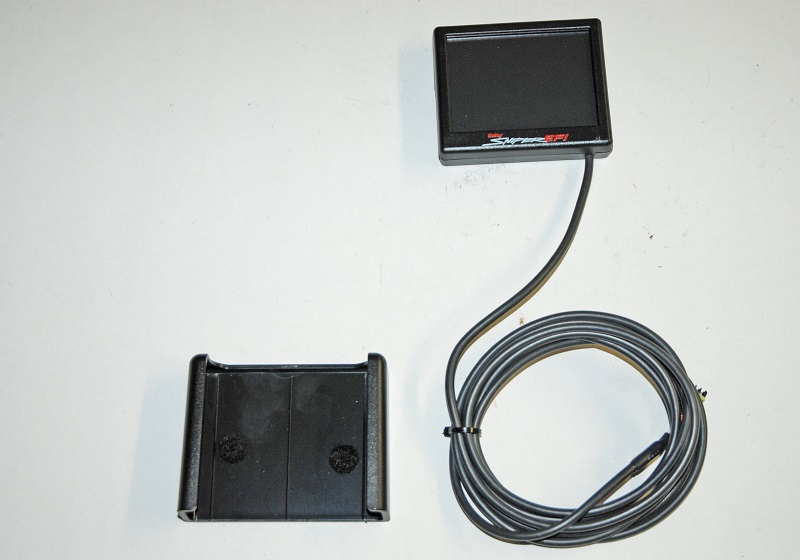
This 3.5-inch LCD display uses a touch pad that allows you to simply input your particular vehicle specs and from there, you can fine tune the system (if you desire). Keep in mind the Sniper EFI system is actually self-tuning. See the text for more info. (Image/Wayne Scraba)
Once everything is hooked up, turn the ignition key to send power to the ECU as well as the Sniper EFI handheld control module.
Once the handheld powers up, the Home screen should appear which contains icons that navigate to the system’s functions and features. Holley’s user manual lists the basic setup instructions along with advanced tuning sequences. All are explained clearly and are simple to work with.
With the Sniper EFI, you simply enter the number of cylinders, engine displacement, cam type (stock, street-strip or race) and target hot-engine idle speed.
You select the ignition type, choose whether or not the Sniper will control ignition timing (if so, you then select ignition timing at wide open throttle). Then, simply press “Start” on the touchscreen and the calibration will be sent to the ECU.
…
Holley Sniper EFI Self-Learning ECU
The Holley Sniper EFI system’s ECU is encased in the throttle body. (Image/Wayne Scraba)
With the setup process completed, you can start the engine and the Sniper will begin to “learn” your combination.
“You need to simply drive your car and let the Sniper’s self-tuning occur. It is best to drive in an area without much traffic where you can drive under different conditions,” the Holley Sniper product manual says. “It’s always a good idea to have a passenger present to look at things like coolant temperatures, battery voltage, etc., on the first drive.
“Start the car and let it idle. Let the car get up to operating temperature (coolant temperature over 160 degrees F) so that the self-tuning can occur. If you’d like, have a passenger look at the handheld display and look at the ‘Cl Comp’ value. Once this value is close to zero, the self-tuning process has been completed in that engine operating area. Next, put the car into gear if it’s an automatic and let it run there. If the vehicle has air conditioning, you can turn it on, which will put the engine in a different tuning area as well.
“Next, slowly accelerate from a stop. If the transmission is a manual, do some slow clutch engagements away from a stop. Then cruise the vehicle at a steady speed, varying the speeds after a few minutes of steady driving. You can also drive in different gears. What you are trying to do is run the vehicle at different engine speed and loads.
“After driving under various driving conditions, you can perform some harder acceleration runs, including WOT runs.”
“After this, the Sniper EFI will have performed most of the self-tuning needed to occur.”
“Just performing routine driving will accomplish this process. After the engine is up and running minor tuning refinements can be performed to optimize fuel economy and power.”
…
With Holley’s Sniper EFI, you get all of the benefits of electronic fuel injection, plus ease of installation along with self-tuning.
Bottom line? Joining the ranks of the fuel injected has never been easier, particularly with the price point Holley has established with this system.
What are the key diffences between this and the MSD master kit at about the same price?
Hey Lawrence, if you’re referring to the MSD Atomic EFI Throttle Body System (part number 2900), it handles applications up to 525 horsepower. The Holley kit(s) Wayne’s using in this story supports up to 650 HP.
How much blow thru boost can this Sniper EFI handle?
Hey Dave, we reached out to the folks at Holley for an answer, and here’s what they said:
“Sniper EFI comes with a 2 bar map sensor that will handle up to 15 pounds of boost. Just remember forced induction has a higher brake specific, which means the horsepower rating of 600 is for naturally aspirated applications. The rating for forced induction will be more like 400-450 hp, depending on what type of forced induction the engine has.”
Does the Holley draw power from the battery when the car is off? I have an Atomic EFI that drains the battery if not driven.
Is it possible, to use the factory installed catalytic Converter ?
I am building a 1977 Corvette with 435 horsepower dual exhaust an HEI distributor aftermarket what’s 65000 I’m running spark plugs Autolite 36s will this be a good system but this build
I have a 68 Ford ranchero with a built 302 stock distributor headers will this sinper kit work with this