Over the years, drag racers with door cars have gone through all sorts of suspension arrangements. Lift bars, slapper bars, Super Stock springs, leaf links, ladder bars, three-links, four-links, and torque arms (there may be others too, but it’s a start). Of all of the systems, the most common you’ll see today is the equal length four-link, probably followed by the ladder bar.
To complicate things, there has been quite a bit penned over the years regarding suspension setup–some right and some wrong (some very seriously wrong). That has led to all sorts of misinformation, which in turn is bad news for the racer. What we’ve done here is cut through the maze of information (good and bad) and we’ve gone straight to an established expert on the subject–Jerry Bickel.
It should be no surprise to anyone reading this that Bickel has built more than his fair share of championship winning race cars, and he is certainly no stranger to tuning suspension systems. What you’ll see below is Bickel’s personal take on ladder bars and four-link setups, along with advice on how to set up a 4-link suspension.
Story Overview
- Equal length four-link and ladder bar rear suspensions are popular for drag racing
- Learn how changes in the ladder bar front pickup point location can have a considerable influence on chassis behavior
- Learn what a four-link instant center is and how setting its length and height can be used to fine-tune the car’s suspension and handling
Ladder Bars
Let’s start at the beginning.
When a drag car launches, the rear-end wraps up. The purpose of a traction device is to turn that wrap-up into forward motion.
Consider the case of a ladder bar.
This is a simple triangular-shaped device that connects the rear-end housing to the frame. The ladder bar prevents excessive suspension wrap up by pushing up on the frame at the point of forward connection (basically the point where the upper and lower bars of the ladder bar intersect). The front of the car is lifted or “picked up” by this section. As a result, the forward attachment point is called the pickup point. If the car has two ladder bars (as nearly all do), there are really two pickup points–one on each side of the car (see illustration #1 below).
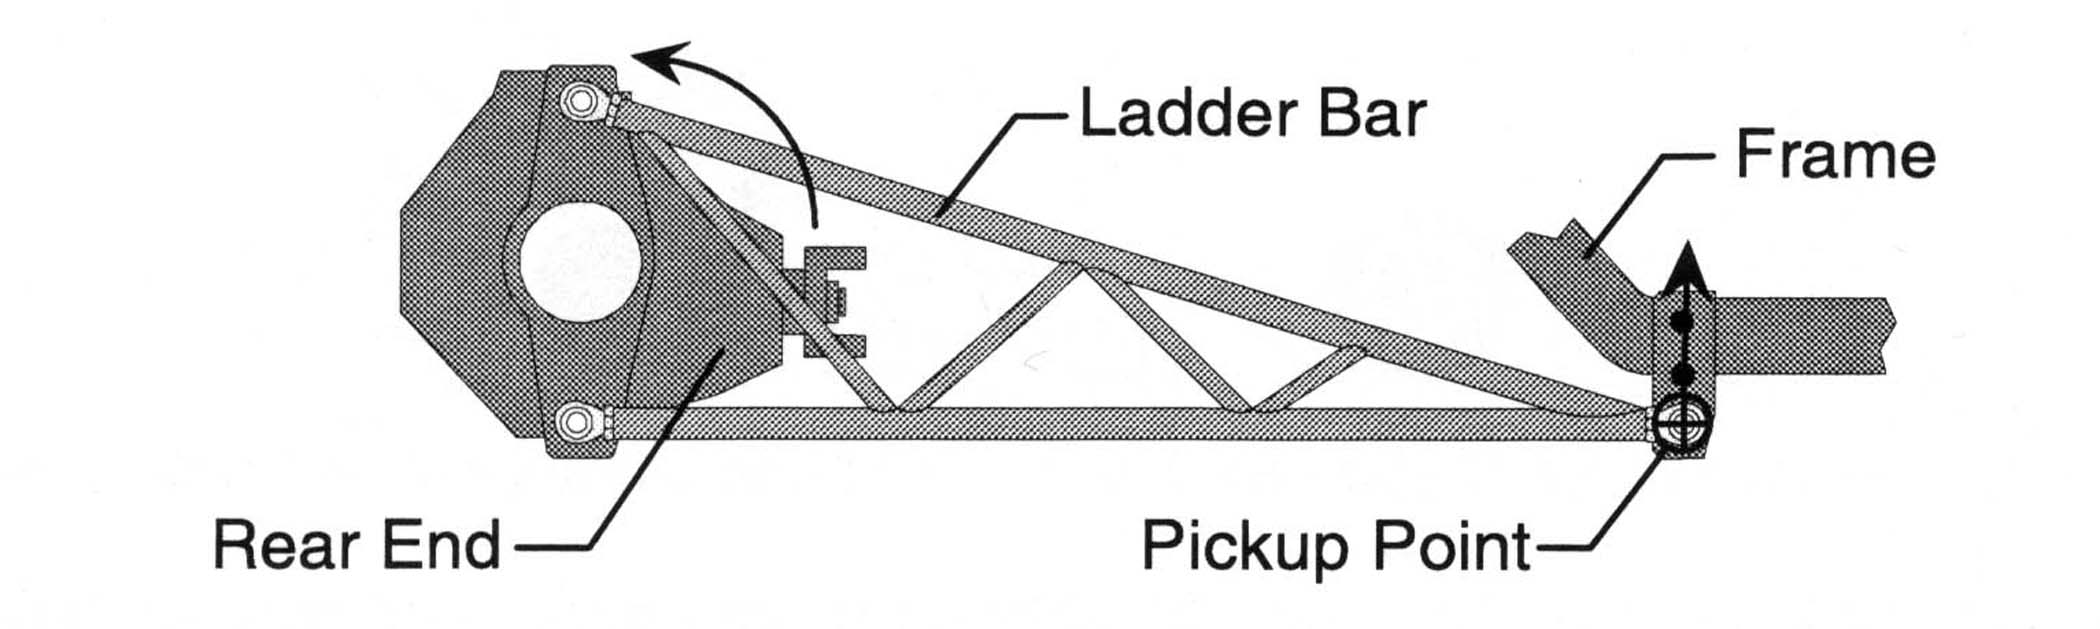
Illustration #1
Consider what happens when the ladder bars push up on the chassis at the pickup point. The respective bar on each of the car also pushes down on the tires and wheels. This effectively “plants” the tires, which in turn, makes the car hook (or at least, that’s the hope!).
That all makes sense, but over time racers quickly discovered that changes in that pickup point location can have a considerable influence upon the behavior of the chassis. If, for example, the pickup points were short and high, then the launch would prove violent. This regularly resulted in the slicks wadding up at the launch. Following this initial violent hit, there usually wasn’t sufficient load transfer to actually maintain traction and keep the tires hooked. Between an excessive amount of tire wadding coupled with the reduced traction following the violent hook, elapsed times can suffer (no brainer, we’re sure).
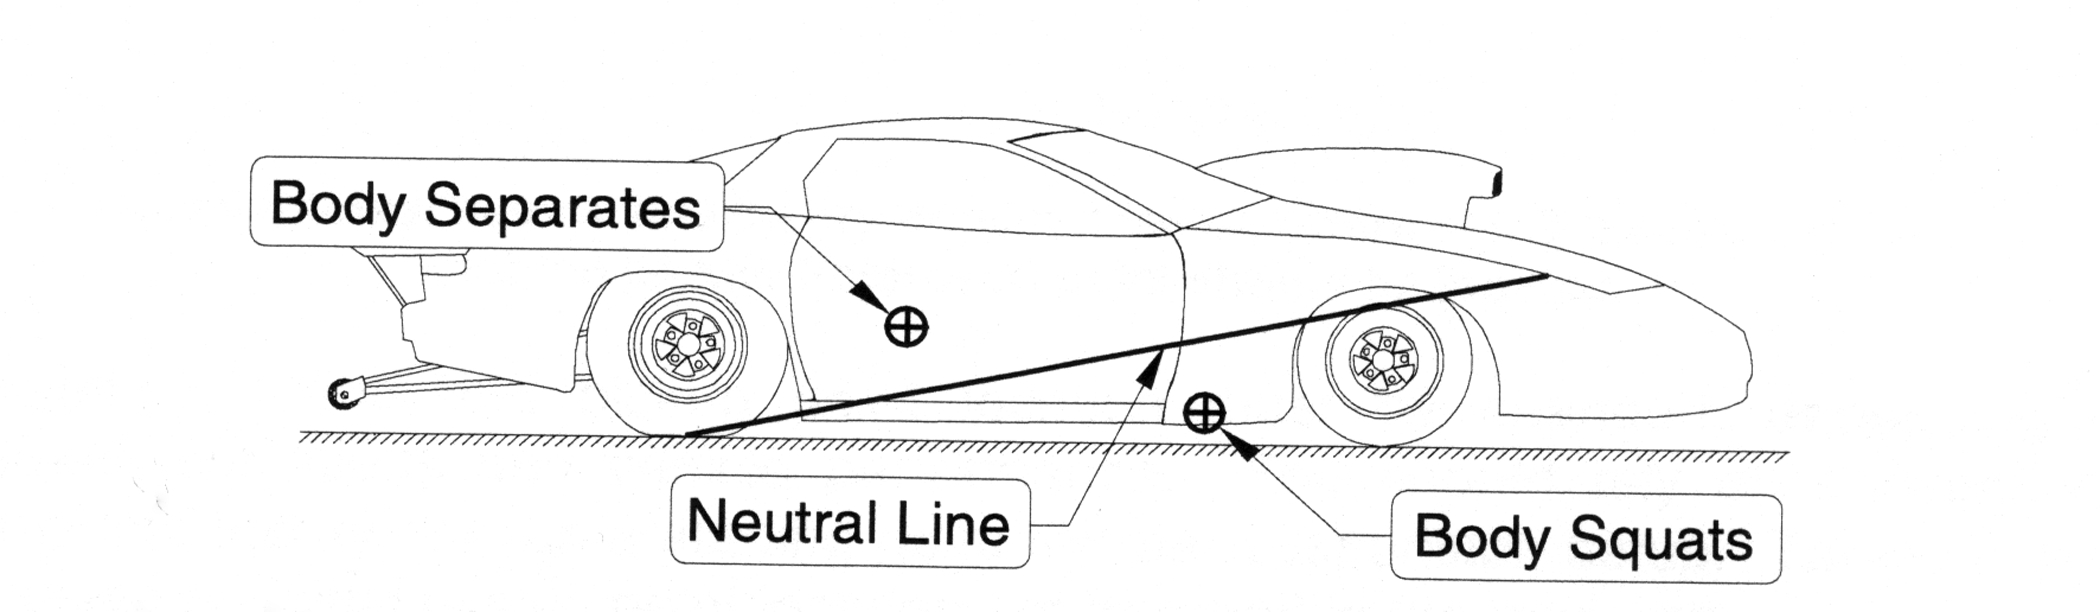
Here’s something else to consider is this: A ladder bar with a short, high pickup point can also create considerable body separation during the launch. It definitely looks wild, but it also can result is horrendous driveshaft alignment–the results of which can prove disastrous.
So instead of a short, high pickup point, what if you had a long, low pickup point? Bickel tells us that this arrangement will tend to hit the tires less violently, but it can also create more total load transfer to the rear tires. Bickel notes that this is generally an acceptable situation, but if you go too far, the chassis may squat excessively or worse, rattle the tires.
The big question with a ladder bar setup is this: How do you make the ladder bar adjustable so that you can tune it from a range of short, high pickup point to long, low pickup point?
It’s not that simple.
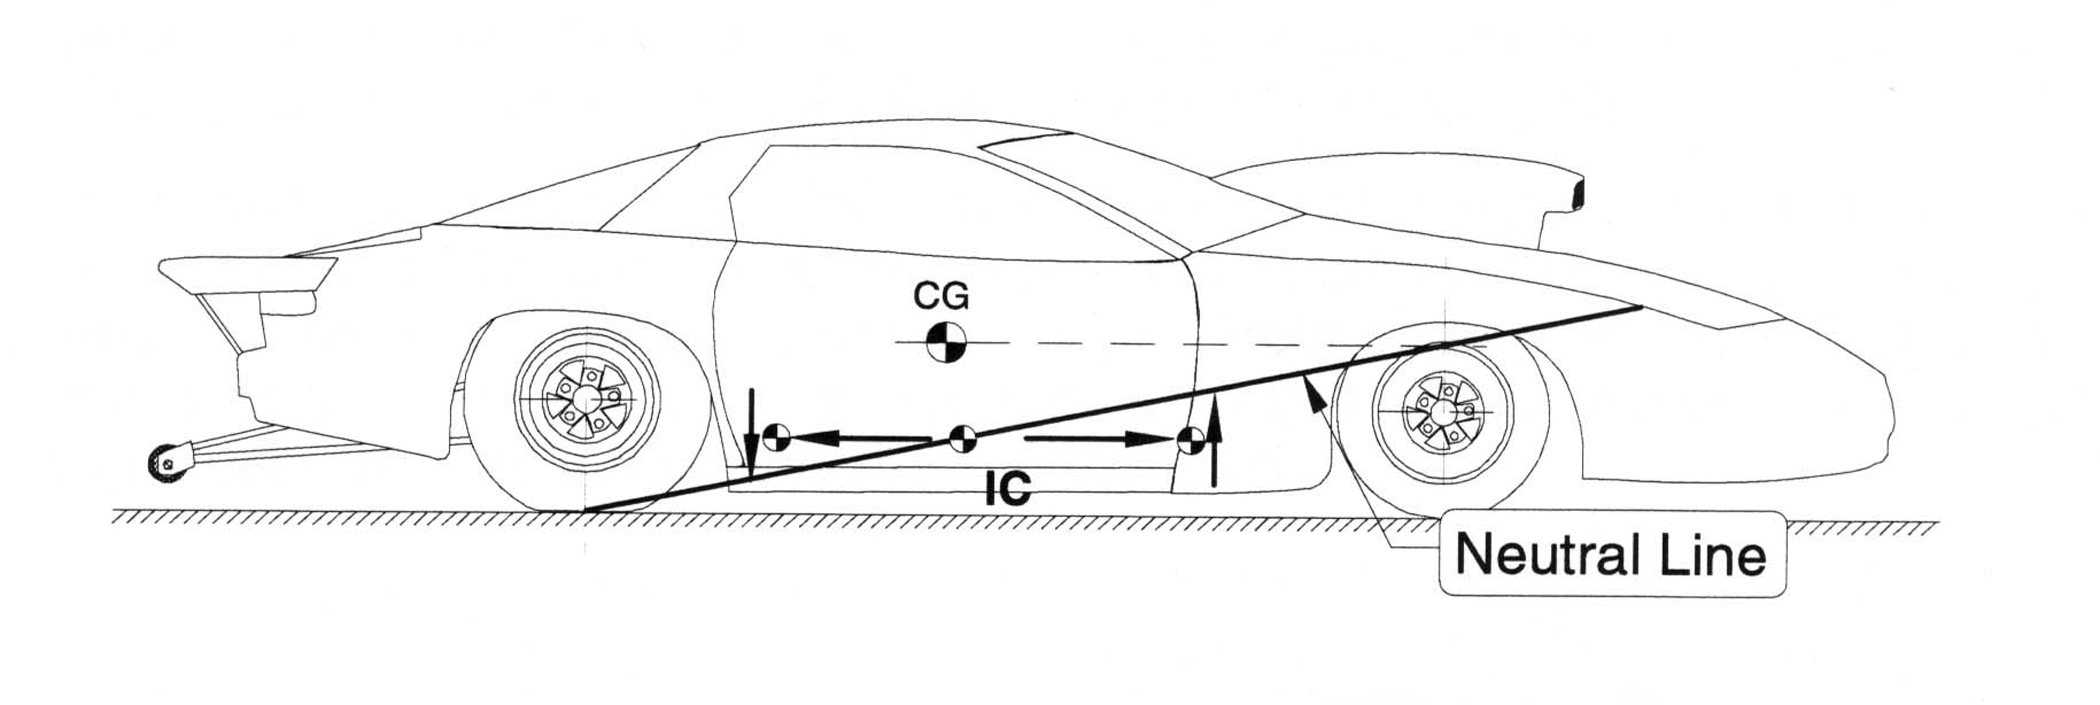
It can be accomplished with several different ladder bars along with several different front ladder bar mounting positions. If you begin with a four-link, Bickel notes that it is entirely possible to create both pickup point extremes (short and high versus long and low). Bickel goes on to tell us that the ideal pickup point locations for a race car are dependent upon multiple factors. But there is one truth: All race cars all have a neutral line that determines how the chassis will behave (see illustration 2 below). If the pickup point is located about this line, the body will separate upon acceleration. If the pickup point is located below this neutral line, the body will squat.
In a perfect situation, the front pickup point should be located near the neutral line. This setup will ultimately work well and prove very stable. The car will neither show squat, nor will it encounter excess body separation. The dilemma here is how do you actually figure out the neutral line location?
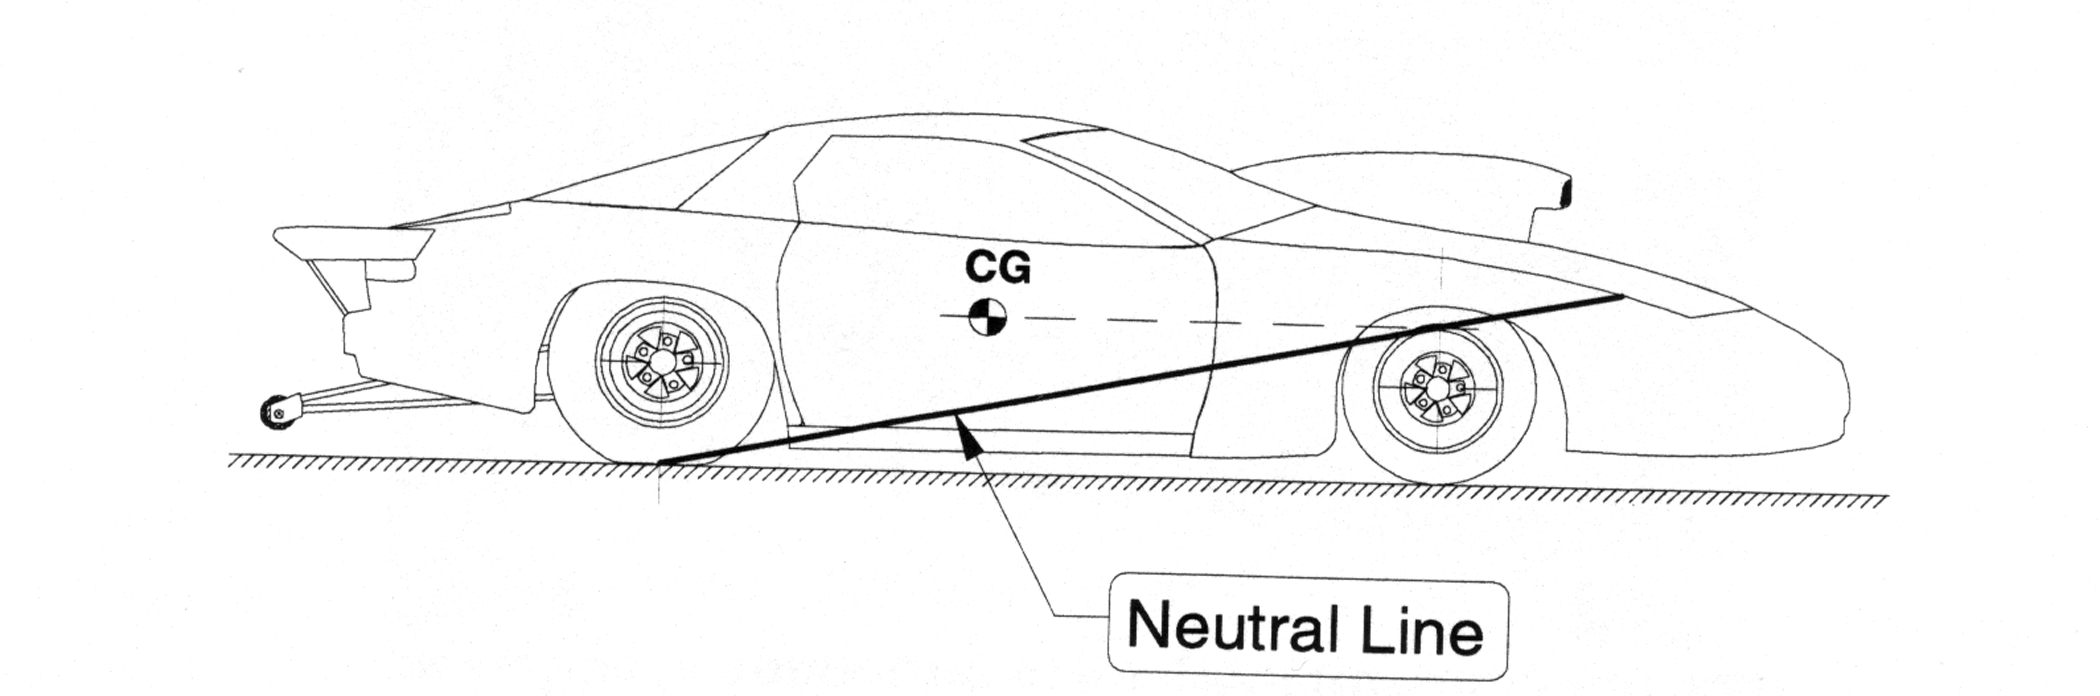
Typically the line of thought states that the neutral line of a drag car can be determined by extending a line level with the height of the center of gravity (CG) until it crosses a vertical line through the front spindle. The neutral line is then represented as a diagonal line that intersects this location and the center of the rear tire-to-pavement contact point (see illustration 3 below).
So far so good, but Bickel points out that there are several difficulties with this method.
“It is difficult to measure the height (Y) of the CG accurately,” Bickel said. “Most racers use the camshaft centerline as the CG height, but without an accurate measurement, it is impossible to locate the neutral line with precision.
“Another problem with this traditional neutral line location theory is that many drag race cars wheel stand through low gear. Once the front tires are in the air, I do not believe that they have an effect upon neutral line location. Experience has shown us that the pickup point distance from the rear axles is at least as important as its height.
“In practice, I find that pickup point location must be changed, depending upon race track conditions and vehicle performance. You should rely on conventional neutral line theory only as a starting point for rear suspension setup.”
Chassis Instant Center
That changes things, and we’re not finished with it yet.
What we need is an idea of something called the “instant center.”
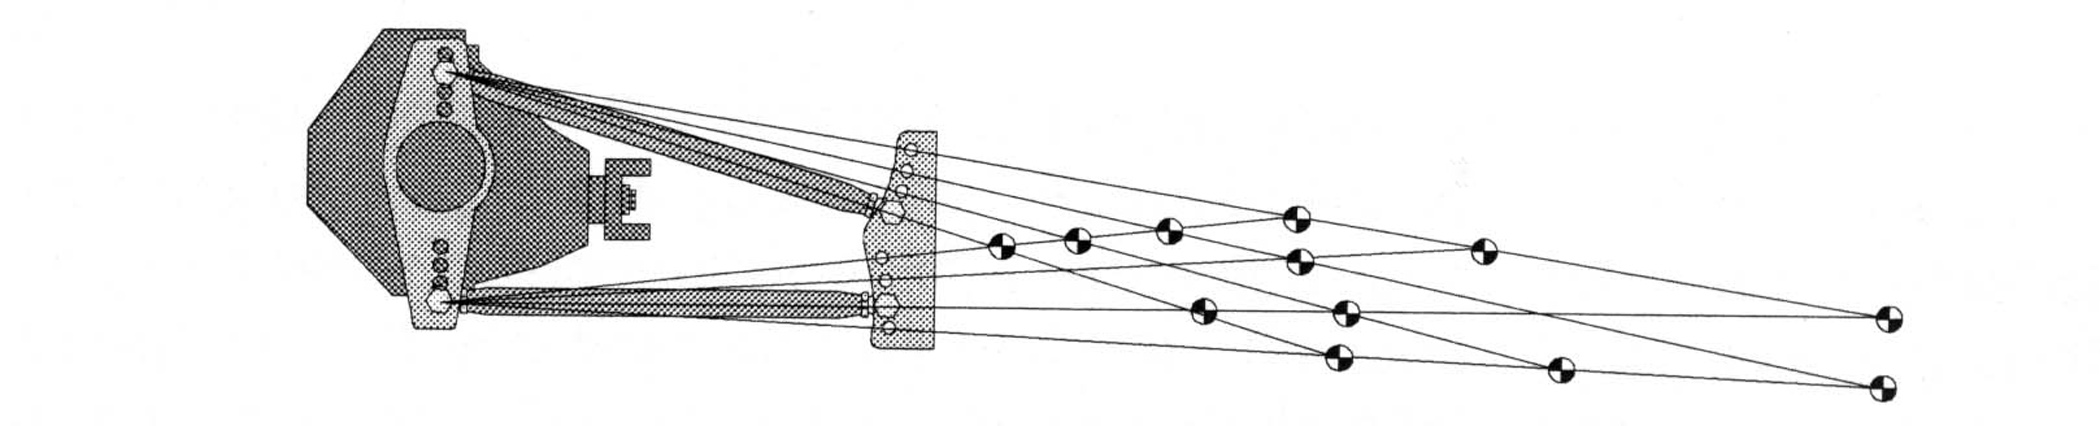
What is instant center? The instant center or “IC” is an imaginary point about which the chassis or a suspension member rotates in a given (instant) position. You can find it by simply projecting lines along suspension members to a point of intersection (for example, the respective bars of a four-link). Where they intersect is called the instant center (see Illustration 4 below). If you examine Jerry Bickel’s drawing, you can see that the four-link has an instant center that acts as a pickup point, even though the actual point is invisible.

Because the respective brackets found on something like a four-link are under load during acceleration and braking, they must be stout. When the race car accelerates, the rear-end wraps up, placing the upper bars in tension while the lower bars are held in compression. As you brake, the forces are reversed.
Establishing Four-link Instant Center
When you or your chassis builder installs the rear-end in your car with a four-link setup, that’s the time to decide exactly which bracket holes you will use for the links. The choices made here will determine the length and height of the instant center. These decisions will ultimately impact how the car works.
Bickel tells us that if you drive the tire down too hard by way of the IC location, it tends to fold up the sidewalls, which in turn makes for poor surface contact. Opposite to this, if insufficient force is applied to the tire, it will simply spin without accelerating the race car. If you look closely at Bickels’s illustration (below), it’s easy to see there are many possible IC locations in a four-link. You have to pick the one that works best for your particular car, but it’s not cut and dry.
So where do you begin?
Bickel offers a very simple explanation to choose the IC pickup points:
“Long, low intersect points create traction for the longest time, but react slowly,” he said. “Short high intersect points create traction for the least time, but react fast.”
Figuring The IC Length
The next thing you’ll have to do is to determine the IC length.
The instant center length can actually affect the overall (race car + driver) reaction time. Bickel states that if your reaction times are good, a long IC point (50-60 inches is generally more desirable than a short one (50 inches or less). This will plant the tires smoothly and keep them planted a long time. However, as we noted much earlier in this article, if too much power is applied to a long IC point, tire shake can result.
The other consideration Bickel tells us about is the amount of torque your engine can deliver to the drivetrain coupled with the type of drag slicks you have.
“For example, racers of high-powered Pro Mod cars often use tires that were initially designed for solid suspension Funny Cars and Top Fuel dragsters,” he said. “The sidewalls of these tires are tall and very flexible, acting like a sort of spongy suspension system. They work best when you limit the rear movement to as little as possible with an IC point on or near the neutral line of the car.
“Further to this, I like to run a long, low IC point in an application such as a high rpm, lower horsepower small block clutch car. This combination seems to help overcome the impact from the high rpm launch and the engine usually doesn’t have enough power to shake the tires.”
Remember when we initially talked about location of the bars in the four-link?
That location relative to the rear axle centerline will make a difference in performance, even if the IC point remains the same. The closer to the housing the upper bar is, the less the car tends to wheel stand. Bickel’s experience shows that when the bottom bar is located lower in the car the suspension, it seems to have better control and simultaneously is less apt to experience tire shake (see illustration 6 below).

Figuring The IC Height
The neutral line (examined previously) slopes within the car from front to rear. Bickel says that should you decide to change the length of the IC, you must also change the height in order to maintain the same anti-squat relationship.
When it comes to IC height, Bickel has this to add:
“The farther forward you move the IC, the lower it must be,” he said. The farther back you move the IC, the higher it must be.”
Some other food for thought is this (again, from Bickels’s tuning bag of tricks): Automatic transmission cars along with lower torque stick shift cars work best when the IC point is from 1- 2 inches above the racing surface. Big power stick shift cars typically need to stay 3-7 inches above the racing surface.
The bottom line here is you have to take your time setting up the four-link for your particular car. Like any other part of the race car, Bickel recommends you follow the above methodology and that you make only one change at a time. It’s very important to keep notes of the changes too.
You can tune your four-link.
There’s absolutely no voodoo or black magic involved.
SOURCE: Jerry Bickel Race Cars
Goooooood thanks..
How do you set up caltracs
A bit late reply, but: Jack your car up so the wheels are hanging freely. Then adjust so that the pressure point is just resting against the spring. Then tighten everything up and put the car back on its wheels.
Ive find that mine (stick car) is happier with an additional 1-1.5 turns of preload
Thanks for the info
intresting thanks
good read thanks! =)
[…] Four link tuning A drag racing friend of mine showed me this article. It's a good read and certainly useful for our trucks. I like the idea of having a bracket on the axle that would have multiple mounting points. That would be cool. Figure Four: A Guide to Tuning Your Four-Link Suspension System – OnAllCylinders […]
[…] Read More […]
[…] Four-Link […]
I would love to see something about stick style suspension on a dragradial car
I just freaking love drag racing
I disagree with most of what was said in above article that was the way it was done 20 years ago all info is outdated
Oh? Did physics change? I’d like to hear some specifics.
Physics never changes?? How can it be out date??.
Would you care to elaborate on what the article states.
[…] you understand the four-link’s function and limitations you can still make your car very quick with one. That being said, in the future I’m going a […]
Interesting Info! Thanks!
On a drag car four link works.Lader bar more for street.
I feel a 4 link is superior to ladder bar, but more time consuming to set up .When the 4 link is right their is nothing better for a high horse power car
Thanks for the info
Hello my name is Robert article from Mr bickel is very informative it leads to a good starting point espically if someone has it allover the place you want the car to move in a forward motion with a minimum wheel stand all is done is a brakage of all peices below chassis.Every race car is different and the track is the best to test a given set up my experience is the keep it as simple as possible only make one change at a time his article on pinion angle is also helpful.i have been drag racing for over 35 years and still learn something new every day.Thanks to Mr Bickel for very helpful article
Your four link information is not great. Four links need to be a parallelogram. By putting them to an instantaneous centre you are inducing twist in the diff housing when the vehicle rolls.
There are way to mitigate this but too much to comment on here.
http://www.sysbearing.com
I am setting up a 4-link in my 74 corvette. Doesn’t the antisquat or neutral line go from rear tire contact patch to the center of gravity point? Why does your line go to cam height over front spindle? Why go through the trouble of weighing the car front to back to find cent. of gravity when you don’t use it?
An interesting and informative article…..I assume the basic principles to setting up a drag car would also be relevant to a circuit racing car which is also fitted with a 4 link rear. ie getting the car to grip and drive off corners……..?????
All too often these tech articles don’t consider other forms of racing. I got nothing from this ……
How well can a 4-link be set up for handling on the street or is it really just a drag racing suspension? Can a sway bar be used with a 4-link for corner handling? I know these are very amateur questions, but I have no experience with 4-link and there seems to be kits for many street rods and pickups.