
Rowing gears with a manual transmission is lots of fun, especially in a lightweight car with way too much horsepower. But when the gears start crunching and the clutch pedal sinks to the floor and you’re stuck at the line or a stoplight, a stick shift suddenly isn’t so much fun anymore.
Clutch problems can be pretty tough to pinpoint, especially without tearing the assembly down to see what’s what. That’s why we asked the experts at Centerforce for the causes of the most common clutch culprits—poor shifting, clutch slippage and shudder, and improper clutch release. Some of the causes aren’t even connected to the clutch itself.
While we had them on the line, we also hit up the Centerforce pros for some clutch installation tips and answers to the most common questions asked by their customers. So let’s have some clutch chatter out there—the talking kind, that is.
Clutch Troubleshooting
Causes of Poor or Notchy Shifting
• Improper clutch release caused by faulty linkage or improper release linkage adjustment
• Improperly adjusted shifter or shift linkage
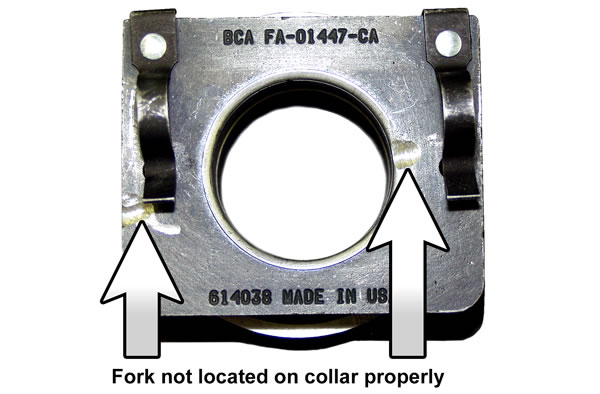
• Damaged/bent shift fork or forks
• Worn transmission synchronizer rings
• Improper transmission lubricant
• Pilot bearing/bushing binding on transmission input shaft
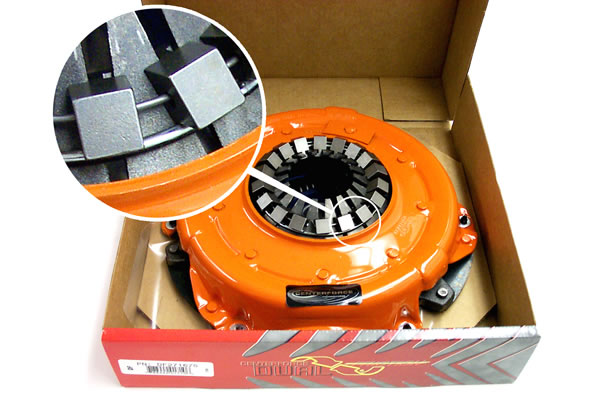
• Clutch disc hub spring pack hitting flywheel or flywheel bolts
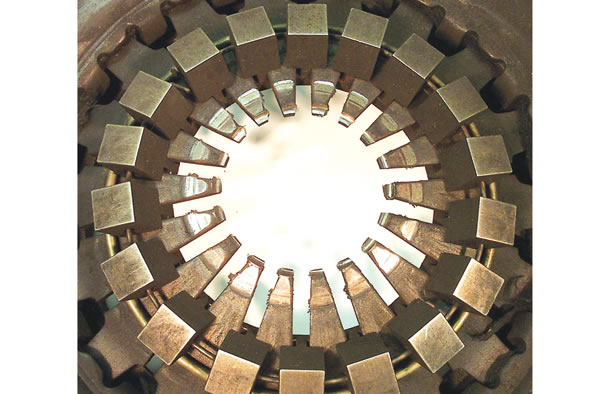
• Damaged or defective pressure plate drive straps
• Bellhousing misalignment
Causes for Clutch Slippage
• Improper clutch adjustment
• Improper clutch release linkage adjustment
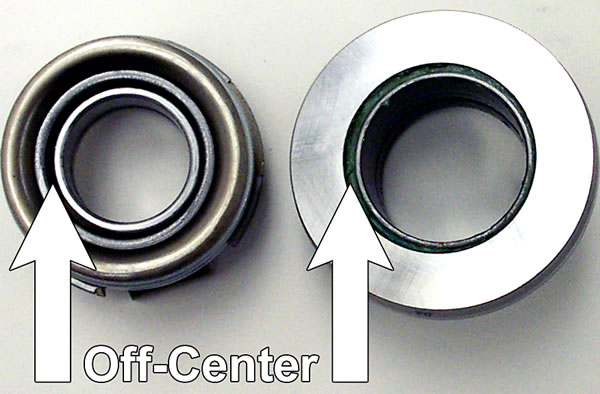
• Incorrect throwout bearing (too long or too short)
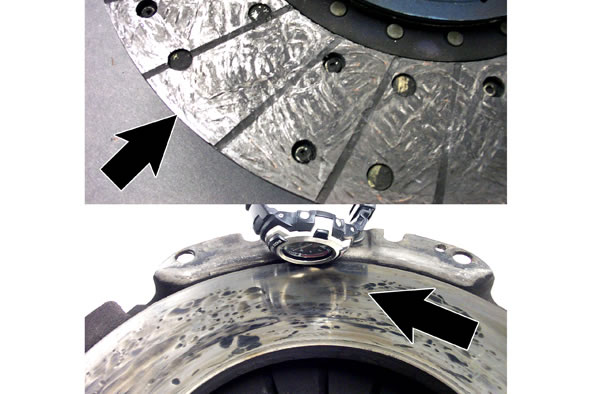
• Clutch assembly contaminated with grease or oil
• Clutch assembly not fully seated due to improper break-in procedure
• Flywheel not properly resurfaced—clutch disc is glazed
• Wrong clutch assembly for the vehicle and/or application (street, drag racing, etc.)
• Clutch assembly not strong enough for the vehicle’s power
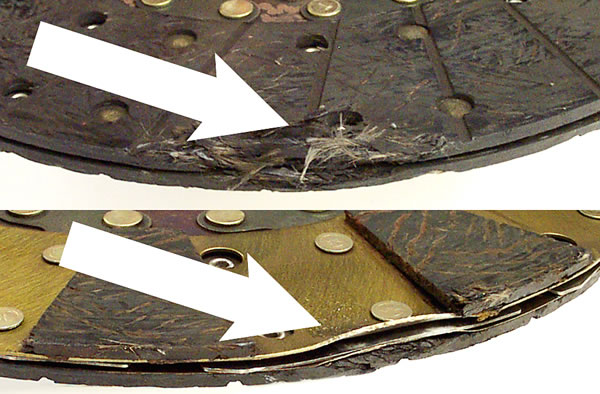
• Broken clutch disc or missing friction material
• Defective or failed clutch assembly
• Flywheel improperly resurfaced
• Damaged or worn throwout bearing collar
• Damaged or bent clutch assembly
• Incorrect gear ratio to tire diameter
Causes of Improper Clutch Release
• Release linkage damaged, not properly adjusted or set
• Flywheel not surfaced or improperly surfaced before installing a new clutch
• Flywheel machined too thin or not manufactured to OEM specifications
• Leaking hydraulic system or trapped air in hydraulic system
• Release linkage cable stretched or damaged
• Improper clutch fork geometry due to a too-thin flywheel or deeper than stock bellhousing
• Improperly adjusted pivot ball
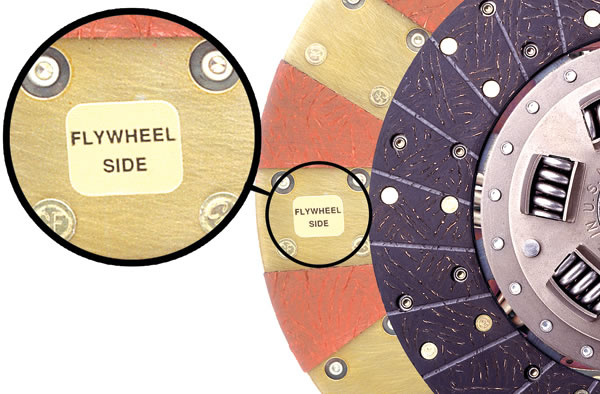
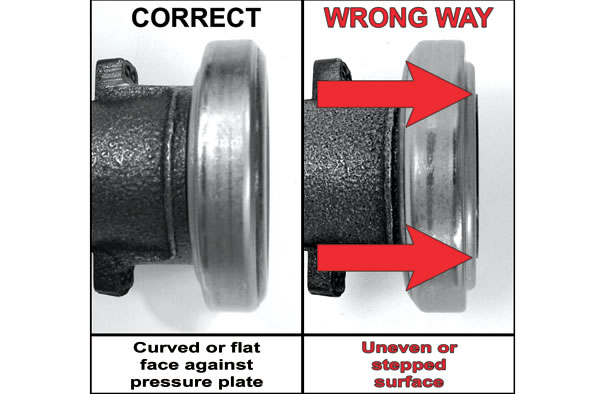
• Clutch disc installed backwards
• Clutch disc hitting flywheel bolts
• Clutch disc binding on transmission input shaft
• Clutch disc runout due to bent input shaft
• Bent or damaged pressure plate assembly and/or clutch disc
• Clutch disc is too thick or has an excessive marcel spring
• Pressure plate has defective or damaged drive straps
• Damaged, worn, or improperly installed pivot bearing/bushing
• Damaged or worn throwout bearing collar
Causes of Clutch Chatter or Shudder
• Improper break-in procedure
• Flywheel not properly resurfaced before installing a new clutch
• Flywheel or clutch disc friction surface not parallel with the crank flange surface
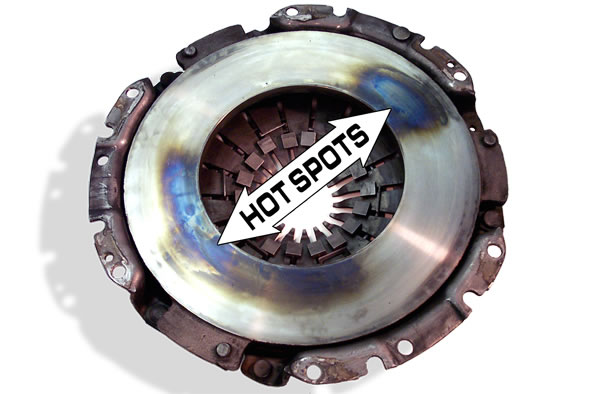
• Flywheel has severe hard spots or hot spots
• Flywheel has an improper step or cup dimension
• Defective pressure plate and/or disc
• Disc has inadequate or no marcel (not enough cushion between friction facings)
• Oil or grease contamination on clutch facings
• Worn or damaged clutch linkage
• Bent cover assembly and/or clutch disc
• Damaged/excessively worn U-joints or CV joints
• Misaligned U-joints
• Excessive backlash in differential
• Excessive driveline angle
• Improper gear ratio versus tire diameter
• Improperly tuned engine
• Worn/damaged engine or transmission mounts
• Bad leaf springs, bushings or mounts
Clutch FAQs
How important is proper bellhousing alignment?
Bellhousing alignment is crucial for proper clutch function and reliability. Due to OEM manufacturing tolerances of engine blocks and bellhousings, the transmission centerline and crankshaft centerline can be misaligned. This misalignment may cause hard shifting, pilot bearing/bushing wear, transmission main shaft bearing wear, and/or failure of the clutch disc hub.
What torque specifications do I use on the pressure plate and flywheel bolts?
Proper torque is crucial to your safety. You can get bolt torque specifications from your vehicle’s factory service manual or from the bolt manufacturer. Always use a calibrated torque wrench when tightening bolts to their proper torque specifications.
Is it necessary to use the alignment dowel pins on my flywheel?
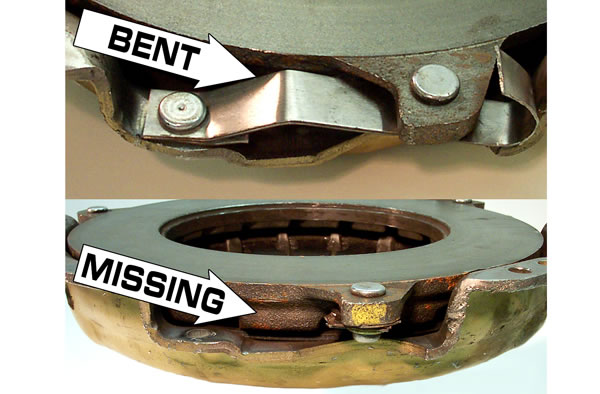
If your OEM flywheel came with alignment dowel pins, you must reuse them. The pins properly locate the pressure plate to the flywheel for balance purposes, and provide shear strength between the pressure plate and flywheel. Replace the pins if they are worn, damaged, broken, or missing.
Must the flywheel be resurfaced for installing a new clutch?
Yes. A flywheel is subject to heat, scoring and warping during use just like brake rotors and drums—it must be resurfaced or replaced to assure good clutch performance. Resurfacing must be performed on a qualified flywheel grinding machine. Using a hand-held electric or pneumatic grinder/sander or scuffing the surface with sandpaper does not constitute a properly resurfaced flywheel. Centerforce does not recommend resurfacing flywheels on a metal or brake lathe or a blanchard grinder. Refer to your vehicle’s factory service manual for specifics on flywheel resurfacing and specifications.
Installation Tips
• Do not get any petroleum-based products on the clutch disc friction material. They can cause clutch shudder, slippage, premature wear, or improper clutch operation.
• Always use a pilot tool to align the clutch disc to the pressure plate and flywheel. This will prevent damage to the disc during installation of the transmission.
• Always clean the pressure plate and flywheel surfaces with brake cleaner or acetone before installation.
• Always check a new clutch disc for proper fitment on the transmission input shaft prior to installation. Ensure the input shaft splines are free of wear and are not twisted.
• Replace any worn components such as input shaft collars, clutch forks, slave/master
cylinders, etc.
See more troubleshooting tips in the slide show below:.


Excellent set of pictures showing all the common faults.
It’s much easier to send someone with questions here than to spend half a page trying to describe what can be shown in a single picture.
And I must say, I love my DYAD clutch on my 03 Cobra. Very quiet and smooth with reasonable pedal pressure.
best
Just had a centerforce clutch installed by a reputable mechanic. There is a pretty bad shudder when I take off in first. Otherwise all other gears are smooth. The slower I go in first, the worse the shudder gets. The mechanic said it should go away once it is “broken in”? I’m concerned about driving the car like this.
[…] have (refer to your vehicle service manual). We’d also recommend you check out our post on troubleshooting clutches, since some transmission troubles can be traced to that […]
Clutch won’t release pulled from all the way back with a ratchet straps and it still doesn’t release