I’m a beginner when it comes to working on engines. We plan to add an aluminum intake manifold to the 350 small block Chevy in my 1972 Chevy C-10 pickup. I’ve done some research as far as swapping the distributor so I think I have that covered, but I’m curious about any tips or tricks you can suggest for sealing the intake manifold to the heads. Is there a particular gasket that works well? Thanks
F.S.
There are several important points to consider when installing a new intake gasket on a small block Chevy and the following suggestions also relate to installing an intake on any engine where the lifter valley is sealed by the bottom of the intake manifold such as a small block Ford or Mopar.
To answer the gasket question, I’ve been using Fel-Pro gaskets for decades but there are plenty of quality gaskets from Victor-Reinz, Cometic, Edelbrock, Mr. Gasket, and many others. There are several different kinds of intake gaskets from Fel-Pro both in stock replacement and performance gaskets. The performance gasket I often use for a stock or mild performance cylinder head intake port is this one, part number FEL-1205. Summit Racing also makes a very good intake gasket that’s very affordable.
How to Install an Intake Manifold on a Small Block Chevy
We’ll assume you have not started yet, so the first item is to drain the coolant out of the radiator to avoid spilling coolant into the lifter valley. Bump the engine over until the distributor points to Number One spark plug and then remove the distributor. Now you can remove the intake bolts. If the intake was sealed well, it may stick to the engine very tightly. Try using very short screwdriver with a wide blade into the area at the front of the intake manifold and drive it in with a small hammer. This will wedge the manifold up and break the seal to allow you to remove the intake.
The next step is to emphasize that the cylinder head and china wall sealing surfaces must be very clean and dry with no residual gasket material, oil, or grease. Start the cleaning process by using paper towels, newsprint, or small towels to seal the intake valley and intake ports so dirt and grime do not fall into the engine. The china walls we referred to are the curved end portions of the block that look like the Great Wall of China. If you are installing a used manifold, make sure the replacement manifold sealing surfaces are also clean and free from grease and oil.
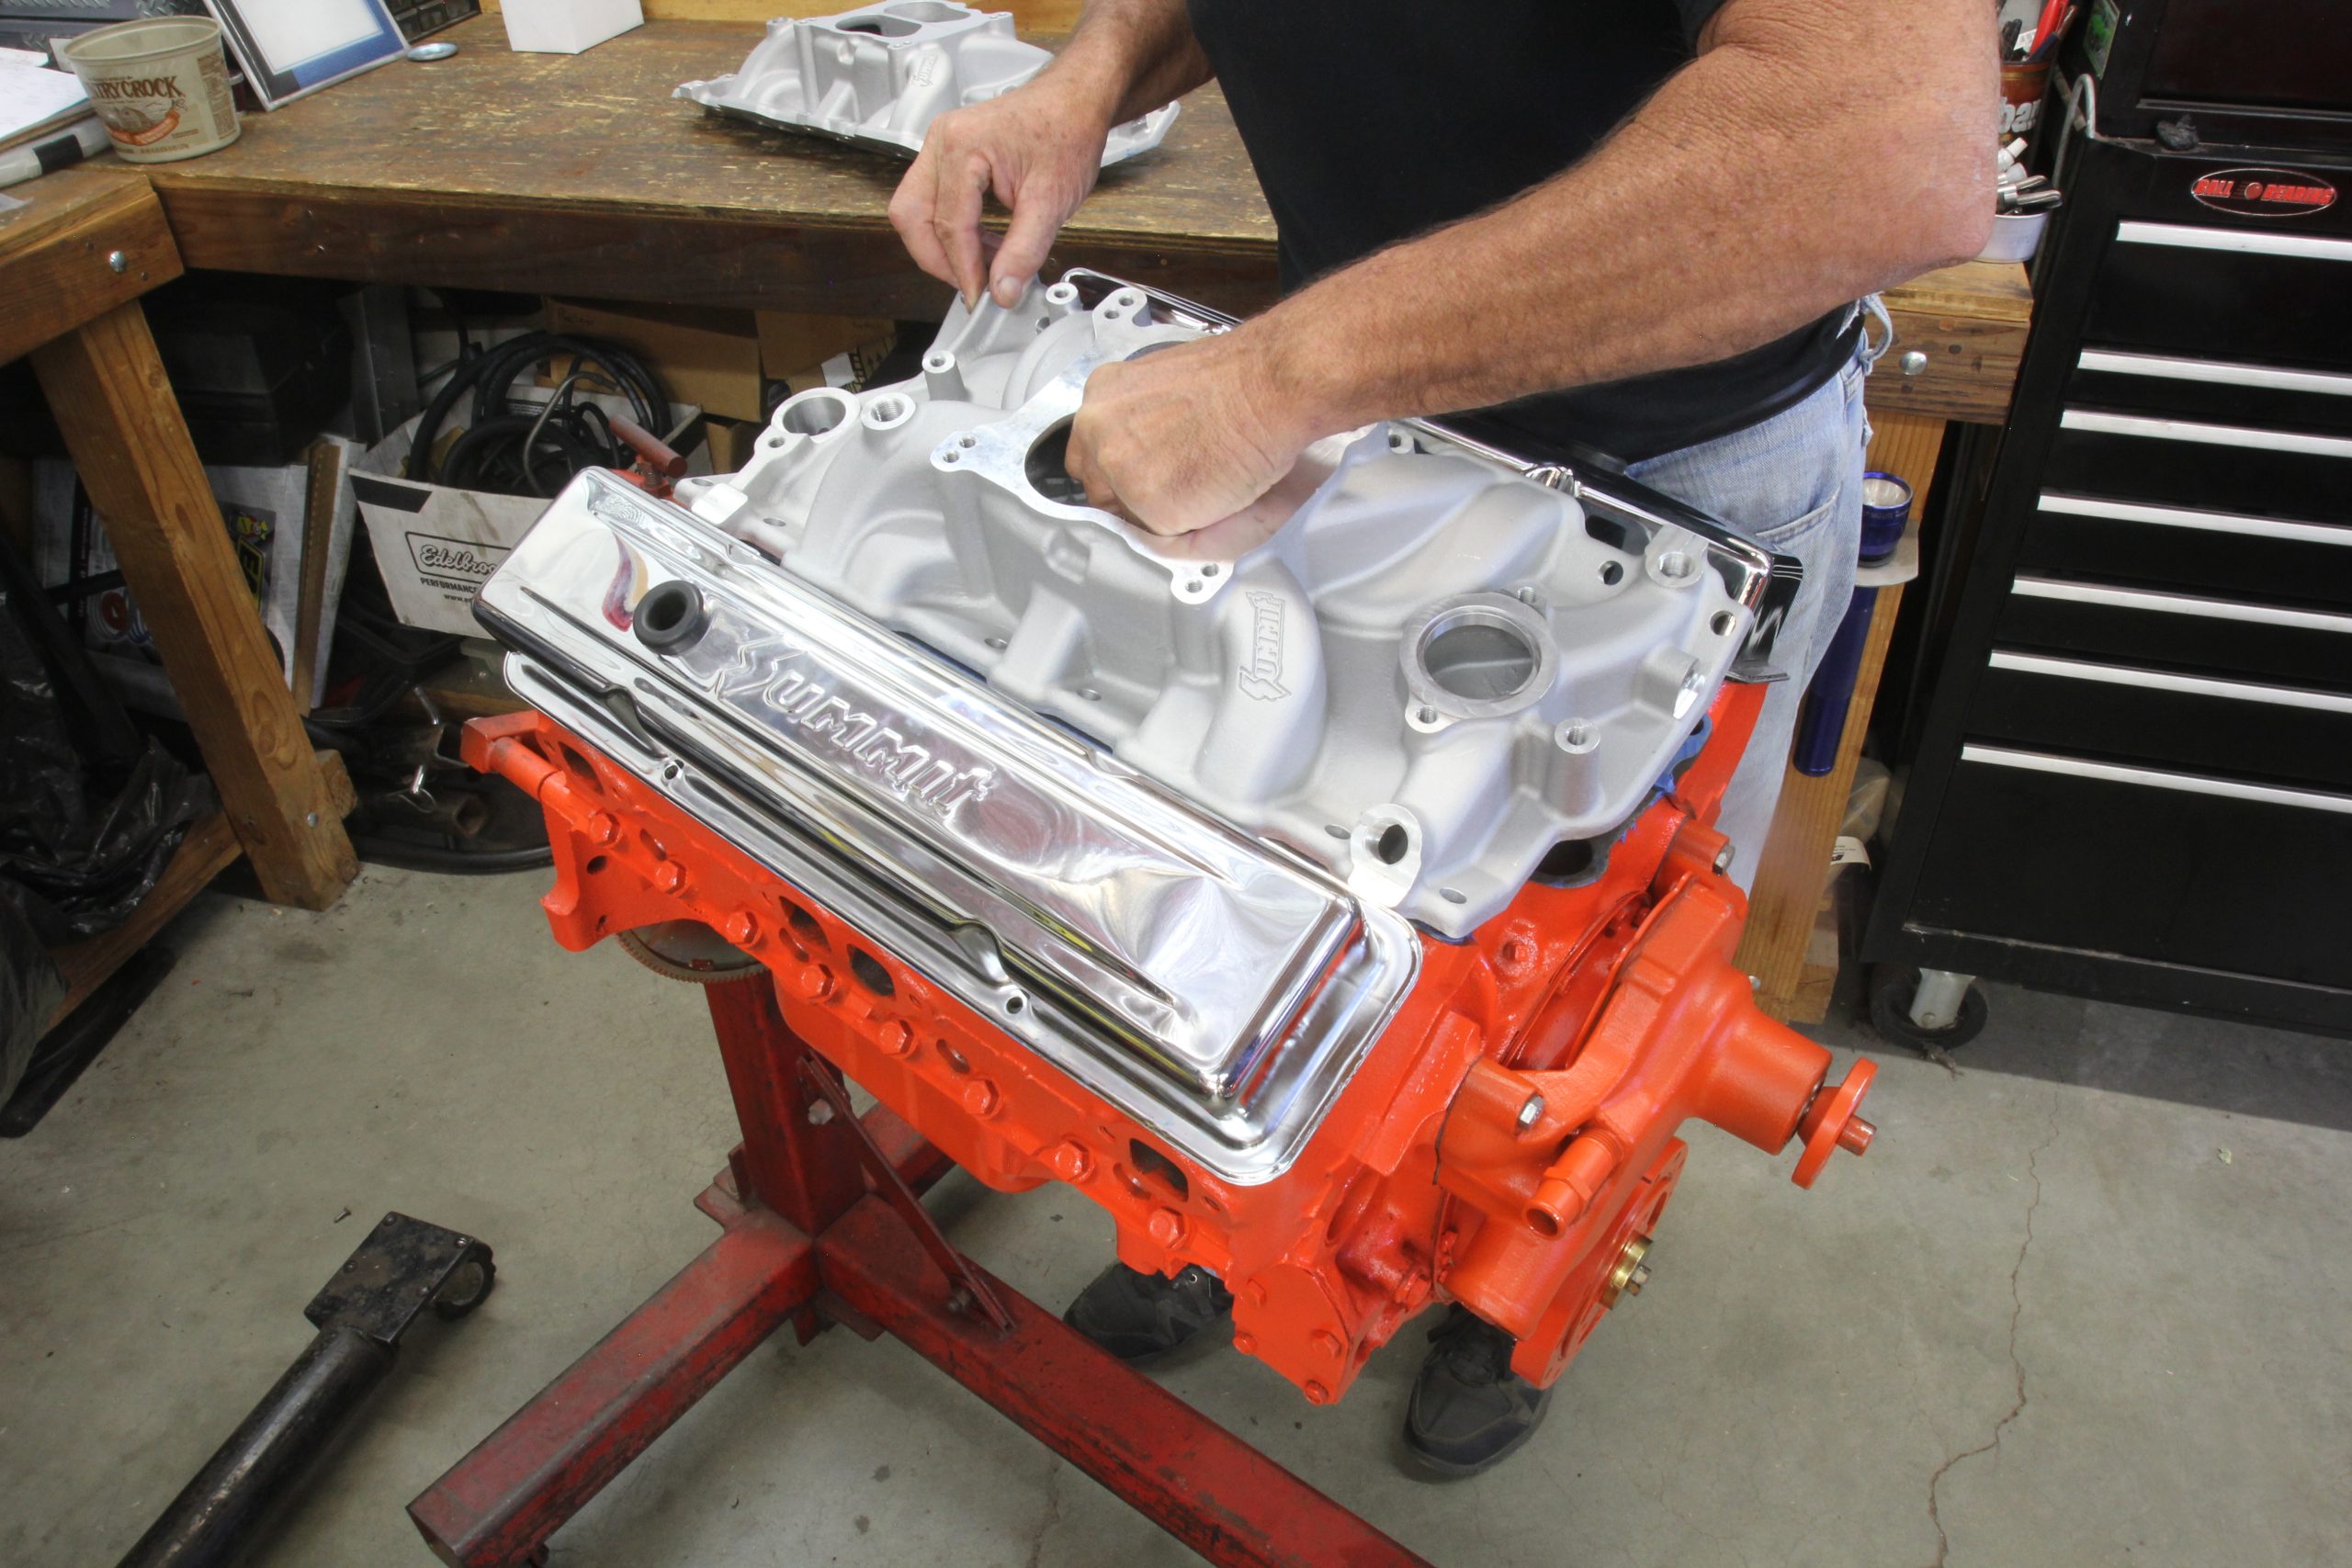
Next, place the two intake gaskets in place for a test fit. You might want to use a looped piece of masking take to hold the intake gaskets in place. With the gaskets in place, drop the intake manifold into place to ensure the bolt holes line up with the holes in the heads. If they do not, the intake may need to be machined to properly fit the engine.
This occurs because the block, heads, or both may have been milled which changes the relationship of the intake manifold to the intake ports on the heads. This will generally require the intake surfaces to be milled an equal amount to allow the bolts to line up. In rare cases, the bottom of the intake port may not be fully sealed and will pull oil up into the intake ports. If you think the ports may not line up, there are wax string kits available from Hughes Engines that allow you to check the alignment of the intake. This website also has instructions on how to use the product. This company focuses on building and selling Chrysler engines and components but this wax kit will perform well on any V8 engine.
Assuming the intake bolt holes all line up and all the bolts test fit okay, also check the clearance between the bottom of the intake end rails and the china wall on the block both front and rear. If this clearance is roughly 1/4 inch or so, this is sufficient. If the clearance is tight or non-existent then the end rails will need to be milled. If the clearance is too wide (3/8 inch or more), then the end seal will not contact the manifold which will cause a massive oil leak.
Now with the clearances checked, inspect the intake manifold bolts for length. A too-short bolt may pull threads out of the head but bolts that are too long can also be bad. On a small block Chevy there are four bolts positioned so that if a bolt is too long it will contact the pushrod and either bend the pushrod or damage it and put metal shavings into the engine.
Assuming the bolts are the proper length, make sure the threads are clean and place some thread sealer on the inner eight bolts. If thread sealer is not used, oil can travel up the threads and leak onto the intake manifold.
Sealing Intake Manifold Gaskets
There are a couple of different sealers we like to use when doing this kind of work. To hold the intake gaskets in place on the head, we like Edelbrock’s Gasgacinch, which is a simple contact adhesive. For RTV, we like the Permatex Ultra Gray or Optimum Gray. (There’s a complete parts list at the bottom of this post.)
Before installing the intake, make sure all the rags, paper, and tools have been removed from the lifter valley and heads before installing the gaskets—this sounds silly, but we once removed an intake manifold and found a 9/16 inch combination end wrench lying in the lifter valley where it had been left by an inattentive installer.
Assuming all these measures have been accomplished, place both cork gaskets on each end of the block. Make sure these end seals remain in place and do not move. Some builders prefer to use a bead of RTV on the china wall which is also acceptable. Next, place a very thin outline of RTV around the coolant passage from the head to the intake manifold at all four corners. We want to prevent coolant leaks into the lifter valley. Then place Gasgacinch along the bottom and sides of each intake port on both the cylinder head and the back side of the gasket. This will hold the gasket in place. Before placing the intake gaskets down, place a small dab of RTV in each of the four corners where the intake seals to the cork gaskets. We like to place RTV under each corner of the gasket nearest the end rails. This is a common place where small block Chevys leak.
Before dropping the intake in place, check to make sure there are no bolts, nuts, or debris in the intake manifold. With both intake gaskets in place, carefully drop the intake manifold down onto the heads and make sure the bolt holes are correctly aligned. Start the four corner bolts first to make sure they all start and thread in easily and then install the remaining bolts. Do not tighten any until all bolts are in place. Start with the center bolts and work outward in an expanding pattern to tighten all the bolts. Do not reach final torque in the first pass—save that for the second pass across all 12 intake bolts. The common torque for an aluminum intake is around 20 to 25 lb.-ft., but hand tight seems to work well.
With the intake in place, immediately place a rag over the distributor hole if the distributor is not going to be used right away. This prevents losing bolts or tools down the distributor hole. (It happens far more often than you might think.) Often we place a dummy distributor in the hole that can also be used to pressure lube the engine if it is new.
You mentioned you have the distributor installation process handled so we won’t detail that procedure but just remember that you bump the engine over to have compression with the timing mark around 10 degrees or so and then install the distributor with the rotor pointed to the Number One spark plug. This will ensure the engine will start easily and with no problem. You can also start the engine immediately even though the RTV is not fully cured.
We do this all the time on the dyno with no leaks if the installation was performed properly. Have fun with your first manifold swap!
I agree with all of the above, plus I always run a tap down all the threads to clean them up before installation. Ted
The gaskets mentioned in the article do not have provisions for exhaust to heat the manifold, a potential issue for the reader depending on where he lives, etc. Also, emphasis on dropping the manifold straight down onto the heads, no moving forward or backwards to line it up once down on the heads. Moving once lowered can cause the gaskets to lose their seal at the front and rear resulting an oil leak. Sounds obvious, but it happens.
Author mentions you can start the engine soon even if RTV is not cured. If you are in a hurry, a better solution is The Right Stuff from Permatex. It was invented for shops requiring a quick turn-around time. It sets up fast.
Also, it’s imperative to coat BOTH sides of the gaskets with the sealant of your choice. Only sealing the cylinder head side of the gasket could result in vacuum leaks in the future.
Do it right. Seal both sides of the gasket.
As far as the China wall seals; throw them as far as you can.
They blow out 90% of the time. Again, use The Right Stuff.
Thanks for the info much appreciated fixing ti di my first intake change!!
Thanks for the Great explanation & parts numbers.
Am i making a mistake?
I have an all original ’58 Belair with a 283. I’m considering changing the carb/manifolf to an Edelbrock Pro Flo 4. the engine has just over 100k miles and runs fine although I thought by doing this swap it will start easier, possibly have better millage and not smoke out the vent tube.
Any input would be greatly appreciated.
Can you use a intake manifold seal and what kind will work
okay I need advice, I got an 1979 silverado k10 with a small block chevy 350. I’m getting ready within the next few days to replace the headgaskets and the intake manifold gaskets. my Dad left behind the gaskets I have and my truck was the only carbureted motor he’s had in past 20 years so I’m assuming the obvious that these gaskets are the correct ones I just need a verification. the headgaskets I have are 7733SH1 was lookin on forums and everyone is saying with my 350 stock 4.000 bore these should work even though the bore for them is 4.100 now the intake manifold gaskets are 90314-1 I can’t find anything on if these will work I seen 90314-2 will work but I don’t know how big of a difference there is between the two and I do need to know asap. so if anyone knows for a solid fact that I have the correct gaskets please let me know, much appreciated in advance!
I have a question. To the left side of the crossover opening, there is a raised rectangle in the gasket that is solid instead of being cut out, doesn’t seal anything. This is somewhere around 85, 86ish block and no clue which heads. Came on a Jasper engine remanufactuted around 2001 as far as I can tell. Intake cast 346259, heads 3998983 (as far as I can tell). Heads might be Mexican made for crate engines.
Hi
Does anyone know why there is a 5th hole on the Chevy Spark LS B10s intake manifold. The odd shape hole seems to house coolant to and fro…..but what is its purpose and why on the air intake manifold.
This is a South African 2010 model Chevy Spark.
I would be interested to know the answer.
Cheers
Malcolm – Cape Town South Africa