I have completed a 5.3L LS truck engine swap into my ’69 Nova with a TH350 trans behind it for now. We decided to use the factory ECU and an aftermarket wiring harness. I’d like to use an aftermarket tach to work with the voltage, oil pressure, and water temperature gauges I already have but when we hooked the white wire that is supposed to be the tach lead, the tach does not work. There appears to be multiple solutions to this and those suggestions just don’t sound quite right. Can you help?
J.T.
It appears there are a couple of issues present here that we discovered when we looked into this. From what we can discern, all late model GM LS computers output a four cylinder signal rather than an 8 cylinder version. This is the first issue.
We checked with Painless Performance and the early 24x engines offer a solid signal from the white wire that should supply the proper signal to run your tach—although you will still have to convert the tach to be accurate with a four cylinder signal.
Because you tried this and did not get a signal, it could be that you have a later, Gen IV 5.3L engine. These engines use a 58x crank trigger wheel and it appears they do not offer a sufficiently strong tach signal.
The signal by itself may not be sufficient to drive an aftermarket tachometer. We found a recommendation from AutoMeter that states that when the computer is re-flashed to eliminate the anti-theft components this sometimes renders the tach lead from the ECU with no signal. We’ll run through a couple of different scenarios starting with the easiest and least expensive way to drive your coil and then get into a couple of more expensive alternatives.
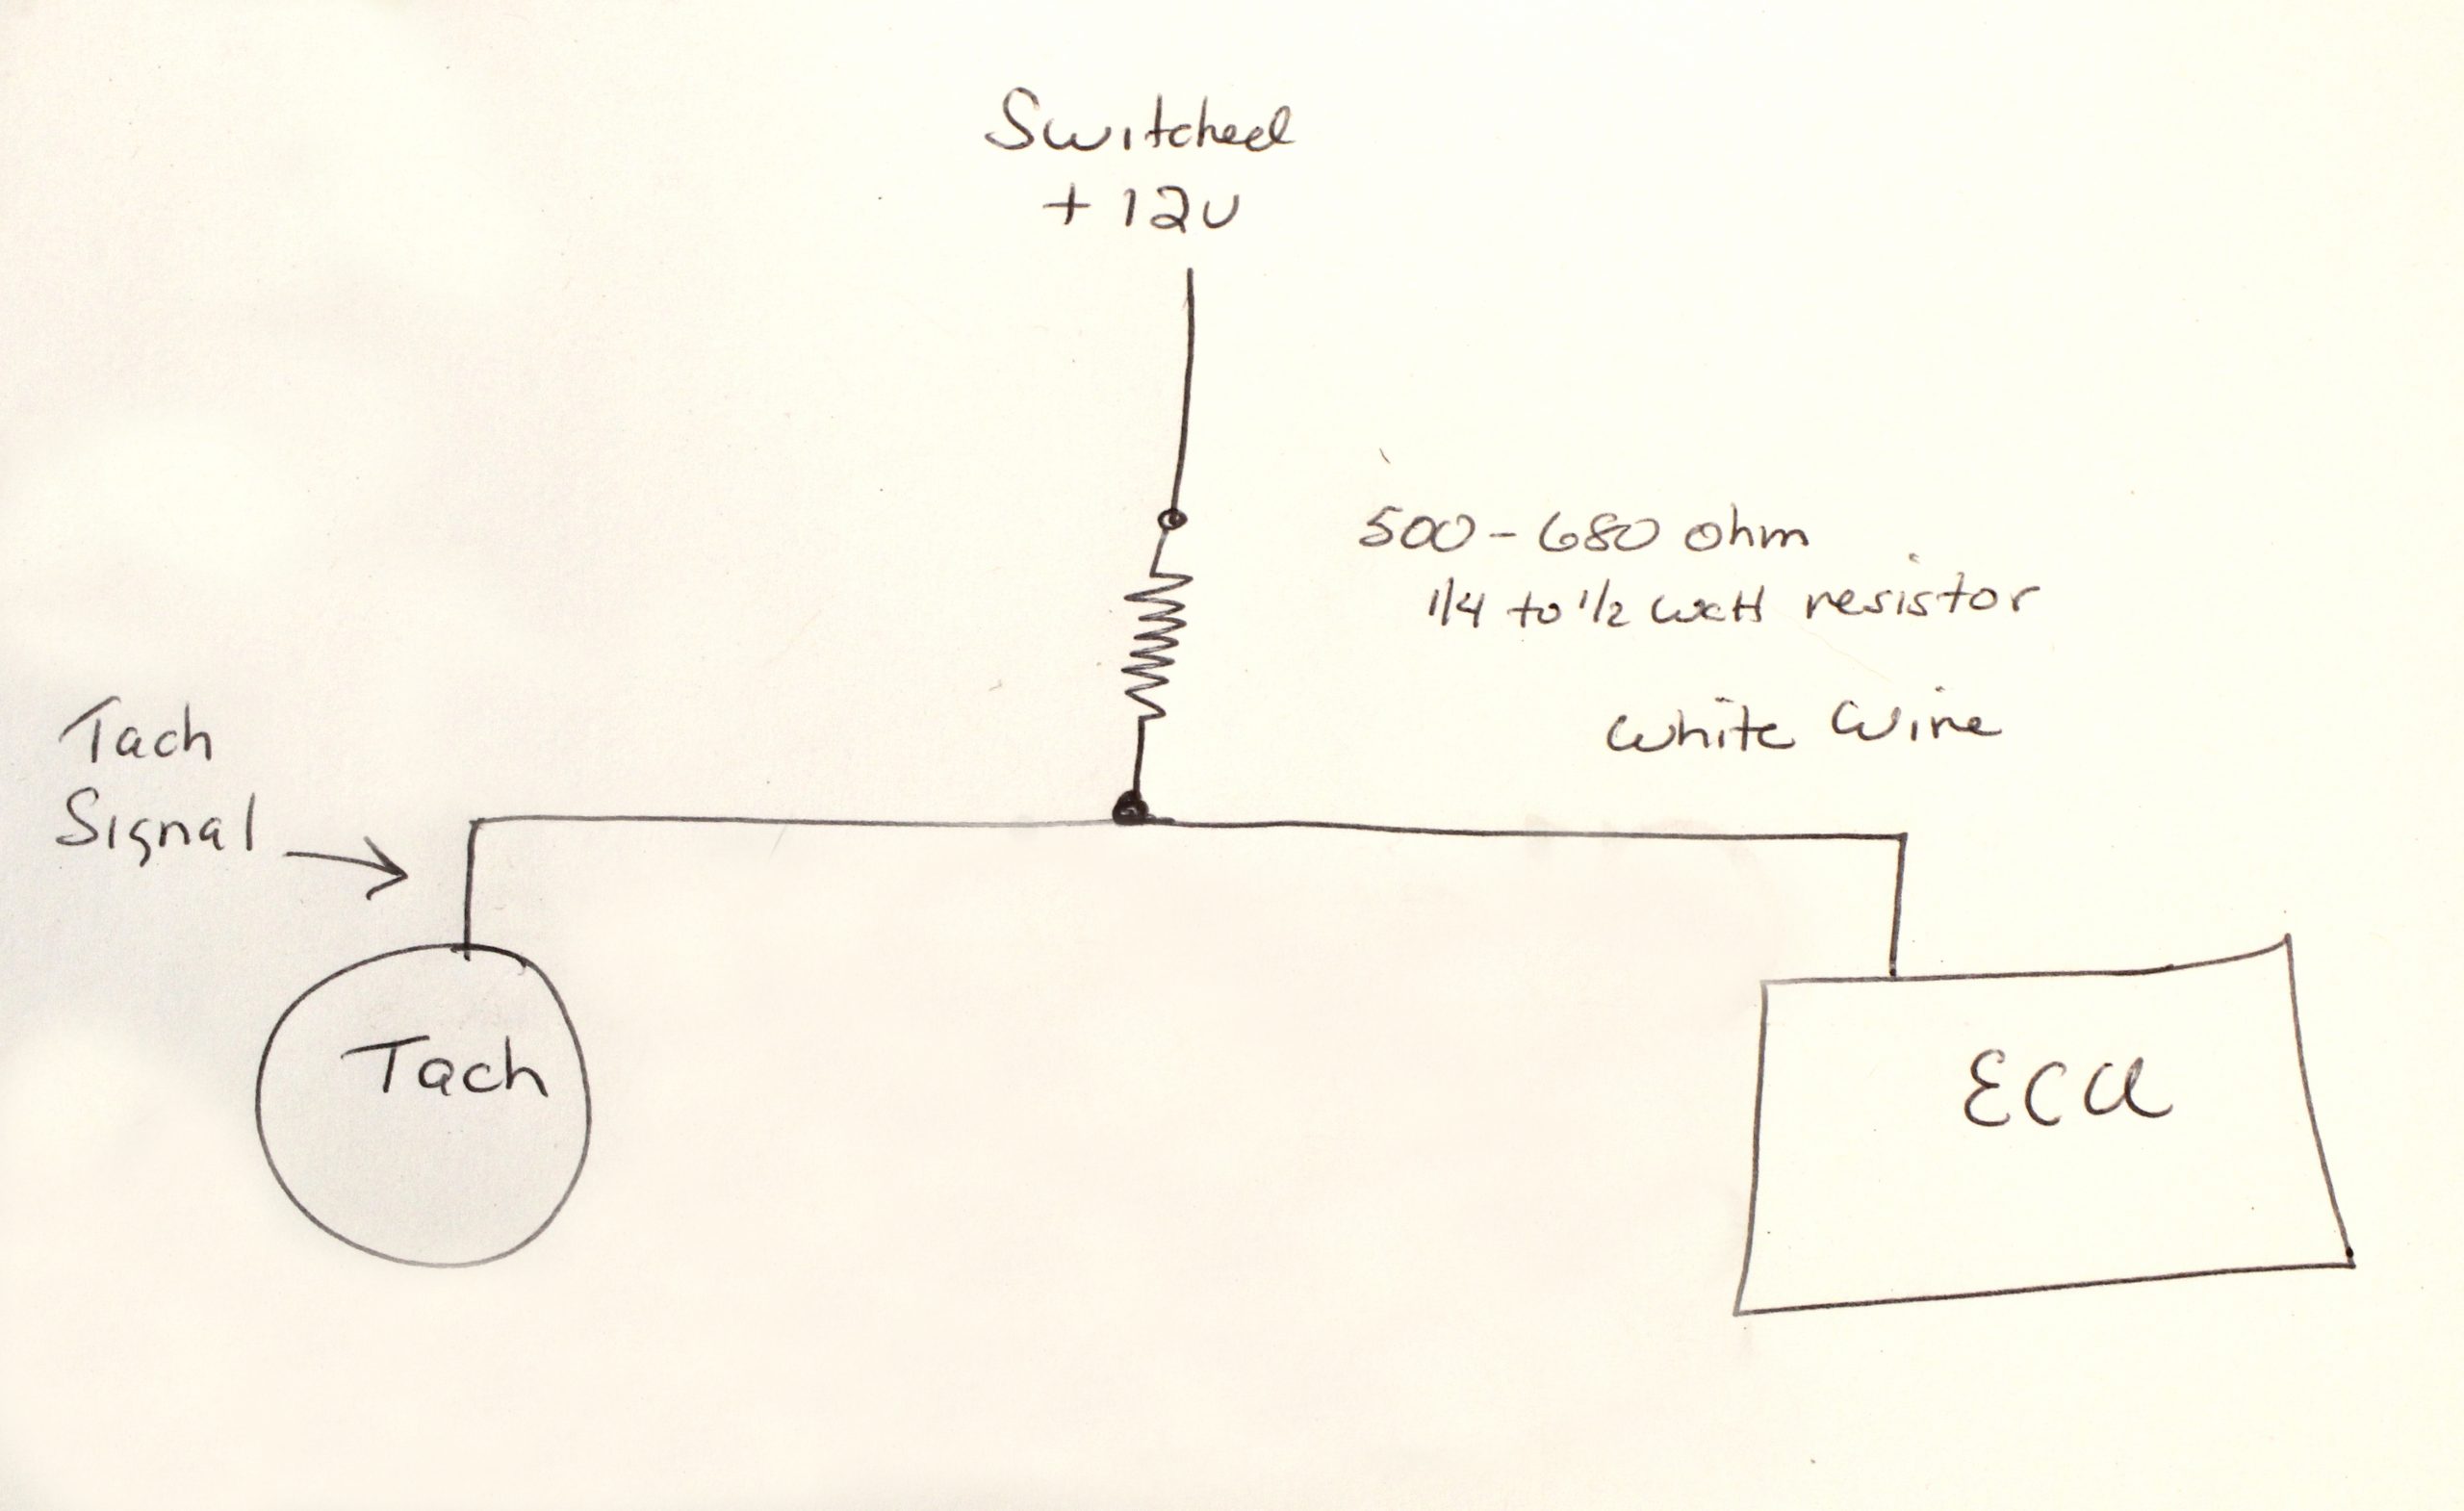
The easiest and least expensive route requires boosting the power signal from the ECU and connecting it to your tachometer. This involves using a switched 12 volt wire (usually from a relay triggered by power from the ignition switch) and connecting this to the white wire from the ECU. Then you add an 850 ohm, 1/2 watt resistor in this line and extend it to your tachometer. As stated above, this signal is for a four cylinder engine so if your tach is set up for a V8, it will not be accurate. Then all you have to do is follow Auto Meter’s instructions on converting your tach to operate as if it were for a four cylinder engine. This can usually be done either by clipping wires on the older version Auto Meter tachs, moving dip switches inside the tach housing, or following the instructions for electronically setting the engine cylinder count.
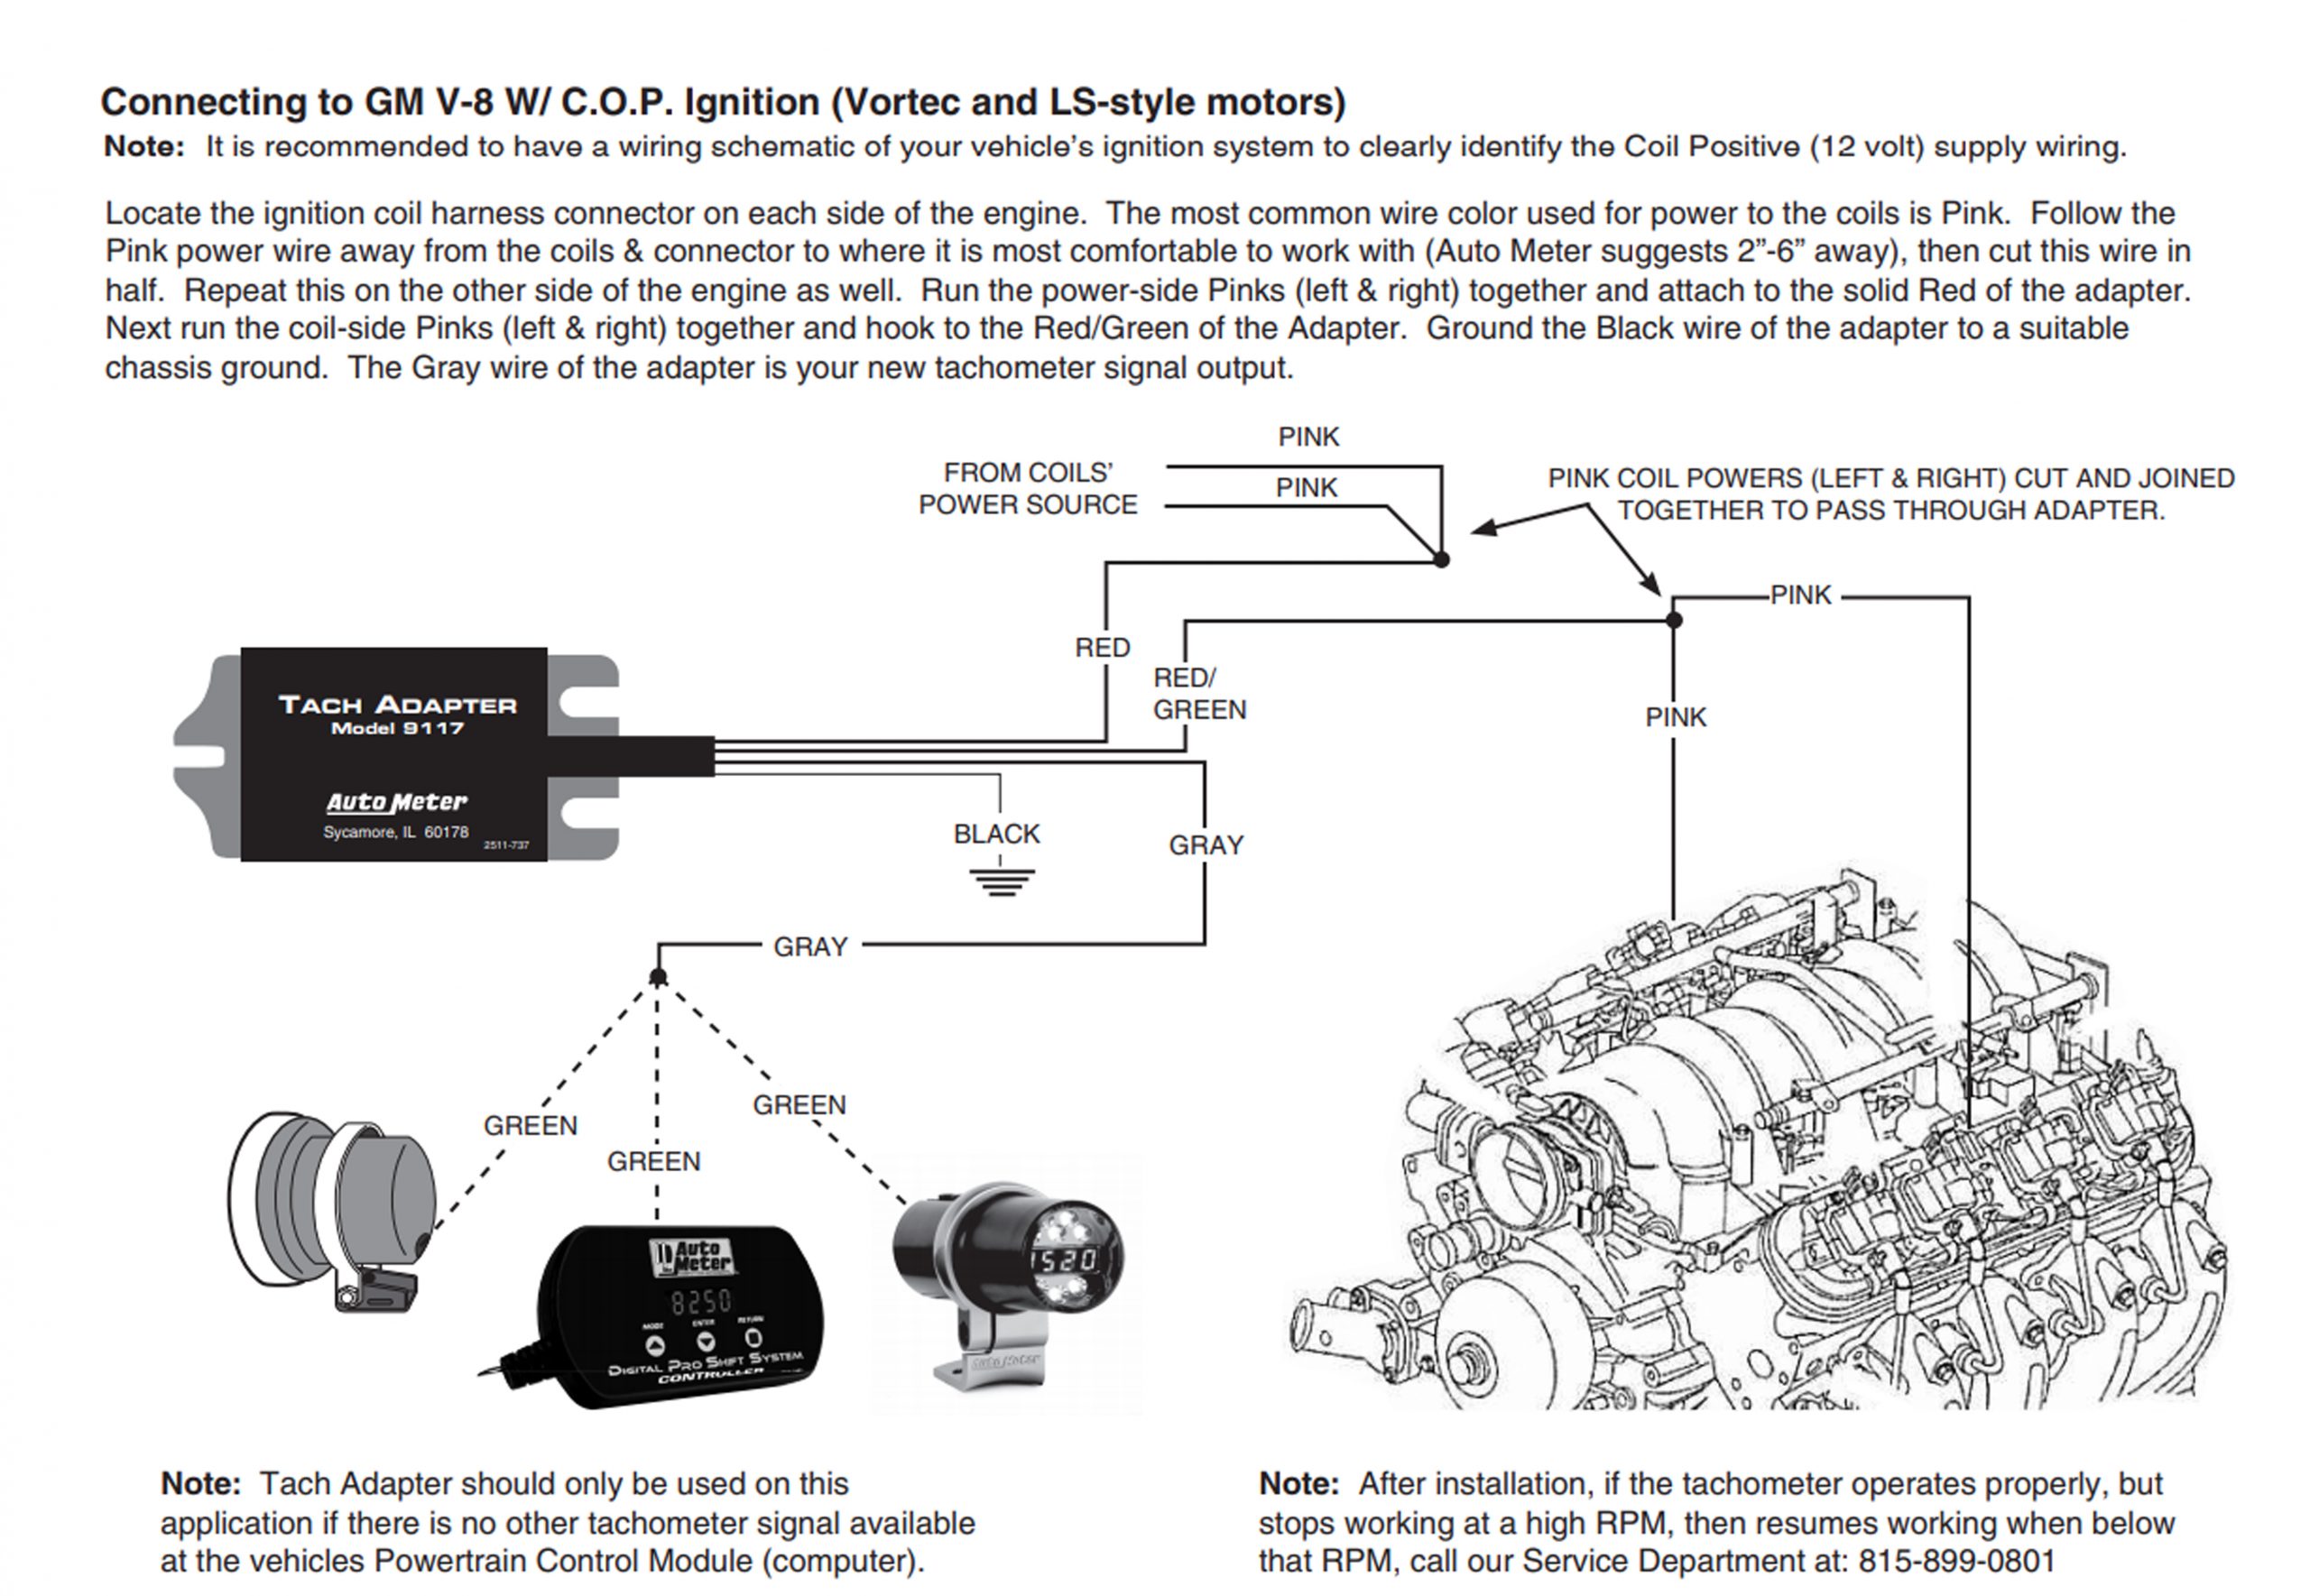
If after attempting this conversion, the tach still does not work, it’s likely the white wire has been disabled or the signal from the ECU is so low that this pull-up resistor trick does not work. But there’s still a chance here. Auto Meter sells a Tach Adapter (full parts list below) that uses factory current trigger to the LS coils to drive the tach adapter, which will then offer a proper square wave, 12v signal to the tach.
We’ve included a copy of Auto Meter’s wiring schematic to help you with this conversion. It involves cutting the pink power wires from each side of the ignition wiring harness and connecting them together to connect to the Tach Adapter red wire. Then the red and green wire from the tach adapter feeds the signal back to the LS harness pink wires. There is also a black ground wire from the tach adapter to connect to the engine. The final wire from the tach adapter is the new gray signal wire that will connect to the signal wire on your tachometer..
If you don’t feel comfortable with clipping wires and making all these connections, Auto Meter offers a complete plug n’ play kit that includes the tach adapter along with the plug-in harnesses for both ignition coil harnesses, making the conversion simple and hack-free. All you would have to do is connect the gray wire from the tach adapter to your tachometer. Of course this route will be more expensive than just purchasing the tach adapter.
We also found a tach adapter from Painless Wiring that is designed for the Gen IV engines that use a 58x crank signal. This harness taps into the signal wire coming from the crank sensor harness and supplies power to increase the signal strength to drive a 12 volt square wave signal to the tachometer.
The initial attempt is fairly simple and easy and costs almost nothing so we’d recommend trying that one first. Then you can decide which approach you’d like to make if that doesn’t work. One way or another, you’ll get the tach working and then all will be right with the world.
Parts List for LS-Swap Nova Tachometer Install
- 850 Ohm, 1/2 Watt Resistor (from any electronics parts supplier)
- Painless 58x LS Gen IV Tach Adapter, PRF-60150
- Auto Meter Tach Adapter, ATM-9117
- Auto Meter Wiring Adapter for ATM-9117 and LS, ATM-2189
- Auto Meter Complete Plug ‘n Play Kit for LS, ATM-9123
is this a drive by wire? if so how did you get your TH350 kick down to work?
Tons of research and time invested to avoid spending money on a new tach. Jeff Smith is a real pro and goes out of his way to help the little guy. He gave a real in depth response if I ever saw one. Jeff is a class act.
have you ever had anyone ask how to get the opposite working for a tach. I put a GM performance LQ9 LS3 head engine in my 2001 Z28 with a Fitech ECM and LS3 Ultimate Injection system. I still have the original ECM in the care to run most of the original system tied the Crank position and Cam sensors in and still can’t get the Tachometer working everything else works. The reason I tied in the CPM’s is to drive the OEM Tach signals since the FiTech signal did not. I can see the Tach trying to work for the first time as the needle actually moves a small bit when power is applied. The ECM interprets the engine speed using the Crank position sensor and Camshaft position sensor then sends it out of pin 10 White wire (C2 ECM Red connector) through the fire wall behind the ECM to C105 and then to the ECBM for brake controlling. From there (somehow) it is combined into the Serial data code of the OBD2 maybe in the (ECBM) system and then seems to be re – interpreted back out by a Serial data connection to a module inside of the instrument cluster that feeds most of the major gauges temp speedo etc… Not sure why GM thought this needed to be so complicated, but it could any of those causing the issue. I guess they just thought it was cool to add all the gauge signals into Serial data. If you know anyone who accomplished this let me know.