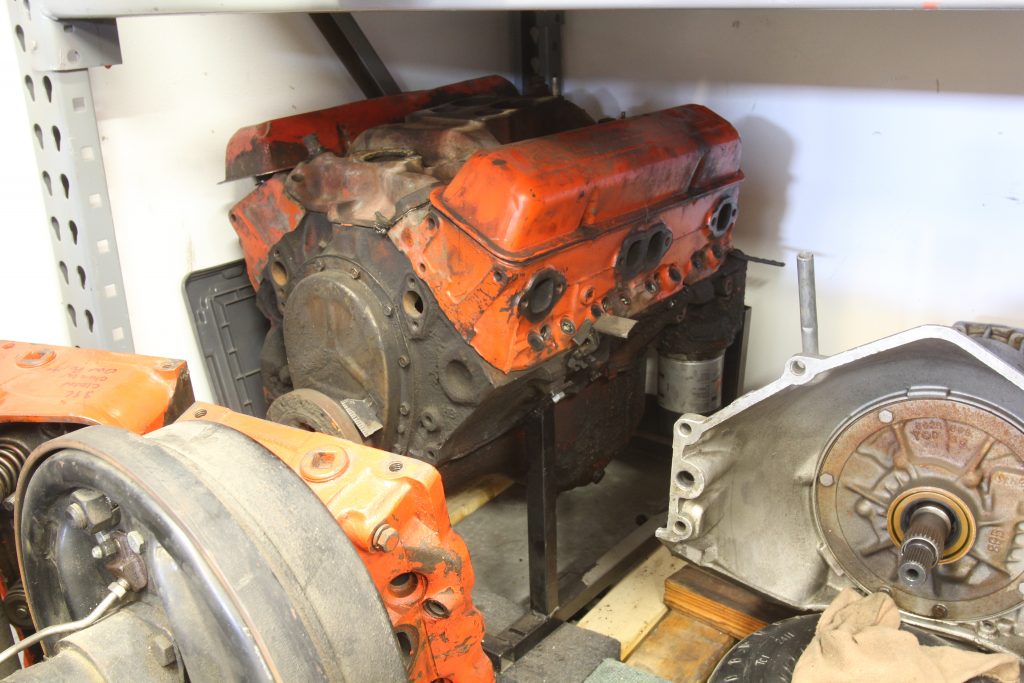
It all began with a cast-off 283 small-block Chevy. The ’64 El Camino limped into our garage spitting out of the carburetor and suffering from severe palpitations. By all indications, it was near death. We pulled the engine and banished into a back corner where it oozed dark stains for years. With shop space at a premium, it was time to decide whether to revitalize this wheezer or truck it off as smelter fodder.
We chose to give this small block new life.
The 283 was Chevy’s base V8 during the 1960s. Nearly every Chevrolet model built during that turbulent decade employed this journeyman small-block. Today, while not extinct, it has become a bit of a novelty, notable if for no other reason than it simply will not go away. We decided to save this one mainly because it seemed worthy of the effort—like finding an old dog in the city pound who’s counting on your compassion to save his life.
Digging into the Engine
The 283’s symptoms were the clues to its problem. The popping from the intake was the result of a flat exhaust lobe. A friend once warned us “Don’t start small projects!” We should have listened. This restoration began as a simple cam swap but quickly evolved into much more. The plan was to quickly disassemble this small-block, clean it up without removing the pistons or crank, install a new cam and intake manifold and then put it to work as a daily parts chaser in a ’53 Chevy pickup that we don’t own—yet.
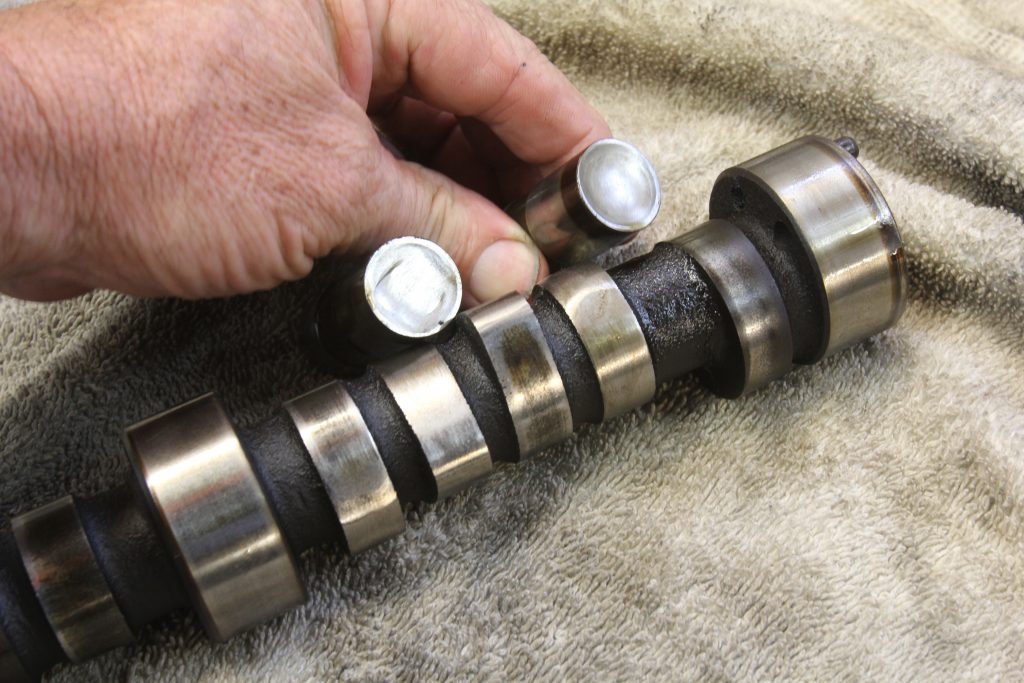
With the oil pan and front cover removed, the cam revealed three lobes approaching oneness with a perfect circle. The surprise came when we noticed a mismatched pair of 76cc chamber heads. We knew from playing with compression ratio programs (like the one on Summit Racing’s website) that large volume chambers absolutely kill compression on short-stroke engines like this 283. As evidenced in the Compression Lessons footnote near the bottom of this story, these heads combined with thick 0.050-inch composition head gaskets, sink the ratio down to a weak 7.4:1.
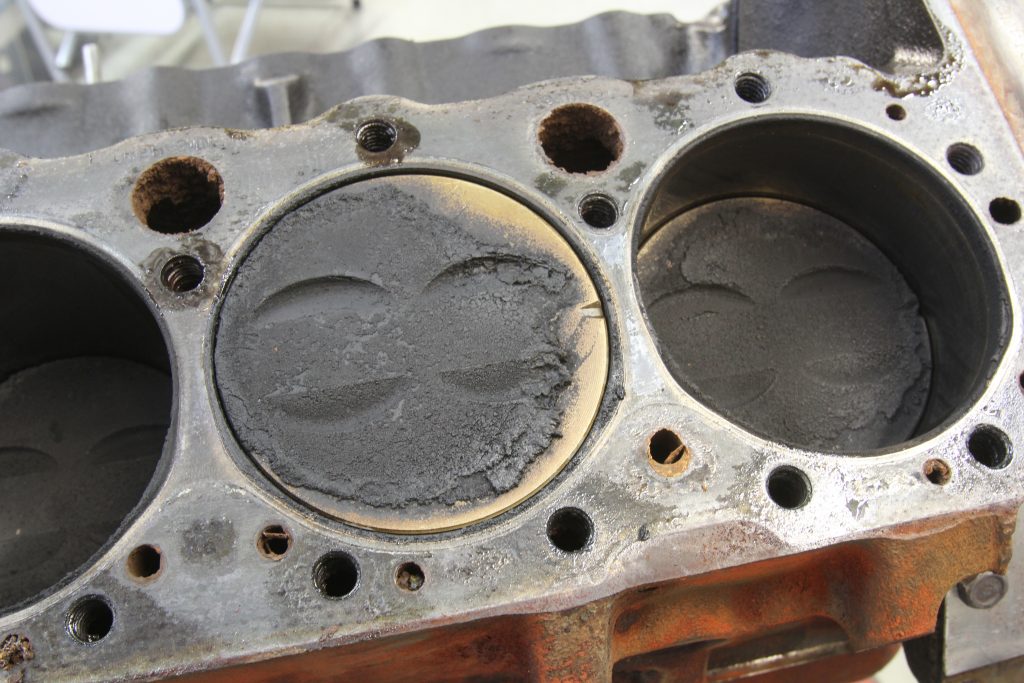
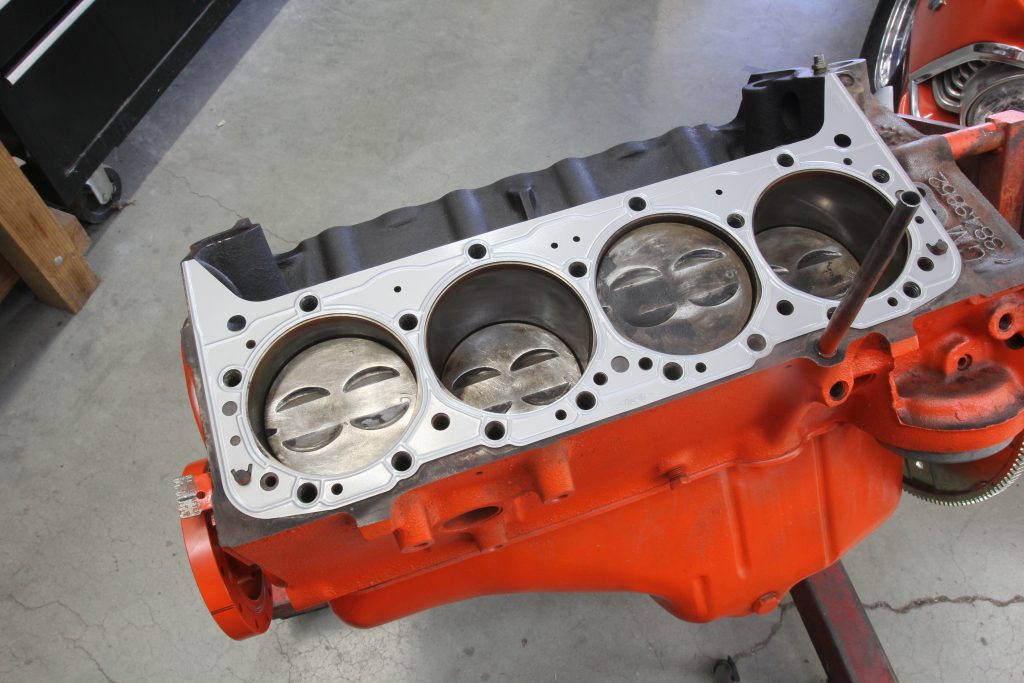
The next surprise was when we discovered the bore was 4.00 inches! Research revealed this as an original 1964 283 block, someone had punched it from 3.875 to an even 4.00-inches. This put the displacement at 301.6 cubic inches. This is similar to what Chevy did in 1967 to create the ’67-’69 302 Z28 engine, except that the factory employed a 4.00-inch bore 327 small-journal block to pair with the 3.00-inch stroke 283 crank. Before 302 became the new buzzword, ‘60s hot rodders called this combo a 301. What encouraged us was the lack of a wear ridge at the top of the piston travel.
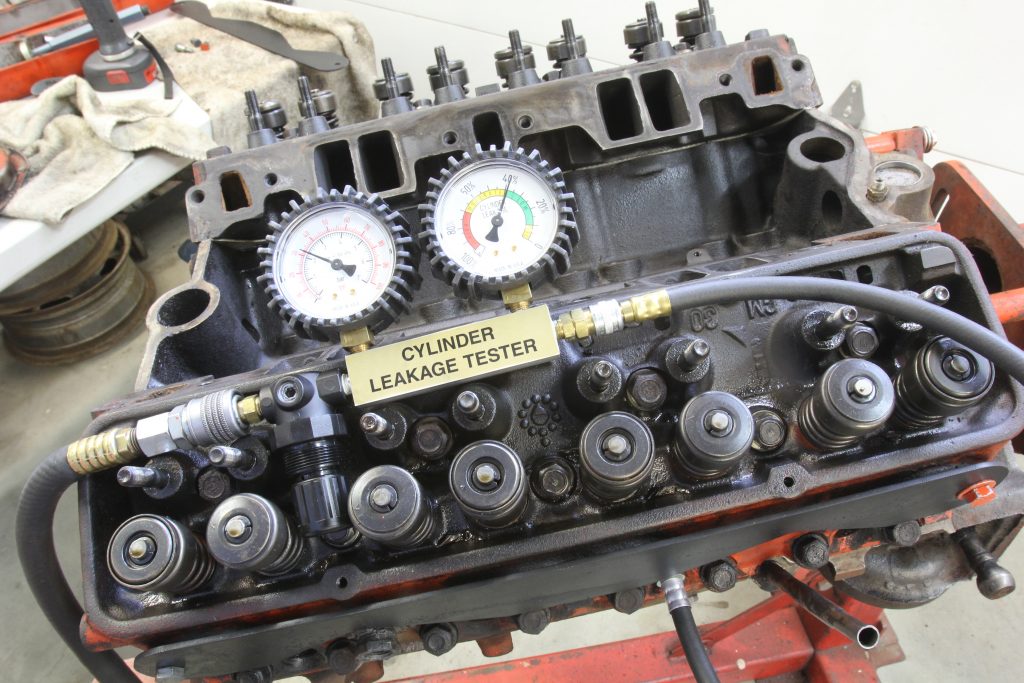
We performed a leak-down test before we snatched the heads and found, not too surprisingly, that it leaked between 30 and 40 percent. We think this number is actually high by 10 percent since we could hold the crank in place with a breaker bar just past top dead center (TDC) and the percentage improved by 10 percent or more. All the leakage appeared to be coming past the rings. We thought about pulling the pistons to install new rings but we avoided that temptation.
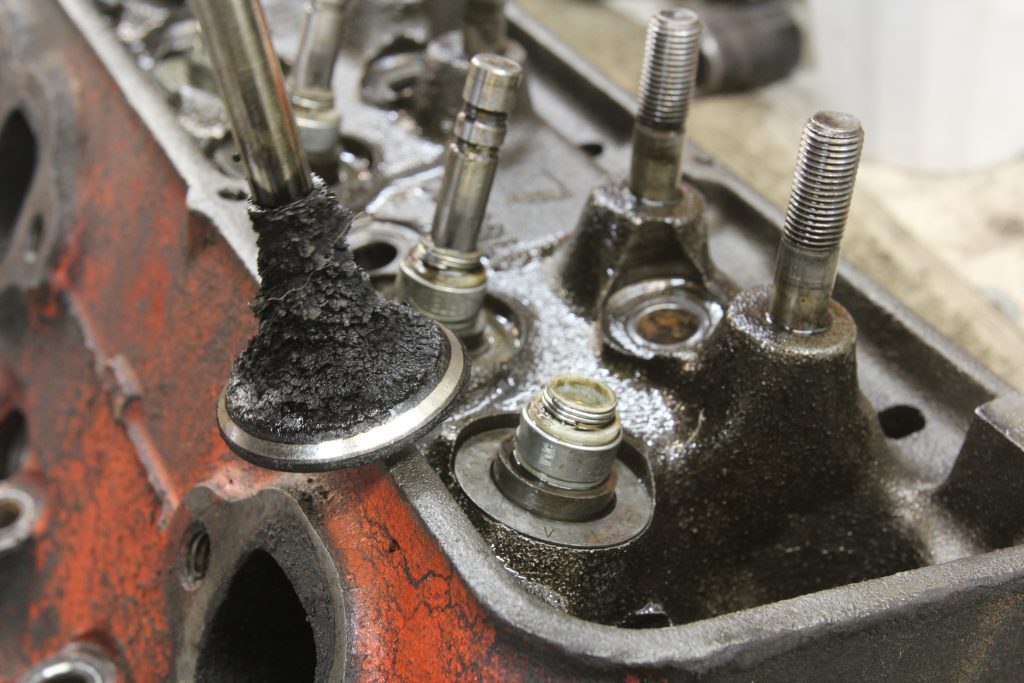
We then searched and uncovered an abused pair of original 283 heads with 3795896 casting numbers. These were used on Power Pack 283 and even 250 hp 327 Corvette engines in 1964. These heads employ a 60cc combustion chamber along with diminutive 1.72/1.50-inch valves. The heads had been rebuilt at least once and featured decent bronze guides but then were criminalized with those terrible white, hard plastic valve guide seals. We pulled the heads apart and threw those PC seals in the trash.
The 283 Rebuild Begins
We delivered the heads to Barrington Machine in Canyon Country, California where Don, Jr. performed a complete cleaning and Magnaflux check for cracks. With a clean bill of health, he installed hardened exhaust seats, added a 3-angle valve job, and milled the deck surface flat, which removed about 2cc from the chambers. This required an investment of around $700, but we knew putting money into cylinder heads like these (even with small valves) will always be rewarded with better performance.
We chose the less expensive route of rebuilding a stock set of heads, but this comes at the cost of reduced airflow. If more power is something you’d like to achieve with a similar small displacement engine, there are now several head offerings that are worth investigating. A stock bore 283 (3.875-inches) or 305 (3.736-inhces) cannot accommodate 2.02-inch intake valves because the valve will hit the small bore. To satisfy this market, Edelbrock, World Products, Trick Flow and others now offer heads with smaller 1.94/1.50-inch valves with 60cc chamber heads that will do the job. The least expensive of these are the World Products iron heads that will command about twice the price of what we spent to rebuild our stock heads. Any of these small-valve, small chamber heads would be a great choice to upgrade one of these early engines.
With the heads out for refurbishing, we poked around on Summit Racing’s website and found an extremely affordable flat tappet hydraulic cam. Our goal was a smooth performing engine that would exhibit excellent street manners yet still make a little more horsepower than stock. The higher horsepower 283 engines from the early ‘60s were rated between 220 and 230 hp. As you can see in our cam spec chart near the bottom of this article, the Summit Racing cam is very conservative with only 204 / 214 degrees of duration for the intake and exhaust respectively. Small engines like this overgrown 283 will just lose torque with a bigger cam while not adding the equivalent peak horsepower because of the small heads. With large-valve aftermarket heads, this is a different story but, for our setup, we felt this combination would deliver an excellent all-around package.
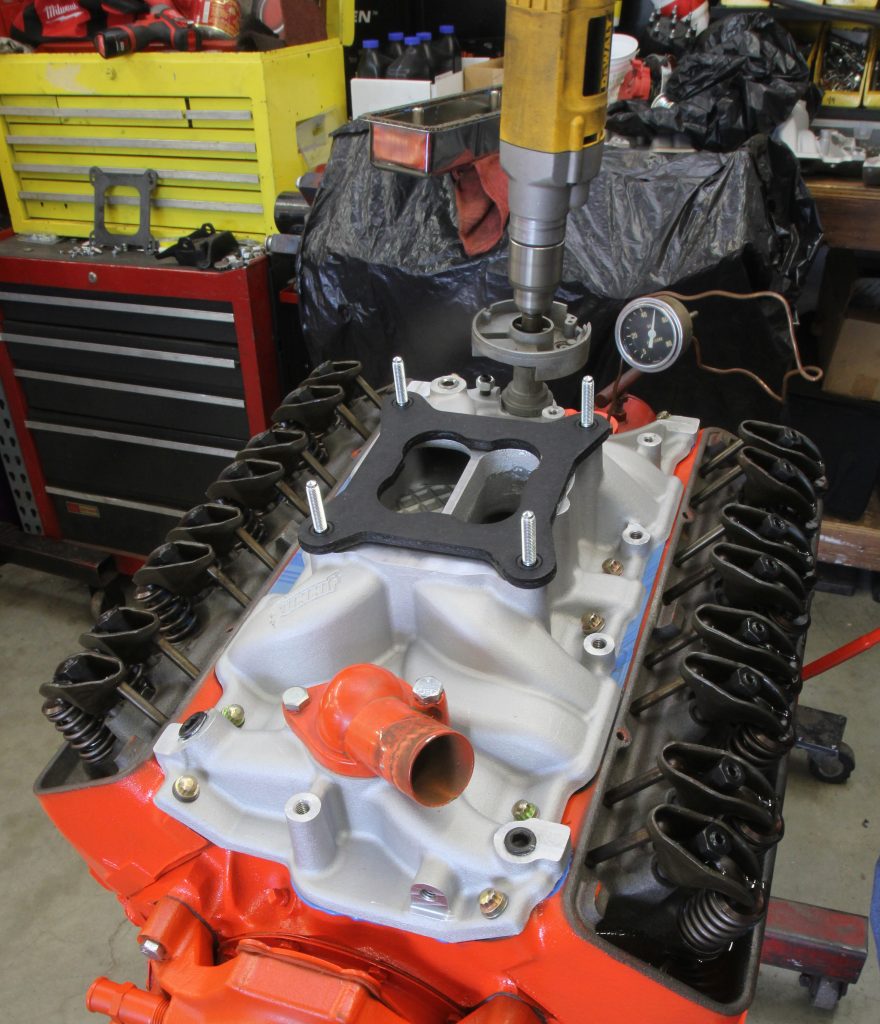
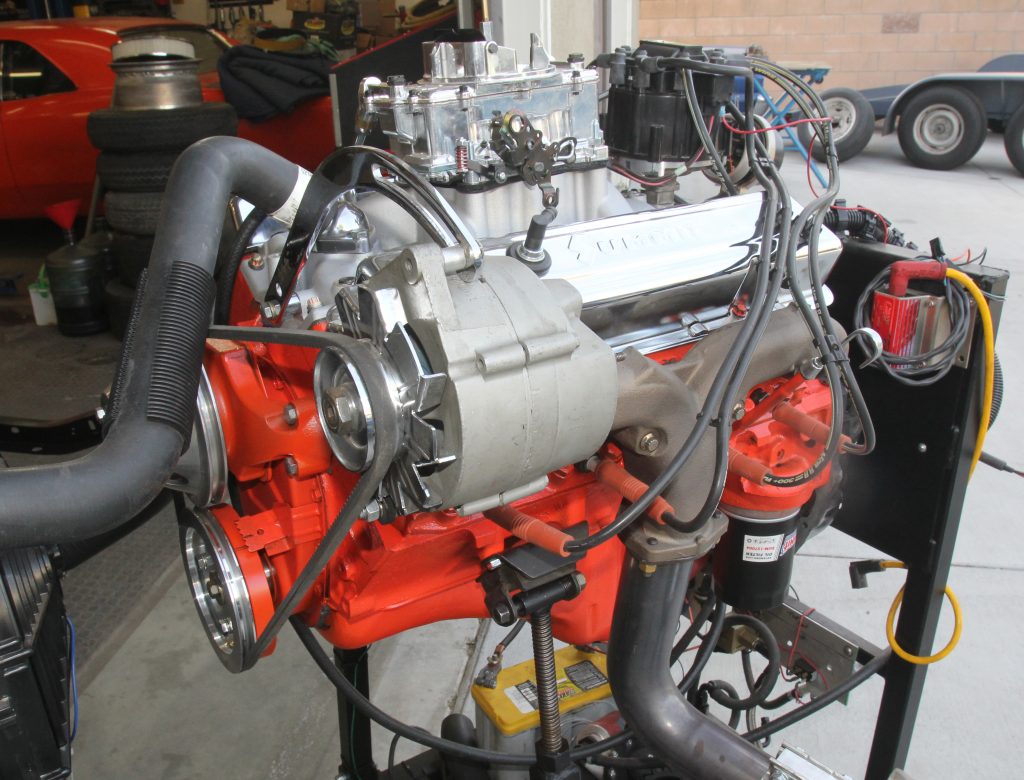
As for the intake, Summit Racing has several levels of dual plane intakes but we chose the smallest again to match our diminutive displacement. This was part of a Summit Racing Pro Pack combo package that includes gaskets, RTV, a chrome air cleaner, and a 600 cfm Summit Racing four barrel carburetor. We’ve had great prior experience with this carburetor and its annular discharge primary boosters. Combine this small carburetor with a dual plane intake, small intake ports with good velocity, and good compression, and our 301 promises to be a nice combination. Now all we had to do was assemble the package.
Putting it Together
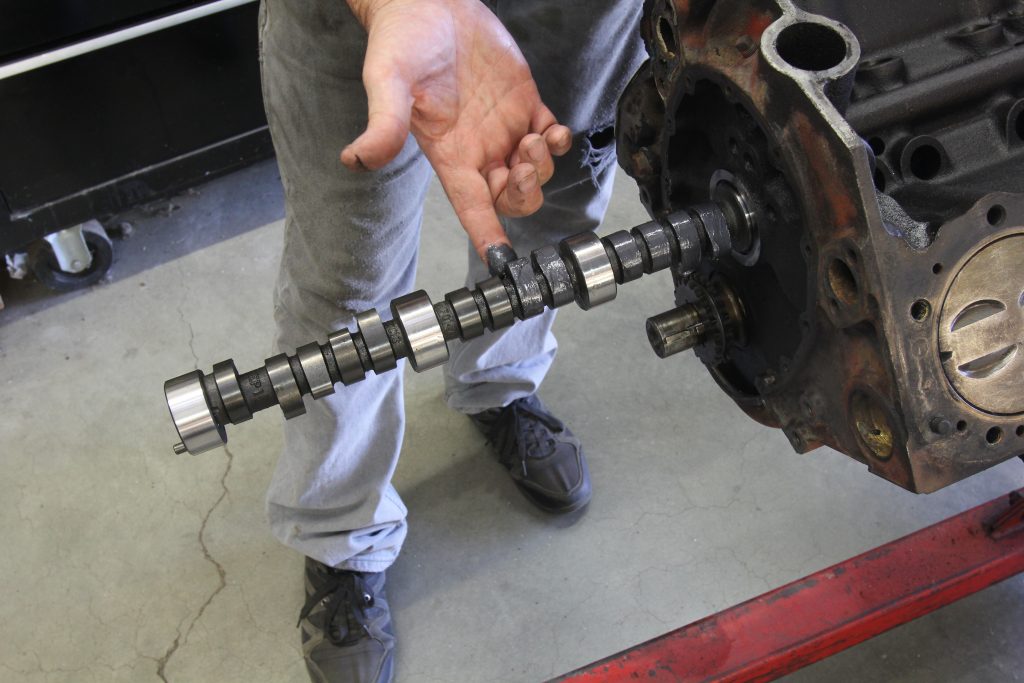
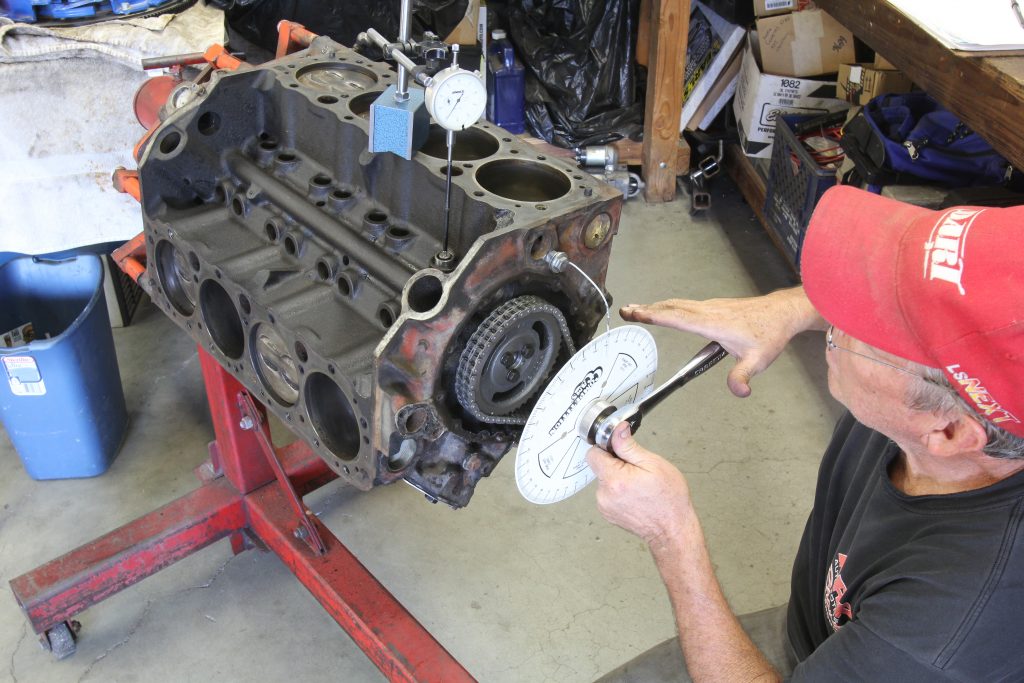
The first step after we had cleaned the short block was to install the cam. We used a moly-based cam coating on all the lobes and also on the bottom of the Melling lifters. We also made sure there were no sharp edges on the lifter bores that might cause problems. With the cam and a new timing set in place, we also took the time to degree the cam using the centerline method. With that set, we then glued down the oil pan gasket and installed the timing cover and oil pan.
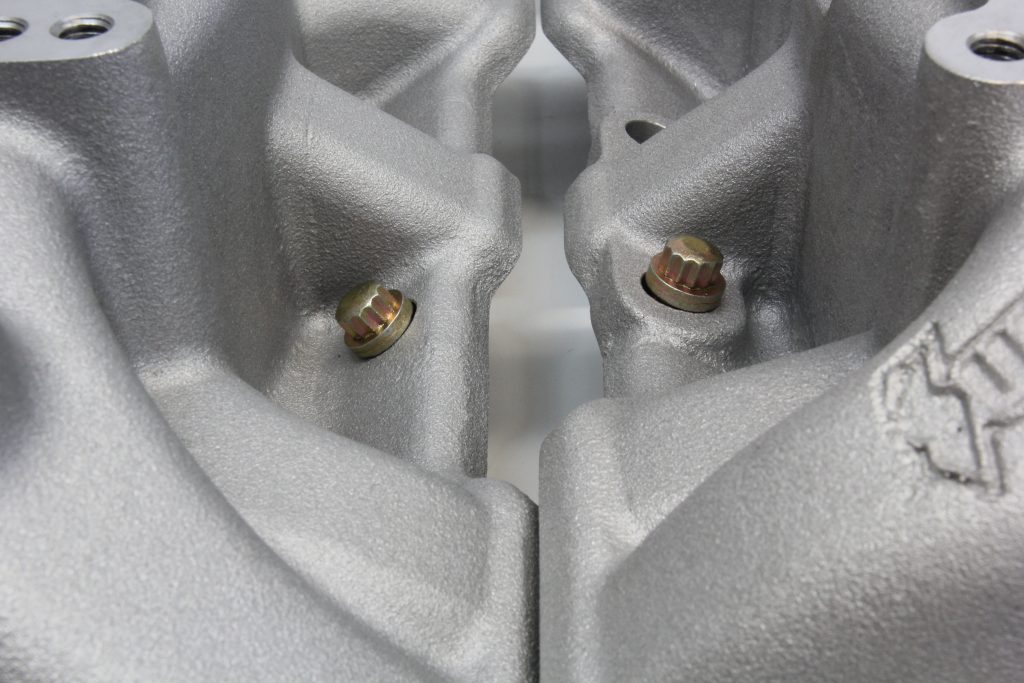
By this time, Barrington had completed the machining on our heads and they were ready to be bolted back in place. Because the pistons were so deep in the hole, we chose a Fel-Pro 0.015-inch head gasket that would help bring the cylinder head closer to the tops of the piston. This improves what is called the quench area as well as increasing compression. As you can see from our Compression Lessons footnote, our efforts were rewarded with a 9.43:1 squeeze factor. That’s a full 2 numbers greater than what it had before.
If we were building a high-end small-block where all the details needed to be exactly right, we’d definitely go with pistons and rods that would bring the tops of the pistons much closer to the deck surface and likely deck the block. But that money wasn’t in the budget, so we’ll just have to live with the 0.030-inch piston-to-deck clearance. We checked another 283 not long ago and found that it too suffered this same malady.
We also caught a small item that might have caused some tuning problems later. The original harmonic balancer had seen better days, so we ordered a small diameter 6 1/8-inch, Dorman balancer and performed a quick check to ensure TDC. That’s when we discovered that even though this balancer is intended for early small-block Chevys, the woodruff key has been machined for a 1969 and later small-block.
The difference is significant. If we used the original 283’s welded-on timing tab, the timing was 12 degrees retarded. In other words, had we used the original timing tab, 12 degrees advanced on a timing light would actually be 0 degrees! We just bolted a late model timing tab over the stock tab and now the TDC mark is accurate. It’s the little things that can make a big difference!
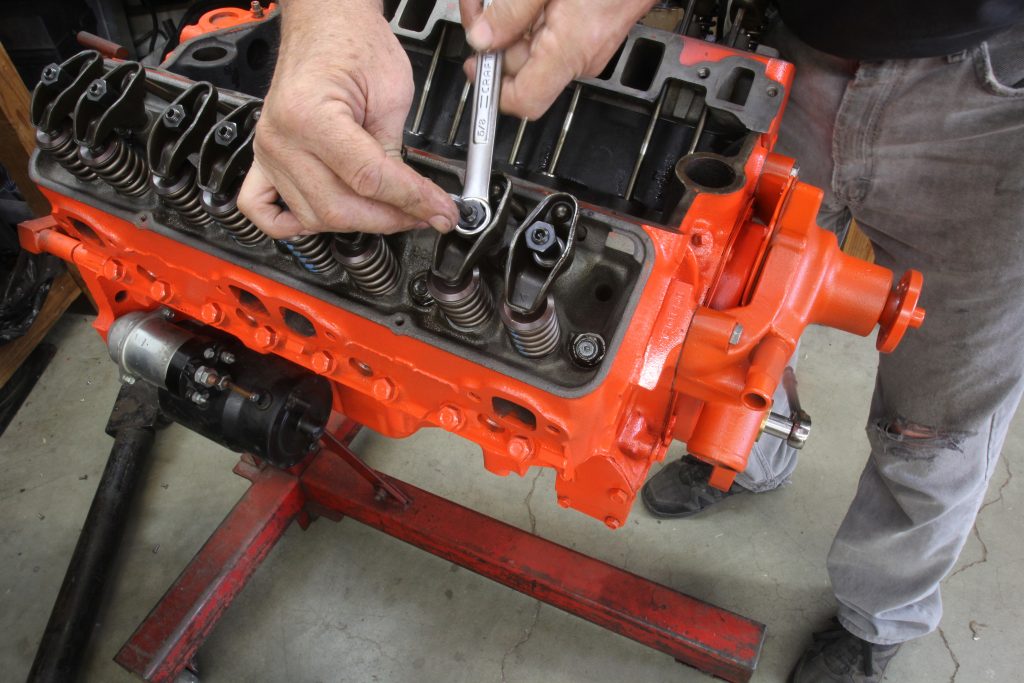
Surprisingly, the valve springs on the old heads were in really good shape giving us 105 pounds on the seat with an installed height of 1.770-inches and 200 pounds of open load at 0.500-inch lift. These numbers are on the low side for a high rpm small-block, but for our mild little street motor this will put less load on the new cam during break-in. We also re-used the original stamped rockers and pushrods since they were in good shape. If you are using new stamped rockers, make sure all the rocker balls are coated with quality high-pressure lube like molybdenum sulfide. Sometimes an exhaust rocker may gall—so watch for that after break-in. If one does gall, the rocker body will turn blue or black.
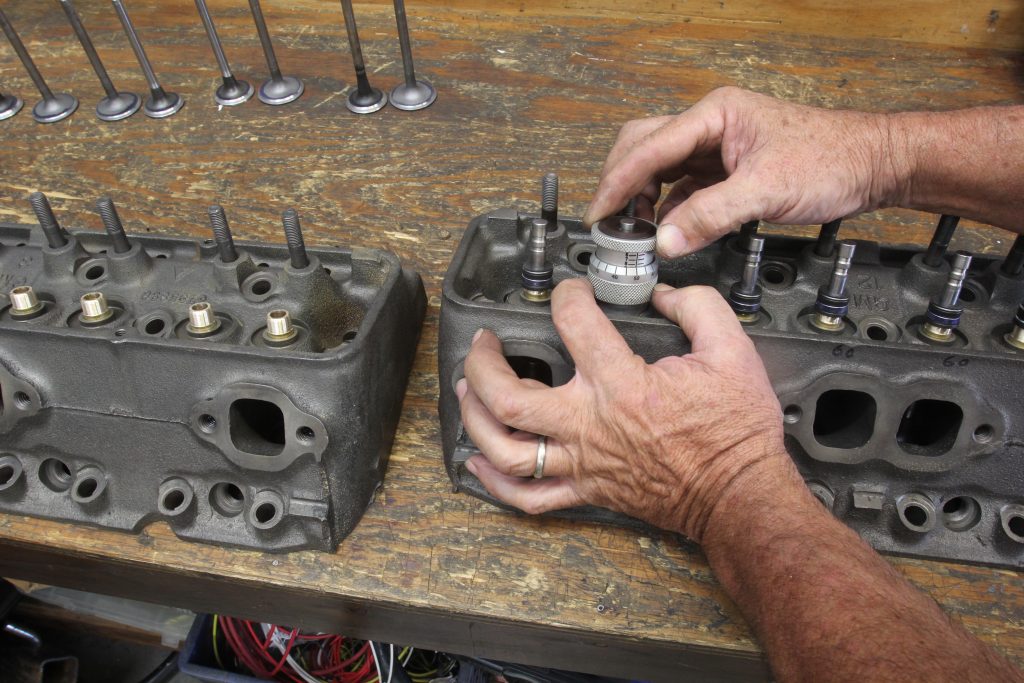
With the rockers in place we still had to set preload since this is a hydraulic lifter camshaft. We won’t run through the details but it’s a simple process. If you need help with this, you can refer to a story we’ve written for the Summit Racing Basics Series here. Our process is very simple and only requires that you remember the initial EO-IC, which stands for exhaust opening and intake closing. When the exhaust valve is opening, you set the preload on the intake side. When the intake is closing, you set the preload on the exhaust side for that pair of rockers on that cylinder. If you are unsure of this process, our story should make it clear.
Priming and Final Prep
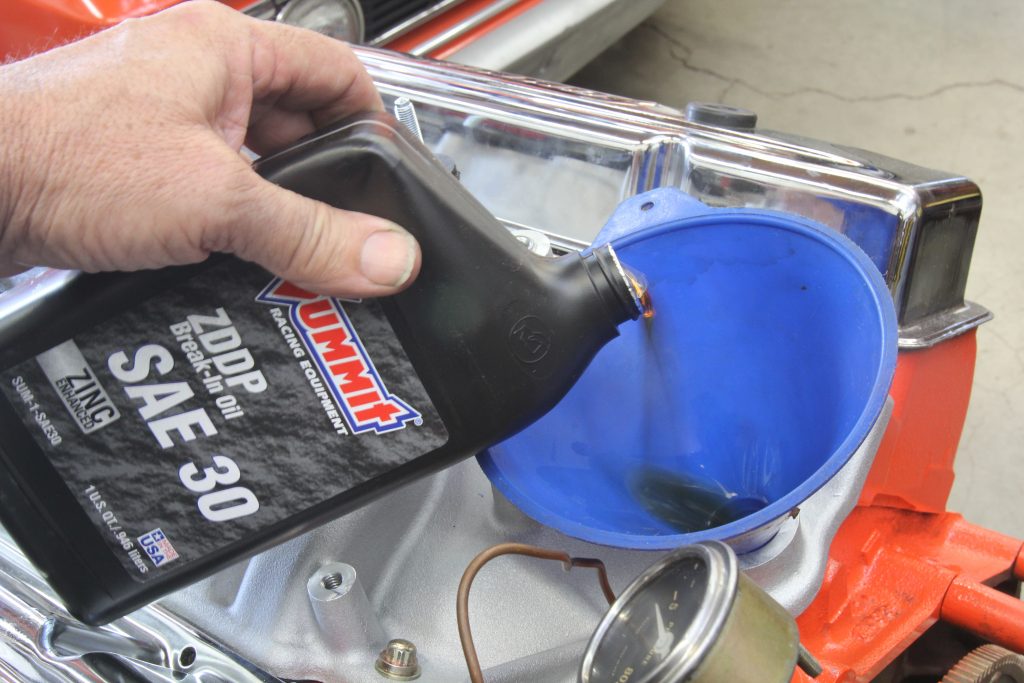
After bolting on the intake with our Fel-Pro gasket set, we filled the oil pan with Summit’s Break-In 30 viscosity oil and used a Summit pressure lube tool to spin the oil pump with a ½-inch drill motor. We removed both valve covers so we could see when all 16 pushrods had oil spilling into the rocker arms. This can take a few minutes so be patient. It’s important that the entire engine is pre-lubed. It’s also worth noting that you should use the proper pre-lube tool. If the channel in the body of the pre-oiler is not used, oil will not reach the right side oil gallery and the lifters will not receive any oil. Look at a typical small- or big-block distributor and you can see where the channel exists near the bottom of the distributor just above the drive gear. This is why a simple shaft will not suffice to direct oil to the entire engine. On a small-block Ford, a simple shaft will work as there is no requirement for a cross-over channel.
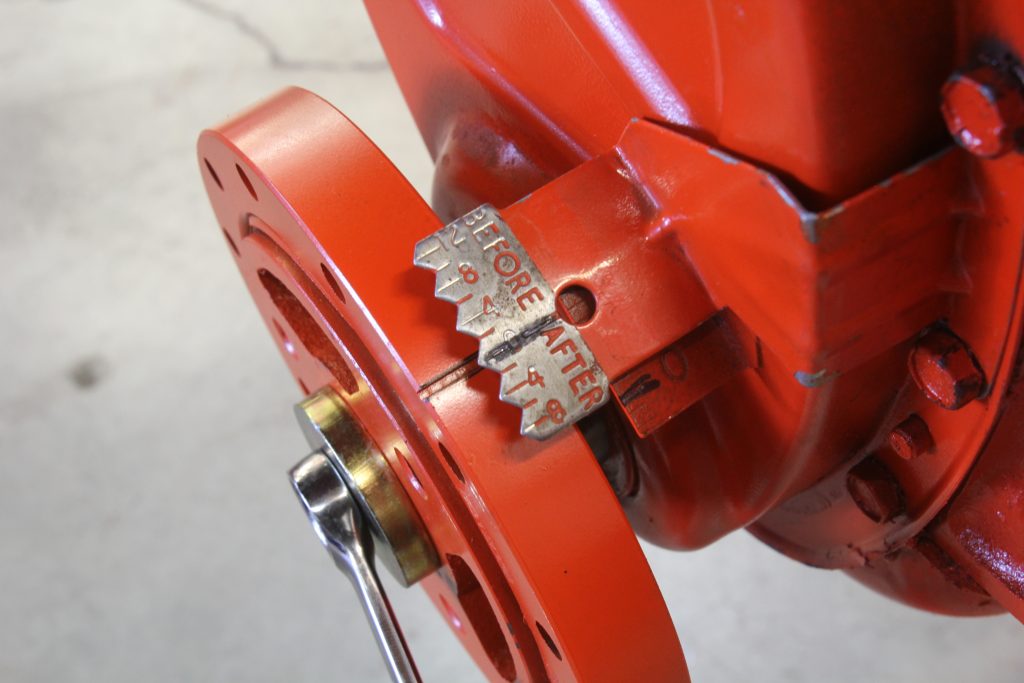
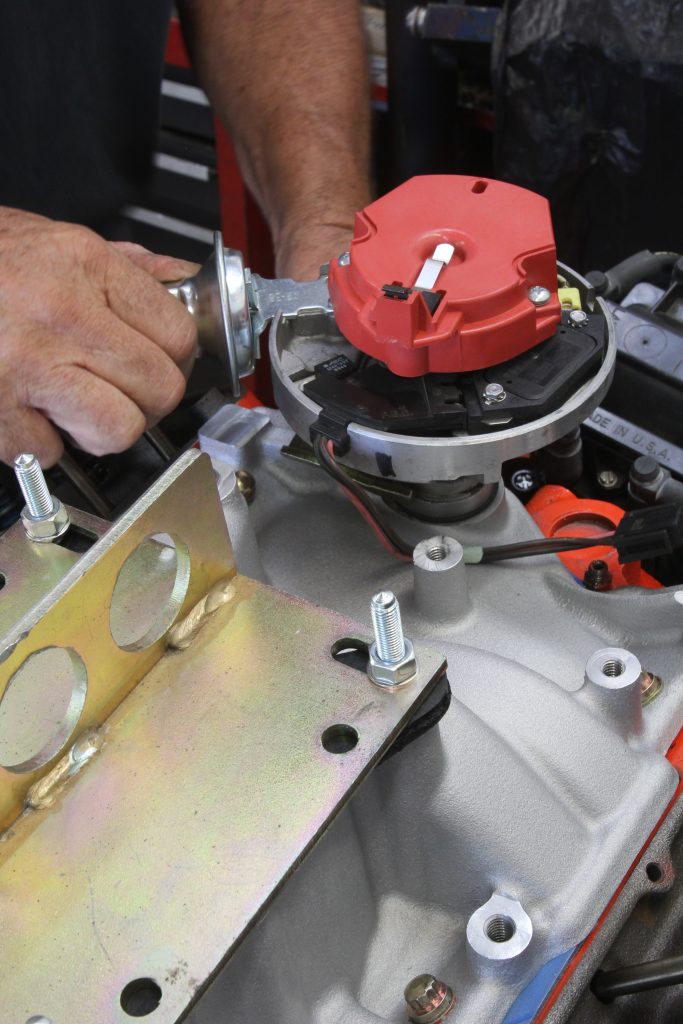
With the pre-oiling completed, we like to set the crankshaft at 12 degrees Before Top Dead Center (BTDC) with the Number One cylinder building pressure. You can tell this by holding your finger over the Number One spark plug hole. When pressure starts to build, this is compression stroke and then you can set the timing tag at 12 degrees. Then it’s an easy matter to drop the distributor in and set it to point directly at the Number One position on the distributor cap. These steps are critical to ensuring the distributor is installed correctly. If you’re not sure how to perform all these steps, we’ve written a complete step-by-step article on how to install a distributor and set timing here. With the distributor in place, we hooked up a set of spark plug wires and a new set of Autolite spark plugs, and our engine was ready to fire.
Engine Break-In
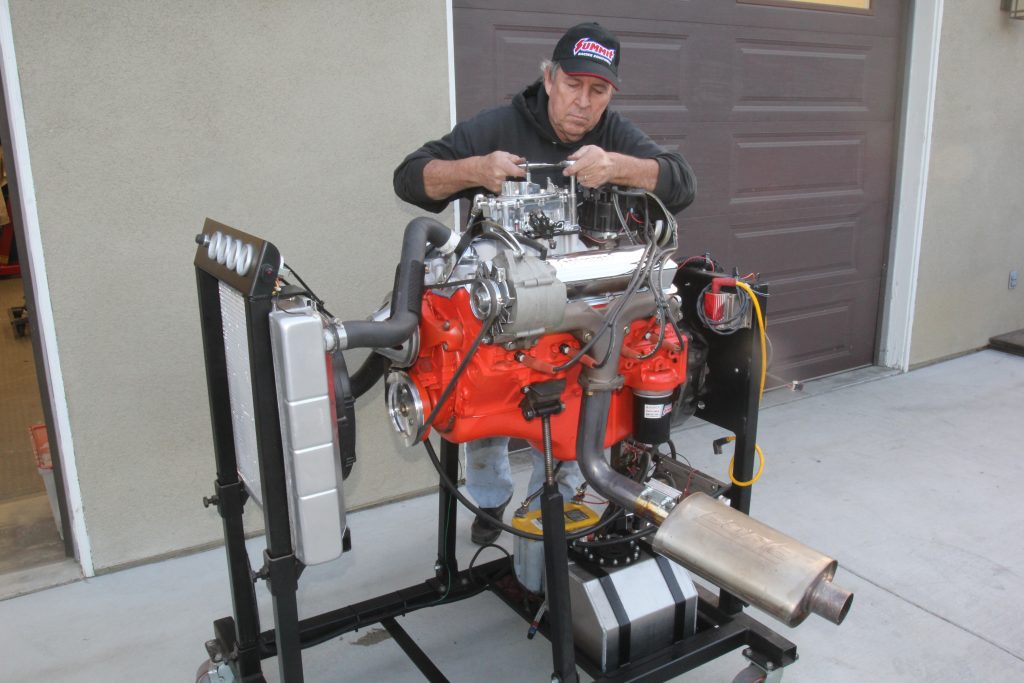
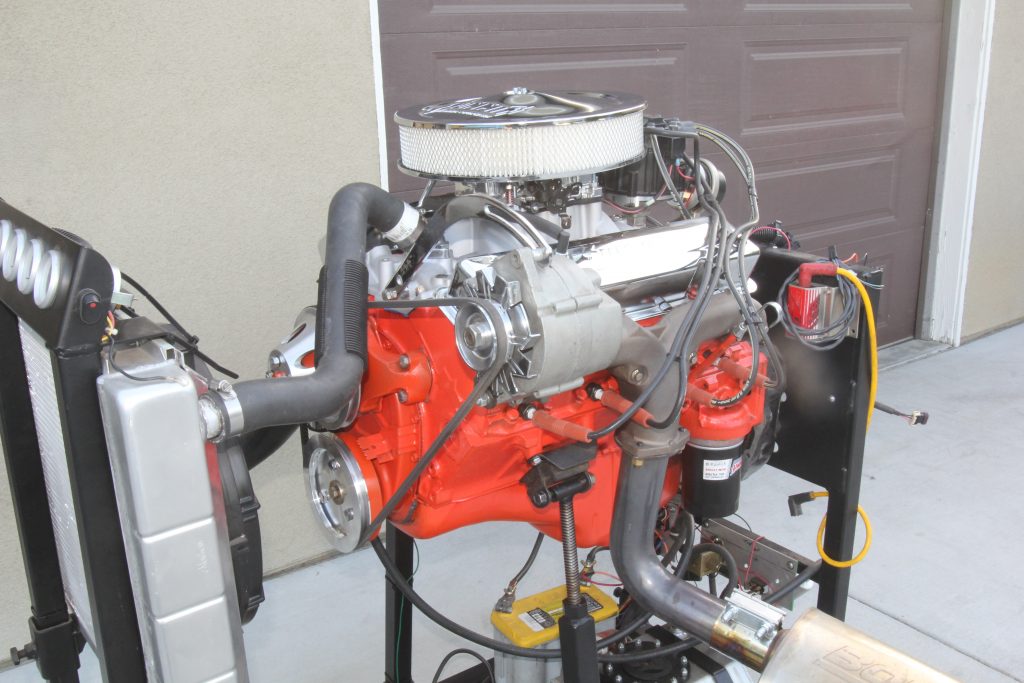
With our engine bolted to the test stand, we had 12 volts to the HEI distributor and primed fuel from the carburetor and the engine started literally on the second crank. With the engine running, we immediately brought rpm up to 1,500 rpm and varied the engine speed by slowly moving the throttle between 1,500 and 2,000 rpm. This higher engine speed ensures plenty of splash lubrication on the camshaft. This is how the lifters are lubricated which is why the additional engine speed is important.
We kept an eye on the oil pressure and water temperature. At first we were a little concerned because the right side exhaust belched some oil for about 20 seconds of running time but then that quickly cleared up.
With the full cooling system on our test stand, the coolant temperature never exceeded 185 degrees. If engine temp exceeds 210 degrees F, slow the speed down to idle and quickly shut it down and allow the engine to cool. The entire break-in process should take between 15 and 20 minutes. If you desire, after 10 minutes of initial run-in the engine can be driven—as long as it is not allowed to idle for more than a few seconds before the 20 minutes of break-in is complete.
We had a small oil leak around the front oil pan seal to the timing cover that required some attention, but otherwise the engine ran smoothly all during the break-in process. After break-in we checked the initial timing at 12 degrees and the mechanical advance added another 22 degrees for a total of 34 degrees of total timing. Then we set the idle mixture on the carburetor to the highest idle vacuum setting and then leaned the adjusters by roughly 1/16-turn for the best lean idle mixture at 850 rpm.
The Results
With the higher compression ratio, the engine sounds snappy and is very responsive to throttle changes. Once we find the suitable donor vehicle, we’ll run the engine in a car for about 100 miles and then change the oil and filter, using five quarts of high-zinc 10w30.
While we had to invest a few more dollars into this engine than we originally intended, we now have a strong, responsive small-block that has been brought back from the brink of destruction and is now ready for miles of care-fee cruising.
Compression Lessons
This chart reveals how important it is to measure the actual components and to compute the true compression ratio. When we disassembled this engine we discovered it had large, 76cc combustion chamber heads, 0.030-inch average piston-to-deck height (less than ideal but typical of ‘60s engines), a 0.050-inch thick head gasket, and pistons with four valve reliefs that add approximately 6cc to the total volume. These measurements combined to produce the ridiculously low compression ratio of 7.27:1 in Combination A. Combo B switches to a 64cc chamber and a 0.015-inch head gasket. Combo C uses a 0.038-inch composition gasket and the smaller 58cc chamber. The final Combo D is the package in our 301 that created the most compression was a 58cc chamber and a 0.015-inch head gasket. Note the amazing change from 7.27:1 to 9.43:1 – this is more than a 2-point increase in compression ratio. That alone is worth roughly 6 to 8 percent power. An 8 percent improvement on a 300hp engine is worth approximately 24 horsepower!
Combo A B C D Compression Ratio 7.27:1 8.79:1 8.92:1 9.43:1
Cam Specs for Last Waltz 283
| Camshaft | Advertised Duration | Duration at 0.050" | Lift | LSA |
|---|---|---|---|---|
| Intake | 278° | 204° | 0.421" | 112° |
| Exhaust | 288° | 214° | 0.444" | 112° |
Parts List for Last Waltz 283
| Component | Part # | Quantity |
|---|---|---|
| Summit Racing Classic Camshaft | SUM-1102 | 1 |
| Melling Replacement Hydraulic Lifters | MEL-JB-817 | 16 |
| Summit Racing Intake Manifold, Carburetor, and Air Cleaner Pro Pack | CMB-03-0190 | 1 |
| Summit Racing Harmonic Balancer Bolt Kit | SUM-G1677 | 1 |
| Summit Racing True Roller Timing Set | SUM-G6600R-9 | 1 |
| Melling 1.72" Intake Valves | MEL-V0399 | 8 |
| Melling 1.50" Exhaust Valves | MEL-V0400 | 8 |
| Summit Racing ZDDP Performance Break-In Oil | SUM-1-SAE30 | 5 |
| Summit Racing ZDDP Performance Motor Oil | SUM-1-10W30 | 5 |
| Summit Racing Valve Covers | SUM-G3306 | 1 |
| Summit Racing Valve Cover Grommets | SUM-G3411 | 2 |
| Summit Racing Valve Cover Hold-Down Tabs | SUM-G3434 | 2 |
| Summit Racing Mechanical Fuel Pump | SUM-250000-1 | 1 |
| Summit Racing Cast Iron Water Pump | SUM-312354 | 1 |
| Summit Racing Water Pump Pulley | SUM-G3959 | 1 |
| Summit Racing Crankshaft Pulley | SUM-G3961 | 1 |
| Dorman Harmonic Balancer | RNB-594-156 | 1 |
| Summit Racing Extended Life Oil Filters | SUM-127004 | 2 |
| Fram PCV Valve | FRM-FV191 | 1 |
| Fel-Pro Performance Head Gaskets | FEL-1094 | 2 |
| Fel-Pro Engine Gasket Kit | FEL-260-1000 | 1 |
| Edelbrock Valve Seals | EDL-9725 | 1 |
| Summit Racing Blueprinted HEI Distributor | SUM-850001R | 1 |
| Summit Racing Oil Pump Primer | SUM-901015 | 1 |
| Summit Racing 8.5mm Ignition Wires | SUM-889011 | 1 |
| Autolite Copper Core Spark Plugs | ATL-A86 | 8 |


Hey Jeff::
It’s steve austin. CHP. I have been enjoying these articles very much. I would like to ask your advice on up dating my Chevelle which has been a 20 year driver. I’m more than willing to pay for your advice and input as my questions will cover some ground. IM 82 and in good shape buiuut not able or willing to do everything in the garage. I would sincerely appreciate any thoughts you would share.
Best regards
Steve
Strange that you did not hone the bores and fit a new set of rings and bearings especialy rings
After doing all the other work ?
Do u need another 283 I have 1 for sale…
283 Long block engine, if you could be the paint it in gray and how much.
Ruben 9513123601
Hi Jeff
I am also doing a 283 rebuild and enjoyed your article shed allot of light and answered several questions. I see you mentioned that you replaced the balancer with a Dorman 6 1/8 diameter. I have the same and not sure if you remember where you purchased it. If you by chance remember i would appreciate any help. You gave me several good ideas thanks
I believe it was a Dorman balancer that you can buy through Summit racing and other places.