I’ve got an old, 327 c.i.d. small-block Chevy that I started to replace the heads with a better set. My problem is I’ve stripped the threads on two head bolts on the driver side. I’m using a set of no-name Grade 8 head bolts. I’m not sure where they came from.
Are these Grade 8 bolts too strong and that’s why I’m pulling threads out of the block? Should I go back to a set of stock head bolts? This block is over 50 years old. Are the threads all rusted out? I don’t want to put Heli-coils into all of the head bolts holes if I don’t have to. — M.T.
…
Jeff Smith: Yours is a very common problem and thankfully there is an easy solution. We’ve run into this issue many times over the years.
Sometimes, the reason is a weak block that has seen a long and abused service life. That may be the case with your 327, but thankfully we can suggest a simple fix that may help.
What you have experienced is probably a tolerance stack-up issue.
Because your block is old, it has likely been disassembled several times. Over this time, previous owners have run a tap down through the head bolt holes more than once to clean the threads. Normal taps will remove metal from the female threads. This reduces the overlap between the male threads in the bolt and the female threads in the block. With this reduced thread overlap, this increases the stress on the remaining thread engagement in the block.
Using the Grade 8 bolts probably made that situation worse. Here’s a quick test you can perform to see for yourself the difference in thread engagement.
You will need three different head bolts for this simple test — a stock head bolt, the Grade 8 bolt you already have, and an ARP head bolt for your engine. Maybe you can borrow a bolt from a friend for this test rather than buy a whole set just to do the test.
Pick any head bolt hole and thread the aftermarket Grade 8 bolt in about two turns and then wiggle the bolt to see how much it moves.
Then perform the same test (in the same hole) with the factory fastener, and finally with the ARP bolt.
What you will experience is that the Grade 8 version will wiggle quite a bit. The factory bolt may be slightly tighter while the ARP will be the tightest of the three.
What you’ve just experienced is the difference in the class of threads that the fastener uses.
For a small-block Chevy, this is a 7/16 x 14 thread pitch.
But within that bolt and thread pitch there are several different grades of threads. Without getting too technical, this has to do with what you learned from the thread-engagement test.
Each bolt has a minor diameter that is the root of the thread and a major diameter that is the peak. Exactly in the middle is what is called the pitch diameter. Lesser-quality bolts tend to offer less actual thread engagement between individual female and male threads. This makes the mating process simple and easy. However, this also reduces the load capacity of the threads.
Essentially, there are three different classes of threads for each size fastener. These are 1A/1B, 2A/2B, and 3A/3B with 1A/1B being the loosest tolerance.
Most bolts are formed by cutting threads into the shank of the bolt because this can be accomplished quickly and easily. Once the threads are cut, the bolt is then heat treated. These bolts often fall into the 1A/1B category.
A high performance fastener like those from ARP use the tighter tolerance schedule and heat treat the bolt first. Then they create the threads in giant thread-rolling machines. This is called cold forming and is the most accurate but is also more expensive because heat-treated bolts tend to wear out the tooling. The result is a far superior fastener.
The ARP bolts will always create a much closer tolerance to the threads in the block, increasing the thread overlap and therefore reducing the load presented to each individual thread in the block. This is why it may often feel like the ARP bolts are more difficult to thread into the block.
ARP also sells what is called a thread cleaning tap for these head bolt holes.
This tool is designed, as its name implies, to clean the female head bolt threads in the block without removing any actual thread material as opposed to a normal tap that will remove metal. In your case, the proper ARP thread cleaning tap would be a PN 911-004.
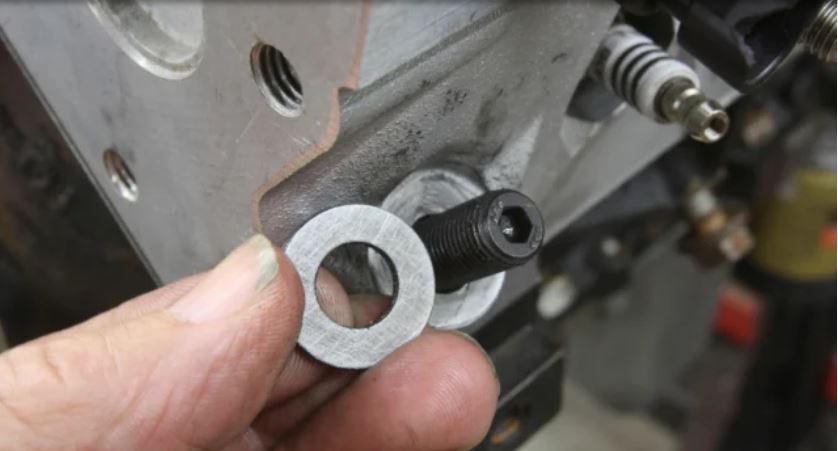
Just buying the bolts is only half the story, however.
It’s also critical that the bolts be installed and torqued properly. Once the threads in the block have been properly cleaned and the head is installed, separate the head bolt washers and look at them carefully. You will notice that each washer will have a countersink on one side. This is the side that must face the bolt head. This radius matches the radius formed under the bolt head.
The next important step is to first read the instructions. This may sound lame, but the world of fasteners is constantly changing and what was once the proper procedure has now changed, so it’s important even for professional engine builders to read the instructions.
The next step is to use the proper lubricant. ARP has actually calibrated its torque spec for these head bolts to be used with the Ultra-Torque lube supplied with the bolts. The PN for a set of ARP head bolts for most stock style small-block Chevy heads is 134-3601. Theses bolts are designed to be torqued to 70 ft.-lbs. using the Ultra-Torque lube.
Place the lube on the threads of the bolt as well as on the radius side of the head bolt washer. Production small-block Chevys expose the head bolt holes to the water jacket so it’s best to use ARP’s thread sealer to prevent coolant from leaking past the threads into the engine.
Make sure to keep the head side of the washer clean and dry. This is important to maintain the washer in place on the head and not allow the washer to turn as the bolt is torqued in place. If there is lube on bottom side of the washer, it may allow the washer to turn. If this happens, the washer becomes like a roller bearing. This is bad because roughly 50 percent of all friction created when a bolt is torqued occurs underneath the bolt head. If this friction is reduced by a spinning washer, it puts a much higher load into the bolt which can pull the threads out of the block, damage the fastener, or both.
Of course, it’s also best to torque the heads in three non-equal stages. With the torque spec at 70 ft.-lbs., start at 40, increase to 50, and then jump to 70 ft.-lbs. for the final sequence.
For the bolt holes that are already stripped, you can replace them with Heli-coils or thread inserts but be careful to install them perpendicular to the deck surface.
Most times, this will require drilling the hole to fit the thread insert. The best plan is to make a drill fixture. This can be a large 3- to 4-inch thick piece of metal that will bolt to the block and create a drill guide that is perpendicular to the block surface. This is the best way to ensure the hole is drilled at 90-degrees to the block surface.
If looking stock is not a concern but you are worried about pulling threads in an older block, a set of ARP head studs will reduce the stress on the threads in the block. Head studs eliminate the twisting motion that is induced with head bolts. However, head studs are somewhat more expensive so that may also be a consideration. Hope this helps with your project.
I have a 1971 chevorlet 307 and I’ve decided to hotrod it. I decided to take to the internet to try and find the best setup for the 307. But I’ve had Soo many answers, mostly from helpful suggestions to buy a 350 to just tossing the motor in a ditch. What is the best setup for a 307 to get the most power I can out of it without blowing it up?
The 307 is basically a 283 block (3.875″ bore) with a 327 (3.25″ stroke) crank and standard (5.7″) small block rods. The limiting factor of a stock 307 is the small chamber, small valve heads. Super Chevy did a 307 build years ago and made very respectable numbers with it. If you can find a core that isn’t completely worn out, the 307 is actually a good starting point for a hot rod build.
Thanks so much for the info about bolt thread types.
[…] I’ve got an old, 327 c.i.d. small-block Chevy that I started to replace the heads with a better set. My problem is I’ve stripped the threads on two head bolts […] Read full article at http://www.onallcylinders.com […]
Ive got a 1968 Z28 327 block with n incorrectly drilled head bolt hole, and the ARP head stud has been bent to suit.
How much of a Hassel is it to fix the issue (cylinder 5, bolt hole closest to the inlet manifold)
Cheer from Australia
You may want to snap a few good, detailed pictures of the hole, then take the pics to your local machine shop. Depending on how “off” the misalignment is, they may have a handful of fixes for it.
can you use torque lube and thread sealant at the same time?
Hey Harold, we found this response on the FAQ section of ARP’s website:
…
“You can use Loctite instead of ARP Ultra-Torque, but do not use them together.”
I have a 327 from my 1964 impala SS that I bought in ’69 after the ARMY only 46,000 miles on it. The car was in storage until last year when I started restoring it. To be honest I grew up a mechanic and went to med school after burning my hands once to often working on cars. Well any way I thought it best to rebuild the motor and put in to get the block machined as little as needed. The crank went to 10/10 but I was told that there were no what we called first oversize pistons available but for .30 over. I really hated to do this to my motor since it was virgin. But gave in after being told this more than once. I was concerned that there was not many other over sizes above that either.
My question is this, is was that true, or was it just more convenient to the shop to just HOG it out to .30 over?