If you’ve been doing without an air compressor, the extra time you’ve been spending the garage lately may be providing just the push you need to add a shop compressor. Or, perhaps you’ve been making do with a smaller, less efficient air compressor than you really need.
In this installment of our Garage Goals series, we’ll help you choose the right compressor and provide tips to create the most ideal setup for your garage.
Choosing the Right Air Compressor
Air compressors come in a variety of configurations, ranging from tankless inflating devices to heavy-duty industrial brutes. There are four major things to consider before purchasing an air compressor: pump configuration, tank size, power and electrical requirements.
Pump Configuration
There are three basic types of pumps commonly used today:
- Lightweight invector compressors incorporate a universal motor with an air-cooling system, which, according to the manufacturer, extends the life of the compressor. They are best-suited for casual use, such as inflating tires or cleaning off parts with an air gun.
- Direct-drive compressors feature standard induction motors. Direct drive pumps are oil-free, so they’re perfect for the occasional- to moderate-use owner who doesn’t want to deal with servicing issues.
- Belt-drive pumps are quieter than their oil-free counterparts. They’re best suited for do-it-yourselfers and professionals who frequently use their air compressor. Belt-drive pumps will last three or more times longer than direct-drive models, but they require regular servicing (oil changes, filter changes, etc.). All heavy-duty commercial compressors you see in repair and body shops incorporate belt-driven pumps.
There are two different types of belt drive pumps commonly available. Single-stage pumps deliver compressed air directly to the tank. A two-stage pump creates pressurized air in a larger displacement, low-pressure cylinder, pumps it into a smaller high-pressure cylinder, and then fills the tank. The main reason for buying a compressor with a two-stage pump is to create an adequate supply of high-pressure air required for tools like a spray gun or air drill.
Many two-stage pumps are intercooled between stages to reduce heat buildup in the air supply. Compressing air creates heat, and less heat equals more efficiency.
Don’t confuse cylinders for stages. It is possible to purchase an air compressor with a two-cylinder, single-stage pump.
Getting Tanked
Air compressor tanks vary widely in size, ranging from two gallons to 120-plus US gallons. Some huge commercial models have 240-plus gallon tanks. Tools that work in short bursts—an impact wrench, for example—work reasonably well with a small tank. Tools that continuously use air such as die grinders, paint equipment, and sand blasters require a larger tank. If you can’t decide between two comparable air compressors, buy the one with the larger tank.
As tank size increases, so does the overall size of the compressor. If you want a big tank but have space concerns, consider a vertical tank instead of a horizontal model. However, a larger capacity tank will lessen the load on the motor, since it won’t have to cycle as often to replace the air you’ve used—a big advantage if you’re keeping the compressor in your workspace.
Power Requirements

You can rate an air compressor in a number of ways. Some do it based on the pump output pressure or by the electric motor’s horsepower output. The real compressor performance gauge is output at a given pressure. The rate at which a compressor can deliver a volume of air is noted in cubic feet per minute (CFM). Because atmospheric pressure plays a role in how fast air moves into the cylinder, CFM varies with atmospheric pressure. It also varies with the air’s temperature and humidity. To create a standard, manufacturers calculate standard cubic feet per minute (SCFM for short) as CFM at sea level with 68 degrees F air at 36-percent relative humidity. SCFM ratings are given at a specific pressure—for example, 20 SCFM at 100 psi. If you reduce pressure, SCFM goes up and vice versa.
The SCFM and PSI ratings are important because they indicate which tools a specific compressor can operate. When choosing a compressor, make sure it can supply the amount of air and the pressure your tools need. Always select an air compressor that exceeds the SCFM requirement of your most powerful air tool.
This chart (above right) gives you an idea of how much air common air tools require. This is only a general guide since some brands and configurations of air tools use more or less air.
Simply put, always select a compressor with a cfm rating greater than that of your “hungriest” air tool. Also, the greater pressure your compressor produces, the wider range of potential tools you’ll have at your disposal. The majority of tools require 90 psi and, while most air compressors produce more maximum pressure than that, you want to check the compressor’s cfm output at 90 psi.
Electrical Requirements
Air compressor motors range from simple 110-volt, 1/2-horsepower jobs all the way up to giant three-phase, 220-240-volt monsters making 25-plus horsepower. The electrical service available to your house or shop dictates the largest compressor you can install (we’re talking 220-240 volt models here). The electricity supplied to the majority of residential properties consists of a single phase or voltage signal. The electricity used in heavy industry is generally three-phase power. Few, if any, residences have three-phase electrical capability. There are converters available that allow you to use a three-phase motor in a building wired for single phase, but it’s best to begin with a single-phase model.
When shopping for a compressor, keep an eye out for the amperage rating of the electrical motor. Electrical service is measured in amps. Amperage is like the size of the water pipe that feeds your house—the bigger the pipe, the more water that can be delivered. Typical homes have 100-, 150-, or 200-amp service. Oftentimes, the older the residence, the smaller the electrical service.
All compressor motors should have a tag that indicates the amperage of the motor. As the electric motor size (HP) goes up, so does the amperage requirement. It is definitely possible to overwhelm the electrical service in your workshop with a large compressor. For example, a five-horsepower, 230-volt motor has a 23-amp rating. To accommodate the compressor motor, a dedicated 30-amp circuit should be used in the shop panel. If you do the math, you see a residence with 100-amp service will be hard pressed to give up 30 amps just for an air compressor. 200-amp service is required in this situation.
A Word About Duty Cycle
Duty cycle is the amount of time a compressor motor can safely operate before it shuts down to cool off. For example, a compressor with a 50-percent duty cycle will run for half of a given time period before shutting down.
Compressors with short duty cycles can pose a problem for continuous-use air tools like grinders and sanders, so be sure to get a compressor with a large tank, big motor, and a duty cycle rating of 50 percent or more if you plan to use these sorts of tools.
Check out Summit Racing’s full selection of shop compressors. After you pick out your compressor, you’re ready to plumb your workspace.
Installing Your Air Compressor
Once your compressor is in place, you might be tempted to throw on an air hose with a quick-disconnect fitting and call it “mission accomplished.” But a good plumbing job is every bit as important as picking the right compressor.
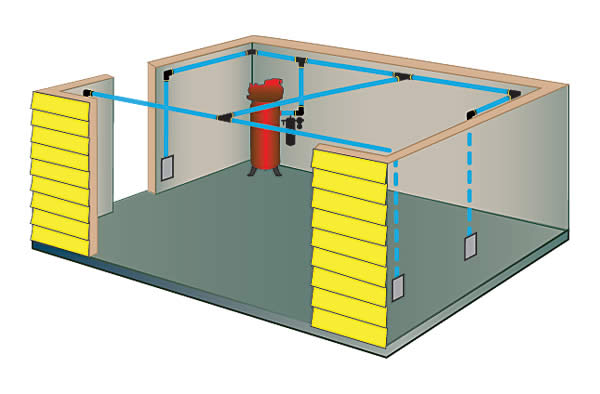
Since everyone’s work space and air requirements are unique, there’s no 100-percent foolproof plumbing setup out there, but the basics remain the same—and our own Summit Racing Push to Connect Air Hose and Fitting Combo is a great place to begin. The kit comes with 50 feet of flexible and tough ½-inch o.d. Puvex hose and plenty of elbows, straight unions, and tee fittings to get you started.
When laying out your setup, start with a short length of hose followed immediately by a filter/dryer. Why? Because air compressors also pass along small amounts of condensation and oil, and that’ll damage your air tools, clump blasting media, and absolutely ruin a paint job. The DeVilbiss QC3 desiccant dryer is the perfect solution—it even comes with a regulator, pressure gauge, and shut-off valve; more setup necessities.
If you’re making upgrades to an existing system with hard lines (copper, galvanized steel, etc.), consider adding a second filter as close to the air outlet (or outlets) as possible. This way, any corrosion, oil, or debris hidden in the pipes will be caught before it reaches your tools.
A properly maintained dryer will catch the majority of moisture in your system, but a small amount can still get through, which makes adding drain valves a must. Plumb in a drain at every drop leg in your plumbing setup, otherwise gathering condensation will inevitably reach your tools. For you forgetful types, a DeVilbiss CAMAIR Automatic Drain makes keeping your lines moisture-free a cinch.
With your air dry, the last step is getting the air where you need it to go. Using Summit Racing Puvex Air Hose, running your lines is easy. It’s flexible, abrasion resistant, and works perfectly with our Push to Connect Fittings.
The real trick is to plan ahead. If you see a blasting cabinet in your future, add a tee fitting and a shutoff valve along the wall where you’d like it to go. For convenience—especially if you’re going to be painting—plumb a Performance Tool Retractable Air Hose Reel from the ceiling—that’s a handy way to avoid draping hoses over your vehicle. For safety, be sure to add a shutoff valve near any point of operation.
That’s all there is to it! With a little planning, a basic air compressor setup will breathe new life into just about any project around the garage. Before you start plumbing your own system, check out our huge selection of air tools. No matter what your next project is, you’ll work harder without all the hard work!
[…] If you’ve been doing without an air compressor, the extra time you’ve been spending the garage lately may be providing just the push you need to add a shop compressor. […] Read full article at http://www.onallcylinders.com […]
A spray gun uses high pressure, I kinda doubt that.
You have obviously never painted before
It is essential for us to add the most suitable and compatible Right Air Compressor to reap out the maximum out of it. I always like to visit edubirdie.org so as to read honest reviews about essays writing service online. Installing improper Air Compressor might cause significant issues which you must avoid.
David,
THank you for this. Honestly.I’m not a bot, not gonna link to some other site, not selling anything. I’m a real human being who’s been trying to find this exact information for DAYS now.
Just wanted to drop a line of appreciation, and let you know your blog IS reaching people (and doing a least one an honest, positive solid). When I’m ready to pull the trigger, I’ll come back through here and use the links provided (I’m trying to give you adequate lead time to set up affiliate links if you haven’t already, LOL).
Great way to describe the topic 🙂 The way you describe the Power Requirement with chart, it shows your expertise in this topic.
Thanks for sharing such good information David Fuller.