(Image/Jeff Smith)
I have a 429 Ford in a Torino I bought about five months ago. The previous owner told me it has a flat tappet hydraulic performance cam but he didn’t know the specs or much of anything else about the engine. Just recently, the engine started making a ticking noise that is the same as engine rpm. We discovered one rocker arm was loose, so we put on new rockers. A couple of them appeared to be loose but there was one that was a lot looser than the rest.
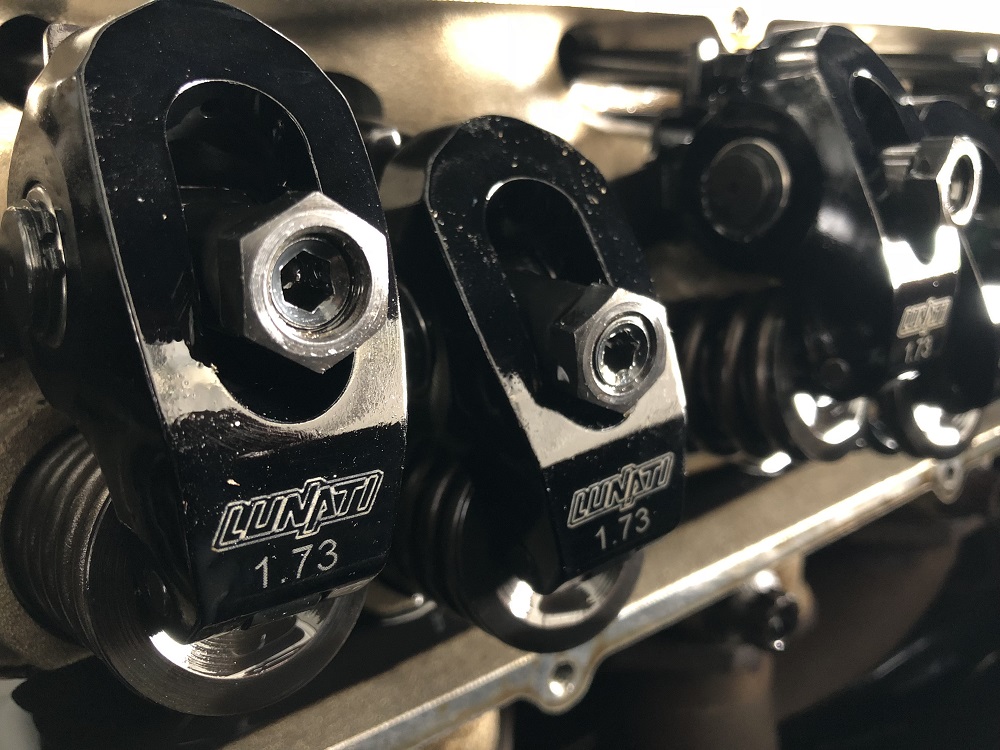
The engine now doesn’t really run right. It doesn’t idle as well as it used to and the idle rolls. I think it acts like a vacuum leak but another friend said it could be ignition. I changed the cap and rotor and new spark plugs but that didn’t help. Compression is even but it seems really low on all the cylinders around 135 pounds. I’ve included a photo of the rockers we put on the engine. We’re running out of things to try. Do you have any suggestions?
S.C.
Jeff Smith: The best way to attack these kinds of drivability issues is to always go after the simple fixes first.
We’ve all been through some dilemma like this trying all kinds of exotic fixes only the discover that it was something simple—but we only learn these lessons after we spend a bunch of time and money on fixes that didn’t solve the problem.
My favorite story like this was a friend who spent big money on a new fuel delivery system thinking that was the reason his car would lay down at the top-end on the drag strip. After a trip to the chassis dyno to “prove” his new parts, the shop discovered his throttle linkage was barely opening to half throttle. The real fix took about 30 seconds and didn’t cost him anything.
So the key is to do simple fixes first.
Test Your Spark Plug Wires
You have already added a new cap, rotor, and spark plugs, but I’ve seen bad or cheap spark plug wires cause problems like these. Rather than just run out and buy new parts, I prefer to test the old parts first to see if they are bad. Spark plug wires are easy to check if you have a digital volt-ohm meter. These little hand-held tools are great for diagnosing problems and inexpensive units are available.
We’re checking the resistance—in ohms—of each spark plug wire.
A typical performance spiral-wound plug wire can go as low as 50 ohms per foot, but we’ll use a number like 3,000 to 5,000 ohms over the entire length of the wire. If the wires check at or below this number then they’re acceptable. Lower numbers are better as it indicates less resistance.
If one or more wires check at 10,000 ohms or more, then they’re suspect. If you find more than two or three wires with high resistance then I’d recommend changing the entire set.
Pay particular attention to the coil wire running from the distributor to the ignition coil. We’ve seen coil wires fail long before the plug wires because they get hit with high voltage eight times more often than the individual spark plug wires.
Several companies make high-quality spark plug wires including MSD, Moroso, Taylor and many others. It’s not necessary to buy the ones with the lowest resistance (down to 50 ohms per foot). These work fine, but tend to be more expensive.
Assuming the plug wires check out okay, we’ll also assume that you set the spark plug gaps at 0.035 to 0.040-inch and the plugs are the proper heat range and that the rest of the ignition system is in good shape.
Test for a Vacuum Leak
The next place you could look is to make sure the engine isn’t suffering from a vacuum leak. Your description of the engine idle rolling is most often associated with a vacuum leak. This is often traced to a poor intake seal between the intake manifold and cylinder heads.
We recently helped a friend resurrect a small-block Chevy in a ’71 Camaro that, once the engine was running (after 19 years in storage), it developed a mild vacuum leak only after the engine was fully warmed up. Teardown revealed the manifold was not sealed properly at the bottom of the intake ports and was sucking both crankcase air and oil mist into the engine. This required custom milling of the manifold to create the proper seal.
The easiest way to determine whether you have a vacuum leak is to bring the engine up to its normal operating temperature—around 180 to 190 degrees F—and with the air cleaner removed, lightly spray carb cleaner or brake cleaner around the intake manifold where it bolts to the heads.
This needs to be the good volatile carb cleaner to work properly—not the water-based foo-foo stuff. Pay close attention to the idle speed. If the engine rpm suddenly increases when spraying the cleaner around one area—this is an indication of a possible vacuum leak. It’s most often the gasket, but we’ve seen older intakes with porosity problems where the manifold actually only leaks once it warms up! That’s rare, but it happens.
Check Carburetor Idle Mixture Screws
Pay close attention to how the idle mixture screws are adjusted on the carburetor.
We’ll assume it’s a typical Holley four-barrel carb with idle mixture screws on the primary side only. First check to make sure they are adjusted the same. With the engine off, slowly turn the screws in and count the number of turns. Each side should be the same within 1/8th of a turn.
If they’re not, balance them and then carefully readjust to achieve the highest manifold vacuum and highest idle speed while keeping the settings as lean as possible. Always make very small changes and maintain the same position of both idle mixture screws so they remain balanced.
Check for Worn Intake Lobes from Improper Engine Oil Use
We think this is likely to be the source of your problem. And unfortunately, this is where solving the problem can get more costly.
You mentioned this engine has a flat tappet performance camshaft. Since you don’t know much about the history of the engine, it’s possible that the previous owner didn’t perform the proper maintenance by using the proper engine oil.
In 1996, API changed the levels of zinc and phosphorous (referred to as ZDDP which stands for zinc dialkyldithiophosphate) in the oil. This is a high-pressure lubricant used to minimize wear in high-pressure applications such as the interface between a flat tappet lifter and the camshaft. The ZDDP levels previous to this were roughly 1,200 parts per million and were lowered to 1,000. The current ZDDP levels are around 800 ppm. This results in a 33-percent reduction in the ZDDP levels.
You may have heard about this and that some enthusiasts began using diesel engine oil because it contained higher levels of ZDDP.
In the last few years, this has also changed with reduced levels of ZDDP in these oils as well, meaning that they are no longer a good idea to use in a flat tappet cam engine. So if the previous owner was using current API engine oil with the little donut on the label stating SM or now SN, these oils along with the current diesel engine oils aren’t recommended.
The reason we’re giving you this information is because it’s possible you could have one or more extremely worn intake lobes.
We’re fairly sure the wear would be present on the intake lobes because if an exhaust lobe was worn to the point of very little lift, then the engine would let you know through a popping sound coming from the carburetor when the engine accelerated. This occurs because the worn exhaust lobe won’t lift the exhaust valve enough to fully evacuate the exhaust gases in the chamber, and when the intake valve opens, that pressure will merely exit into the intake manifold.
Since your engine doesn’t exhibit this kind of problem, it’s likely one or more intake lobes has flattened just enough to be so weak that the engine doesn’t idle properly. Idle will be where the issue is most obvious because this is when there is the most amount of time between cylinder-firing events. At higher engine speeds, the weak cylinder(s) will not be as obvious but power will most certainly be way down.
Another clue is the very low 135 psi indicated on the compression test.
Even a stock two-barrel 429 in 1969 had 10.5:1 compression and with a mild cam should still have something near like 150-165 cranking compression.
One quick way to check your problem would be to use a hand-held infrared temperature guns on each exhaust port with the engine running.
If checked directly on the exhaust port as it exits the head, compare the temperature from each cylinder. A weak cylinder should show a lower temperature.
If that doesn’t indicate a problem, then a slightly more accurate test is to remove one valve cover and start the engine. Look for a rocker arm that doesn’t open the valve as much as the rest. This will be your worn lobe.
This is likely your problem and the reason that you had to tighten that one lobe. In fact, if you look at the photo you supplied, note how the adjuster Allen lock inside the poly lock is much higher than the adjoining rockers. This indicates that you had to tighten the poly lock down further to compensate for the worn lobe.
We’re Sorry for the Bad News, but it’s a Worthy Investment
We can sympathize with this failure—it happened to us a number of years ago, leading to an extended search for proper engine oil to use with performance flat tappet cams.
Fortunately, you have several choices when it comes to “boutique” engine oils that can do the job.
Edelbrock offers several motor oils with higher ZDDP levels as does Driven Racing Oil, Lucas, and many others. These oils also come in either petroleum-based, synthetic, or synthetic blends, so you have multiple options.
Unfortunately, most of these oils aren’t available at the local auto parts store. I’ve found the easiest way to deal with this is to stock up by ordering a quantity of oil from a company like Summit Racing that will ship it right to your house so you always have what you need.
If the problem is a dead lobe on the cam, the right way to repair this problem is to tear down the engine completely.
I know this isn’t what you want to hear, but all the metal torn from multiple cam lobes has by this time travelled throughout the engine, getting into areas that are near-impossible to clean—the worst being the oil passages behind the cam bearings.
This would require completely disassembling the engine, removing the cam bearings, sonic cleaning the block, and then reassembling the engine.
I know this isn’t good news, but with a nice big-block Ford like a 429, it really is worth it to invest in doing the job correctly.
https://mobiloil.com/~/media/amer/us/pvl/files/pdfs/mobil-1-oil-product-specs-guide.pdf
This chart will help some people with flat tappet cams. Look for oils that has Phosphorus and Zinc level 1000ppm or higher.
is the benefit the same if you add the zzdp supplement to your favorite motor oil as it is buying the more costly oil with the already added zzdp?
I’ve been told by an oil engineer that ZDDP works the best when it is blended into the oil by the oil company as ZDDP can only be integrated at a certain temperature. I’m not sure if this is accurate or not but it does make sense. I do know that adding moly disulfide onto the camshaft lobes during assembly to help all ends up in the bottom of the oil pan once the engine fires up. So it’s possible the same thing occurs with ZDDP. Conversely, for decades GM has offered its Engine Oil Supplement (EOS) which is a ZDDP additive which seems to counter the argument it must be blended. You have a great question that I unfortunately don’t have a solid answer for.
Pull the intake and check the lifters first as it could be a collapsed lifter. While the compression may seem “low” it is even across all cylinders, which could be an indication of retarded cam timing rather than a bad lobe.
Big with 429’s especially the cj’s is the intake gskt . If the intake gets a little loose it’ll suck the gskt in and instant vacuums leak . Always check my intake bolts every 2 or 3 oil changes .
Pull the distributor. Check your gear pin isn’t sheared off
I have oil restricted in my lifter holes and my rocker are not getting enough oil they are lunati solid rollers. I have seen where guys have made a small grove in the lifter between the oil hole and the middle of the lifter??
I HAVE A 1970 BOSS 429 THAT IS GETTING COOLANT IN OIL THERE IS A LOCAL MUSTANG EXPERT THAT TELLING ME SOME COOLANT IN OIL ON A BOSS 429 IN NORMAL (NO WAY) HAVE YOU RUN INTO AMY THING ON THE BOSS 429 LIKE THIS (NO LEAKS ON OUT SIDE OF ENGINE )