Sixty-some years ago, before our favorite four-wheel-drive vehicle earned the name Jeep, the Army’s 4WD ¼-ton scout vehicle was given the designation of “GP” for General Purpose vehicle. It was given this designation because the Army needed a small, agile vehicle that could do any job it was called upon to perform: carrying four soldiers, mounting a machine gun, towing a ¼-ton trailer, supplying ammo to the front lines, carrying wounded to the rear echelon, etc. This “GP” designation is one of the original reasons that GIs started calling it a “Jeep.”
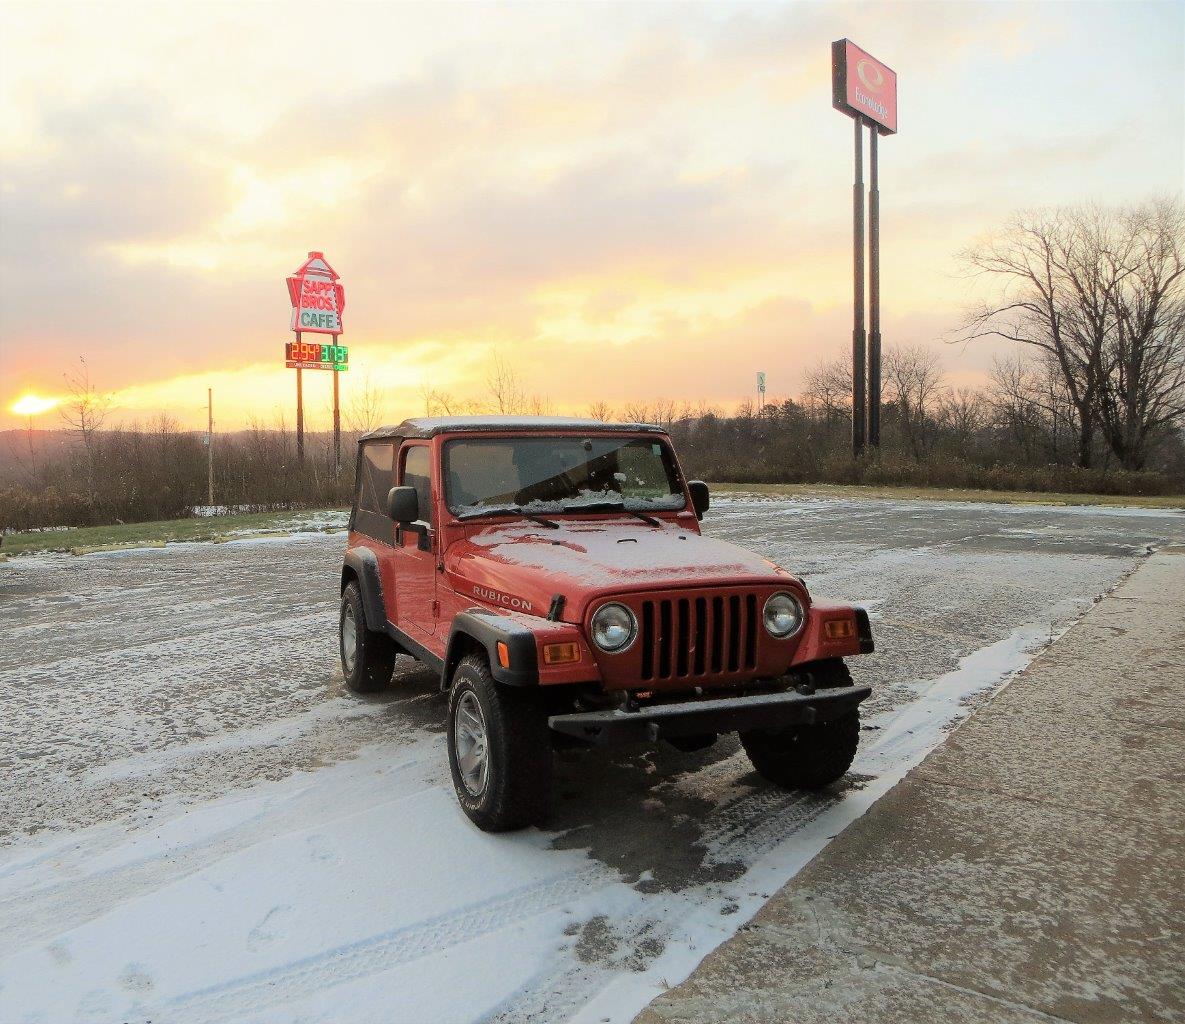
“GP” was also in the back of our minds when we first conceived the idea for our latest Jeep project: a 2005 Jeep Rubicon Unlimited. We’ll be building it into the ultimate general purpose “GP” vehicle—an exploration rig that can be flat-towed behind a motorhome or tow its own camping trailer to and over the Rubicon. It may not be able to compete in the King of the Hammers, but it will be able to climb all of the Hammers—and drive there to boot!
We decided early on that we wanted an orange Rubicon LJ with an automatic transmission. We wanted a Rubicon because of its Dana 44 differentials, its heavier-duty transfer case with 4:1 low range, its selectable lockers, and its four disc brakes. The Rubicon Unlimited is one heck of a machine right off the dealership’s floor, but it still needs help to become an extremely capable trail runner.
In this first part of our two-part series, we’ll cover the gears, suspension, and tires. With the exception of a few parts, all the steps are interchangeable between the LJ and the TJ.
Just as it came from New Hampshire, the stock 2005 Rubicon Unlimited is a fairly competent machine out of the box.
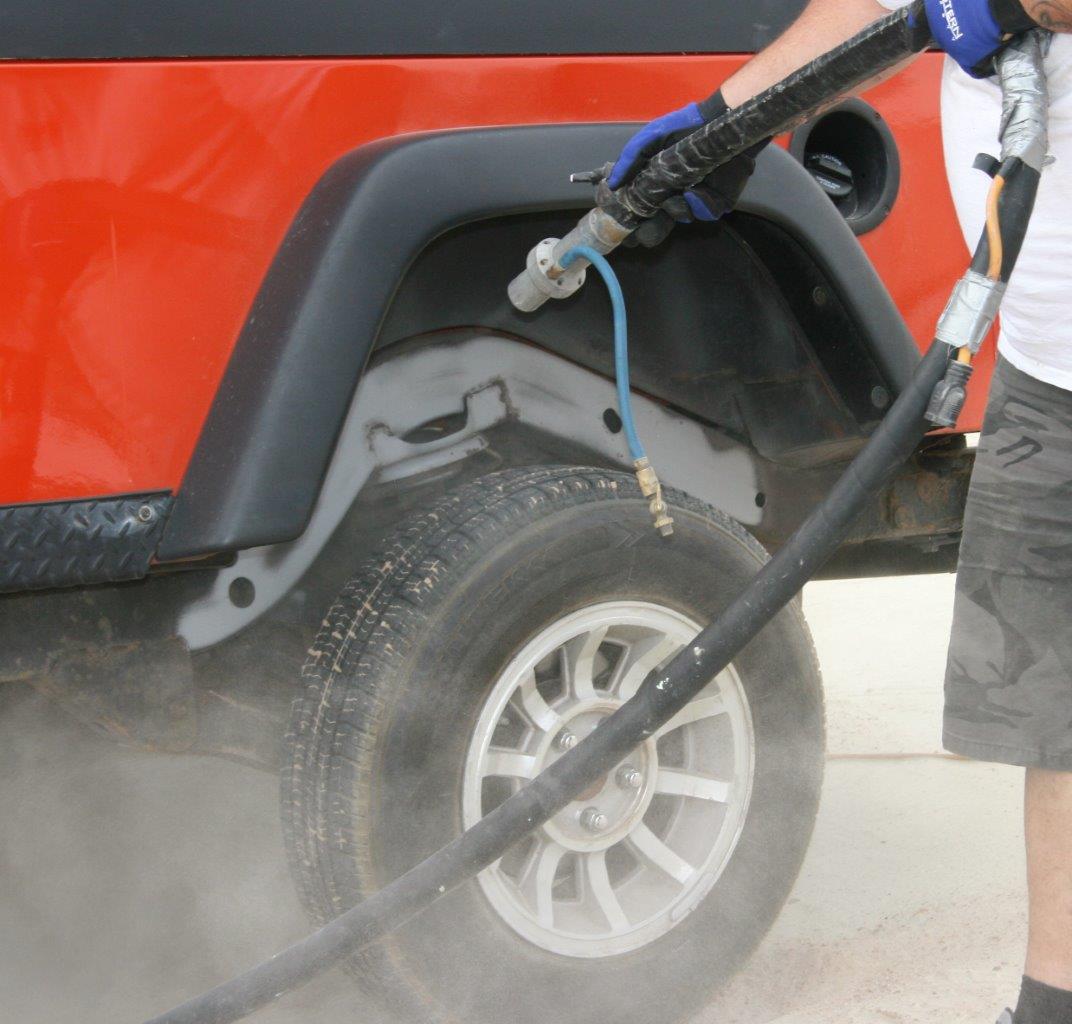
After ten New England winters, the Jeep’s frame needed cleaning before we could work on it. Clint Hindelang volunteered a soda blasting to remove most of the Jeep’s rust. We used my flatbed trailer to lift the Jeep. The soda beads are a safe way to remove old paint and rust flakes without damaging the metal underneath.
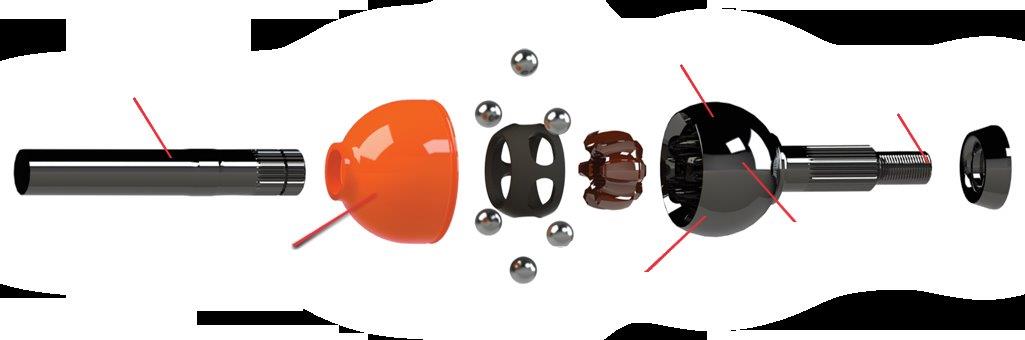
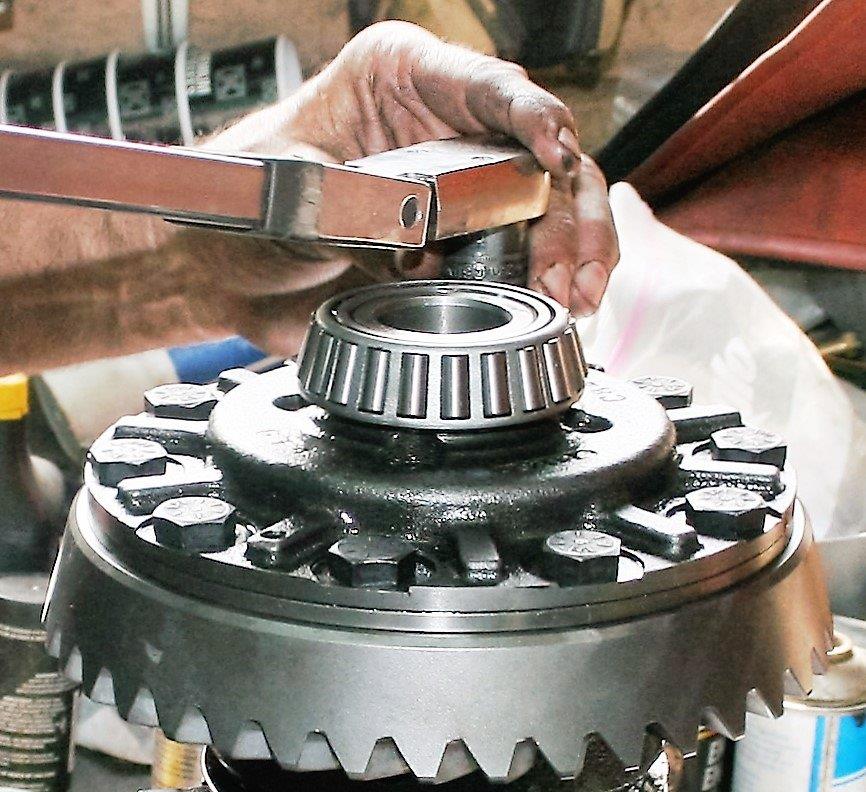
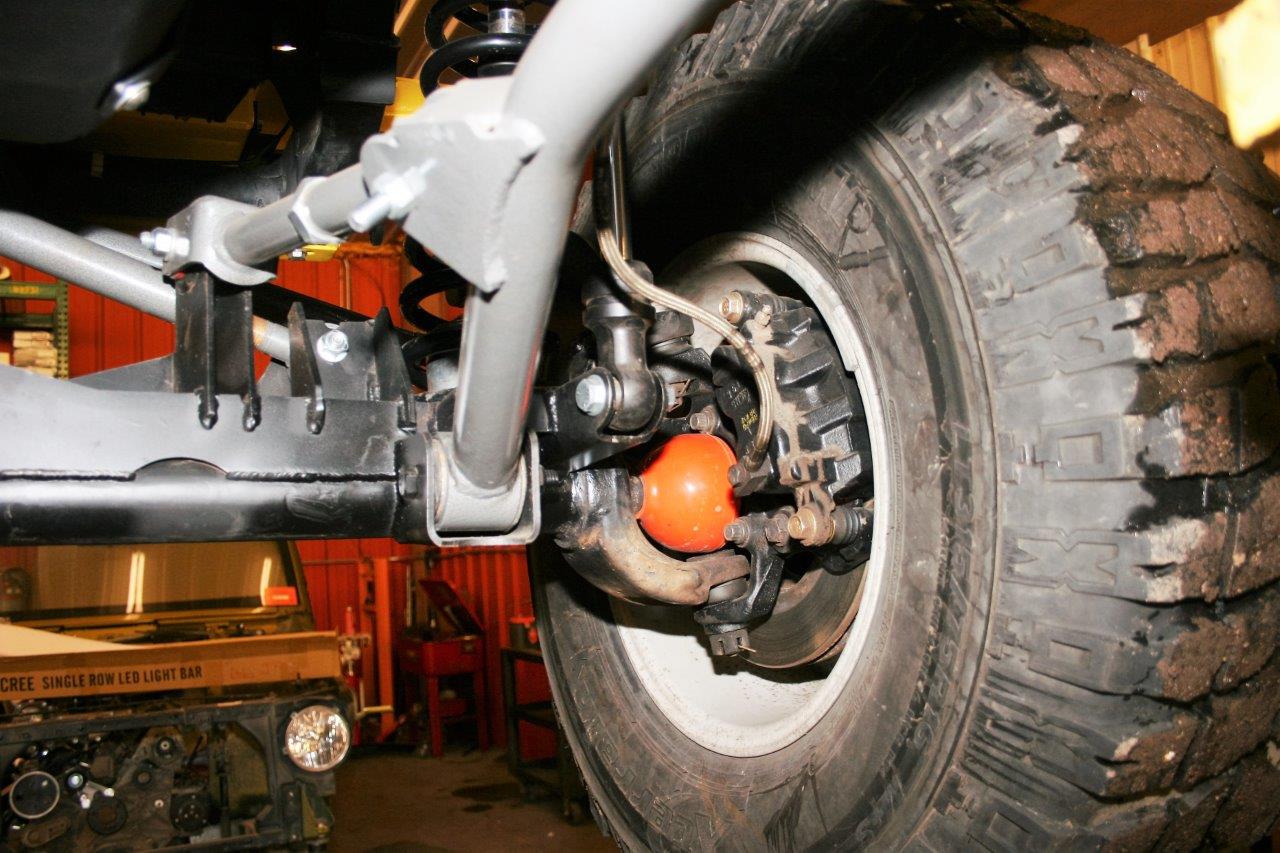
Ten years of New Hampshire winters can really put a strain on factory axles, but the addition of RCV axles makes the front differential almost invincible. RCV Performance’s diagram shows the large ball bearings that are the heart of the constant velocity front axle joint. An aperture in the outside end of the axle allows you to grease the CV joint annually without dismantling the front axle. That’s why the text mentions that you should leave the wheels’ hub caps off when you mount the wheels.
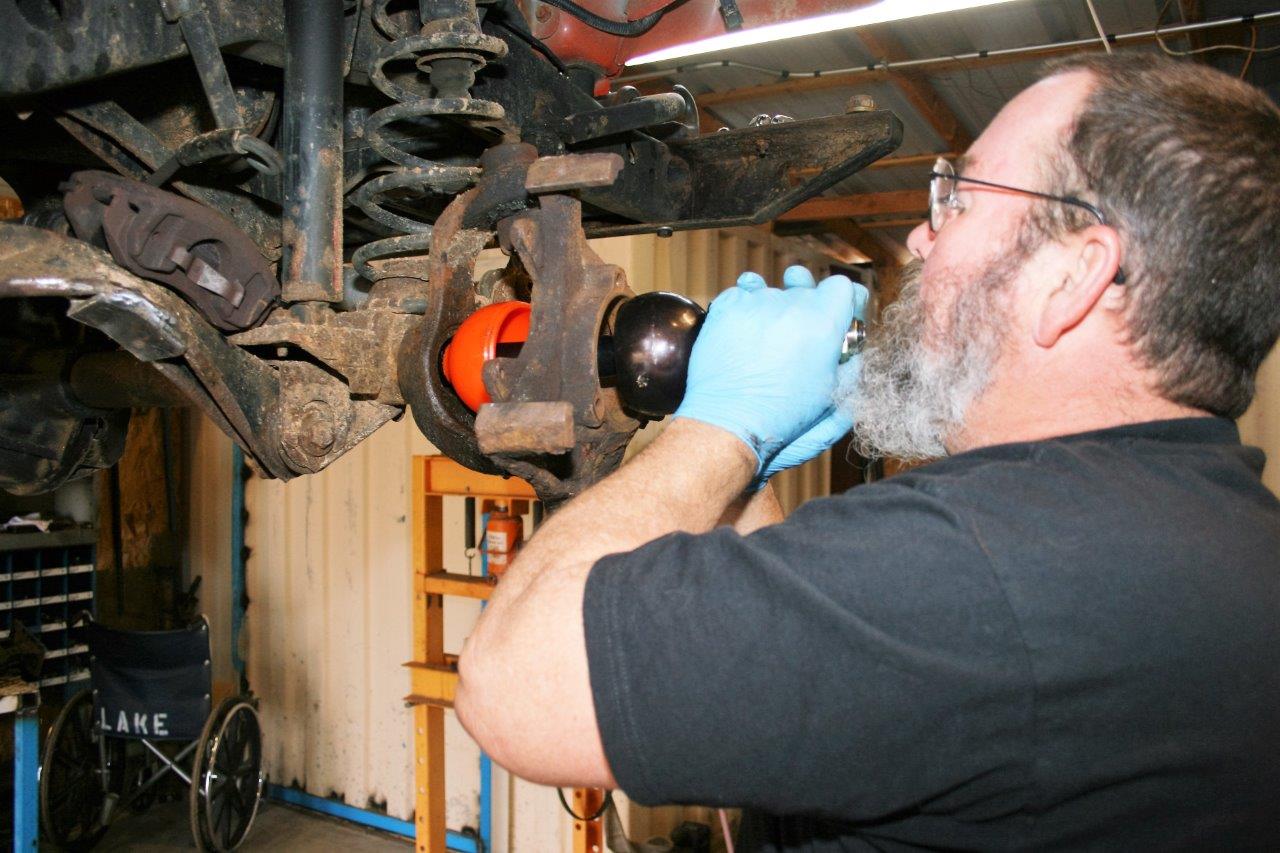
On some axles the orange grease cup can be installed on the axle shaft before it is inserted. On others, it must be in place before the shaft is inserted into the housing. RCV’s distinctive orange grease cup tells everyone that your front axles have a lifetime warranty. Kevin Lake—at whose shop all this work was done—is slipping the axle into the housing carefully so that the splines aren’t damaged. The shaft may have to be jockeyed back forth so the splines will mate with the gears.
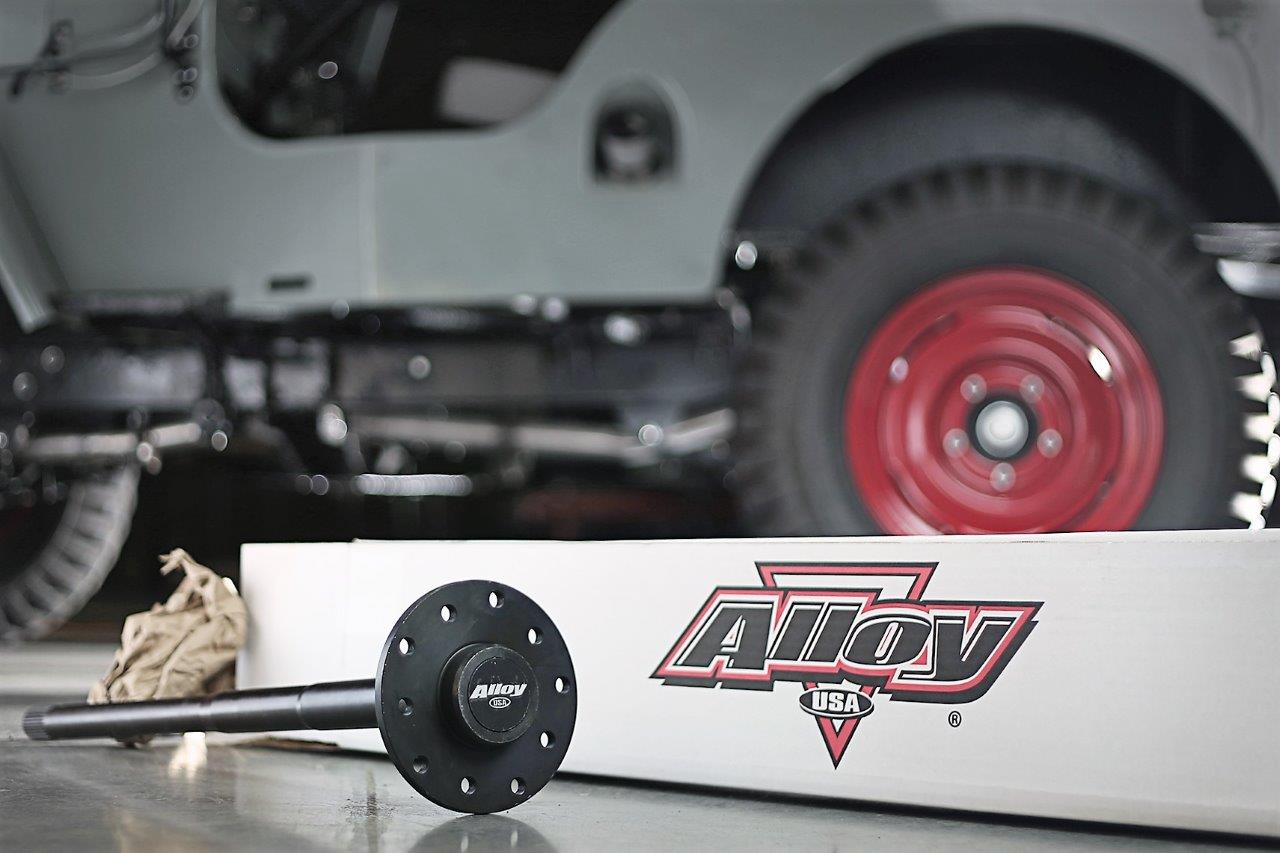
Since we were using RCV lifetime axles in the front Dana 44, we decided to upgrade the rear Dana 44 as well. Alloy USA includes a 10-year warranty with each set of chromoly axles. As you can see from all the lug bolt holes, this Alloy chromoly axle has more than one application.
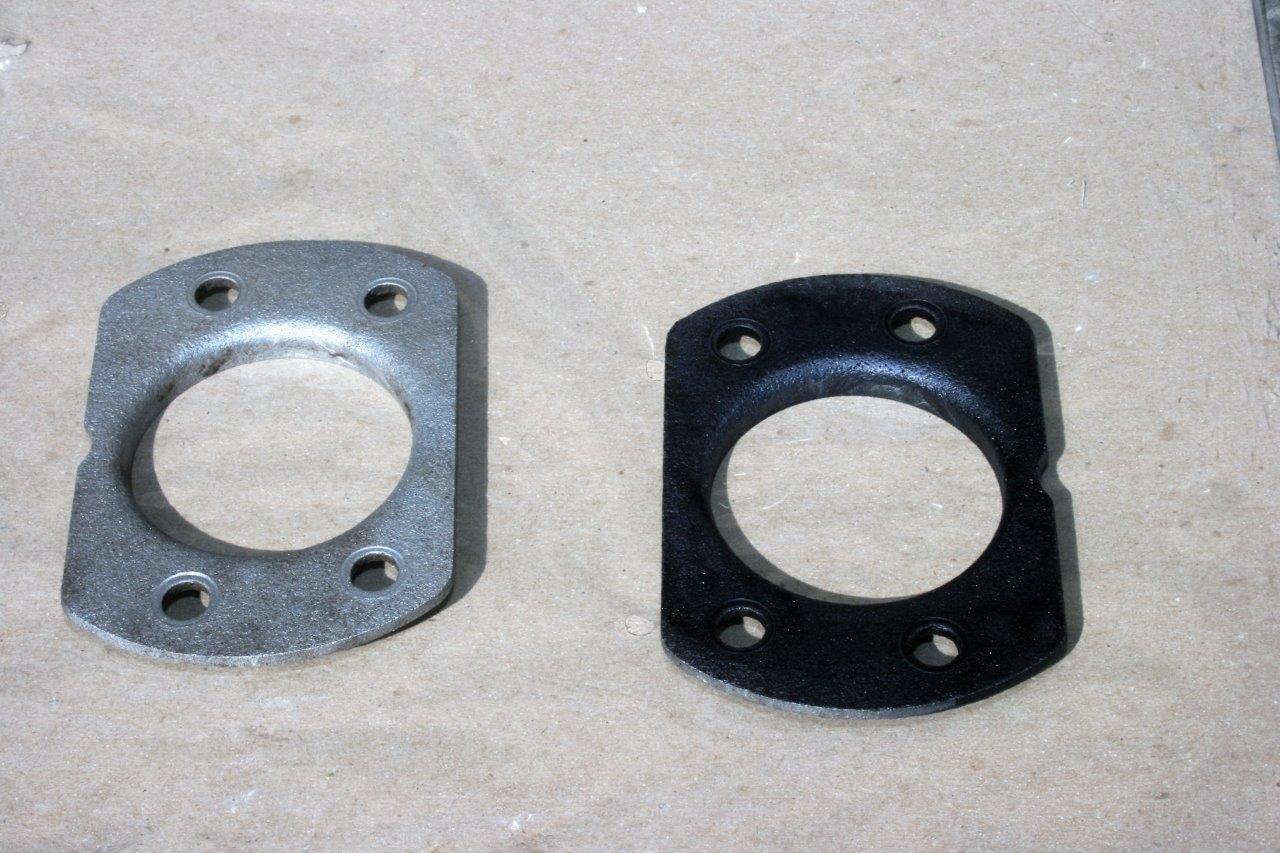
If you’re working on a used Jeep, there’s going to be rust. Klean Strip Rust Converter chemically alters rust and turns it into black primer paint. The axle mounting plate on the left has been sand blasted only. The plate on the right was sand blasted and then sprayed with Rust Converter—it’s ready for finish painting.
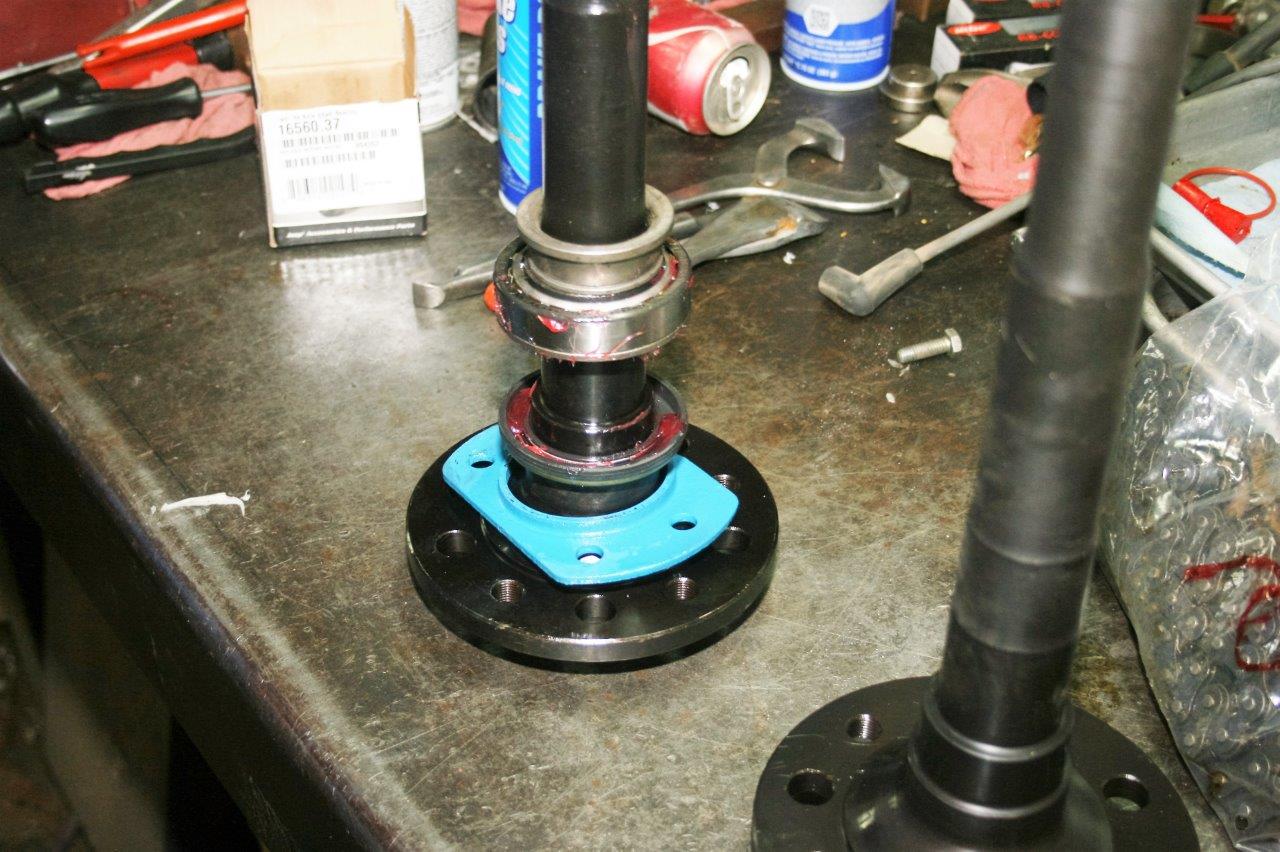
The plate was painted and then slipped onto the axle before the bearings were pressed on.
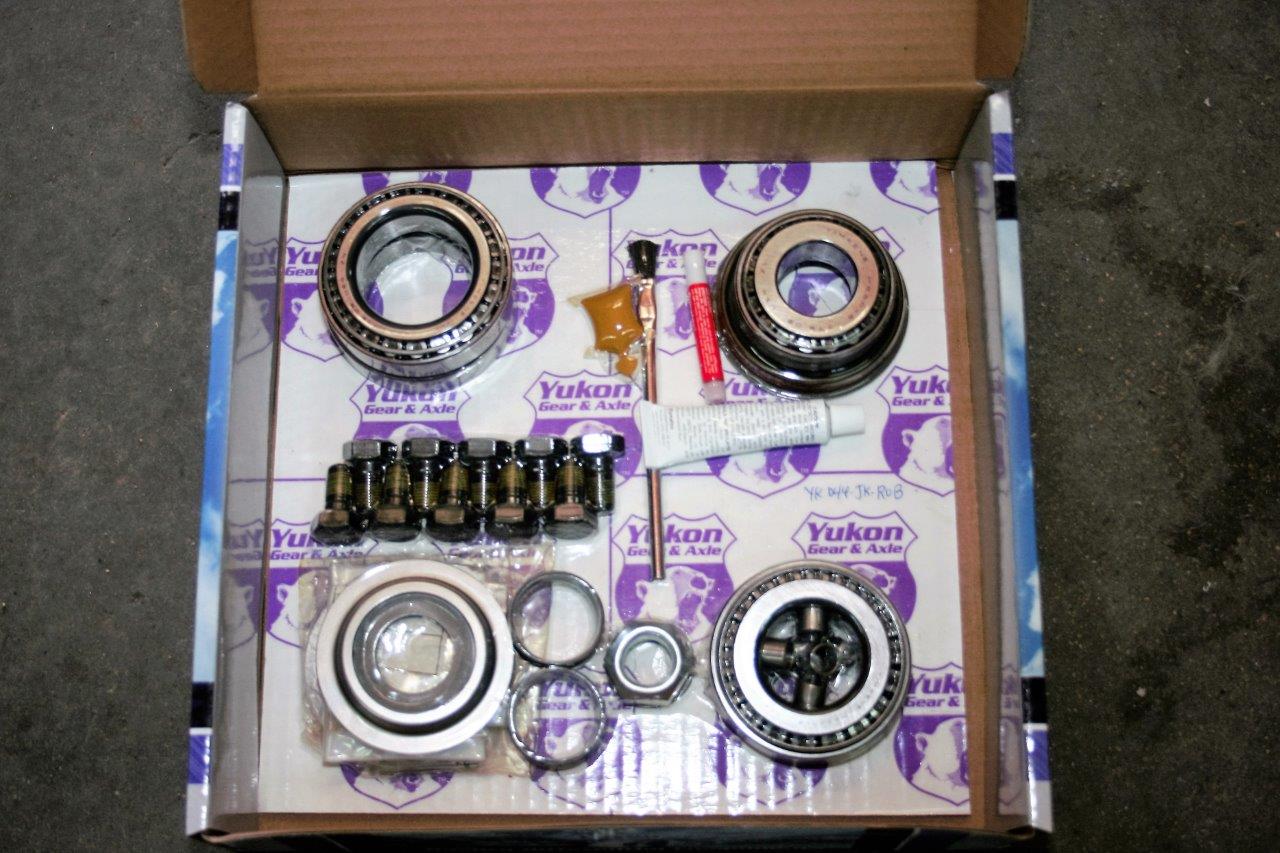
Most of us hate shrink-wrap, but it sure protects the Yukon differential rebuild kit. It includes everything you need to rebuild a differential when you change gear sets. We ordered a kit for each differential.
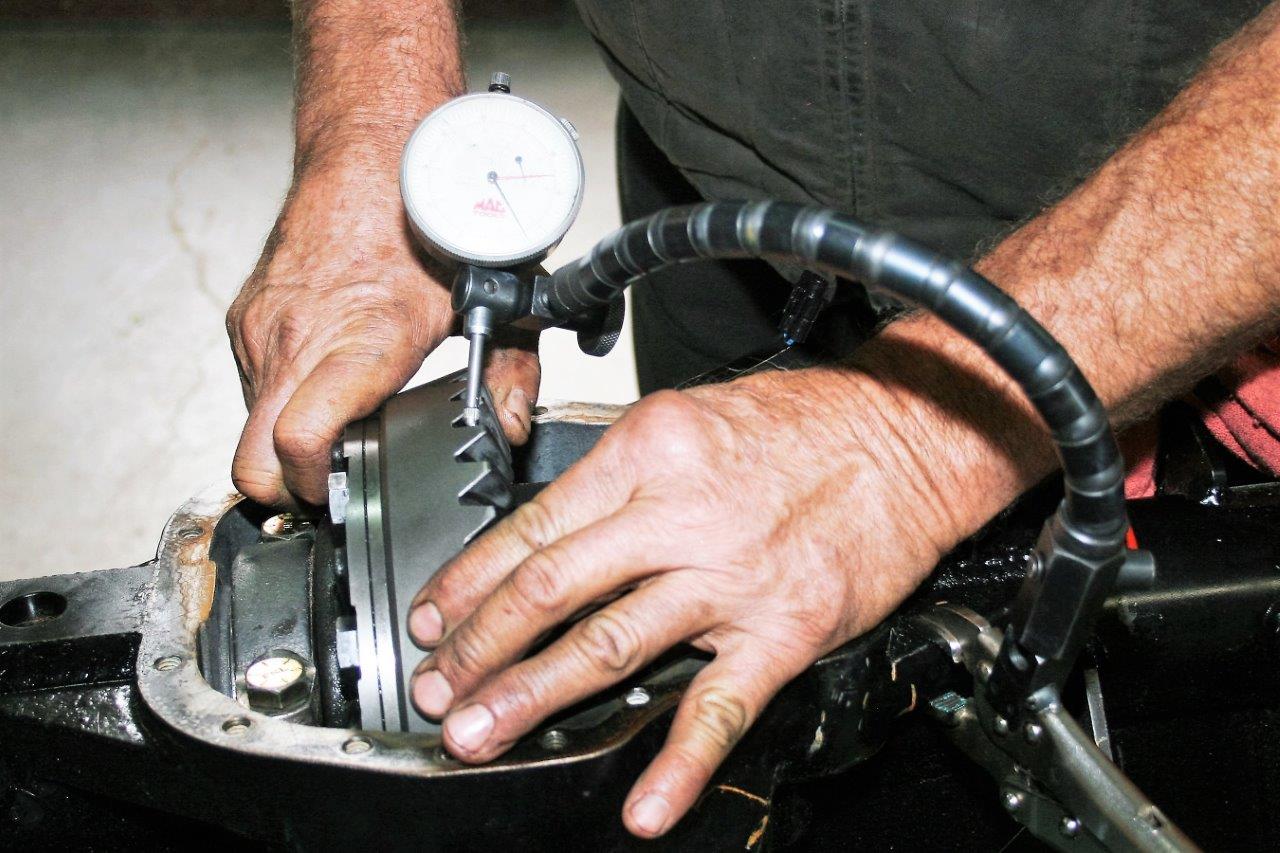
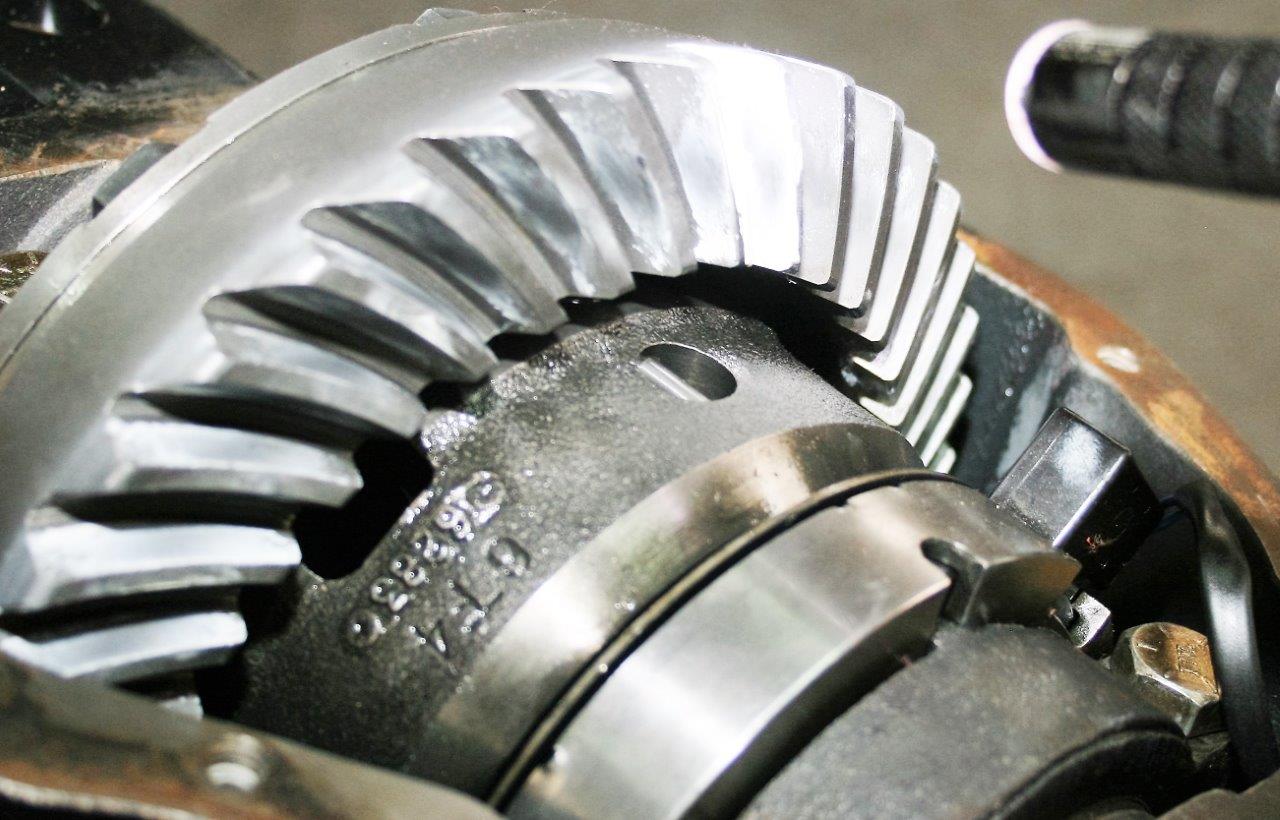
The carrier, ring, pinion, side gears, and bearings must be assembled properly. The carrier must be torqued to the ring gear according to the manufacturer’s specification.
The pinion gear must be meshed with the ring gear to the proper depth and backlash.
It’s difficult to see, but if you look closely, you’ll see a mark in the center of the white paint where the pinion gear mates with the ring gears.
All factory attachment points must be removed from the housing in order to mount the truss. Even the upper control arm’s cast mount has to be cut off.
After being removed, the mounting point’s residue must be ground down flush with the differential’s housing to clear the new truss. So a fellow club member, Mike Barnes, is grinding off any residue or welds to make sure the housing is smooth and ready for the next step. Mike cleaned all the paint and rust off the front differential housing in preparation for welding the truss into place.
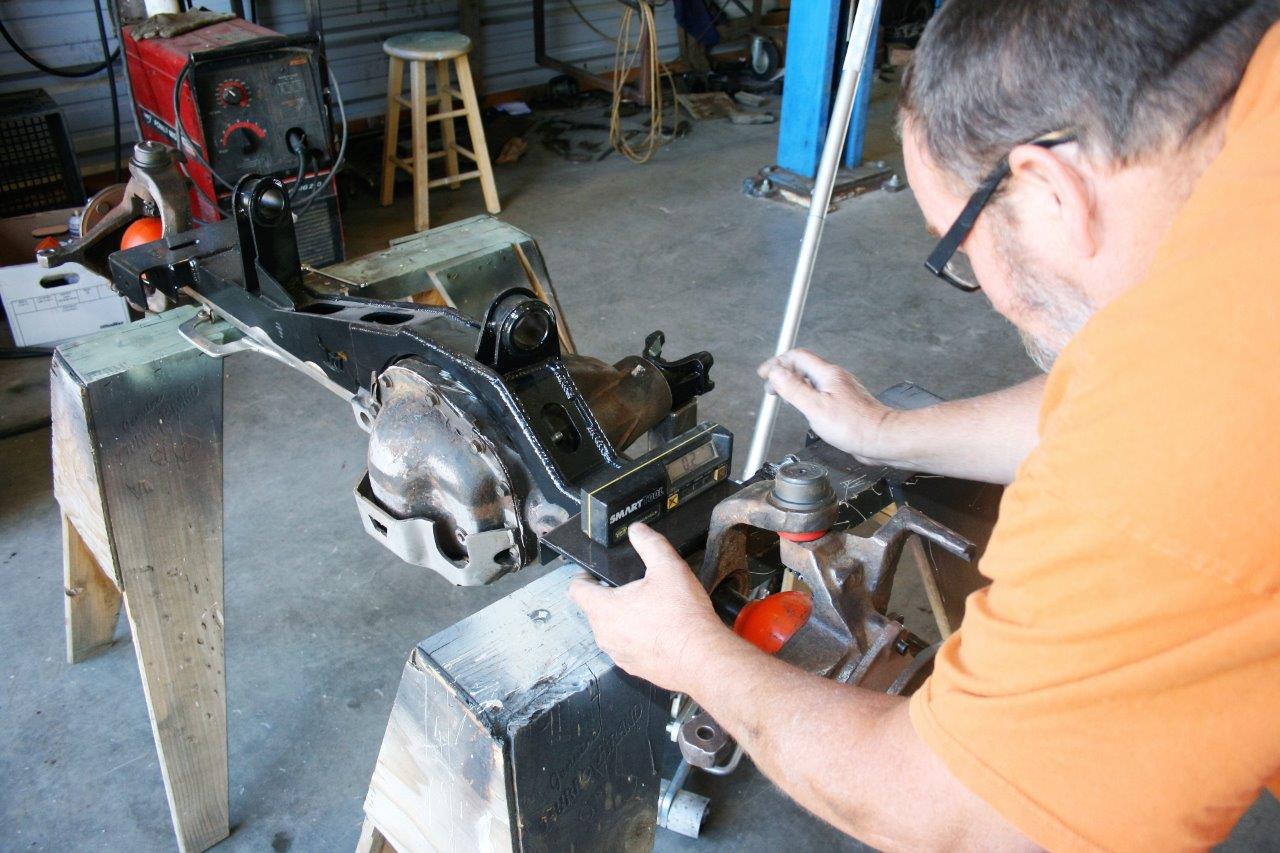
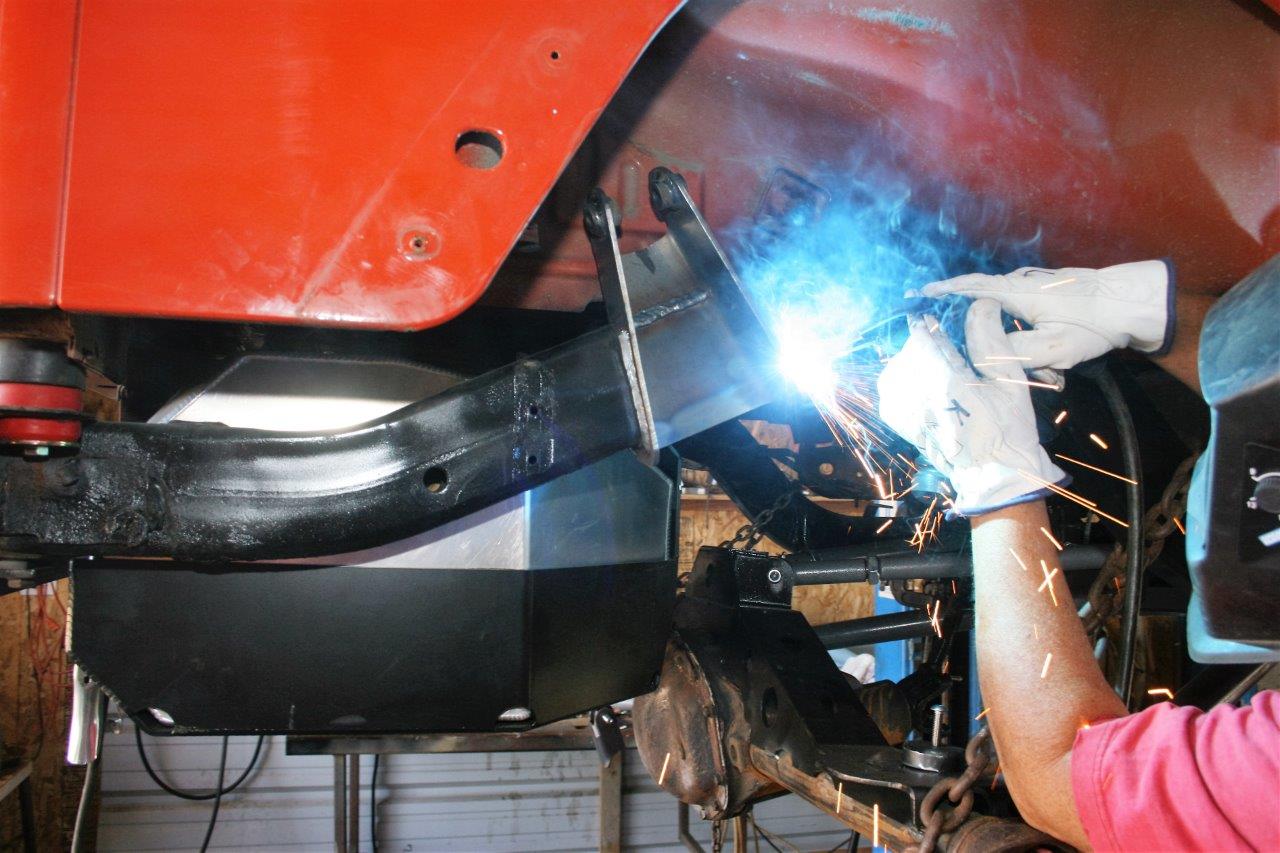
The TNT front truss is an extra-cost option and is not included in the kit. TNT indicated that the front truss is not needed, but we opted for it because of the added strength. Kevin is verifying that the truss will be attached in the right place so that the pinion angle will be within parameters.
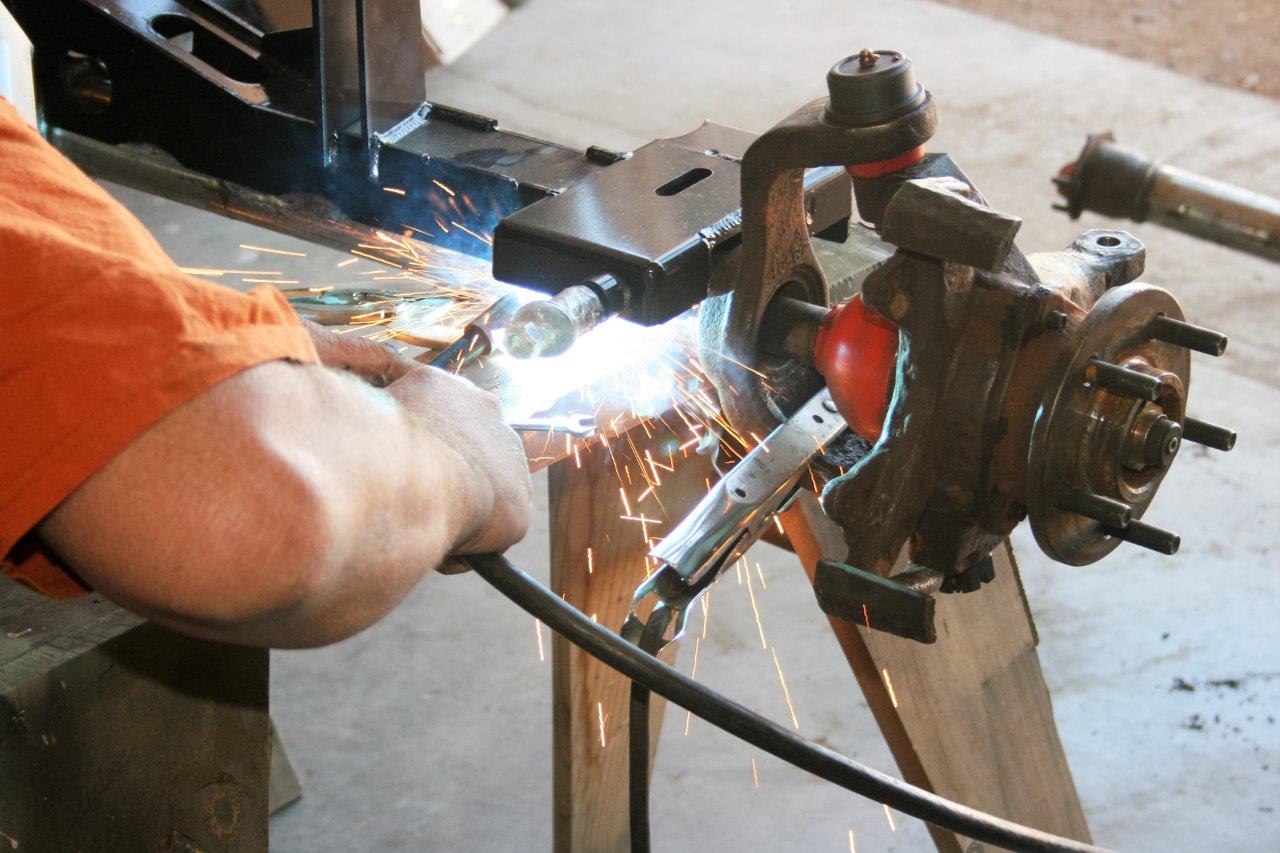
Kevin is applying the “strong tacking.”(“It’s easier to cut off good tack welds than try to relocate the truss if the tacks fail,” said Bob Levenhagen, TNT’s owner.) He also did all the welding for the project. The TNT front truss is made with 3/16-inch steel and greatly increases the housing’s strength.
Before mounting the front differential into the Jeep we worked on the rear housing. Again, all OEM attachment points had to be removed in preparation for the TNT rear truss. We located the rear truss, strongly tacked the truss into place, and lifted the housing into place beneath the Jeep to verify its proper location.
We pulled the rear differential back out, turned it upside down, and Kevin proceeded to finish all the welding on the truss. Once the rear truss was fully welded, the rear bottom mounts for the shock absorbers were welded on. Although still near the bottom of the axle housing, the mounts are more protected than stock mounts because they are level with the housing, not below it in harm’s way.
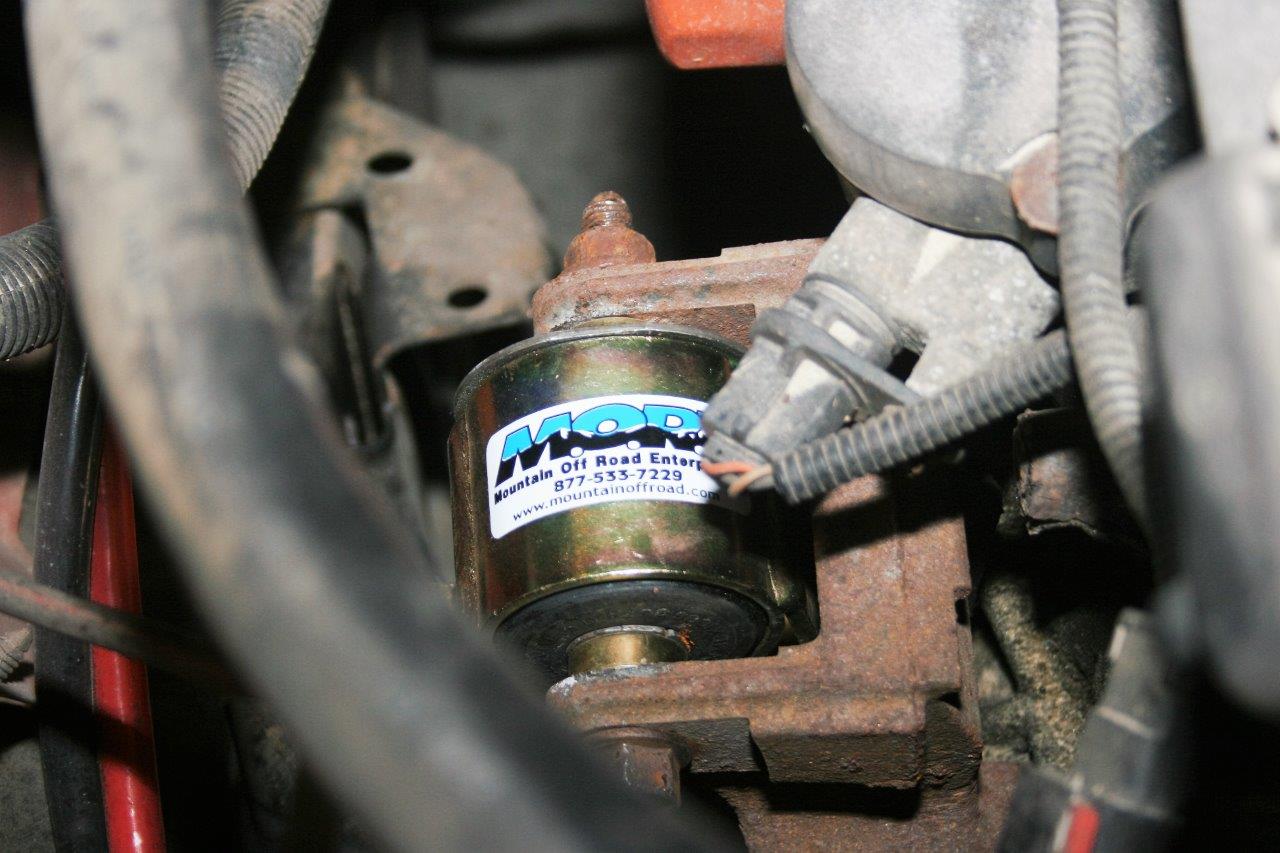
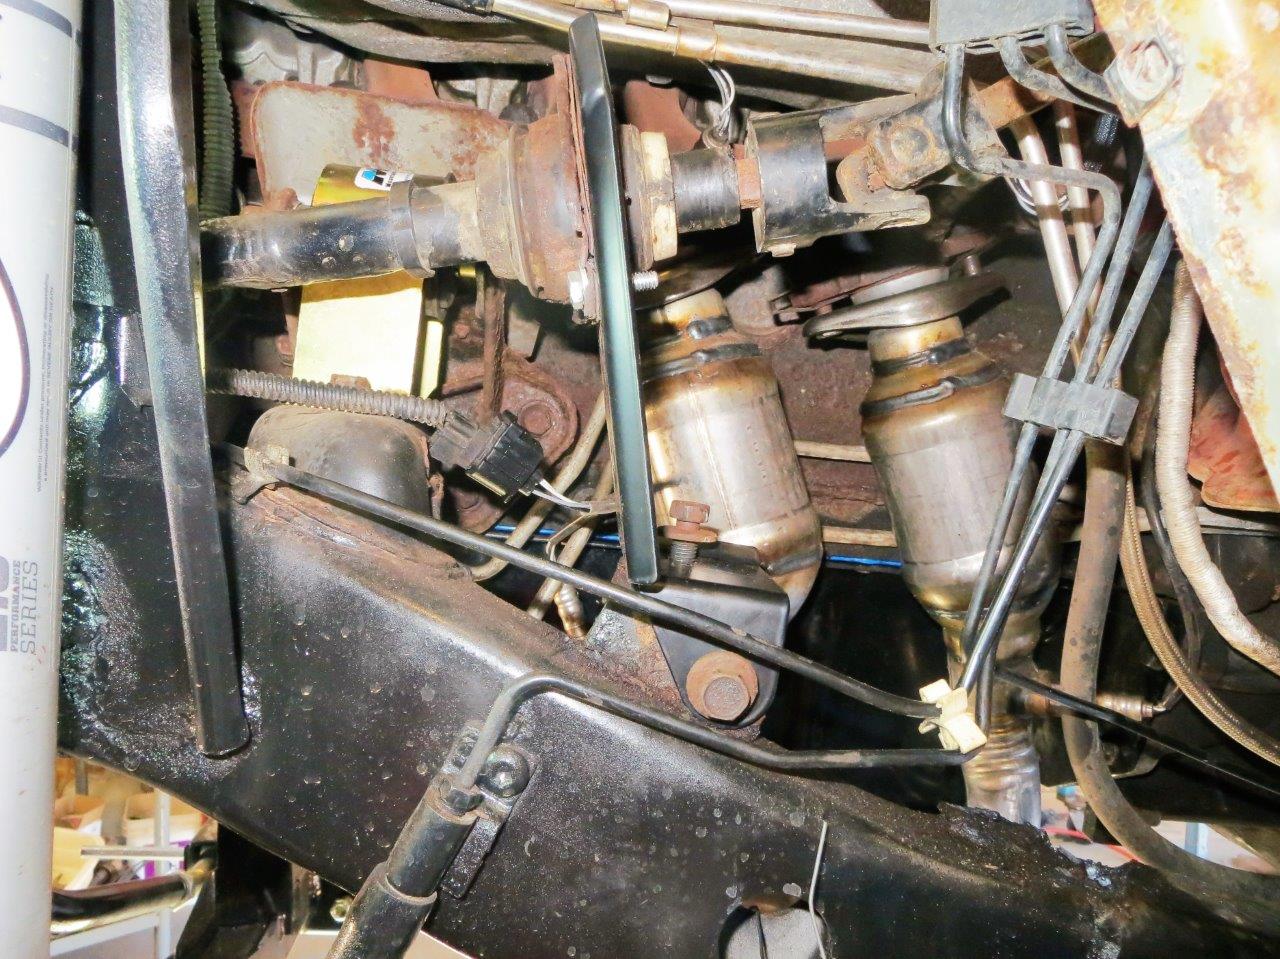
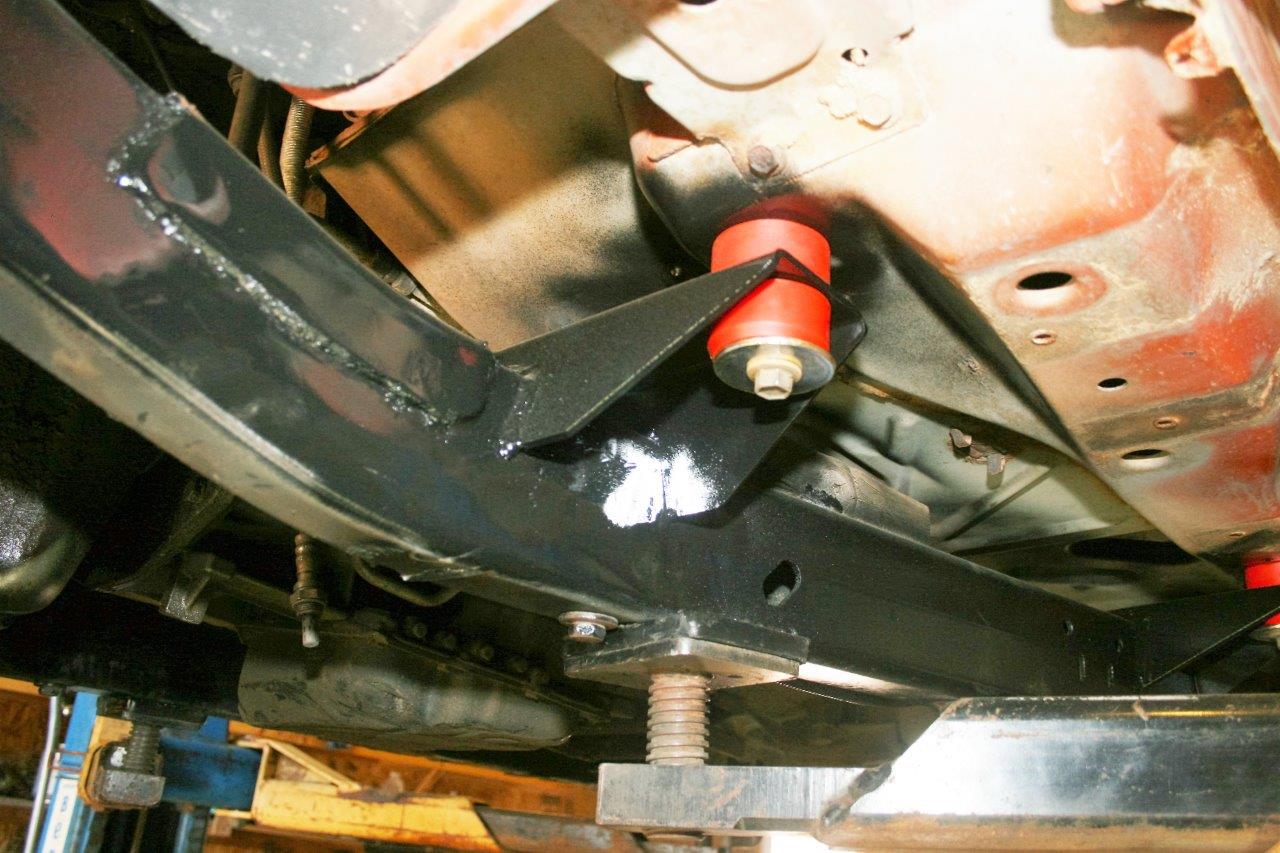
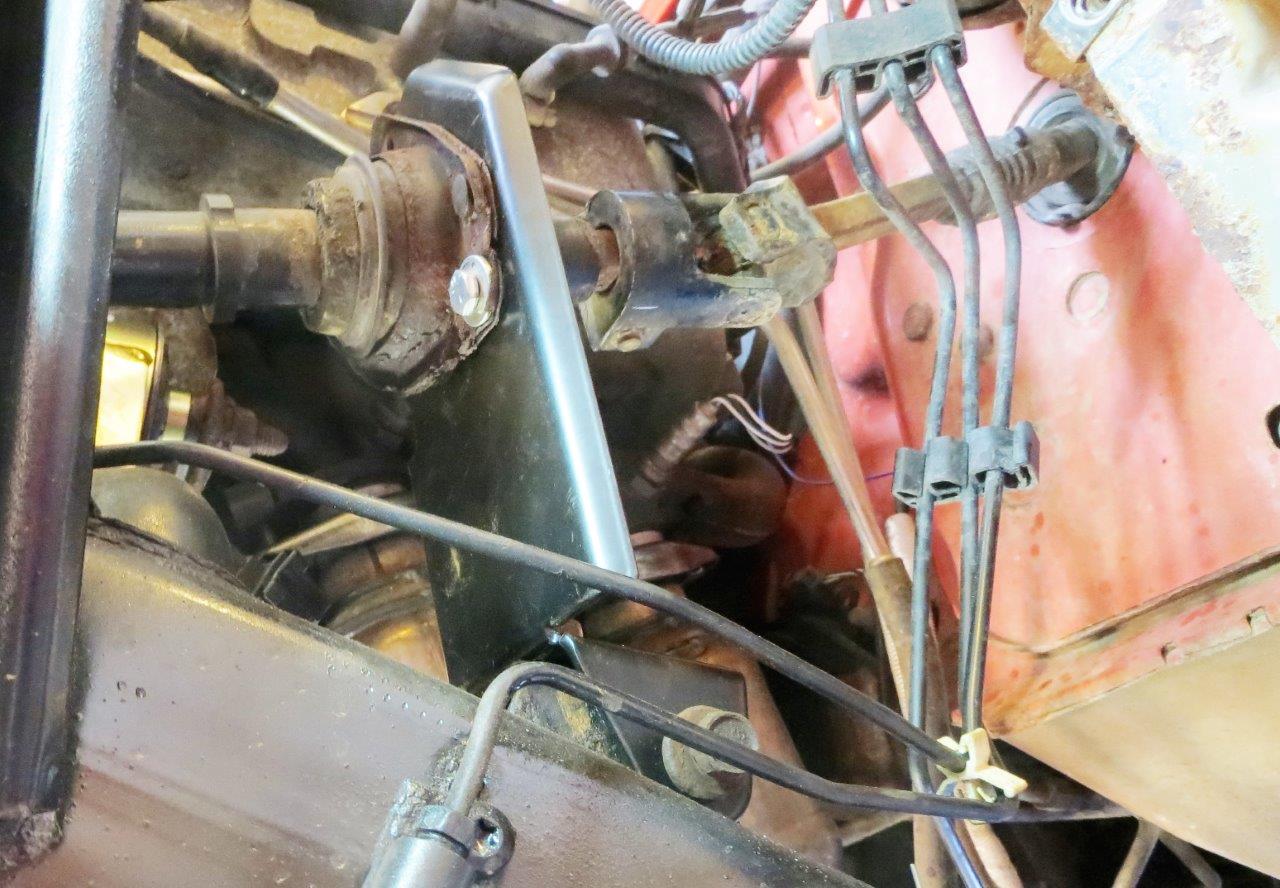
Before mounting the TNT Customs cross members, the engine had to be lifted an inch, which was accomplished with a pair of Mountain Off-Road Enterprises motor mounts. These mounts not only lift the engine, but they are designed to provide stronger attachment points for the engine during the stresses of trail duty.
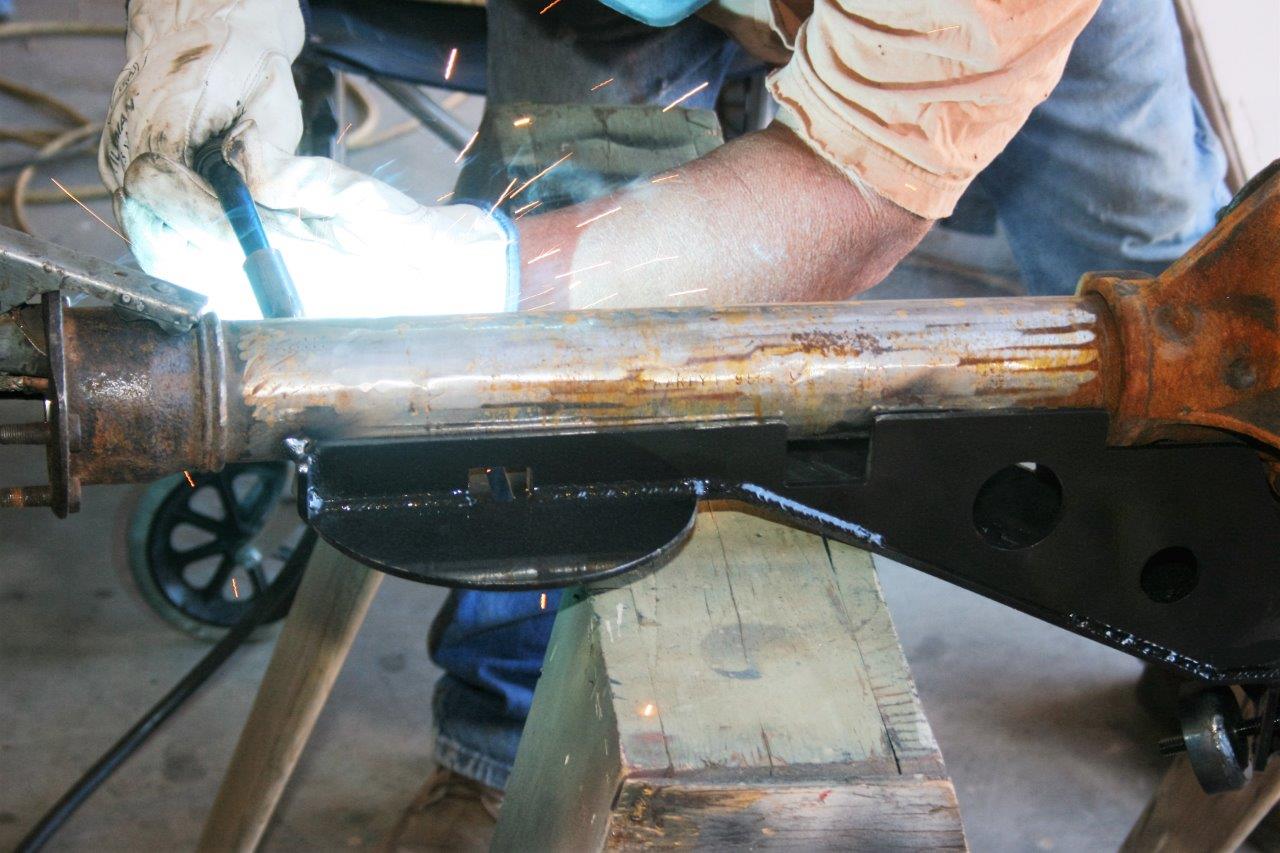
The Jeep’s 4.0L exhaust also has to be modified for the TNT Customs cross members. Since original exhaust had spent ten winters in New Hampshire, it wasn’t strong enough to be modified. We replaced it with new headers from Summit Racing, which included new catalytic converters as well, although the original oxygen sensors were reused. The Y-section in the header has to be notched and then welded to fit around the oil pan and the front axle’s control arms.
All bolted into place, the exhaust headers fit like a glove and don’t interfere with engine movement or control arm movement.
The Jeep’s body also had to be lifted one inch for the TNT Customs suspension. Where it was called for we cut off the OEM body mounts so the TNT-supplied body mounts could be installed. Most body-lift kits use thicker bushings, which accelerate wear and tear to the bushings, whereas the TNT Customs’ mounts are raised to lift the body off the frame. We used stock-height neoprene bushings from Summit Racing in place of the 10-year-old OEM bushings.
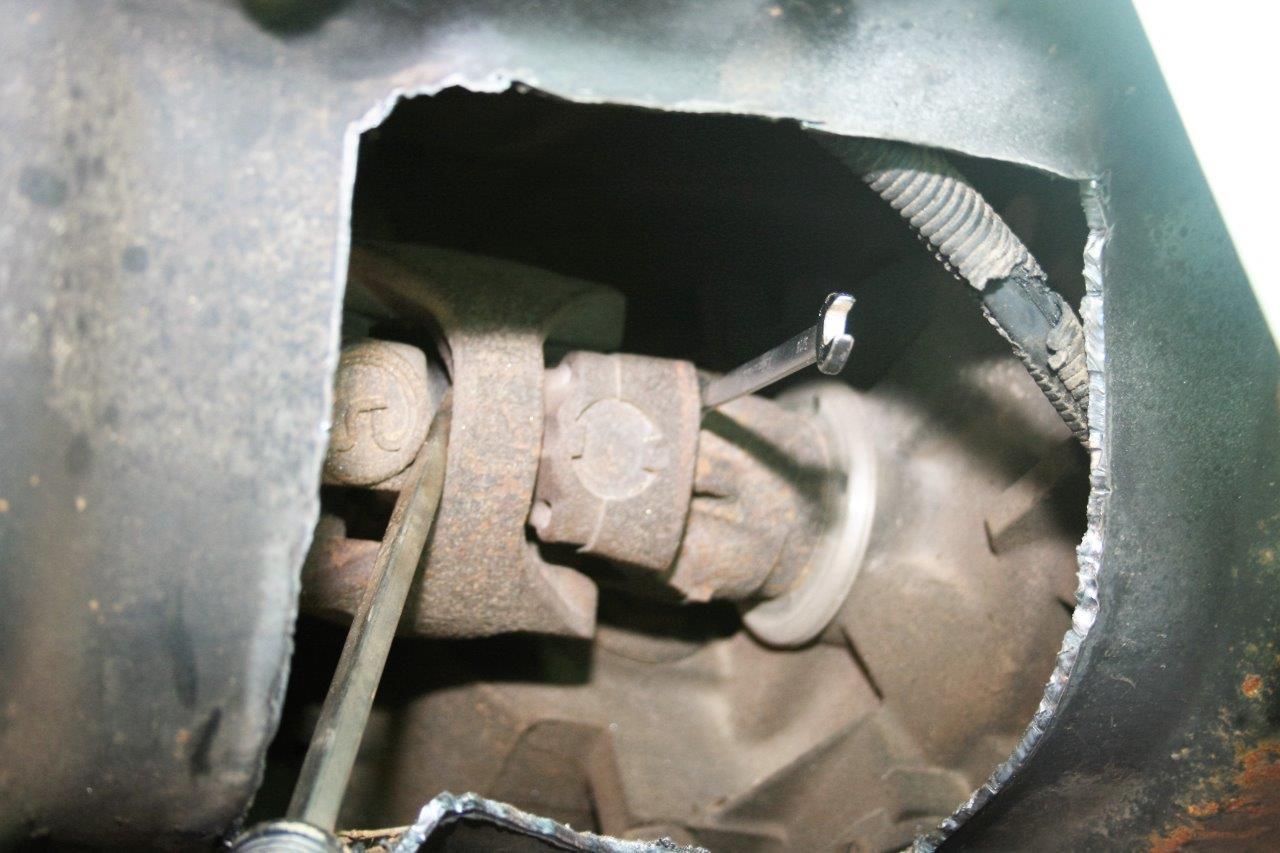
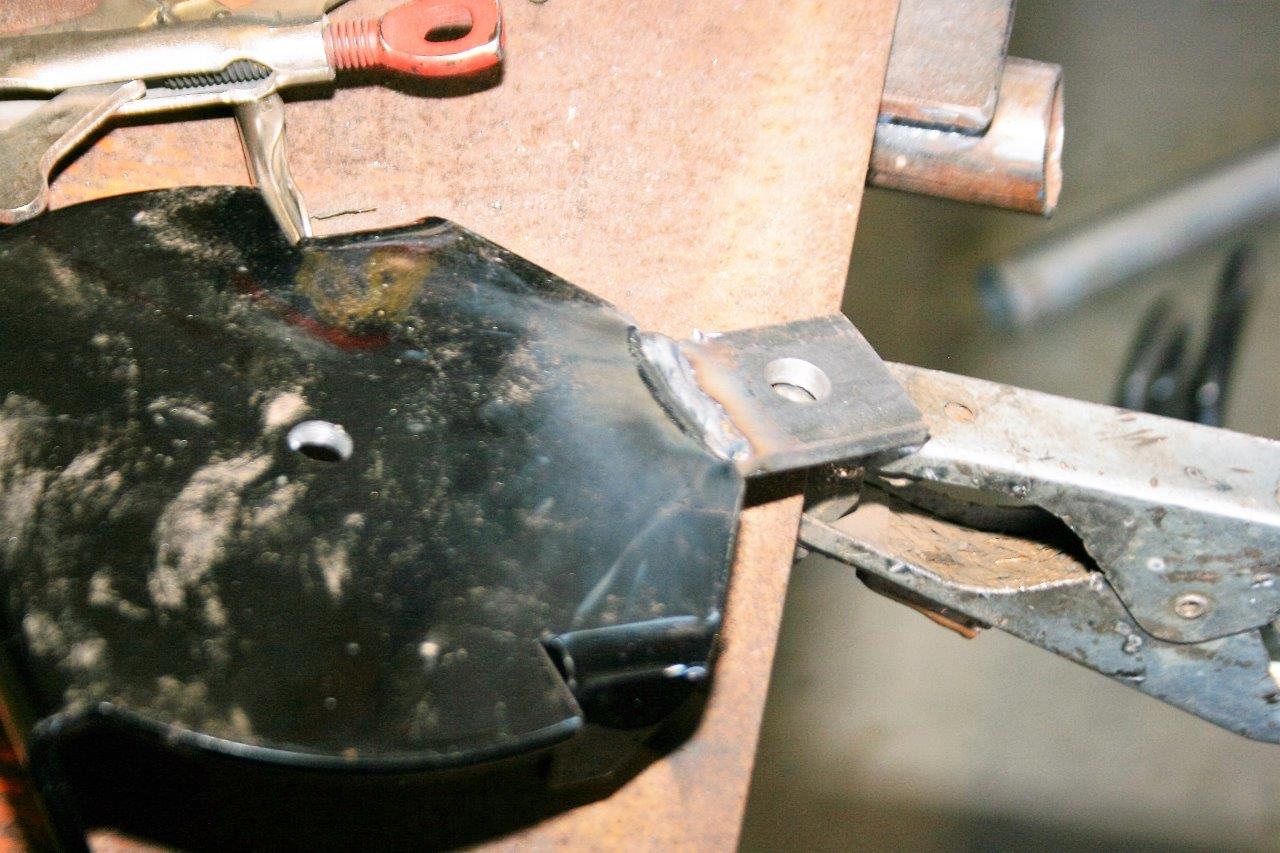
To remove the front driveshaft, we were forced to cut a hole in the OEM skid plate/cross member. Since it’s replaced with the TNT cross member, it was a quick and easy choice.
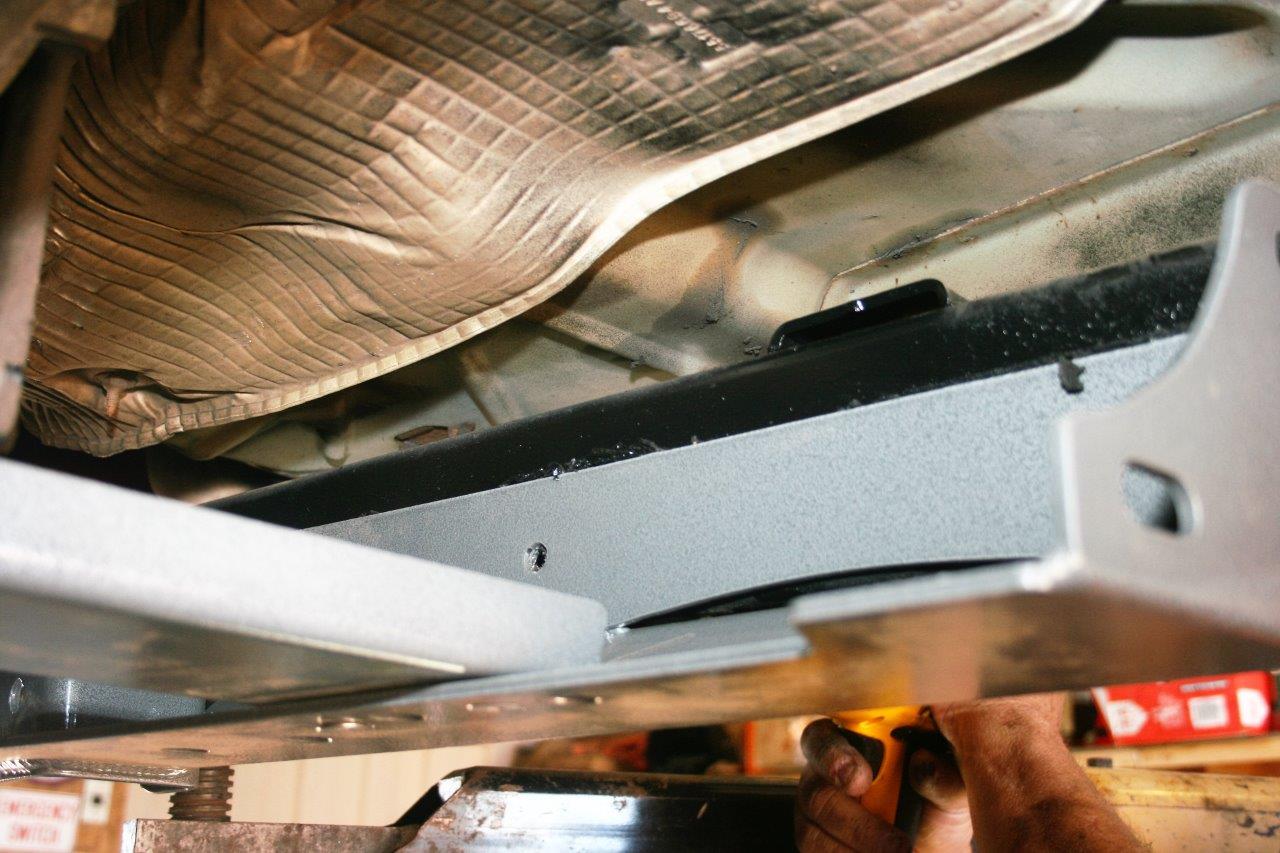
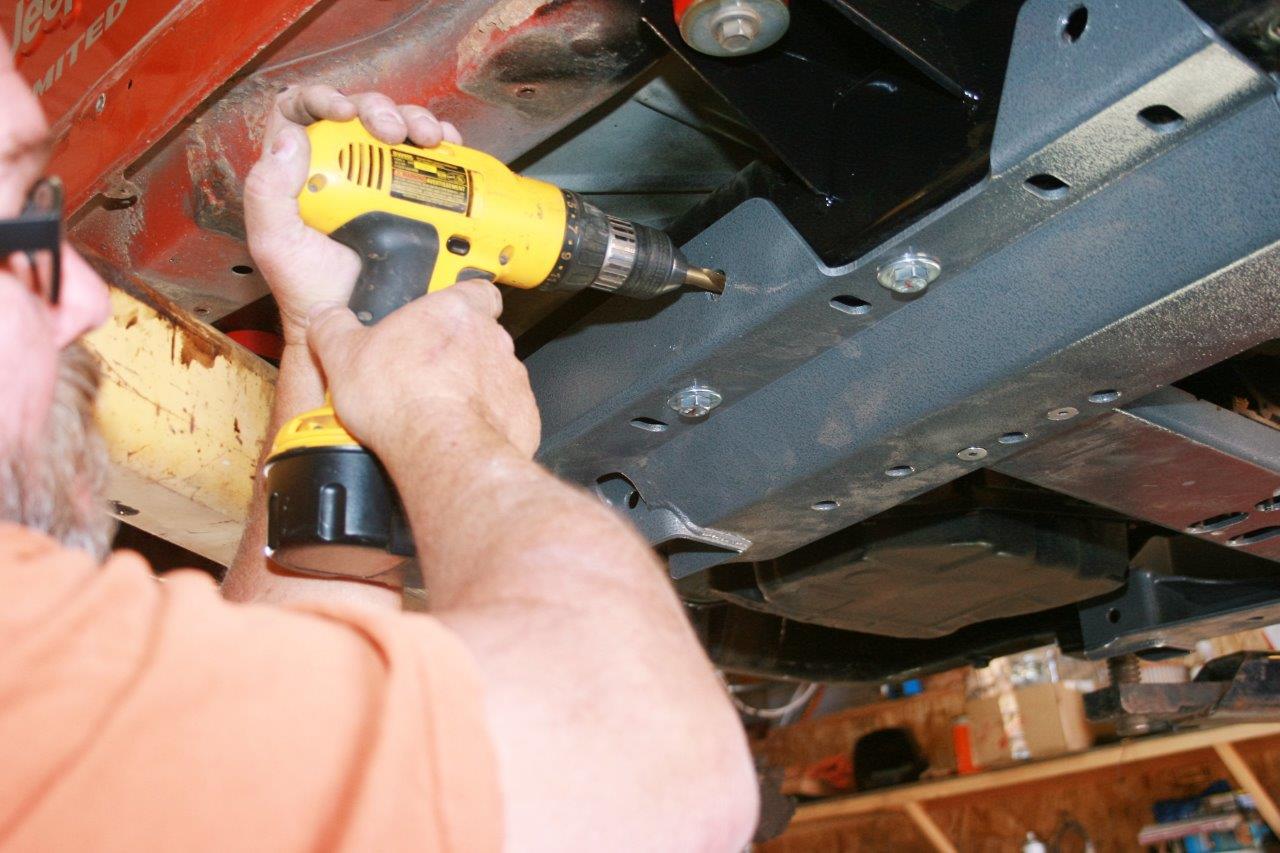
Like the OEM mounts on the differentials, all of the factory control arm mounts must be removed from the Jeep’s frame before the TNT cross members can be mounted. The TNT Customs’ instructions are complete and fairly easy to follow for an experienced technician. Be sure to carefully read them. Temporarily install the modular belly pan with the supplied hardware.
Existing holes are used in several locations, but you’ll also need to drill several holes using the predrilled holes in the belly pan as guides. After the belly pan is securely bolted to frame from below, drill the necessary holes in frame sides.
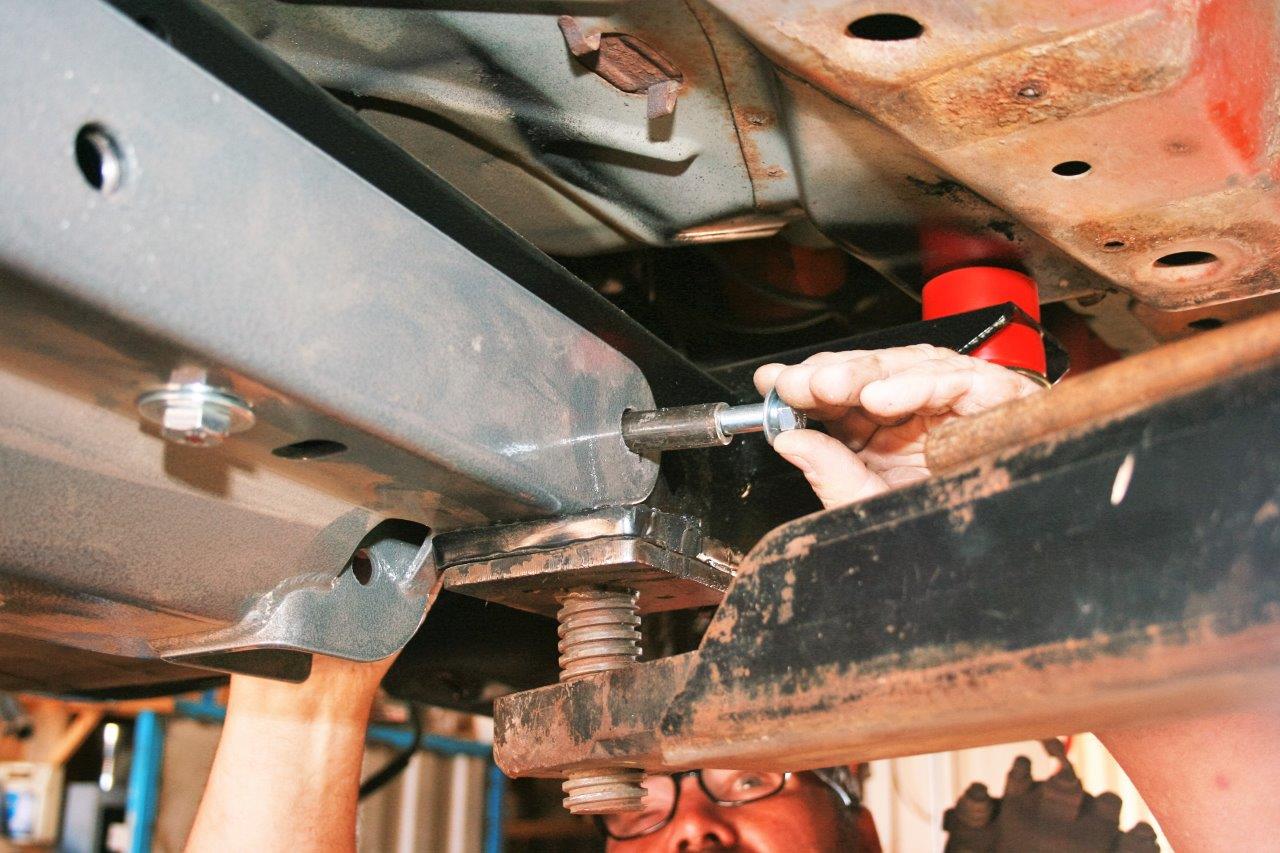
Using the 7/16- x 4-inch bolts and flat washers, insert them into the crush sleeves and insert the resulting assemblies through the control arm mount. Tighten the crush sleeve hardware to 65 ft.-lbs., and the lower bolts in the frame to 35 ft.-lbs.
The Rubicon option uses selectable low-pressure air lockers to lock up the Dana 44 differential gears. The lockers’ air pumps are mounted on the cross member that’s removed with the new kit. We let the pumps hang temporarily until the new cross member was in place. Once the transmission and mount are secured to the cross member, lower the assembly onto the front suspension side mounts. We also fabricated a mount for the lockers’ air pumps as shown here.
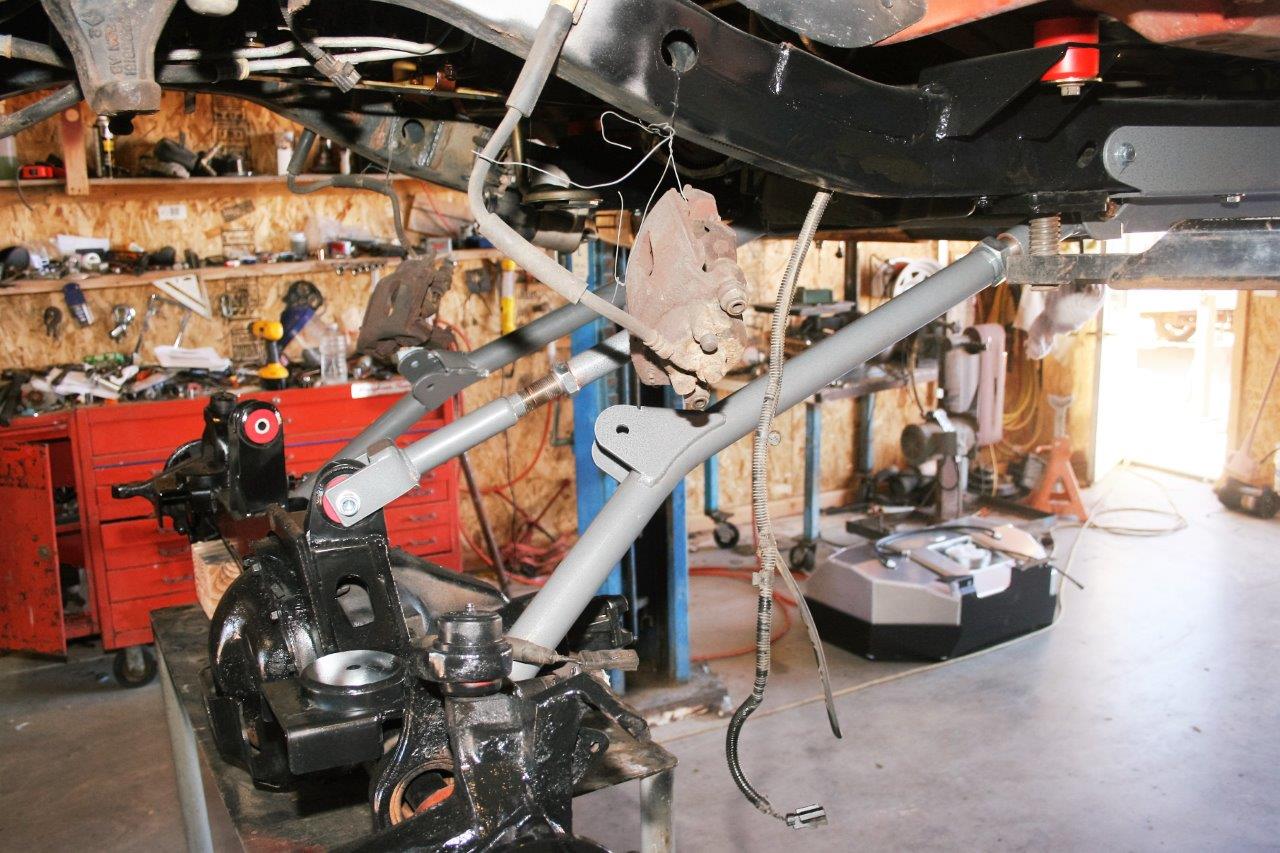
Install the Y-link lower control arm flex joint into the mount on the XD front control arm side mount. Safely support the front axle housing at the proper height and swing the Y-link lower control arm up into its mount on the truss. Insert the bolt and leave loose at this time. Slide the upper control arm into place. Move over to the other side and perform the same tasks. Leave all the bolts loose.
Support the front axle housing with a ratchet strap or a come-along so you can adjust its location. Do the same thing on the other side as well. You’ll need to be able to adjust the housing’s position in order to bolt all of the Y-link components into place. Once all the bolts are in place, the track bar must be installed. You may need to use a ratchet strap or come-along to move the housing to the side in order to align the track bar.
The passenger side Y-link connection should look like this when you’re finished. On the driver’s side, verify that the Y-link is secured properly.
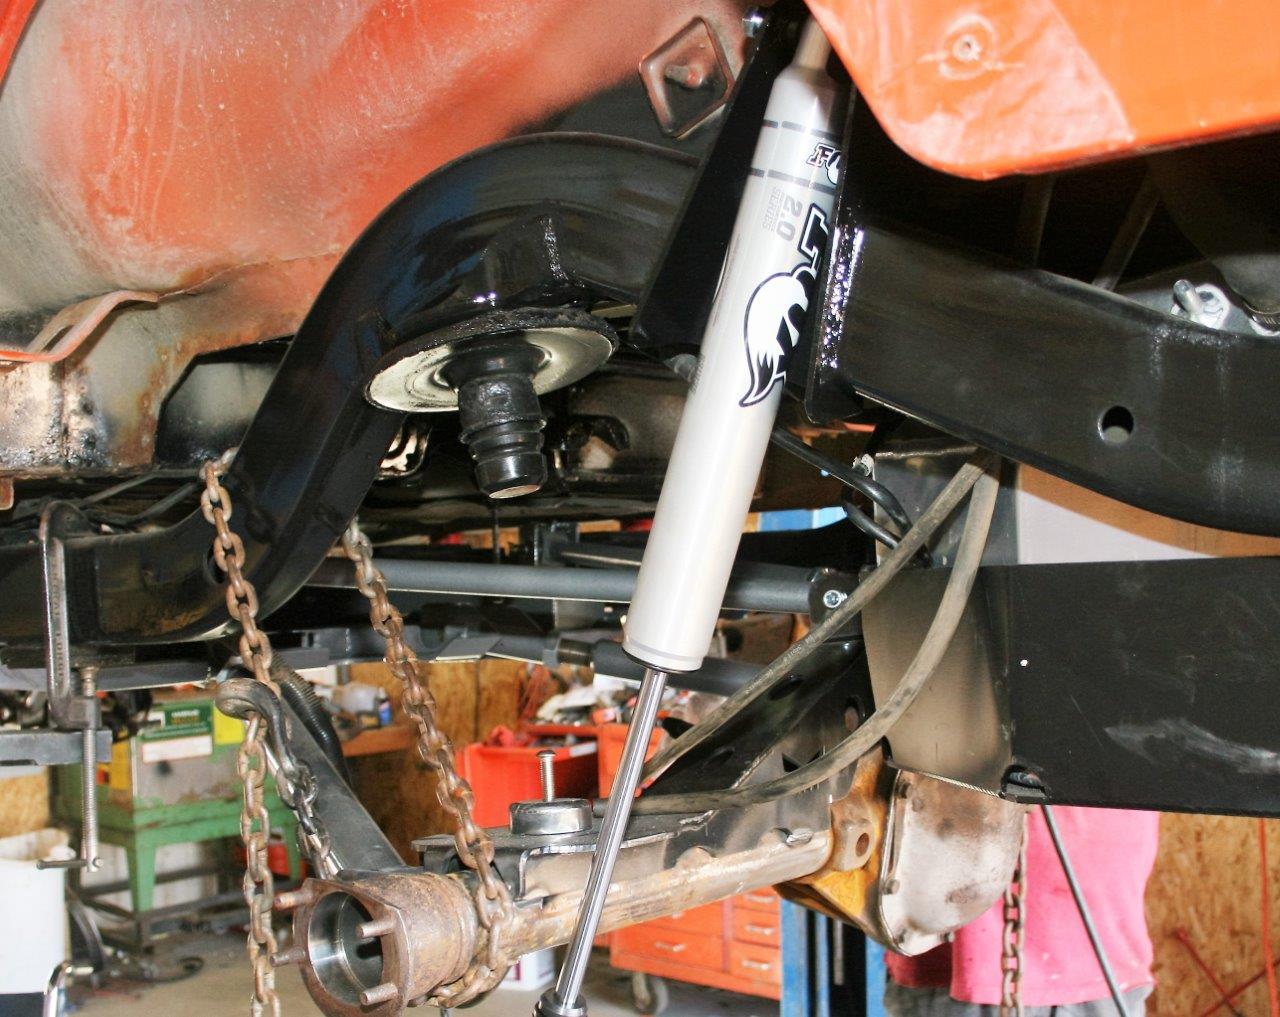
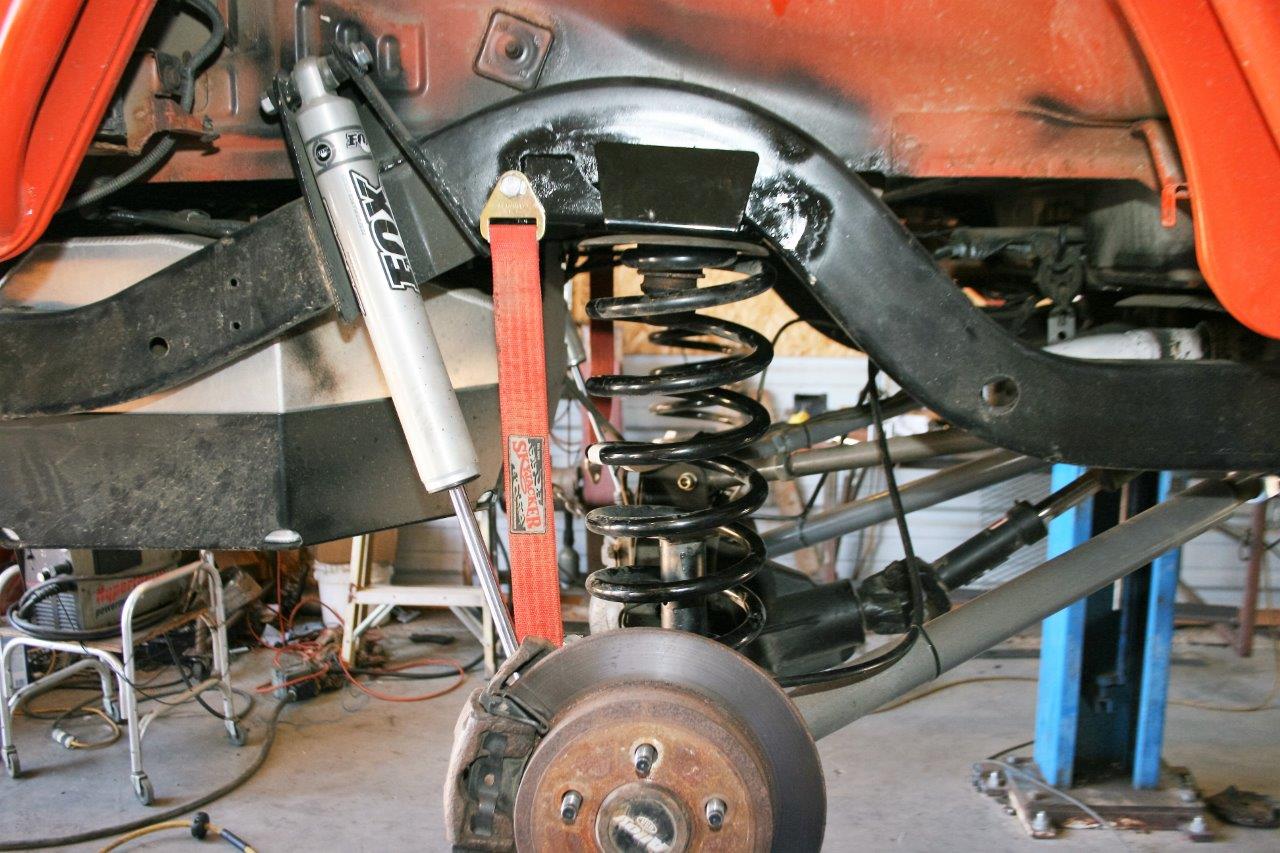
Support both ends of the axle housing and install the shock absorbers. If you’re going to install limiting straps, now is the time. You want them so that when the axle housing extends downward, the strap will stop it from hanging on the shock. About an inch shorter than the shock’s maximum length will work.
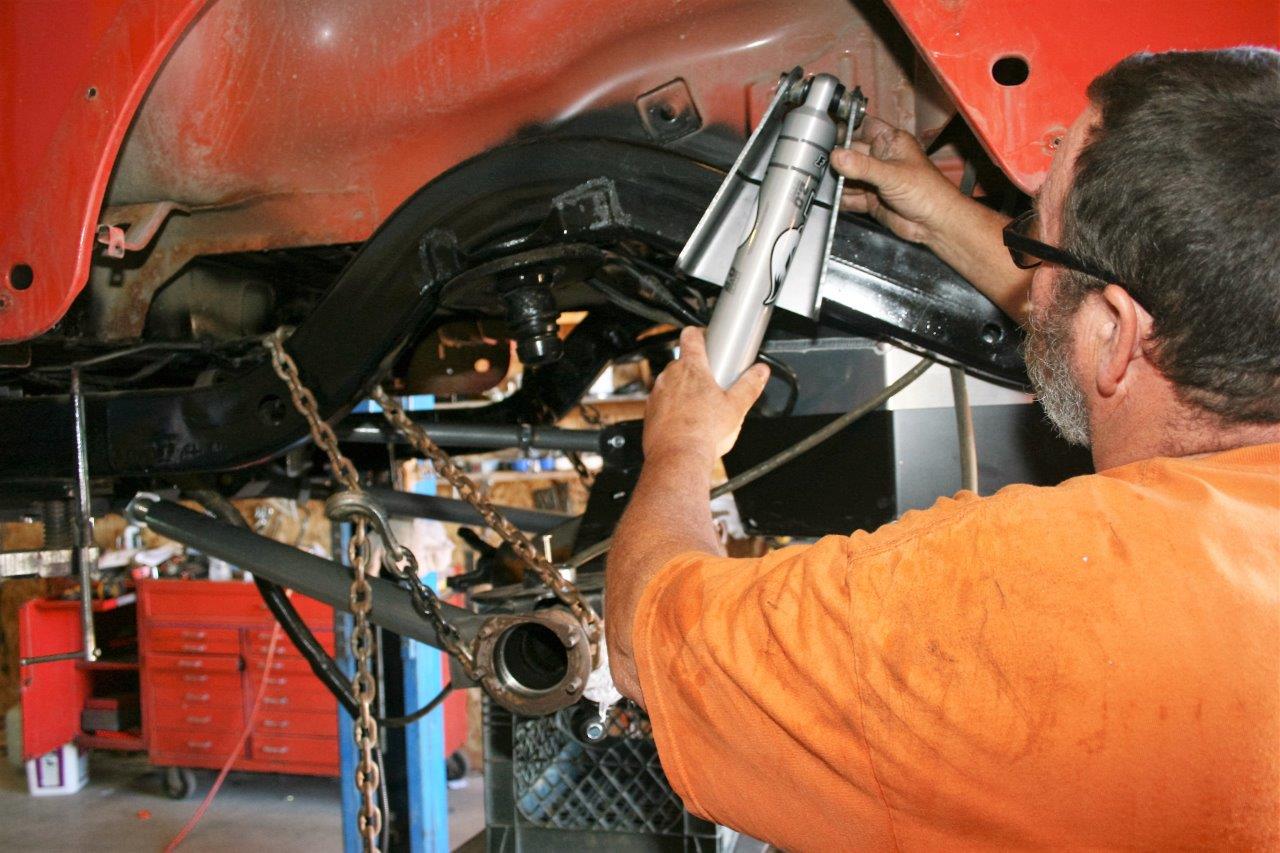
Set both rear upper control arms to the same length. We located the rear upper control arms onto their mounts on the XD cross member. Again, using the TNT Customs instructions, measure and mark the frame for the upper rear shock mount on both sides. After marking one side, use the mount itself for marking the other side to cut.
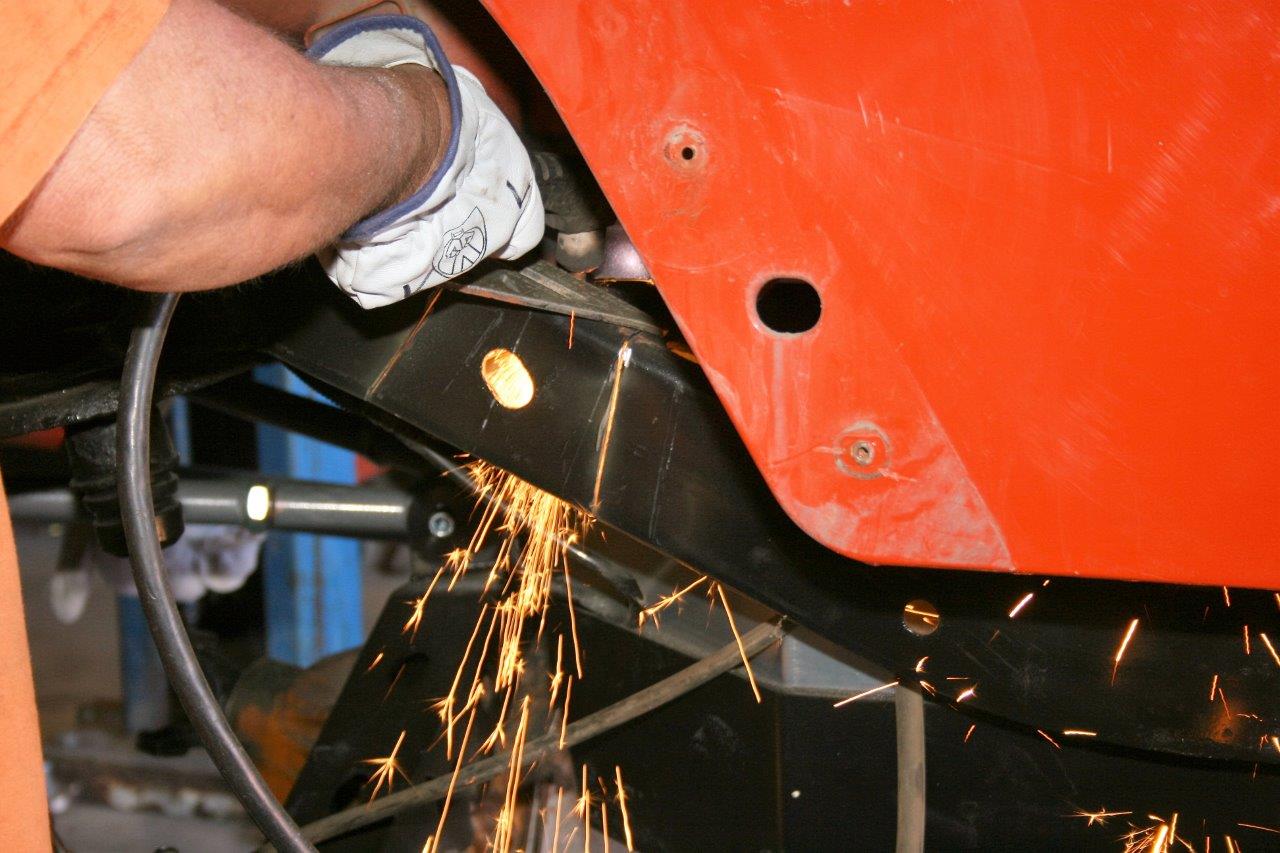
Since the upper shock mount requires the frame to be cut half-way through, Kevin double checked that everything fit several times. “Measure twice (or thrice), cut once,” was our motto for the entire installation of the suspension system. Using a cutting wheel on a hand grinder, Kevin is cutting the frame open for the shock mount.
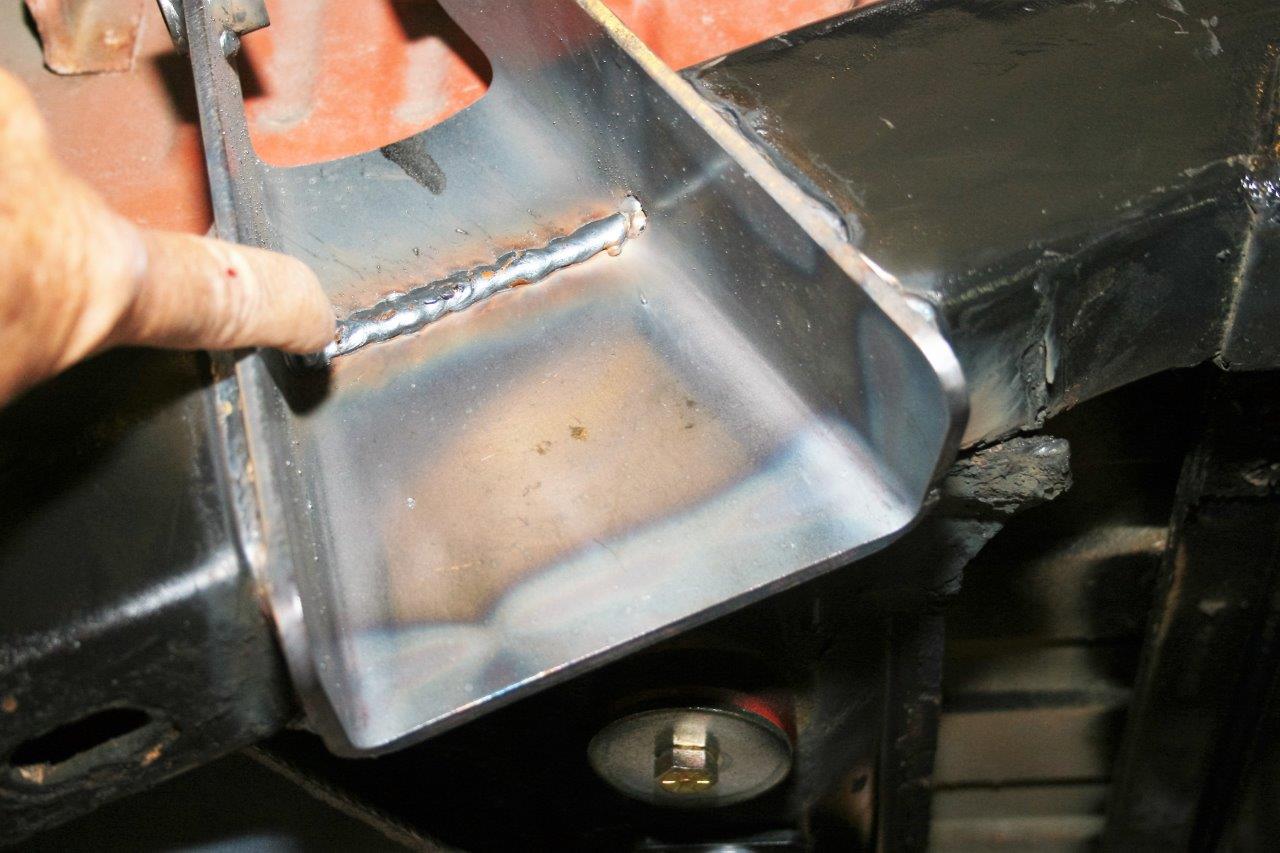
The upper mount must be welded on both sides, top, bottom, and across the slot to make sure the frame is not weakened by the mount.
The pre-cut slot in the shock mount is designed to match the top of the frame once the frame is cut. This helps strengthen the entire assembly once the mount is welded into place. This is where the frame is welded to the upper shock mount through the pre-cut slot.
Now is the time to reinstall the rear differential. Connect all four control arms to their mounts on the rear differential’s TNT-supplied truss.
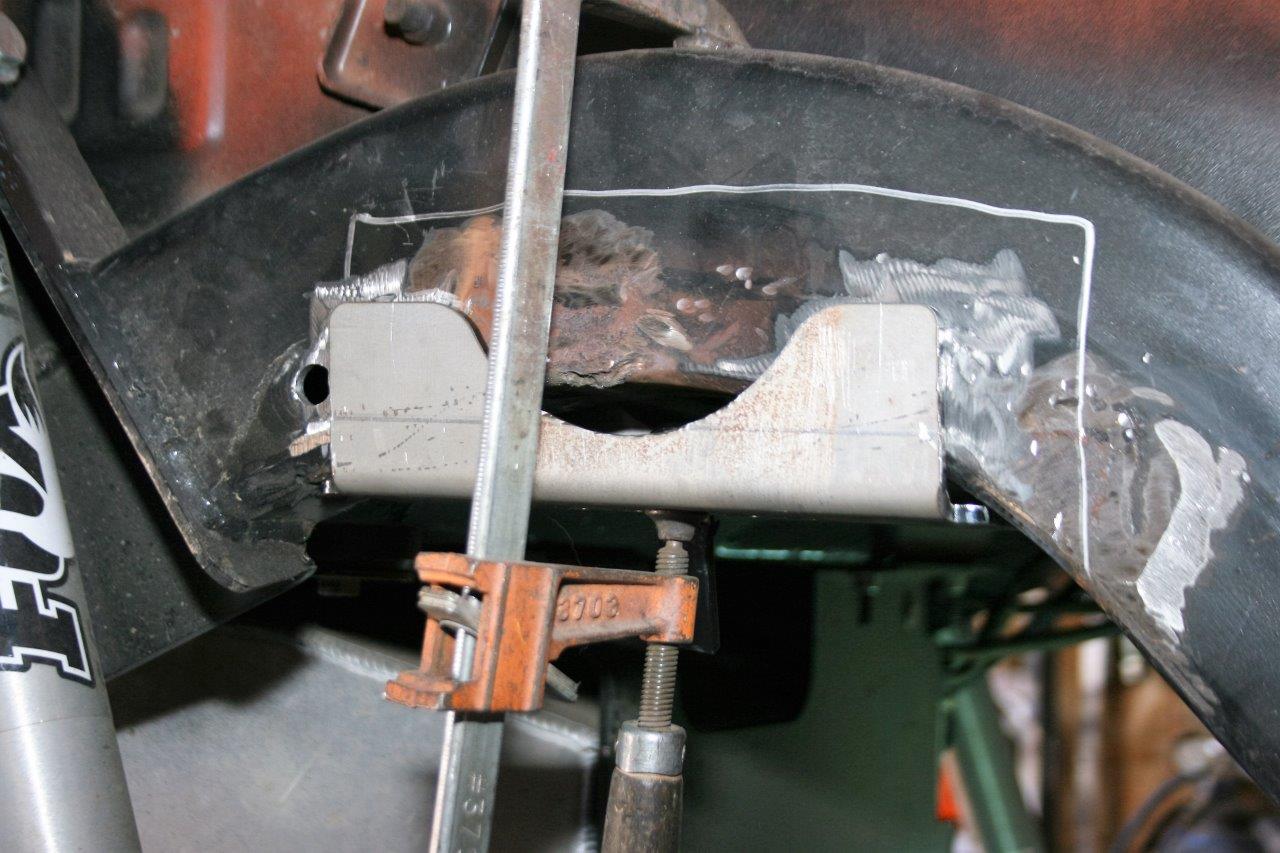
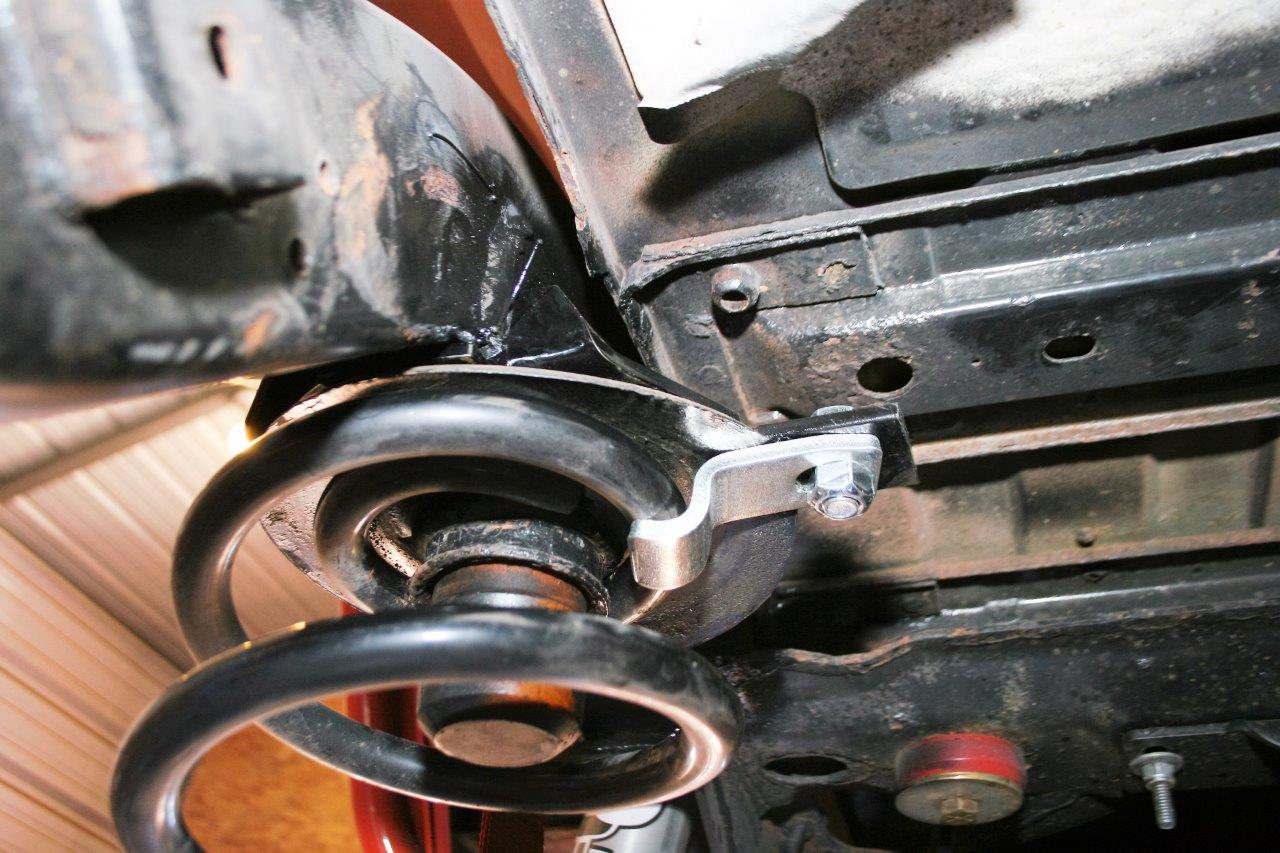
Here’s where we differed from the TNT Customs’ instructions. After we completed the suspension installation, we discovered that we needed to straighten the rear ARB coil springs—the two spring pads no longer lined up. We used Rusty’s Off-Road adjustable upper spring pads to do this. First step is to remove the foam bump stop and the bump stop cup, and the OEM upper spring pads must also be removed. We used a plasma cutter initially. To remove the final remnants of the pads, we used a hammer and chisel, air chisel, and a grinder.
We discovered that the holes in the bump stop pad and relocator plate were too small for the supplied bolts, so we had to drill them out. We also had to drill out the holes in the relocator plates. We’d purchased a coil spring retainer clip kit from TerraFlex, which was designed to be used with the OEM spring pads, so we located and welded predrilled tabs on each relocator for later use.
Once the sides of both frame rails are smooth, you can fit the kit’s bases onto the frame. Follow Rusty’s instructions for the installation. As is shown in the photo, the base goes in the peak of the frame rail’s upper curve. Once the relocator base is positioned properly and aligned correctly with the frame, weld it into place securely. Welded and painted, the base is ready for the relocator.
Temporarily position the upper and lower bump stops. They are supposed to be aligned. When they’re aligned, they tell you that the springs will be vertical. To properly align the spring we moved the upper relocator all the way to the most forward hole, which aligned the springs properly. Slide the coil spring into place. On this Jeep the lower bump stop cannot be screwed into place until the spring is located. Use a Philips screwdriver to thread and tighten the bump stop into place. The ARB rear coil springs come in two lengths, the shorter one goes on the driver’s side.
As an additional security measure, we used the tab on the relocator to secure the top of the coil spring with the TerraFlex spring retainer clip.
Everything is bolted back into place, and the Jeep is ready for its tires.
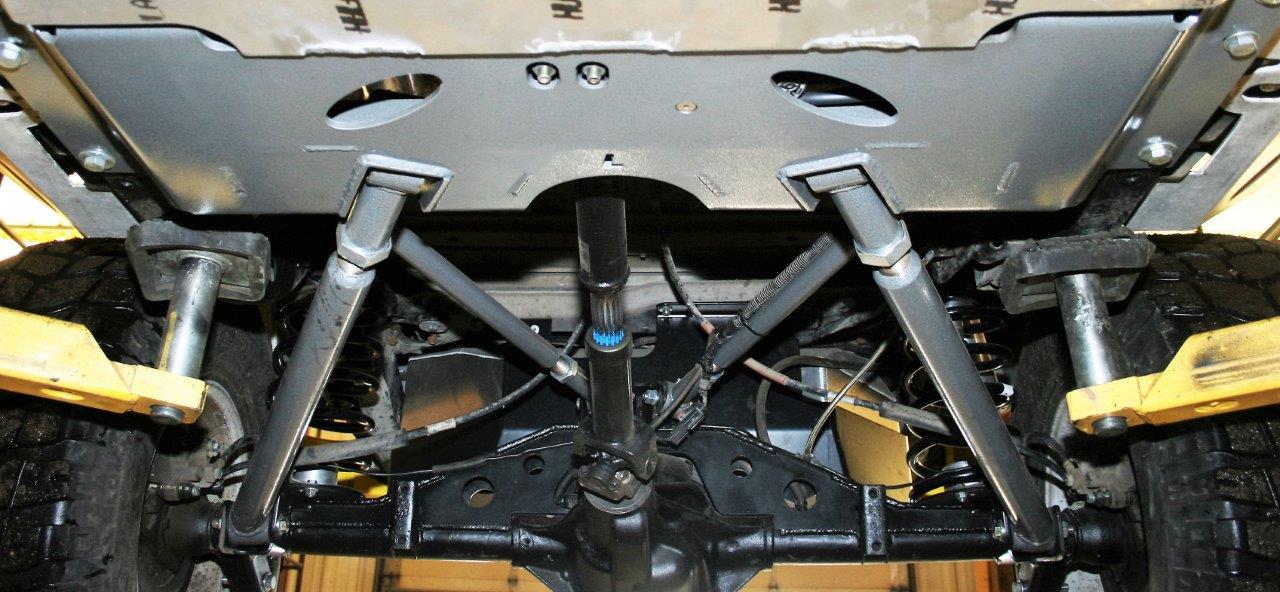
This is an example on how the finished rear four-link system should appear. Also make sure that your new exhaust system completely exits the rear of the Jeep.
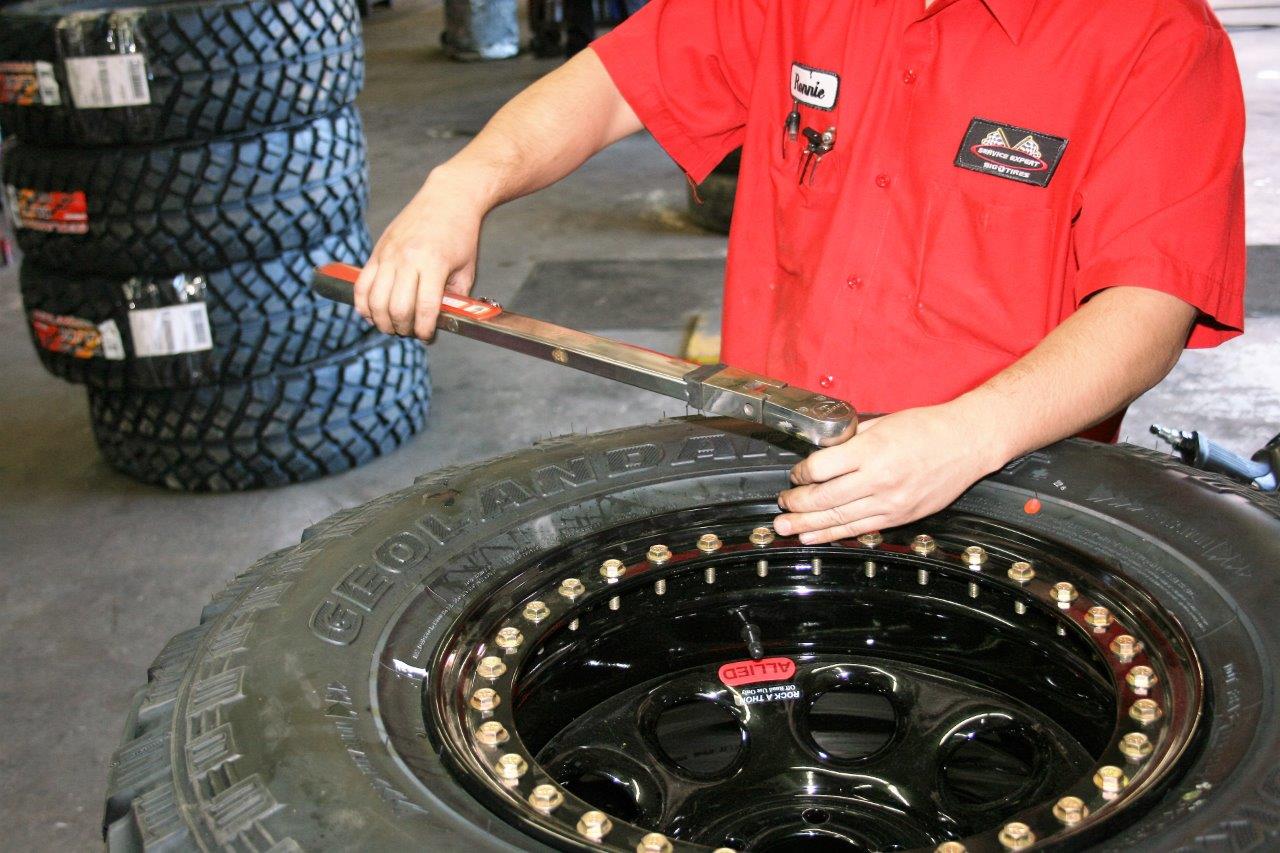
Raceline’s Allied brand steel beadlock wheels from Summit Racing were the only wheels we wanted for this project. They are 10 inches wide by 17 inches in diameter with a 3-1/2-inch offset. The five-on-4.5 inches match the Jeep’s lug pattern. The Big O tire shop in Kingman mounted the Yokohama Geolandar M/T 35x12.50-17 tires for me. The 32-bolt beadlock ring holds the tire securely to the rim even with very low air pressure by clamping the tire bead between the locking ring and the rim—providing more traction and safety. Each ring bolt must be torqued to the manufacturer’s specifications. Make sure you crisscross the bolt pattern while tightening and don’t exceed your rims’ manufacturer’s specs. Always balance your tires on a high-speed spin machine; this provides a much more precise balance.
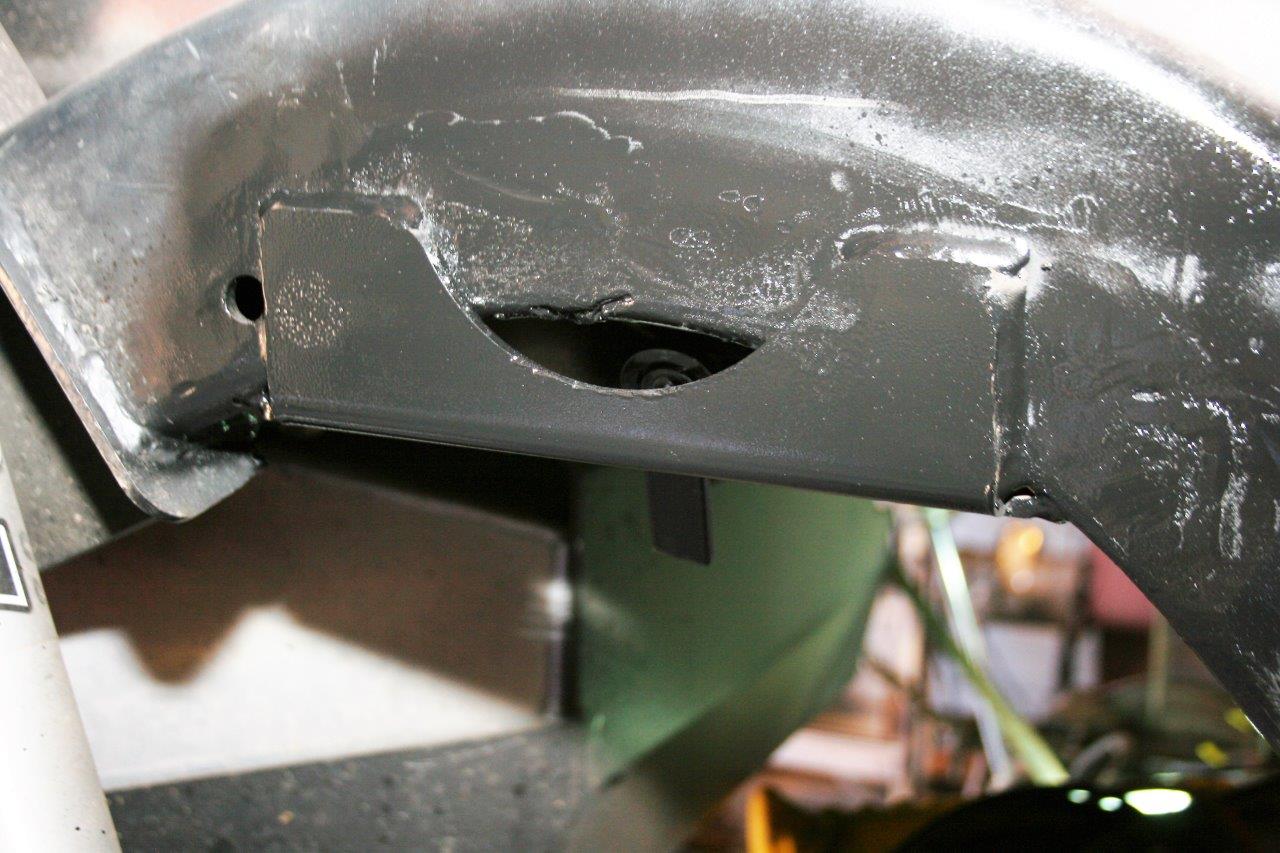
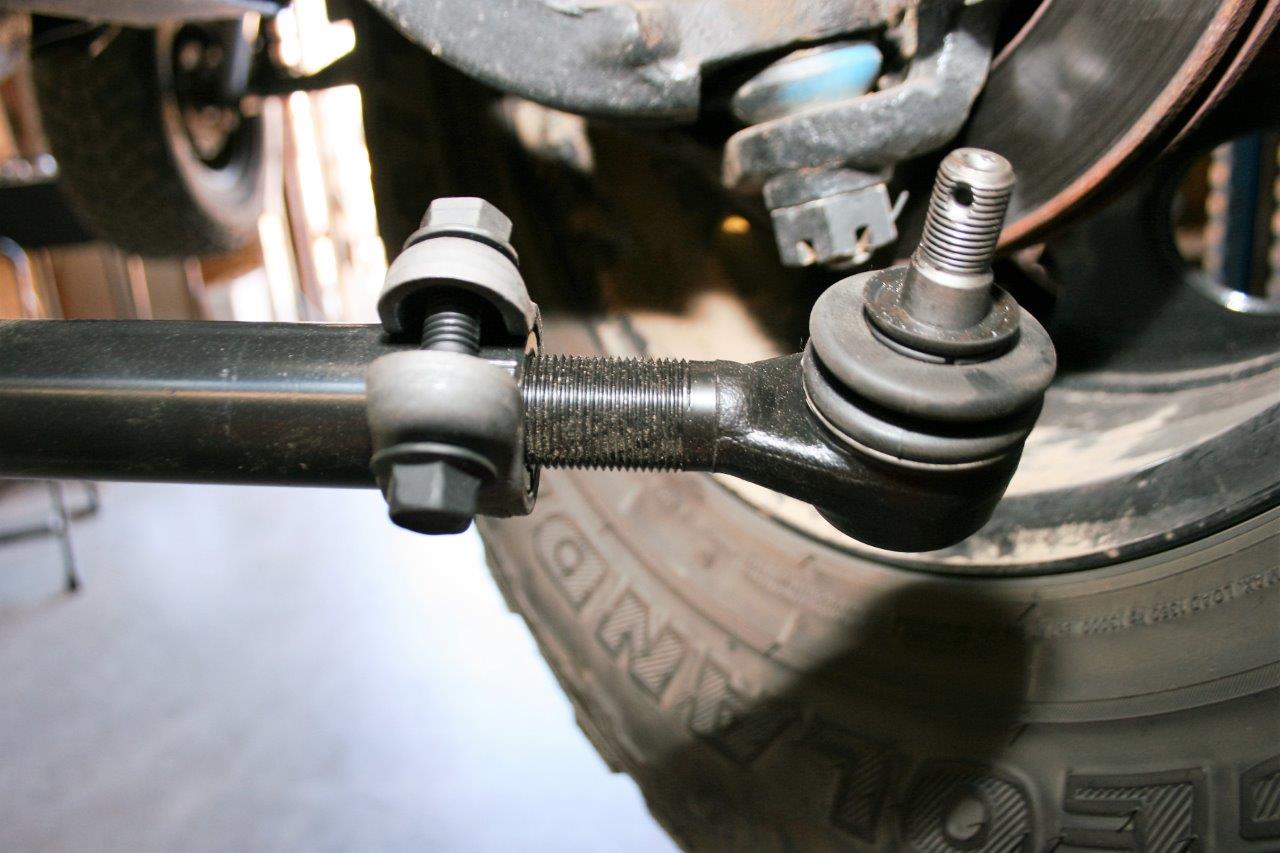
Stronger steering components are also needed with a lift and big tires. This new steering shaft support was included in the TNT body lift kit.
The Rugged Ridge heavy-duty steering kit included much stronger tie rod ends and clamps. Thread the ends into the tie rod or drop link until there is about an inch of threads is left.
The stronger design gives you a straight tie rod—instead of a bent tie rod—with the drop link attachment point near the end. We didn’t use an extended Pitman arm; we retained the OEM arm, which is working very well. Make sure new cotter pins are used. Bend them back over the pin to securely hold the castle nut. We also used the heavy-duty stabilizer kit from Rugged Ridge. There is absolutely no hint of a wobble with this steering.
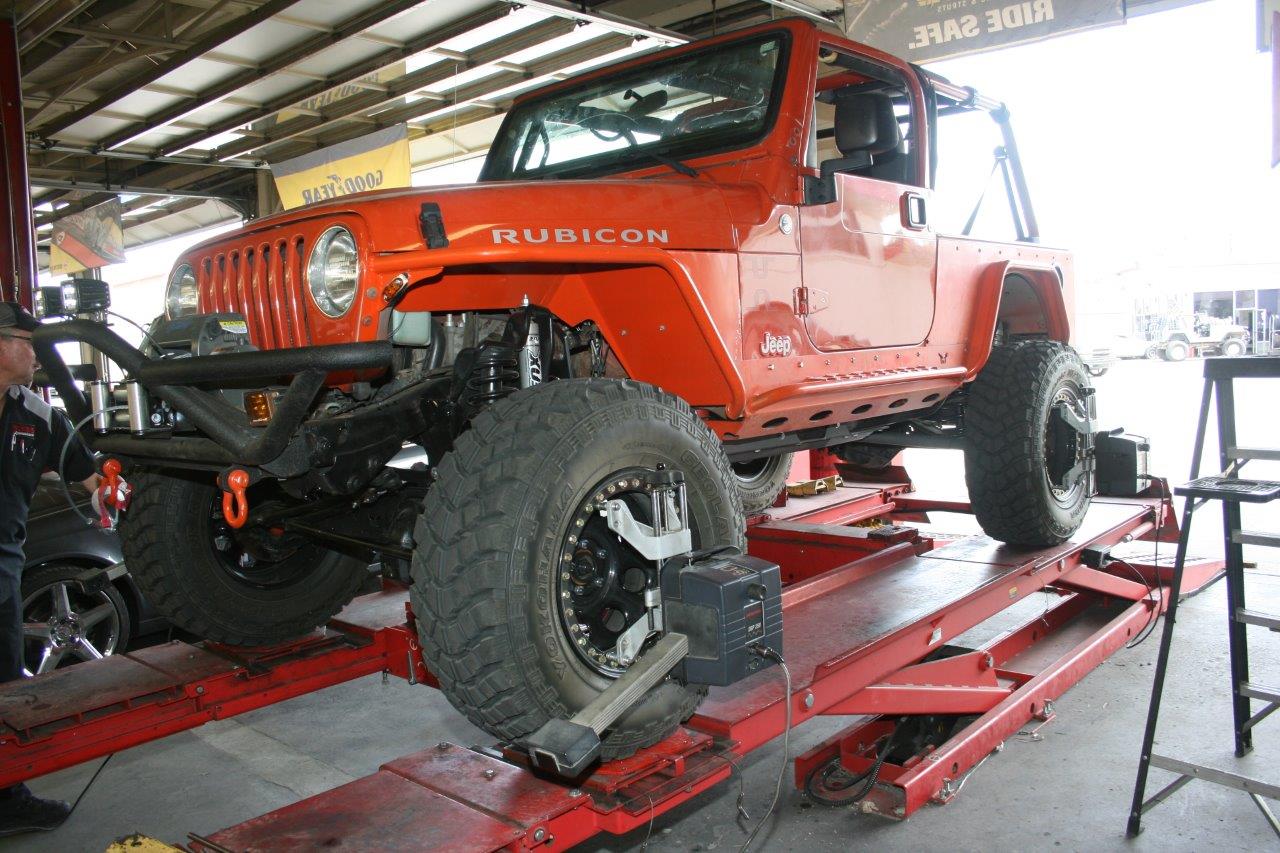
Finally, the Jeep is ready for a complete chassis alignment at Ted Wiens Tires in Las Vegas. Whenever any chassis work is done, have it aligned. If you live within driving distance of Las Vegas, you can’t beat a Ted Wiens alignment. After each alignment correction, the Jeep was thoroughly test driven.
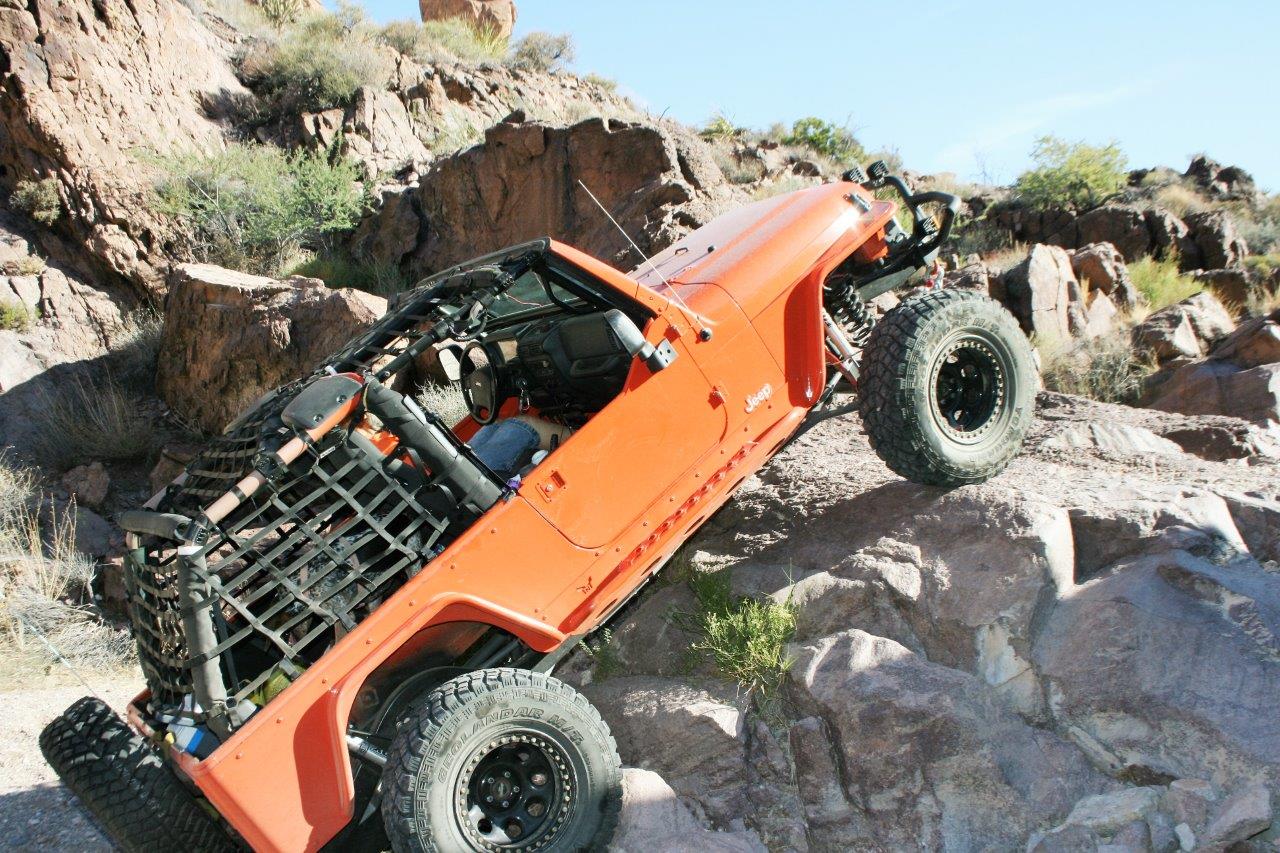
We would not even think about trying this 6-foot near vertical waterfall before the lift. It popped over the lip with just a bit of a blip of gas.
Axles and Gears
Starting with the strongest Wrangler available made our job much easier, but even more strength was our goal when we were deciding what our Jeep needed in its upgrade. We were keeping the original engine and transmission combination, but we opted to upgrade the axles.
We chose an RCV Performance front axle set. RCV axles use constant-velocity (CV) joints instead of the more common—and less expensive—U-joints. Not only are CVs smooth when at full lock turns, they are also far stronger. The RCV Dana 44 front axle kit comes complete and ready to install, including a tube of special-compound axle grease to fill the CV joints just before installation. The kit also includes a tool that aids in the installation of the orange urethane boots that protect the CV joints from moisture and debris while on the trail. (Hint: If you leave the axle ends exposed—i.e., don’t use the hub caps that usually come with new wheels—it’ll aid in the axles’ annual maintenance later on. You may need RCV’s Needle Grease Tip, Part #100-24, to shoot the grease into the axles’ ends.)
In past builds, other than adding trusses to the differential housings and installing deeper gears, we’ve pretty much left the rear differentials alone. However, this build was different, since we planned to hit the trails with a fully built Jeep rather than taking months to build it piecemeal. We chose a pair of Alloy USA chromoly axles, which are strong enough to twist our Yokohamas over Jackhammer boulders without snapping or even stressing an axle. The high-tensile 4340 chromoly rear axle shafts are heat-treated and induction-hardened to have twice the tensile strength of stock axles and are up to 40 percent stronger overall due to the utilization of the latest cold spline technology.
Why should you upgrade the rear axles?
The cost is the same or less than OEM replacement axles, but the big reason is that horsepower is useless if you can’t get it to the ground. And large, high-traction tires—such as our Yokohama Geolandar M/T 35-inch tires—can break or twist a decade-old OEM axle shaft.
But what were the axle splines going to slip into?
We could’ve left the stock gear set in place, but 35-inch tires can really overtax 4.11:1 gears on the highway. And we’ll be towing our custom camping trailer on most of our on-road excursions and many of our off-road expeditions, so we don’t want to lug the engine or cause the four-speed automatic transmission to be hunting for the right gear all the time.
We needed a gear set that kept the engine’s rpm at the same rpm or slightly higher than the factory-gear/tire-height setup, so we used Summit Racing’s gear comparison calculator. The calculator asks for the gear ratio, tire height, and miles-per-hour. Once you have the stock rpm, you input the variables that you are considering (tire size, gear ratios, etc.) and note the resulting rpm. With the Yokohama Geolander M/T’s 35-inch diameter, we determined that 4.56:1 gear ratios would give us a few hundred rpm above the stock gear/tire combo, which we thought was perfect for towing the trailer. Plus, we’d also get the advantage of increased rpm multiplication in the lower transmission gears for hill climbing and rock crawling.
We chose Yukon Gear and Axle for the two gear sets and differential rebuilding kits. The company’s master overhaul kits are what you need for a successful differential rebuilding. The Yukon master kits ensure a hassle-free install by utilizing the best components, including Timken bearings. Just remember, assembling gear sets properly is not for the inexperienced mechanic, nor for the experienced tech without the proper tools. A word of warning: Make sure you follow the manufacturer’s break-in procedures faithfully if you change your gearing! Today’s gears are cut closely to increase their lifetime and reliability, and to decrease wear and noise. If you don’t break them in correctly and carefully, they could very well seize and strand you in the middle of the desert.
Once you’ve changed your gears or tire size, you need a computer control module to recalibrate your speedometer and shift points. If you don’t wish to buy a module, most shops will have modules that will reprogram your onboard computer.
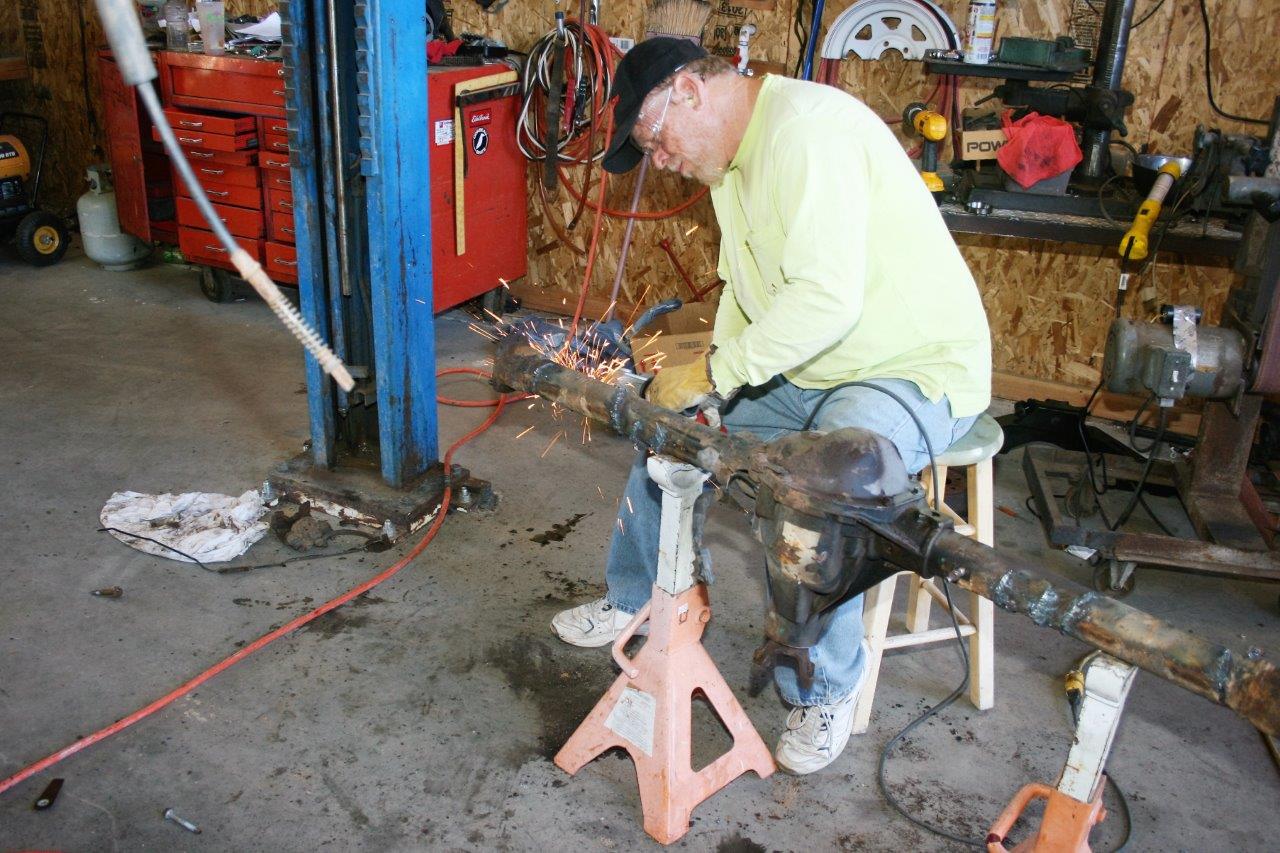
With a 4-inch lift, we also needed a longer rear driveshaft. The OEM front driveshaft is built with a double Cardin-style CV (constant velocity) joint while the rear is a slip-yoke/U-joint design. We decided to retain the front driveshaft, but we had it rebuilt with new joints by Precision Automotive in Kingman, AZ.
We contacted Powertrain Industries to replace the rear driveshaft. Powertrain builds double Cardin-style CV (constant velocity) driveshafts, which replace the OEM slip yoke. The 1310 series for Jeeps are somewhat light-duty compared the 1350 series or larger normally seen on ¾-ton or 1-ton trucks, but it is plenty strong for the Wrangler applications. And Powertrain’s design gets rid of the slip yoke and returns to the old-school design of the slip joint being near the differential end of the driveshaft.
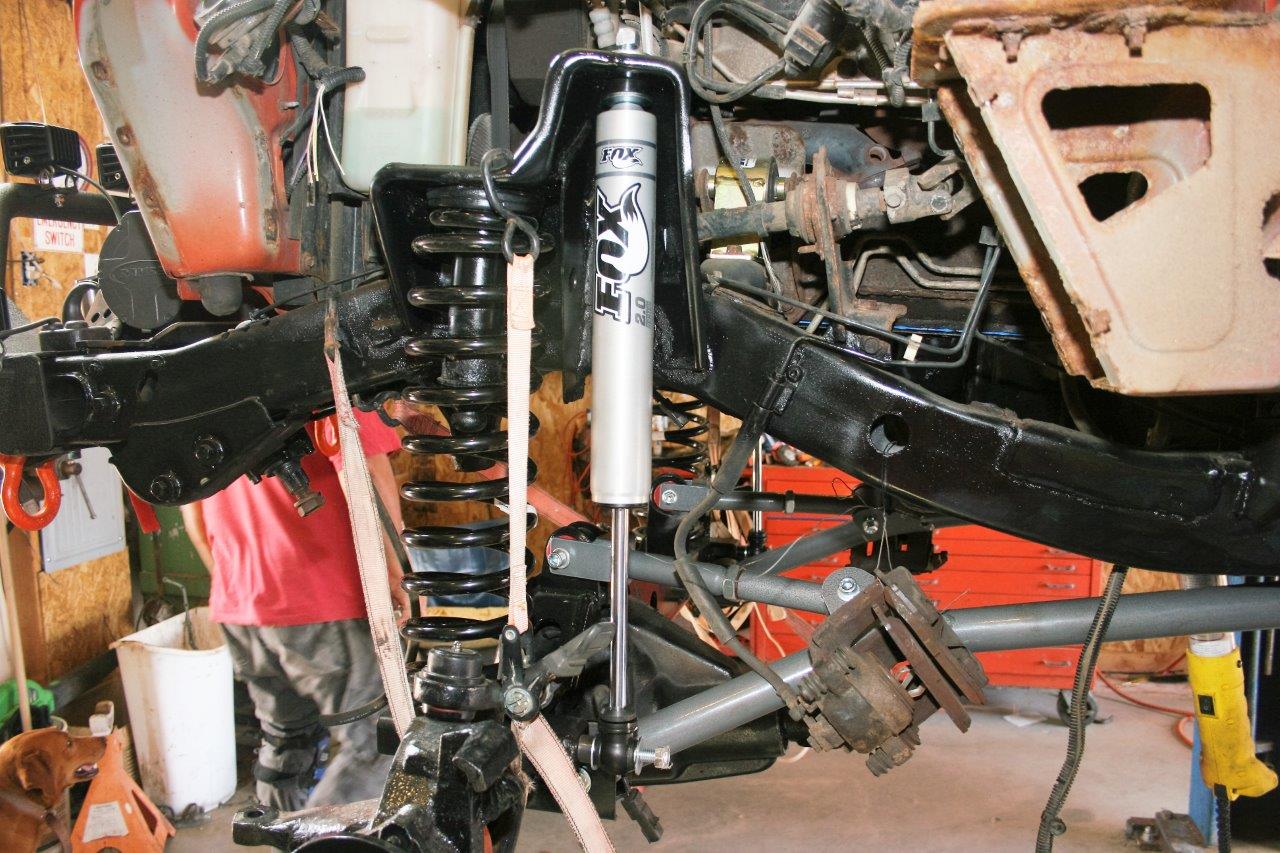
TNT Customs of Cheyenne, WY offers a sophisticated, strong, stable Rock-Tek suspension for TJs and LJs. Quite simply, this is the most technical suspension system with which we’ve ever worked. According to TNT:
“The Rock-Tek suspension is specifically designed for tackling the most difficult terrain. The TRI-4 rear suspension is designed to cycle vertically throughout articulation to eliminate rear-steer commonly found in other suspensions. Aggressive geometry coupled with a flat roll center will make your Jeep stick to even the steepest climbs or radical off-camber situations. Lower arms are manufactured from 2- x0.375-inch 1026 DOM tubing, to handle anything they may come in contact with. Upper arms are 1.50- x0.250-inch 1026 DOM tubing. All control arms have 2.5 inches of adjustable length and feature rebuild-able Flex joints and bushings. Our high clearance pan gains 1 ¾-inch over stock on ‘97-‘02 models and nearly 3 inches on ‘03-‘06 model years. TNT Rock-Tek long arm suspensions come with a weld-on, full-length rear axle truss assembly that fits your rear axle. Our axle truss assembly includes our Tri-4 mount, coil spring mounts as well as new lower control arm mounts and shock mounts.… An added bonus of a weld-on truss assembly is an axle housing that is fortified against bending that can be caused by extreme terrain coupled with oversized tires.”
Keep in mind, though, installing this system requires a very well-equipped shop with a vehicle hoist, a plasma cutter, a MIG welder, several grinders, air tools, drills (both floor and hand-held), power saws, floor jacks, and a multitude of hand tools. Plus, you’ll need an experienced technician and patience (our Jeep was on the hoist for two months). In addition, many procedures require more than one set of hands.
Even with all those warnings, conditions, and requirements, the suspension is well worth it! It’s simply one of the best commercially built suspension systems we’ve ever had the pleasure of riding on. Not only is our Jeep more stable than stock at increased trail speeds, it is one heck of a rock crawler, too. While the LJ’s Rock-Tek Y-link high-clearance front arms are similar to the Jeep’s OEM suspension, changing the rear suspension from a track bar system to a Rock-Tek dual-triangulated four-link and relocating the shock mounts vastly improves the overall stability of the Jeep.
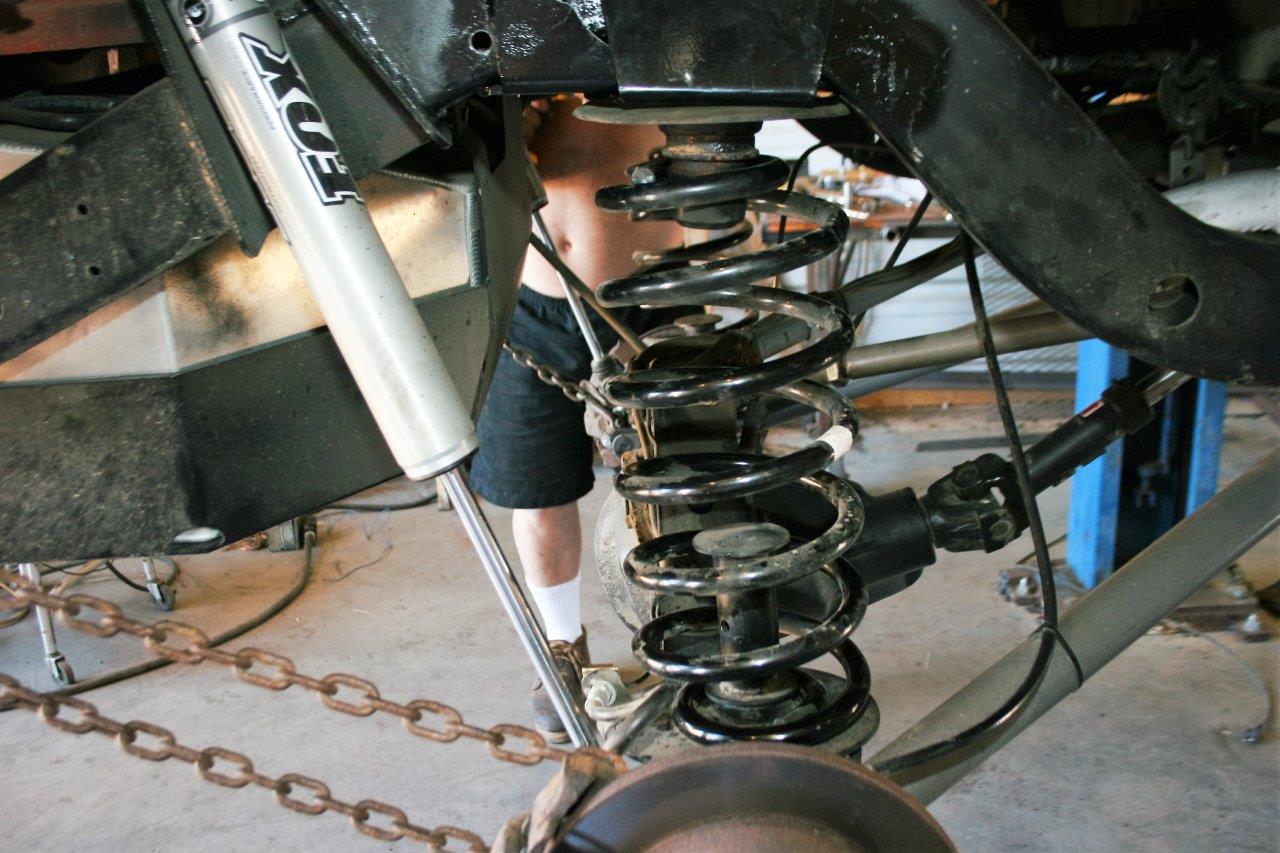
TNT recommends Fox 2.0 Performance Series IFP smooth body shocks for use with the Rock-Tek system. These shocks use race-proven dampening control to provide a comfortable on-road ride and predictable off-road handling in even the toughest conditions. According to Fox, the precision metal impact aluminum body increases cooling capacity and will never rust, and inside is Fox’s race-proven performance-valving technology. Fox’s Internal Floating Piston (IFP) mono-tube design separates the shock oil from the high-pressure, nitrogen-charged gas chamber.
Tires
As we alluded to earlier, we decided to go with Yokohama’s Geolandar M/T 35×12.50-17 directional tires. These tires can churn through the deepest of mud with ease because they feature beefy, deep tread lugs and a directional tread pattern for outstanding traction and easier clean-out. Plus, the tires have extra sidewall ribs and an advanced tread compound for added durability out on the trail.
We mounted our Geolander’s on a set of Raceline beadlock wheels from Summit Racing. The Raceline’s are designed, engineered, and machined to hold up to the extreme abuses of off-road desert racing and professional rock crawling. The fully functional beadlock wheels have a 32-bolt beadlock system built with durable outer rings and a strong inner lip to securing the tire’s bead to the wheel, even at extremely low air pressures.
In addition to strong wheels, strong steering is also needed for controlling the larger, heavier wheels and tires. We turned to Rugged Ridge for its heavy-duty steering components and stabilizer. Once the Jeep was finished, we took it to a Ted Wiens store in Las Vegas, NV for a full chassis alignment.
In Part 2 of our “GP” project, we’ll cover body armor and protection.


I need a 2.4 engine for my 2003 TJ