


[Editor’s note: This article was originally posted in 2012. Since then, the Percy’s company was purchased by Taylor Cable. Taylor is still making Adjust-a-Jet kits, but now under the Taylor name, with many of the same part numbers. You can find them by clicking here.]
Remove fuel bowl, swap out jets, replace fuel bowl, start car, and test. Remove fuel bowl again, swap out jets again, replace fuel bowl, start car, and test again. Remove fuel bowl yet again, swap out—well, you get the idea. Making fuel adjustments to your carburetor can be tedious and frustrating, not to mention messy and time-consuming.
Fortunately, Percy’s High Performance has taken much of the hassle, mess, and guesswork out of tuning most Holley carburetors. Whether you own a hardcore race car or a “double duty” street/strip car, the Percy’s Adjust-a-jet Metering Plate allows you to make adjustments to your carburetor’s air/fuel mixture instantly without removing the float bowls. In fact, you race guys can make quick, accurate, in-between round adjustments at the track while the engine is still running!
Simple Installation
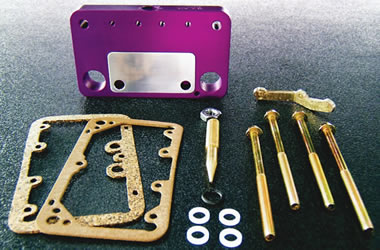
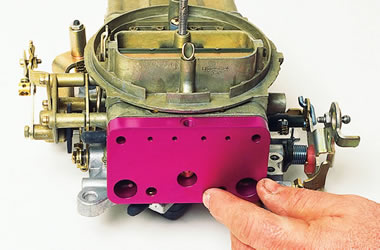
The Adjust-a-Jet set comes with everything you need to make the installation quick and painless, including the metering plate, bolts, accelerator pump arm, gaskets, and O-rings. It bolts on between the existing metering block and fuel bowl with little or no modification required.
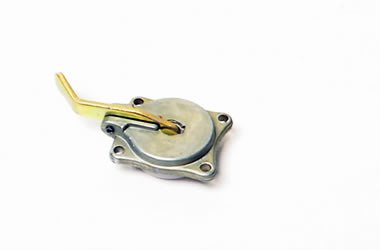
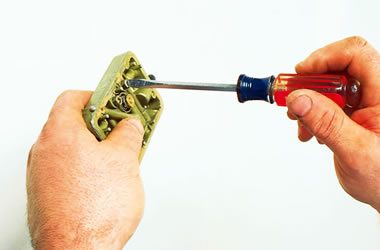
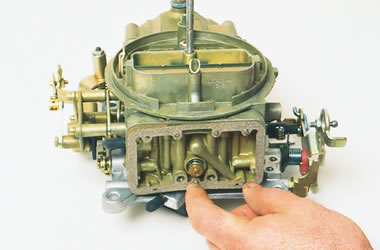
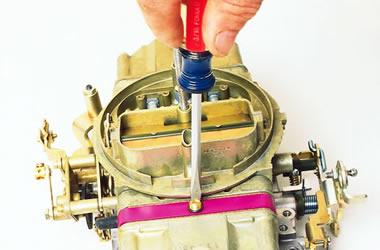
To get started, you’ll have to remove the fuel bowl–for the last time. Once the fuel bowl is off, you replace the existing accelerator pump arm with the special extended accelerator arm included in the kit. You then remove the existing jets, put the Adjust-a-Jet and new gaskets in place, and reinstall the fuel bowl. It’s all stuff you can do with basic hand tools, and it’s all covered in the step-by-step slide show above.
Easy Adjustments
Once the Adjust-a-Jet is installed and you have established your initial setting, you can make tuning adjustments with simple fractional turns of the external needle valve.
To establish your initial setting, turn the Adjust-a-Jet needle to the fully closed position. We recommend that you turn the needle adjustment screw with your fingertips to prevent overtightening. Once the needle is in the closed position, add the needle O-ring and secure it with the included hold-down nut.
Using the embossed markings around the needle assembly, begin turning the Adjust-a-Jet needle in 1/8-inch increments until you’ve reached the desired setting. The chart below compares Holley jet sizes to fractional turns of the Adjust-a-Jet valve:
Jet Size=Turns Open
#60 (jet size) =1 (turns open)
62=1 1/8
64=1 1/4
65=1 1/2
66=1 5/8
67=1 3/4
68=1 7/8
69=2
70=2 1/8
71=2 1/4
72=2 3/8
73=2 1/2
74=2 5/8
75=2 3/4
76=3
77=3 1/2
78=3 5/8
79=3 3/4
80=4
81=4 1/2
82=4 3/4
83=5
84=5 1/4
85=5 1/2
86=5 5/8
87=5 3/4
88=6
89=6 1/2
90=7
91=7 1/2
92=8
93=8 1/2
94=9
95=9 1/2
96=10 1/2
97=11 1/2
98=12
99=12 3/4
100=13
Once your initial setting is dialed in, you can adjust for rich/lean conditions as opposed to jet size. Best of all, you can make these adjustments with the carburetor in place and the engine running, so your tuning will be as accurate as possible.
Here’s a listing of Percy’s popular Adjust-a-Jet applications:
| PHP-15001 | Percy’s Adjust-a-Jet, Holley 2300/3310/4150/4160/4150HP, street/strip gasoline |
| PHP-15002 | Percy’s Adjust-a-Jet, Holley Dominator, street/strip gasoline |
| PHP-15003 | Percy’s Adjust-a-Jet, Holley 4150 and Dominator, drag racing alcohol |
| PHP-15004 | Percy’s Adjust-a-Jet, Holley 4150/4160 with circle track primary |
| PHP-15005 | Percy’s Adjust-a-Jet, Holley 4150/4160 with circle track secondary |
| PHP-15006 | Percy’s Adjust-a-Jet, Holley 4150/4160 with circle track primary, alcohol |
| PHP-15007 | Percy’s Adjust-a-Jet, Holley 4150/4160 with circle track secondary, alcohol |
don’t forget to buy a longer fuel tube. the stock one will not be long enough after the adjust a jet metering block is installed
Do you mean a fuel line?
No he means “Transfer Tube” on 4160 and the part number is PHP-15008
It would not fit my quickfuel carb, because the qf has billet metering blocks, that has raised bosses for the original jets to go in, so they are not flush with the gasket, and leave a 1/4 inch gap.
will this fit demon
This is currently for Holley carbs only.
Will this work on alcohol? Thanks
Certain part numbers work on alcohol, as outlined above.
Would buy them if they weren’t made out of plastic- might try to find the Webber power plates
Looking for old stock ones made from alum not plastic do not like plastic list # 80910 Dominator 1450 CFM
Hi guys, I am chasing gaskets for my Holley which is fitted with Percy valves , am after the cork gaskets between metering block please x 2
Will this work using a plate on both primary and secondary at the same time so both can be adjusted with a screwdriver or on the primary only ?
Will this work for the Holley 4776
Hi guys been looking for this for quite a while. I stubbled across this on a youtube video. Was wondering if it is still available through summit. If not will you ship to canada. thanks
Hey Jim, this is an older article. But good news:
…
For starters, Summit Racing will absolutely ship parts to Canada–no problem.
…
And Taylor Cable bought Percy’s about a decade ago, which means you can still get the same kit, only sold under the Taylor Cable brand name. In most cases, they maintained the part number too.
…
Click here to see the Taylor Adjust-a-Jets kits.
What would be the equivalent “turns open” for a range of #50 to #60, or is that too low for your unit?
Do you know who and how to contact someone at Taylor Adjust-A-Jet for technical information regarding their Metering Plate?
I have searched the internet and cannot find Taylor advertising the metering plate at all. Did Taylor stop selling it?
Thanks
R.E.Ruiz
Hey Ruben, Taylor’s under the Pertronix Brand nowadays. You can click here for customer technical support.
I noticed in the chart where it shows one’s to fit a holley 4160. Does this apply to side hung float bowls such as the 1850? What about the fuel transfer tube? Is the pla ft e for secondary only or both primary and secondary. O ask because of the idle mixtu ure screws.