I recently stripped down my 350 small-block Chevy because of loss of compression over the last three years. In 5,000 miles and three different checks of the cranking compression, it has dropped from a high of 190 to as little as 120 pounds.
The rings and pistons look good and the engine does not have blow by. Valve seals look good and the valve stems mic good. The tops of pistons are oily or gummed as well as the valve backsides. To me it looks like bad seals but I think not. My roller rockers have a 0.090-inch orifice compared to 0.060-inch on other rockers Could this larger orifice be filling the covers with oil and flooding the seals? I hope I have given enough info. Thanks for your time have a great day. — G.S.
…
Jeff Smith: First of all, I don’t think the larger orifices in the rockers will affect the oil usage. You didn’t mention what type of valve stem seals are being used, but assuming that they are of the positive seal type that fit tightly over the valve guide and are not those white plastic PC-style seals but instead a high-quality positive seal, then we should be able to rule them out as the cause of the oil usage.
If the engine does have those hard plastic white seals then immediately replace them with better Viton rubber seals.
Also, it’s important to point out that oil in the chamber and piston top is not necessarily an indication of a lack of control from the oil ring. Yes, if both the oil control and second ring have failed, then oil will be found in the combustion space.
The reason I doubt you have problems with ring seal is because you mention there is no serious blow-by. All engines exhibit blow-by but if it is not excessive, then we can assume from your description of the engine that the rings appear to be in decent condition.
Assuming that the valve seals are working properly, there is another possibility. To discover the issue, you will need to perform a minor test. It’s possible that the intake manifold is not sealing at the bottom of the intake port and allowing oil to be pulled into the engine by manifold vacuum. This has happened to engines I’ve built on two different occasions so it is somewhat common — especially if the engine block has been decked or the heads milled. But even with stock deck height this is possible.
The problem occurs because the intake manifold is not at the same angle of the intake ports on the head. In this case, the manifold fits much closer to the head at the top of the intake port, leaving a wide gap at the bottom. This seals the intake port at the top but allows engine vacuum to leak past the gasket at the bottom of the port and since that area is exposed to the lifter valley, it will pull oil into the intake port. To be properly sealed, the intake should be parallel or slightly tighter at the bottom of the intake compared to the top.
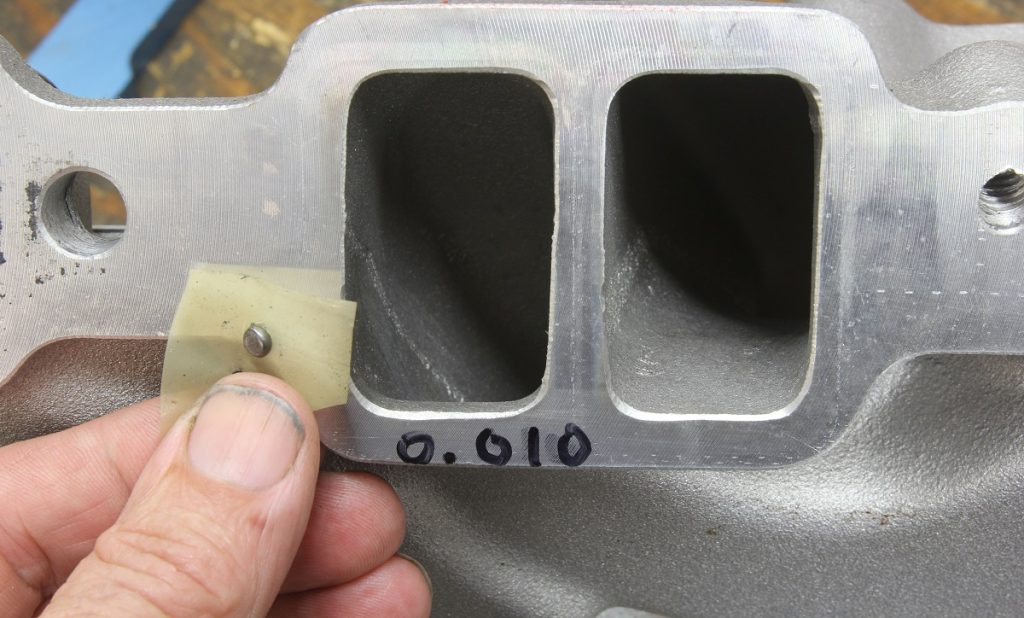
The test involves using a kit from Hughes Engines.
This kit employs a length of wax string placed on all four corners of the intake manifold along with some thin spacers to prevent excessively compressing the string which is 0.100-inch thick. This will indicate how well the manifold seals to the heads. If your combination is not ideal, the intake will be squeezed tighter at the top of the manifold rather than the bottom. This reduces the clamp load on the seal at the bottom and allows oil in the lifter valley to be pulled into the intake ports.
If the intake is tight at the top, this will require milling the intake manifold sealing surface 0.008 – 0.010-inch (or more) on both sides to “square it up” by milling more at the top of the manifold than on the bottom. This will improve the seal and should stop pulling oil into the intake port.
There is another way to perform this test.
We learned this test from a good friend, Greg West, who is now retired from Fel-Pro gaskets. Start with an old intake gasket set and cut four 3/8-inch holes in the gasket near the top and bottom of the gasket at both the leading and trailing ends — essentially near the four corners of the intake gasket. Then use grease to position lead shot pellets obtained from a shotgun shell with one pellet in each corner. These pellets should be roughly 0.100-inch in diameter must be soft lead shot not steel. These may be difficult to find as lead shotgun pellets are being phased out. Place the pellets in the holes and use the grease to retain them.
Torque the manifold in place and then carefully remove the manifold to ensure the lead pellets are not displaced or fall into the engine. Measure the thickness of the compressed shot balls top and bottom. Ideally, the top pellets should be thicker than the bottom. But if the bottom pellets are thicker by 0.005-inch or more then the manifold will not be as compressed at the bottom which may allow the gasket to leak.
Often, enthusiasts will blame a particular style or brand of intake manifold gasket for sealing issues when the real problem is the intake is not properly aligned to the head.
Performing this test requires some effort, but it is well worth the time spent to make sure. Let’s say that the manifold is tighter at the top by 0.010-inch. This will require milling at least 0.010-0.012 off the top of the manifold. This may also require milling the end portions of the manifold as well to prevent these “china wall” sections from contacting the block. This will also prevent the manifold from sealing properly.
So you will have to do some investigative work and some testing.
I cannot say for sure this is your problem, but the clues tend to lead us in this direction. Of course, I’m aligning this response with your assessment that the guides and valve guide seals are in great shape. At the very least I would include a new set of quality Viton rubber valve guide seals in the engine’s reassembly.
As to why the compression has dropped, it’s important to make sure you tested the engine the same way both times.
The best way to evaluate compression is with the engine warmed up and all of the spark plugs removed. Also ensure that engine cranking speed is the same. Since you have the engine apart, you might as well add new rings to this package. That should bring the compression back into line.
[…] I recently stripped down my 350 small-block Chevy because of loss of compression over the last three years. In 5,000 miles and three different checks of the cranking compression, it […] Read full article at http://www.onallcylinders.com […]
I have seen oil in combustion chambers from unsealed rocker arm studs.intake runners drilled through on aluminum heads
Instead of lead shot you could use soft solder we would use a length to check piston to dome on a two stroke.
Engine compression is measured in the cylinder, where the air/fuel mixture enters and is then ignited. The burning, expanding gases push the piston, translating that energy into forward movement. The ability to confine this explosion in the cylinder is measured and called compression. Any leak out of the cylinder is defined as compression loss, which can severely lower the power output of the engine. https://wikipagemaker.com/
I have problems with my 305 build all new but heads was redone valve job and trued up cyc 1 and 2 180lbs 3 and 4 175 5 and 6 170 7 and 8 165 what could be causeing this
A 10% difference between the Highest and lowest cylinders is generally acceptable, since 10% of 180 is 18Lbs. your just at the edge. However, since your numbers appear to get lower from the front to the back. Its possible the block deck is not square to the crank, meaning the pistons in the back are sitting a little lower in the bores. or the heads were cut leaving the combustion chambers a little larger in the back.
[…] a new intake manifold gasket. There is a procedure for checking for proper manifold sealing that we’ve already outlined in an earlier tech column, so we won’t run through it here, but it’s worth the effort if you think the intake may be […]
I had to use the “Greg West” method on a SBC, 355, used lead shot from a 12GA cartridge. Tell tale sign was, engine off, after warming up, open throttle blades all the way, look down the carb with a bright light and check for oil on the floor of the intake. I could see traces of oil, so I performed the above test which confirmed I was sucking oil out of the lifter valley. 🙁
The problem was “low compression.” It isn’t caused by intake leak.
i have a 350 small block and I cannot get it to idle down. it idles at about 1200r’s and it will not idle any lower without stalling. (???)
It has a TH350 trans, Edlebrock performer, Edlebrock 600cfm 4Bbl, headers. electric fuel pump.
I cannot find a vacuum leak anywhere, could it be a cracked piston. What are other symptoms be?
Thanks for your help
rebuilt 327 small block chevy new everything bigger cam installed in car motor ran good didnt like the new cam took motor back out removed the bigger cam replaced with milder cam finished rebuild placed back in cam tried to start no compression coming out of number one plug and no fire on nunmber one plug