This may sound like a simple question, but what is cylinder wall glazing and how is it created? I hear about it all the time when people talk about piston rings not sealing, but I’m not sure what it really is. Thanks. – T.D.
…
Jeff Smith: Great question! We did a little digging and then called Keith Jones at Total Seal for a quick education.
Two types of distress can victimize the cylinder wall, Jones said.
- Glazing
- Burnishing
Let’s start with glazing.
If you use a microscope to look at a side view of a freshly honed cylinder wall, it might look a little like a hash of sharp lines like those earthquake seismograph plots that Californians are conditioned to viewing on TV.
The idea behind creating the proper honing pattern is to create a series of peaks and valleys. The valleys are the most important since they hold the oil that eventually lubes the cylinder wall. The peaks also need to be there to eventually break in the rings, but the latest trend now is to reduce their height to improve ultimate sealing.
The break-in process is extremely important to make sure the rings fully seat to the cylinder wall and that a portion of those peaks remain. Jones said the engine should not be idled for more than 10 or 15 minutes and even during this time the engine speed should be varied.
“I hate run-in stands, Jones said. “I really don’t like them because they don’t put any load on the engine.”
The key to ensuring that the rings break-in properly is to put a load on the rings as soon as the engine has achieved its normal coolant and oil temperature, he said.
If you’re on the dyno, put progressive load on the engine starting at 50 percent and quickly moving to 100 percent. With the engine in the car, this means 10 minutes of idle or less to get the coolant temperature up and then go out and begin light acceleration runs quickly followed by eventual wide-open-throttle (WOT) accelerations. It’s likely the rings will be seated even before you get to the WOT runs.
This approach is for a typical street engine using moly-faced rings, which would be the majority.
Race engines with nitride steel rings use a different, courser finish for honing and may take slightly longer to seat, but the process won’t take days or even hours.
Problems can occur when the engine is lightly loaded or idled for long periods after the first startup.
“Never idle a brand new engine for an hour with no load,” Jones said.
Doing so can create a glazed cylinder wall.
Glazing is essentially combusted oil residue and carbon that remains on the cylinder wall and eventually builds up to a wet, shiny look on the cylinder wall. It almost looks like the cylinder wall has been painted with a clear paint job, Jones said. This finish occurs when the oil fills in all those valleys, creating a very smooth surface on the cylinder wall because no load was applied to peel the oil off of the wall.
This glazing makes the job of removing oil from the cylinder wall nearly impossible. The buildup will continue and eventually you will likely see a bluish haze coming from the exhaust.
With no load on the rings to remove this coating, it continues to build and if allowed to go on too long, will pile up enough that it turns yellow and creates a hard layer that makes oil control nearly impossible even with undamaged rings.
Possible Solutions to Cylinder Wall Glazing
While many sources claim that this will require re-honing, Jones said there are possible solutions to consider first.
There are some top-end cleaners such as SeaFoam engine cleaner treatment that can be poured directly down the carburetor or inlet tract on an EFI engine to help clean the cylinder walls.
The best stuff he has ever tried, Jones said, was a GM top-end cleaner that is no longer on the market. There’s no guarantee that the current cleaners will do the job but a combination of high load and a top-end cleaner might be able to reduce the glazing and allow the rings to seat.
Burnishing: Even Worse than Glazing
An even-worse condition is called burnishing.
This occurs when engines are run with excessive rich air-fuel ratios and no load.
Jones has seen several examples of engines with 9.5:1 to 10:1 air-fuel ratios that idled for long periods with no load. When this occurs, excess fuel washes the oil from the cylinder walls and essentially peels the top peaks over into the adjacent valleys.
When this happens “the cylinder wall gets very dark in color. Like a dark grey—almost black,” Jones said.
The only correct solution for burnishing is to disassemble the engine and re-hone the cylinder walls.
…
So the obvious message here is to properly break in the engine using high quality lubricants designed specifically for engine break-in.
There are dozens of boutique engine break-in oils and several companies, like Driven Racing Oil, offer different styles based on viscosity and application.
It would take perhaps an entire story on all the different break-in oils and why each has a place, but perhaps among the important points is that sufficient levels of high-pressure lubricants like zinc dialkyldithiophosphate (ZDDP) is more important for proper break-in of a flat tappet cam than for ring break-in. In fact, levels in excess of 1,500 to 2,000 parts-per-million (ppm) of ZDDP can contribute to cylinder wall glazing—especially if this oil is combined with excessive engine idling for an excessive period of time.
So be careful because too much of a good thing like ZDDP can create poor results.
…
To prevent cylinder glazing or the even-worse condition of burnishing, it’s best to use high-quality break-in oil, be spot on with the part throttle idle air-fuel ratio and ignition timing, and don’t idle the engine without load for more than 15 minutes and vary the rpm during this time by constantly spinning the engine up to 1,500 to 2,000 rpm. Apply a load to the engine as quickly as possible. Then drain the break-in oil after 100 miles or so and go directly to the long-term oil you intend to run. All that will contribute to a well-sealed engine that will likely perform up to your expectations.
Jeff I have a kind of a different question I have an old engine that’s been sitting for a long time and wanting to know what can I put down the spark plug holes for the piston so I can break them free and also lubricate the walls of the cylinders. Thank you Steve Schumacher
Best thing I’ve used for that is ATF. Fill the cylinders, and let it sit. Top up any cylinders that lose fluid. After a few days, to a week, try and rotate the crank left and right to break the rusty seal. Then let it sit for a while longer, and try again.
Greetings Jeff,
Those are real world problems that anyone could unfortunately experience. But the best part of your article is how you addressed those problems with real world solutions that most readers can relate to. Not a lengthy endorsement of the latest snake oil product wearing a thin disguise of technical information.
Naturally there are products that should be mentioned as part of the solution but you covered the actual technical proceedures generally accepted to repair cylinder wall problems. All that and some good break-in information too !
Well done Mr. Smith.
And the beat goes on…..
I have salvaged more than one engine that didn’t get the proper initial break in for the rings by slowly sifting bon ami down the throttle body. It has enough abrasive action to help the rings seat. Beats tearing down the engine.
i have heard of this fix too and considering trying it on my 350 chev it hasn’t done a lot of miles and very good oil pressure . I had a problem with a float and may have washed the bores with fuel. I imagine with engine running throttle open its sifted down the carburetor. Water down the carby withmotor running is supposedto be alright for decarboning the top end also.
So, I was always told to break in a new engine with a flat tappet cam for 20 minutes at 2,000 rpm with a quality break-in oil, is this incorrect??
Cam can’t tell if it’s driving or idling. To seat rings you need to drive under load & some throttle, up to around 4000rpm or mid revs for your motor in short runs.
Speaking of oil , I currently use shell rotella 10 w 30.since my rebuild I have been using comp cams zinc additive in every oil change .I have put 20,000 miles on it a was wandering if I could stop using the zinc additive all together and not wear out my cam?
Kevin,
Yes you should stop using the zinc additive but you should probably substitute a high-zinc oil like Edelbrock’s Hot Rod oil or Comp Cam’s version. There are several. The current levels of zinc in Rotella and all diesel oils has dropped dramatically so there’s no advantage plus – their detergent levels are higher which strip the zinc from the metal surfaces. Wear depends quite a bit on spring loads so if you have light spring loads this wont’ be as critical but just to be safe I would use one of the hot rod oils.
hello, I have been the rebuilding business for about 40 years. I have come across a problem that I can not figure out. I bored out a ford 360 and honed all of the cylinders as usual, except the left rear cylinder. I have literally honed on that cylinder for 2 days using coarse and medium stones with very little effect. the piston is a very tight 1.5 thousandths and I would like it to be a little looser however it seems like I am not accomplishing any thing. I have tried different kinds of lubricants. Don’t know what else to do and I am concerned that, that cylinder and rings will not break in
I mostly built motorbike engiens but have done a couple cars for myself but I have a shop building power sports motors
I have ran into multiple cylinder motors haveing one hole harder than others and not gone near as fast
It does seem that some times a bore can get work hardened due to heat or pressure and hone differntly . But in those cases I switch hone blocks to ones set up for hard bore wich are softer material and continually expose fresh abrasive
Years ago I bought Sunnen diamond homes and would never go back they cut so much faster and cleaner on all types of bore , nickel plated , iron liner done matter . Even the finer 300 grit feels like it bites so much harder than even say a 150 grit aluminum oxide or silicancarbide stones and does not require the same stone pressure to remove material
I would suggest buying differnt hone blocks for your AN style hone if that’s what your useing and Sunnen would be best to ask what ones your using currently and then they would recommend what ones to use
Is this article in relation to petrol or diesel or both?
Read the article, it doesn’t seem to be my issue. I recently started to rebuild my Pontiac 400 into a 461 stroker. I noticed that the crank was easy to rotate by hand until I installed the first piston. It didn’t matter which cylinder, same result. The crank became very hard to rotate and a craping sound happens. All of the cylinders are getting black lines running down them, all around the walls. I have gapped the rings to .019 and liberally lubed the cylinder walls. What could cause this to happen? Mike
If you just honed you’re cylinders, then Sounds like you might have honed to course and that causes the drag feeling
And if your getting lines when you turn motor over then you must have dirty cylinder bores!
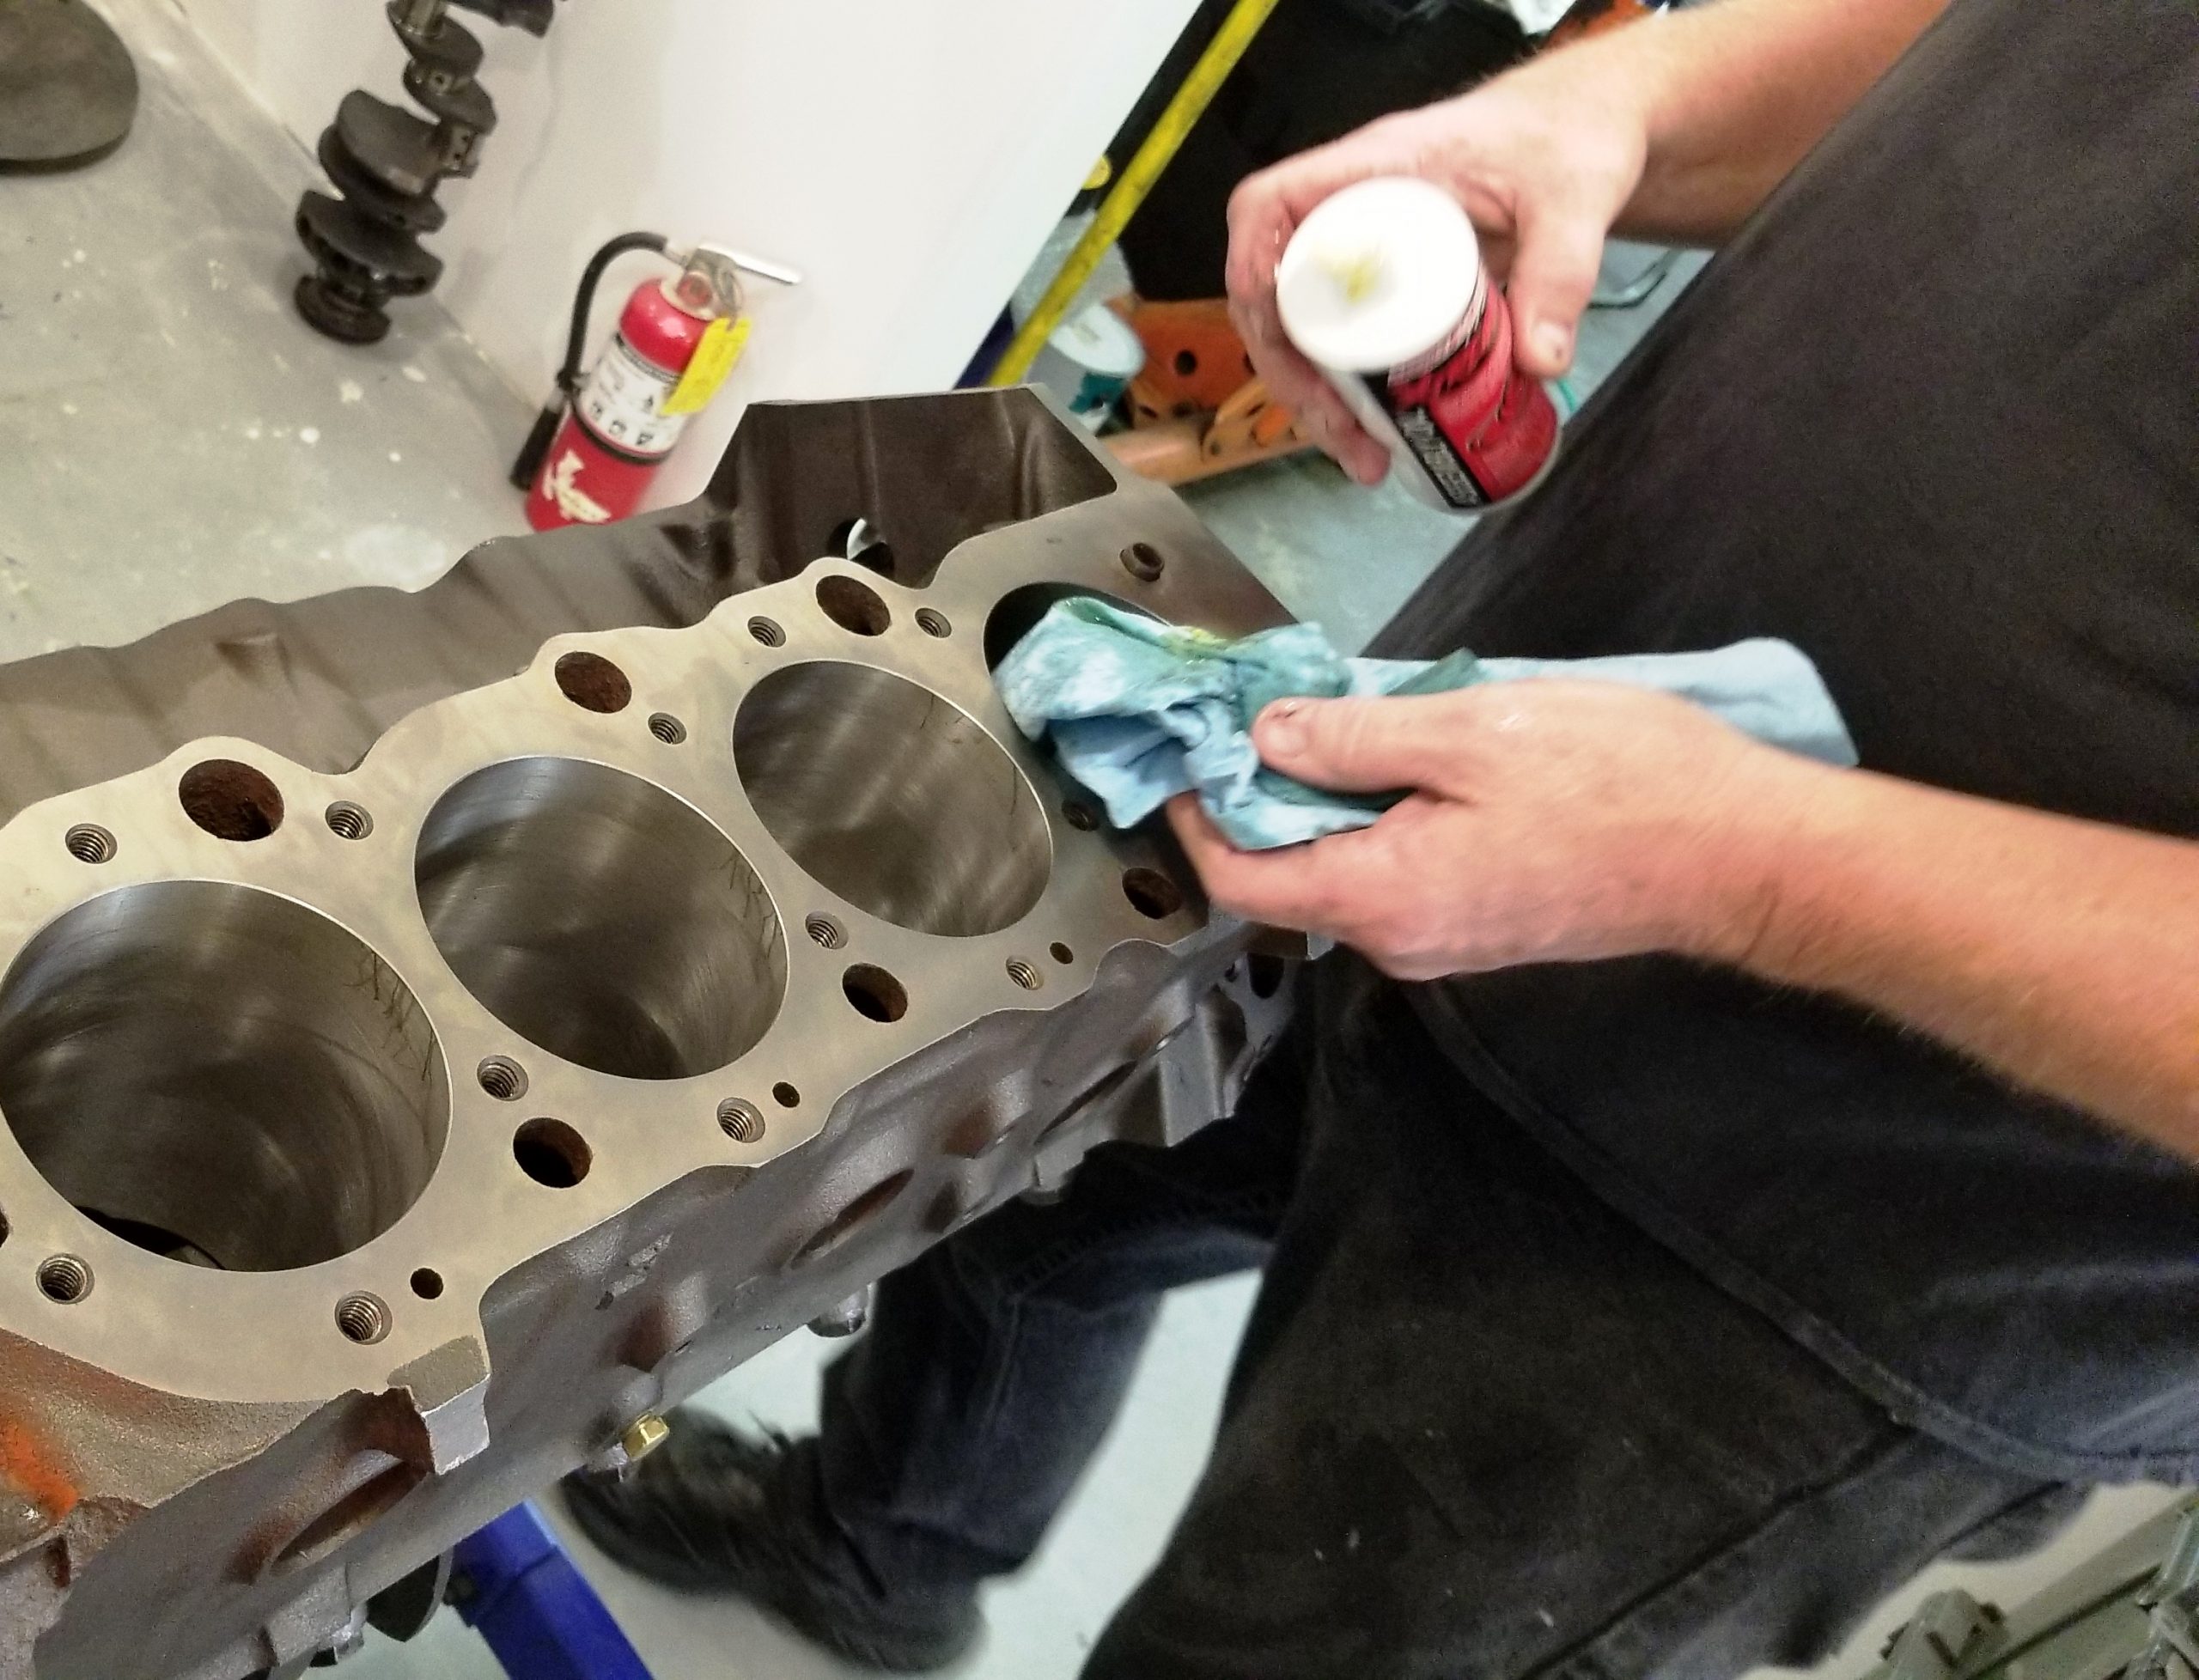
Cross hatch holds a lot of grit and metal and must be scrubbed very well untill with light oil like WD40 on cylinder walls and a clean white cloth or blue paper shop rag you get absolutely no coloration on the cloth .
So many times I see people trying to assemble motors where I can take a rag and rub the bore and get dark black spots on clean rag
I spend a lot of time to make sure my cylinder walls are very clean alternating from brake parts cleaner and rags ( but it evaporates to fast ) to WD40 and a rag and I scrub the cylinders with the rag untill no more crap comes from the cross hatch . On motorbikes I take and also use soapy water and rag at the end to make sure I got everything and then blow it off and then WD40 and a last wipe job confirming nothing left to leave spots on my clean shop rag.
It takes more scrubbing than most people think to get cross hatch clean. Try WD40 and rub your cylinder walls pushing hard and see what comes out of your cross hatch. Hope this helps eliminate your vertical scratch Marks
cool article
[…] Download Image More @ http://www.onallcylinders.com […]
[…] Download Image More @ http://www.onallcylinders.com […]
will glazing of number 1 and 5 cylinder on a 302 ford after running 3,000 miles BR40 cause piston slapping noise as jasper engine states due to carb problem. bronco starts and runs perfect.
Hi Jeff, Frank,
I just recently did something very stupid, I have 2 x 454 bbc in a boat with Holley hp efi systems, completely rebuilt with original plenum ( to keep torque). Now my stupidity was I obviously didn’t understand how engine breathers work so in my brain fade I put a pcv in each valve cover, none of which ran to intake plenum. So im still in run in stage and noticed oil coming from cam sync plug, then after a time popping out the pcv. Now I understand what I did wrong, and how the setup should be, ie. Breather on one side pcv on the other connected to plenum for excess crank pressure to be burnt up. I have some blow by now that I didn’t have literally for first 6 hours of running in under load, then engine rpm came down on its own and smoke from engine bay as a result of oil on exhaust manifolds, at this point I realised that I had done something wrong, at which point I realised my mistake. After cleaning all engine oil up that spewed out of most places. I removed plenum completely cleaned inside and routed pcv to plenum and added breather to other side. I have some blow by now, which I assume is or was caused by my mistake, have I completely stuffed my engines or is an engine oil flush and complete filter changes going to help.
Any help with what I have done would be greatly appreciated, maybe someone can explain what I have done to my cylinder walls and can I correct it, without a complete removal of engines. ( not as easy as a car). Thanks in advance.
Aaron.B.
Hi Jeff, I do small engine work, and have found that a lot of information you render is spot on. Thank you for clearing, the differences between glazing , and burnishing.
.
A neighbor is reluctant to invest in a whole house generator [air cooled] because he says that [automatically] running the engine for five minutes weekly is not enough to prevent glazing. [He would instead run it once every two months for thirty or more minutes.] We live near the coast, so we have high humidity most of the year, and he feels that five minutes is not enough time to eliminate any moisture in the oil, and this will contribute to glazing. Your thoughts please?
Hi Jeff, I have a John Deere E110 Ride on Mower. Purchased in Dec 2018. The mower was used every few weeks as we had a drought, and the grass was not growing too much (50 hours in 2 years & 9 months). In late 2021 the drought ended, and the mower has been used a little more regularly since (70 hours in the following 3 years). However, I have had a problem with the engine in the last week. It started blowing out dirty smokey exhaust fumes. Oil level was fine at the time. I suspected a blown gasket. The dealership is suggesting it could be glazed cylinders, suggesting that this is because the mower has not been used regularly enough. Never heard of the term before and the implications. A total of 120 hours since purchase in Dec 2018. I was suggesting to them that a blown gasket in 120 hours was unreasonable and then they threw the glazed cylinder angle at me. I should know their prognosis in a few days but wished to find out more beforehand. Are you able to advise me of your thoughts on their angle please.
Two questions: are you still answering comments and does this thread cover diesel engines, also? Thanks.