I have an Edelbrock 2×4 setup using the 500 cfm Endurashine carburetors for my 383ci small-block Chevy that I’m putting in a ’53 Chevy hot rod pickup. In a month or so I’m going to fire the new engine and I’m wondering if there are any changes I should make to the carburetors before I take this out for its first test drive? I heard that I should lean out these carbs because they are a 2×4 setup. Thanks.
T.M.
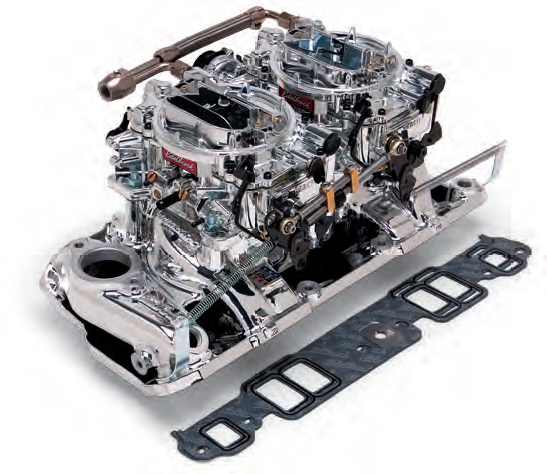
(Image/edelbrock.com)
Jeff Smith: I’ve never had the chance to play with Edelbrock’s 2×4 setup, so I did a little research. The combination that you describe appears to be EDL-20254. As you mentioned, this kit is based on a pair of 500 cfm Edelbrock carburetors and comes with all the other necessary parts including the intake manifold, gaskets, linkage, fuel line and hardware. The primary carburetor has an electric choke while the secondary carburetor does not.
Since I don’t have any personal experience with this kit, I called my buddy Smitty Smith at Edelbrock to learn a little more. He actually has this exact kit on his 383 cubic-inch small-block Chevy-powered ’37 Ford pickup. In the course of our discussion, he mentioned that the system is designed so that the primary carburetor is mounted at the rear, rather than the front. He also mentioned Edelbrock did some dyno testing and determined that with this pair of carburetors on a typical street small-block Chevy, the jetting needed to be leaned out.
The stock jetting on a single-carb application would use an 86 primary jet with a 65×52 metering rod matched with 95 secondary jets. Let’s take a minute to explain how this metering rod system works.
The Edelbrock carbs are designed to use the combination of a metering rod and jet on the primary side and just a main jet on the secondary side. This offers more precise primary fuel metering for part-throttle operation.
The tapered metering rod is designed to fit inside the main primary jet with its vertical location controlled by the power piston. This piston is pulled down by engine vacuum and raised by a small power valve spring underneath the piston. Under light throttle, for example, the engine creates high manifold vacuum since the throttle plates are nearly closed. The vacuum pulls down on the piston, against the spring load. This also lowers the metering rod into the jet. Since the metering rod is tapered, the thick part reduces the jet’s flow area, reducing fuel flow in the main metering circuit.
When you stab wide-open throttle (WOT), manifold vacuum falls off to near zero. The spring then pushes the metering rod up and out of the jet, exposing the thinner, tapered end of the rod in the jet which allows more fuel into the main metering circuit. This becomes the power enrichment circuit.
For the 2×4 package, everything works exactly the same way but the jets and metering rods are different. Edelbrock has leaned out the primary circuit by adding a 65×57 metering rod that is larger on the small tapered end to flow less fuel compared to the single four-barrel 65×52 primary rod. On the secondary side, Edelbrock has reduced the secondary jetting from a 95 to a 77 because there are two carburetors flowing fuel.
Smitty says his engine runs great with the jetting right out of the box, but he warns that some enthusiasts don’t realize how critical ignition timing is to both performance and drivability. A typical small-block like the engine you have may well be equipped with aftermarket heads and camshaft. Unfortunately, many enthusiasts don’t add more initial timing with these combinations — relying instead on placing the initial timing at six or eight degrees before top dead center (BTDC) as called for stock.
Most small-blocks fitted with heads and a camshaft should start with much more initial timing — 14 to 16 degrees of initial timing is a great place to start. Then you need to measure the total timing advance above 3,000 rpm. As an example, let’s say you place the initial at 16 degrees BTDC and then discover that the distributor offers total mechanical advance of 32 degrees BTDC at 3,200 rpm. Generally, 34 to 36 BTDC is a better starting point. The simple fix is to just add another two degrees of timing to the initial and you will be close.
If you measure in excess of 36 degrees BTDC, then the best procedure is to modify the mechanical advance curve in the distributor so that it delivers somewhere near 36 degrees of total timing with the 14-16 degrees of initial. If you have an MSD distributor, the advance curve can be modified easily by changing the bushing in the advance weight area. We’ll save that specific discussion for another time, but the point here is that proper initial and total timing advance is important to get the most out of the engine once you have all the parts in place.
With the proper timing, the engine should run well.
If you think you might want to perform further tuning changes to improve the part-throttle performance, this is where the Edelbrock carburetors are really much more tuner friendly than other carburetors. Remember the primary metering rods mentioned earlier? These rods are easily accessed by loosening a small screw that allows you to slide the cover aside. There are two covers, one for each primary venturi. With the cover moved aside, the metering rod and piston will be pushed up by the power valve spring.
This makes it easy to change the metering rod without having to disassemble the carb or remove the lid. You will need to pull the top of the carb if you want to get at the primary or secondary jets. We mentioned that the stock 2×4 primary rod measured 65×57. The larger 65 number is the large diameter of the rod that sits inside the primary jet during high manifold vacuum cruising. If you decide to lean the cruise circuit at part throttle, you could change the two primary rods on both carburetors to a 67×55 combination. This will reduce the fuel flow at light throttle while adding a little more fuel under high power demands.
As you can see, there are many things you can do to fine-tune your particular system. Most enthusiasts don’t bother with all this because the engine will probably run fine right out of the box. But since all combinations and engines operate differently, don’t be afraid to make small changes to see if the engine responds. We’d also recommend keeping record of your changes just in case you want to go back to a certain setting that performed well. Have fun!
Jeff – Read your reply to the guy that has the Edelbrock 2X4 carb setup. Back in the late 50’s – early ’60’s we ran a ’57 Chev. with the stock 270 — dual quad setup that came from the factory. Still have the complete carb system, manifold, distributor, etc. that came with the car. Any carb adjusting hints? Would like to use it on my ’77 Chev. Suburban with a small block 400 engine. Will it fit? Any help or suggestios would be appreciated.
I have a 1957 Chevy Bel with an Ellen Brock 383 signature series engineI. The engine is signature series 76. I bought new in 2010. The car has a Trimmick 5 speed Manual transmission. I am having trouble driving the car in paradeIn low gear the car wants to jump We’ll not run smooth. I have bought a set of 1″ riser blocks do you think that might help the surging Or jumping In low gear. Any suggestions would help to correct this problem. My email address is Mike M ATT Y
1957 @yahoo. com All small leather.
Could I please get a reply to this email I sent you. Thank you. Is mike.
Hey Mike, if you’re dealing with a specific transmission related problem, you can click here to contact the Summit Racing tech folks. They can help work through the issue.
[…] what I have said. Mind you, this is for a Chevy engine, but the same thoughts still hold true. Ask Away! with Jeff Smith: Tuning Tips for Edelbrock 2×4 Carb Setup on a Small-Block Chevy – OnAllCy… PontiacJim is online now Quote Quick […]
While this may not be what you want to hear, a Performer RPM dual plane and a 750 cfm carb will be a lot better than that early ’60s 2×4 package. More torque and better throttle response -especially for a heavy Suburban that needs torque. But if you just want it to look cool with the 2×4 – I understand. One key would be to ensure the throttle shafts are tight to the base plates and those old carbs don’t leak into the manifold. I’m not that familiar with those older carbs. the manifold should fit as long as you are running the traditional small-block heads and not the Vortec or the later model small-block heads that use those weird vertical center four bolt holes. If you have either of these manifolds – that old 2×4 intake won’t bolt up. A big help when tuning the system is to balance all four idle mixture screws. You’d be surprised at how often I see mixture screws unbalanced – even when there are only two screws on one carburetor. Hope this helps…
Yes a single carb on a dual plane is more powerful. The dual four on a dual plane manifold is just for looks.
Hello small block 289 motor going to install dual 4;s this fall do the carb numbers have to match one has a factory chock other hasen’t one. Have been told both need to be non elec choke` so you can add your on one carb the rear matching carb’s I have two new carbs with less than 1000 miles on the run time one has a factory installed chock other doesn’t but the numbers don’t match has these on a big block chev and just seem to load up after eng was warm. Thanks for any Info you can send along Chuck
Hi Jeff have a blue print 355 stroker motor bp35512ct1 that I want to put the edelbrock dual quad carb with the 500 cfm carbs .What should i set the jets at so there is not too much fuel for that engine or are they right with the settings out of the box.
Gerald,
I talked with Edelbrock about this and they have already made adjustments to the twin 500 cfm carburetors to lean them out. The only place where this might be an issue is on the idle circuit. But likely this will still be workable. If the adjustments are less than one full turn out, this indicates that the entire circuit is too rich, but install them first and then make careful adjustments. With four idle screws, a very small adjustment will have a greater effect. Hope this helps.
I read on the dual quad that the font carb the idle screws should be half a turn out.The rear carb the primary should be tuned as per the instructions. What are your finding? Not to much documentation on the dual quad tuning
i have a edelbrock duel quad air gap set up on my 1980 350 small block when i reach 6200 rpm the engine bladders ,be cause of two much fuel can you tell me what jets i need to install and metering needles to hopefully eliminate this problem,i was told that the cards they sold me were not jetted for a dual quad setup. i have tryed numerous jetting but can not seem to get just right.
jeff i sent a reply, you answered me back with email about a bunch of questions that i answered to that email, have not heard back from you ???
Jeff: I have a 327 small block in a t-bucket with an edelbrock duel quod set up. It is an older build ,but great motor. I want to replace the old carbs with 500 edelbrocks. SHOULD I put a progressive throttle linkage with the rear carb as the main one? Will they work well out of the box? It now has them both tied straight together an am having trouble adjusting them. I would like your input and thank you . From MIKE in N.C.
Ok Jeff I have a 383cu chevy with the 2 X 4 and I see your recommendation for jetting which is a good start but I am at 6,000 ft should I down another 10%
Have a question have a355 Chevy 11:1 comp 202 heads large solid cam have tunnel ram with two 600 edlebrocks on cold start it idles well once you drive it idles erratically from 1000 to 2000 rpm while adjusting mixture screws it do change sound of motor any and motor only makes 6lbs of vacuum cause of cam any info to make the idle better would be great thanks
Bruce,
A 10 percent number might be a bit too much. Holley suggests one jet size for every 2,000 feet of altitude. Each jet is roughly 2 percent flow change so for 6,000 feet – that would be roughly 3 jet sizes that would equal a 6 percent change. Jetting is also dependent on temperature, and humidity as well as pressure (altitude) so start with a roughly 6 percent change and see how that works and then fine tune from there.
This is a really good question! Thanks
Jeff
Hi Jeff,
With this set-up, is it better to run a progressive linkage or a straight linkage? What is Smitty Smith linkage like? We are going to run 2- 500 cfm Edelbrocks on a 383 Chevy motor just like Smitty.
I have a rebuilt 302 ford I would like to install the dual quad intake manifold with the dual 500cfm carbs but my mechanic said that would be to much fuel.is he correct about that thank you dale
I was just wondering if they put a different jetting on the 500 CFM carburetor Does that make it less cfm also I was curious about if it only runs the back carburetor most the time does that mean the front cylinders are neglected or something Giving it possibly less horsepower than if it was just one in the middle well I don’t know much about this stuff but if I sound ignorant I’m sorry but they are honest questions
I have this set up , neither of the carbs have a electric choke will the spec be the same.
I am running a 31 Ford with a 383 Chevy Stroker 14 inch tunnel ram with dual Edelbrock 500 CFM carburetors what should my main Jets size be to start with I seem to be able to have good Idle No high-end or bad idle good high-end
Hello, I have the Edelbrock 2X4 kit in a 79 El Camino. Do you have pics or diagram of the linkage from the car to the carb? It appears to attach to the rear carb. what about the 700R4 cable and the cruise control cable?
a picture is worth a thousand words. Stock bracket is too close to activate the throttle.
I just picked up this same 2 x 4 for my 1968 327. My question is, what would be the best camshafts Cylinder head combination for my set up? Any advice would be greatly appreciated.
Thank you
Robert
Have you looked at the #3927141 302/290hp solid camshaft. If you have 11;1 compression and a low gear set 3.91:1 or lower with a four speed.
Automatic trans equipped will prefer 110-112 lsa. Match your valve lift to the cylnder head flow capability.
When hooking up fuel lines to a elderbrock 2×4 set up , what fuel inlets get blocked off.
I’m putting a 2×4 set up on my 350 Chevy engine using 600 cfm elderbrock caburators. What fuel feed fuel line should I use ?
In my experience with tunnel rams on boats the performance increase at low speeds is actually quite impressive.
If you have a tunnel ram with a modest size plenum and two modest size carburetors it is actually more powerful through the whole rpm range than a single 4 barrel on a single plane intake manifold.
Dennis Moore, THE Dennis Moore? I’m glad to see you are still out there. I am looking at getting a dual quad Edelbrock for the Chevy 383 in my Formula. Mostly for the cool factor as I already have a QuickFuel marine 750 on an Air Gap Performer.
The dual quads are intriguing. Might do it.
I have two Edelbrock spreadbore carbs. They are 500cfm each. The manifold is a standard bore. Can I put them on the manifold with adapter plates. How well will this work on a SBC 350 with aluminum heads and a retro fit roller Cam. The cam has a duration of 284 and a lift of 555.
Hi, I have the avs2/ 500cfm 2×4 carb set up on my 1962 409ci , my problem is my fuel pump bleeds of if the car sits for a week or so , stock fuel pump for carter afb . 2×4 . might be diaphragm issue ? what fuel pump would you recommend to maintain 8lbs fuel pressure? 409ci, 4 speed, 4.11 rear gear solid lift , moderate crane mechanical blueprinted cam . not racing, street driver ?? THANX DON SMITH
Hey Don, we’re assuming (with the 8 pound pressure reference) that you’re running a traditional mechanical fuel pump attached to the engine. So you’re saying fuel is draining back down from the carburetor? First step would be to make sure it’s not the carb bleeding down the manifold and into the cylinders——though it sounds like you’ve got that covered. I actually had a similar issue and it was the result of a weeping seal on the fuel pump itself, which thankfully was really cheap to replace. If you’ve got any fuel filters or check valves installed between the pump and carb, it’d be worth checking/removing those too to eliminate any possible culprits.
I’ve got an aeromotive electric fuel pump and regulator feeding my Edelbrock
AVS2 1904 500 cfm. After several rod and jet changes, it’s almost where I want it.
Turn down your regulator to 5 psi, see how much better it runs!
I’ve got an aeromotive electric fuel pump and regulator feeding my Edelbrock
AVS2 1904 500 cfm. After several rod and jet changes, it’s almost where I want it.
Turn down your regulator to 5 psi, see how much better it runs!
Hi Don I have just had my motor on the Dyno it is a BBC with a solid roller i have dual Quad Edelbrock 4×4 ,it has 2 x 500 to suit the intake , it is pulleying 500 ftb of torque from 3500 rpm on wards but it is running at .75 lambda should change the secondary jets to 77 and the metering rods to 65×57 .
Also after this i will be fitting a tunnel ram do think i will have to jet this motor again .
Jeff, on your explanation for leaning out the dual quads metering rods from 65 x 55 to 65 x 57 your rich to lean numbers are reversed in the next to last paragraph of your explanation. Thanks, Charley
P.S. I started Drag Racing Chevrolets in 1964, I had a 1952 F/Gas 301.59 cu.in. SBC 8” Slicks and a D/MP 348 cu.in. Mk1 10” Slicks in the 10th grade using Carters from 401 Buicks. In 1965 I was on board with Kuehner Racing F.E.Dragster 481 cu.in. Mk1 Chevy (409) 100% Methanol dual quad factory intake w/offenhauser offset carb adapters factory Chevy carbs at first then 401 Buick Carters best tune after drilling the jets until the threads fell off was to leave them all out including no metering rods We broke the track record at 9.88 sec. 1/4 mile with direct drive foot slipping the clutch! FUN!!! I am now 75 years young building a 1948 Chevy Coupe Gasser w/1952 Chevy pickup front axle, 481 cu in (409 4” stroker+.0625”) 2 x4 Edelbrock 1407’s on 4” spacers, 4speed B&M Hydro, 3500rpm torus, narrow QC80 Frankland rearend. WOO-HOO !!! SouthEastGasserAssoc.!
Jeff How do I post a story on a 283 dual quad corvette that was brought back to life on your thread. Your info helped me and I would like to help others with what I learned.
Hi Jeff
withwithRead article tuning tips for edelbrock2x4 carb set up on small block Chvey.I have a friend with a 1957 Plymouth Belvedere with a 301
engine .had it rebuilt 15yrs.ago .The mechanic had a oem dual quad intake laying around with 2 1403 edelbrock carbs.I know way to much fuel but looks nice .He had me rebuilt both carbs 1 yr ago and found some dirt in bowls on both carbs He brings the car in for mechanical gauges and notice car running rich.What I dont knowif the engine was oversize piston s and no oversize cam.Can I lean out meter rods first and jets
second and if no good results change the rear meter rods and jets ? really running rich.
My phone # is 1-602-298-7640 cell is 1-602-206-7839 Thank you for yourreply.