Editor’s Note: Perhaps the only things Travis Jones loves more than his 1986 Monte Carlo SS are autocross courses and a good challenge. That’s why Travis is on a mission to transform his Monte Carlo from an underpowered, ill-handling daily driver to an Autocross hero. A self-described “GM guy through-and-through,” Travis is a regular on the site OppositeLock, has documented his project on his Instagram page (@sslow6.0), and will give us a first-person account of his build here as a guest writer.
Travis has owned the Monte Carlo since high school. Although he’s thought about selling it from time-to-time, Travis has held on to it for sentimental reasons, even though the car has often sat idle. After his girlfriend inspired him to try Autocross for the first time, Travis started to look at the Monte in a whole different way.
“I became obsessed with taking a 1980s boat and making it handle,” Travis said.
In Part 9 of his Monte Makeover series, Jones looks to upgrade the Monte’s steering system. You can see all the other installments of the Monte Makeover series here.
***
If you’ve been following along you’ll know that I’ve upgraded the suspension with a bunch of QA1 goodies, the stock brakes to Brembos, the old small block Chevy to a healthy LS engine, and lastly swapped a manual transmission into my 1986 Monte Carlo SS. The car absolutely rips and never fails to put a smile on my face. I reinstalled the interior minus the center console which won’t fit with the current shifter position. I ran the wiring for the reverse lights, clutch safety switch, and vehicle speed sensor and generally cleaned up some of the wiring and rough edges of the car.
Now that all the “major” surgery was done and the car was just about how I wanted it, it was time to focus on the fine tuning. From a suspension tuning aspect, on tight 180 degree turns, the triangulated four-link would tend to bind and lift the inside tire. Part of this was the stiff polygraphite bushings in my QA1 lower control arms. I already had a set of UMI Roto-Joint equipped boxed lowers (UPI-3042-B) that I was planning to use when I convert my car to a three-link with a panhard rod using a Ford 8.8 rear end, so I figured why not toss them on now.
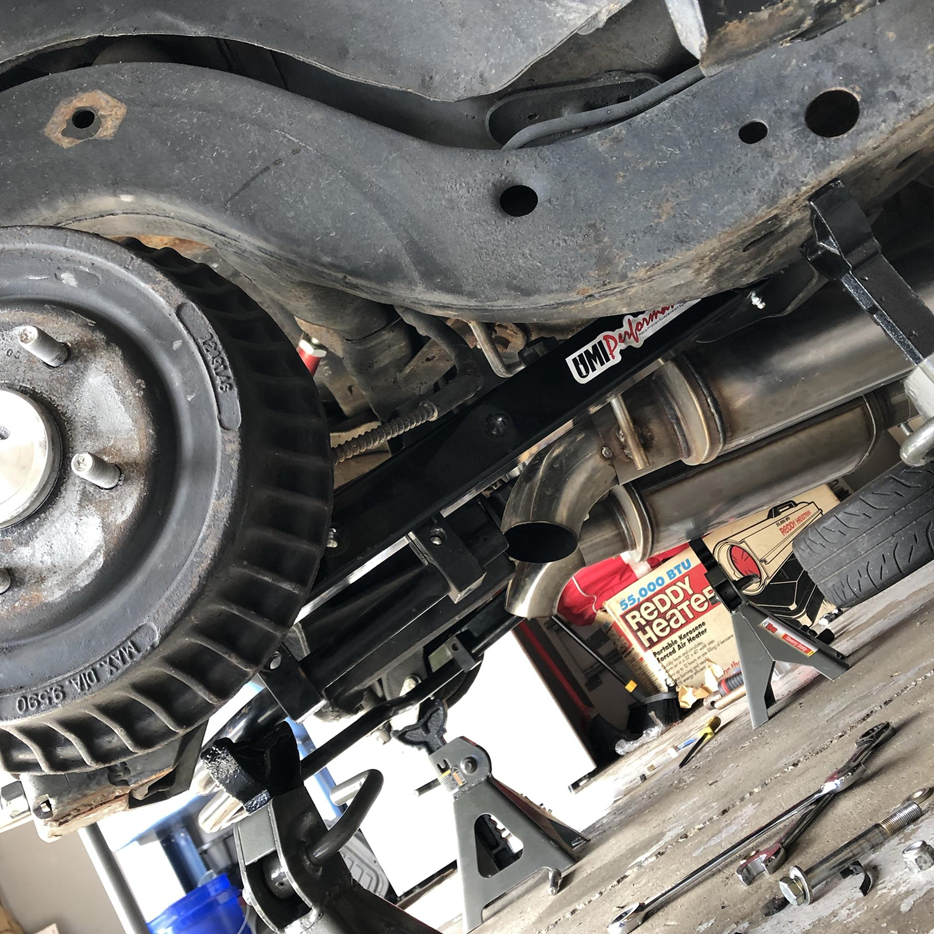
This quick upgrade made a considerable difference in A/B “testing” and by testing, I mean ripping off a couple of 180 degree turns in a parking lot. With the roto-joints, the rear end has more articulation and less bind, leading to a better contact patch on the inside rear tire for corner exit. Still, it isn’t a silver bullet for this issue. The three-link will be an upgrade I tackle at a later date, not just for the improved articulation, with 400+ ft.-lbs. of torque and a manual transmission, the GM 7.5 in. ring and pinion gearset is running on borrowed time.
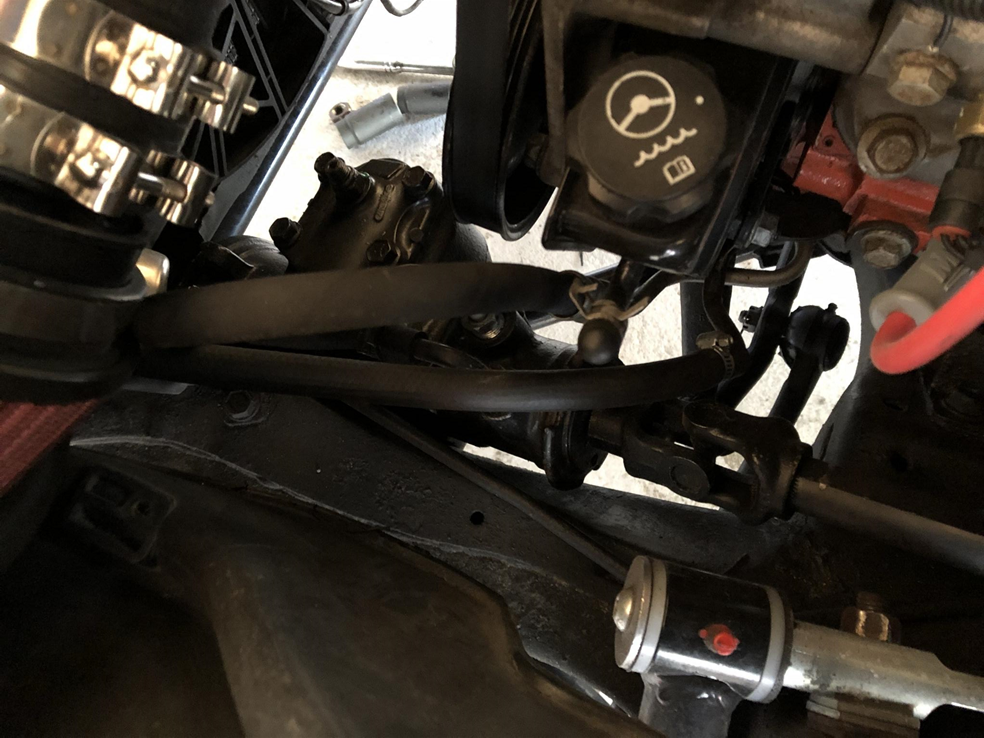
Next up, is the steering. Despite all fresh steering hard parts from Pro-forged (POF-116-10011) a freshly remanufactured “XH” steering box from an 1980s IROC-Z Camaro, and a trick U-joint steering shaft, the steering was still painfully sloppy on center. It’s hard to complete a slalom when you don’t know exactly where your front wheels are pointed.
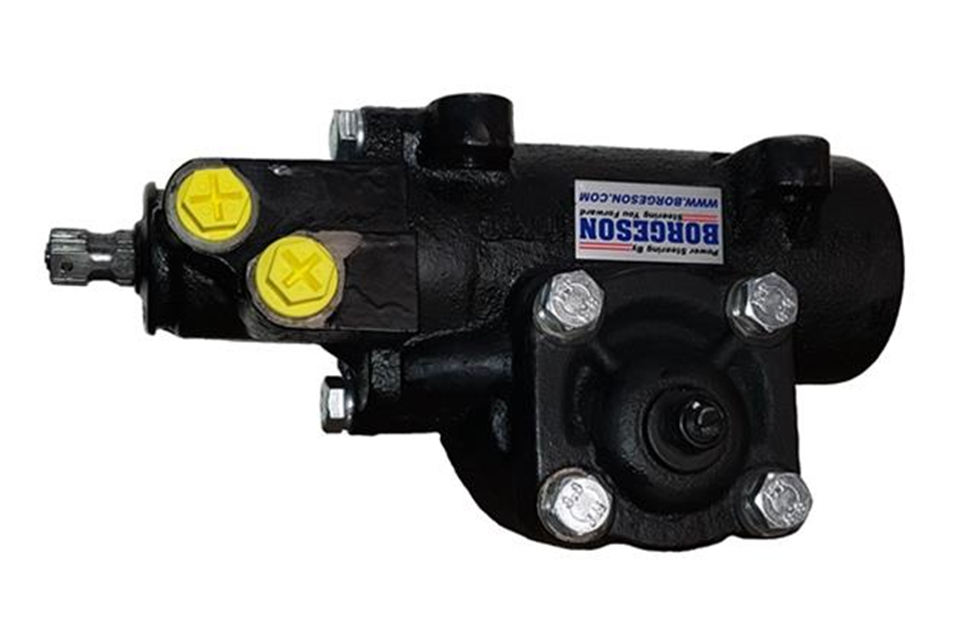
I did some research and there are three top contenders for the best steering box for a G-body. The first is a rebuilt 800 series unit from AGR (AGR-225153) this would be great for a street machine, but it’s still based on 1960s technology.
The other option is a rebuilt Delphi 670 gear box which was developed during the 1990s. People like Turn One and Lee Power Steering rebuild these boxes for serious autocross, road race and even NASCAR cup cars. The problem is 670 gear cores are almost impossible to find these days, as they are well out of their original and very limited production. They are also some of the most expensive gearboxes on the market, and while those who have them tell me they are well worth the money, I am not prepared to spend $1,000 on a steering gear—for those following along at home that’d be more than what I spent on my engine!
The newest option and the one that I chose is the Borgeson “800” Steering Box (BRG-800130) while Borgeson calls this an 800 series steering box, it isn’t exactly your grandfather’s Saginaw 800. What it is, according to Borgeson, is the culmination of two years of R&D and the lack of good 670 cores in the market. Essentially because the core market dried up, Borgeson decided to go their own way, with their own all new design that incorporates the best features of the 670 and the 800 box. The box promises a firm modern steering feel and a direct fit into my application with it’s 12.7:1 quick ratio.
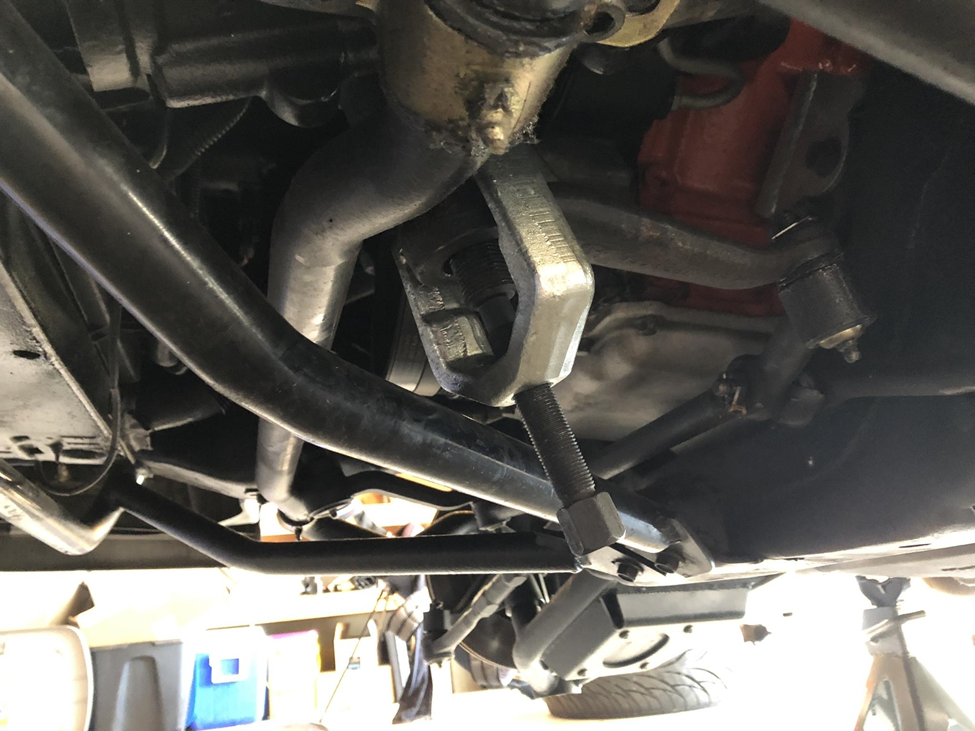
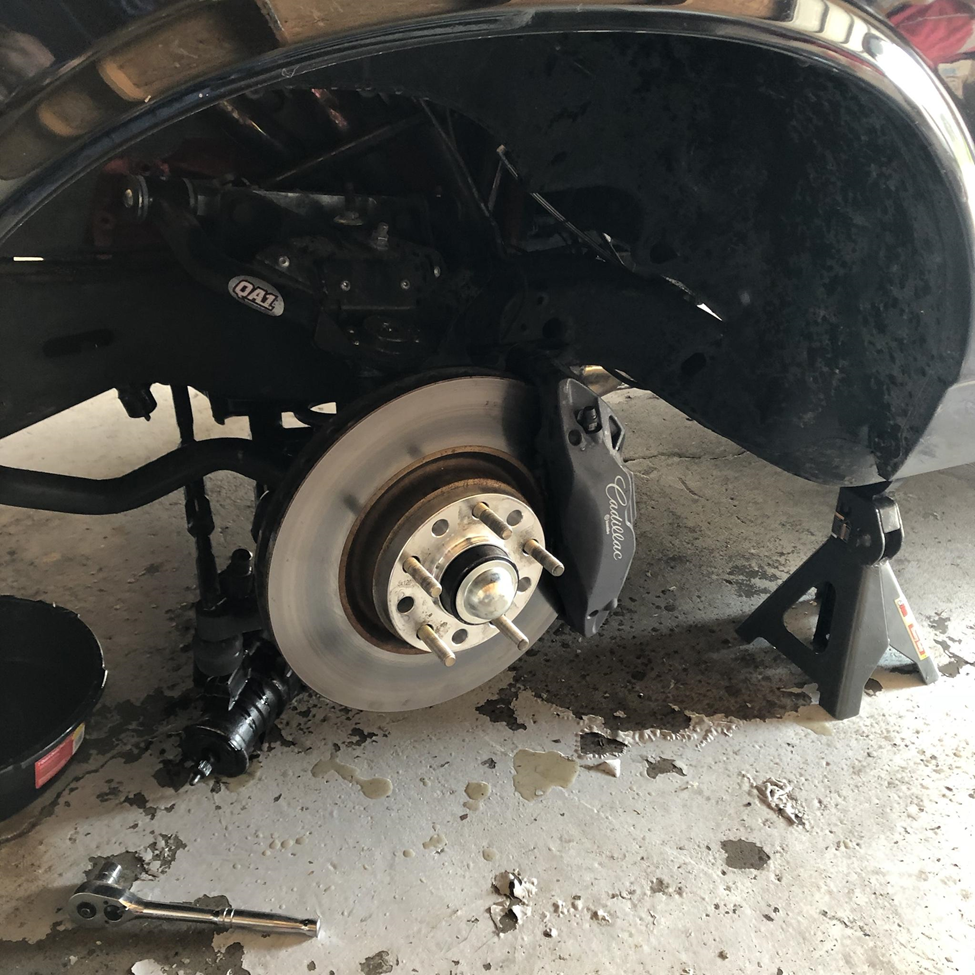
To install the steering box you’ll need a few things. First a pitman arm puller, I prefer a heavy duty one like the OTC-7310A, because I have actually bent a few of the standard duty pullers. Second, you’ll need a catch pan because when you disconnect your lines, it’s going to get messy. So to start, support the front of the car on jack stands so that the wheels are barely off the ground and pointing straight, you’ll be working in the engine compartment and underneath. Then remove the front wheels. I recommend this because it allows easier access to the power steering gear bolts that go through the frame.
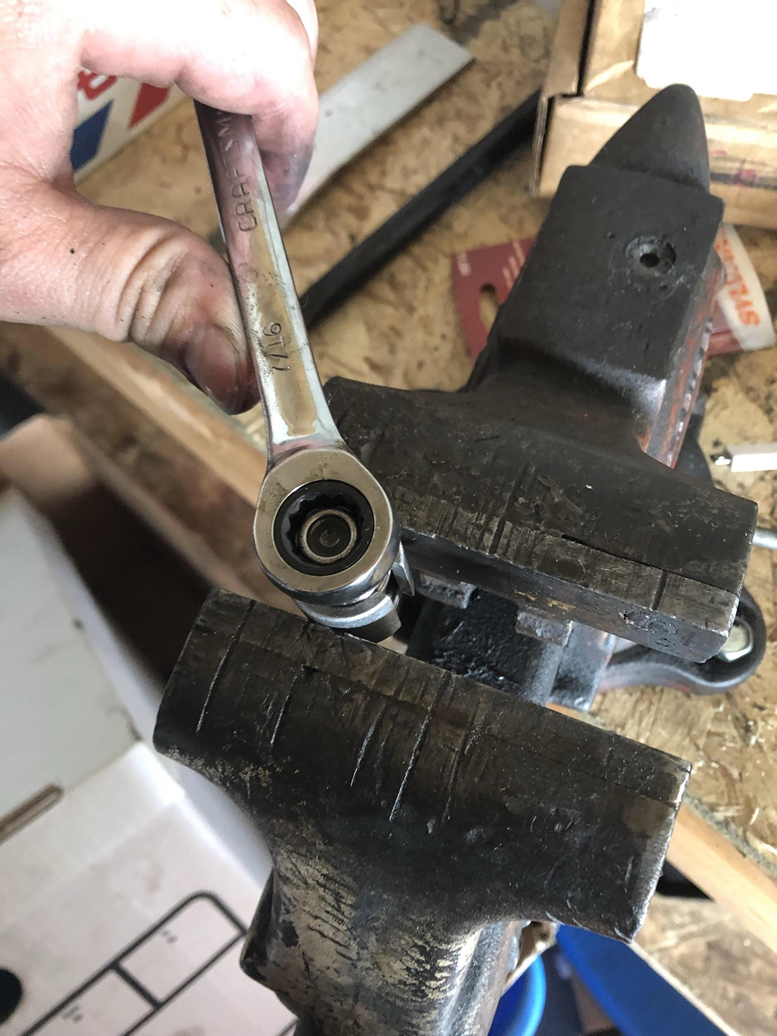
Now we will remove the pitman arm. Using a 34mm socket and a large breaker bar, remove the nut. It should have about 150 ft.-lbs. of torque holding it on, so it won’t be easy. I don’t recommend using an impact for this job. With the nut off, use the pitman arm puller to remove the pitman arm.
Next, place a catch pan under the power steering box and return to the topside of your vehicle, then remove the 12mm pinch bolt retaining the steering shaft to the steering box and remove the shaft from the box. I have a trick collapsible steering shaft that makes this step easy. Next loosen the feed and return lines using a line wrench and loosen the cap on your power steering box. These will be 16mm and 18mm on a post 1978 vehicle. Let the fluid drain into the catch pan.
Then once the fluid has drained, and you have all of the attachments off your steering box loosen the three 17mm bolts mounting the box to the frame. You should be able to take the box out from the bottom, even with the UMI front brace and front anti-roll bar still attached. It’s pretty heavy and will likely be slicker than greased lightning from all the fluid you drained out of it, so be careful not to drop it, like I did, into the catch pan full of power steering fluid and fling power steering fluid all over your car, shop, and yourself. Oops.
Before we install the new box, we’ll need to adjust the pressure output of my GM LS truck truck style pump. The GM Saginaw truck pumps are some of the highest flow and pressure units that GM ever built. They output 3.0+ GPM and upwards of 1,500 PSI. The optimum input pressure for these Borgeson Boxes is about 1,100-1,250 PSI. To lower the pressure, we’ll be re-working the pressure relief valve on the PS pump.
To do this we’ll need to pull the pump from the front of the engine. First, loosen the belt tensioner and remove the belt, then remove the two 15mm bolts holding the alternator, the 10mm nut holding the charging cable and remove the alternator. Since the pump won’t come free from the bracket without removing the pulley. we’ll just pull the whole drivers side PS and alternator bracket. Just remove the four long 15mm bolts and one short 15mm bolt holding the bracket to the front of the engine and lift the whole bracket and pump assembly out of the vehicle.
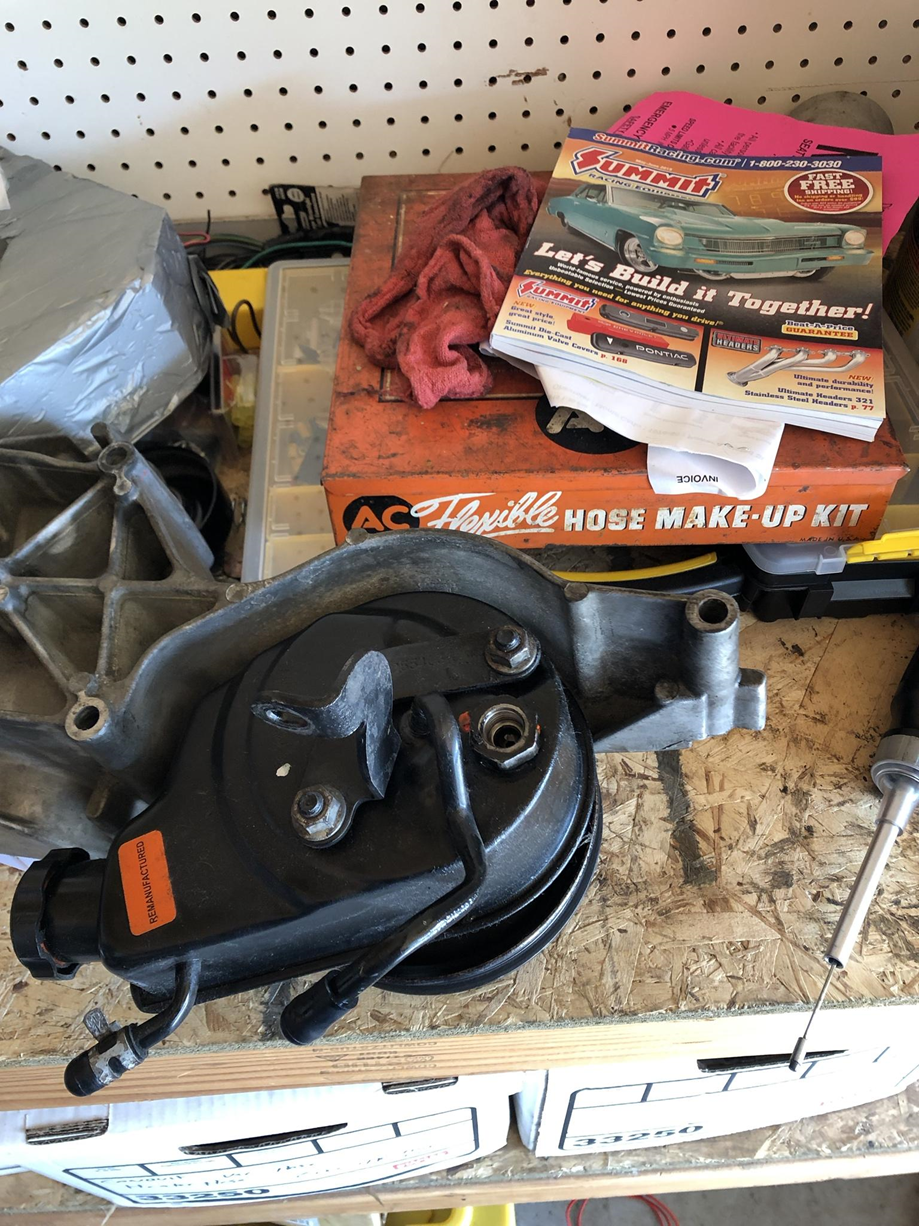
Taking the whole assembly to the work bench, remove the high pressure line fitting from the back of the PS pump. To access the flow valve place a one inch wrench or socket over the high pressure hose fitting on the pump and loosen it. The whole flow control valve should come out.
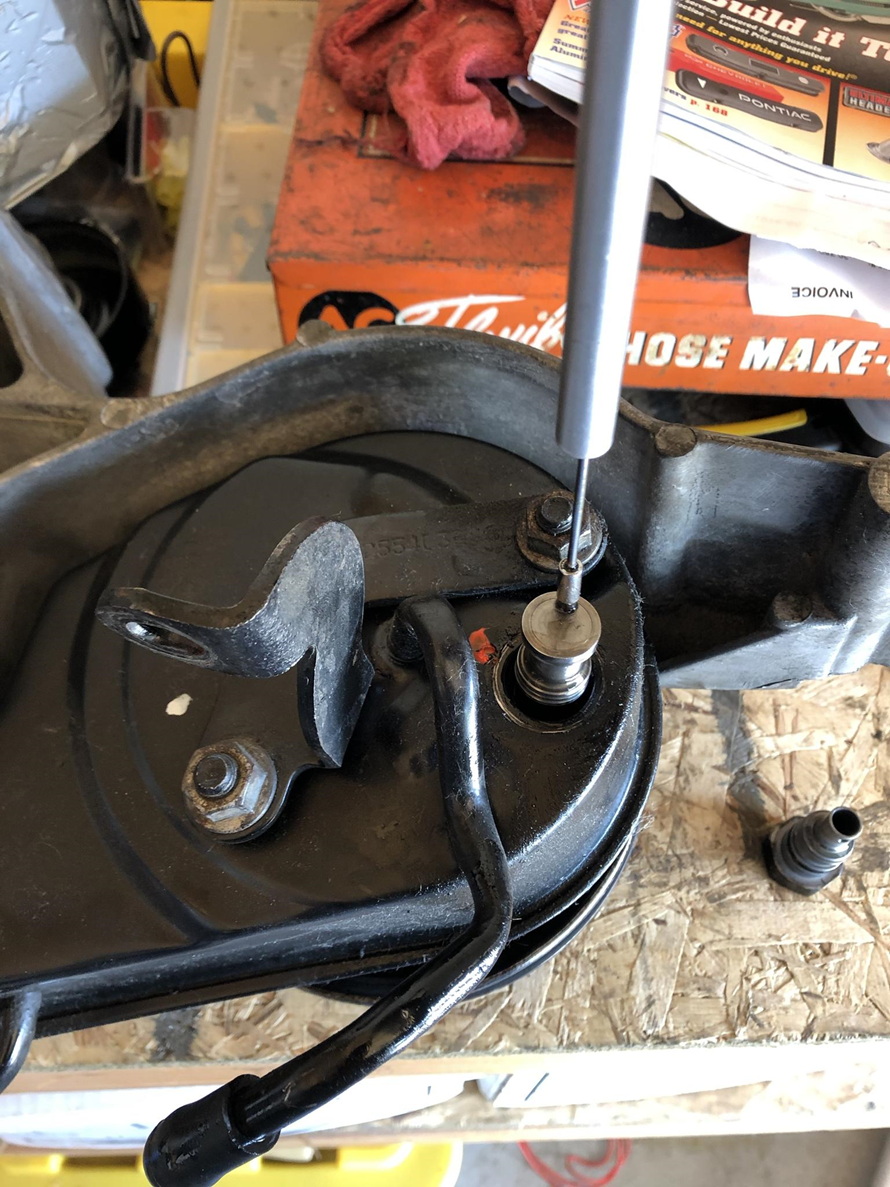
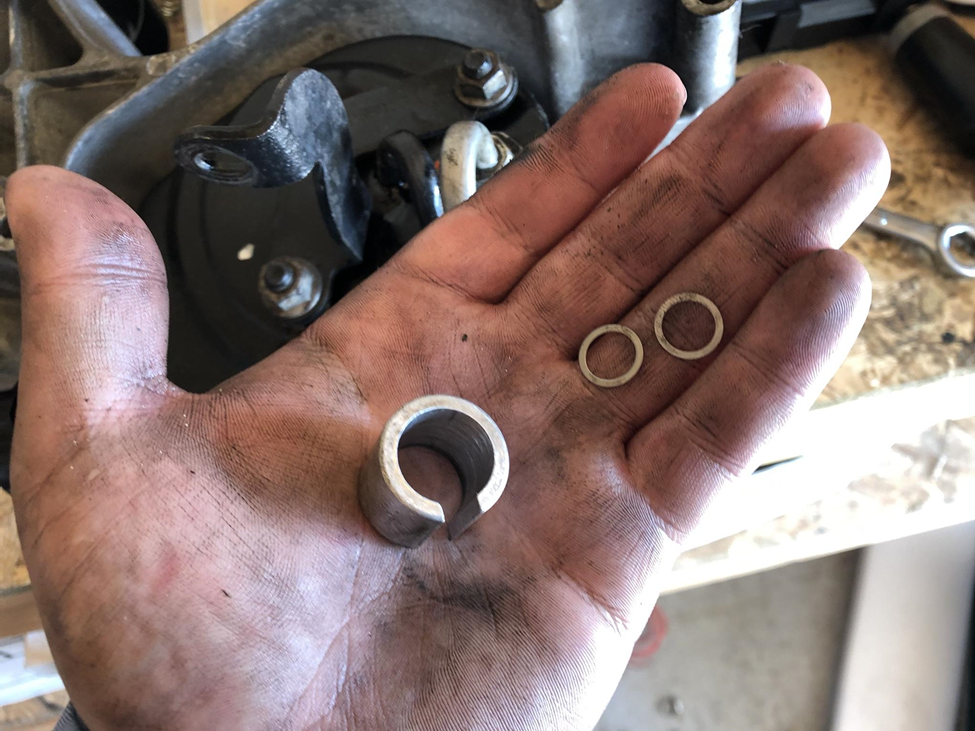
Next slide the cover provided in the Borgeson Power Steering Flow Valve kit over the flow valve and clamp it into your bench vise. Be sure to use this cover, as any damage or scratches to the surface of the valve will cause it to stick. Next slowly remove the 7/16 in. (11mm) bolt from the valve, being careful not to lose the spring check ball or pintle.
If there are any shims present, remove those and install the correct number of shims to meet the approximate pressure that you desire. Knowing that the truck outputs 1,500+ psi, based on the chart that Borgeson provides, I’m going to use three shims trying to get to the 1,100-1,200 psi range. (It would turn out that four shims was the magic number for the “right” steering feel my application.) If you have a power steering pressure tester, you could, through trial and error, dial the pressure in perfectly, however I’m just guessing. Reinstall the spring, pintle, and check valve into the flow valve with your desired number of shims and reinstall into the back of the power steering pump.
Next, install the power steering pressure hose to the pump and re-install the pump and bracket assembly and alternator back to your engine. Now we’ll center the new steering gear. To do this you’ll need to know the total turns side to side. On your workbench, take the new box and turn the steering input shaft all the way to the left, then count the number of rotations to the right. It should be three turns on the Borgeson 800 box. Turn the box 1.5 turns to the left, and this should be center. You can check this, because the master splines on the bottom should be at three, six, nine, and 12 o’clock positions. I suggest taking a paint marker and drawing a line from the input shaft to the body of the pump to designate center in case it moves during install.
From under the car, lift the steering gear back into position and install the three 17mm bolts to the frame to hold the gear in place. Next, install the steering shaft to box, and then the pitman arm. I run the nut alone up to push the pitman arm into place, then remove and install it with the lock washer. Make sure your steering column is locked and use your muscles to torque the pitman arm nut to 150 ft.-lbs.
Now reconnect your power steering lines to the pump and refill the reservoir with fresh power steering fluid. You may notice a metal canister on my return line from my power steering pump, this is a power steering filter, this helps keep any trash or metal shavings from the gear from entering the pump, not that you should have to worry about it with the new Borgeson unit, but for me it’s peace of mind as I’ve killed three power steering pumps due to contamination in the past. I’d recommend the one from CPP (CLP-PSFFK); it’s a little cooler looking than mine and will protect your pump just as well.

With all of the lines back in place and the fluid reservoir full, reinstall your belt, wipe down any excess fluid, and start the car with the front still on jack stands. Let the pump work for a while and check the fluid level, making sure to keep it topped off. Next bleed the system by turning the wheel slowly to full lock left, holding it there for a few seconds and then slowly to full lock right, again holding it there a few seconds. If the fluid becomes aerated or foamy, turn the engine off and let the fluid settle, and start the process again until there is little to no groaning or noise coming from the PS pump or box.
Once the box is bled, check for leaks, reinstall your wheels and lower the car back to the ground. If you have adjustable steering stops on your lower control arms, you might want to adjust them to prevent rubbing if you have wider than stock wheels and tires.
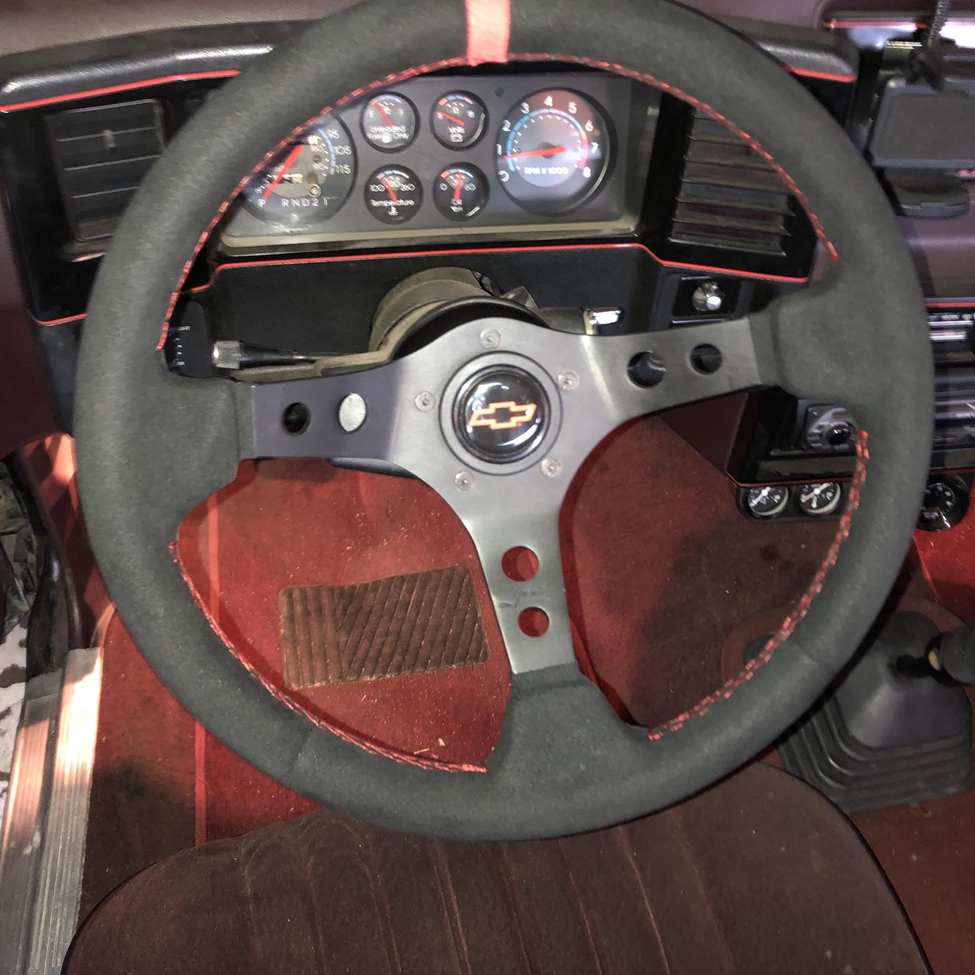
Now that I had a modern power steering box, I felt like updating the steering wheel to something a little bit more modern as well. I bought a Grant 695 suede wrapped steering wheel (GRT-695) and Grant Wheel Installation kit (GRT-3196), as well a the Grant Chevy Bowtie horn button (GRT-5660). Don’t get me wrong, I love the looks of the factory steering wheel, but with it’s thin grip and 15 inch diameter, it doesn’t feel suited to carving corners.
To install the Grant steering wheel, first disconnect your horn under the hood, or remove your horn relay. If you don’t, the neighbors aren’t going to like you very much. Next pull of the center cover of the wheel and remove the three plastic screws holding the horn contact. Next remove the snap ring and steering wheel nut. Using a steering wheel puller, remove the factory wheel.
From here you’ll notice a small spring loaded aluminum pin sticking out, this is the horn contact. At the base you’ll see a small plastic tube with a locking collar in it. Remove the locking collar, spring, and contact and run the horn contact cable that comes in the Grant installation kit through the lock collar, install the longer spring and install into the plastic tube.
Next take the Grant three-bolt adapter and push it over the splines on your steering wheel. Route the wire according to instructions and through the trim cover. Then install the three- to five-bolt adapter that comes with the wheel, reinstall the factory steering wheel nut and lock ring. Next take the horn button ring and wheel and install the five bolts that hold it to the adapter. Then install the horn lead to the button on the inner contact and push the button into the horn button bracket. Re-install your horn wire(s) under the hood and enjoy your new wheel.
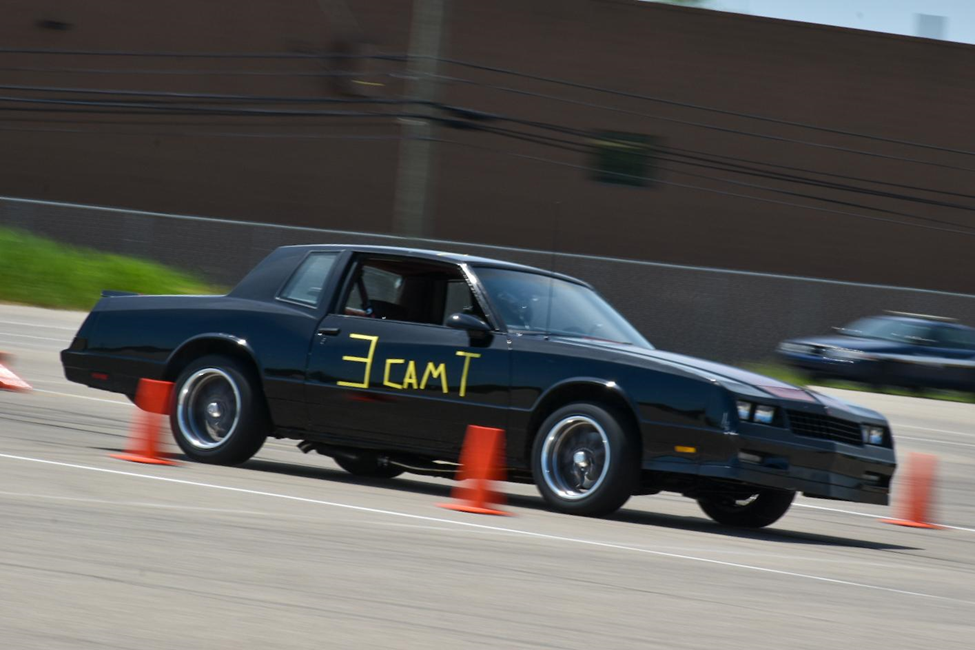
Well with the new steering box, wheel and UMI Roto-Joint lower control arms I was ready to hit the autocross course…or so I thought.
I had the pleasure of being an autocross instructor for the Detroit Region SCCA Solo School, and spent Friday evening, and all day Saturday teaching people new to autocross how to drive fast. My students made great progress through the day, we wrapped up around 8:00 pm. The next day the Detroit Region SCCA would host Summer Heat Solo Autocross. I arrived early to work tech inspection. I decided to let my friend Santiago (@escuderiaborica) who usually runs a stage rally Subaru BRZ co-drive my car. We made our runs and the car was definitely better, the steering was much more predictable and tighter through the slaloms. but there was WAY more body roll than I had remembered. The car was a handful to get around the course, but really fun to drive and according the track announcer, the Summit Racing Stage III LS Cam and 3 inch exhaust sounded “filthy” out on the track. I’ll take that as a compliment.
That being said, I ended up 2nd, and Santiago 3rd in our class and the car looked amazing on course.
After the event, I took the car home and investigated the body roll situation. Apparently, I hadn’t torqued the sway bar end links down since the last time I had the front end apart!
Tech Tip: Even if you’re exhausted from a day in 90 degree heat teaching baby autocrossers how to drive, give your car a once over before you go to race, check your sway bar end links, control arm bushings, and ball joints for play.
All in all, the Borgeson box delivered on the tight steering it promised, the Grant Steering wheel made the car easier to control, the FABBot AR5 swap kit stayed together, and I had an absolute blast!
Travis, these articles are great. I know you’ve been doing them for a while, but I only just found them. As a fellow G-body owner (79 El Camino), these are very relevant to me. My Elco has a factory 4-speed, so I’m curious how close the AR5 shifter would come to fitting the factory shifter location. I doubt I’ll ever have over 300 HP in my car (it has the original 305 and 3.08 rear end today), so I’m sure the AR5 would have no trouble.
As an aside – I see from the byline that you were a frequent visitor on the old Kinja oppositelock. If you’re not there already, I know we’d love to see you at our new home, opposite-lock.com.