I’m in the process of tuning up the HEI distributor in my 350 small-block Chevy. The engine has a mild cam. My understanding is that to re-curve my distributor it needs to be tested on a distributor machine. Where I live this isn’t an option. So what other options do I have other than guesswork? — J.D.
Jeff Smith: While using a distributor machine is one way to set up an advance curve, it isn’t necessary. This task can be accomplished without removing the distributor from the engine.
Several kits are available for the HEI distributor. Most contain both weights and springs. We’ll focus on how you can create your own custom curve and all you need is a timing light, an accurate tachometer, a pen and paper, and perhaps a friend to help record the information.
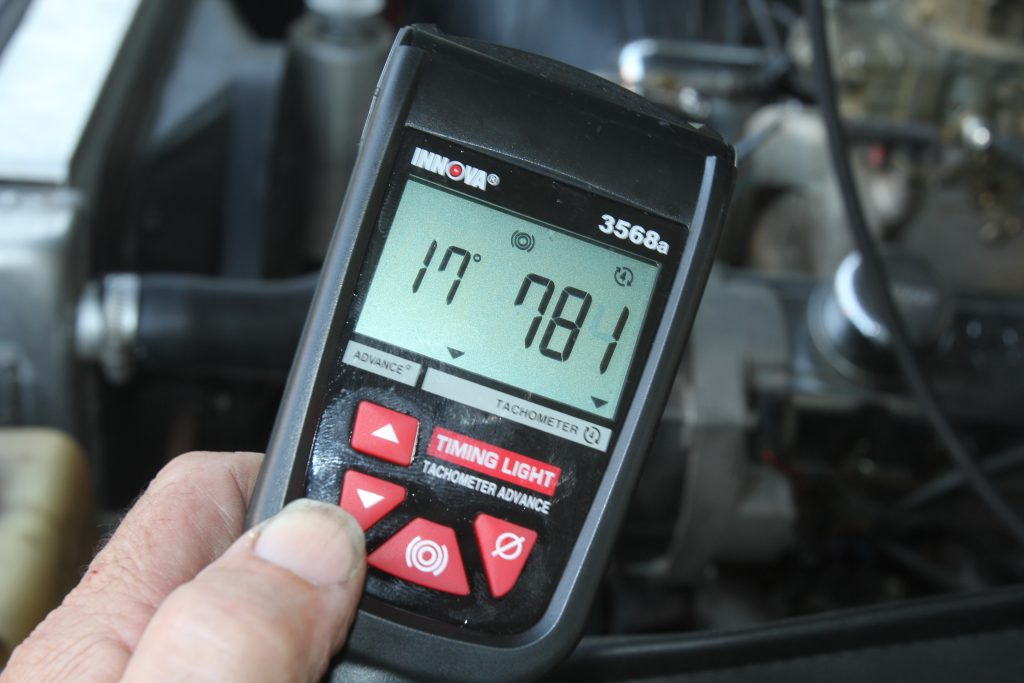
This task is much easier with a dial-back timing light. The dial-back models allow you to dial the timing to indicate zero on the timing tab while the light displays the actual advance. Plus, the light that we use, an electronic Innova timing light, will also display the rpm which is very convenient.
If your timing light is the more traditional style, that can still work. For this process to work, it’s important to be able to clearly read timing marks on the balancer. If your balancer isn’t degreed, MSD sells a white, adhesive timing tape sized for several diameter balancers. If you’re in a hurry—you can make your own with a length of masking tape.
Here’s how to make the tape. We’ll use an 8-inch balancer for our example. First, we must determine the circumference of the balancer.
The formula for circumference is Pi x diameter so for an 8-inch balancer, this would be 3.1416 x 8= 25.13 inches. To get the equivalent of 10 degrees we would divide that 25.13 by 36 (360 degrees in a circle), which would be 0.698— call that 0.700-inch. Every two degrees would be 25.13/180 = 0.1396—we’ll round that to 0.140 inches.
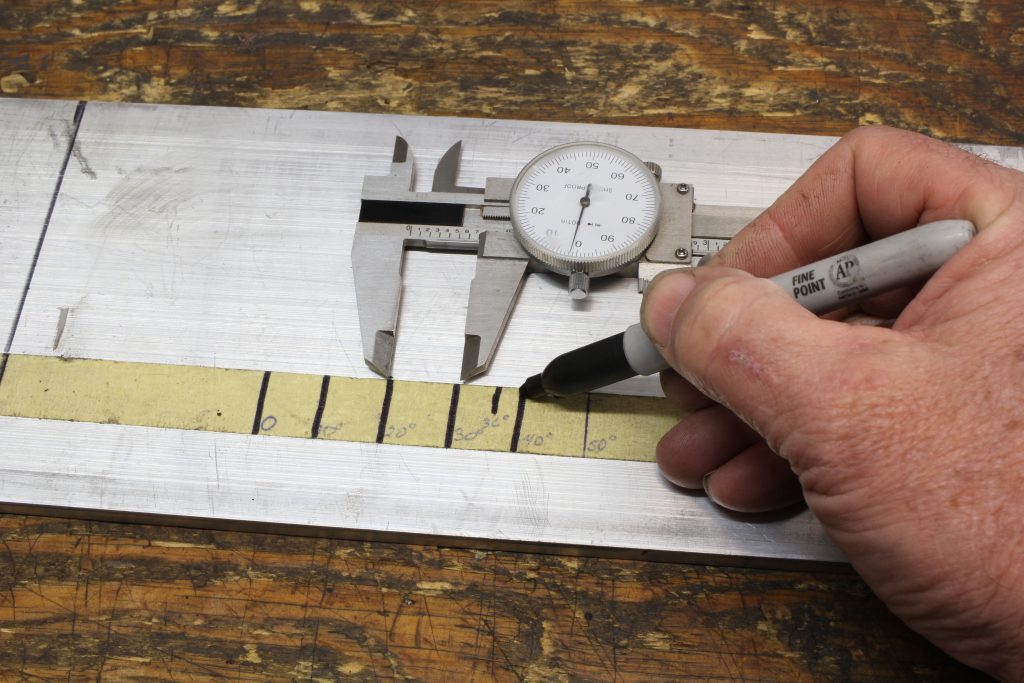
Next, lay a 12-inch long length of tape on a piece of clean, flat metal stock. Make a heavy TDC mark that will line up with the balancer zero line and then use a dial caliper to set up 10-, 20-, and 30-degree timing marks. Then use the caliper to make 2-degree tics in between those larger 10-degree increments and you have just constructed a homemade timing tape.
Next, hook up your timing light and tachometer and create an rpm curve like the one we’ve included on a sheet of paper. You can change the rpm increments if you desire. Disconnect the vacuum advance line to the distributor and plug the hose from the carburetor.
Start the engine and make sure the trans is in Park (or neutral with a manual trans) with the parking brake on. Remove the air cleaner so you can operate the throttle linkage while watching the timing light. You will rev the engine to one of the rpm numbers while you watch for the amount of timing indicated on the tape.
Have a friend write the numbers on the chart as you rev the engine and call out the rpm and advance. What you are doing is using your engine as a distributor machine.
Keep in mind that the number you read at a given engine speed will be the combination of initial timing at idle and the mechanical advance. As an example, if the initial timing is 10 degrees Before Top Dead Center (BTDC) and the total timing at 2,000 rpm is 20 degrees, then you have 10 degrees of mechanical advance at 2,000 rpm.
We’ve plotted a typical mechanical advance curve in the accompanying chart.
Each engine will want a specific advance curve but for a typical street engine with 9.0:1 compression and pump gas, this will be pretty close and would certainly work to begin your effort. Don’t just automatically choose the two lightest springs in the kit. Our experience has shown that mixing a light spring with a heavier spring tends to work best, but ultimately you will have to experiment to come up with a suitable curve.
A common mistake is to use the lightest springs and bring the curve in very quickly. Unfortunately, light springs often struggle to pull the weights back into the base (zero advance) position. This allows the engine to idle higher than normal because it has more timing at idle. That’s one of many reasons why slightly heavier springs tend to work better.
If the engine wants more timing down low, consider adding more initial advance. This, of course, adds to the total timing at maximum advance so it’s a balancing act.
Another crucial point is that up until now, all these changes have only addressed the rate of advance, not the total.
The total mechanical advance is limited by the length of the slot that contains a pin. The travel of the pin in the slot determines the total mechanical advance. Changing the amount of advance requires modifying the slot.
For factory distributors like your HEI, if more mechanical advance is required, the slot will need to be lengthened by grinding the metal with a die grinder. If less mechanical advance is demanded, the slot needs to be shortened with a weld or possibly a heavy-duty epoxy like JB Weld.
MSD distributors operate similarly but use bushings of various diameters that determine the travel in the slot. This makes it easy to customize the total mechanical advance.
So far we haven’t talked about the vacuum advance. It’s a completely separate advance determined by engine load as dictated by engine vacuum. We’ve addressed that issue before in this column and you can read that here. These two systems must work together. Many tuners merely disconnect vacuum advance thinking it isn’t necessary, but that article will outline why it’s important as a load-based timing curve.
Don’t be afraid to try several sets of springs to come up with the mechanical curve your engine prefers. Pay attention to what the engine is telling you. Rely less on a pre-determined magic number and just give the engine what it wants. It will tell you when it’s happy.
You can also tailor the centrifugal advance even further by…
Need more “initial” advance but also need to keep it easy to start? Use one extremely light spring on one weight, and a heavier spring with a bit of “slack” on the pins on the other. The light spring will keep the weights seated while cranking but the light spring and the slack heavier spring will instantly allow advance the moment the engine fires.
Mixing the spring tensions will let you utilize a non-linear curve if you need less advance at lower rpms where the engine might be under heavier loads and more as the rpms increase and load decreases.
On Ford distributors with limiting “tabs” you can cut a small piece of clear vinyl hose and slip it over the tabs to reduce the amount of total advance. Gluing a larger piece of hose over a smaller one can give you more.
If you’re REALLY serious, you can modify the advance weights fulcrum point to produce the exact curve your engine needs, but this is well beyond the realm of tuning without a dyno… 🙂
Ive seen that stated but in my case I might need to increase my mechanical advance. From all the math I have done for a starting point it seems like I need 24* to 26* mechanical advance. I can get 26* in the form of a 13L slot but I don’t know if there is a factory slot that provides 24* mechanical advance. I know 10L and 13L seems to be the more sought after ones.
I kind of hope my new cardone steel geared DSII dist has a 10L/13L advance in it, one guy I know on a forum said his had it but didn’t state if it was their ’85 Mustang dist with the steel gear or not.
Hey Jeff,
I have this 306 I am slowly piecing together for my truck, 5,250 GVW is what it is and I have been doing a lot of reading to figure out a good starting point that will get me very close for a initial start to fine tune it hopefully with minor adjustments if at all possible.
For me my engine build specs are as follows
1) 306 short block
2) AFR 165 Renegade heads 1.90″/1.60″ valves 58cc heart shaped chamber
3) 1.6:1 Scorpion roller rockers 7/16″ stud
4) Edelbrock Performer intake (daily driver street truck)
5) 1″ divided phenolic spacer (to help with heat soak that is quite common here in Texas)
6) Summit 600 cfm carb vac secondary (installed a holley secondary quick change kit to make life easier)
7) Cardone new distributor DSII for a ’85 Mustang 302 with steel gear
8) Crane Truck max hydraulic roller cam (216*/224* @ 0.050, 278*/286* Advertised, 0.520″/0.542″ lift, 112* LSA, 107* ICL, 117* ECL, 1400-5400 operating range, 2400-3000 cruise rpm, 6000 rpm redline)
9) 9.5:1 compression
10) Hedman shorty street headers (listed for 86 – 96 f-series trucks)
11) off road Y pipe 2 1/2″ (86 – 96 f-series trucks)
12) Magnaflow XL 3 chamber 6″ round 2 1/4″ (close to stock size round muffler used on 80 – 85 F-series trucks)
13) 2 1/4″ stock mandrel bent tail pipe (83-86 only way to obtain 2 1/4″ size, correct ’82 is in 2″ which isn’t oem spec)
Main goal for this truck is daily driving and maybe towing one day. I will be making changes to the transmission as well as changing the rear axle ratio later on as well.
From the reading I have done it seems like I should be around 37* to 39* total timing for 9.5:1 compression ratio for most fords. I also see that for heart shaped chambers such as the AFR heads I will be running it is required to have 36* to 38* total advance. For me this puts my total in the area of 37* or 38* as a starting point.
Furthermore from the reading ive done I seen it stated for 270* duration cams with an expected idle speed of 600-800 rpm to run 10* – 12* initial advance and for 280* duration cams with an expected idle speed of 900-1000 rpm to run 12* – 14* initial. My plan from the start before I read this was to start off with 12* initial as that’s what my stock smog 302 loved.
So with 12* initial in mind with a 37* or 38* total it means I need to ensure the mechanical advance on my dist is around 24* or 26* to put me at 36* total timing or 38* total timing.
Engine builder I know he personally told me Fords don’t like a whole lot of timing and told me to keep my total timing around 34* to 36* which is possible if I run 24* mechanical advance.
Outside of that the Crane distributor tuning kit I have lists what springs to run for a given full advance rpm, saw one review that stated FAST was sold this advance kit by crane and neither knows the specs of the silver springs which I don’t know how true that is but from the reading I done, for high performance applications it states to run all advance in around 2,500 rpm to 3,000 rpm and in towing applications or heavy load use to delay total advance till 3,500 rpm or around there. From the paperwork in my kit I can achieve that they say by using a silver spring and a stock light spring for 3,500 rpm full advance.
My big question to you is does this all sound like its sound planning for an initial starting point? This is going in a old ’82 style side truck with a heavy C6 that currently might be worn out with excessive slippage but I want to rebuild it and upgrade it with some more modern parts, a wide ratio planetary gear set for lower first and second gears, and a hughes XT series converter. Rear axle I want to get rid of the 2.75:1 gears and drop in a curry 9″ third member hopefully in 3.25:1 if the slippage of the rebuilt C6 isn’t too high. I will be doing quite a bit of highway driving after I move and want to keep highway speeds of 65 mph to 75 mph between 2,400 and 3,000 rpm if possible.
If you can provide some insight to this, I would greatly appreciate it. Im new to this aspect of tuning and trying to learn this to do the work myself so I can fine tune vs shipping the dist out to someone else to set it up on a distributor machine.