
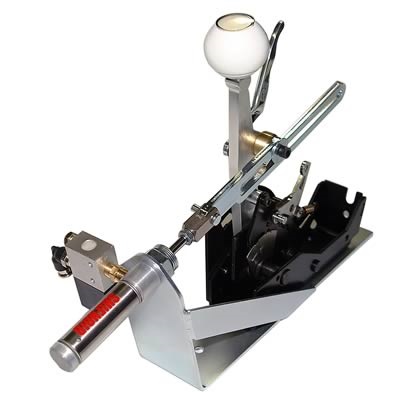
Here’s a close look at an air shifter. While operating, when charged with gas by the solenoid, the cylinder moves the shift lever. There are many air shift kits designed to convert a conventional shifter to CO2 use. This particular example is designed as a dedicated CO2 shifter. (Image/Wayne Scraba)
Not long ago, few people had ever heard of an air shifter.
Today, at every drag strip in the world, they’re about as common as a radial slick.
Wherever they’re class legal, air shifters have turned manually shifted automatic transmissions back into “automatic” transmissions. The reason is simple: Well-executed first gear changes aren’t easy to accomplish with a hard-leaving race combination.
For example, in something like a mid- to upper-class NHRA Super Stocker, the one-two gear change can occur within 1.5 seconds of leaving the starting line (or at approximately the 80-foot mark of the track).
Think about that for a moment. Before you can count to three after launching, you have to shift. Moreover, in a car like a Super Stocker, the g-forces at launch are often considerable. A quick SS car such as this can deliver just under 2g of force on the launch, then drop to just under 1g right before the gear change.
Couple the g-forces with the incredibly short time between the gear change and you can see where an “automatic” shift can become desirable. And in a Super Stocker, these considerations don’t take into account the obligatory wheel stand (which obviously makes things even more entertaining). With a Comp car, the situation is similar, but things happen even faster and in most cases with larger g-forces present.
Perhaps the best feature of an air shifter is the fact that it allows you to keep both hands on the steering wheel.
The first generation of air shifters typically accomplished one goal: They shifted the transmission from first into second.
In a three-speed transmission, the two-three shift was up to you. Shifters that handle the one-two shift are still common (and of course, all that’s required with a Powerglide).
But with the popularity of three-speed automatics in drag cars, it became clear to both the racers and the manufacturers that an automatic two-three shift could also be desirable.
Given the mix of automatic transmission configurations in use today, coupled with the different designs of air shifters on the market, there’s much to consider and there are several options. In the end, you have to ask yourself which air shifter design best suits your needs. You also have to figure out exactly what to look for in an air shifter. That’s where we can help.
How to Choose an Air Shifter
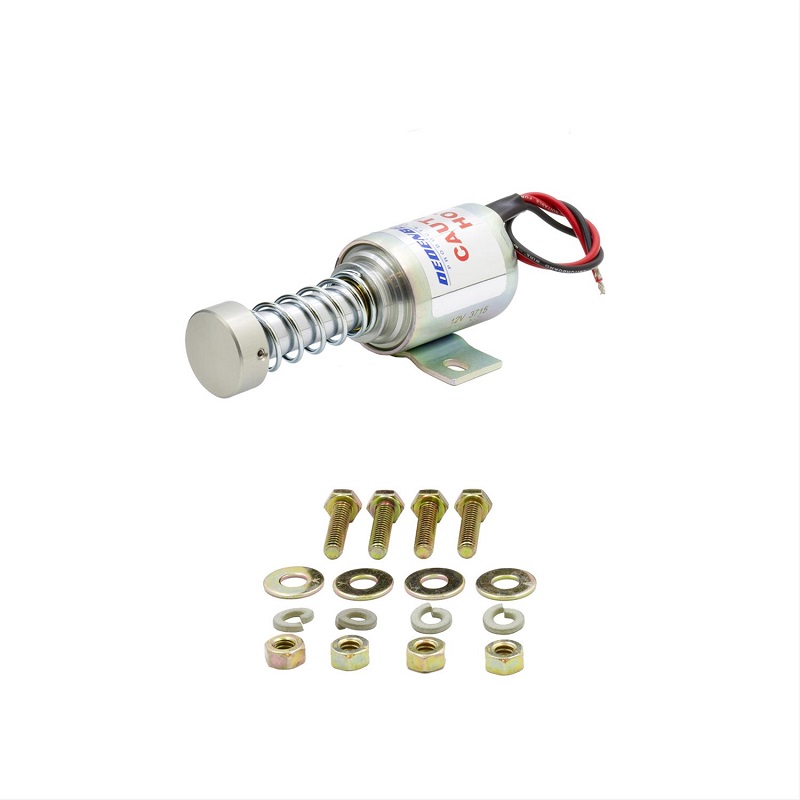
The “brains” of an air shifter is the electric solenoid (this is a Dedenbear solenoid from Summit Racing). The solenoid must be mounted solidly then the supply hose needs attached to the bottle regulator. A length of hose is attached to the shifter actuation cylinder. Wiring the solenoid is easy: The solenoid is grounded with one wire while the second wire is routed to an RPM switch (ignition box or RPM control box). An alternate method of installation has a wire leading to a steering wheel-mounted push button switch. In this system, the driver will have to initiate the gear change, and there is no automatic shift capability. (Image/Summit Racing)
According to air shifter manufacturers, the place to begin is the air supply tank or cylinder.
In practice, an air shifter requires a supply tank (CO2 or compressed air), a regulator, and a three-way 12-volt solenoid valve to allow air or CO2 to pass to the actuation cylinder (ram) on the shifter when a gear change is required.
There are two basic ways to command a gear change:
- Using an RPM switch that sends a pulse of electric current to the solenoid valve at a pre-set engine RPM.
- A manual switch activated by the driver (typically a push button mounted on the steering wheel).
Many manufacturers believe a CO2 shifter is superior to a more conventional compressed-air shifter.
Compressed gas (CO2) is usually good for 400 or more shifts, depending upon the application. Meanwhile, compressed air usually has a 10-pound (PSI) loss for every shift. The shift quality declines rapidly on every gear change. With a compressed-air setup, the actual air will deplete very quickly and you can’t always be dragging an air tank through the staging lanes.
You also have to remember that compressed air is not as accurate. Typically, a complete fill of a liquid CO2 bottle will cost a couple of bucks and will last for 500 (or so) runs. Remember too that a Powerglide shifter or an air shifter that only has a one-two shift will consume less CO2 than a three-speed air shifter.
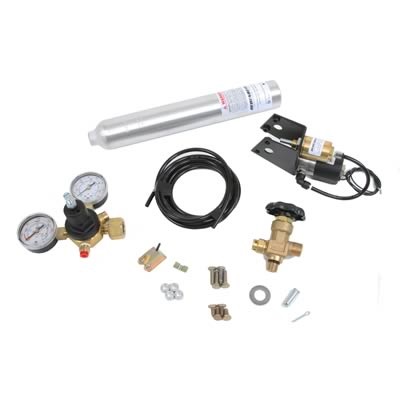
This Dedenbear air shifter kit (available with or without the CO2 bottle) is for a rear exit Hurst Powerglide Quarter Stick II with a rear exit cable. This photo shows the deluxe kit. (Image/Summit Racing)
Tips for Mounting CO2 Bottles
When it comes to mounting CO2 bottles, there is some misunderstanding within the racing community. Some manufacturers don’t like to see bottles mounted upside down (don’t laugh—we’ve witnessed this mounting procedure). Meanwhile, others maintain that the CO2 bottle must be mounted vertically. If mounted at an extreme angle, there is a good chance the CO2 will siphon (liquid) when the bottle is full, which makes the solenoid vulnerable to freezing.
Some manufacturers recommend either mounting the bottle upright or mounting it so that the regulator is facing forward.
You don’t want liquid CO2 to siphon out of the system which can happen if the bottle isn’t mounted correctly.
If it does siphon, and the regulator is equipped with a bronze filter (high-quality regulators have this feature), the liquid CO2 can freeze the filter.
There’s more to bottles than meets the eye: It’s a good idea to ensure bottle quality before buying a unit. You want a CO2 bottle that has a DOT 1800# rating. It’s a sanctioning body requirement and the rating should be stamped onto the body of the bottle.
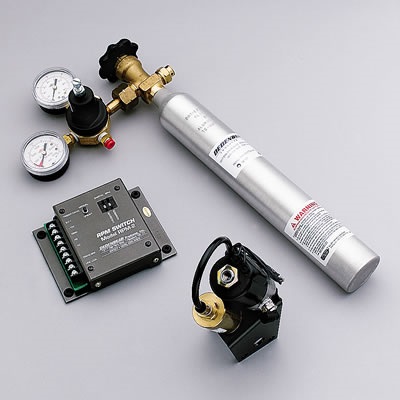
This is a complete Dedenbear CO2 shifter setup for a Turbo Action Cheetah shifter. The assembly is pre-assembled, and all you have to do is bolt it to the shifter, plumb the airline, and install two wires. (Image/Summit Racing)
As far as attaching the bottle, several manufacturers supply a sanctioning body-approved bottle clamp system (two clamps). It’s manufactured in a plastic material that serves to damp vibrations (especially important with regard to the regulator). The regulator is somewhat sensitive to vibration, which can be directly transferred from the chassis by way of solid, billet clamps. A vertical side mounting is possible if a roll bar or chassis member is convenient. Additionally, many chassis shops offer a set of fabricated mount brackets for bottles, which may be more practical in some applications.
Something else to note: You should not mount a C02 bottle in a spot that can receive direct sunlight. The heat from the sun can raise the temperature of the CO2 bottle, which in turn, raises the CO2 pressure. At 3,000 psi, the bottle safety disk will rupture and you’ll have to buy a new one.
With most systems, the CO2 gas pressure is regulated to approximately 90 psi for normal conditions. The tank pressure can be monitored to a certain extent by using the regulator gauge. It will register approximately 800 psi at normal temperature levels. When the pressure falls below normal levels, it indicates that the bottle will need refilled shortly.
Typically, you can refill CO2 bottles at welding and fire extinguisher supply companies.
An empty bottle will require 10 ounces maximum of liquid carbon dioxide. You should treat CO2 like you would nitrous oxide. For complete accuracy, weigh the bottle. Don’t rely upon the gauge entirely as a point of reference.
Shifter Cables
Little items such as shifter cables can become a source of frustration. Some cables don’t like to make tight bends. For example, a B&M-style cable makes bends easily. Morse cable cannot. On the other hand, extremely tight bends in any type of shifter cable can have an adverse effect upon shifter performance. The same applies to transmission lever hardware. You should look for sturdy, easy-to-find hardware along cables that are easy to source.
Shifter Design
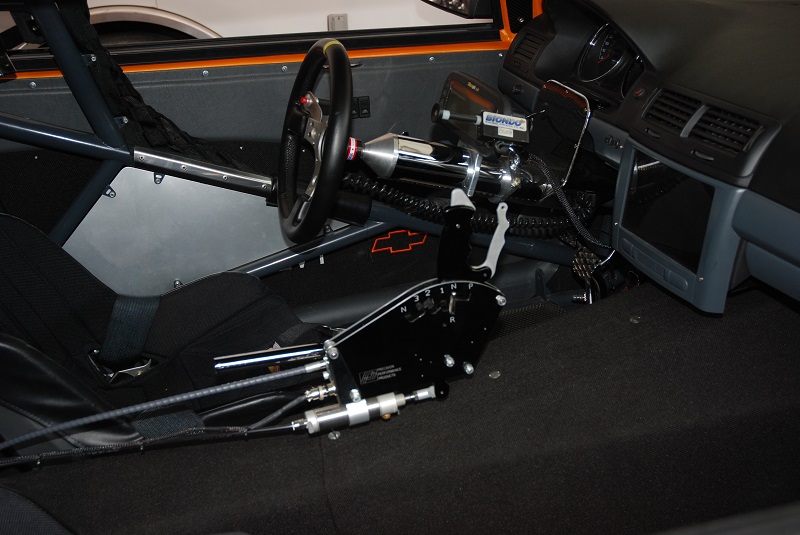
(Image/Wayne Scraba)
When you look at an air shifter, keep in mind that some use multiple actuation cylinders that are designed to bring in a 1-2, then a 2-3, shift. With some shifters, there is as much as a 30-degree impact on the handle to accommodate the multiple rams. Obviously, this misalignment doesn’t help from the accuracy department.
When shopping for a shifter, make sure it’s designed so that it won’t over-shift. You want a positive shift gate so it won’t miss a gear change. As far as detent adjustment is concerned, it’s important as well.
Shifter Configuration
When ordering parts, be sure to specify the exact type of shifter you have.
In many cases, it’s possible (but not recommended) to operate a reverse-pattern transmission with a forward-pattern shifter. If that’s the case, the air shifter won’t work correctly.
There’s more too: A standard or forward-pattern shifter has a standard shift pattern of PRN321. A reverse-pattern shifter refers to a transmission valve body with a shift pattern of PRN123. Normally, the reverse pattern is used in a modified drag race transmission (trans brake, manual valve body etc.). Forward- or reverse-pattern shifters don’t mean that you have to specifically pull or push to shift. This is determined by the shifter configuration.
Shift Detents & Installation
You should also consider the shift detents when installing the shifter (this is a critical step). Many air shifters can be operated manually (without any CO2). Given this feature, you can easily set the shift cable travel so that the shifter detents and the transmission detents are identical.
Detents on the transmission are simply the “clicks” where the transmission arm goes into the next gear. If the detents don’t match, you can create a missed shift or an over-shift situation. The cable arm on the transmission must be correct for the application (for example: Turbo 400 for a Turbo 400 transmission) and of course, correct for the shifter used. The length from the center of the shaft on the transmission to the attachment hole for the cable must match the ratio of movement of the shifter.
Supply Lines & Installation
Another common problem with air shifters is incorrectly installed supply lines.
The manufacturers suggest one of the biggest issues with air shifter installations is that people don’t read the instructions, and end up hooking up the supply lines backwards.
Front Exit vs. Rear Exit Cables
Here’s a Shiftnoid CO2 kit from Summit Racing. It’s designed to fit a Hurst Quarter Stick or B&M Pro Stick (front cable mount). Like the Dedenbear kit, this setup is pre-assembled.
Finally, what’s best—a front exit or a rear exit cable? Some shifters are “convertible,” which means they can be converted from front to rear, or vice versa. Usually, the type of shifter and the mounting arrangement determines which exit style is incorporated.
In a typical door car, a rear exit cable will eliminate at least one bend in the cable and also allow for a shorter cable. Keep in mind that some transmission types mandate a specific shifter configuration.
…
As you can see, there is more to air shifters than first meets the eye. But in operation, they’re hard to beat.
Great info Thanks