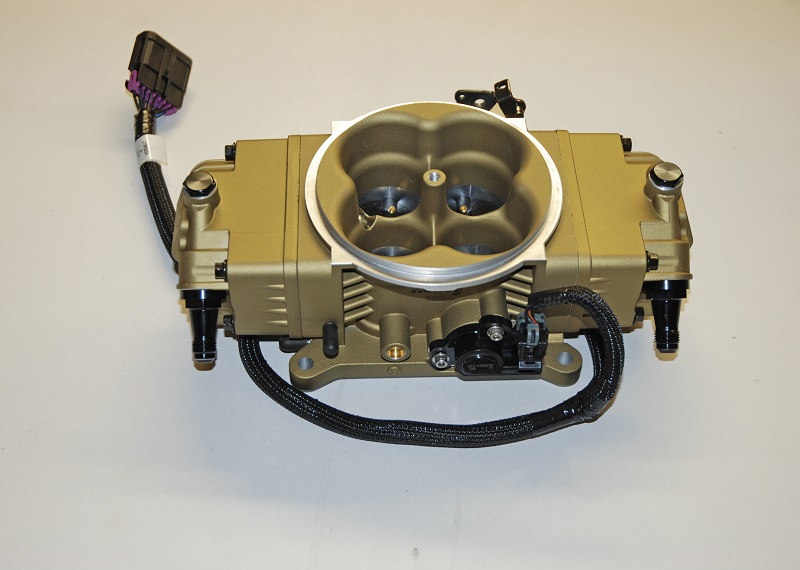
Holley Terminator Stealth EFI throttle body. (Image/Wayne Scraba)
Last month, we took a close look at MSD’s entry-level Atomic EFI in the first of our articles designed to demystify electronic fuel injection for anyone interested in converting from carburetion who is intimidated by the wiring and computer aspects of EFI.
This is our second attempt.
With the Atomic EFI, MSD simplified installation, eliminated the need for a laptop computer, and priced the electronic fuel injection system in a budget-friendly way.
MSD’s sister company Holley Performance Products wasn’t going to let MSD have all of the fun, so Holley’s product engineers took to reworking and reconfiguring the Holley Terminator EFI system to make it more user-friendly.
Enter Holley’s Terminator Stealth EFI system.
The reengineered system is named “Stealth” for good reason—the throttle body system lives in a package that looks remarkably like a good old-fashioned 4150 Holley carburetor.
Here’s how Holley describes the new system:
“If you want the benefits of fuel injection but you don’t want to give up the classic look of carburetors, Holley gives you the best of both worlds with their new Terminator Stealth EFI lineup. With the stealth system, you get the same great features found in the Terminator EFI, but with the looks of a Holley carburetor. The Stealth EFI incorporates four 80-pound-per-hour injectors which is ideal for engines producing 250-600 hp. The Stealth uses a Holley 4150-style mounting flange which makes the swap from carburetor to EFI super-easy.”
A Closer Look at the Terminator Stealth EFI System
Throttle Body
The throttle body for the Stealth is all new, but it’s based upon the architecture of the original Terminator.
That Terminator throttle body takes engineering cues from the Holley-engineered system NASCAR is mandating on current Cup Cars (in particular, it incorporates the same air entry and venturi area).

That air entry profile you see here was actually crafted for NASCAR. When they switched to EFI, Holley became the major supplier. They came up with the flowed entry and it’s also used here in the Stealth (which, by the way has a CFM rating of 950). (Image/Wayne Scraba)
The Stealth throttle body flows a considerable 950-cfm.
In addition to its great looks, the way fuel is distributed is a big leap forward.
If you look closely at the photos you’ll note a series of annular discharge orifices machined downstream of the four throttle plates. Holley eliminated fuel delivery issues from outdated EFI designs. There is more fuel flow and these Stealth units also provide superior fuel atomization.
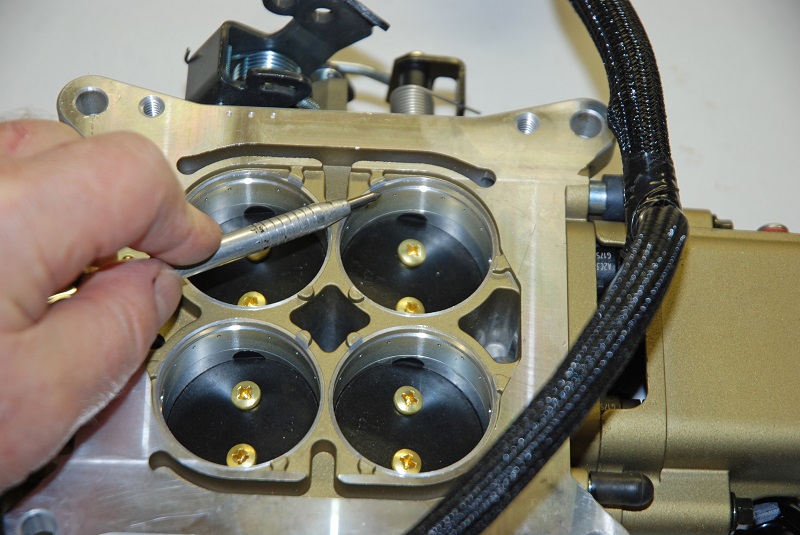
Fuel is discharged into the airstream through these annular discharge orifices that encircle each throttle bore. (Image/Wayne Scraba)
That’s not the only neat feature of the throttle body.
Holley has mounted the four 80 lbs./hr. injectors (@ 43 psi) inside the pair of “bowls.” There’s a throttle position sensor mounted where you’d normally find a carburetor choke. At the back of the throttle body, Holley has included a large full vacuum port for power brakes (also found in many Holley carburetors). The “baseplate” has a pair of additional vacuum ports—one at the back for full manifold vacuum and another on the right for timed spark.
On the left (driver) side, the throttle body has a conventional Holley-style throttle arm, complete with locations for the throttle (cable or lever) along with a conventional return spring.
For GM applications, the throttle arm has positions to operate Turbo 350, 700R4 and 2004R kick-down linkages. Holley offers optional linkage extensions for other transmission applications. Additionally, throttle cable brackets (that attach to the rear “carb” stud) are included for both automatic and stick-shift combinations.
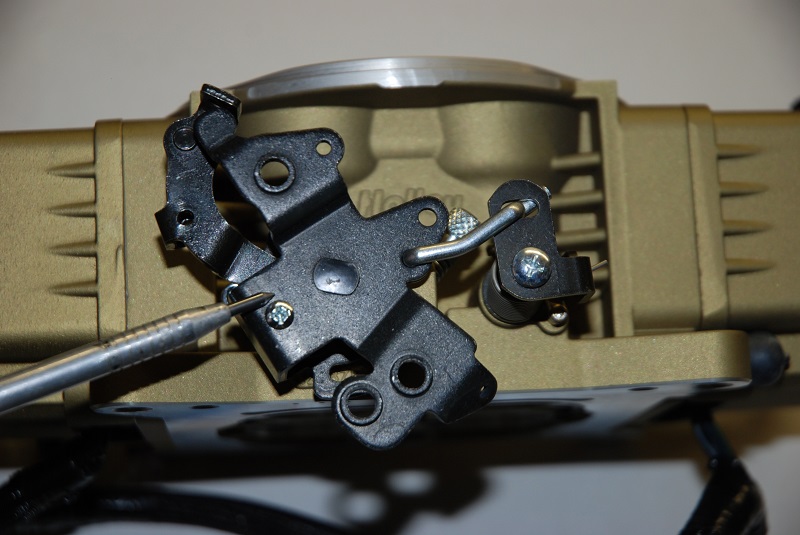
Here’s the basic throttle lever setup. It has locations for the throttle (cable or lever) along with a conventional return spring. For GM applications, the throttle arm has positions to operate Turbo 350, 700R4 and 2004R kick down linkages. (Image/Wayne Scraba)
The throttle body bolts down just like a regular carb, and new studs and a base gasket are included. Upstairs, it accepts a conventional air cleaner stud and you can use any common 4150 air cleaner, including drop base examples (an air cleaner gasket is included with the kit). Each of the “bowls” is fitted with a male AN fitting. Holley includes a dual-feed-style fuel line for the throttle body.
Summit Racing stocks all of the different versions of the Stealth—complete with everything you need for installation (Master Kits), or minus fuel-delivery components (Standard Kits). You can get kits designed to control an electronic transmission (GM 4L80E or 4L60E), or order a kit without transmission control (for example, a stick or a something with a conventional automatic). Additionally, you have a choice of finishes on the throttle body: Polished, Hard Core Gray Anodized, or Gold Dichromate.
About the ECU
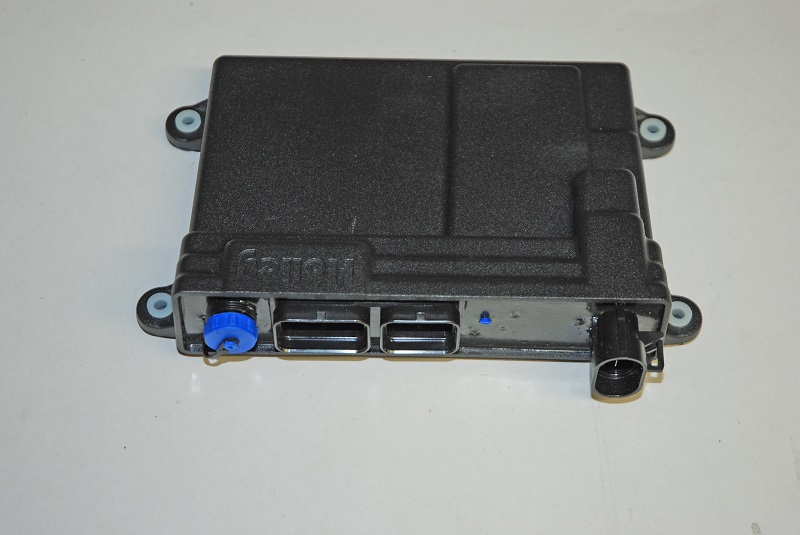
The ECU is essentially plug and play. You don’t have to program anything really. No computer is required, although you can upgrade the ECU (at no charge) to function with a laptop. (Image/Wayne Scraba)
The brains of the system (the ECU, or “computer”) aren’t exactly entry-level. Holley has what might be the toughest ECU on the market (with a robust cast-aluminum body), but it can also be upgraded easily (we’ll get to that in a bit).
The self-learning unit is also incredibly smart and operates by way of feedback received from a wide-band oxygen sensor situated in the exhaust system (header collector). The sensor samples the exhaust gas and determines the amount of oxygen found in it. Then the ECU calculates the required air/fuel ratio from those samples. Essentially, the ECU tells the injector how much fuel to supply for any given situation, and it all happens instantaneously.
Touchscreen Hand-Held Controller
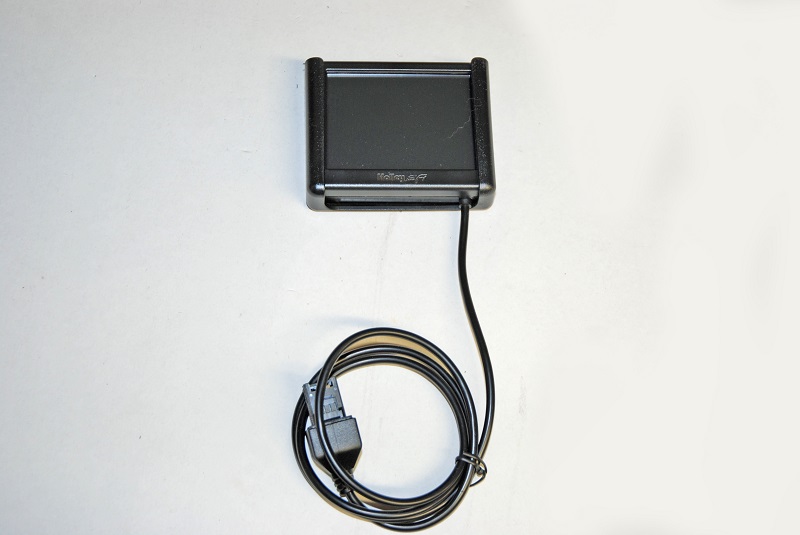
When it comes to system calibration, all you have to do is to run through a series of questions that are displayed on the hand-held touchscreen controller. (Image/Wayne Scraba)
With this system, you don’t need a laptop or any computer skills whatsoever. You don’t have to program the system. Holley includes a 3.5-inch handheld control device for setup and it functions via touchscreen.
All navigation is done through “touching” an icon or button on the screen. It couldn’t get easier! Here is an overview of the different types of adjustment screens that are used in the display, and that may be utilized when tuning or making selections:
The Home screen has four options:
- Tuning
- Monitor
- File
- Wizard
According to Holley: “Tuning allows for various parameters to be easily adjusted. Monitor provides a variety of gauge and dash displays. File is for saving and loading files. It also shows information about the ECU and the handheld controller. Wizard creates a base calibration and performs the TPS Autoset function.”
Upgrading the ECU
With the Stealth EFI system, if you want to fine-tune or customize engine calibration, you can upgrade the ECU for free by downloading the update from Holley’s website, which then allows the Stealth EFI unit to be tuned by laptop computer.
Doing this allows users to use the Stealth EFI in LSX, boosted, or nitrous applications.
…
Installation Tips
Three things you must do and keep in mind before firing up the vehicle:
- Rework the fuel system.
- Add a bung for the O2 sensor in a header collector or exhaust downpipe.
- Connect power to unit only after all other wiring work is complete.
O2 Sensor Installation
A big part of the Stealth “intelligence” is the wide-band oxygen sensor. It’s the key for self-learning. Stealth EFI self-tunes as you drive, maximizing fuel economy and power from your engine. A cool part about the Stealth package is the way the O2 sensor is mounted.
While it’s possible to weld a bung into a header collector (or exhaust downpipe) where all cylinders on the bank converge, it can also be bolted in.
When drilling the hole for the sensor, Holley notes there must at least 18 inches of exhaust pipe after the sensor. If your vehicle has catalytic converters, the oxygen sensor must be located between the engine and the catalytic converters. Additionally, the sensor hole should be mounted at an angle. This helps prevent condensation in the exhaust tubing from entering the sensor. The sensor can be mounted on either side of the collector or down tube.
Reworking the Fuel System
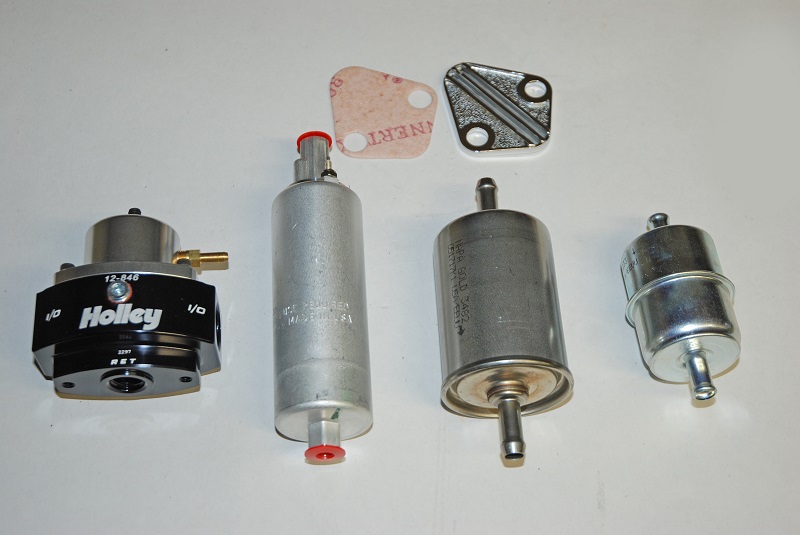
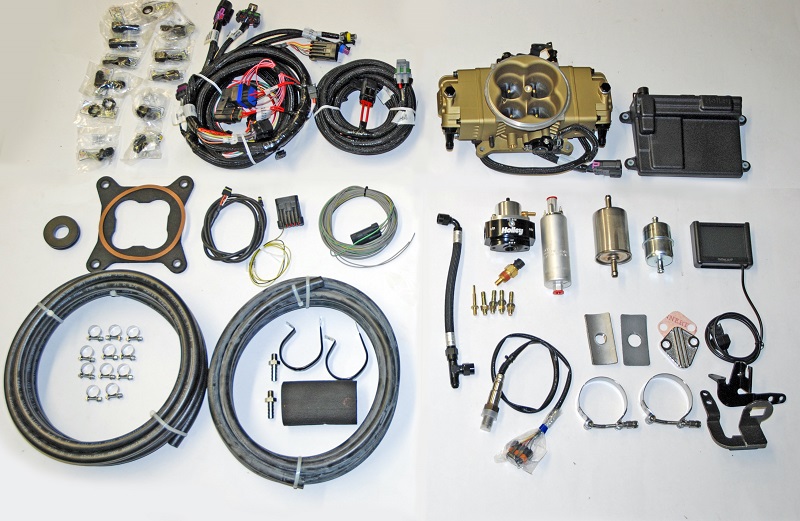
With the master kits, you get a comprehensive fuel delivery package. Holley includes a billet aluminum regulator, a high-pressure fuel pump, pre and after filters along with a mechanical fuel pump block off for small block Chevys. (Image/Wayne Scraba)
The Holley’s Stealth Master Kit includes pretty much everything you need to swap from a carburetor to EFI. Included are an electric fuel pump, pre-pump filter, and post pump filter. During installation, the fuel pump should be mounted lower than the lowest portion of the gas tank and as close to the tank as possible. Additionally, Holley marks these components with arrows to indicate the flow direction.
EFI systems require a fuel pressure regulator and Holley includes a slick billet job.
According to Holley, “this kit includes the hose and fittings necessary for a return line installation on most vehicles. Some late model vehicles that were originally equipped with a throttle body injection system may already have a return line to the fuel tank that can be utilized. The return line must not present a pressure restriction to the return fuel flow. There should never be more than approximately 3 psi of pressure in the return line. A line that is too small or has restrictions will cause tuning problems with the system.”
The returning fuel has to go somewhere.
Holley tells us that you should never use vapor canister lines for the return. Instead, a special bulkhead connection is supplied with the Master Kit. The bulkhead fitting must be installed through a flat surface where the nut can be tightened from the bottom. It must also be installed in a location where the fuel cuff won’t interfere with the sending unit float.
If possible, Holley strongly recommends removing, cleaning, and drilling (a 9/16-inch hole) directly into the sending unit. That makes installation pretty easy. If you decide to drill into the tank, heed this warning: “If drilling into the tank rather than the sending unit, Holley recommends having the tank professionally cleaned before drilling. If you chose not to the have the tank professionally cleaned, drain the tank completely, let dry and fill with water.”
The Master Kit includes all of the high-pressure hoses and Earl’s fittings you need for assembly. Essentially, Holley includes sufficient hose for both the feed and return lines you’ll need to install the Stealth system in your vehicle. The only things you’ll need are clamps to affix the hose.
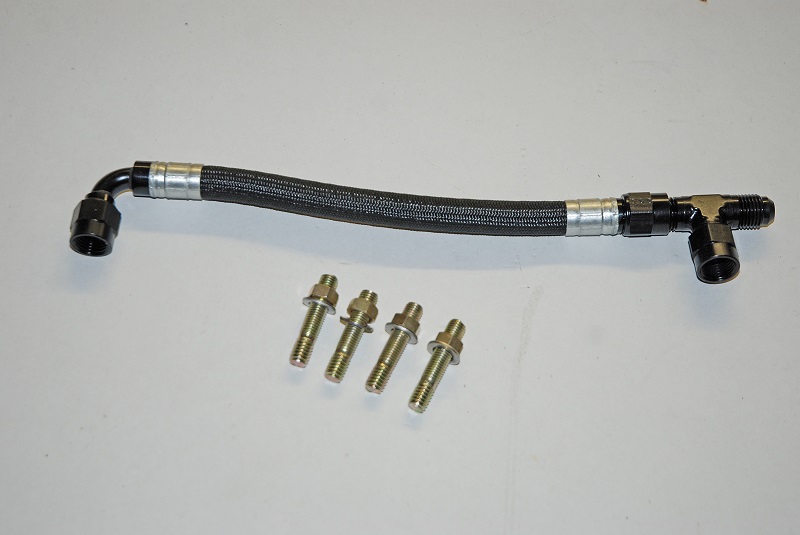
Holley includes this slick pre-fabbed Earl’s -6 AN fuel line fitting with the kit. It makes plumbing simple. (Image/Wayne Scraba)
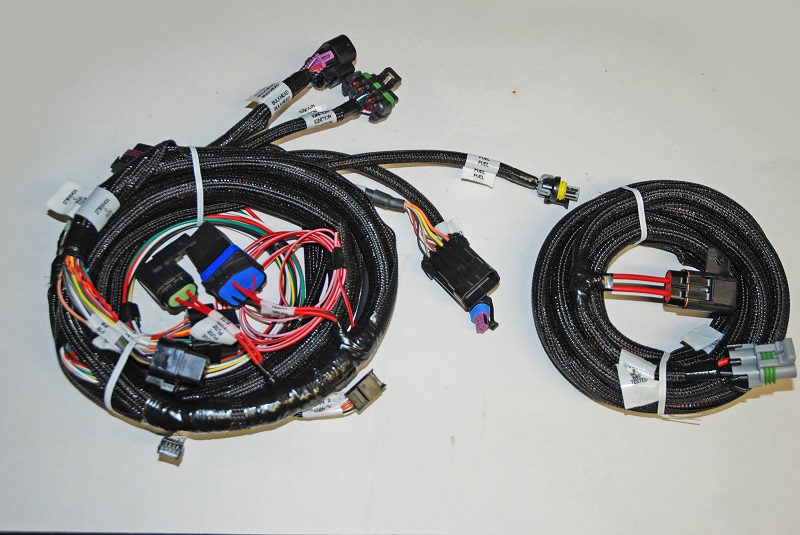
Holley Stealth EFI Electrical Wiring
Also included (and another key to the easy installation) is a comprehensive plug-and-play electrical wiring harness. Holley’s Stealth EFI throttle body comes with sensors pre-wired for easy installation. While working with the wiring harness keep in mind, the main ECU power and ground must be connected directly to the battery AFTER all other wiring installation has been performed.
Holley notes that if the ECU is mounted in the interior, the harness must be routed through the firewall to the engine compartment. Use a two-inch hole saw to create a path if there is no other access point available. A grommet is supplied for a two-inch hole to seal this area.
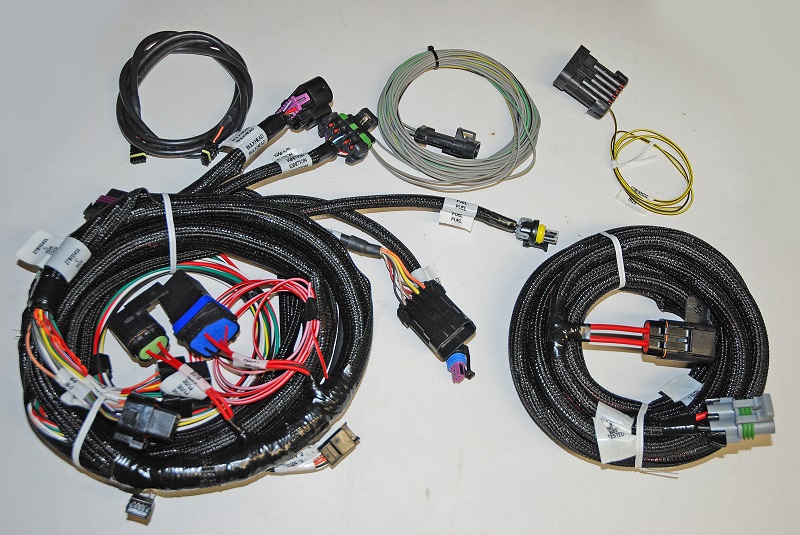
This is the entire wiring harness for the system. It includes two plug and play harness assemblies along with an ignition adapter (top right), an output harness (to operate electric fans and/or an AC shutdown switch) along with a CAN-bus harness (that is essentially an “extension cord” for the 3.5-inch hand held touch screen). (Image/Wayne Scraba)
If the ECU is mounted in the engine compartment, the hand-held tuning module cable will have to be routed to the “CAN” connector on the main harness (located near the ECU connector main connector). This is assuming you want to access the hand-held module after startup. This will require routing the small CAN connector somewhere through the firewall. The beauty of this is, you can ultimately use the hand-held device to monitor the engine performance after the installation is complete.
The connections are clearly marked and the majority of them are plug and play. There are a few other connections to make. These are the basic power and switched connections. Holley has clear wiring instructions for all applications in the user manual included with the EFI system. Included is a pair of heavy power and ground wires to the battery (clearly marked red for positive; black for negative). The red/white wire is 12 volt switched which should be connected to a clean +12 volt power source (not the coil).
The power source should only be active when the ignition is on. Make sure source has power when engine is cranking as well (check with voltmeter). Not all sources apply power when the ignition switch is in “cranking” position. The green wire is used to directly power the fuel pump (ignition switch “on”). The fuel pump requires a ground wire. Run a wire from the negative side of the fuel pump and connect it to a solid chassis/frame ground. The white wire is used for ignition configurations that must be configured with a laptop computer. The yellow wire is an rpm-input wire used for some applications (you’ll have to determine that with your specific combination).
“The most important signal for the ECU is the Engine Speed input,” Holley officials say. “It is critical that this is configured and wired correctly or poor performance will result. Pay close attention to the options below or ECU damage could result!”
We told you this was plug-and-play! Holley clearly labels everything and that makes installation a literal snap. While not shown, Holley also includes a detailed installation manual. (Image/Wayne Scraba)
According to Holley’s Terminator Stealth EFI installation manual, you have two options for wiring the ignition without the need of an additional Holley Ignition Adapter:
1. Coil – engine speed input
“Use this if you are using a stock type mechanical advance distributor with a stock inductive ignition coil. Examples of this would be any older style points distributor, a 1974-1981 GM large cap HEI. Do NOT use this input if you are using an aftermarket Capacitive Discharge (CD) ignition system such as a MSD, Mallory, or others. The ECU will be damaged if you connect to a capacitive discharge type ignition coil,” Holley says.
2. Tach Out – engine speed input
“Use this if you are using an aftermarket Capacitive Discharge (CD) ignition system such as a MSD, ACCEL, or others, you need to connect to the Tach Out connection or wire these systems provide. This is a 12-volt square wave output,” Holley says.
If you use this input, the EFI system will not control the ignition timing of the engine. The timing will be based on the distributor initial, mechanical, and vacuum advance, just like it did with a carburetor.
Finally, there are three optional outputs available on the system that can be used for Air Conditioning Shutdown at wide-open throttle and two electric fan outputs.
Holley’s new Stealth EFI is not only easy to use, it’s easy on the eyes—especially for purists who dig the look of a traditional carburetor under the hood.
Uber-cool? You bet, and we dig it a lot.
Check it out for yourself.
(Image/Wayne Scraba)
Thanks Wayne!
[…] Holley’s Uber-Cool Terminator Stealth EFI Another Easy Path to EFI Conversion […]