My neighbor kid just bought a ’69 C10 pickup with a 350 small block with a Holley carburetor an aluminum intake, cast iron exhaust manifolds, and a TH350 automatic. He’s been driving it around when the weather’s nice and since I’m the old guy in the neighborhood with a couple of hot rods, he comes to me with questions. I like the kid so I’m now his go-to guy. Anyway, he showed up recently with a small problem where the engine hesitates under hard acceleration. In fact, the engine will almost die when he hits the throttle hard from a dead stop. I don’t have the heart to tell him I haven’t worked on a points ignition and carbureted engine in 25 years! Think you could clue me in on some ways to make his engine run better?
M.A.
Jeff Smith: I know exactly where you’re coming from. I too have encouraged a young guy in my neighborhood to buy an older car and fix it up. He comes by here at various times looking for answers. His best quote to me after buying his ’64 Chevelle was “I bought this car thinking the chicks would dig it – but so far the only attention I get is from old men!”
Let’s see if we can help you be the local tuning hero.
While the first thing most tuners might look at is the carburetor’s accelerator pump circuit, the place I like to to start is with ignition timing. Many supposed carburetor-related problems like low-speed hesitation can be traced to improper ignition timing. So I would start by checking the initial timing. First, remove the vacuum advance line from the vacuum can and plug the hose so there’s no vacuum leak.
Next, check the initial timing at idle. It’s possible that this may not be the original engine, but our tuning efforts will be the same for just about any carbureted small block. Let’s say that you check the initial timing and it reads 6 degrees Before Top Dead Center (BTDC). Every small block Chevy I’ve ever worked on seems to like at least 10 to 14 degrees initial timing. So bump the initial to at least 10 degrees and then check the total timing with the vacuum advance unhooked. This will require a dial-back timing light.
If you don’t have a dial-back light, you can make a quick timing tape using an 8-inch long, 1/32-inch graduated ruler, some masking tape, and a pen. Measure the balancer diameter – likely it will be an 8-inch diameter. Circumference = Diameter x 3.1417 (pi) so the circumference will be 25.13 inches. Divide that by 180 (to get a distance for every 2 degrees) which will come to 0.140-inch. The closest fraction is 9/64. Start with a 0 line and if we multiply 10 X 0.140-inch this would be 1.40 inches which would equal 20 degrees (10 times 2 degrees). This means that one inch equals 0.70-inch, so 30 degrees would equal 2.1 inches. If we wanted to make a mark at 36 degrees, it would be 0.140 x 18 = 2.53 inches which could be easily rounded off to 2.5 inches. Now you have a timing tape. Place the tape so that the zero line overlaps the zero mark on the balancer and now you have a tape that will reveal total timing using a standard timing light. Of course, there’s a shorter way to get there by buying a timing tape sheet from MSD.
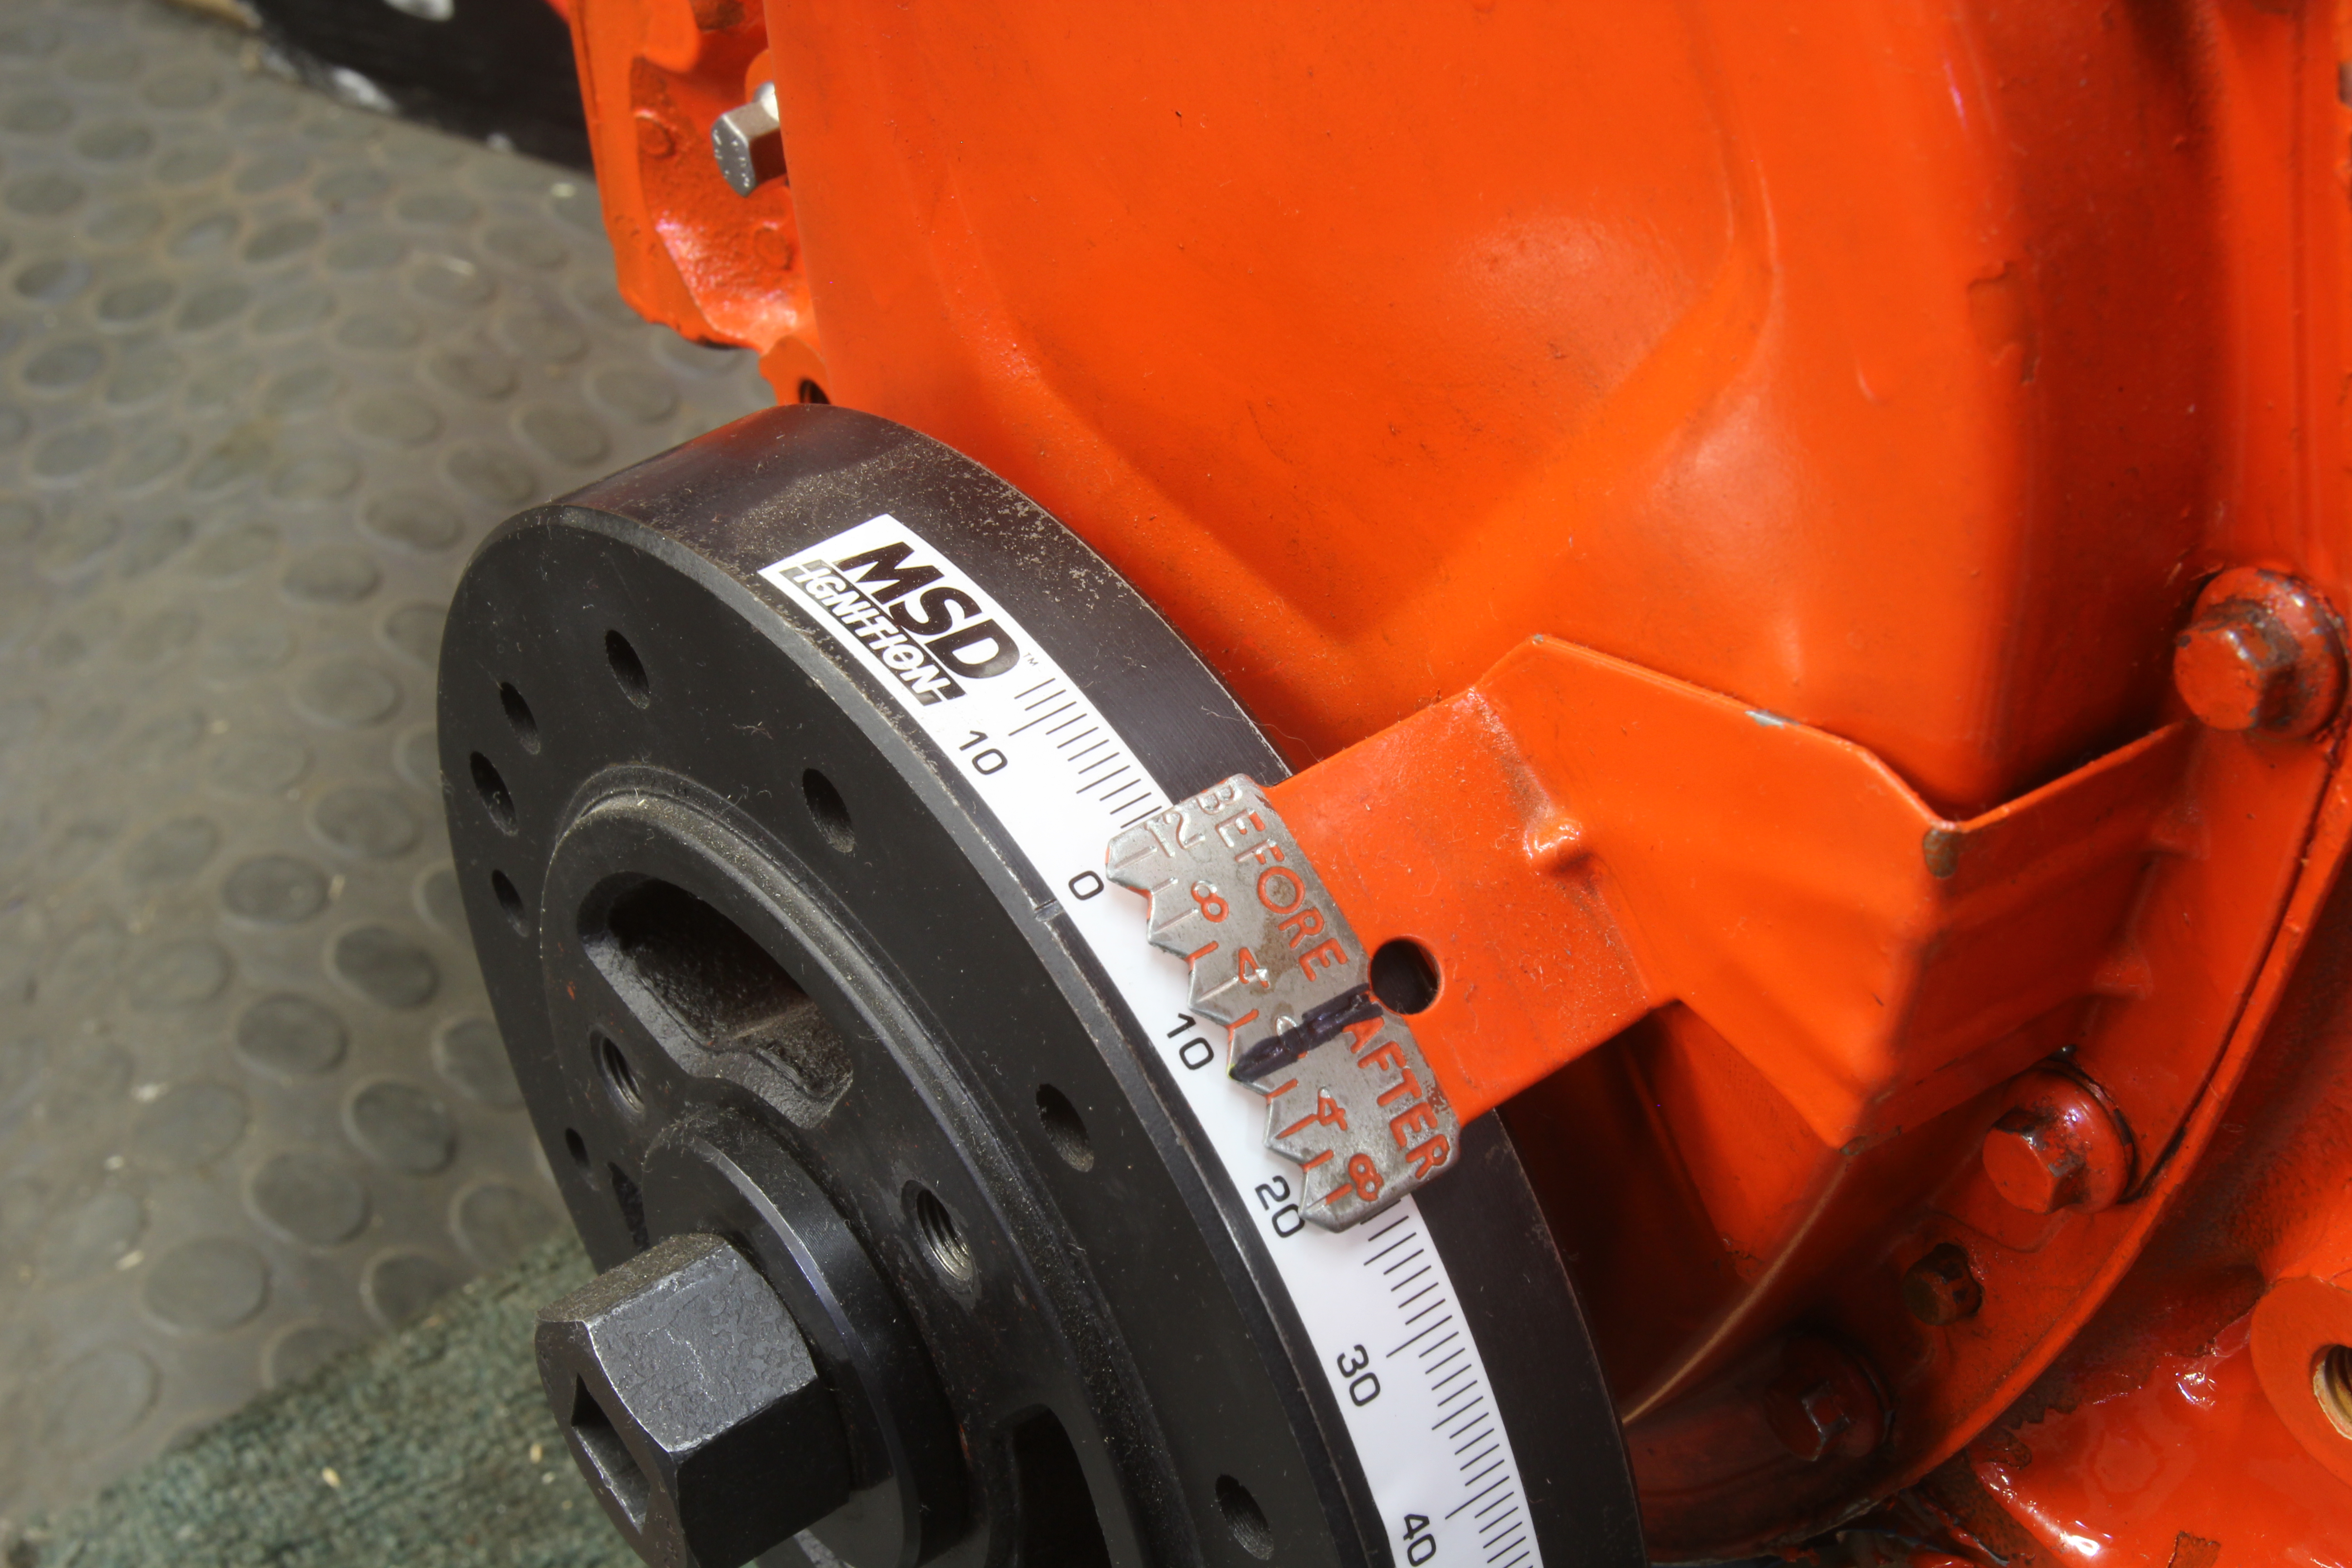
This photo shows the timing tape available from MSD that comes as an adhesive decal you can place directly on the harmonic balancer. This allows you to use a standard timing light to check total ignition advance. Tape is cheap – advance timing lights are nice – but expensive. Both ways work.
Now that we can check both the initial and total timing, I would set the initial at whatever allows the total mechanical advance to be 34 to 36 degrees BTDC. Be sure when you check these numbers to disconnect the vacuum advance so it is not affecting your readings. Let’s say your initial is 14 degrees with 21 degrees of advance for a total of 35 degrees BTDC. This would be a great combination. With the timing set, now you can see if the acceleration hesitation is still present. Assuming the hesitation is annoyingly still present, now we can turn our attention to the carburetor and accelerator pump.
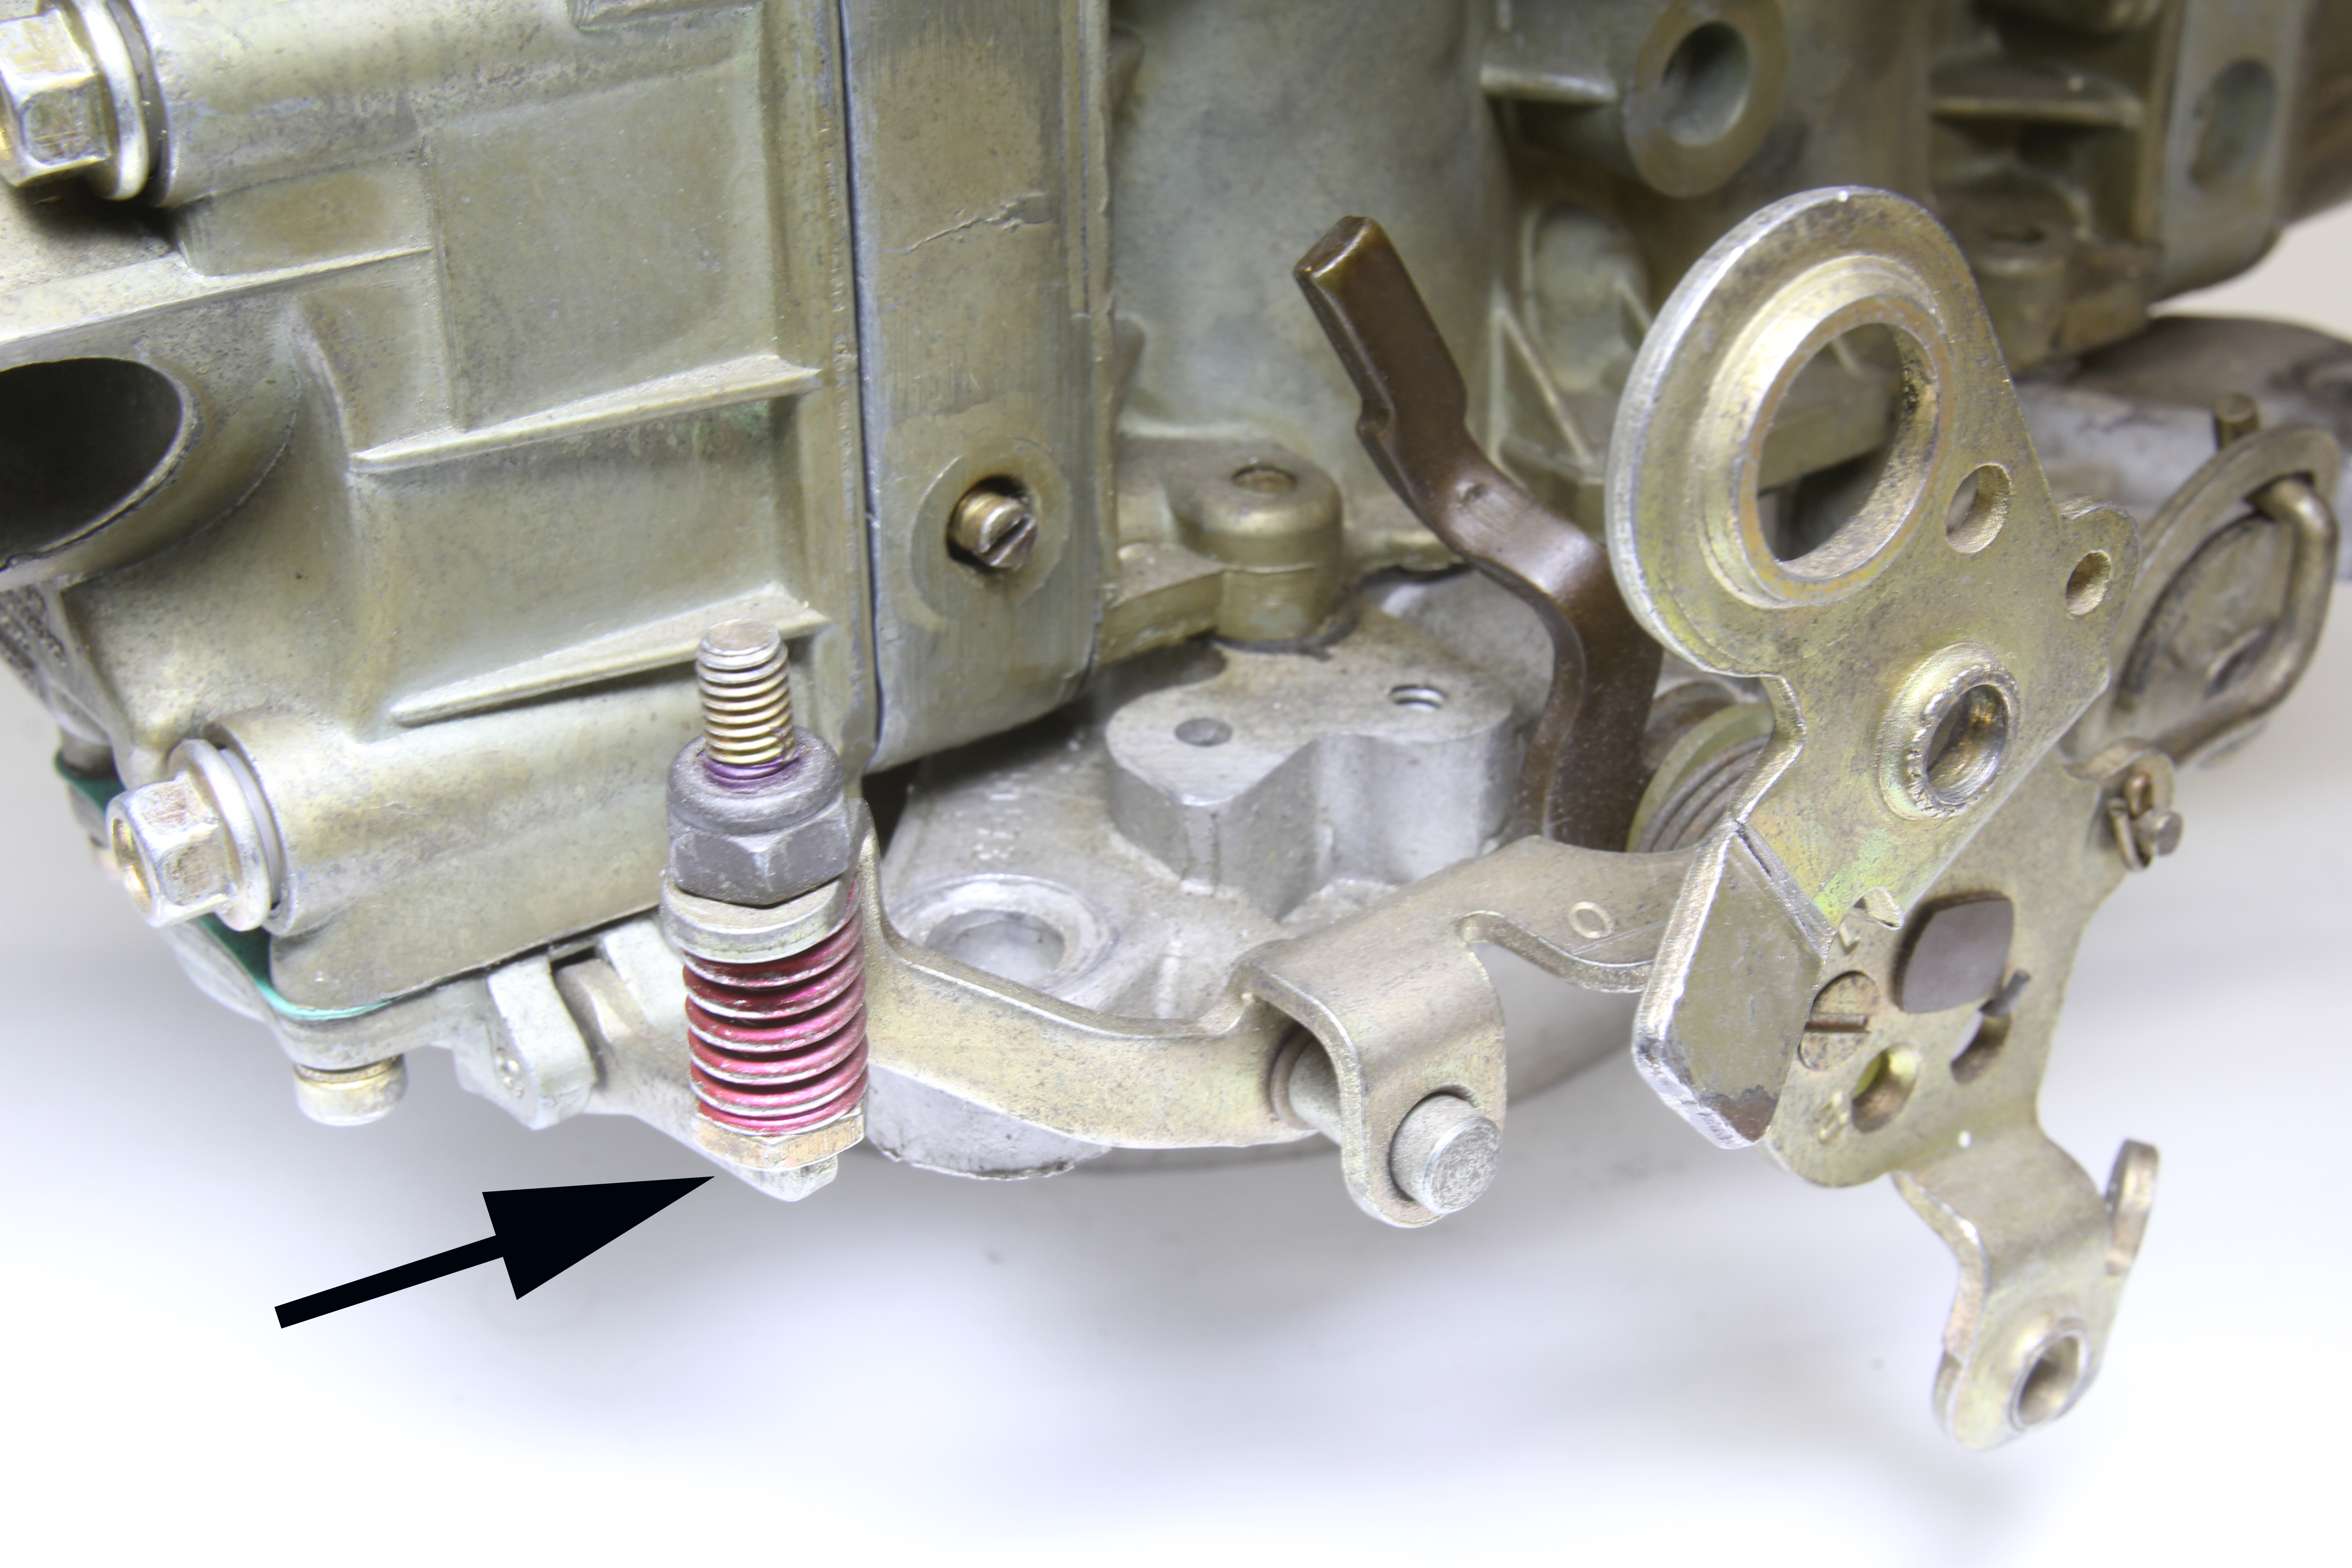
This is the accelerator pump linkage arrangement on a Holley carburetor. Make sure there is no clearance between the adjustment bolt and the accelerator pump arm (arrow) at rest. This is a typical problem on Holleys where somebody shortened the bolt thinking that would help – it doesn’t.
But before we do that, let’s take the time to stabilize the idle mixture. Before starting the engine, carefully screw in one idle mixture screw at a time and count the turns. Both idle mixture screws should be adjusted the same number of turns out from fully seated. If they are not, average the two settings and set them both at this average. A good starting point is 1½ turns out from fully seated. Assuming the idle speed is still acceptable, slowly turn in one idle mixture screw only about 1/16th of a turn and evaluate the idle. Do this on both idle mixture screws and keep going in short increments back and forth until the engine stumbles. Then back out to the best idle quality. A vacuum gauge is a great way to evaluate when the idle begins to stumble as the needle will begin to twitch or drop before you hear the engine misfire.

This is the pump cam screw location. Note on this carb that the screw is already located in the number 1 position. This advances the cam slightly which hits the accelerator pump with more lift once it begins to move.
Assuming that the timing and idle mixture are both close to ideal, if the engine still hesitates let’s start with the simple stuff first. Remove the air cleaner and make sure that when you hit the linkage fuel exits the accelerator pump nozzle – also called the squirter. If there’s no fuel when the throttle linkage is operated, then you’ve found the problem. Recently, I’ve seen a rash of dead accelerator pump diaphragms that just refuse to push fuel through the system. This often occurs after the carburetor has sat for awhile. I think the diaphragm just turns to stone. The fix is to replace the diaphragm by removing the four screws that hold the accelerator pump cover in place.
If actuating the throttle linkage shoots fuel out of the squirter, then we’ll have to do a little more investigating. I often find that the linkage that actuates the accelerator pump arm is out of adjustment. The included photo will help with this discussion. The first thing to check is to see if there’s clearance between the spring-loaded actuating arm and the accelerator pump lever. There should be no clearance or free play between the two, but I find that there is often an excess.
For the accelerator pump circuit to operate properly, any movement of the throttle linkage should instantly move the accelerator pump and fuel should exit the squirter. If this doesn’t happen until the throttle moves quite a bit, this means the linkage moves but the accelerator pump arm doesn’t. This requires adjusting that spring-tension bolt and nut by loosening it (making it longer) until there is no clearance between the lever and the accelerator pump arm with the throttle at curb idle. If you found clearance here, likely a proper adjustment will eliminate that bog or hesitation.
But occasionally, we may have to go further. If you look behind the main throttle linkage arm on a Holley, you will notice a small plastic cam. This is an eccentric (much like a camshaft lobe) that moves the pump linkage to actuate the accelerator pump. On the main throttle linkage there is a small screw that fastens the plastic pump cam to the linkage arm. Usually, Holley places the screw in the hole marked “2.” If this is the case, remove the screw and move the pump cam clockwise until the plastic cam mounting hole lines up with the number “1” hole and place the screw in this position. This moves the cam forward on the linkage and initiates the pump cam lever sooner.
If this doesn’t fix the problem, then you might have to change to a larger accelerator pump nozzle. Let’s assume that the carb we are working on is a 600 cfm 0-1850 Holley carburetor. The stock accelerator pump nozzle is a 31 which means the discharge holes are drilled to 0.031-inch. I would try a larger, 0.035-inch nozzle. This is easily changed with a large Phillips head screwdriver and a long pair of needle-nose pliers. The pliers are used to grab the nozzle inside the choke housing. Be careful to not lose the gasket underneath the squirter. There’s also a gasket underneath the mounting screw.
You probably won’t have one of those squirters, but they are easily obtained. Holley sells them individually. A 0.035-inch nozzle will come with a pair of gaskets. As a last resort you can also try changing the accelerator pump cams as Holley sells a kit for this as well, but frankly it’s rare that I have to resort to changing the pump cams. Usually a combination of the above tuning efforts will result in eliminating that sag in acceleration.
This will all take an hour or so and the results should be great. But just so you know, as soon as you become the carburetor guru – expect all kinds of people with dead carburetors beating down your door!
try this trick https://www.youtube.com/watch?time_continue=3&v=QMHgbFPEVXA
I agree that it is probably ignition timing. When I was a kid, I would turn the distributor and try it. Sooner or later I would find the sweet spot. I had a 4 speed so hesitation usually didn’t bother me. It was that hard pull with no misfire I was looking for.
Hey there
I have 302 with 600 holley. I have a severe bogg at quick throttle. I can see the fuel spay vigorously in the chambers so I squeazed the pump nozzles closed to almost no fuel. But it still appears to be overfueling. I have 2 twin engines and both carbs built with same kit and valve. But i can’t get this one right. I am thinking jets may be too big? I did not check or change those.