I’ve got a Chevy small block 350 with a mild cam (I don’t know what the specs are – I bought the engine used), an Edelbrock Performer intake, Holley 750 vacuum secondary carburetor, and headers. All of this is in my ’72 Chevy pickup. The truck runs great except for a stumble when you first step on the gas from a dead stop. I’ve had lots of guys tell me I need a new carburetor, but I’m not sure that will solve the problem. Thanks for your help.
K.S.
Jeff Smith: This is a very common issue with street-driven, carbureted engines and certainly not confined to small block Chevys. What’s even more confusing is that often the culprit will be a stack-up of several minor issues creating a much larger problem. So let’s dive into this one system at a time. But before we start, we have to warn that all these recommendations are based on a sound running engine that doesn’t suffer from a burned valve, dead cylinder, blown head gasket, or other malady. Another common issue is vacuum leaks anywhere between the carburetor base, the intake manifold, and the cylinder heads. Often, this can be something as simple as loose intake manifold bolts. All of these should be checked and repaired before you continue.
Ironically, many seeming carbureted drivability issues are really caused by an under-performing ignition system. You didn’t mention what kind of ignition was on your truck – I’ll hazard a guess that it is probably an HEI distributor. We’ll run under that assumption. The first thing I’d recommend is to check your initial timing. Stock timing for early ‘70s small block Chevys was something like 6 or 8 degrees before top dead center (BTDC).
If you are looking at the timing marks on a typical timing tab, the BTDC timing will be above the zero mark while after top dead center (ATDC) will be below the zero mark. I mention this for clarification because I’ve seen situations where the owner set the timing – “dead on” as one friend put it – except that he set the timing at 10 degrees ATDC! Don’t make that mistake.
While this initial timing is acceptable for stock engines, you mentioned there is a cam in the engine. Generally when valve duration is lengthened on an otherwise stock compression engine, this usually results in lower cylinder pressure at idle. The best way to compensate is to advance the initial ignition timing. I would recommend setting the initial timing at 14 degrees BTDC to start with. You will need to then check the total mechanical advance timing to make sure that it is not over-advanced. I’d suggest a total timing of 34 to 36 degrees – which is the combination of initial timing and mechanical advance. As an example, 14 degrees initial with 22 degrees of mechanical advance would produce 36 degrees of total timing. Always check this total with the vacuum advance unhooked.
Another interesting idea is to make sure the vacuum advance mechanism on your distributor is functioning. This is often overlooked and even intentionally disconnected. I see this all the time on street engines and it’s a major mistake.
If the vacuum advance is disconnected but the canister works properly, then I would strenuously suggest connecting it to ported vacuum outlet on the carburetor. On a Holley carburetor, this is usually the nipple located on passenger side of the primary metering block. This will add timing at part throttle under light acceleration and will often cover up a part-throttle stumble. Very few enthusiasts truly appreciate just how much a functioning vacuum advance helps drivability.
Next, I would recommend checking the float level of the primary and secondary floats on the Holley carburetor. Checking this is easy by removing the small brass screw-in plugs on the passenger side of each float bowl. Newer Holleys use a clear sight plug. With the engine off and the plug removed, the proper float level is fuel just at the bottom of the sight hole. If the float is too low, you won’t see fuel dribble out the hole. If fuel pours out when the plug is removed, the level is too high.
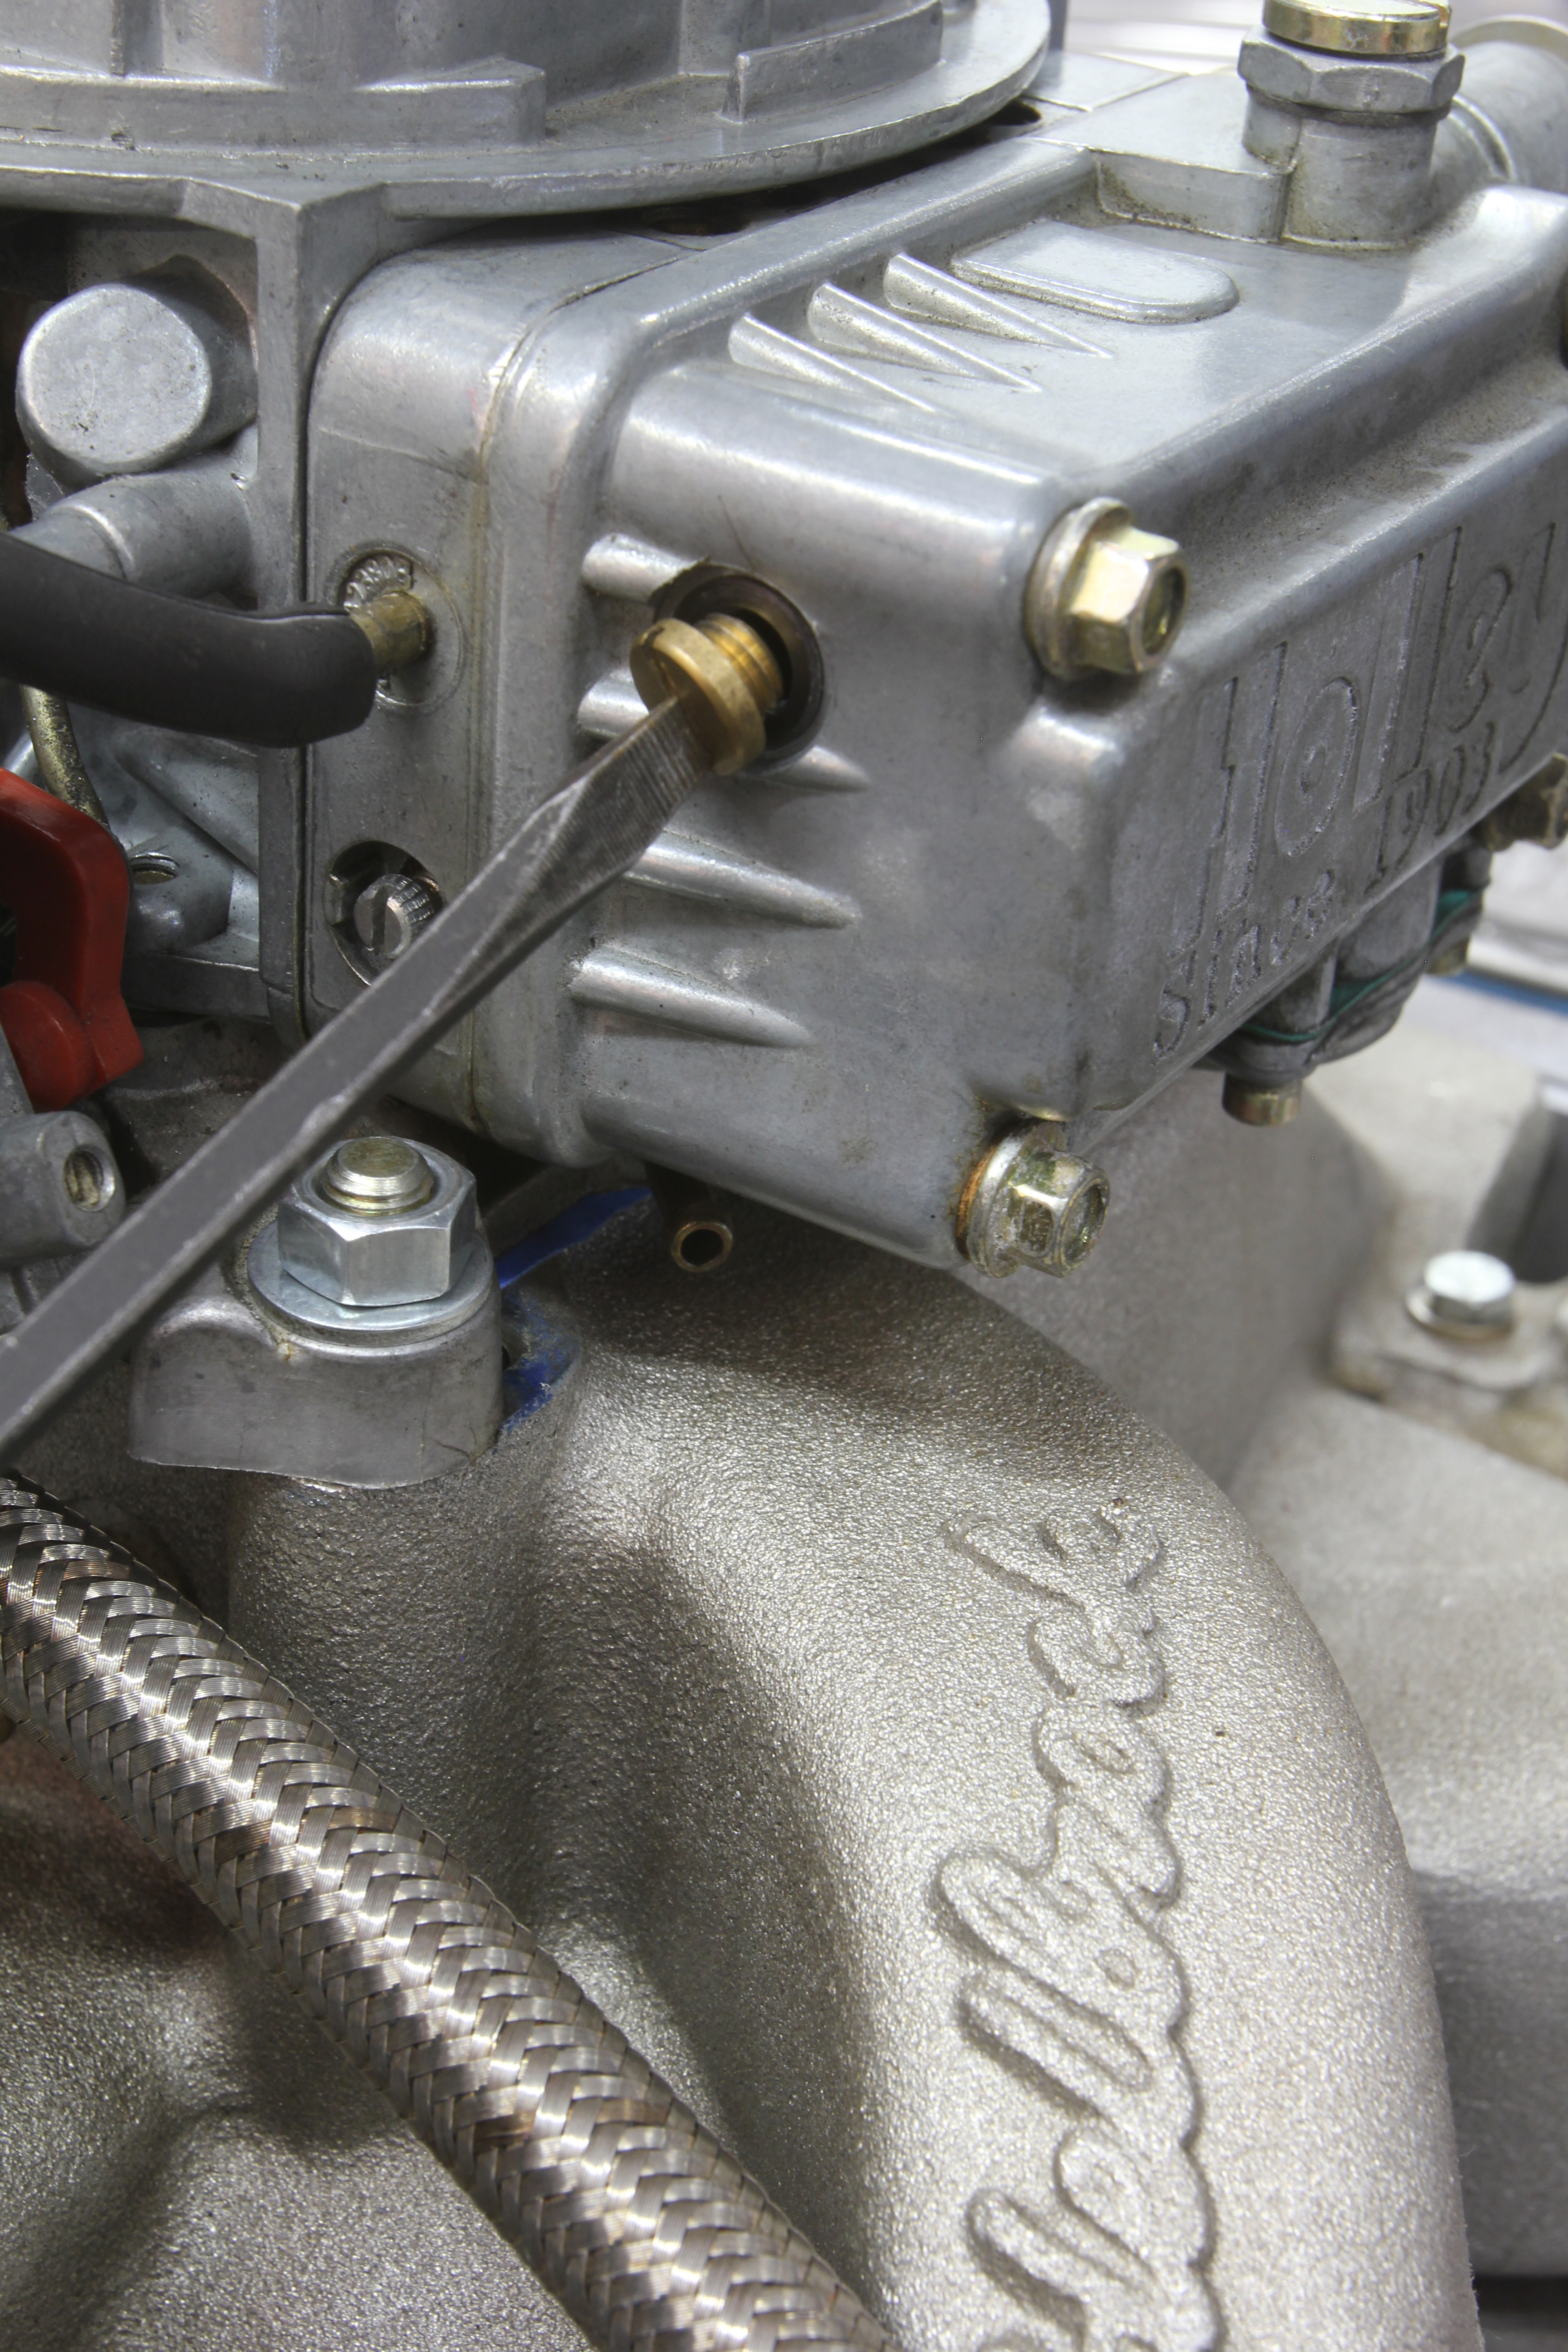
Checking the float level is very easy by removing this screw in the passenger side of the metering block and checking for fuel level just at the bottom of the sight hole.
The float adjustment is found on the top of the float bowl with a straight blade screw lock and a 5/8-inch adjuster nut. After loosening the lock screw, turning the adjustment nut clockwise (tightening) will lower the float level while counter-clockwise turns will raise the float level. Make your adjustment and then start the engine and recheck the level after idling the engine for several seconds. Do this for both primary and secondary float bowls.
Now set your idle mixture. Be sure to make all your adjustments so that both idle mixture screws are adjusted exactly the same. Start this by turning the engine off and counting the number of half-turns the idle mixture screws are out from lightly seated. Start with 1 ½ turns out for both screws. Then adjust for best idle speed from there.
Now at least we have your engine idling correctly – hopefully with something more than 10 inches of manifold vacuum. My first recommendation would be to carefully look at the movement of the accelerator pump arm that transfers motion from the primary throttle linkage to the accelerator pump. That angled arm should move the accelerator pump the moment the throttle linkage is moved. The result should be a small shot of fuel from the squirter the moment the throttle linkage moves.
I’ve found that often this linkage has excessive free play, allowing quite a bit of throttle movement before the accelerator pump assembly pushes fuel out the primary squirter. This freeplay is often the source of an off-idle stumble. To adjust this, you will need a pair of 3/8-inch wrenches. If there is clearance between the bottom nut and the accelerator pump arm at idle, use the wrenches to adjust the length of the accelerator pump adjustment bolt until there is zero clearance. Do not adjust the length of the arm longer or it can cause the pump arm to bind at wide open throttle. Carefully adjusting the accelerator pump linkage should produce an instant shot of fuel from the accelerator pump squirter in the top of the primary venturi whenever the throttle linkage is moved.
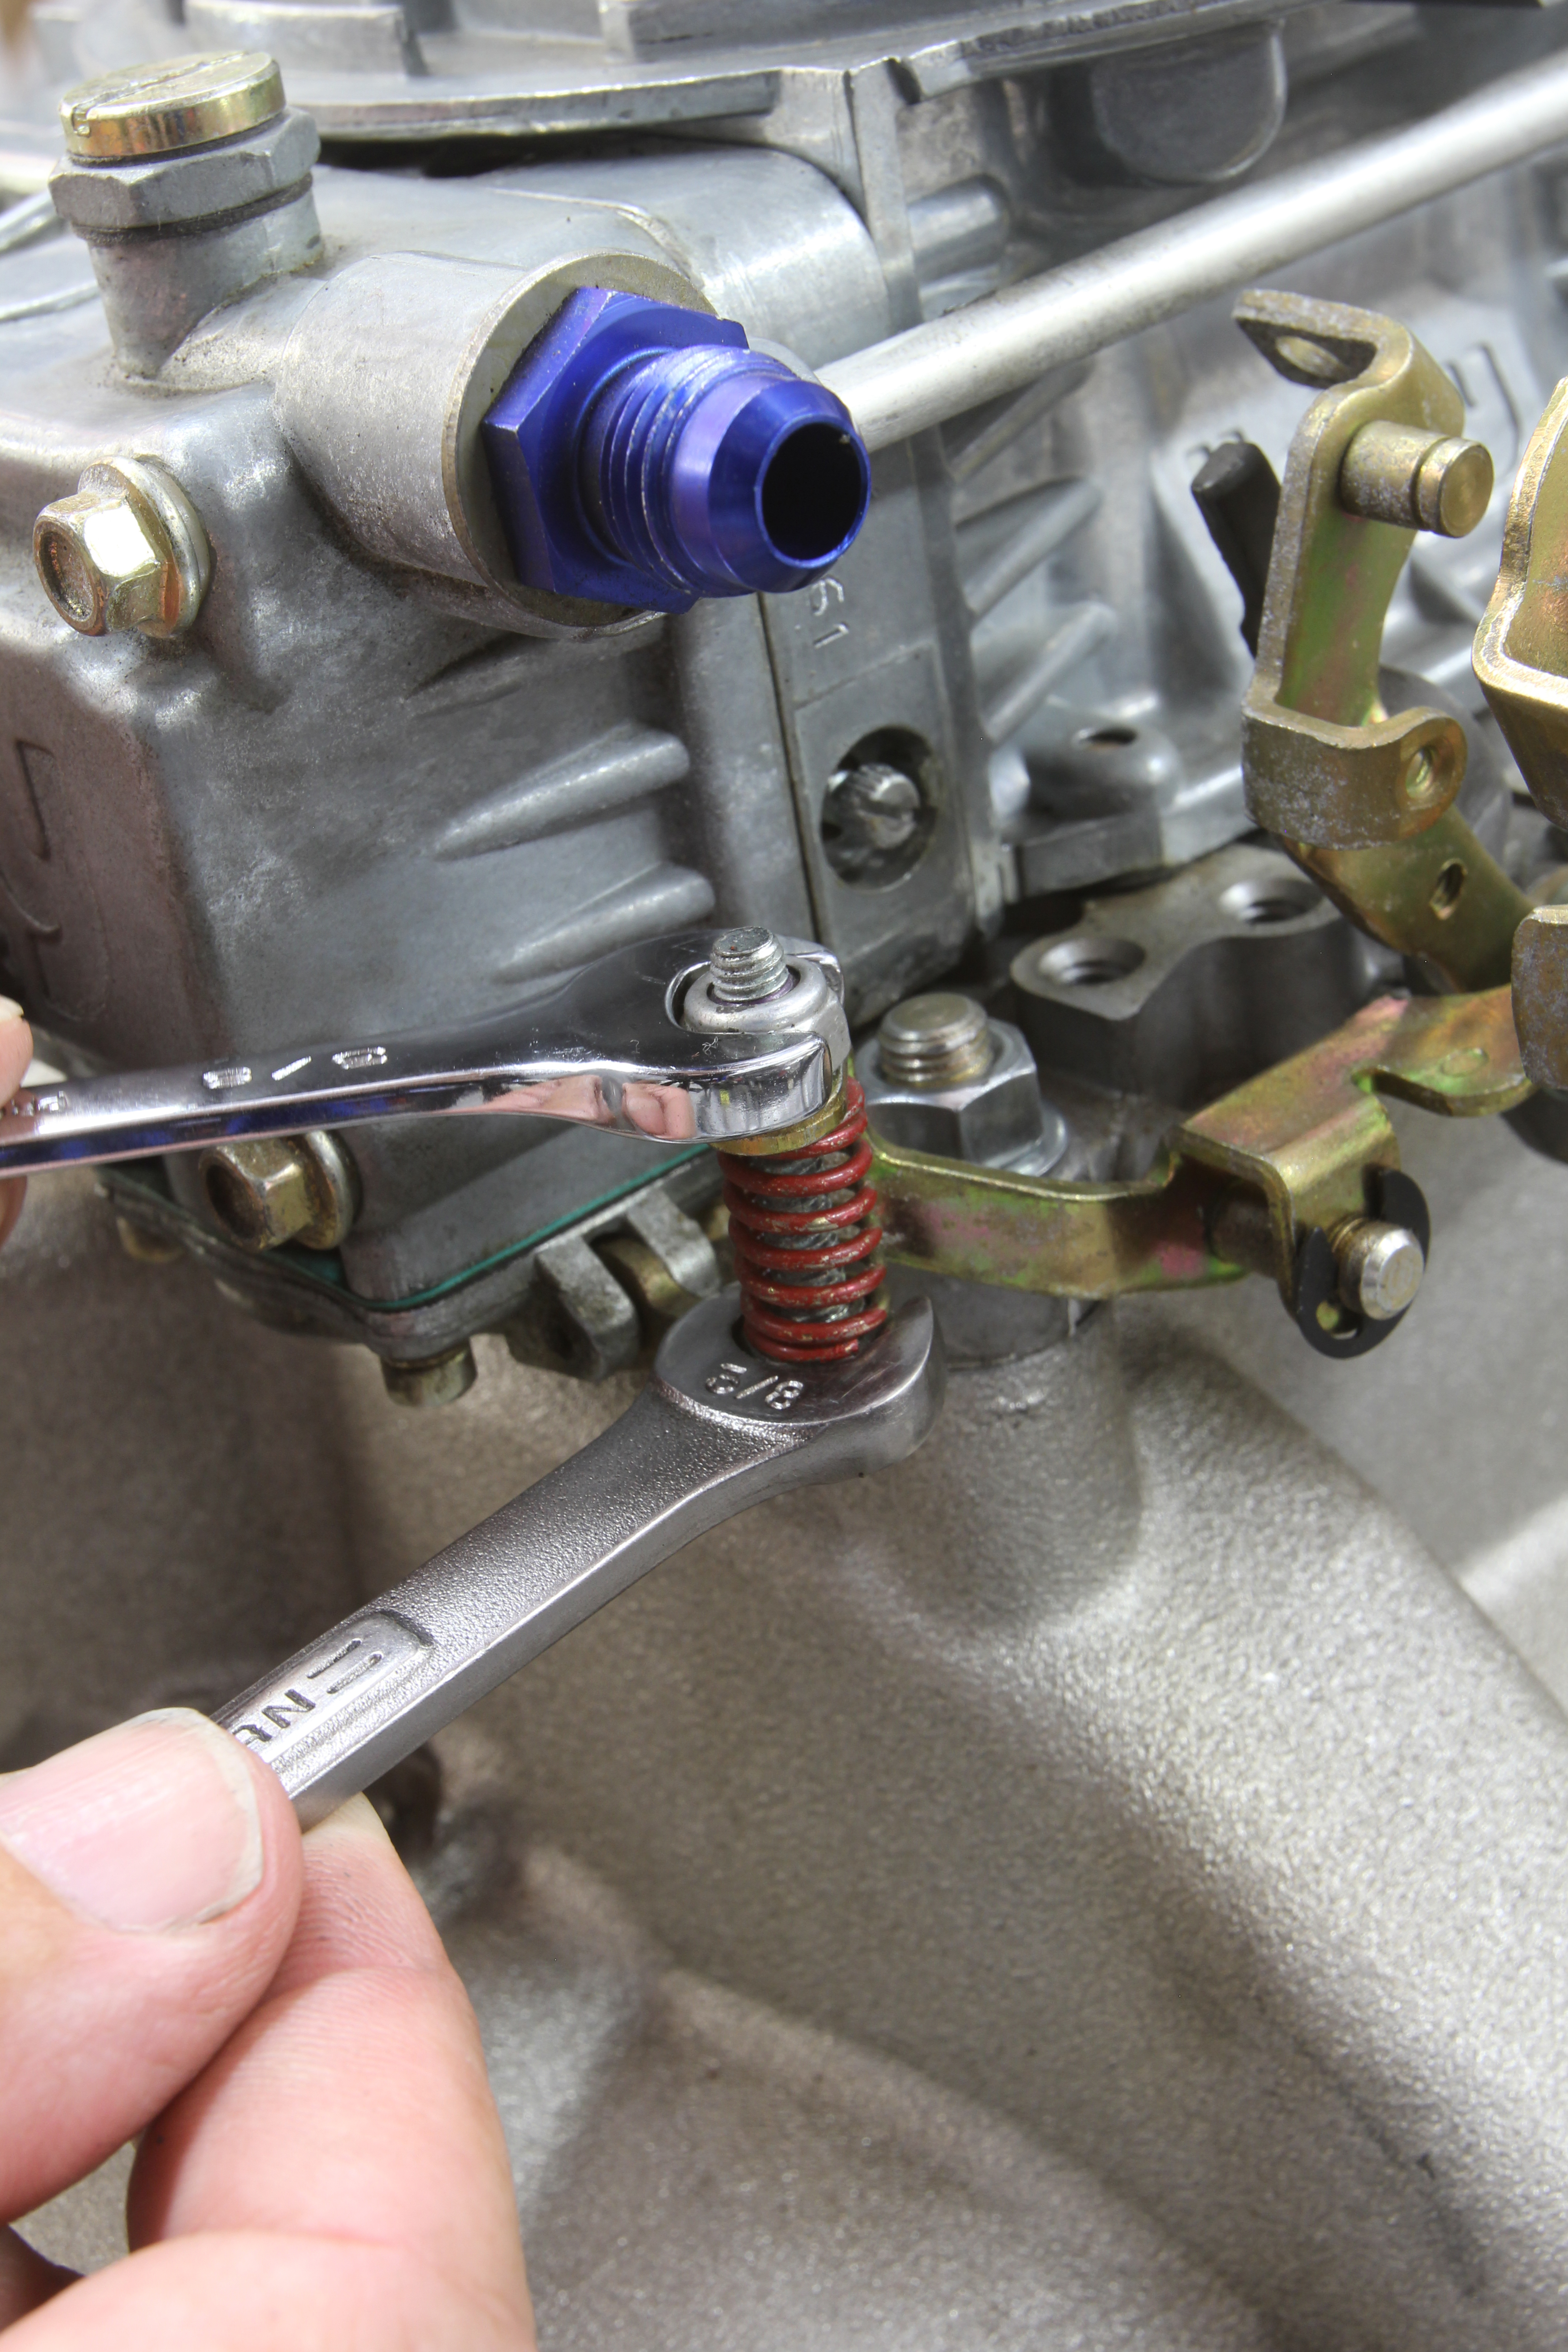
Adjust the accelerator pump bolt and nut assembly so that the linkage moves the accelerator pump arm on the carb the moment the throttle is moved. This is a very common problem with carbs that have been “adjusted” by people who don’t know what they’re doing.
Implementing just one of these suggestions could solve your problem. Accomplishing all these suggestions should radically improve the drivability of your engine and even improve fuel mileage at the same time! There’s nothing wrong with that!
Any help with the Edelbrock “bogg”
5.5 pounds of fuel pressure to the carb. Check your timing. Initial, Total and the advance curve. Edelbrocks have a flap / door for the secondary that can be adjusted to open faster of slower – Just like a Q-jet. The bogg sound is when the secondary is slammed open too fast and there is not enough fuel going into the engine ( a lean condition ) the accelerator pump needs to be large enough to feed your cid / size of your engine.
I purchased a Chevrolet Performance 670cfm Holley Street Avenger speced by Chevy for a 350 290 HP crate motor. That carburetor came stock with a #42 accelerator pump discharge nozzle. Unfortunately, whoever put it together at the factory used a standard hold down screw for the nozzle. I tried to tune out that off idle stumble when I had time for several months thinking that Chevy had a reason for using the standard screw. Gave up and bought the hollow screw, which is what was supposed to be used in a Holley carburetor with a discharge nozzle greater than 40, and low and behold the carburetor works like it is supposed to. Point is it might be wise to check everything on the primary side of the carburetor at the very least before bolting it on and running fuel through it to be sure the manufacturer put it together right. Don’t assume Holley did it right. It could save a lot of time chasing down problems.
Good article
I enjoyed this. Good stuff.
a shot gun approach that I have seen work for me many time is two fold, bigger squirter ie pump nozle and bigger 10.5 power valve, the way I see it the factory or aftermarket gives you middle of the road tunes and I like to tune for performance those two simple changes yield instant positive results
My atk ford 302 motor came with a standard holley 4160, squirter #31 and orange cam. It had an off idle hesitation. I got suggestions to use a bigger squirter, but no improvement. After trying different squirters it resulted in a #25. And after all the green accelarator pump cam made it smooth. This was for a 1965 Mustang.
Great article. Sometimes your getting too much fuel upon acceleration. On eldebrock carbs check and aadjust the linkage for the accelerator pump arm.
I have a 84 corvette 350 dog how is the best way to get more out of it 300 or more hp. Thanks john
When you adjust the fuel pump arm hold the carb in wide open position (with the motor off ovecorse) use a small screw driver to hold the pump arm down while using a 10 thousands feeler gauge to check the clearance between the pump arm an the adjuster bolt this will give you the correct adjustment for the pump .I use the 30 30 cam on the primary in the no.2 hole with a 37 squatter seems to be a good combo.
When you adjust the fuel pump arm hold the carb in wide open position (with the motor off ovecorse) use a small screw driver to hold the pump arm down while using a 10 thousands feeler gauge to check the clearance between the pump arm an the adjuster bolt this will give you the correct adjustment for the pump .I use the 30 30 cam on the primary in the no.2 hole with a 37 squitter seems to be a good combo.
Hello Jeff, I have a new bolted together 4 main bolts 350 SBC. Over bored @ .060 with .100cc dome pistons. Heads are modified 76cc 882 castings with 2.02 x 1.60, ported intake / exhaust. cam is a comp cam 280H magnum toped with 1.6 roller tip rockers. final lift is .510 x .510. dual plane manifold, 1″ open spacer toped with a 750cfm Holley carb 4160 vacuum sec. Msd box with height distributor. Car at idle sounds like cancelling cylinders, even warmed up, shutting down engine, turn it back on, I need to paddle carb couple of times in order to engine to turn on. Placed rebuilt kit…the same issue…swapped carburetor…the same issue…idle wont stay running less than 1,220 RPM. If I remove 14″ air cleaner, motor tends to shut off…initial timing 16 degrees. Carb has 72 jets on primary, 34R rear plate sec….driving me crazy…
Thanks, Jeff…I usually enjoy your input on various engine issues, and this one is the same. Carbs are an area of “expertise” for me, and your suggestions are right on, especially when checking for vacuum leaks to address a reason for the stumble. I would only add that the carb should be clean, fresh gaskets, and ready to run before going through your list. A gunked-up carb will never run right.
97 Silverado Z 71 4 x 4 engine stumbles tries to stall on acceleration what could be the cause
Sounds like a AWESOME group of car lovers and I believe the input the guys had.