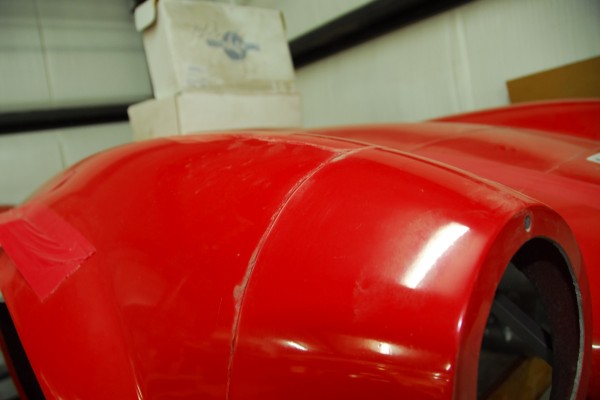
close up of unfinished body lines on a cobra kit car
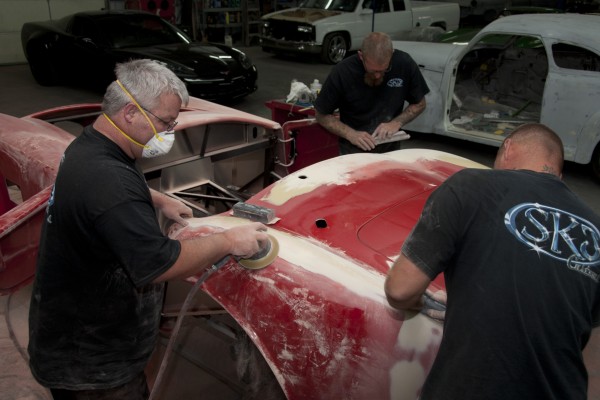
men applying filler and sanding bodywork on a cobra kit car
man sanding bodywork on a car
sanding fender edge bodywork on a classic car
sanding and applying body filler to a classic car
a cobra kit car body in primer
fitting gas cap onto a cobra kit car
fitting a door onto a cobra kit car
fitting a hood hinge on a cobra kit car
fitting a windshield onto a cobra kit car
sanding and finishing car bodywork prior to pain
spraying primer on a classic car body
wet sanding a car's bodywork

This closeup of the front fender shows the parting line from the molding process. This ridge of excess gelcoat is not structural—it’s extra material from the seams in the fiberglass mold, and needs to be sanded down smooth.

The crew at SKJ Customs uses a DA (dual action) sander with 80-grit paper to remove the excess gelcoat. Do not use an orbital sander as it can grind through the gelcoat.

Some areas require sanding with a flexible block to ensure a smooth contour. Block sanding will be used later on in the prep process as well.

Areas with a tight radius, such as the fender lips and cockpit coaming, require hand sanding with a smaller block.

The entire body is scuff-sanded with 80-grit sandpaper to remove the slick, glossy surface. This will allow the body filler to adhere properly.

Several different approaches can be used to build a barrier between the gelcoat and primer. In addition to filler specifically designed for fiberglass, body shops often use a glaze or feathering agent and an epoxy-based sealer. Fillers designed for metal are not recommended for fiberglass. They don’t have the required structural fibers, and they expand and contract at a rate different from the underlying fiberglass. That expansion and contraction leads to cracked filler.

Exterior items such as this gas cap should be test-fitted during the “putty phase” so mounting holes can be checked, repaired or tweaked as needed. The cap will be removed prior to spraying primer and paint.

The hood, doors, and trunk lid are mounted during body prep. SKJ uses a paint stick wrapped in sandpaper to check panel gaps.

Mounting holes for hinges need to be checked (with mounting screws installed) and reworked if necessary.

The windshield requires pre-fitting to ensure there are no gaps in the post holes that require filler.

Once exterior hardware and trim fitment has been checked, the pieces are removed and the body is masked for sealer and primer.

Once all the primer coats have been applied and sanded with 600- or 800-grit paper, SKJ sprays a guide coat as a final check for any imperfections in the surface.

Once all the primer coats have been applied and sanded with 600- or 800-grit paper, SKJ sprays a guide coat as a final check for any imperfections in the surface.

In part three of our Factory Five Mk4 Roadster build, we covered assembly of the 427-cubic-inch 351 Windsor and installation of the drivetrain. Now we direct your attention to prepping the Mk4’s shapely fiberglass body for paint.

Body shops and car builders agree that when it comes to painting, it’s all about the prep work. Skimp on the foundation and no amount of paint will correct any imperfections. You have to make the extra effort to do things right—take your time with sanding, blocking, and filling.

On the Summit Racing Mk4, builder SKJ Customs sanded the body several times and used three different types of fillers and coatings (supplied by Summit Racing) plus three coats of primer to get premium-grade results. During the prep process, SKJ installed and aligned the hood, doors, and trunk lid, then test-fitted all of the exterior trim and hardware.

Why fit the trim before painting is done? “There’s nothing worse than taking a file or drill to a brand-new paint job,” Factory Five’s Nate Smith said. “It’s a nightmare if you mess it up.”

He speaks from experience, having attempted this shortcut once with, er, less than optimum results. That’s why SKJ Customs fits trim during the “putty phase” (application of filler) so any adjustments can be made then.

The first stage of the prep process starts with removing the parting lines (ridges of excess gelcoat left over from the molding process) with 80-grit sandpaper on a DA sander. Plyo Grip, an epoxy-based filler, is then applied. This is sanded with increasingly higher grades of sandpaper (as fine as 800-grit) to smooth the surface.

Once the filler is sanded U-POL 0714 Dolphin Glaze is applied to fill pinholes. This step is followed by more sanding and an application of epoxy sealer. While the sealer is still drying, SKJ applies three coats of primer. A final spray of a dark “guide coat” reveals any dips or imperfections, which are removed by wet sanding. Only when the body is as smooth as a baby’s behind is it ready for the color coat and clear coat.

Follow along as SKJ Customs gets our Factory Five Mk4 body ready for paint–scroll through the slideshow above.

More Factory Five/Summit Racing Mk4 Stories:

Factory Five Racing Kit Components
Summit Racing/Factory Five Mk4 Kits
Mk4 Build (Part 1): Front Suspension and Steering
Mk4 Build (Part 2): Rear Suspension
Mk4 Build (Part 3): Engine and Drivetrain